# Part 1: Installing VS Code IDE
###### tags: `TA Stuff RP2` `Raspberry Pi Pico`
In this tutorial, we walk you through the basic installation of the development environment, if you choose to use VS Code as your development IDE, you should follow this tutorial.
You will:
* install Node js (needed for the plugin)
* install the VS Code IDE
* add the **Pymakr** plugin to your VS Code
We'll continuously update this walkthrough. **Is there anything missing or unclear, or have you experienced some issue? Please add a comment.** You do this by highlighting the text and then you can write a comment on the highlighted part. You need to log in/create an account on HackMD first.
## 0. Prerequisites
To finish this tutorial you need:
* Your computer (Windows, Linux, or Mac)
* Internet connection
:::info
**Depending on your operating system follow one of the following sections.**
:::
### [Windows](#Windows-OS)
### [Mac](#Mac-OS)
### [Linux](#Linux-OS-(Ubuntu-22.04))
## Windows OS
Follow these steps:
+ **Step 1:** Download and install [**Node js (here)**](https://nodejs.org/en/).
+ **Step 2:** Download and install [**VS Code (here)**](https://code.visualstudio.com/Download).
+ **Step 3:** Open VS Code and then the Extensions manager from: the *left panel icon* OR from *`View >> Extensions`* OR by pressing *`Ctrl+Shift+X`*.
+ **Step 4:** Look for **Pymakr** and Install it. (Follow the numbered steps of the following figure)

:::success
You are now ready to move to the next tutorial [**(here)**](https://hackmd.io/@lnu-iot/rkFw7gao_) to update your device firmware and try a simple example.
:::
## Mac OS
Follow these steps:
+ **Step 1:** Download and install [**Node js (here)**](https://nodejs.org/en/download).
Once installed, verify with (in the terminal)
```bash
which node
```
and you should get an output similar to:
```
/usr/local/bin/node
```
+ **Step 2:** Download and install [**VS Code (here)**](https://code.visualstudio.com/Download).
If VSCode was already installed on your MAC and running during the nodejs installtion, restart it.
+ **Step 3:** Open VS Code and then the Extensions manager from: the *left panel icon* OR from *`View >> Extensions`* OR by pressing *`Ctrl+Shift+X`*.
+ **Step 4:** Look for **Pymakr** and Install it. (Follow the numbered steps of the following figure)

+ Confirm that the installation of your development environment was successful by clicking on the pymakr plugin icon in the menu to the left.

If you see the `Projects` section and `DEVICE` section, then you're all set!
:::success
You are now ready to move to the next tutorial [**(here)**](https://hackmd.io/@lnu-iot/rkFw7gao_) to update your device firmware and try a simple example.
:::
## Linux OS (Ubuntu / Fedora)
Follow these steps:
### Ubuntu (20.04 / 22.04)
* **Step 1:** Install Node.js
Open up a `Terminal` and run following commands:
```shell=
sudo apt -y update
sudo apt -y upgrade
sudo apt install -y nodejs npm
```
To check that everything has installed correctly, you can run these commands in your terminal:
```shell=
npm --version
node --version
```
These commands should give you an output like this:

* **Step 2:** Download and install Visual Studio Code.
:::info
If you already have Visual Studio Code, be sure to restart it after you have installed Node.js.
:::
Download the **.deb version** of [**Visual Studio Code**](https://code.visualstudio.com/download).

Run the downloaded installer:


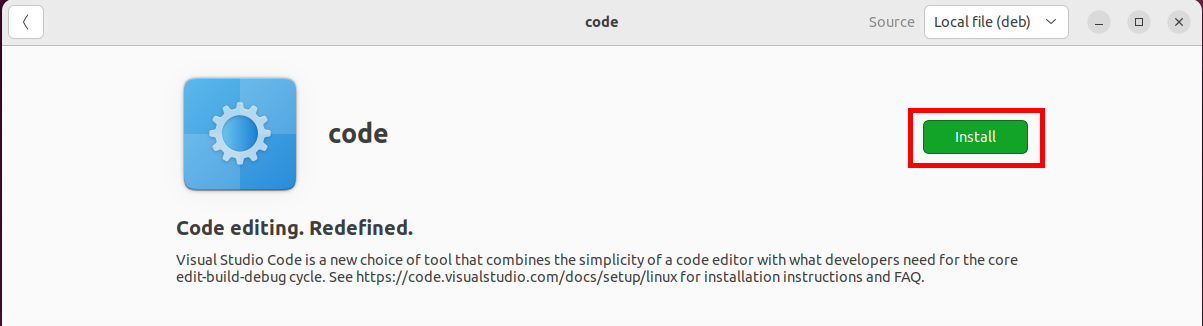
Now you've installed Visual Studio Code and should be able to open it.
* **Step 3:** Install Pymakr
Open Visual Studio Code and then the Extensions manager by clicking `ctrl+shift+x` (or press the button marked 1 in the screenshot below), and then follow the numbered steps.

Once installed, you should see Pymakr in your left bar in Visual Studio Code:

### Fedora (36 / 37 / 38)
* **Step 1:** Install Node.js
Open up a `Terminal` and run following commands:
```shell=
sudo dnf -y update
sudo dnf install -y nodejs npm
```
To check that everything has installed correctly, you can run these commands in your terminal:
```shell=
npm --version
node --version
```
These commands should give you an output like this:

* **Step 2:** Download and install Visual Studio Code.
:::info
If you already have Visual Studio Code, be sure to restart it after you have installed Node.js.
:::
Download the **.rpm version** of [**Visual Studio Code**](https://code.visualstudio.com/download).

Run the downloaded installer:


Now you've installed Visual Studio Code and should be able to open it.
* **Step 3:** Install Pymakr
Open Visual Studio Code and then the Extensions manager by clicking `ctrl+shift+x` (or press the button marked 1 in the screenshot below), and then follow the numbered steps.

Once installed, you should see Pymakr in your left bar in Visual Studio Code:

:::success
You are now ready to move to the next tutorial [**(here)**](https://hackmd.io/@lnu-iot/rkFw7gao_) to update your device firmware and try a simple example.
:::
 Sign in with Wallet
Connect another wallet
Sign in with Wallet
Connect another wallet