# <div id=animation_title>Class</div>
###### tags: `C++`
**<a href="https://hackmd.io/@Mes/CPP_Note" class="redlink">點此回到 C++筆記 目錄 </a>**
#
# 宣告Class
有些資料會有相關性,相關聯的資料組織在一起,對於資料本身的可用性或者是程式碼的可讀性,都會有所幫助,例如,在程式中你可能發現,在進行帳戶之類的處理時,帳號、名稱、餘額這三個資料總是一併出現的,這時可以將它們包在一起,這樣的東西叫做 Class(類別)。
我們通常會在 .h檔裡宣告Class裡有哪些東西,名字通常會與 Class 的名字相同,然後再建立一個 cpp 檔來定義Class的內容實際上要做些什麼,名字通常也會與 Class 的名字相同,最後再於 main.cpp 內實際應用Class,可以看看接下來的例子:
**account.h**
```cpp=
#include <string>
using namespace std;
class Account {
public:
string id;
string name;
double balance;
};
```
在檔頭檔中定義類別,表頭檔案的名稱建議與類別名稱同名,class 是定義類別的關鍵字,Account 是類別名稱,public 表示定義的 id、name 與 balance 值域(field),都是可以公開存取的。例如:
**main.cpp**
```cpp=
#include <iostream>
#include "account.h"
void printAcct(Account *acct) {
cout << "Account("
<< acct->id << ", "
<< acct->name << ", "
<< acct->balance << ")"
<< endl;
}
void printAcct(Account &acct) {
printAcct(&acct);
}
int main() {
Account acct1;
acct1.id = "123-456-789";
acct1.name = "Justin Lin";
acct1.balance = 1000;
printAcct(acct1);
Account *acct2 = new Account();
acct2->id = "789-654-321";
acct2->name = "Monica Huang";
acct2->balance = 1000;
printAcct(acct2);
delete acct2;
return 0;
}
```
Account acct1 建立了 Account 的實例,這時 acct1 在函式執行完畢後就會自動清除,存取實例的值域時可以使用 dot 運算子「.」。
若是 Account acct = acct1 這類指定,會將 acct1 的值域複製給 acct,若 Account 的值域佔用了許多資源,複製會造成負擔的話,可以透過參考或指標來避免複製的動作,例如 printAcct(acct1) 運用的就是參考。
可以使用 new 來動態建構 Account 的實例,動態建立的實例不需要時要使用 delete 清除,透過指標存取實例成員時,要使用箭號運算子「->」,當然你也可以先提址後再使用dot運算子,但通常會使用箭頭運算子。
從 C 背景來的開發者可能會想,這種風格像是 C 的結構(struct),在 C++ 中,struct 也被視為定義類別,將以上的 class 關鍵字換為 struct,程式也可以運作,struct 與 class 的差別在於,Struct 在第一個權限可見的修飾詞出現前(例如 public、private),定義的成員預設會是公開可存取,而 Class 預設會是私有(也就是 private)。
執行結果如下:
```cpp=
Account(123-456-789, Justin Lin, 1000)
Account(789-654-321, Monica Huang, 1000)
```
在剛剛的範例裡,初始 Account 值域的流程,其實是重複的,我們可以定義建構式(constructor)來去除這種重複動作,例如:
**account.h**
```cpp=
#include <string>
using namespace std;
class Account {
public:
Account(string id, string name, double balance);
string id;
string name;
double balance;
};
```
妳可能會想說,怎麼有一個沒有型態的函式? 這個就是建構式,我們通常會將建構式的名字與Class取同名,後面會講到解構式也是一樣。
而在上面標頭檔的建構式定義中,定義了建構實例時,需要帳號、名稱、餘額這三個資料,接下來將剛剛的初始流程重構至建構式的實作:
**account.cpp**
```cpp=
#include <string>
#include "account.h"
using namespace std;
Account::Account(string id, string name, double balance) {
this->id = id;
this->name = name;
this->balance = balance;
}
```
Class 內的函式我們會給他一個特別的名字,叫做 方法(method),或叫成員函式。
\: : 是Class範圍解析(class scope resolution)運算子,在實作Class建構式或成員函式時,會在 : : 前指明是要實作哪個類別的定義,換句話說,就是在生成這個 Class 時,我們要先做什麼事。
如果沒有定義任何建構式,編譯器會自動產生沒有參數的預設建構式,而如果自己定義了建構式,就會使用你定義的建構式,在建構式或成員函式的實作中,若要存取實例本身,可以透過 「this」 ,這是個指標,因此要透過箭號運算子來存取值域。
現在可以像這樣來使用 Account 類別:
**main.cpp**
```cpp=
#include <iostream>
#include <string>
#include "account.h"
string to_string(Account &acct) {
return string("Account(") +
acct.id + ", " +
acct.name + ", " +
std::to_string(acct.balance) + ")";
}
void deposit(Account &acct, double amount) {
if(amount <= 0) {
cout << "必須存入正數" << endl;
return;
}
acct.balance += amount;
}
void withdraw(Account &acct, double amount) {
if(amount > acct.balance) {
cout << "餘額不足" << endl;
return;
}
acct.balance -= amount;
}
int main() {
Account acct("123-456-789", "Justin Lin", 1000);
cout << to_string(acct) << endl;
deposit(acct, 500);
cout << to_string(acct) << endl;
withdraw(acct, 700);
cout << to_string(acct) << endl;
return 0;
}
```
輸出:
```cpp=
Account(123-456-789, Justin Lin, 1000.000000)
Account(123-456-789, Justin Lin, 1500.000000)
Account(123-456-789, Justin Lin, 800.000000)
```
註: `to_string` 是C++11定義於string內的函式
上面這個例子裡的 to_string、deposit、withdraw 都是為了 Account 而設計的,既然這樣,為什麼不將它們放到 Account 的定義中呢?
**account.h**
```cpp=
#include <string>
using namespace std;
class Account {
private:
string id;
string name;
double balance;
public:
Account(string id, string name, double balance);
void deposit(double amount);
void withdraw(double amount);
string to_string();
};
```
以上只定義了成員函式,也可以選擇在 Class 內撰寫成員函式內容,這類成員函式預設是 inline 的,選擇在 Class 之外實作成員函式時,則可以明確地指定 inline。
現在 to_string、deposit、withdraw 被定義為 Account 的成員函式了,也稱為成員函式(member function),因為實作時,可以透過 this 來存取實例,就不用在成員函式上定義接受 Account 的參數了,而原本的 id、name、balance 被放到了 private 區段,這是因為不想被公開存取,也就只能被建構式或成員函式存取,這麼一來,就可以定義更動這些值域的流程。
**account.cpp**
```cpp=
#include <iostream>
#include <string>
#include "account.h"
using namespace std;
Account::Account(string id, string name, double balance) {
this->id = id;
this->name = name;
this->balance = balance;
}
string Account::to_string() {
return string("Account(") +
this->id + ", " +
this->name + ", " +
std::to_string(this->balance) + ")";
}
void Account::deposit(double amount) {
if(amount <= 0) {
cout << "必須存入正數" << endl;
return;
}
this->balance += amount;
}
void Account::withdraw(double amount) {
if(amount > this->balance) {
cout << "餘額不足" << endl;
return;
}
this->balance -= amount;
}
```
那麼接下來要用 Account 就簡單多了:
**main.cpp**
```cpp=
#include <iostream>
#include <string>
#include "account.h"
int main() {
Account acct = {"123-456-789", "Justin Lin", 1000};
cout << acct.to_string() << endl;
acct.deposit(500);
cout << acct.to_string() << endl;
acct.withdraw(700);
cout << acct.to_string() << endl;
return 0;
}
```
這就是為什麼要定義類別,將相關的資料與成員函式組織在一起的原因:易於使用。物件導向目的之一就是易於使用,當然,可以重用也是物件導向的其中一個目的,不過易用性的考量,往往會比重用來得重要,過於強調重用,反而會設計出不易使用的類別。
# 建構子
在前面提到了,如果沒有定義任何建構式,編譯器會自動產生沒有參數的預設建構式,那麼預設建構式做了什麼呢? 如果舊以下的 Class 來說:
```cpp=
class Account {
public:
string id;
string name;
double balance;
};
```
預設建構式會對每個 member class 進行預設初始化,例如 string 就會初始化為空字串,但 int、double 之類的就不會。
如果定義了類別內初始式(in-class initializer),那麼預設建構式會使用初始式,例如:
```cpp=
class Account {
public:
string id = "000-000-000";
string name = "Anonymous";
double balance;
};
```
id 以定義的初始式初始為 string("000-000-000")、name 以定義的初始式初始為 string("Anonymous"),而 double 預設初始為 0.0。
但要注意的是,預設建構式會在沒有自定義任何建構式時,編譯器才會產生,因此就算自定了初始式,編譯器仍會生成預設的建構式。簡單來說,就是會先執行一次預設的建構式,再去初始化值,看看這個例子:
```cpp=
class Account {
string id;
string name;
double balance;
public:
Account() {
this->id = "000-000-000";
this->name = "Anonymous";
this->balance = 0.0;
};
};
```
就上面這個 Class 來說,若實例化 Account,id、name、balance 會進行預設初始化,之後執行建構式,將 "000-000-000"、"Anonymous"、0.0 指定給對應的值域。
因此,在某些情況用初始式會有問題,例如:
```cpp=
class Foo {
const int wat;
Foo(int wat) {
this->wat = wat;
}
};
```
若以 Foo(1) 實例化,wat 會預設初始為 0,之後執行初始式流程,然而 wat 被 const 修飾過,不可以在建構式中被指定值了,因此會編譯失敗。
<br>
建構式可以重載,如果自定義了建構式,也想提供無參建構式,並希望其行為與預設建構式相同,可以加上 default。例如:
```cpp=
class Account {
string id;
string name;
double balance;
public:
Account() = default;
Account(string id, string name, double balance);
};
```
在前面我們的 Account 的建構式是這麼定義的:
```cpp=
Account::Account(string id, string name, double balance) {
this->id = id;
this->name = name;
this->balance = balance;
}
```
如果建構式中想要指定某個值域的值,可以定義初始式清單(constructor initializer list),就上例來說,可以直接在定義類別時撰寫:
```cpp=
class Account {
string id;
string name;
double balance;
public:
Account(string id, string name, double balance) :
id(id), name(name), balance(balance) {};
};
```
這麼一來,id 值域就會用參數 id 的值初始化,name 值域就會用參數 name 的值初始化,balance 值域就會用參數 balance 的值初始化,括號中指定不一定要是參數,也可以是運算式,如果初始式清單省略了某個值域,那就會使用預設初始化;在這邊,初始式清單的順序並不代表值域初始化的順序,值域初始化的順序是依 Class 內值域定義的順序而定。
那我們再回到前面這個例子:
```cpp=
class Foo {
const int wat;
Foo(int wat) {
this->wat = wat;
}
};
```
由於const修飾詞,這樣會出錯,然而以下這樣可以通過編譯:
```cpp=
class Foo {
const int wat;
Foo(int wat) : wat(wat) {}
}
```
如果建構過程,想要委由另一個版本的建構式,可以在 : 後指定。例如:
```cpp=
class Account {
string id;
string name;
double balance;
public:
Account(string id, string name, double balance) :
id(id), name(name), balance(balance) {};
Account(string id, string name) : Account(id, name, 0.0) {}
};
```
若以 `Account acct("123-456-789", "Justin Lin")` 建構實例,那麼會先執行 Account(string id, string name, double balance) 的流程,接著才是 Account(string id, string name) 的流程。
在前面我們有看過,可以使用以下的方式來建構 Account 實例:
```cpp=
Account acct = {"123-456-789", "Justin Lin", 1000};
```
在講不定長度引數時我們有看過,{"123-456-789", "Justin Lin", 1000} 實際上會建立 initializer_list,可是〈定義類別〉中並沒有定義可接受 initializer_list 的建構式啊?這其實是隱含地型態轉換,預設會尋找符合初始式清單的建構式來進行實例建構。
實際上 string 也是如此,在 `string name = "Justin Lin"` ,"Justin Lin" 是 const \*char 型態,隱含地會使用對應的建構式來建構 string 實例。
如果不希望有這種行為(隱式轉換 - implicit conversion),可以在對應的建構式上加上 explicit,例如〈定義類別〉中的類別若定義為:
```cpp=
class Account {
string id;
string name;
double balance;
public:
explicit Account(string id, string name, double balance);
void deposit(double amount);
void withdraw(double amount);
string to_string();
};
```
若我們這樣建構實例:
```cpp=
Account acct = {"123-456-789", "Justin Lin", 1000};
```
編譯的時候就會看到以下的錯誤訊息:
```cpp=
error: converting to 'Account' from initializer list would use explicit constructor
```
# const 、 mutable 與 static
## const
如果在建立 string 實例時指定 const,那表示不能變動該實例的狀態,如果試圖改變該實例狀態,或者呼叫了會變動實例狀態的成員函式,編譯時會發生錯誤:
```cpp=
const string text = "Justin";
text.append(" Lin") // error: no matching function
```
const 修飾表示不能變動實例狀態,因此,如果呼叫的成員函式沒有被 const 修飾,由於怕被不小心變動狀態,就算成員函式沒有改動狀態,編譯器也會使它無法通過編譯,例如,若如下使用〈定義類別〉中的 Account,雖然 to_string 並沒有變動實例狀態,也不能通過編譯:
```cpp=
#include <iostream>
#include "account.h"
using namespace std;
int main() {
const Account acct = {"123-456-789", "Justin Lin", 1000};
cout << acct.to_string() << endl; // error: passing 'const Account' as 'this' argument discards qualifiers
}
```
如果要通過編譯的話,to_string 必須加上 const 限定:
**account.h**
```cpp=
#include <string>
using namespace std;
class Account {
private:
string id;
string name;
double balance;
public:
Account(string id, string name, double balance);
void deposit(double amount);
void withdraw(double amount);
string to_string() const;
};
```
**account.cpp**
```cpp=
...略
string Account::to_string() const {
return string("Account(") +
this->id + ", " +
this->name + ", " +
std::to_string(this->balance) + ")";
}
...略
```
當成員函式被加上 const 限定後,就不能有改變值域的動作,有了這個保證,剛剛的 to_string 呼叫才能通過編譯。
另一個類似的問題是:
```cpp=
#include <iostream>
#include <string>
using namespace std;
class Foo {
public:
Foo& doSome() {
return *this;
}
Foo& doOther() {
return *this;
}
};
int main() {
const Foo foo;
foo.doSome().doOther();
}
```
這個程式在 Foo foo 前,若沒有加上 const 的話,是可以通過編譯的,你可能會想,那就在 `doSome`、`doOther` 函式本體前,也加上 const 就可以了吧!可惜…加上了還是不能通過編譯!
const 的要求很嚴格,不僅要求成員函式不能變動實例狀態,如果以參考傳回型值域,或者是如上以參考傳回實例本身,也會要求傳回值的狀態不得改變,必須得如下才能通過編譯:
```cpp=
#include <iostream>
#include <string>
using namespace std;
class Foo {
public:
const Foo& doSome () const {
return *this;
}
const Foo& doOther () const {
return *this;
}
};
int main() {
const Foo foo;
foo.doSome().doOther();
}
```
看到這邊可能會有點搞混 const 的用法,所以我做個總結
這個代表函式回傳的內容是唯讀的:
```cpp=
const Foo doSome(){...}
```
而這個代表函式在執行時不能修改資料成員,通常會在Class裡用。
```cpp=
Foo soSome() const{...}
```
## mutable
你可能會想在被限定為 const 的成員函式中,可以改變某些值域,因為這些值域的改變,從使用者來看,並不代表實例狀態的改變,若是有這類需求,值域在宣告時,可以加上 mutable,mutable 從字面意義上來講就是「可變的」,但是以 const 修飾後又是不可改動的,這樣合在一起用大家可能會覺得奇怪。其實這算是個命名問題, const 實際上表示的意義是「唯讀 (readonly)」,因此透過加上 mutable ,我們就能夠改動這個值了。
舉個<a href="https://liam.page/2017/05/25/the-mutable-keyword-in-Cxx/" class="redlink">例子</a>:
```cpp=
class HashTable {
public:
//...略
string lookup(const std::string& key) const
{
if (key == last_key_) {
return last_value_;
}
string value{this->lookupInternal(key)};
last_key_ = key;
last_value_ = value;
return value;
}
private:
mutable string last_key_
mutable string last_value_;
};
```
這邊我們呈現了 HashTable 這個 Class 的一部分。 很顯然的,在查詢 HashTable 時,邏輯上不該修改 HashTable 本身。 因此 `lookup` 這個成員函式需要加上 const 修飾。 在 `lookup` 裡,我們使用了 `last_key_` 和 `last_value_` 來實現一個簡單的緩存。 當傳入的 `key` 與 上一次查詢的 `last_key_` 一致時,就會回傳 `last_value_` ,否則回傳實際查詢到的 `value` 並更新`last_key_` 和 `last_value_` 。
在這裡,`last_key_` 和 `last_value_` 是 `HashTable` 的數據成員。 正常來說, 有 const 修飾的成員函式是不允許修改數據成員的。但我們知道,`last_key_` 和 `last_value_` 從邏輯上來說,修改它們的值,從外面來看是沒有差的,因此也就不會破壞邏輯上的唯讀。 就是為了解決這一種狀況,才會有 mutable 的出現。
## static
對於基於相同 Class 產生的實例而言,會擁有各自的值域資料,不過有些資料不用實例各自擁有一份,而可以屬於 Class,例如可以定義 Math 類別,它提供了 PI 成員,因為 PI 是個常數,不需要個別實例擁有各自的 PI:
```cpp=
class Math {
public:
constexpr static double PI = 3.14159;
};
```
換句話說,就是以這個 Class 所創造出來的實例,裡面的 PI 都會是 3.14159,那既然大家都一樣,就不用每次都再重新賦值了。這裡的 PI 不屬於某個實例,他屬於這個 Class ,所有以這個 Class 做出來的實例都共用這個變數。
想在類別內初始 static 資料成員的話,必須是個 constexpr,也就是必須是編譯時期常數,如果沒有加上 constexpr,就必須在類別外指定,例如:
```cpp=
class Math {
public:
static double PI;
};
double Math::PI = 3.14159;
```
static 成員屬於類別,可以使用類別名稱加上 : : 解析運算子來存取,當然,他需要是 public 的才能這樣做:
```cpp=
cout << Math::PI << endl;
```
我們也可以宣告 static 成員函式,同樣地,會是屬於 Class 擁有,而不屬於實例,也因此,即便我們沒有產生實例出來,我們也可以隨時使用這個函式。 例如來定義一個角度轉徑度的 toRadian:
```cpp=
#include <iostream>
using namespace std;
class Math {
public:
constexpr static double PI = 3.14159;
static double toRadian(double);
};
double Math::toRadian(double angle) {
return PI / 180 * angle;
}
int main() {
cout << Math::PI << endl;
cout << Math::toRadian(30) << endl;
return 0;
}
```
static 成員屬於 Class,同樣地,可以使用類別名稱加上 :: 解析運算子來呼叫 static 成員函式。
由於 static 成員是屬於 Class 而不是實例,呼叫靜態函式時,並不會傳入實例位址,也就是說 static 函式裡不會有 this 指標,因此 static 函式中不允許使用非 static 成員,因為沒有 this 可以使用。
static 成員屬於 Class,某些程度上,就是將 Class 當成是一種名稱空間,用來組織一組相關的值或函式,像這邊的 Math,可以用來組織 PI、toRadian 等數學相關的常數或函式,若想使用數學上的這類東西,透過 Math 這名稱來取用,就會比較方便。
# 巢狀、區域、匿名類別、friend
在 Class 中假設還有其他相關的資料,像是前面 HashSearch 會需要 HashTable 那樣,我們就可以再定義一個 Class 在裡面,稱為巢狀 Class 或內部類別,應用的場景之一是實作 IntLinkedList 時,內部節點可用 IntNode 來定義:
```cpp=
#include <iostream>
using namespace std;
class IntLinkedList {
class IntNode {
public:
IntNode( int value, IntNode *next ) : value( value ), next( next ) {}
int value;
IntNode *next;
};
IntNode *first = nullptr;
public:
IntLinkedList &append( int value );
int get( int i );
};
IntLinkedList &IntLinkedList::append( int value ) {
IntNode *node = new IntNode( value, nullptr );
if ( first == nullptr ) {
this->first = node;
}
else {
IntNode *last = this->first;
while ( last->next != nullptr ) {
last = last->next;
}
last->next = node;
}
return *this;
}
int IntLinkedList::get( int i ) {
IntNode *last = this->first;
int count = 0;
while ( true ) {
if ( count == i ) {
return last->value;
}
last = last->next;
count++;
}
}
int main() {
IntLinkedList lt;
lt.append( 1 ).append( 2 ).append( 3 );
cout << lt.get( 1 ) << endl;
return 0;
}
```
範例中 append 以 new 的方式建構了 IntNode 實例,應該要有個解構式,在不需要 IntLinkedList 時,將這些動態建立的 IntNode 清除,這在之後的文件再來詳加探討,目前暫時忽略這個議題。
內部的 Class 也可以於外部定義,例如:
```cpp=
class IntLinkedList {
class IntNode;
IntNode *first = nullptr;
public:
IntLinkedList& append(int value);
int get(int i);
};
class IntLinkedList::IntNode {
public:
IntNode(int value, IntNode *next) : value(value), next(next) {}
int value;
IntNode *next;
};
```
在範例中,IntNode 的值域是 public,這是為了便於給外部類別取用 IntNode 的值域,因為內部類別中若有 private 成員,外部類別預設也是不可存取的。
IntLinkedList 的使用者不需要知道 IntNode 的存在,因此 IntNode 被設定為 IntLinkedList 的 private 成員,這將直接將 IntNode 的值域設為 public,也只有 IntLinkedList 可以存取。
然而有時候,內部類別會是 public,你又不想公開某些值域,又想允許外部類別存取內部類別的 private 值域,怎麼辦呢?可以宣告外部類別是內部類別的朋友,例如:
```cpp=
#include <iostream>
#include <string>
using namespace std;
class Screen {
public:
class Pixel {
int x;
int y;
friend Screen; // 朋友類別
public:
Pixel(int x, int y) : x(x), y(y) {}
};
string info(Pixel px) {
return "Pixel(" + to_string(px.x) + ", " + to_string(px.y) + ")";
}
};
int main() {
Screen screen;
Screen::Pixel px(10, 10);
cout << screen.info(px) << endl;
return 0;
}
```
被 friend 修飾的對象並不是 Class 成員的一部份,單純是種存取控制,在這個範例中,Screen::Pixel 的值域不希望被公開存取,但允許 Screen 存取。 允許存取 private 成員,表示之間有強烈的耦合關係,就範例來說,螢幕包含像素資訊,所以這邊設計為這種的耦合關係是可以允許的。
被 friend 修飾的對象可以是類別、函式或者是另一類別的方法,例如重載運算子時,若選擇以非成員函式實作,就有可能需要將非成員函式設為 friend,在〈運算子重載〉中就有個例子;然而要記得,允許存取 private 成員,表示之間有強烈的耦合關係,只有在有充分理由之下,才定義哪些該設定為朋友。
類別也可以在定義在函式之中,也就是區域類別,主要用來臨時封裝一組資料,然而,不可以存取函式中的區域變數:
```cpp=
#include <iostream>
using namespace std;
int main() {
class Point {
public:
Point(int x, int y) : x(x), y(y) {}
int x;
int y;
};
Point p1(10, 10);
Point p2(20, 20);
return 0;
}
```
必要時,區域類別也可以匿名,也就是匿名類別:
```cpp=
#include <iostream>
using namespace std;
int main() {
const int dx = 10;
const int dy = 20;
class {
public:
int x = dx;
int y = dy;
} p;
cout << p.x << endl;
return 0;
}
```
範例中的 const 是必要的,因為類別中出現的 dx、dy 實際上並不是外部的 dx、dy,編譯器在類別中建立了新的 dx、dy,將外部 dx、dy 的值複製,為了避免類別中試圖參考或取址後進行變更,誤以為外部的 dx、dy 取值時也會隨之變化,故要求加上 const,這麼一來類別中試圖參考或取址也得加上 const,這樣就沒有變更的問題了。
# 運算子重載
在一些情況下,會想將兩個物件進行 +、-、\*、/ 運算,例如在定義了有理數類別之後,若能透過 +、-、\*、/ 之類的運算來處理,程式碼撰寫上會比較直覺,在 C++ 中,可以透過重載運算子來達到目的。
運算子重載是函式重載的延伸應用,定義類別時可以指定重載哪個運算子,實作對應的運算,運算子重載的語法如下:
```cpp=
傳回型態 類別名稱::operator#(參數列) {
// 實作重載內容
}
```
其中 # 指明要重載哪個運算子,例如重載一個 + 運算子,# 處就替換為 +。
如果要重載 ++ 或 -- 運算子,必須注意前置與後置,這是使用一個 int 參數來區別:
```cpp=
傳回型態 operator++(); // 前置,例如 ++x
傳回型態 operator++(int); // 後置,例如 x++
傳回型態 operator--(); // 前置,例如 --x
傳回型態 operator--(int); // 後置,例如 x--
```
後置的 int 會傳入 0,實際上沒有作用,只是用來識別前置或後置,通常在重載 ++ 與 -- 運算子時,前置與後置都要重載。
底下範例定義了有理數 Rational 類別,並重載了一些運算子:
```cpp=
#include <iostream>
#include <string>
using namespace std;
class Rational {
int numer; //分子
int denom; //分母
public:
Rational(int numer, int denom) : numer(numer), denom(denom) {}
Rational operator+(const Rational&);
Rational operator-(const Rational&);
Rational operator*(const Rational&);
Rational operator/(const Rational&);
Rational& operator++();
Rational& operator--();
Rational operator++(int);
Rational operator--(int);
string to_string() const;
};
Rational Rational::operator+(const Rational &that) {
return Rational(
this->numer * that.denom + that.numer * this->denom,
this->denom * that.denom
);
}
Rational Rational::operator-(const Rational &that) {
return Rational(
this->numer * that.denom - that.numer * this->denom,
this->denom * that.denom
);
}
Rational Rational::operator*(const Rational &that) {
return Rational(
this->numer * that.numer,
this->denom * that.denom
);
}
Rational Rational::operator/(const Rational &that) {
return Rational(
this->numer * that.denom,
this->denom * that.numer
);
}
Rational& Rational::operator++() {
this->numer = this->numer + this->denom;
return (*this);
}
Rational& Rational::operator--() {
this->numer = this->numer - this->denom;
return (*this);
}
Rational Rational::operator++(int) {
Rational r = (*this);
this->numer = this->numer + this->denom;
return r;
}
Rational Rational::operator--(int) {
Rational r = (*this);
this->numer = this->numer - this->denom;
return r;
}
string Rational::to_string() const {
return std::to_string(this->numer) + "/" + std::to_string(this->denom);
}
int main() {
Rational a(1, 2);
Rational b(2, 3);
cout << (a + b).to_string() << endl;
cout << (a - b).to_string() << endl;
cout << (a * b).to_string() << endl;
cout << (a / b).to_string() << endl;
cout << (++a).to_string() << endl;
cout << (--a).to_string() << endl;
cout << (b++).to_string() << endl;
cout << (b--).to_string() << endl;
return 0;
}
```
所以當我們在呼叫 a+b 時,就等於把 b 這個實例傳入 a 內的 operator+函式內,其他運算也同理,也因此參數只會吃一個 Class實例。
有些運算子重載可以實作為類別成員函式,也可以實作為一般函式,涉及 private 值域存取的,通常會實作為成員函式,然而,若運算子涉及不同型態的運算,例如 Rational 加法運算的左或右運算元,可以是 int 整數的話,運算子就得定義為非成員函式,例如:
```cpp=
#include <iostream>
#include <string>
using namespace std;
class Rational {
int numer;
int denom;
public:
Rational(int numer, int denom) : numer(numer), denom(denom) {}
friend Rational operator+(int, const Rational&);
friend Rational operator+(const Rational&, int);
...略
};
...略
Rational operator+(int lhs, const Rational &rhs) {
return Rational(
lhs * rhs.denom + rhs.numer,
rhs.denom
);
}
Rational operator+(const Rational &lhs, int rhs) {
return Rational(
lhs.numer + rhs * lhs.denom,
lhs.denom
);
}
...略
int main() {
Rational a(1, 2);
Rational b(2, 3);
...略
cout << (1 + a).to_string() << endl;
cout << (a + 1).to_string() << endl;
return 0;
}
```
讀到這裡可能會想說,要怎麼分是不是成員函式呀? 他不是也宣告在Class裡面嗎?怎麼又不是成員函式了? 這是因為,成員(member)這個詞是針對物件(object)的, 我們實例出來兩個同Class的object出來,他們的成員會是獨立的,但這函式並不是這兩個object內的東西,有點static的味道,因此他們不是成員函式。 這部分我想了一陣子XD 第一次看見時要理解可能要有點靠通靈了。
另外,有時候 你不能或不想修改物件的類別原始碼,例如,想重載 cout 的 << 運算子,這時就只能選擇實作為非成員函式:
```cpp=
#include <iostream>
#include <string>
using namespace std;
class Rational {
...略
public:
...略
string to_string() const;
};
...略
string Rational::to_string() const {
return std::to_string(this->numer) + "/" + std::to_string(this->denom);
}
ostream& operator<<(ostream &os, const Rational &r) {
return os << r.to_string();
}
int main() {
Rational a(1, 2);
Rational b(2, 3);
cout << (a + b) << endl;
cout << (a - b) << endl;
cout << (a * b) << endl;
cout << (a / b) << endl;
cout << (++a) << endl;
cout << (--a) << endl;
cout << (b++) << endl;
cout << (b--) << endl;
cout << (1 + a) << endl;
cout << (a + 1) << endl;
return 0;
}
```
要注意的是,大部份的運算子都是可以被重載的,然而 . 、 :: 、 .\* 、 ?: 這四個不能重載。
# 自訂型態轉換
在前面,若 Rational 加法的左運算元是 int 整數的話,運算子重載時使用了 friend 非成員函式,這明確地定義了遇到 int 為左運算元,而右運算元為 Rational,計算結果要是 Rational 的話,應該採取的行為。
然而,在其他的運算需求中,可能會想要 Rational 能轉換為 int、double 或者是其他型態,以便進一步以該型態的其他值進行運算,這可以透過自訂轉換函式來達到,又稱為轉型運算子。例如:
```cpp=
#include <iostream>
#include <string>
using namespace std;
struct Double {
const double n;
Double(double n) : n(n) {}
};
class Rational {
int numer;
int denom;
public:
Rational(int numer, int denom) : numer(numer), denom(denom) {}
operator double() {
return static_cast<double>(this->numer) / this->denom;
}
operator Double() {
return Double(static_cast<double>(this->numer) / this->denom);
}
};
void foo(Double d) {
cout << d.n << endl;
}
int main() {
Rational a(1, 2);
// a 隱含地轉換為 double
cout << a + 0.1 << endl;
cout << 0.3 + a << endl;
// a 隱含地轉換為 Double
foo(a);
return 0;
}
```
以上的範例,允許編譯器隱含地完成型態轉換,如果型態轉換必須得明確,可以加上 explicit,例如:
```cpp=
#include <iostream>
#include <string>
using namespace std;
struct Double {
const double n;
explicit Double(double n) : n(n) {}
};
class Rational {
int numer;
int denom;
public:
Rational(int numer, int denom) : numer(numer), denom(denom) {}
explicit operator double() {
return static_cast<double>(this->numer) / this->denom;
}
explicit operator Double() {
return Double(static_cast<double>(this->numer) / this->denom);
}
};
void foo(Double d) {
cout << d.n << endl;
}
int main() {
Rational a(1, 2);
cout << static_cast<double>(a) + 0.1 << endl;
cout << 0.3 + static_cast<double>(a) << endl;
foo(static_cast<Double>(a));
return 0;
}
```
將上例中的 `static_cast` 拿掉,就會發生編譯錯誤,因為 explicit 指出不允許隱含型態轉換。
# 函子
在呼叫函式時的 ( ) 是呼叫運算子(call operator),你可以重載呼叫運算子。例如:
```cpp=
#include <iostream>
using namespace std;
struct IntPlus {
int operator()(int rhs, int lhs) const {
return rhs + lhs;
}
};
int main() {
IntPlus plus;
cout << plus(10, 20) << endl;
return 0;
}
```
在範例中,plus 稱為函式物件(function object),又稱為函子(functor),是 Callable 類型,可以像函式一樣地呼叫,範例中的 plus 可以指定給 `function<int(int, int)>` 型態的變數。
這邊的 IntPlus 實例,相當於 lambda 運算式,`[ ] (int rhs, int lhs) { return rhs + lhs; }`,lambda 運算式多半編譯為匿名的函子,如果一個 lamdbda 運算式有捕捉變數呢?例如 `[a] (int b) { return a + b; }`,那麼相當於底下的函子:
```cpp=
#include <iostream>
using namespace std;
int main() {
class __anonymous {
int a;
public:
__anonymous(int a) : a(a) {}
int operator()(int b) const {
return a + b;
}
};
int a = 10;
__anonymous f(a);
cout << f(20) << endl;
return 0;
}
```
如果一個 lamdbda 運算式以參考方式捕捉變數呢?例如 `[&a] { a = 30; }`,那麼相當於底下的函子:
```cpp=
#include <iostream>
using namespace std;
int main() {
class __anonymous {
int &a;
public:
__anonymous(int &a) : a(a) {}
void operator()() const {
a = 30;
}
};
int a = 10;
__anonymous f(a);
f();
cout << a << endl; // 30
return 0;
}
```
既然如此,不如就使用 lamdbda 運算式就好了,還需要函子嗎?一種說法因為編譯器會對其最佳化,函子比較有效率,不過就目的來說,因為函子是個物件,它就可以攜帶更多的資訊,例如:
```cpp=
#include <iostream>
using namespace std;
class PrintLine {
string sep;
public:
PrintLine(string sep) : sep(sep) {}
void operator()(string text) const {
cout << text << sep;
}
};
int main() {
PrintLine printLf("\n");
PrintLine printCrLf("\r\n");
printLf("print lf");
printCrLf("print crlf");
return 0;
}
```
還有一個好處是函子可以模版化,在[〈高階函式〉](https://hackmd.io/U2U3exOWSkioXerWmerKbw?both#%E9%AB%98%E9%9A%8E%E5%87%BD%E5%BC%8F)中看過,functional 中包含了對應於運算子的函子(Functor),像是 plus、minus、multiplies 等,這些函子都模版化了,其中的範例就看過,建立函式物件時就可以指定型態:
```cpp=
#include <iostream>
#include <functional>
using namespace std;
using namespace placeholders;
int main() {
auto add10 = bind(plus<int>{}, _1, 10);
auto mul5 = bind(multiplies<int>{}, _1, 5);
cout << add10(30) << endl; // 40
cout << mul5(20) << endl; // 100
return 0;
}
```
# 類別模版
至今已經直接使用過類別模版很多次了,那麼如何自訂類別模版呢?基本上,類別模版就只是函式模版的概念延伸,如同函式模版實例化後的是各個不同版本的函式,類別模版實例化後的是各個不同的類別,更具體來說,是各種不同的型態。
例如 vector\<int> 是個實例化後的型態,vector\<char> 是實例化後另一個型態,vector\<int> 與 vector\<char> 是兩種不同的型態。
因為類別模版實例化後,會是不同的類別、不同的型態,因此定義類別模版時,在傳回型態涉及類別模版本身時,必須包含模版參數,在 : : 範圍解析時也必須包含模版參數。
來看個實例吧!在〈巢狀、區域、匿名類別〉中的 IntLinkedList,只能用於 int 的元素,可以將之定義為類別模版,適用於各個指定的型態,例如:
```cpp=
#include <iostream>
using namespace std;
template <typename T>
class LinkedList {
class Node {
public:
Node(T value, Node *next) : value(value), next(next) {}
T value;
Node *next;
};
Node *first = nullptr;
public:
LinkedList<T>& append(T value);
T get(int i);
};
template <typename T>
LinkedList<T>& LinkedList<T>::append(T value) {
Node *node = new Node(value, nullptr);
if(first == nullptr) {
this->first = node;
}
else {
Node *last = this->first;
while(last->next != nullptr) {
last = last->next;
}
last->next = node;
}
return *this;
}
template <typename T>
T LinkedList<T>::get(int i) {
Node *last = this->first;
int count = 0;
while(true) {
if(count == i) {
return last->value;
}
last = last->next;
count++;
}
}
int main() {
LinkedList<int> intLt;
intLt.append(1).append(2).append(3);
cout << intLt.get(1) << endl;
LinkedList<char> charLt;
charLt.append('a').append('b').append('c');
cout << charLt.get(2) << endl;
return 0;
}
```
如果看不懂append這段程式碼可以手寫出來看看,大概會像這樣:
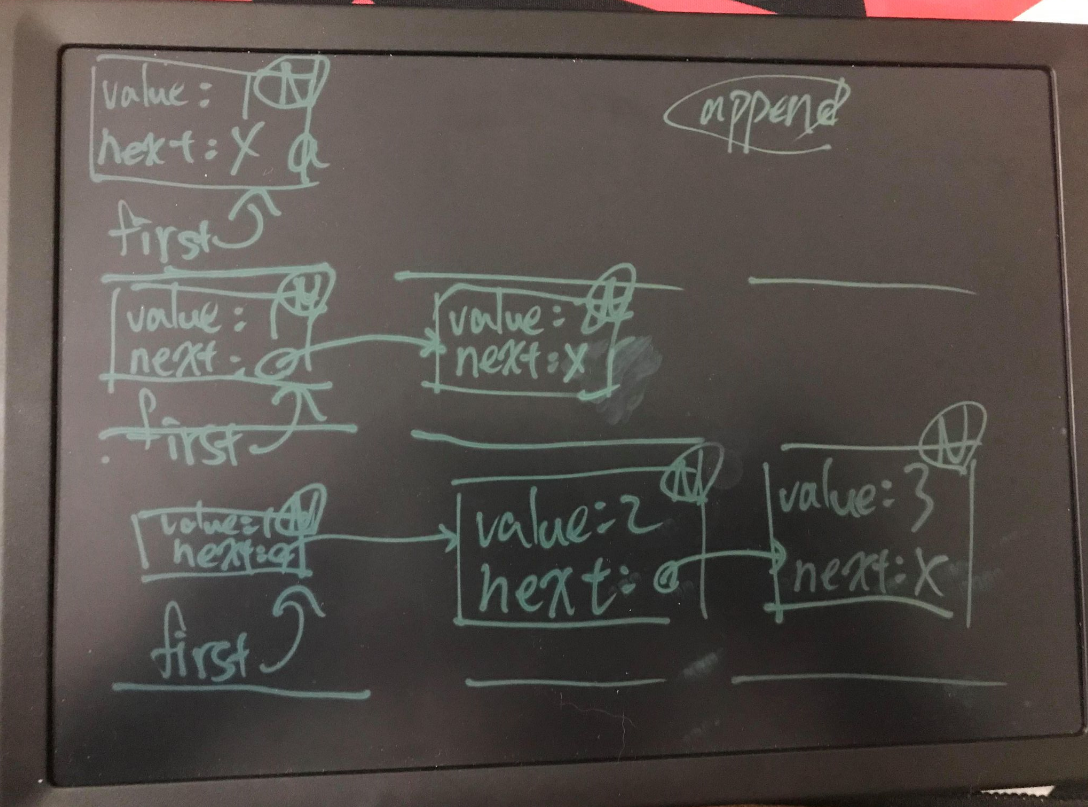
可以留意到範例中,是如何傳回類別本身型態,以及範圍解析 : : 是怎麼指定的,對於實作於類別之中的成員函式,不用範圍解析 : :,也不用重複宣告 template 模版參數名稱。例如:
```cpp=
#include <iostream>
using namespace std;
template <typename T>
class LinkedList {
class Node {
public:
Node(T value, Node *next) : value(value), next(next) {}
T value;
Node *next;
};
Node *first = nullptr;
public:
LinkedList<T>& append(T value) {
Node *node = new Node(value, nullptr);
if(first == nullptr) {
this->first = node;
}
else {
Node *last = this->first;
while(last->next != nullptr) {
last = last->next;
}
last->next = node;
}
return *this;
}
T get(int i) {
Node *last = this->first;
int count = 0;
while(true) {
if(count == i) {
return last->value;
}
last = last->next;
count++;
}
}
};
int main() {
LinkedList<int> intLt;
intLt.append(1).append(2).append(3);
cout << intLt.get(1) << endl;
LinkedList<char> charLt;
charLt.append('a').append('b').append('c');
cout << charLt.get(2) << endl;
return 0;
}
```
如果 static 資料成員是在類別外指定,記得範圍解析時也得加上型態參數,而使用 static 成員時,必須實例化,即使實例化時指定的型態與 static 無關,也是得實例化。例如:
```cpp=
#include <iostream>
using namespace std;
template <typename T>
class Foo {
static int wat;
public:
static int wat10();
};
template <typename T>
int Foo<T>::wat = 10;
template<typename T>
int Foo<T>::wat10() {
return wat * 10;
}
int main() {
cout << Foo<double>::wat10() << endl;
return 0;
}
```
模版類別中若要宣告 friend 比較麻煩,因為 friend 與類別之間有耦合關係,我們有兩種做法,第一種是:
```cpp=
#include <iostream>
using std::cin;
using std::cout;
using std::endl;
template <class T>
class Foo {
private:
T t;
public:
Foo( T t ) : t( t ) {}
template <class U>
friend void foo( Foo<U> f );
};
template <class T>
void foo( Foo<T> f ) {
cout << f.t << endl;
}
int main() {
Foo<int> f( 10 );
foo( f );
cin.get();
return 0;
}
```
這個方法應該會是比較常見的方法,但發現了嗎?它有兩個型態,T 和 U ,這會有一個缺點,就是不夠嚴謹,舉個例子,Foo\<int>會是foo\<int>的朋友,但同時也會是foo\<double>的朋友,有時候這會導致一些錯誤,因此就會需要第二種方法:
```cpp=
#include <iostream>
using std::cin;
using std::cout;
using std::endl;
template <class T>
class Foo;
template <class T>
void foo( Foo<T> &f );
template <class T>
class Foo {
private:
T t;
public:
Foo( T t ) : t( t ) {}
friend void foo<T>( Foo &f );
};
template <class T>
void foo( Foo<T> &f ) {
cout << f.t << endl;
}
int main() {
Foo<int> f( 10 );
foo( f );
cin.get();
return 0;
}
```
雖然比較麻煩,但實例後的類別型態與朋友之間的型態是對應的,例如 Foo\<int> 與 void foo(Foo\<int>) 才會是朋友,與 void foo(Foo\<char>) 不會是朋友。
看到這邊你可能會發現我們 `tmeplate` 後面用的是 `class` 而不是之前看見的 `typename` ,而這兩種有什麼差別呢? 如果只是用來指定模板參數內的型態,那這兩種其實是沒有差別的。 其實一開始都是使用 `class` 來宣告模板參數的型態,但後來怕會與類別混淆,所以才增加了 `typename`。然而,這兩個也有不同的地方,各有各獨有的功能。
首先我們看 `typename` :
由於C++允許在 Class定義型態別名,而且它的使用方法和通過型態名訪問 Class member 的方法一樣。 因此,在Class定義不可知的時候,編譯器就無法知道,類似 `Type::foo` 這樣的寫法具體指的是一個 Class 還是一個 Class member,例如:
```cpp=
#include <iostream>
class Foo {
public:
typedef int bar_type;
};
template <typename T>
class Bar {
typename T::bar_type bar;
// ↑ 這裡需要typename
};
int main() {
std::cin.get();
return 0;
}
```
上面這個例子,如果只有 `T::bar_type bar;` 而沒有 `typename`,那編譯器會無法確定它究竟是不是一個類型,所以需要加上typename,像 `bar_type` 這樣取決於模板參數的類型我們稱它為 "dependent name", 而 T: :bar_type 也是一種 dependent name,另外,包含在某個 Class 內的 dependent name 我們會稱它為 "nested dependent names"。 要注意的是,"nested dependent names" 默認不是個類型,所以才要加上 `typename` 告訴編譯器其是個類型。
再來我們看 `class` :
只有一個地方會強制需要用 `class` 關鍵字,那就是在使用模板的模板時,宣告的部分會需要 `class` ,舉個例子,假設我們現在想宣告一個 Stack ,那我們會這樣宣告:
```cpp=
template <typename T, typename Containter = std ::deque<T>>
class stack{};
```
因此,在使用的時候,我們能以 `std::stack <int>` 來宣告一個用 `std::deque<int>` 保存整數變數的 Stack ; 也可以使用 `std::stack<int, std::vector<int>>` 來宣告一個用 `std::vector<int>` 保存整數變數的 Stack :
```cpp=
#include <deque>
#include <iostream>
#include <vector>
template <typename T, typename Containter = std::deque<T>>
class stack {};
int main() {
stack<int, std::vector<int>> test;
std::cin.get();
return 0;
}
```
但現在有個問題,就是我們需要指定兩次元素類型,但我們能不能只以 `Stack<int,std::vector>` 這樣的形式宣告就好?
為了達到這個目的,我們需要利用模板的模板來完成:
```cpp=
#include <deque>
#include <iostream>
#include <vector>
template <typename T, template <typename E, typename = std::allocator<E>> class Container = std::deque>
class Stack {};
int main() {
Stack<int, std::vector> test;
std::cin.get();
return 0;
}
```
然而在C++17後,`class` 也能夠改成 `typename` 了
文章參考: [參考1](https://liam.page/2018/03/16/keywords-typename-and-class-in-Cxx/) [參考2](https://blog.csdn.net/chenyijun/article/details/107228699)
# 成員指標
在〈函式指標〉介紹過如何將函式指定給對應型態的函式指標,類別的成員函式也是函式,必要時也可以指向對應型態的指標。
要宣告成員函式的指標,與非成員函式的指標宣告類似,主要是要以 : : 來指定是哪個類別的成員函式,函式簽署必須符合,以〈宣告Class〉的 Account 為例,可以如下宣告:
```cpp=
void (Account::*mf1)(double) = nullptr;
mf1 = &Account::deposit;
mf1 = &Account::withdraw;
string (Account::*mf2)() = &Account::to_string;
```
上例中 mf1 可以接受的是 Account 的 deposit 與 withdraw,而 mf2 可以接受的是 to_string,類別的實例會共用成員函式,呼叫成員函式時,必須將提供實例的位址給成員函式中的 this 指標,例如:
```cpp=
#include <iostream>
#include <string>
#include "account.h"
void call(Account &self, void (Account::*member)(double), double param) {
(self.*member)(param);
}
int main() {
Account acct = {"123-456-789", "Justin Lin", 1000};
call(acct, &Account::deposit, 1000);
call(acct, &Account::withdraw, 500);
cout << acct.to_string() << endl;
return 0;
}
```
如果 self 是個指標,就要使用 ->,例如:
```cpp=
#include <iostream>
#include "account.h"
void call(Account *self, void (Account::*member)(double), double param) {
(self->*member)(param);
}
int main() {
Account acct = {"123-456-789", "Justin Lin", 1000};
call(&acct, &Account::deposit, 1000);
call(&acct, &Account::withdraw, 500);
cout << acct.to_string() << endl;
return 0;
}
```
在 functional 標頭中定義有 mem_fn 函式,接受成員函式,傳回的呼叫物件,可以指定呼叫者收者,例如:
```cpp=
#include <iostream>
#include <functional>
#include "account.h"
void call(Account &self, void (Account::*member)(double), double param) {
mem_fn(member)(self, param);
}
int main() {
Account acct = {"123-456-789", "Justin Lin", 1000};
call(acct, &Account::deposit, 1000);
call(acct, &Account::withdraw, 500);
cout << acct.to_string() << endl;
return 0;
}
```
指定呼叫者時可以是個值,這相當於指定 \*this 參考的對象,也可以是個指標,這就是指定 this:
```cpp=
#include <iostream>
#include <functional>
#include "account.h"
void call(Account *self, void (Account::*member)(double), double param) {
mem_fn(member)(self, param);
}
int main() {
Account acct = {"123-456-789", "Justin Lin", 1000};
call(&acct, &Account::deposit, 1000);
call(&acct, &Account::withdraw, 500);
cout << acct.to_string() << endl;
return 0;
}
```
也許你會想起〈高階函式〉中的 bind 函式,它也可以用來綁定 this,例如:
```cpp=
#include <iostream>
#include <functional>
using namespace std;
using namespace std::placeholders;
void call(Account &self, void (Account::*member)(double), double param) {
bind<void>(member, &self, _1)(param);
}
int main() {
Account acct = {"123-456-789", "Justin Lin", 1000};
call(acct, &Account::deposit, 1000);
call(acct, &Account::withdraw, 500);
cout << acct.to_string() << endl;
return 0;
}
```
為什麼要將 &self 當成是第一個參數呢?對於一個方法,例如 void Account::deposit(double amount),可以想像成編譯器將之轉換為 void Account::deposit(Account \*this, double amount),而對於 acct.deposit(1000) 時,可以想像成編譯器將之轉換為 Account::deposit(&acct, 1000),實際上程式碼這麼寫不會編譯成功,因此才說是想像,然而可以透過 bind 來綁定第一個參數的值。
這就解答了另一個問題,怎麼使用 functional 的 function 模版來宣告成員函式型態呢?記得,第一個參數就是接受 this,因此就會是:
```cpp=
#include <iostream>
#include <functional>
using namespace std;
using namespace std::placeholders;
void call(Account &self, function<void(Account*, double)> member, double param) {
bind<void>(member, &self, _1)(param);
}
int main() {
Account acct = {"123-456-789", "Justin Lin", 1000};
call(acct, &Account::deposit, 1000);
call(acct, &Account::withdraw, 500);
cout << acct.to_string() << endl;
return 0;
}
```
那麼 static 成員函式呢?在〈static 成員〉中談過,static 成員屬於類別,某些程度上,就是將類別當成是一種名稱空間,實際上與一般函式無異,因此,函式指標的宣告與一般函式無異:
```cpp=
double (*fn)(double) = Math::toRadian;
```
類似類別的成員函式指標,也可以宣告類別的資料成員指標,例如:
```cpp=
#include <iostream>
using namespace std;
class Point {
public:
int x;
int y;
Point(int x, int y) : x(x), y(y) {}
};
void printCord(Point &pt, int Point::*cord) {
cout << pt.*cord << endl;
}
int main() {
Point pt(10, 20);
printCord(pt, &Point::x);
printCord(pt, &Point::y);
return 0;
}
```
在上例中,cord 是個資料成員指標,可以指向類別定義的資料成員,實際上要代表哪個實例的值域還需指定,同樣也可以透過 .\*(參考的時候)、->\*(指標的時候) 來使用。
# 解構子、複製與移動
在〈類別模版〉中的 LinkedList 範例,每個元素都由內部類別 Node 實例保存,而 Node 是以 new 動態配置,若不再使用 LinkedList 實例,應該清除這些 new 出來的 Node 實例,這可以藉由定義解析式(destructor)來實作,例如:
```cpp=
#include <iostream>
using namespace std;
template <typename T>
class LinkedList {
class Node {
public:
Node(T value, Node *next) : value(value), next(next) {}
T value;
Node *next;
};
Node *first = nullptr;
public:
~LinkedList(); // 解構式
...略
};
...略
template <typename T>
LinkedList<T>::~LinkedList() {
if(this->first == nullptr) {
return;
}
Node *last = this->first;
do {
Node *next = last->next;
delete last;
last = next;
} while(last != nullptr);
}
...略
```
解析式是由 ~ 開頭,不用指定傳回型態,與類別名稱空間的成員函式,當實例被清除時,就會執行解構式,可以在解構式中實作清除資源的動作,在這邊用來 delete 每個 new 出來的 Node 實例。
如果沒有定義解構式,那麼編譯器會自行建立一個本體為空的解構式。
如果 LinkedList 實例被建構出來之後,不會被用來建構另一個 LinkedList 實例,那麼以上的實作是不會有什麼問題,然而若是如下就會出問題:
```cpp=
...略
int main() {
LinkedList<int> *lt1 = new LinkedList<int>();
(*lt1).append(1).append(2).append(3);
LinkedList<int> lt2 = *lt1; // 複製初始化
delete lt1;
cout << lt2.get(2) << endl; // 不可預期的結果
return 0;
}
```
若使用一個類別實例來建構另一類別實例,預設會發生值域的複製,複製的行為視型態而定,以指標類型來說,會是複製位址,也就是淺複製(shallow copy),就上例來說,\*lt1 實例的 first 位址值會複製給 lt2 的 first,在 delete lt1 後,\*lt1 實例的 first 位址處之物件被 delete,因此透過 lt2 的 first 存取的位址值就無效了。
若使用一個類別實例來建構另一類別實例,可以定義複製建構式(copy constructor)來實現自定義的複製行為。例如:
```cpp=
#include <iostream>
using namespace std;
template <typename T>
class LinkedList {
class Node {
public:
Node(T value, Node *next) : value(value), next(next) {}
T value;
Node *next;
};
Node *first = nullptr;
public:
LinkedList() = default; // 預設建構式
LinkedList(const LinkedList<T> <); // 複製建構式
~LinkedList();
...略
};
template <typename T>
LinkedList<T>::LinkedList(const LinkedList<T> <) {
// 逐一複製 Node 實例(而不是複製位址值)
if(lt.first != nullptr) {
this->first = new Node(lt.first->value, nullptr);
}
Node *thisLast = this->first;
Node *srcNext = lt.first->next;
while(srcNext != nullptr) {
thisLast->next = new Node(srcNext->value, nullptr);
thisLast = thisLast->next;
srcNext = srcNext->next;
}
}
...略
template <typename T>
LinkedList<T>::~LinkedList() {
if(this->first == nullptr) {
return;
}
Node *last = this->first;
do {
Node *next = last->next;
delete last;
last = next;
} while(last != nullptr);
}
...略
```
跟預設建構式不同的是,無論有沒有定義其他建構式,若沒有定義複製建構式,那編譯器一定會生成一個複製建構式,預設會發生值域的複製,複製的行為視型態而定,基本型態的話就是複製值,指標的話是複製位址值,陣列的話,會逐一複製每個元素,類別型態的話,視各類別定義的複製建構式而定。
也就是說,在沒有自定義 LinkedList 的複製建構式前,編譯器產生的預設建構式,相當於有以下的內容:
```cpp=
template <typename T>
LinkedList<T>::LinkedList(const LinkedList<T> <) : first(lt.first) {}
```
在定義了複製建構式,方才的 main 執行上沒問題了,然而以下還是會有問題:
```cpp=
...略
int main() {
LinkedList<int> *lt1 = new LinkedList<int>();
LinkedList<int> lt2;
(*lt1).append(1).append(2).append(3);
lt2 = *lt1; // 指定時會發生複製
delete lt1;
cout << lt2.get(2) << endl; // 不可預期的結果
return 0;
}
```
在指定時預設也是會發生複製行為,指定時預設的行為類似預設的複製建構式,若要避免問題發生,得自定義複製指定運算子(copy assignment operator):
```cpp=
#include <iostream>
using namespace std;
template <typename T>
class LinkedList {
class Node {
public:
Node(T value, Node *next) : value(value), next(next) {}
T value;
Node *next;
};
Node *first = nullptr;
void copy(const LinkedList<T> <);
public:
LinkedList() = default;
LinkedList(const LinkedList<T> <);
~LinkedList();
LinkedList<T>& operator=(const LinkedList<T> <); // 定義複製指定運算子
...略
};
template <typename T>
void LinkedList<T>::copy(const LinkedList<T> <) {
// 逐一複製 Node 實例(而不是複製位址值)
if(lt.first != nullptr) {
this->first = new Node(lt.first->value, nullptr);
}
Node *thisLast = this->first;
Node *srcNext = lt.first->next;
while(srcNext != nullptr) {
thisLast->next = new Node(srcNext->value, nullptr);
thisLast = thisLast->next;
srcNext = srcNext->next;
}
}
template <typename T>
LinkedList<T>::LinkedList(const LinkedList<T> <) {
this->copy(lt);
}
template <typename T>
LinkedList<T>& LinkedList<T>::operator=(const LinkedList<T> <) {
this->copy(lt);
return *this;
}
...略
template <typename T>
LinkedList<T>::~LinkedList() {
if(this->first == nullptr) {
return;
}
Node *last = this->first;
do {
Node *next = last->next;
delete last;
last = next;
} while(last != nullptr);
}
...略
```
如果定義類別時,需要考慮到要不要自定義解構式、複製建構式、複製指定運算子其中之一,幾乎就是三個都要定義了,這就是 Rule of three。
如果某個類別不希望被複製、指定等,C++ 11 以後可以如下:
```cpp=
struct Foo {
Foo() = default; // 採用預設建構式行為
Foo(const Foo&) = delete; // 刪除此函式(不定義此函式)
~Foo() = default; // 採用預設解構式行為
Foo& operator=(const Foo&) = delete; // 刪除此函式(不定義此函式)
};
```
在過去的話,會將複製建構式、複製指定運算子設為 private:
```cpp=
class Foo {
Foo(const Foo&);
Foo& operator=(const Foo&);
public:
Foo() = default;
~Foo();
};
```
另外,在〈rvalue 參考〉中看過 std::move 用來實現移動語義,而建構式、指定運算子也可以實現移動語義,也就是移動建構式(move constructor)、移動指定運算子(move assignment operator),如果考慮要在類別上實現移動語義,解構式、複製/移動建構式、複製/移動指定運算子幾乎就都要全部出現,這就是 Rule of Five。
例如,可以為 LinkedList 加上移動建構式、移動指定運算子:
```cpp=
#include <iostream>
#include <utility>
using namespace std;
template <typename T>
class LinkedList {
class Node {
public:
Node(T value, Node *next) : value(value), next(next) {}
T value;
Node *next;
};
Node *first = nullptr;
void copy(const LinkedList<T> <);
void move(LinkedList<T> <);
public:
LinkedList() = default;
LinkedList(const LinkedList<T> <); // 複製建構式
LinkedList(LinkedList<T> &<); // 移動建構式
~LinkedList(); // 解構式
LinkedList<T>& operator=(const LinkedList<T> <); // 複製指定運算子
LinkedList<T>& operator=(LinkedList<T> &<); // 移動指定運算子
LinkedList<T>& append(T value);
T get(int i);
};
template <typename T>
void LinkedList<T>::copy(const LinkedList<T> <) {
// 逐一複製 Node 實例(而不是複製位址值)
if(lt.first != nullptr) {
this->first = new Node(lt.first->value, nullptr);
}
Node *thisLast = this->first;
Node *srcNext = lt.first->next;
while(srcNext != nullptr) {
thisLast->next = new Node(srcNext->value, nullptr);
thisLast = thisLast->next;
srcNext = srcNext->next;
}
}
template <typename T>
void LinkedList<T>::move(LinkedList<T> <) {
if(lt.first != nullptr) {
this->first = lt.first;
lt.first = nullptr;
}
}
template <typename T>
LinkedList<T>::LinkedList(const LinkedList<T> <) {
this->copy(lt);
}
template <typename T>
LinkedList<T>::LinkedList(LinkedList<T> &<) {
this->move(lt);
}
template <typename T>
LinkedList<T>& LinkedList<T>::operator=(const LinkedList<T> <) {
this->copy(lt);
return *this;
}
template <typename T>
LinkedList<T>& LinkedList<T>::operator=(LinkedList<T> &<) {
this->move(lt);
return *this;
}
template <typename T>
LinkedList<T>& LinkedList<T>::append(T value) {
Node *node = new Node(value, nullptr);
if(first == nullptr) {
this->first = node;
}
else {
Node *last = this->first;
while(last->next != nullptr) {
last = last->next;
}
last->next = node;
}
return *this;
}
template <typename T>
T LinkedList<T>::get(int i) {
Node *last = this->first;
int count = 0;
while(true) {
if(count == i) {
return last->value;
}
last = last->next;
count++;
}
}
template <typename T>
LinkedList<T>::~LinkedList() {
if(this->first == nullptr) {
return;
}
Node *last = this->first;
do {
Node *next = last->next;
delete last;
last = next;
} while(last != nullptr);
}
int main() {
LinkedList<int> lt1;
lt1.append(1).append(2).append(3);
LinkedList<int> lt2 = std::move(lt1); // 將 lt1 的資料移動給 lt2
cout << lt2.get(2) << endl;
return 0;
}
```
記得移動之後,因為資料轉移出去了,對目前 lt1 的狀態不能有任何的假設,只能銷毀 lt1,或者重新指定實例給 lt1。
具有解構式、複製/移動建構式、複製/移動指定運算子的類別,要全權負責管理自身資源;至於其他類別,就完全不需要其中之一,這就是 Rule of zero。
有關 Rule of three、Rule of Five、Rule of zero,可進一步參考[〈The rule of three/five/zero〉](https://en.cppreference.com/w/cpp/language/rule_of_three)。
# 智慧型指標(Smart pointer)
## auto_ptr
使用 new 動態配置的物件時,要在使用完後以 delete 刪除,然而動態記憶體配置很容易發生忘了delete,如果有個方式可以自動刪除資源就好了!
若能建立一個非動態配置的物件,該物件管理著動態配置的對象,因為非動態配置的物件在不使用時會自動清除,若在解構式中對動態配置的物件進行 delete 的動作,是不是就不用擔心忘了 delete 的問題?
要實現這件事有許多面向必須得考慮,目標先不要太遠大,先從基本的開始考慮。
首先,它可以管理任意的類別型態,這可以定義模版;其次,管理動態配置對象的物件,行為上得像個指標,也就是必須支援 \*、-> 操作,這倒是可以透過重載 \*、-> 來達成;另外,物件被用來實例化或指定給另一物件時,誰該負責最後的資源刪除?而原本物件管理的資源怎麼辦?
若先來做個簡單的考量,物件被用來實例化另一物件時,管理資源的動作就交給新的物件,被指定給另一物件時,原物件管理的資源就釋放,並接管另一物件的資源,按照以上的想法,一個基本的 AutoPtr 管理類別就會像是:
```cpp=
#include <iostream>
using namespace std;
template<typename T>
class AutoPtr {
T* p;
public:
AutoPtr() = default;
AutoPtr(T* p) : p(p) {}
// 接管來源 autoPtr 的資源
AutoPtr(AutoPtr<T> &autoPtr) : p(autoPtr.p) {
autoPtr.p = nullptr;
}
// 刪除管理的資源
~AutoPtr() {
if(this->p != nullptr) {
delete this->p;
}
}
// 原管理資源被刪除,接管來源 autoPtr 的資源
AutoPtr<T>& operator=(AutoPtr<T>& autoPtr) {
if(this->p) {
delete p;
}
this->p = autoPtr.p;
autoPtr.p = nullptr;
return *this;
}
// 令 AutoPtr 行為像個指標
T& operator*() { return *(this->p); }
T* operator->() { return this->p; }
};
class Foo {
public:
int n;
Foo(int n) : n(n) {}
~Foo() {
cout << "Foo deleted" << endl;
}
};
void foo(int n) {
AutoPtr<Foo> f(new Foo(n));
cout << f->n << endl;
}
int main() {
foo(10);
return 0;
}
```
這是個自動管理資源的簡單實作,foo 中動態配置的 Foo 實例被 AutoPtr 管理,f 是區域的,foo 執行結束後 f 會被摧毀,因而自動刪除了管理的資源,因此執行結果會是:
```cpp=
10
Foo deleted
```
然而,這個實作用來建構另一 AutoPtr 或指定給另一 AutoPtr 實例時,資源會被接管,若忘了這件事,如下使用,就會出問題:
```cpp=
#include <iostream>
using namespace std;
template <typename T>
class AutoPtr {
T *p;
public:
AutoPtr() = default;
AutoPtr( T *p ) : p( p ) {}
// 接管來源 autoPtr 的資源
AutoPtr( AutoPtr<T> &autoPtr ) : p( autoPtr.p ) {
cout << "transforming!" << endl;
autoPtr.p = nullptr;
}
// 刪除管理的資源
~AutoPtr() {
if ( this->p != nullptr ) {
cout << "deleting!" << endl;
delete this->p;
}
}
// 原管理資源被刪除,接管來源 autoPtr 的資源
AutoPtr<T> &operator=( AutoPtr<T> &autoPtr ) {
if ( this->p ) {
delete p;
}
this->p = autoPtr.p;
autoPtr.p = nullptr;
return *this;
}
// 令 AutoPtr 行為像個指標
T &operator*() { return *( this->p ); }
T *operator->() { return this->p; }
};
class Foo {
public:
int n;
Foo( int n ) : n( n ) {}
~Foo() {
cout << "Foo deleted" << endl;
}
};
void foo( AutoPtr<Foo> f ) {
cout << f->n << endl;
}
int main() {
AutoPtr<Foo> f( new Foo( 10 ) );
cout << "calling foo( f ) " << endl;
foo( f ); // 顯示 10、Foo deleted
//cout << f->n << endl; // 不可預期行為
cin.get();
return 0;
}
```
輸出:
```cpp=
calling foo( f )
transforming!
10
deleting!
Foo deleted
```
因為呼叫foo(f)時,將由foo函式內的f接管p指向的位址,而在foo函式執行完畢後便會呼叫解構子,因此我們剛剛於 main( ) 內 new 出來的物件就消失了,此時如果再去呼叫 f->n 就會噴錯。
AutoPtr 顯然地,也不能用來管理動態配置而來的連續空間,因為它並沒有使用 delete \[ ] 來刪除資源。
實際上,在 C++ 98 就提供有 auto_ptr,定義在 memory 標頭檔,大致原理就像以上的 AutoPtr 實作,如果這麼用是沒問題:
```cpp=
#include <iostream>
#include <memory>
using namespace std;
class Foo {
public:
int n;
Foo(int n) : n(n) {}
~Foo() {
cout << "Foo deleted" << endl;
}
};
void foo(int n) {
auto_ptr<Foo> f(new Foo(n));
cout << f->n << endl;
}
int main() {
foo(10);
return 0;
}
```
實際上,auto_ptr 已經被廢棄了(deprecated),因此編譯時會產生警訊,被廢棄的原因就跟方才的 AutoPtr 類似,容易忽略了資源被接管的問題,例如:
```cpp=
#include <iostream>
#include <memory>
using namespace std;
class Foo {
public:
int n;
Foo(int n) : n(n) {}
~Foo() {
cout << "Foo deleted" << endl;
}
};
void foo(auto_ptr<Foo> f) {
cout << f->n << endl;
}
int main() {
auto_ptr<Foo> f(new Foo(10));
foo(f); // 顯示 10、Foo deleted
cout << f->n << endl; // 不可預期行為
return 0;
}
```
實際上,C++ 11 提供了 unique_ptr、shared_ptr 等類別模版,可以根據不同資源管理需求來選用,因此不該再使用 auto_ptr,不過藉由以上的探討,可以理解自動管理資源的原理,並認清一件事實,認識自動管理資源的相關類別原理是重要的一件事,以避免不可預期的行為。
## unique_ptr
在〈auto_ptr〉中,主要是認識自動管理動態配置物件的原理,c++ 98 的 auto_ptr 被廢棄的原因顯而易見,往往一個不小心,就忽略了資源被接管的問題,另一個問題是,它無法管理動態配置的連續空間,因為不會使用 delete \[ ] 來刪除。
對於第一個問題,主要原因來自於複製時就會發生資源接管,既然如此,就禁止複製吧!這可以將複製建構式與複製指定運算子刪掉來達到,不過,實際上還是會需要轉移資源權,那麼就明確地定義釋放資源與重置資源的方法;對於第二個問題,可以讓使用者指定刪除器,自行決定怎麼刪除資源。
實際上 C++ 11 的標準程式庫在 memory 標頭檔,定義有 unique_ptr 實現了以上的概念,不過試著自行實現個基本版本,是個不錯的挑戰,也能對 unique_ptr 有更多認識,那就來看個基本的版本吧!
```cpp=
#include <functional>
#include <iostream>
#include <utility>
using namespace std;
class Deleter {
public:
template <typename T>
void operator()( T *ptr ) { delete ptr; }
};
// 預設的 D 型態是 Deleter
template <typename T, typename D = Deleter>
class UniquePtr {
T *p;
D del;
public:
// 不能複製
UniquePtr( const UniquePtr<T> & ) = delete;
UniquePtr<T> &operator=( const UniquePtr<T> & ) = delete;
UniquePtr() = default;
// 每個 UniquePtr 有自己的 Deleter
UniquePtr( T *p, const D &del = D() ) : p( p ), del( del ) {}
// 對於右值可以直接進行資源的移動
UniquePtr( UniquePtr<T> &&uniquePtr ) : p( uniquePtr.p ), del( std::move( uniquePtr.del ) ) {
uniquePtr.p = nullptr;
}
UniquePtr<T> &operator=( UniquePtr<T> &&uniquePtr ) {
if ( this != &uniquePtr ) {
this->reset();
this->p = uniquePtr.p;
del = std::move( uniquePtr.del );
uniquePtr.p = nullptr;
}
return *this;
}
~UniquePtr() {
del( this->p );
}
// 釋放資源的管理權
T *release() {
T *r = this->p;
this->p = nullptr;
return r;
}
// 重設管理的資源
void reset( T *p = nullptr ) {
del( this->p );
this->p = p;
}
// 令 UniquePtr 行為像個指標
T &operator*() { return *( this->p ); }
T *operator->() { return this->p; }
};
class Foo {
public:
int n;
Foo( int n ) : n( n ) {}
~Foo() {
cout << n << " Foo deleted" << endl;
}
};
int main() {
UniquePtr<Foo> f1( new Foo( 10 ) );
UniquePtr<Foo> f2( new Foo( 20 ) );
f2.reset( f1.release() );
cout << f2->n << endl;
cin.get();
return 0;
}
```
因為這段看了挺久,所以加個講解,以後忘了可以再看。首先是 `Deleter` 這個函子,基本上就只是把傳入的指標指向的記憶體空間釋放而已。
再來是 `reset` 這個函式,它需要傳入一個指標,如果沒傳入東西,那便預設為空指標,然後把現在指標指向的記憶體空間釋放,再將其指到傳入的指標,如果沒傳入東西就一樣,變成空指標。
`release` : 回傳現在指向的位址並把現在的指標設為空指標。
移動指定運算子 : 如果傳入的位址與現在的位址不同,便會將現在的指標指向的記憶體空間釋放,然後指到傳入的指標,並把函子移動過來,再將傳入的設為空指標。
~~註:這段我看了一天XD 但看懂後其實就那樣,記得要花時間把它看懂~~
<br>
因為無法複製了,在上例中,你不能 UniquePtr\<Foo> f2 = f1,或者是 f2 = f1,因此不會隱含地就轉移了資源的管理權,然而,可以透過 release 本身釋放資源,f1.release() 後不再管理原本的資源,資源的位址被傳回,透過 f2 的 reset 設定給 f2,f2 原本的資源會被刪除,管理的資源被設定為接收到的資源,透過 release 與 reset,資源的轉移得到了明確的語義。
因為無法複製了,你不能將 UniquePtr 實例作為引數傳入函式;然而,這邊看到了 rvalue 運算式與 std::move 的一個應用,當 UniquePtr 實例作為傳回值時,雖然呼叫者會建立新的 UniquePtr 實例,然而因為實作了移動建構式與移動指定運算子,被傳回的 UniquePtr 實際上進行了資源的移動,結果就是,你可以從函式中傳回 UniquePtr 實例。例如:
```cpp=
...略
auto unique_foo(int n) {
return UniquePtr<Foo>(new Foo(n));
}
int main() {
auto foo = unique_foo(10);
cout << foo->n << endl;
return 0;
}
```
這個範例的用意就是,既然自動管理資源了,就透過 unique_foo 避免使用 new 吧!如果要管理動態配置的連續空間呢?
```cpp=
...略
auto unique_arr(int len) {
auto deleter = [](int *arr) { delete [] arr; };
return UniquePtr<int, decltype(deleter)>(new int[len] {0}, deleter);
}
int main() {
auto arr = unique_arr(10);
cout << *arr << endl;
return 0;
}
```
透過自訂的刪除器,就可以指定如何刪除動態配置的連續空間了,當然,這邊實作的 UniquePtr 並不全面,因為沒有重載下標運算子,因此無法如陣列可以使用下標操作。
來看看標準程式庫的 unique_ptr 怎麼用吧!
```cpp=
#include <iostream>
#include <memory>
#include <functional>
using namespace std;
class Foo {
public:
int n;
Foo(int n) : n(n) {}
~Foo() {
cout << n << " Foo deleted" << endl;
}
};
int main() {
unique_ptr<Foo> f1(new Foo(10));
unique_ptr<Foo> f2(new Foo(20));
f2.reset(f1.release());
return 0;
}
```
C++ 11 時要以 new 建立 unique_ptr,這是制定規範時的疏忽,從 C++ 14 開始,建議使用 make_unique,這可以避免直接使用 new:
```cpp=
#include <iostream>
#include<memory>
#include <functional>
using namespace std;
class Foo {
public:
int n;
Foo(int n) : n(n) {}
~Foo() {
cout << n << " Foo deleted" << endl;
}
};
int main() {
auto f1 = make_unique<Foo>(10);
auto f2 = make_unique<Foo>(20);
f2.reset(f1.release());
return 0;
}
```
C++ 11 沒有 make_unique,不過可以自行實作:
```cpp=
template<typename T, typename... Args>
std::unique_ptr<T> make_unique(Args&&... args)
{
return std::unique_ptr<T>(new T(std::forward<Args>(args)...));
}
```
這個版本的 make_unique 指定的引數,都會用於建構實例,如果是動態配置連續空間呢?C++ 11 時,為此準備了另一個版本的 unique_ptr,支援下標運算子,例如:
```cpp=
#include <iostream>
#include<memory>
using namespace std;
int main() {
unique_ptr<int[]> arr(new int[3] {1, 2, 3});
for(auto i = 0; i < 3; i++) {
cout << arr[i] << endl;
}
return 0;
}
```
這個版本不用指定刪除器,在 unique_ptr 生命週期結束時,會自動刪除動態配置的連續空間,make_unique 有個對應的重載版本,可以指定動態配置的長度:
```cpp=
#include <iostream>
#include<memory>
using namespace std;
int main() {
auto arr = make_unique<int[]>(3);
for(auto i = 0; i < 3; i++) {
cout << arr[i] << endl;
}
return 0;
}
```
雖然可以如下動態配置連續空間,也可以自行指定刪除器,然而意義不大就是了:
```cpp=
#include <iostream>
#include<memory>
using namespace std;
int main() {
auto deleter = [](int *arr) { delete [] arr; };
unique_ptr<int, decltype(deleter)> arr(new int[2] {0, 1}, deleter);
cout << *arr << endl;
return 0;
}
```
在這個範例中,並不能對 arr 下標操作,也不能對 arr 進行加、減操作,因為並沒有重載對應的運算子,這也說明了一件事,雖然許多文件會稱 unique_arr 或之後要談到的 shared_ptr 等為智慧指標(smart pointer),然而我們從這篇文件一開始,其實就知道,unique_arr 等型態的實例並不是指標,它只是有指標部份行為罷了。
理解這個事實後,對於動態配置連續空間這件事,並想要以下標操作應該先前使用使用 unique_ptr 或 make_unique 的對應版本。
支援下標運算子版本的 unique_ptr,也可以自訂刪除器:
```cpp=
#include <iostream>
#include<memory>
using namespace std;
int main() {
auto deleter = [](int arr[]) { delete [] arr; };
unique_ptr<int[], decltype(deleter)> arr(new int[3] {1, 2, 3}, deleter);
for(auto i = 0; i < 3; i++) {
cout << arr[i] << endl;
}
return 0;
}
```
那麼 make_unique 可否指定刪除器呢?基本上 make_unique 是為了不需要自訂刪除器的場合而存在的,因為指定了刪除器,代表著你會使用 delete,這就表示也必須對應的 new 存在,另外,由於支援下標操作的版本存在,自訂刪除器的需求也減少了,若還是有需求,就直接在建構 unique_ptr 時指定。
## shared_ptr
很多情況下,動態配置的物件會在不同的類別實例間共享,很自然地就會引發一個問題,誰該負責刪除這個被分享的、動態配置的物件?
答案可以很簡單,最後一個持有動態配置物件的實例不再需要該物件時,該實例要負責刪除物件,想採用這個答案,要解決的就是,怎麼知道誰是最後一個持有物件的實例?
如果有個 SharedPtr 可以管理動態配置物件,SharedPtr 實例共用一個計數器,它記錄有幾個 SharedPtr 實例共享該物件,每多一個 SharedPtr 實例共享物件時,計數器增一,若共享物件的 SharedPtr 實例被摧毀時,計數器減一,若有個 SharedPtr 實例發現計數器為零時,就將共享的物件刪除。
當然,想實作這樣的 SharedPtr 也是點挑戰性,不過若能實現,對 C++ 11 以後標準程式庫提供的 shared_ptr 就會更能掌握,就來實現個簡單版本吧!
```cpp=
#include <iostream>
using std::cin;
using std::cout;
using std::endl;
template <typename T>
class SharedPtr {
using Deleter = void ( * )( T * ); // 宣告 Deleter 是一種函式指標
T *p = nullptr;
size_t *pctr = nullptr; // 參考計數
Deleter del = nullptr;
// 被交換的 sharedPtr,參考計數是否減一
// 就看還有沒有在其他處被引用
void swap( SharedPtr &sharedPtr ) {
std::swap( this->p, sharedPtr.p );
std::swap( this->pctr, sharedPtr.pctr );
std::swap( this->del, sharedPtr.del );
}
public:
SharedPtr( T *p = nullptr, Deleter del = nullptr ) : p( p ), pctr( new size_t( p != nullptr ) ), del( del ) {} // pctr( new size_t( p != nullptr ) )代表建一個新的size_t指定給pctr,然後把size_t的內容初始化成p!= nullptr (0 或 1)
SharedPtr( const SharedPtr &sharedPtr ) : p( sharedPtr.p ), pctr( sharedPtr.pctr ), del( sharedPtr.del ) {
// 參考計數加一
++*( this->pctr );
}
SharedPtr( SharedPtr &&sharedPtr ) : SharedPtr() {
this->swap( sharedPtr );
}
// sharedPtr 參數在執行過後就摧毀了,參考計數會減一
SharedPtr &operator=( SharedPtr sharedPtr ) {
this->swap( sharedPtr );
return *this;
}
~SharedPtr() {
if ( this->p == nullptr ) {
return;
}
// 參考計數減一
if ( --*( this->pctr ) == 0 ) {
// 若參考計數為零,刪除資源
this->del ? this->del( this->p ) : delete this->p;
delete pctr;
}
}
void reset( T *p = nullptr, Deleter del = nullptr ) {
// wrapper 參數在執行過後就摧毀了,參考計數會減一
SharedPtr wrapper( p, del );
this->swap( wrapper );
}
// 令 SharedPtr 行為像個指標
T &operator*() { return *p; }
T *operator->() { return p; }
};
class Foo {
public:
int n;
Foo( int n ) : n( n ) {}
~Foo() {
cout << n << " Foo deleted" << endl;
}
};
int main() {
SharedPtr<Foo> f1( new Foo( 10 ) );
SharedPtr<Foo> f2( new Foo( 20 ) );
SharedPtr<Foo> f3( f1 );
f2 = f1;
f3 = SharedPtr<Foo>( new Foo( 30 ) );
SharedPtr<int> arr( new int[3]{ 1, 2, 3 }, []( int *arr ) { delete[] arr; } );
cout << f2->n << endl
<< ( *f3 ).n;
cin.get();
return 0;
}
```
這個簡單版本也考慮了自訂刪除器的指定,你可能會發現,怎麼與 unique_ptr 不太一樣,這是因為 shared_ptr 的刪除器是共享的,不像 unique_ptr 是各自管理著一個資源,而有各自的刪除器,在實作上,必須得在執行時期判斷是否有指定刪除器,決定要使用刪除器,還是 delete。
C++ 11 提供了 shared_ptr,定義在 memory 標頭,上面的範例基本上就是模仿了 shared_ptr,來看看 shared_ptr 的使用:
```cpp=
#include <iostream>
#include <memory>
using namespace std;
class Foo {
public:
int n;
Foo(int n) : n(n) {}
~Foo() {
cout << n << " Foo deleted" << endl;
}
};
int main() {
shared_ptr<Foo> f1(new Foo(10));
shared_ptr<Foo> f2(new Foo(20));
shared_ptr<Foo> f3(f1);
f2 = f1;
f3 = shared_ptr<Foo>(new Foo(30));
shared_ptr<int> arr(new int[3] {1, 2, 3}, [](int *arr) { delete [] arr; });
return 0;
}
```
雖然可以直接建構 shared_ptr 實例,然而在不指定刪除器的情況下,建議透過 make_shared,可以避免使用 new:
```cpp=
#include <iostream>
#include <memory>
using namespace std;
class Foo {
public:
int n;
Foo(int n) : n(n) {}
~Foo() {
cout << n << " Foo deleted" << endl;
}
};
int main() {
auto f1 = make_shared<Foo>(10);
auto f2 = make_shared<Foo>(20);
auto f3(f1);
f2 = f1;
f3 = make_shared<Foo>(30);
return 0;
}
```
shared_ptr 實例可以透過 unique 方法,得知動態配置的物件是否與其他 shared_ptr 實例共享,透過 use_count 方法可以取得參考計數,shared_ptr 沒有像 unique_ptr 提供有可使用下標運算子的版本,本身也不支援加、減運算,因此對於動態配置的連續空間,若要取得指定空間的值,必須透過 get 取得管理的資源。例如:
```cpp=
#include <iostream>
#include <memory>
using namespace std;
int main() {
shared_ptr<int> arr(new int[3] {1, 2, 3}, [](int *arr) { delete [] arr; });
for(int *p = arr.get(), i = 0; i < 3; i++) {
cout << *(p + i) << endl;
}
return 0;
}
```
## weak_ptr
weak_ptr 用來搭配 shared_ptr,當 shared_ptr 實例用來建構 weak_ptr 實例或指定給 weak_ptr 時,動態配置資源的參考計數並不會增加。例如:
```cpp=
#include <iostream>
#include <memory>
using namespace std;
template<typename T>
struct Node {
Node(T v) : v(v) {}
~Node() {
cout << v << " deleted" << endl;
}
T v;
weak_ptr<Node<T>> pre;
weak_ptr<Node<T>> nxt;
};
weak_ptr<Node<int>> foo() {
auto sp = make_shared<Node<int>>(10);
weak_ptr<Node<int>> wp = sp;
cout << wp.expired() << endl; // 0
shared_ptr<Node<int>> sp2 = wp.lock();
cout << sp2->v << endl; // 10
return wp;
}
int main() {
weak_ptr<Node<int>> wp = foo();
cout << wp.expired() << endl; // 1
return 0;
}
```
在這個範例中,sp 動態配置的資源要不要刪除,與 wp 沒有關係,weak_ptr 指向的資源還有沒有效(是否被刪除),可以透過 expired 來得知,如果指向的資源已經被刪除了,就會回傳true,否則回傳false。 若要取得資源,可以透過 lock 方法,如果資源仍有效,就會傳回 shared_ptr 實例,否則傳回 nullptr。
weak_ptr 用來搭配 shared_ptr,應用場合之一是解決 shared_ptr 形成環狀的問題,例如底下的範例會因為 shared_ptr 形成環狀,使得最後各自的資源並沒有被刪除:
```cpp=
#include <iostream>
#include <memory>
using namespace std;
template<typename T>
struct Node {
Node(T v) : v(v) {}
~Node() {
cout << v << " deleted" << endl;
}
T v;
shared_ptr<Node<T>> pre;
shared_ptr<Node<T>> nxt;
};
int main() {
auto node1 = make_shared<Node<int>>(10);
auto node2 = make_shared<Node<int>>(20);
cout << node1.use_count() << endl // 1
<< node2.use_count() << endl; // 1
node1->nxt = node2;
node2->pre = node1;
cout << node1.use_count() << endl // 2
<< node2.use_count() << endl; // 2
return 0;
}
```
可以看到,shared_ptr 被指定給 shared_ptr,會令參考計數增加,兩個 shared_ptr 實例各自被回收時,各自的參考計數都會是一而不是零,shared_ptr 各自的資源並不會被刪除,若是底下這樣:
```cpp=
#include <iostream>
#include <memory>
using namespace std;
template<typename T>
struct Node {
Node(T v) : v(v) {}
~Node() {
cout << v << " deleted" << endl;
}
T v;
weak_ptr<Node<T>> pre;
weak_ptr<Node<T>> nxt;
};
int main() {
auto node1 = make_shared<Node<int>>(10);
auto node2 = make_shared<Node<int>>(20);
cout << node1.use_count() << endl // 1
<< node2.use_count() << endl; // 1
node1->nxt = node2;
node2->pre = node1;
cout << node1.use_count() << endl // 1
<< node2.use_count() << endl; // 1
return 0;
}
```
shared_ptr 被指定給 weak_ptr,不會令參考計數增加,兩個 shared_ptr 實例各自被回收時,各自的參考計數都會是零,shared_ptr 各自的資源可以被刪除。
# 列舉 (enum)
有時候,你會想要定義一組相關的常數,例如,以一組常數來代表遊戲中動作:
```cpp=
#include <iostream>
using namespace std;
struct Action {
const static int STOP = 0;
const static int RIGHT = 1;
const static int LEFT = 2;
const static int UP = 3;
const static int DOWN = 4;
};
void play(int action) {
switch(action) {
case Action::STOP:
cout << "播放停止動畫" << endl;
break;
case Action::RIGHT:
cout << "播放向右動畫" << endl;
break;
case Action::LEFT:
cout << "播放向左動畫" << endl;
break;
case Action::UP:
cout << "播放向上動畫" << endl;
break;
case Action::DOWN:
cout << "播放向下動畫" << endl;
break;
default:
cout << "不支援此動作" << endl;
}
}
int main() {
play(Action::RIGHT);
play(Action::LEFT);
return 0;
}
```
這種方式雖然行得通,不過 play 接受的是 int 整數,這表示你可以傳入任何 int 整數,而不一定要是列舉的數值,雖然可以透過設計,令列舉的 static 成員為 Action 的實例,並令其成為單例(singleton)等,不過,C++ 本身就提供了 enum 來達到這類任務。例如:
```cpp=
#include <iostream>
using namespace std;
enum Action {
STOP, RIGHT, LEFT, UP, DOWN
};
void play(Action action) {
switch(action) {
case Action::STOP:
cout << "播放停止動畫" << endl;
break;
case Action::RIGHT:
cout << "播放向右動畫" << endl;
break;
case Action::LEFT:
cout << "播放向左動畫" << endl;
break;
case Action::UP:
cout << "播放向上動畫" << endl;
break;
case Action::DOWN:
cout << "播放向下動畫" << endl;
break;
default:
cout << "不支援此動作" << endl;
}
}
int main() {
play(Action::RIGHT);
play(LEFT);
play(1); // error: invalid conversion from 'int' to 'Action'
return 0;
}
```
enum 列舉的成員具有型態,以上例來說,STOP 等成員都是 Action 型態,也就是說 enum 本身就是一種特殊的型態,因此 play 接受是 Action 的成員,就上例來說,Action 等成員,可見範圍會與使用 enum 處的範圍相同,因此上例可以直接使用 LEFT 而不一定使用 Action: : 前置,且 switch case 的部分也不一定需要,然而,如果有其他 enum 列舉了同名的成員,省略 Action: : 就會發生名稱衝突。
enum 列舉的成員,會有預設的對應整數,無範疇的列舉成員,在必須取得整數值的場合,會自動轉換為對應的整數,對應整數預設由 0 開始,也可以自行指定。例如:
```cpp=
enum Action {
STOP = 1, RIGHT, LEFT, UP, DOWN
};
```
就上例來說,Action::STOP 對應的整數為後續列舉成員沒有設定對應數值的話,會自動遞增 1,所以 Action: :RIGHT 為 2、Action: :LEFT 為 3,依此類推,然而列舉成員對應的常數值不需獨一無二,例如:
```cpp=
enum Action {
STOP = 1, RIGHT, LEFT = 1, UP, DOWN
};
```
對於無範疇的 enum 成員,C++ 標準只保證對應的整數型態,可以容納被指定的整數值,若無法容納則編譯錯誤,這會導致一個[問題](https://kheresy.wordpress.com/2019/03/27/using-enum-class/):
```cpp=
#include <iostream>
enum EColor {
RED,
GREEN,
BLUE
};
enum EFruit {
APPLE,
BANANA
};
int main() {
EColor eColor = RED;
EFruit eFruit = APPLE;
if ( eColor == eFruit ) {
std::cout << "color and fruit are equal" << std::endl;
}
else {
std::cout << "color and NOT fruit are equal" << std::endl;
}
}
```
上例的執行結果會是「color and fruit are equal」。原因是因為系統把「RED」和「APPLE」都直接當作 int 的數值來做比較;而在這個狀況下,兩者都是 0,所以就變成相等了。
因此在 C++ 11 可以定義有範疇的列舉成員,也就是可視範圍是在 enum 之內,使用時就必須加上型態前置:
```cpp=
#include <iostream>
using namespace std;
enum class Action {
STOP, RIGHT, LEFT, UP, DOWN
};
void play(Action action) {
switch(action) {
case Action::STOP:
cout << "播放停止動畫" << endl;
break;
case Action::RIGHT:
cout << "播放向右動畫" << endl;
break;
case Action::LEFT:
cout << "播放向左動畫" << endl;
break;
case Action::UP:
cout << "播放向上動畫" << endl;
break;
case Action::DOWN:
cout << "播放向下動畫" << endl;
break;
default:
cout << "不支援此動作" << endl;
}
}
int main() {
play(Action::RIGHT);
play(LEFT); // error: 'LEFT' was not declared in this scope
return 0;
}
```
定義有範疇的列舉時,可以使用 class 或 struct,兩者等效,有範疇的列舉不會自動轉換為對應的整數值,必要時得明確指定轉型:
```cpp=
int action = static_cast<int>(Action::RIGHT);
```
在 C++ 11 以後可以指定型態:
```cpp=
enum Action : int {
STOP, RIGHT, LEFT, UP, DOWN
};
```
要注意的是,運作時它仍會轉換成整數,但 enum 的大小會不同。
C++ 11 以後也可以先宣告而不定義列舉成員:
```cpp=
enum Action : int;
```
# union
有些類別的實例,可能包含不同型態的成員,然而,在某個時間點上,只會有一個成員是有效的,例如,你可能會設計一個磁頭類別,磁頭讀取磁帶中的資料並儲存為對應的資料型態:
```cpp=
#include <iostream>
using namespace std;
class Output {
public:
virtual void write(char cvalue) = 0;
virtual void write(int ivalue) = 0;
virtual void write(double dvalue) = 0;
virtual ~Output() = default;
};
class Console : public Output {
public:
void write(char cvalue) override {
cout << cvalue << endl;
}
void write(int ivalue) override {
cout << ivalue << endl;
}
void write(double dvalue) override {
cout << dvalue << endl;
}
};
class Head {
char cvalue;
int ivalue;
double dvalue;
enum {CHAR, INT, DOUBLE} type; // type是個變數,它會是 CHAR、INT 或 DOUBLE 其中一種
public:
void read(char cvalue) {
this->cvalue = cvalue;
this->type = CHAR;
}
void read(int ivalue) {
this->ivalue = ivalue;
this->type = INT;
}
void read(double dvalue) {
this->dvalue = dvalue;
this->type = DOUBLE;
}
void writeTo(Output &output) {
switch(this->type) {
case CHAR:
output.write(this->cvalue);
break;
case INT:
output.write(this->ivalue);
break;
case DOUBLE:
output.write(this->dvalue);
break;
}
}
};
int main() {
Console console;
Head head;
head.read(10);
head.writeTo(console);
head.read('A');
head.writeTo(console);
return 0;
}
```
上例用到了繼承,如果看不懂沒關係,只要知道 Head 一次只儲存一種資料,也就是說 cvalue、ivalue、dvalue 這三個裡只有其中一項會有值,之後依 type 決定該寫出哪種資料,因為 Head 一次只儲存一種資料,不需要分別為 cvalue、ivalue、dvalue 各開一個記憶體空間。
你可以使用 union,它是一種特殊的類別,維護足夠的空間來置放多個資料成員中的一種,而不是為每個資料成員配置各自空間,例如:
```cpp=
...略
class Head {
union {
char cvalue;
int ivalue;
double dvalue;
} value;
enum {CHAR, INT, DOUBLE} type;
public:
void read(char cvalue) {
this->value.cvalue = cvalue;
this->type = CHAR;
}
void read(int ivalue) {
this->value.ivalue = ivalue;
this->type = INT;
}
void read(double dvalue) {
this->value.dvalue = dvalue;
this->type = DOUBLE;
}
void writeTo(Output &output) {
switch(this->type) {
case CHAR:
output.write(this->value.cvalue);
break;
case INT:
output.write(this->value.ivalue);
break;
case DOUBLE:
output.write(this->value.dvalue);
break;
}
}
};
...略
```
在 Head 中定義了匿名的 union 並建立了 value 成員,union 配置足夠大的空間以來容納最大長度的資料成員,以上例而言,最大長度是 double 型態,因此 value 成員的大小是 double 的長度,由於 union 的資料成員共用記憶體空間,存取當前具有合法值的資料成員,才能正確地取資料,
union 是種特殊的類別,因此多數的類別語法也可以用於 union,例如,可以為 union 定義名稱,預設權限為 public,也可以宣告為 protected 或 private,可以定義建構函式、解構函式與成員函式等,然而不能擁有虛擬函式,不能繼承其他類別,也不能作為基礎類別。
在 C++ 11 以後,成員的型態可以是自訂型態,可以有建構函式、解構函式或是複製指定運算子,不過並不建議,因為會令管理成員資源更為複雜。
# 位元欄位
位元欄位(Bit-field)就是資料成員,然而被指定了可存放的位元數量,也就是用來存放位元資料的值域,必須是整數或列舉,通常使用 unsigned,例如 unsigned int:
```cpp=
#include <iostream>
#include <stdexcept>
#include <string>
using namespace std;
using Bit = unsigned int;
class File {
Bit modified : 1; // 使用 1 位元
Bit mode : 2; // 使用 2 位元
const string &filename;
public:
enum class modes { READ = 0b01, // 1
WRITE = 0b10, //2
READ_WRITE = 0b11 }; //3 (二進位的11 == 10進位的2)
File( const string &filename, modes mode ) : filename( filename ), mode( static_cast<Bit>( mode ) ) {}
bool isRead() {
return this->mode & static_cast<Bit>( modes::READ );
}
bool isWrite() {
return this->mode & static_cast<Bit>( modes::WRITE );
}
void write( const string &text ) {
if ( !this->isWrite() ) {
throw runtime_error( this->filename + ":read-only" );
}
this->modified = 0b01;
// ...
}
//...
};
int main() {
File foo1( "foo1", File::modes::READ );
File foo2( "foo2", File::modes::READ_WRITE );
foo2.write( "XD" );
cin.get();
return 0;
}
```
每一個位元欄位在緊跟著的冒號後指定使用的位元數量,在允許的狀況下,連續宣告的位元欄位成員會緊鄰著被配置空間。
位元欄位成員不可被 & 取址,也不可為靜態成員。
<style>
.green {
color:#29E5A9;
}
.brown {
color:#990000;
}
.pink {
color:#DD9FBD;
}
.red {
color:#E71B18 ;
}
.blue {
color:#0b5394;
}
.purple {
color:#AC9FDD;
}
@-webkit-keyframes A
{
0% { color:#C10066;}
10% { color: #CC0000;}
20% { color: #E63F00; }
30% { color:#EE7700; }
40% { color: #DDAA00; }
50% { color:#EEEE00;}
60% { color: #99DD00;}
70% { color:#66DD00;}
80% { color: #00DDDD;}
90% { color: #0044BB;}
100% { color: #A500CC;}
}
#animation_title{
animation: A 3s ease 0s infinite alternate;
-webkit-animation: A 3s ease 0s infinite alternate;
}
</style>
<style>
a.redlink {
color:#DB1859;
}
a.redlink:link {
color:#DB1859;
text-decoration:none;
}
a.redlink:visiteid {
color:#DB1859;
text-decoration:none;
}
a.redlink:hover {
color:#19CABC;
text-decoration:none;
}
a.redlink:active {
color:#000000;
text-decoration:underline;
background:#FFFFFF;
}
</style>
<style type="text/css">
h1 {
font-size:;
color:#0b5394;
}
h2 {
font-size:;
color:#0b5394;
}
p {
font-size:;
color:;
}
h3 {
font-size: ;
color:#990000;
}
h4 {
font-size:;
color:#990000;
}
</style>
 Sign in with Wallet


