# <div id=animation_title>STL容器</div>
###### tags: `C++`
**<a href="https://hackmd.io/CSZ3EUqhSRa8AyDyBMq1Bw" class="redlink">點此回到 C++筆記 目錄 </a>**
# Vector
使用vector時需要vector的標頭檔: `#include <vector>`,另外,vector在std內,沒有 `using namespace std;` 的話,記得前面要打std::
> vector<資料型態> 容器名 = { };
> **後面記得分號**
```cpp=
vector<int> number;
```
這會建立一個空的vector <int>,如果想設定容器內的初始值,可以使用清單初始化(list initialization)或 者初始器(Initializer):
</int>
```cpp=
vector<int> number = {10, 20, 30};
vector<double> score{85.5, 78.2, 63.0};
```
如果想要印出裡面的每個元素,與array一樣,可以使用for迴圈印出:
```cpp=
#include <iostream>
#include <vector>
using namespace std;
int main() {
vector<int> number = {10, 20, 30};
for(auto n : number) {
cout << n << endl;
}
for(int i = 0; i < number.size(); i++) {
cout << number[i] << endl;
}
return 0;
}
輸出:
10
20
30
10
20
30
```
建立 vector 時可以指定初始的長度,每個元素會被初始為指定型態的零值,例如底下會建立長度為 10 的 vector,元素初值都是 0:
```cpp=
vector<int> v1(10);
```
也可以在指定初始長度的同時,指定每個元素的初值,例如底下會建立長度為 10 的 vector,元素初值都是 5:
```cpp=
vector<int> v1(10, 5);
```
vector 可以使用另一個 vector 作為引數來建構,例如以 v1 作為引數來建構 v2:
```cpp=
vector<int> v1 = {10, 20, 30};
vector<int> v2(v1);
```
下面這會將 vector 的元素複製給被指定的vector:
```cpp=
vector<int> v1 = {10, 20, 30};
vector<int> v2 = v1;
```
若要指定來源 vector 的某個範圍建構出新的 vector,必須指定起始位置的 iterator 與結束位置的iterator,例如底下從索引 2 開始走訪至尾端的元素,用以建立新的 vector:
```cpp=
vector<int> v1 = {10, 20, 30, 40, 50};
vector<int> v2(v1.begin() + 2, v1.end()); // 包含 30, 40, 50
```
上面這裡,begin 與 end 會分別傳回起始位置的 `vector<int>::iterator` 與結束位置的 `vector<int>::iterator`,可以把它們看成代表首個元素與最後一個元素的位址,對它們進行 + 或 - 運算,表示元素的位移量,操作上很像指標,至於是不是真的指標,要看底層的實作而定。
因此,我們可以使用迭代器搭配for迴圈來走訪容器內的元素 :
```cpp=
#include <iostream>
#include <vector>
using namespace std;
int main() {
vector<int> number = {10, 20, 30};
for(vector<int>::iterator it = number.begin();
it != number.end();
it++) {
auto n = *it;
cout << n << endl;
}
return 0;
}
```
同樣的,我們可以使用 begin 和 end 來建構vector :
```cpp=
int number[] = {10, 20, 30, 40, 50};
vector<int> v(begin(number) + 2, end(number)); // 包含 30, 40, 50
```
### vector常用函式
### 1. 存取元素的用法
+ **vec[i]** - 存取索引值為 i 的元素值
+ **vec.at(i)** - 存取索引值為 i 的元素的值
+ **vec.front()** - 回傳 vector 第一個元素的值
+ **vec.back()** - 回傳 vector 最尾元素的值
### 2. 新增或移除元素的用法
+ **vec.insert()** - 插入一個或多個元素至 vector 內的任意位置
+ **vec.erase()** - 刪除 vector 中一個或多個元素
+ **vec.clear()** - 清空所有元素
+ **vec.push_back()** - 新增元素至 vector 的尾端,必要時會進行記憶體配置
+ **vec.pop_back()** - 刪除 vector 最尾端的元素
> **—— 少依賴 push_back() 的自動記憶體配置,不是不要用 push_back,是不要讓 push_back 自己判定記憶體需求,能自己要記憶體的就自己要,善用 reserve()、resize() 或 constructor 引數。**
> pop_back( ) 並不會清除記憶體內的值,所以去提址還是能找到他,只是他就不在容器內了。
### 3. 取得長度/容量的用法
+ **vec.empty()** - 如果 vector 內部為空,則傳回 true 值
+ **vec.size()** - 取得 vector 目前持有的元素個數
+ **vec.resize()** - 改變 vector 目前持有的元素個數
+ **vec.capacity()** - 取得 vector 目前可容納的最大元素個數。這個方法與記憶體的配置有關,它通常只會增加,不會因為元素被刪減而隨之減少重新配置/重設長度
+ **vec.reserve()** - 如有必要,可改變 vector 的容量大小(配置更多的記憶體)。在眾多的STL 實做,容量只能增加,不可以減少。
> **—— 不建議使用 size()==0 判斷容器是否為空,用 empty() 判斷較恰當。因為並不是所有容器的 size() 都是 O(1) (不知道我在說什麼的可以先看一下下面的時間複雜度),例如 `<list>` 是 linked list 結構,其 size() 是 O(n)。**
</br>
> **每個 vector 都有兩個重要的數字:容量 (capacity) 和長度 (size) 。**
>
> **$\quad$容量 (capacity) : 是這個 vector 擁有的空間。
> $\quad$長度 (size) : 是實際儲存了元素的空間大小。capacity 永遠不小於 size。**
$\quad\quad\quad\quad\quad\quad$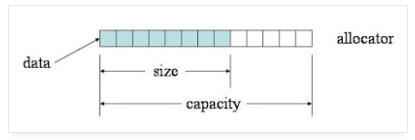
來源: https://mropengate.blogspot.com/2015/07/cc-vector-stl.html
> **$\quad$reserve() 的目的是擴大容量。做完時,vector 的長度不變,capacity 只會長大不會縮小,資料所在位置可能會移動 (因為會重配空間)。因為 vector 一開始是空的,立刻預留顯然比填了資料後才預留省了拷貝資料的時間。
> $\quad$resize() 的目的是改變 vector 的長度。做完時,vector 的長度會改變為指定的大小,capacity 則視需要調整,確保不小於 size,資料所在位置可能會移動。如果變小就擦掉尾巴的資料,如果變大就補零。補零如果會超過容量,會做重配空間的動作。**
### 4. 迭代 (Iterator) (類似指標 : 0x00...)
+ **vec.begin()** - 回傳一個 iterator,它指向 vector 第一個元素。
+ **vec.end()** - 回傳一個 iterator,它指向 vector 最尾端元素的下一個位置 **(請注意:它不是最末元素)**。
+ **vec.rbegin()** - 回傳一個反向 iterator,它指向 vector 最尾端元素的。
+ **vec.rend()** - 回傳一個 iterator,它指向 vector 的第一個元素。
### 來源
**<a href = "https://mropengate.blogspot.com/2015/07/cc-vector-stl.html" class = "redlink">C/C++ - Vector (STL) 用法與心得完全攻略</a>**
**<a href = "https://ramihaha.tw/c-program-container-vector-array-linklist/" class = "redlink">[C++程式設計] 學習筆記─容器 vector的使用(二維陣列與二維串列)</a>**
#
# List
### 與 Vector 的比較
List 常常會用來和 Vector 比較,他們最大的不同就是儲存元素的方式:
Vector 的儲存空間是連續的,像是這樣:
<center><img src = "https://i.imgur.com/08LEV66.png"></center><br>
但 List 的儲存空間並不是連續的,像是這樣:
<center><img src = "https://thispointer.com/wp-content/uploads/2016/05/linkedlist.png"></center><br>
List 內的每個元素都會有一個指向前後元素的指標,用來記錄前後兩個元素在哪,因此支持前後遍歷和高效的隨機插入/刪除,但隨機訪問的效率很低,而且有額外的指標,開銷也比大,每個節點都包含一個 信息塊Info、一個前驅指標Pre、一個後驅指標Post。 也因此 List 沒有「容器大小」的問題。
這個原因造成了他們使用上有一些效率的不同
1. 插入與刪除
List 的插入與刪除元素比 Vector 有效率,因為在 Vector 中間插入元素時,我們需要把插入位址後方的一整塊空間都向後移(他們是連續的),而 List 只需要改前驅與後驅指標就行了。
2. 存取元素
因為 List 的元素儲存方式,假設我們現在想要提取 List 內的第 15 個元素,那我們就必須從第一個元素開始,一個一個慢慢的沿著指標走到第 14 元素,再走到第 15 個元素。
而 Vector 因為它的元素是連續的,所以可以直接透過起始位址與index來直接取得元素,所以會比 List 快很多。
也因為這個原因,像 `std::sort` 這種演算法 List 就無法使用。
3. 迭代器
在 Vector 內可能會有迭代器失效的問題,例如:
```cpp=
#include <iostream>
#include <string>
#include <vector>
using namespace std;
void vectorTest() {
vector<int> container;
for ( int i = 0; i < 10; i++ ) {
container.push_back( i );
}
vector<int>::iterator iter;
//迴圈2
for ( iter = container.begin(); iter != container.end(); iter++ ) {
container.erase( iter );
}
for ( iter = container.begin(); iter != container.end(); iter++ ) {
cout << *iter << endl;
}
}
int main() {
vectorTest();
cin.get();
return 0;
}
```
這個程式的輸出會是 1 3 5 7 9 ,原因是在迴圈二內,刪除一個元素時,後方的元素全部都往全移了,但迭代器的位址還沒有變,以上例來說,原本的 Vector 內容是 0 1 2 3 4 5 6 7 8 9 ,然後我們在迴圈2內把 0 給刪掉了,因此內容會變為 1 2 3 4 5 6 7 8 9,但此時我們的迭代器仍在「容器內第一個位置」,也就是「元素 1」的地方,然後迴圈第一次執行結束,迭代器往後一格,就跑到了「元素 2」的位置,再把 2 刪掉,這樣重複下來,輸出就變成了 1 3 5 7 9,而不是我們預期的將元素全部刪除,這種問題我們就稱為迭代器失效。
會有這個問題的原因很明顯,就是因為儲存空間是連續的,那麼 List 就不會有這個問題。
### 使用 List
List,又稱雙向鍊錶容器,即該容器的底層是以雙向鍊錶的形式實現的。這意味著,list容器中的元素可以分散存儲在內存空間裡,而不是必須存儲在一整塊連續的內存空間中:
<center><img src = "https://i.imgur.com/Zj3tJWD.png"></center><br>
每個元素前後順序是靠指標來聯繫的,這前面提過了,就不再贅述。
根據不同的情況,我們有6種方法來創建 List :
1. 創建一個沒有任何元素的空List:
```cpp=
std::list<int> values;
```
array不同,空的list在創建之後仍可以添加元素,因此這個創建list的方式很常用。
2. 創建一個包含n個元素的List:
```cpp=
std::list<int> values(10);
```
通過此方式創建values容器,其中包含10個元素,每個元素的值都為相應類型的默認值(int類型的默認值為0)。
3. 創建一個包含n個元素的list容器,並為每個元素指定初始值:
```cpp=
std::list<int> values(10, 5);
```
如此就創建了一個包含10個元素並且值都為5的 List。
4. 在已經有list的情況下,可以通過複製List來創建新的list容器:
```cpp=
std :: list<int> value1 ( 10 );
std :: list<int> value2 ( value1 );
```
要注意的是,採用此方式,必須保證新舊容器內的元素類型一致。
5. 通過拷貝其他類型容器(或者普通數組)中指定區域內的元素,可以創建新的list容器:
```cpp=
#include <array>
#include <iostream>
#include <list>
using std::cin;
using std::cout;
using std::endl;
int main() {
//拷貝普通數組,創建list容器
int a[] = { 1, 2, 3, 4, 5 };
std ::list<int> values_one( a, a + 5 );
//拷貝其它類型的容器,創建list 容器
std ::array<int, 5> arr{ 11, 12, 13, 14, 15 };
std ::list<int> values_two( arr.begin() + 2, arr.end() ); //拷貝arr容器中的{13,14,15}
for ( auto it = values_one.begin(); it != values_one.end(); it++ ) {
cout << *it << " ";
}
cout << endl;
for ( auto it = values_two.begin(); it != values_two.end(); it++ ) {
cout << *it << " ";
}
cin.get();
return 0;
}
```
6. 直接列出 List 內的元素:
```cpp=
std::list<int> values{ 0, 1, 2, 3, 4, 5, 6, 7, 8, 9, 10, 12, 11 };
```
### list容器可用的成員函數
| Column 1 | Column 2 |
| --------------- | --------------------------------------------------------------------------- |
| begin() | 返回指向容器中第一個元素的雙向迭代器。 |
| end() | 返回指向容器中最後一個元素所在位置的下一個位置的雙向迭代器。 |
| rbegin() | 返回指向最後一個元素的反向雙向迭代器。 |
| cbegin() | 和begin() 功能相同,只不過在其基礎上,增加了const 屬性,不能用於修改元素。 |
| cend() | 和end() 功能相同,只不過在其基礎上,增加了const 屬性,不能用於修改元素。 |
| crbegin() | 和rbegin() 功能相同,只不過在其基礎上,增加了const 屬性,不能用於修改元素。 |
| crend() | 和rend() 功能相同,只不過在其基礎上,增加了const 屬性,不能用於修改元素。 |
| empty() | 判斷容器中是否有元素,若無元素,則返回true;反之,返回false。 |
| size() | 返回當前容器實際包含的元素個數。 |
| max_size() | 返回容器所能包含元素個數的最大值。 |
| front() | 返回第一個元素的別名。 |
| back() | 返回最後一個元素的別名。 |
| assign() | 用新元素替換容器中原有內容。 |
| emplace_front() | 在容器頭部生成一個元素。該函數和push_front() 的功能相同,但效率更高。 |
| push_back() | 在容器尾部插入一個元素。 |
| pop_back() | 刪除容器尾部的一個元素。 |
| emplace() | 在容器中的指定位置插入元素。該函數和insert() 功能相同,但效率更高。 |
| insert() | 在容器中的指定位置插入元素。 |
| erase() | 刪除容器中一個或某區域內的元素。 |
| swap() | 交換兩個容器中的元素,必須保證這兩個容器中存儲的元素類型是相同的。 |
| resize() | 調整容器的大小。 |
| clear() | 刪除容器存儲的所有元素。 |
| splice() | 將一個list 容器中的元素插入到另一個容器的指定位置。 |
| remove(val) | 刪除容器中所有等於val 的元素。 |
| remove_if() | 刪除容器中滿足條件的元素。 |
| unique() | 刪除容器中相鄰的重複元素,只保留一個。 |
| merge() | 合併兩個事先已排好序的list 容器,並且合併之後的list 容器依然是有序的。 |
| sort() | 通過更改容器中元素的位置,將它們進行排序。 |
| reverse() | 反轉容器中元素的順序。 |
### 來源
**<a href = "https://www.itread01.com/content/1523965270.html" class = "redlink">C++ vector、list和deque的區別 (整理)</a>**
**<a href = "https://thispointer.com/difference-between-vector-and-list-in-c/" class = "redlink">Difference between Vector and List in C++</a>**
**<a href = "http://c.biancheng.net/view/6892.html" class = "redlink">C++ list(STL list)容器完全攻略(超級詳細)</a>**
#
# Deque
deque 稱為雙端隊列(double-end queue),在功能上結合了 Vector 和 List。它是一種連續的存儲結構,也就是說每個元素在內存上是連續的,類似於vector,不同之處在於,deque提供了兩級陣列結構, 第一級完全類似於vector,代表實際容器;另一級維護容器的首位地址。這樣,deque除了具有vector的所有功能外,還支持高效的首/尾端插入/刪除操作,但缺點就是占用的內存會比較多。
### 使用 Deque
與 List 一樣,我們有6種方法可以創建 Deque:
1. 創建一個沒有任何元素的空Deque:
```cpp=
std::deque<int> values;
```
array不同,空的Deque在創建之後仍可以添加元素,因此這個創建Deque的方式很常用。
2. 創建一個包含n個元素的Deque:
```cpp=
std::deque<int> values(10);
```
通過此方式創建values容器,其中包含10個元素,每個元素的值都為相應類型的默認值(int類型的默認值為0)。
3. 創建一個包含n個元素的Deque容器,並為每個元素指定初始值:
```cpp=
std::deque<int> values(10, 5);
```
如此就創建了一個包含10個元素並且值都為5的 Deque。
4. 在已經有Deque的情況下,可以通過複製Deque來創建新的Deque容器:
```cpp=
std :: deque<int> value1 ( 10 );
std :: deque<int> value2 ( value1 );
```
要注意的是,採用此方式,必須保證新舊容器內的元素類型一致。
5. 通過拷貝其他類型容器(或者普通數組)中指定區域內的元素,可以創建新的Deque容器:
```cpp=
#include <array>
#include <iostream>
#include <deque>
using std::cin;
using std::cout;
using std::endl;
int main() {
//拷貝普通數組,創建list容器
int a[] = { 1, 2, 3, 4, 5 };
std ::deque<int> values_one( a, a + 5 );
//拷貝其它類型的容器,創建list 容器
std ::array<int, 5> arr{ 11, 12, 13, 14, 15 };
std ::deque<int> values_two( arr.begin() + 2, arr.end() ); //拷貝arr容器中的{13,14,15}
for ( auto it = values_one.begin(); it != values_one.end(); it++ ) {
cout << *it << " ";
}
cout << endl;
for ( auto it = values_two.begin(); it != values_two.end(); it++ ) {
cout << *it << " ";
}
cin.get();
return 0;
}
```
6. 直接列出 deque 內的元素:
```cpp=
std::deque<int> values{ 0, 1, 2, 3, 4, 5, 6, 7, 8, 9, 10, 12, 11 };
```
### Deque 可用的成員函式
| Column 1 | Column 2 |
| ----------------- | ------------------------------------------------------------------------------------------|
| begin() | 返回指向容器中第一個元素的雙向迭代器。 |
| end() | 返回指向容器中最後一個元素所在位置的下一個位置的雙向迭代器。 |
| rbegin() | 返回指向最後一個元素的反向雙向迭代器。 |
| cbegin() | 和begin() 功能相同,只不過在其基礎上,增加了const 屬性,不能用於修改元素。 |
| cend() | 和end() 功能相同,只不過在其基礎上,增加了const 屬性,不能用於修改元素。 |
| crbegin() | 和rbegin() 功能相同,只不過在其基礎上,增加了const 屬性,不能用於修改元素。 |
| crend() | 和rend() 功能相同,只不過在其基礎上,增加了const 屬性,不能用於修改元素。 |
| size() | 返回當前容器實際包含的元素個數。 |
| max_size() | 返回容器所能包含元素個數的最大值。 |
| resize() | 調整容器的大小。 |
| empty() | 判斷容器中是否有元素,若無元素,則返回true;反之,返回false。 |
| shrink\_to\_fit() | 將內存減少到等於當前元素實際所使用的大小。 |
| at() | 使用經過邊界檢查的索引訪問元素。 |
| front() | 返回第一個元素的別名。 |
| back() | 返回最後一個元素的別名。 |
| assign() | 用新元素替換容器中原有內容。 |
| push_back() | 在容器尾部插入一個元素。 |
| push_front() | 在容器的頭部添加一個元素。 |
| pop_back() | 刪除容器尾部的一個元素。 |
| pop_front() | 刪除容器頭部的一個元素。 |
| insert() | 在容器中的指定位置插入元素。 |
| erase() | 刪除容器中一個或某區域內的元素。 |
| clear() | 刪除容器存儲的所有元素。 |
| swap() | 交換兩個容器中的元素,必須保證這兩個容器中存儲的元素類型是相同的。 |
| emplace() | 在容器中的指定位置插入元素。該函數和insert() 功能相同,但效率更高。 |
| emplace_front() | 在容器頭部生成一個元素。和push_front() 的區別是,該函數直接在容器頭部構造元素,省去了複製移動元素的過程。 |
| emplace_back() | 在容器尾部生成一個元素。和push_back() 的區別是,該函數直接在容器尾部構造元素,省去了複製移動元素的過程。 |
### 來源
**<a href = "https://www.itread01.com/content/1523965270.html" class = "redlink">C++ vector、list和deque的區別 (整理)</a>**
**<a href = "http://c.biancheng.net/view/6860.html" class = "redlink">C++ STL deque容器(詳解版)</a>**
**<a href = "https://en.cppreference.com/w/cpp/container/deque" class = "redlink">std: :deque</a>**
#
# Stack
### 使用 Stack
Stack 是一種後進先出(LIFO, Last In First Out)的資料結構,在 C++ 中若要使用堆疊,可以運用 C++ 標準函式庫(STL)所提供的 stack,以下是基本的使用範例:
```cpp=
#include <iostream>
#include <stack> // 引入堆疊>標頭檔
int main() {
std::stack<int> myStack; // 建立堆疊
for (int i = 0; i < 5; ++i) {
myStack.push(i); // 放入元素
}
// 傳回最上方的元素
std::cout << "Top: " << myStack.top() << std::endl;
// 移除最上方的元素
myStack.pop();
// 傳回最上方的元素
std::cout << "Top: " << myStack.top() << std::endl;
return 0;
}
```
### 取得堆疊內元素個數
若要取得堆疊內的元素個數,可以使用 `size` 函數:
```cpp=
#include <iostream>
#include <stack>
int main() {
std::stack<int> myStack;
for (int i = 0; i < 5; ++i) {
myStack.push(i);
}
// 取得堆疊內元素個數
std::cout << "Count: " << myStack.size() << std::endl;
return 0;
}
```
### 檢查堆疊是否有元素(是否為空)
若要檢查堆疊內是否有任何元素,可以使用 `empty` 函數:
```cpp=
#include <iostream>
#include <stack>
int main() {
std::stack<int> myStack;
for (int i = 0; i < 5; ++i) {
myStack.push(i);
}
// 檢查堆疊是否有元素(是否為空)
if (myStack.empty()) {
std::cout << "堆疊是空的。" << std::endl;
} else {
std::cout << "堆疊不是空的。" << std::endl;
}
return 0;
}
```
### 堆疊內容互換
若要將兩個堆疊的內容互換,可以使用 swap 函數:
```cpp=
#include <iostream>
#include <stack>
int main() {
std::stack<int> myStack1, myStack2;
for (int i = 0; i < 5; ++i) { myStack1.push(i); }
for (int i = 10; i < 13; ++i) { myStack2.push(i); }
// 將兩個堆疊內容互換
myStack1.swap(myStack2);
// 輸出 myStack1
std::cout << "myStack1 = ";
while (!myStack1.empty()) {
std::cout << myStack1.top() << " ";
myStack1.pop();
}
std::cout << std::endl;
// 輸出 myStack2
std::cout << "myStack2 = ";
while (!myStack2.empty()) {
std::cout << myStack2.top() << " ";
myStack2.pop();
}
std::cout << std::endl;
return 0;
}
```
這個範例一開始建立了 myStack1 與 myStack2 兩個堆疊,然後使用 swap 函數將兩個堆疊中的內容互換。
### 來源
**<a href = "https://officeguide.cc/c-cpp-stack-tutorial/" class = "redlink">C++ 程式語言堆疊 stack 用法教學與範例</a>**
#
# Queue
Queue 與 Stack 很像,但 Queue 是先進先出的容器(FIFO),因此 Queue 只能在尾端新增元素,在前端移除元素,像是排隊那樣:
<center><img src = "https://i.imgur.com/XI98Nbv.png"></center><br>
Queue 的生成方式和 Stack 相同,下面將展示如何創建一個保存字符串的 Queue:
```cpp=
std::queue<std::string> words;
```
也可以使用複製構造函式:
```cpp=
std::queue<std::string> words;
std::queue<std::string> copy_words{ words }; // A duplicate of words
```
stack\<T>、queue\<T> 這兩種適配器型容器都默認封裝了一個deque\<T> 容器,也可以通過指定第二個模板類型參數來使用其他類型的容器:
```cpp=
std::queue < std::string, std::list<std::string>> words;
```
註:適配器簡單來說就是由另一種容器改裝過來的容器,以上例來說,Stack 與 Queue 都是由 Deque 改裝而來的
### 使用 Queue
queue 和stack 有一些成員函數相似,但在一些情況下,工作方式有些不同:
+ front():返回queue 中第一個元素的別名。如果queue 是常量,就返回一個lreference;如果queue 為空,返回值是未定義的。
+ back():返回queue 中最後一個元素的別名。如果queue 是常量,就返回一個lreference;如果queue 為空,返回值是未定義的。
+ push(const T& obj):在queue 的尾部添加一個元素的副本。這是通過調用底層容器的成員函數push_back() 來完成的。
+ push(T&& obj):以移動的方式在queue 的尾部添加元素。這是通過調用底層容器的具有右值引用參數的成員函數push_back() 來完成的。
+ pop():刪除queue 中的第一個元素。
+ size():返回queue 中元素的個數。
+ empty():如果queue 中沒有元素的話,返回true。
+ emplace():用傳給emplace() 的參數調用T 的構造函數,在queue 的尾部生成對象。
+ swap(queue\<T> &other_q):將當前queue 中的元素和參數queue 中的元素交換。它們需要包含相同類型的元素。也可以調用全局函數模板 swap() 來完成同樣的操作。
queue\<T>模板定義了拷貝和移動版的operator=(),對於所保存元素類型相同的queue對象,它們有一整套的比較運算符,這些運算符的工作方式和stack容器相同。
和stack一樣,queue也沒有迭代器。訪問元素的唯一方式是遍歷容器內容,並移除訪問過的每一個元素。例如:
```cpp=
std :: deque<double> values {1.5, 2.5, 3.5, 4.5}; std::queue<double> numbers ( values );
while (! numbers , empty ())
{
std :: cout << numbers . front () << " " ; // Output the 1st element
numbers . pop (); // Delete the 1st element
}
std :: cout << std :: endl ;
```
### 來源
**<a href = "https://zhidao.baidu.com/question/1669491583678066307.html" class = "redlink">C++ 適配器到底是個什麼概念, 函數適配器,迭代器適配器</a>**
**<a href = "http://c.biancheng.net/view/479.html" class = "redlink">C++ queue(STL queue)用法詳解</a>**
**<a href = "" class = "redlink"></a>**
#
# Array
### 使用Array
在C++11的Standard Template Library (STL)之中,加入了std::array,其實他只不過是把fixed sized array做一層包裝,但他和傳統的C-style array到底有甚麼不同?帶來了那些優缺點呢?
比起C-Style array來說,有以下優缺點:
1. 包裝成class,可以避免array被隱式(implicit)轉型成pointer。(e.g. 把array當pointer傳給function)
2. performance幾乎沒有差別(C-Style比較好一點點)
3. C-Style array可以access超過array的範圍,這將造成undefined behavior;std::array則否。
4. std::array知道自己的size;但是如果你透過pointer把一個C-Style array傳給一個function的話,在該function中是無法透過sizeof()來取得該array的size的。
5. std::array有實作copy constructor和assignment operator,所以他可以方便的被複製。
6. std::array需要額外#include ,C-Style則不需要include額外的header。
7. std::array的2D array宣告較為冗長。
8. C-Style array宣告時可以不需要指定其size,有其便利性。
### 來源
**<a href = "https://coherence0815.wordpress.com/2015/08/22/stdarray-in-c-11/" class = "redlink">std::array in C++ 11</a>**
#
# pair
### pair的定義
pair在c++STL中被定義為struct。可以將兩個值視為一個單元。經常在容器map中使用或用於函數有兩個不同類型的返回值。
頭文件是#include \<utility>
```cpp=
template<class Type1, class Type2>
struct pair
{
typedef Type1 first_type;
typedef Type2 second_type
Type1 first;
Type2 second;
pair( );
pair(
const Type1& __Val1,
const Type2& __Val2
);
template<class Other1, class Other2>
pair(
const pair<Other1, Other2>& _Right
);
template<class Other1, class Other2>
pair(
Other1&& _Val1, Other2&& _Val2
);
};
```
### 使用pair
(1)pair對象定義和初始化
```cpp=
// Using the constructor to declare and initialize a pair
pair <int, double> p1 ( 10, 1.1e-2 );
// Compare using the helper function to declare and initialize a pair
pair <int, double> p2;
p2 = make_pair ( 10, 2.22e-1 );
// Making a copy of a pair
pair <int, double> p3 ( p1 );
```
(2)pair成員變量的訪問
pair的兩個變量名為first,second。直接用點操作變量名即可訪問。
```cpp=
std::pair<std::string, std::string> p ( "Lily", "Poly" );
std::string name;
name = p.second;
std::cout << name;
```
### 來源
**<a href = "https://blog.csdn.net/lz20120808/article/details/51382664" class = "redlink">c++ STL 之map 和pair</a>**
#
# Map
### 簡介
Map 是 C++ 標準程式庫中的一個 class,為眾多容器(container)之一。它提供搜尋和插入友善的資料結構,並具有一對一 mapping 功能:
+ 第一個稱為關鍵字 (key),每個關鍵字只能在 map 中出現一次。
+ 第二個稱為該關鍵字的值 (value)。
Map 的 key-value 對應主要用於資料一對一映射 (one-to-one) 的情況,比如一個班級中,每個學生的學號跟他的姓名就存在著一對一映射的關係。
#### Map 的特色
+ map 內部資料結構為一顆紅黑樹 (red-black tree),因此:
+ 內部是有排序的資料。
+ 對於搜尋和插入操作友善( O(logn) )。
+ 可以修改 value 值、不能修改 key 值。
+ 以模板(泛型)方式實現,可以儲存任意類型的變數,包括使用者自定義的資料型態。
<center><img src = "https://1.bp.blogspot.com/-irj_g2Xr7E8/VmU8mlBPOVI/AAAAAAAA_K4/sIdTgAMLUxE/s1600/27.4.png"></center>
#### 類似map的STL結構
+ map : 紅黑樹 (查询、插入、删除都是O(logn) )
+ unordered_map : hash 結構,C++11 標準函式庫。
+ unordered_set : hash 結構,但 value 本身即是 key。
+ hash_map : hash 結構,非標準函式庫。
### 成員函式簡介與常用程式寫法
1. 宣告
```cpp=
map<string, string> mapStudent;
```
2. 插入 insert()
```cpp=
// 用 insert 函數插入 pair
mapStudent.insert(pair<string, string>("r000", "student_zero"));
//用 "array" 方式插入
mapStudent["r123"] = "student_first";
mapStudent["r456"] = "student_second";
```
3. 尋找 find()
```cpp=
iter = mapStudent.find("r123");
if(iter != mapStudent.end())
cout<<"Find, the value is"<<iter->second<<endl;
else
cout<<"Do not Find"<<endl;
```
<center><img src = "https://3.bp.blogspot.com/-p2D7ql_iuFE/VmU7pe7zQrI/AAAAAAAA_Ks/WC3G3ADrKBE/s1600/27.7.png"></center><br>
4. 刪除與清空
清空 map 中的資料可以用 clear() 函數,判定 map 中是否有資料用 empty() 函數,如果回傳 true 則 map 為空,而資料的刪除用 erase() 函數,它有三種 overload 的用法:
```cpp=
//迭代器刪除
iter = mapStudent.find("r123");
mapStudent.erase(iter);
//用關鍵字刪除
int n = mapStudent.erase("r123");//如果刪除了會返回1,否則返回0
//用迭代器範圍刪除 : 把整個map清空
mapStudent.erase(mapStudent.begin(), mapStudent.end());
//等同於mapStudent.clear()
```
### 來源
**<a href = "https://mropengate.blogspot.com/2015/12/cc-map-stl.html" class = redlink>C/C++ - Map (STL) 用法與心得完全攻略</a>**
{%hackmd aPqG0f7uS3CSdeXvHSYQKQ %}
 Sign in with Wallet


