owned this note
owned this note
Published
Linked with GitHub
---
tags: fabacademy, blender
---
# Embedded programming
##  ATSAMD11C
### What's in the box
* 16KB of flash memory and 4KB of SRAM
* Up to 48MHz operating frequency, internal and external clock options.
* Two serial communication modules (SERCOM) configurable as UART/USART, SPI or I2C,
* Two 16-bit timer/counters
* 32-bit Real-Time Clock and calendar
* 12 PWM channels
* One 5-channel 12-bit ADC
* One 10-bit DAC
* Full-Speed USB device
* 1.62V to 3.63V
* 8 external interrupts
* Two-pin Serial Wire Debug (SWD) programming, test and debugging interface
* Watchdog Timer (WDT)
* 12 GPIO pins
* 14-pin SOIC

### Pinout

*Usable pins with arduino bootloader*

:::info
[Datasheet](https://ww1.microchip.com/downloads/aemDocuments/documents/OTH/ProductDocuments/DataSheets/Atmel-42363-SAM-D11_Datasheet.pdf)
:::
---
---
## Board
## Arduino IDE setup
### Installing board definitions
To be able to program XXX boards in Arduino IDE you need to install the [Arduino Fab SAM](https://github.com/qbolsee/ArduinoCore-fab-sam) core. Inside the _File_ → _Preferences_ window ont he _Additional Boards Manager URLs_ copy this address:
~~~
https://raw.githubusercontent.com/qbolsee/ArduinoCore-fab-sam/master/json/package_Fab_SAM_index.json
~~~
After that open the **Boards Manager** window located in _Tools_ → _Board_ → _Boards Manager_ and search for _Fab SAM_, just click install!

## Programming a programmer
The programmer board will allow us to upload sketches to any SAMD board via the SWD interface.
To upload the Free DAP code to your board you need another programer, either the DIY version or a commercial one like the [SAM ICE](https://www.digikey.es/en/product-highlight/a/atmel/atmel-ice-programmer-debugger). You can also do it with a raspberry Pi using OpenOCD [here](https://learn.adafruit.com/programming-microcontrollers-using-openocd-on-raspberry-pi/overview) you can find more info.
[Free DAP](https://github.com/ataradov/free-dap)
> This is a free and open implementation of the CMSIS-DAP debugger firmware.
Free DAP [binary](http://academy.cba.mit.edu/classes/embedded_programming/SWD/free_dap_d11c_mini.bin) file.
Uploading the code via edbg:
~~~
edbg -b -t samd11 -epv -f free_dap_d11c_mini.bin
~~~
## Sketch upload
### Arduino IDE
Config settings:
- Serial Config to TWO_UART_NOSPI
- Programmer to Atmel EDBG

### EDBG FLASHING BOOTLOADER
1. Connect the board to the Programmer and plug it into the computer.
2. Download the sam_ba_Generic_D11C14A bootloader[here is a list of all the binaries for ATMSAM FAMILY](https://github.com/qbolsee/ArduinoCore-fab-sam/tree/master/bootloaders/zero/binaries). You need to have the [EDBG downloaded](https://github.com/ataradov/edbg). The bootloader has to be inside the EDBG folder.
3. Open GitBash Terminal in the same folder and run, edbg-windows-r24.exe -ebpv -t samd11 -f sam_ba_SAMD11C14A.bin
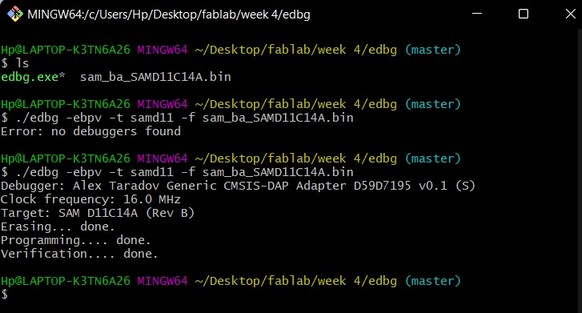
4. Disconnect the programmer and connect the new board.
5. Open Arduino program.
### EDBG
~~~
CMSIS-DAP SWD programmer. Built Mar 15 2022 10:51:34.
Usage: edbg [options]
Options:
-h, --help print this help message and exit
-b, --verbose print verbose messages
-x, --reset <duration> assert the reset pin before any other operation (duration in ms)
-e, --erase perform a chip erase before programming
-p, --program program the chip
-v, --verify verify memory
-k, --lock lock the chip (set security bit)
-u, --unlock unlock the chip (forces chip erase in most cases)
-r, --read read the whole content of the chip flash
-f, --file <file> binary file to be programmed or verified; also read output file name
-t, --target <name> specify a target type (use '-t list' for a list of supported target types)
-l, --list list all available debuggers
-s, --serial <number> use a debugger with a specified serial number or index in the list
-c, --clock <freq> interface clock frequency in kHz (default 16000)
-o, --offset <offset> offset for the operation
-z, --size <size> size for the operation
-F, --fuse <options> operations on the fuses (use '-F help' for details)
~~~
To find out your chip target name do `edbg -t list`:
~~~
Supported device families:
Atmel SAM C/D/L/R series:
samd09 samd10 samd11 samd20 samd21 samc21 saml21 saml22 samr21 samr30 samr34 samr35 samda1 pic32cm
Atmel SAM3X/A/U series:
sam3x sam3a sam3u
Atmel SAM G and SAM4 series:
samg51 samg53 samg54 samg55 sam4sd sam4sa sam4s sam4e sam4n
Atmel SAM E7x/S7x/V7x series:
same70 sams70 samv71 samv70
Atmel SAM D5x/E5x:
same51 samd51 same53 same54
Microchip SAM L10/L11:
saml10 saml11
STMicroelectronics STM32G0 series:
stm32g0
GigaDevice GD32F4xx series:
gd32f4xx
Nuvoton M480 series:
m480
Lattice LCMXO2 series:
lcmxo2
~~~
So the command for uploading our binary file is:
~~~
edbg -b -t samd11 -epv -f binary.bin
~~~
:::info
Command reference
program: edbg -b -t target_type -epv -f binary_file
read fuses: edbg -b -t target_type -F r,*,file_name
write fuses: edbg -b -t target_type -F w,high_bit:low_bit,bit_value
disable SAMD bootloader protection: edbg -b -t target_type -F w,2:0,7
:::
## Coding in arduino - Space saving/no bootloader
Seems that any code we upload is very voluminous for the SAMD11C, in fact, as you can see in the following image, it uses almost all of the microcontroller memory.
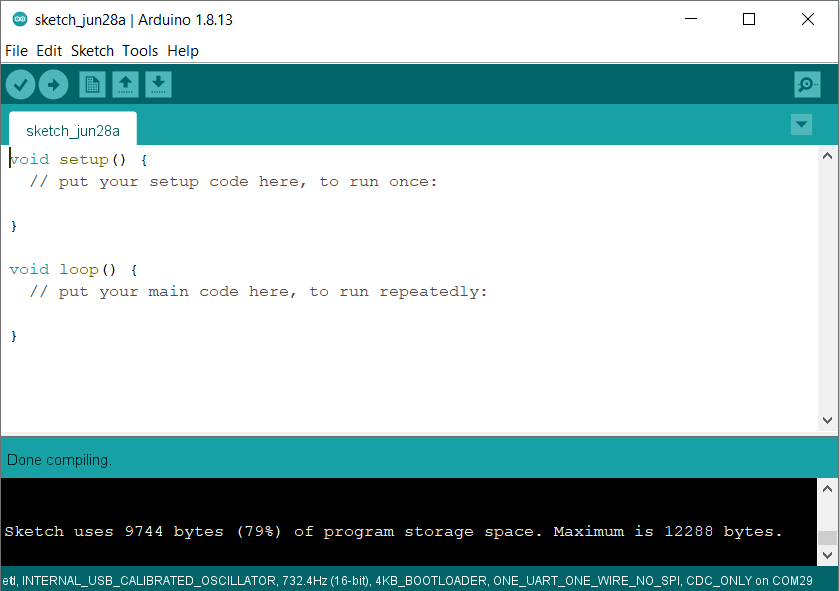
**That's because there are a series of libraries uploaded to the SAMD11C each time you upload a program code you wrote with arduino IDE.**
These libraries are needed for you to program the microcontroller using directly the Arduino IDE, but only they occupy 79% of the SAMD11C's entire memory.
To overcome this problem, we can save some space by removing the bootloader from the memory of the SAMD11C.
This way we save about 25% of memory that we can use to load a more substantial code at the cost, however, of a little inconvenience in loading codes.
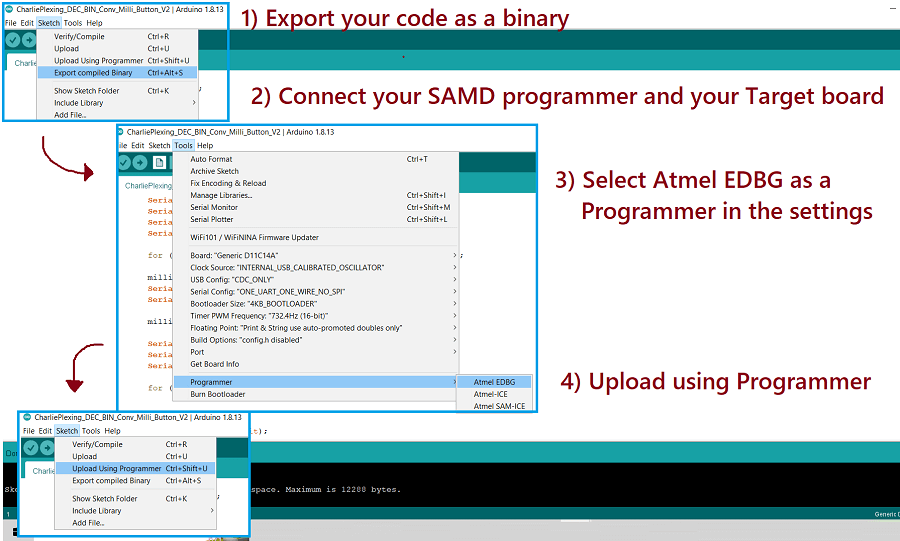
That's because without the bootloader we could no longer upload programs to the SAMD11C directly by clicking the "Upload Code" button in the Arduino IDE, instead we need to firstly convert the code in a .bin and then upload it via a programmer.
Although the whole procedure is certainly longer, it can still be done very easily through the arduino IDE.
*Documentation- Fabacademy2022-Marco Antonio Sardo*
 Sign in with Wallet


