# <div id=animation_title>陣列、指標 與 物件別名 (Reference 參考)</div>
###### tags: `C++`
**<a href="https://hackmd.io/CSZ3EUqhSRa8AyDyBMq1Bw" class="redlink">點此回到 C++筆記 目錄 </a>**
# 一維陣列
C++內可以宣告一個以索引(index)作為識別的資料結構,稱作陣列,能夠用來儲存資料,宣告陣列的方式為 `資料型態 名稱[長度];`
長度必須是個編譯時期的常數 (後面會提到動態配置,這邊先當要固定大小), 以下是幾個宣告的範例:
```cpp=
int number[10]; // 宣告 10 個元素的整數陣列
double score[10]; // 宣告 10 個元素的浮點數陣列
char ascii[10]; // 宣告 10 個元素的字元陣列
```
宣告陣列後,陣列內的元素並不會自動初始化,宣告僅僅是分配了一段記憶體空間給他,並以陣列的名字標記他在哪(後面指標會詳細講到), 因此我們需要手動初始化陣列的值,若想在宣告時一次初始陣列全部的元素值,可以如下:
```cpp=
int number[10] = {0};
double score[10] = {0.0};
char ascii[10] = {'\0'};
bool flag[10] = {false};
```
上面的幾個宣告,整數陣列中的元素都會被初始為 0,浮點數陣列則會被初始為 0.0,字元陣列會被初始為空字元('\0'),而 bool 陣列會被初始為 false。
當然,我們也可以指定不同的初始值給陣列,如:
```cpp=
int number[5] = {0, 1, 2, 3, 4};
double score[5] = {87.0, 78.0, 99.5, 69.5, 82.5};
char ascii[5] = {'A', 'B', 'C', 'D', 'E'};
bool flag[5] = {false, true, false, true, false};
```
要存取陣列中的元素值時,可以使用下標(Subscript)運算子 [] 加上索引」,索引值由 0 開始,下面這個簡單的程式是個示範:
```cpp=
#include <iostream>
using namespace std;
int main() {
constexpr int LEN = 10;
int number[LEN] = {0};
for(int i = 0; i < LEN; i++) {
cout << number[i] << " ";
}
cout << endl;
for(int i = 0; i < LEN; i++) {
number[i] = i;
}
for(int i = 0; i < LEN; i++) {
cout << number[i] << " ";
}
cout << endl;
return 0;
}
輸出:
0 0 0 0 0 0 0 0 0 0
0 1 2 3 4 5 6 7 8 9
```
陣列在使用時,一定要先得知陣列長度,不可以存取超過陣列長度的記憶體,這會發生無法預期的結果 (因為超出了有定義值的記憶體位址),陣列本身並不知道自己的長度資訊,在上面的範例中,使用了 LEN 來記錄長度,不過,有沒有辦法計算出長度呢?可以使用底下的方式:
```cpp=
#include <iostream>
using namespace std;
int main() {
int number[5] = {0, 1, 2, 3, 4};
int length = sizeof(number) / sizeof(number[0]);
for(int i = 0; i < length; i++) {
cout << number[i] << " ";
}
cout << endl;
return 0;
}
```
陣列索引值由 0 開始不是沒有原因的,陣列名稱儲存了陣列記憶體的首個位置的位址,而索引值表示陣列元素是相對於陣列首個記憶體位址的位移量(offset),位移的量與資料型態長度有關,如果是 int 整數,每次位移時是一個 int 整數的長度,例如在上例中 number[0] 索引值為 0 時,表示位移量為 0,自然就是指第一個元素,而 number[9] 就是指相對於首個元素的位移量為 9。
<br>
若在宣告陣列時指定各個索引處的的值,可以不用宣告陣列元素大小,例如:
```cpp=
int number[] = {1, 2, 3};
double weight[] = {0.4, 3.2, 1.0, 4.2};
char ch[] = {'A', 'B'};
```
上面宣告中,number[] 的元素個數會是 3,weight[] 的個數會是 4,而 chs[] 的個數會是 2。
<br>
如果使用 const 或 constexpr 來修飾陣列,每個索引位置就成為唯讀。例如:
```cpp=
constexpr int number[] = {1, 2, 3};
number[1] = 10; // error: assignment of read-only location 'number[1]'
```
另外,陣列無法像vector直接複製,如:
```cpp=
int arr1[5];
int arr2[5];
...
arr1 = arr2;// 錯誤!不能直接指定陣列給另一個陣列
```
如果要複製陣列,只能一個一個元素複製,如:
```cpp=
constexpr int LENGTH = 5;
int arr1[LENGTH];
int arr2[LENGTH];
...
for(int i = 0; i < LENGTH; i++) {
arr1[i] = arr2[i];
}
```
同樣的,要比較兩個陣列是否相同的話,也是要一個一個元素比較。
<br>
# 二維(多維)陣列
一維陣列使用陣列名稱與一個索引值來指定存取陣列元素,二維陣列使用陣列名稱與兩個索引值來指定存取陣列元素,宣告方式與一維陣列類似:
```cpp=
int maze[5][10];
```
上面這個宣告會配置 5 * 10 = 50 個整數的記憶體空間給陣列來使用,二維陣列使用兩個索引值來指定存取陣列,這兩個索引值都是由 0 開始,下面這個程式簡單的示範二維陣列的存取:
```cpp=
#include <iostream>
using namespace std;
int main() {
constexpr int ROWS = 5;
constexpr int COLUMNS = 10;
int maze[ROWS][COLUMNS];
for(int row = 0; row < ROWS; row++) {
for(int i = 0; i < COLUMNS; i++) {
maze[row][i] = (row + 1) * (i+ 1);
}
}
for(int row = 0; row < ROWS; row++) {
for(int i = 0; i < COLUMNS; i++) {
cout << maze[row][i] << "\t";
}
cout << endl;
}
return 0;
}
輸出:
1 2 3 4 5 6 7 8 9 10
2 4 6 8 10 12 14 16 18 20
3 6 9 12 15 18 21 24 27 30
4 8 12 16 20 24 28 32 36 40
5 10 15 20 25 30 35 40 45 50
```
上面這個程式宣告了 5 列(Row)、10 行(Column)的陣列,第一個 [] 是用來指定存取哪一列,第二個 [] 是用來指定存取哪一行。
<br>
和一維陣列相同,可以在宣告二維陣列的同時指定二維陣列的值,例如:
```cpp=
int maze[2][3] = {
{1, 2, 3},
{4, 5, 6}
};
```
從上面這個程式來看,可以清楚地看出 maze[2][3] 中 2 與 3 的意義,maze[2] 表示 maze 有兩個元素,各是 {1, 2, 3} 與 {4, 5, 6},也就是說,這兩個元素是一維陣列,而長度是 3。
<br>
其實二維陣列存取時的行與列,只是為了便於理解陣列元素索引,索引值的意義,仍是指相對於陣列第一個元素的位移量。 例如,在一維陣列中的陣列配置與索引意義如下圖所示(若 int 長度為 4 個位元組):
<center>
<img src="https://codimd.mcl.math.ncu.edu.tw/uploads/upload_5ba2111cb8992bd71a39b8f6ce1b35fd.png">
</center><br>
對 int 陣列來說,每次位移量是 4 個位元組,指定存取 maze[4],相當於指定存取相對於 maze[0] 四個位移量的記憶體空間。
<br>
二維陣列在記憶體中也是線性配置,例如:
<center>
<img src="https://codimd.mcl.math.ncu.edu.tw/uploads/upload_8e0f9f50d15e8ff1bdd2342caae0983c.png">
</center><br>
在上面的例子中,二維陣列將得到的記憶體分為兩個區塊,宣告陣列 maze[2[4],表示 maze[0][0] 與 maze[1][0] 相對位移量為 4,存取 maze[1][3] 時,表示存取位置相對於 maze[1][0] 位移3個單位。
<br>
若宣告 maze[3][5] 的話,記憶體位置的指定是如何呢?在這個陣列中 5 的意義是 maze[0][0]、maze[1][0] 與 maze[2][0] 間都是 5 個位移量,如下圖所示:
<center>
<img src="https://codimd.mcl.math.ncu.edu.tw/uploads/upload_2fe6df6f8a2f317efe64db38bd10c871.png">
</center><br>
如果想要印出陣列中的元素,可以利用for迴圈,如下:
```cpp=
#include <iostream>
using namespace std;
int main() {
int maze[2][3] = {
{1, 2, 3},
{4, 5, 6}
};
for(int i = 0; i < 2; i++) {
for(int j = 0; j < 3; j++) {
cout << maze[i][j] << " ";
}
cout << endl;
}
system("pause");
return 0;
}
輸出:
1 2 3
4 5 6
```
<br>
# 指標
## 指標
+ **<span class="pink">& 取址運算子</span>**
> &n 是n的位置,位置採16進位
```cpp=
int n=10;
cout << &n << endl;
輸出:0x61febc(不一定一樣)
```
+ <span class="pink"><strong>* 指標</strong></span>
> 資料型態* 變數名
ex:
```cpp=
int *n
```
> 則n的型態為int*
> 此變數用來儲位置
```cpp=
int main() {
int n = 10;
int *p = &n ;
cout << "n 變數的位址:" << &n << endl
<< "p 儲存的位址:" << p << endl;
return 0;
}
輸出:
n 變數的位址:0x61feb8
p 儲存的位址:0x61feb8(不一定一樣)
```
+ <span class="pink"><strong>* 反參照運算子</strong></span>
> 你沒看錯,和指標的符號一模一樣!
> 可以使用提取運算子來拿指標儲存位置處的物件,ex:
```cpp=
int main() {
int n = 10;
int *p = &n;
cout << "指標 p 儲存的位址:" << p << endl
<< "提取 p 儲存位址處的物件:" << *p << endl;
return 0;
}
輸出:
指標 p 儲存的位址:0x61feb8(不一定一樣)
提取 p 儲存位址處的物件:10
```
+ 用 const 宣告的變數,必須使用對應的 const 型態指標才可以:
```cpp=
const int n = 10;
const int *p = &n;
```
+ 要留意的是,const int *p 宣告的 p 並不是常數,可以儲存不同的位址。例如:
```cpp=
#include <iostream>
using namespace std;
int main() {
const int n = 10;
const int m = 20;
const int *p = &n;
cout << p << endl;
p = &m;
cout << p << endl;
return 0;
}
輸出:
0x61feb8
0x61feb4(不一定一樣)
```
+ 如果想令指標儲存的值無法變動,必須建立指標常數,先來看看來源變數沒有 const 的情況:
```cpp=
int n = 10;
int m = 20;
int* const p = &n;
p = &m; // error: assignment of read-only variable 'p'
```
+ 如果 n、m 被 const 修飾,那麼就必須如下建立指標常數:
```cpp=
const int n = 10;
const int m = 20;
const int* const p = &n;
p = &m; // error: assignment of read-only variable 'p'
```
對於傳址進function是如何運作有疑問的人可以看看這個例子:
```cpp=
#include <bits/stdc++.h>
using namespace std;
void sw( int *a, int *b ) {
cout << "現在有一個變數在sw內,名字叫a,存的東西是:" << a << endl
<< "然後有一個變數在sw內,名字叫b,存的東西是:" << b << endl
<< endl;
int *x = a; //創了一個變數x,x存的東西要是一個位址,a現在存的東西是位址,所以可以給他
a = b; //把sw內,a存的位址改成b存的位址
b = x; //把sw內,b存的位址改成剛剛x存的位址
cout << "現在sw內,a裡面存的東西是:" << a << endl
<< "現在sw內,b裡面存的東西是:" << b << endl
<< endl;
cout << "實際上sw內a的記憶體位置是:" << &a << endl
<< "實際上sw內b的記憶體位置是:" << &b << endl
<< endl;
}
int main() {
int a = 10;
int b = 20;
cout << "現在在main裡面,經過sw前,a的位址是:" << &a << endl
<< "現在在main裡面,經過sw前,b的位址是:" << &b << endl
<< endl;
sw( &a, &b );
cout << "現在在main裡面,經過sw後,a的位址是:" << &a << endl
<< "現在在main裡面,經過sw後,b的位址是:" << &b << endl
<< endl;
system( "pause" );
return 0;
}
輸出:
現在在main裡面,經過sw前,a的位址是:0x61ff0c
現在在main裡面,經過sw前,b的位址是:0x61ff08
現在有一個變數在sw內,名字叫a,存的東西是:0x61ff0c
然後有一個變數在sw內,名字叫b,存的東西是:0x61ff08
現在sw內,a裡面存的東西是:0x61ff08
現在sw內,b裡面存的東西是:0x61ff0c
實際上sw內a的記憶體位置是:0x61fef0
實際上sw內b的記憶體位置是:0x61fef4
現在在main裡面,經過sw後,a的位址是:0x61ff0c
現在在main裡面,經過sw後,b的位址是:0x61ff08
```
可以看見在sw內仍會間接的產生一個變數來複製a與b的位置,但相較於值皆傳值進去,傳址的效率仍會快一些。
## 指標的運算
指標加法與減法與一般數值的加減不同,在指標運算上加 1 ,表示前進一個資料型態的記憶體長度,例如 int ,長度為 4 個位元組,在 int* 型態的指標上加 1,表示在位址上前進 4 個位元組的長度:
```cpp=
#include <iostream>
using namespace std;
int main() {
int *p = 0;
cout << "p 位址:" << p << endl
<< "p + 1:" << p + 1 << endl
<< "p + 2:" << p + 2 << endl;
return 0;
}
輸出:
p 位址:0
p + 1:0x4
p + 2:0x8
```
如果你不曉得某型態的記憶體空間時,可以使用sizeof()函式:
```cpp=
cout << sizeof(double);
輸出: 8
```
## 指標與陣列
在宣告陣列之後,使用到陣列變數時,會取得首元素的位址,例如在下面的程式中將指出,陣列 arr 與 &arr[0] 的值是相同的:
```cpp=
#include <iostream>
using namespace std;
int main() {
int arr[10] = {0};
cout << "arr:\t\t" << arr << endl
<< "&arr[0]:\t" << &arr[0] << endl;
return 0;
}
輸出:
arr: 0x61fe98
&arr[0]: 0x61fe98(不一定一樣)
```
陣列索引(index)其實是相對於首元素位址的位移量,下面這個程式以指標運算與陣列索引操作,顯示出相同的對應位址值:
```cpp=
#include <iostream>
using namespace std;
int main() {
constexpr int LENGTH = 10;
int arr[LENGTH] = {0};
int *p = arr;
for(int i = 0; i < LENGTH; i++) {
cout << "&arr[" << i << "]: " << &arr[i]
<< "\tp+" << i << ": " << p + i << endl;
}
return 0;
}
//每個元素的位址型態都是 int*
輸出:
&arr[0]: 0x61fe8c p+0: 0x61fe8c
&arr[1]: 0x61fe90 p+1: 0x61fe90
&arr[2]: 0x61fe94 p+2: 0x61fe94
&arr[3]: 0x61fe98 p+3: 0x61fe98
&arr[4]: 0x61fe9c p+4: 0x61fe9c
&arr[5]: 0x61fea0 p+5: 0x61fea0
&arr[6]: 0x61fea4 p+6: 0x61fea4
&arr[7]: 0x61fea8 p+7: 0x61fea8
&arr[8]: 0x61feac p+8: 0x61feac
&arr[9]: 0x61feb0 p+9: 0x61feb0(不一定一樣)
```
在上面這個程式中,將陣列的首元素位址指定給 p,然後對 p 遞增運算,每遞增一個單位,陣列相對應索引的元素之位址都相同。
也可以利用指標運算來取出陣列的元素值,如以下的程式所示:
```cpp=
#include <iostream>
using namespace std;
int main() {
constexpr int LENGTH = 5;
int arr[LENGTH] = {10, 20, 30, 40, 50};
int *p = arr;
// 以指標方式存取
for(int i = 0; i < LENGTH; i++) {
cout << "*(p + " << i << "): " << *(p + i) << endl;
}
cout << endl;
// 以指標方式存取資料
for(int i = 0; i < LENGTH; i++) {
cout << "*(arr + " << i << "): " << *(arr+i) << endl;
}
cout << endl;
return 0;
}
輸出:
*(p + 0): 10
*(p + 1): 20
*(p + 2): 30
*(p + 3): 40
*(p + 4): 50
*(arr + 0): 10
*(arr + 1): 20
*(arr + 2): 30
*(arr + 3): 40
*(arr + 4): 50
```
前面知道可以用sizeof來計算陣列長度,在認識指標及其運算後,我們現在知道,透過begin與end函式,也可以計算陣列長度:
```cpp=
#include <iostream>
using namespace std;
int main() {
constexpr int LENGTH = 5;
int arr[LENGTH] = {10, 20, 30, 40, 50};
cout << sizeof(arr)/sizeof(*arr) << endl; // 顯示 5
cout << end(arr) - begin(arr) << endl; // 顯示 5
return 0;
}
```
每個陣列元素的位址型態是 int*,這表示對它進行運算時,是以 int 長度為單位,而 arr 變數的位址處就是陣列資料的開端,因此 arr+1 就會是array裡面第二個元素。
而&arr是一個 **陣列的指標** ,型態會是 `int (*)[5]`,表示對它進行運算時,是以5個int的長度( `int *[Length]` )為單位,因此 &arr+1 會一次移動5個int的大小,也就是到達arr[5] (arr後的一格,因為arr只有5格),如果想宣告相對應的變數,可以如下:
```cpp=
int (*p)[LENGTH] = &arr;
```
則p是一個指標變數,指到arr的位置,p+1會一次移動整個arr的大小,因此,若我們想計算陣列長度,還可以有這樣的寫法:
```cpp=
constexpr int LENGTH = 5;
int arr[LENGTH] = {10, 20, 30, 40, 50};
int len = *(&arr + 1) - arr;
```
## 指標的指標
指標的指標,還是指標(廢話XD), 都是拿來儲存記憶體位址的,差別在於指標的型態,可以看看底下的範例:
```CPP=
#include <iostream>
using namespace std;
int main() {
int n = 10;
int *p1 = &n;
int **p2 = &p1;
cout << "n 位址:" << p1 << endl
<< "p1 位址:" << p2 << endl;
return 0;
}
輸出: n 位址:0x61feb8
p1 位址:0x61feb4
```
> n 儲存了 10,n 的位址 0x61feb8,指定給 p1 儲存,而 p1 的位址是 0x61feb4,指定給 p2 儲存。
n的型態是int,因此 &n 的型態為`int*` ,所以宣告p1時宣告的型態為int*,而 &p1 的型態則為`int**`, 因此宣告p2時宣告的型態為int**。
指標的指標好用的地方在於運算多維陣列扮演的作用,因為多維陣列是由陣列的陣列所組成的,實際上就是數段一維陣列所構成的,而若對變數取址後遞增1,則會位移一整個陣列空間。
<br>
在宣告二維陣列時,我們需要宣告每段一維陣列的長度為何:
```cpp=
int arr[2][3] = {{10, 20, 30}, {40, 50, 60}};
int (*p)[3] = arr;
```
同樣的,在宣告三維陣列時,我們需要宣告每段二為陣列的長度為何:
```cpp=
int arr[2][2][3] = { {{1, 2, 3},{4, 5, 6}} , {{7, 8, 9},{10, 11, 12}} };
int (*p)[2][3] = arr;
```
在使用時可以直接使用auto比較方便:
```cpp=
int arr1[2][3] = {{10, 20, 30}, {40, 50, 60}};
auto p1 = arr1;
int arr2[1][2][3] = {{{10, 20, 30}, {40, 50, 60}}};
auto p2 = arr2;
```
再利用前面談二維陣列時的例子,如果我們要印出一個二維陣列,也可以利用指標的方式來操作,如下:
```cpp=
#include <iostream>
using namespace std;
int main() {
int maze[2][3] = {
{1, 2, 3},
{4, 5, 6}
};
for(int (*it)[3] = begin(maze); it < end(maze); it++) {
int *row = *it;
for(int i = 0; i < 3; i++) {
cout << row[i] << "\t";
}
cout << endl;
}
return 0;
}
輸出:
1 2 3
4 5 6
```
## new 與 delete
到目前為止,變數建立後會配置記憶體空間,這些空間在函式執行過後就會被清除掉。 因此,如果我們要將函式的執行結果回傳,就不能直接回傳這類被自動配置空間的位址,而要自行配置或刪除記憶體空間,這時候就需要new和delete了。
舉例來說: `int *p = new int;` 會配置一個int型態大小的記憶體空間,而 new 會回傳這個空間的位址,並用p來儲存,這段程式只配置空間但不初始空間的值,如果要在配置空間後指定儲存值,可以這樣宣告: `int *p = new int(100);` ,如此一來,會將此空間中的儲存值設定為100
我們可以用下面這個程式來看看動態配置的使用:
```cpp=
#include <iostream>
using namespace std;
int main() {
int *p = new int(100);
cout << "空間位址:" << p << endl
<< "儲存的值:" << *p << endl;
*p = 200;
cout << "空間位址:" << p << endl
<< "儲存的值:" << *p << endl;
delete p;
return 0;
}
輸出:
空間位址:0x787a88
儲存的值:100
空間位址:0x787a88
儲存的值:200
```
另外,因為此空間是我們配置的,因此程式結束前不會自動刪除,我們需要自行使用delete來將空間刪除 ex: `delete [] p;`。若大量使用new但沒有適當使用delete( `delete [] p` )的話,會將記憶體空間用盡,或是導致記憶體空間碎片化。
若想配置連續個指定型態的空間,可以這樣宣告: `int *p = new int[1000];`,這段程式碼動態配置了1000個int大小的空間,並回傳空間的第一個位址,配置後的空間資料是未知的,**[ ]中指定的長度可以來自運算式,不必是編譯時期就得決定的值**,這個值必須自行儲存下來,因為沒有任何方式可以從p得知到底配置的長度是多少(p只儲存了位址)
如果要全部設定為型態的零值,可以這樣寫: `int *p = new int[3]()`
<br>
之前在談陣列時說過,陣列具有指標性質,因此上面的方式,會被用來克服陣列大小必須事先決定的問題,也就是可以用來動態地配置連續空間,並當成陣列來操作,例如底下是個簡單的示範:
```cpp=
#include <iostream>
using namespace std;
int main() {
int size = 0;
cout << "輸入長度:";
cin >> size;
int *arr = new int[size]{0};
cout << "指定元素:" << endl;
for(int i = 0; i < size; i++) {
cout << "arr[" << i << "] = ";
cin >> arr[i];
}
cout << "顯示元素值:" << endl;
for(int i = 0; i < size; i++) {
cout << "arr[" << i << "] = " << arr[i]
<< endl;
}
delete [] arr;
return 0;
}
輸出:
輸入長度:3
指定元素:
arr[0] = 10
arr[1] = 20
arr[2] = 30
顯示元素值:
arr[0] = 10
arr[1] = 20
arr[2] = 30
```
<br>
若要動態配置連續空間,並當成二維陣列來操作,就記得二維(或多維)陣列,就是以陣列的陣列來實作,二維陣列就是多段一維陣列,如果你的二維陣列有兩段一維陣列,那就是如下:
```cpp=
#include <iostream>
using namespace std;
int main() {
int **arr = new int*[2];
for(int i = 0; i < 2; i++) {
arr[i] = new int[3]{0};
}
for(int i = 0; i < 2; i++) {
for(int j = 0; j < 3; j++) {
cout << arr[i][j] << " ";
}
cout << endl;
}
for(int i = 0; i < 2; i++) {
delete [] arr[i];
}
delete [] arr;
return 0;
}
輸出:
0 0 0
0 0 0
```
既然可以動態配置,那每段一維陣列長度當然可以不一樣囉!
```cpp=
#include <iostream>
using namespace std;
int main() {
int **arr = new int*[2];
arr[0] = new int[3]{0};
arr[1] = new int[5]{0};
for(int i = 0; i < 3; i++) {
cout << arr[0][i] << " ";
}
cout << endl;
for(int i = 0; i < 5; i++) {
cout << arr[1][i] << " ";
}
cout << endl;
for(int i = 0; i < 2; i++) {
delete [] arr[i];
}
delete [] arr;
return 0;
}
輸出:
0 0 0
0 0 0 0 0
```
因為我這邊常常卡住XD 每次看到這個都要再重新想一遍,所以再貼一個範例上來,用來整理思緒:
```cpp=
int main() {
int **arr = new int *[2]();
arr[0] = new int[3]();
arr[1] = new int[3]();
for ( int i = 0; i < 3; ++i ) {
arr[0][i] = i + 1;
arr[1][i] = i + 4;
}
/*
arr[2][3] = {
{1,2,3},
{4,5,6}
}
*/
cout << "arr = " << arr << endl
<< "arr+1 = " << arr + 1 << endl
<< endl
<< "*arr = " << *arr << endl
<< "**arr = " << **arr << endl
<< endl
<< "*(arr+1) = " << *( arr + 1 ) << endl
<< "**(arr+1) = " << **( arr + 1 ) << endl
<< endl
<< "*arr+1 = " << *arr + 1 << endl
<< "*(*arr +1 ) = " << *( *arr + 1 ) << endl
<< endl;
for ( int i = 0; i < 2; i++ ) {
delete[] arr[i];
}
delete[] arr;
system( "pause" );
return 0;
}
輸出:
arr = 0xfd1910
arr+1 = 0xfd1914
*arr = 0xfd1930
**arr = 1
*(arr+1) = 0xfd1958
**(arr+1) = 4
*arr+1 = 0xfd1934
*(*arr +1 ) = 2
```
內部記憶體就會長這樣:
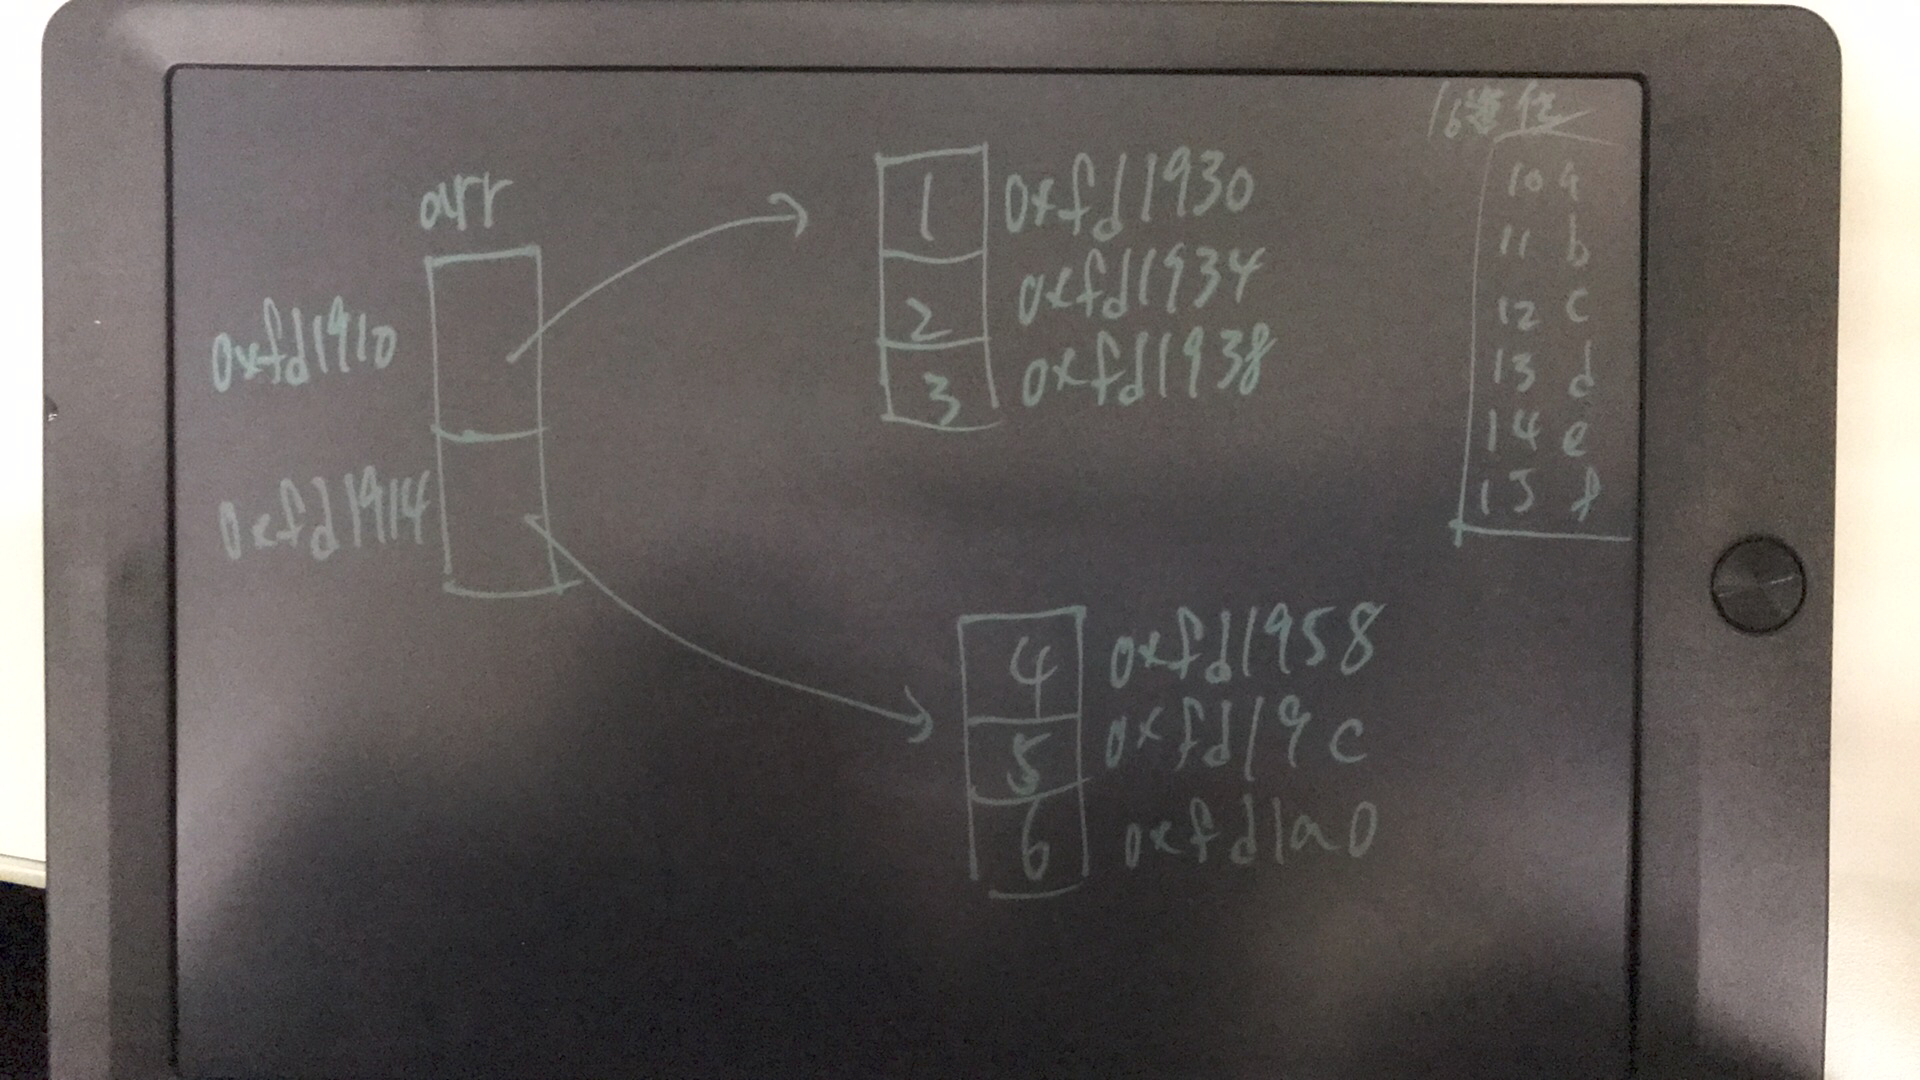
要注意,每個小空間是連續的,但大空間並不是連續的,因為她是動態配置的關係。
<br>
# 物件別名 (Reference 參考) (待補)
## Reference
Reference是物件的別名,你可以把他想成某個變數的綽號,對Reference進行的任何存取,都會對原物件進行操作。 在C++裡,物件不單只是指類別,而是指記憶體裡的一塊資料,換句話說,Reference類似pointer,但reference指到的是記憶體位址內的數值,pointer則是記憶體的位址。 另外,一個函式內不能有相同名稱的兩個Reference。
要定義Reference,是在型態關鍵字後加上&運算子,例如:
```cpp=
int n = 10; // 定義變數
int *p = &n; // 定義指標,儲存 n 的位址
int &r = n; // 定義參考,是 n 的別名
```
<br>
要注意的是,Reference後面必須要有指定的物件,否則無法通過編譯,如: `int &r;` 就會出錯。
對Reference的進行的任何存取,都會對原物件進行操作,如:
```cpp=
#include <iostream>
using namespace std;
int main() {
int n = 10;
int &r = n;
cout << "n:" << n << endl
<< "r:" << r << endl;
r = 20;
cout << "n:" << n << endl
<< "r:" << r << endl;
return 0;
}
輸出:
n:10
r:10
n:20
r:20
```
指標也可以使用Reference,例如:
```cpp=
int n = 10;
int *p = &n;
int *&r = p; // 也就是 int* &r = p, int* 是型態, r是指標p的Reference
```
陣列也可以,但需要指定長度,如:
```cpp=
int arr[] = {1, 2};
int (&r)[2] = arr;
```
<br>
既然陣列也可以使用,那麼再一次借用前面二維陣列的例子,我們也可以使用reference來幫助我們印出二維陣列,如下:
```cpp=
#include <iostream>
using namespace std;
int main() {
int maze[2][3] = {
{1, 2, 3},
{4, 5, 6}
};
for(int (*it)[3] = begin(maze); it < end(maze); it++) {
int (&row)[3] = *it; // 使用reference
for(auto offset = begin(row); offset < end(row); offset++) {
int n = *offset;
cout << n << "\t";
}
cout << endl;
}
return 0;
}
```
不過這樣寫有點複雜,可以再搭配 for range 的語法與 auto 進行簡化,如下:
```cpp=
#include <iostream>
using namespace std;
int main() {
int maze[2][3] = {
{1, 2, 3},
{4, 5, 6}
};
for(auto &row : maze) { // 使用reference
for(auto n : row) {
cout << n << "\t";
}
cout << endl;
}
return 0;
}
```
<br>
## Rvalue Reference
記憶體中臨時的資料,如常數,無法擁有Reference,如下:
```cpp=
int &r = 10; // error: cannot bind non-const lvalue reference of type 'int&' to an rvalue of type 'int'
```
若真的想要讓他擁有Reference,需要加上const,如下:
```cpp=
const int &r = 10;
```
這段在編譯時會被轉換為像是:
```cpp=
const int _n = 10;
const int &r = _n;
```
可以看見實際上 r 並不是真的為 10 的Reference,而是 10 被複製給 _n,然後 _n 的Reference為 r 。 如果不加上 const,那麼編譯器可能會以為變更了 r,就是變更了 10 位址處的值,因此就編譯器要求你一定得加上 const,不讓它可以被改動。
那為什麼常量會需要Reference呢? 這通常跟函式呼叫相關,這之後再來討論;類似地,以下會編譯失敗:
```cpp=
int a = 10;
int b = 20;
int &r = a + b; // error: cannot bind non-const lvalue reference of type 'int&' to an rvalue of type 'int'
```
這是因為 a + b 運算出的結果,會是在臨時的記憶體空間中,無法取址;類似地,若想通過編譯,必須加上 const:
```cpp=
int a = 10;
int b = 20;
const int &r = a + b;
```
但是!! 在 C++ 11 之後,像以上的運算式,可以直接使用Reference了:
```cpp=
int a = 10;
int b = 20;
int &&rr = a + b;
```
上面這個程式中,int&& 為 Rvalue Reference ,rr 是 a + b 運算結果的空間的Reference,相對於以下的程式來說比較有效率:
```cpp=
int a = 10;
int b = 20;
int rr = a + b; // 將 a + b 的結果複製給 rr
```
因為不必有將值複製、儲存至 rr 的動作,效率上比較好,特別是當運算式會產生龐大物件時,複製就會是個成本考量。
<br>
相對於 Rvalue Reference,int& 這類Reference就被稱為 Lvalue Reference;只不過,lvalue 或 rvalue 是什麼?剛剛編譯錯誤的訊息中,似乎也出現了 lvalue、rvalue 之類的字眼,這些是什麼?
lvalue、rvalue 是 C++ 對運算式(expression)的分類方式,一個粗略的判別方式,是看看 & 可否對運算式取址,若可以的話,運算式是 lvalue,否則是個 rvalue,換句話說就是:
>Lvalue: 有名稱的、在記憶體中有實際位置可供程序員加以存取物件。
>
>Rvalue: 沒有名稱的暫時物件,離開該敘述即被摧毀的物件, 以前面的舉例來說: 兩個 int 變數 a, b 相加的結果 (a+b) 就是 rvalue,因為這個結果:
>1. 他是沒有名稱的暫時物件
>2. 離開這行敘述後這物件就不見了,你再也沒有其他方法可以存取到它
<style>
.green {
color:#29E5A9;
}
.brown {
color:#990000;
}
.pink {
color:#DD9FBD;
}
.red {
color:#E71B18 ;
}
.blue {
color:#0b5394;
}
.purple {
color:#AC9FDD;
}
@-webkit-keyframes A
{
0% { color:#C10066;}
10% { color: #CC0000;}
20% { color: #E63F00; }
30% { color:#EE7700; }
40% { color: #DDAA00; }
50% { color:#EEEE00;}
60% { color: #99DD00;}
70% { color:#66DD00;}
80% { color: #00DDDD;}
90% { color: #0044BB;}
100% { color: #A500CC;}
}
#animation_title{
animation: A 3s ease 0s infinite alternate;
-webkit-animation: A 3s ease 0s infinite alternate;
}
</style>
<style>
a.redlink {
color:#DB1859;
}
a.redlink:link {
color:#DB1859;
text-decoration:none;
}
a.redlink:visiteid {
color:#DB1859;
text-decoration:none;
}
a.redlink:hover {
color:#19CABC;
text-decoration:none;
}
a.redlink:active {
color:#000000;
text-decoration:underline;
background:#FFFFFF;
}
</style>
<style type="text/css">
h1 {
font-size:;
color:#0b5394;
}
h2 {
font-size:;
color:#0b5394;
}
p {
font-size:;
color:;
}
h3 {
font-size: ;
color:#990000;
}
h4 {
font-size:;
color:#990000;
}
</style>
 Sign in with Wallet


