# <div id=animation_title>排序法與時間複雜度</div>
###### tags: `C++`
**<a href="https://hackmd.io/CSZ3EUqhSRa8AyDyBMq1Bw" class="redlink">點此回到 C++筆記 目錄 </a>**
## <span class="purple">時間複雜度 O</span>
> **1. 大 O 符號是用來描述一個演算法在輸入 n 個東西時,總執行次數與 n 的關係。**
> **2. 演算法有多快不是以秒衡量,而是以步驟次數**
> **3. 紀錄最高次方的那一項,並忽略其所有的係數**
## 常見的時間複雜度與演算法
### 1. O(1)
```cpp=
char arr[8] = {'a','b','c','d','e','f','g','h'};
```
假設我們已經知道這個陣列裡面全部的元素與順序,那當我們想找到"d"時,我們只要輸入n=3就可以找到它了
```cpp=
cin >> n;
cout << arr[n] << endl;
```
由上面的例子我們能發現,無論n輸入了多少,執行次數都是1次,因此時間複雜度為 O(1)
</br>
### 2. O(n)
這邊我們沿用上方的陣列
```cpp=
char arr[8] = {'a','b','c','d','e','f','g','h'};
```
假設我們現在只知道這個陣列裡面有abcdefgh,但不知道順序,那麼如果我們想找到"d",要怎麼辦呢?
最簡單的方法就是一個一個找(線性搜尋法),從第一個找到第八個,如果找到了就停止。
```cpp=
for(i=0 ; i < sizeof(arr)/sizeof(arr[0]) ; i++ ){
if(arr[i] == 'd') {
cout << i << endl;
break;
}
}
輸出: 3
```
我們可以發現在最糟的情況下,要搜尋的次數會等於的陣列長度(n),因此時間複雜度為 O(n)
<br>
### 3. O(logn) —— 二分搜尋法
假設今天我們要從1~99裡猜一個數字,除了上方的線性搜尋法,有沒有什麼更好的方法呢?
有的,這就是我們接下來要談的二分搜尋法。 同時,說到O(logn),最經典的例子便是它。
那麼什麼是二分搜尋法呢? 步驟如下:
1.檢查上界與下屆中間的數字i
2.如果大於目標,便把下界設為i。反之,如果小於目標,就把上界設為i
3.回到步驟一
<a href="https://medium.com/appworks-school/%E5%88%9D%E5%AD%B8%E8%80%85%E5%AD%B8%E6%BC%94%E7%AE%97%E6%B3%95-%E5%BE%9E%E6%99%82%E9%96%93%E8%A4%87%E9%9B%9C%E5%BA%A6%E8%AA%8D%E8%AD%98%E5%B8%B8%E8%A6%8B%E6%BC%94%E7%AE%97%E6%B3%95-%E4%B8%80-b46fece65ba5"><center><img src="https://codimd.mcl.math.ncu.edu.tw/uploads/upload_2a72ed5fed623c1a8d354cf52cd2e61b.png" width="600"></center></a>
我們可以把它寫得更清楚,如下
1. 決定好左邊界 L,右邊界 R
2. 取 M = (L+R)/2,作為中間的 index
3. 如果 array[M] == 要找的數,return M
4. 如果 array[M]>要找的數,表示 M~R 這一段數字都是不可能的,所以讓 R = M - 1
5. 如果 array[M]<要找的數,表示 L~M 這一段數字都是不可能的,所以讓 L = M + 1
6. 如果 R>=L,持續第 2 步,否則回傳 -1(代表找不到)
<a href="https://blog.techbridge.cc/2016/09/24/binary-search-introduction/"><center><img src="https://static.coderbridge.com/img/techbridge/images/huli/binary_search.gif"></center></a>
這邊的停止條件是「當L>R」的時候,就代表找不到了
因為 L 代表:最左邊的有可能的值。換句話說,假如有答案,一定在 >=L 的位置
R 代表的是:最右邊有可能的值,假如有答案,一定在 <=R 的位置
所以當L > R 的時候,>=L 跟 <=R 已經是空集合了,代表不可能有答案
首先我們先宣告變數並建一個陣列,如下
```cpp=
int n; //陣列大小(1~數字n)
int i; //迭代器
int target; //目標數(array[M] == target)
cout << "n =";
cin >> n;
int arr[n]={0};
int L = 0; //下界
int R = sizeof(arr)/sizeof(*arr)-1; //上界
int M; //猜target在第幾個
cout << "target= ";
cin >> target;
for(i=0; i < n; i++){
arr[i] = i+1;
}
```
現在我們有一個陣列了,假設我們輸入n=99,target=76,代表我們建了一個陣列,裡面有數字1~99,然後我們想要找到76在陣列中的index是多少 ( 陣列: [1, 2, 3, ... , 97, 98, 99] )
那麼現在要開始用二分演算法來找到76的index了,如下
```cpp=
while(R >= L) {
M = (int)(L + R)/2;
//cout << "L = " << L << endl << "R = " << R << endl << "M = " << M << endl << "arr[M] = " << arr[M] << endl << endl;
if(arr[M] > target) {
R = M-1;
}
else if(arr[M] < target) {
L = M+1;
}
else if(arr[M] == target) {
cout << M;
break;
}
}
輸入: n=99, target=76
輸出: 75
```
可以把註解打開,看看L M R是如何變化的。
經過一些數學運算,我們能發現執行的次數約為logn次 (n為陣列大小,也可以說是輸入的資料數),因此時間複雜度為 O(logn)
二分法還有些其他的狀況,有興趣可以到<a href="https://blog.techbridge.cc/2016/09/24/binary-search-introduction/">這裡</a>看看
<br>
### 4-1. O(n²) —— 選擇排序法(Selection Sort)
假設今天我們有一個未排序的數字陣列,那我們要將它由小排到大,可以怎麼做呢? 解決這個問題的方法就是我們接下來要討論的排序法。
第一種方法是選擇排序法,這個排序法非常簡單,簡單來說只有兩個步驟,如下
1. 從「尚未排序的數字」中找最小值
2. 把這個最小值丟到「未排序數字」的最左邊
不停地重複這兩個動作,直到沒有未排序的數字,這就是選擇排序法!
假設現在有一個未排序的陣列[41, 33, 17, 80, 61, 5, 55],那麼排序的情況會如下圖
<center><a href="https://medium.com/appworks-school/%E5%88%9D%E5%AD%B8%E8%80%85%E5%AD%B8%E6%BC%94%E7%AE%97%E6%B3%95-%E6%8E%92%E5%BA%8F%E6%B3%95%E5%85%A5%E9%96%80-%E9%81%B8%E6%93%87%E6%8E%92%E5%BA%8F%E8%88%87%E6%8F%92%E5%85%A5%E6%8E%92%E5%BA%8F%E6%B3%95-23d4bc7085ff"><img src="https://codimd.mcl.math.ncu.edu.tw/uploads/upload_70bca464eb96df6e2010fe04e618fbeb.png"></a></center><br>
首先我們先宣告變數並建一個陣列,如下
```cpp=
int i;
int j;
int min_index;
int a;
int arr[] = {41, 33, 17, 80, 61, 5, 55};
```
這樣我們就有一個未排序的陣列了,現在要開始用選擇排序法來排序,如下
```cpp=
for(i = 0; i < sizeof(arr)/sizeof(*arr); i++ ) {
min_index = i;
for(j = i+1; j < sizeof(arr)/sizeof(*arr) ; j++) {
if(arr[j] < arr[min_index]) {
min_index = j;
}
}
//cout << "arr[i] = " << arr[i] << " arr[min_index] = " << arr[min_index] << endl;
a = arr[i];
arr[i] = arr[min_index];
arr[min_index] = a;
//cout << "arr[i] = " << arr[i] << " arr[min_index] = " << arr[min_index] << endl;
//for(int i : arr ) {
// cout << i << " ";
//}
//cout << endl << endl;
}
for(int i : arr ) {
cout << i << " ";
}
輸出:5 17 33 41 55 61 80
```
一樣可以把註解打開,看看整個陣列是如何變化的
找最小值的動作會執行$\frac{n^2+n}{2}$次,而把最小值往前丟的動作會做n次,因此程式執行的次數為 $\frac{n²+3n}{2}$ 次 (n為陣列大小,也可以說是輸入的資料數),時間複雜度為 O(n²)
例題:
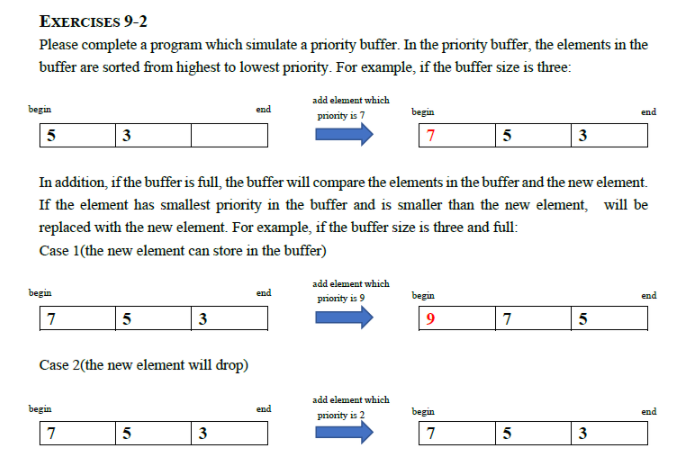
範例輸出:
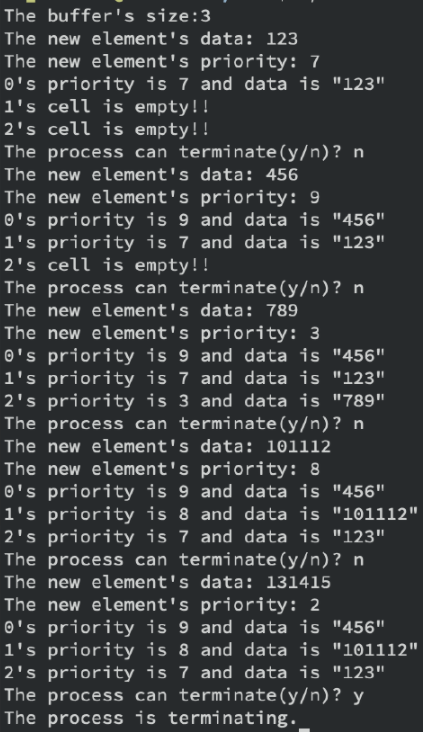
我的解答:
```cpp=
#include <iostream>
using namespace std;
void fSwap(int& p,int& q)
{
int r = p;
p = q;
q = r;
}
int main()
{
//建立初始陣列
//ex:size=3
//data=[-1 -1 -1 -1] 注意會有四格,最後一格拿來放輸入的值
char yon;
int size;
cout << "The buffer's size:" ;
cin >> size;
int data[size+1];
for(int i=0; i < size+1; i++) {
data[i]= -1;
}
int pri[size+1];
for(int i=0; i < size+1; i++) {
pri[i]= -1;
}
int counter = 0;
while(1) {
cout << "The new element's data: ";
cin >> data[sizeof(pri)/sizeof(*pri)-1];
cout << "The new element's priority: ";
cin >> pri[sizeof(pri)/sizeof(*pri)-1]; //輸入最後一格的值
for(int k = 0; k < sizeof(pri)/sizeof(*pri) ; k++) {
int max_index = k;
for(int j = k+1; j < sizeof(pri)/sizeof(*pri) ; j++) {
if(pri[j] > pri[max_index]) {
max_index = j;
}
}
fSwap(pri[max_index], pri[k]);
fSwap(data[max_index],data[k]);
}
for(int c=0; c < size; c++) {
if(pri[c] != -1)
cout << c << "'s priority is " << pri[c] << " and data is \"" << data[c] << "\"" << endl;
else
cout << c << "'s cell is empty!!\n";
}
cout << "The process can terminate(y/n)? ";
cin >> yon;
if(yon == 'y') {
cout<<"The process is terminating.\n";
break;
}
}
return 0;
}
```
<br>
### 4-2. O(n²) —— 插入排序法
第二種方法是插入排序法,這個排序法也是只有兩個步驟,如下
1. 從「尚未排序的數字」中讀一個數
2. 把讀取的數往前插入一個位置
我們繼續使用 [41, 33, 17, 80, 61, 5, 55] 這個陣列,排序的情況見下圖
<a href="https://medium.com/appworks-school/%E5%88%9D%E5%AD%B8%E8%80%85%E5%AD%B8%E6%BC%94%E7%AE%97%E6%B3%95-%E6%8E%92%E5%BA%8F%E6%B3%95%E5%85%A5%E9%96%80-%E9%81%B8%E6%93%87%E6%8E%92%E5%BA%8F%E8%88%87%E6%8F%92%E5%85%A5%E6%8E%92%E5%BA%8F%E6%B3%95-23d4bc7085ff"><center><img src="https://codimd.mcl.math.ncu.edu.tw/uploads/upload_40b71ff6ee843f25d01d29c6e8aea471.png"></center></a>
首先我們先宣告變數並建一個陣列,如下
```cpp=
int i;
int j;
int a;
int k;
int arr[] = {41, 33, 17, 80, 61, 5, 55};
```
這樣我們就有一個未排序的陣列了,現在要開始用插入排序法來排序,如下
```cpp=
for(i=1; i < sizeof(arr)/sizeof(*arr); i++) {
//cout << " i= " << i << endl;
k = i;
while( k > 0 && arr[k] < arr[k-1]) {
//cout << " k= " << k << " 符合條件 "<< endl;
a = arr[k];
arr[k] = arr[k-1];
arr[k-1] = a;
//cout << "a = " << a << " arr[k] = " << arr[k] << " arr[k-1] = " << arr[k-1] << endl;
k--;
//for(auto j:arr) {
// cout << j << " ";
//}
//cout << endl << endl;
}
}
for(auto j:arr) {
cout << j << " ";
}
cout << endl << endl;
return 0;
輸出:5 17 33 41 55 61 80
```
一樣可以把註解打開,看看整個陣列是如何變化的
「插入合適位置」需要 1+2+3+…+n 個步驟,而「讀一個數字」需要 n 個步驟,因此程式執行的次數為 $\frac{n²+3n}{2}$ 次 (n為陣列大小,也可以說是輸入的資料數),時間複雜度為 O(n²)
<br>
### 5-1. O(n logn) —— 快速排序法(Quick Sort)
第三種方法是快速排序法,這是一個很常使用的排序法,他是一種「把大問題分成小問題處理」的Divide and Conquer方法,
Quick Sort的步驟主要有兩步
+ 在數列中任意挑選一個數,稱為pivot,然後調整數列,使得「所有在pivot左邊的數,都比pivot還小」,而「在pivot右邊的數都比pivot大」。
+ 接著,將所有在pivot左邊的數視為「新的數列」,所有在pivot右邊的數視為「另一個新的數列」,「分別」重複上述步驟(選pivot、調整數列),直到分不出「新的數列」為止。
<center><br>
<img src="https://codimd.mcl.math.ncu.edu.tw/uploads/upload_02897ab90d8ce2c5dec817bd1180b08f.png">
</center>
<br>
以上圖為例,考慮數列{9、4、1、6、7、3、8、2、5},先任意選定5為pivot,接著調整數列,使得pivot左邊的數{4、1、3、2}皆小於5,而pivot右邊的數{9、8、6、7}皆大於5。
那我們該如何做到這件事?這時候就要介紹「調整數列」的方法了,俗稱Partition。
Partition的思路就是把數列「區分」成「小於pivot」與「大於pivot」兩半。
詳細步驟如下:
定義變數(variable)
<center><br>
<img src="https://codimd.mcl.math.ncu.edu.tw/uploads/upload_6bf64dceec5987470d8c6893fdaf12ed.png">
</center><br>
+ int pivot = array[end],以數列最後一個數做為pivot,pivot的「數值」可以是任意的,挑選矩陣的最後一個位置是為了方便index(j)的移動,也可以挑選任意位置。
+ int front為數列的「最前端」index。
+ int end為數列的「最尾端」index。
+ int j是讓pivot與其餘數值逐一比較的index,從front檢查到end-1(因為end是pivot自己)。
+ int i是一個旗子(檢查點),一開始設為-1,當發現了比pivot小的數值(arr[j])時,便將旗子往後插一格(i++),然後把arr[i]與arr[j]互換,當演算法要結束時,將arr[i]與pviot的互換,因此當演算法結束時,所有在index(i)左邊的數,都比pivot小,所有在index(i)右邊的數,都比pivot大。
可以參考下面的圖<br>
<center>
<img src="https://codimd.mcl.math.ncu.edu.tw/uploads/upload_985cd27cb0f88ef92951a3f3f8851b5c.png
">
</center><br>
最後,將pivot與arr[i]互換就完成了調整<br>
<center>
<img src="https://codimd.mcl.math.ncu.edu.tw/uploads/upload_9c361540f2c6fb08a779ea210f5fc300.png
">
</center><br>
接下來只要對「左數列」與「右數列」重複執行這些動作,就能完成整個數列的調整啦!
<center>
<img src="https://codimd.mcl.math.ncu.edu.tw/uploads/upload_72aa03d7b0ef5e0e6a253f81ac85021d.png
">
</center><br>
範例程式碼於下,我把i的初始值設為0了
```CPP=
#include <bits/stdc++.h>
using namespace std;
void Quicksort(int arr[], int front, int end);
int Partition(int arr[], int front, int end);
void swap(int *a, int *b);
int main() {
int arr[10] = {9, 8, 7, 6, 5, 4, 3, 2, 1, 0};
int front = 0;
int end = sizeof(arr) / sizeof(*arr)-1;
Quicksort(arr, front, end);
//印出被改變後的陣列
for(auto n : arr)
cout << n << " ";
system("pause");
return 0;
}
void Quicksort(int arr[], int front, int end) {
if (front < end){
int pivot = Partition(arr, front, end);
//排列每個左邊的陣列
Quicksort(arr, front, pivot-1);
//排列每個右邊的陣列
Quicksort(arr, pivot + 1, end);
}
}
int Partition(int arr[], int front, int end) {
//把pivot設在最後一個數
int pivot = arr[end];
//先把旗子插在第一格
int checkpoint = front;
//掃描
for (int i = front; i < end; i++) {
//如果找到了比pivot小的數就交換數值並插旗
if(arr[i] < pivot) {
swap(&arr[checkpoint], &arr[i]);
checkpoint++;
}
}
//最後要交換pivot和旗子位置的值
swap(&arr[checkpoint], &arr[end]);
return checkpoint; //回傳最後pivot的位置
}
void swap(int *a, int*b) {
int temp = *a;
*a = *b;
*b = temp;
}
```
<br>
### 5-2. O(n logn) —— 合併排序法(Merge Sort)
<br>
### 6. O(2$^n$) —— 費氏數列遞迴
<style>
.green {
color:#29E5A9;
}
.brown {
color:#990000;
}
.pink {
color:#DD9FBD;
}
.red {
color:#E71B18 ;
}
.blue {
color:#0b5394;
}
.purple {
color:#AC9FDD;
}
@-webkit-keyframes A
{
0% { color:#C10066;}
10% { color: #CC0000;}
20% { color: #E63F00; }
30% { color:#EE7700; }
40% { color: #DDAA00; }
50% { color:#EEEE00;}
60% { color: #99DD00;}
70% { color:#66DD00;}
80% { color: #00DDDD;}
90% { color: #0044BB;}
100% { color: #A500CC;}
}
#animation_title{
animation: A 3s ease 0s infinite alternate;
-webkit-animation: A 3s ease 0s infinite alternate;
}
</style>
<style>
a.redlink {
color:#DB1859;
}
a.redlink:link {
color:#DB1859;
text-decoration:none;
}
a.redlink:visiteid {
color:#DB1859;
text-decoration:none;
}
a.redlink:hover {
color:#19CABC;
text-decoration:none;
}
a.redlink:active {
color:#000000;
text-decoration:underline;
background:#FFFFFF;
}
</style>
<style type="text/css">
h1 {
font-size:;
color:#0b5394;
}
h2 {
font-size:;
color:#0b5394;
}
p {
font-size:;
color:;
}
h3 {
font-size: ;
color:#990000;
}
h4 {
font-size:;
color:#990000;
}
</style>
 Sign in with Wallet


