Victor Barberan
    • Create new note
    • Create a note from template
      • Sharing URL Link copied
      • /edit
      • View mode
        • Edit mode
        • View mode
        • Book mode
        • Slide mode
        Edit mode View mode Book mode Slide mode
      • Customize slides
      • Note Permission
      • Read
        • Only me
        • Signed-in users
        • Everyone
        Only me Signed-in users Everyone
      • Write
        • Only me
        • Signed-in users
        • Everyone
        Only me Signed-in users Everyone
      • Engagement control Commenting, Suggest edit, Emoji Reply
    • Invite by email
      Invitee

      This note has no invitees

    • Publish Note

      Share your work with the world Congratulations! 🎉 Your note is out in the world Publish Note

      Your note will be visible on your profile and discoverable by anyone.
      Your note is now live.
      This note is visible on your profile and discoverable online.
      Everyone on the web can find and read all notes of this public team.
      See published notes
      Unpublish note
      Please check the box to agree to the Community Guidelines.
      View profile
    • Commenting
      Permission
      Disabled Forbidden Owners Signed-in users Everyone
    • Enable
    • Permission
      • Forbidden
      • Owners
      • Signed-in users
      • Everyone
    • Suggest edit
      Permission
      Disabled Forbidden Owners Signed-in users Everyone
    • Enable
    • Permission
      • Forbidden
      • Owners
      • Signed-in users
    • Emoji Reply
    • Enable
    • Versions and GitHub Sync
    • Note settings
    • Note Insights
    • Engagement control
    • Transfer ownership
    • Delete this note
    • Save as template
    • Insert from template
    • Import from
      • Dropbox
      • Google Drive
      • Gist
      • Clipboard
    • Export to
      • Dropbox
      • Google Drive
      • Gist
    • Download
      • Markdown
      • HTML
      • Raw HTML
Menu Note settings Versions and GitHub Sync Note Insights Sharing URL Create Help
Create Create new note Create a note from template
Menu
Options
Engagement control Transfer ownership Delete this note
Import from
Dropbox Google Drive Gist Clipboard
Export to
Dropbox Google Drive Gist
Download
Markdown HTML Raw HTML
Back
Sharing URL Link copied
/edit
View mode
  • Edit mode
  • View mode
  • Book mode
  • Slide mode
Edit mode View mode Book mode Slide mode
Customize slides
Note Permission
Read
Only me
  • Only me
  • Signed-in users
  • Everyone
Only me Signed-in users Everyone
Write
Only me
  • Only me
  • Signed-in users
  • Everyone
Only me Signed-in users Everyone
Engagement control Commenting, Suggest edit, Emoji Reply
  • Invite by email
    Invitee

    This note has no invitees

  • Publish Note

    Share your work with the world Congratulations! 🎉 Your note is out in the world Publish Note

    Your note will be visible on your profile and discoverable by anyone.
    Your note is now live.
    This note is visible on your profile and discoverable online.
    Everyone on the web can find and read all notes of this public team.
    See published notes
    Unpublish note
    Please check the box to agree to the Community Guidelines.
    View profile
    Engagement control
    Commenting
    Permission
    Disabled Forbidden Owners Signed-in users Everyone
    Enable
    Permission
    • Forbidden
    • Owners
    • Signed-in users
    • Everyone
    Suggest edit
    Permission
    Disabled Forbidden Owners Signed-in users Everyone
    Enable
    Permission
    • Forbidden
    • Owners
    • Signed-in users
    Emoji Reply
    Enable
    Import from Dropbox Google Drive Gist Clipboard
       owned this note    owned this note      
    Published Linked with GitHub
    Subscribed
    • Any changes
      Be notified of any changes
    • Mention me
      Be notified of mention me
    • Unsubscribe
    Subscribe
    --- tags: fablab, esp32, mdef, fabacademy, fabricademy --- # ESP32 Feather [TOC] :::info A lot of the content in this document comes from the [Adafruit page](https://learn.adafruit.com/adafruit-huzzah32-esp32-feather) where you can find more details. ::: ## Specifications * 240 MHz dual core Tensilica LX6 microcontroller with 600 DMIPS * Integrated 520 KB SRAM * Integrated 802.11b/g/n HT40 Wi-Fi transceiver, baseband, stack and LWIP * Integrated dual mode Bluetooth (classic and BLE) * 4 MByte flash * On-board PCB antenna * Ultra-low noise analog amplifier * Hall sensor * 10x capacitive touch interface * 32 kHz crystal oscillator * 3 x UARTs (only two are configured by default in the Feather Arduino IDE support, one UART is used for bootloading/debug) * 3 x SPI (only one is configured by default in the Feather Arduino IDE support) * 2 x I2C (only one is configured by default in the Feather Arduino IDE support) * 12 x ADC input channels * 2 x I2S Audio * 2 x DAC * PWM/timer input/output available on every GPIO pin * OpenOCD debug interface with 32 kB TRAX buffer * SDIO main/secondary 50 MHz * SD-card interface support [Specifications](https://espressif.com/en/products/hardware/esp32/overview) from Espressif about the ESP32 microcontroller. ## Pinout ![](https://raw.githubusercontent.com/jango-fx/Adafruit-HUZZAH32-Feather-pinout/master/Adafruit-HUZZAH32-Feather-pinout.png) 
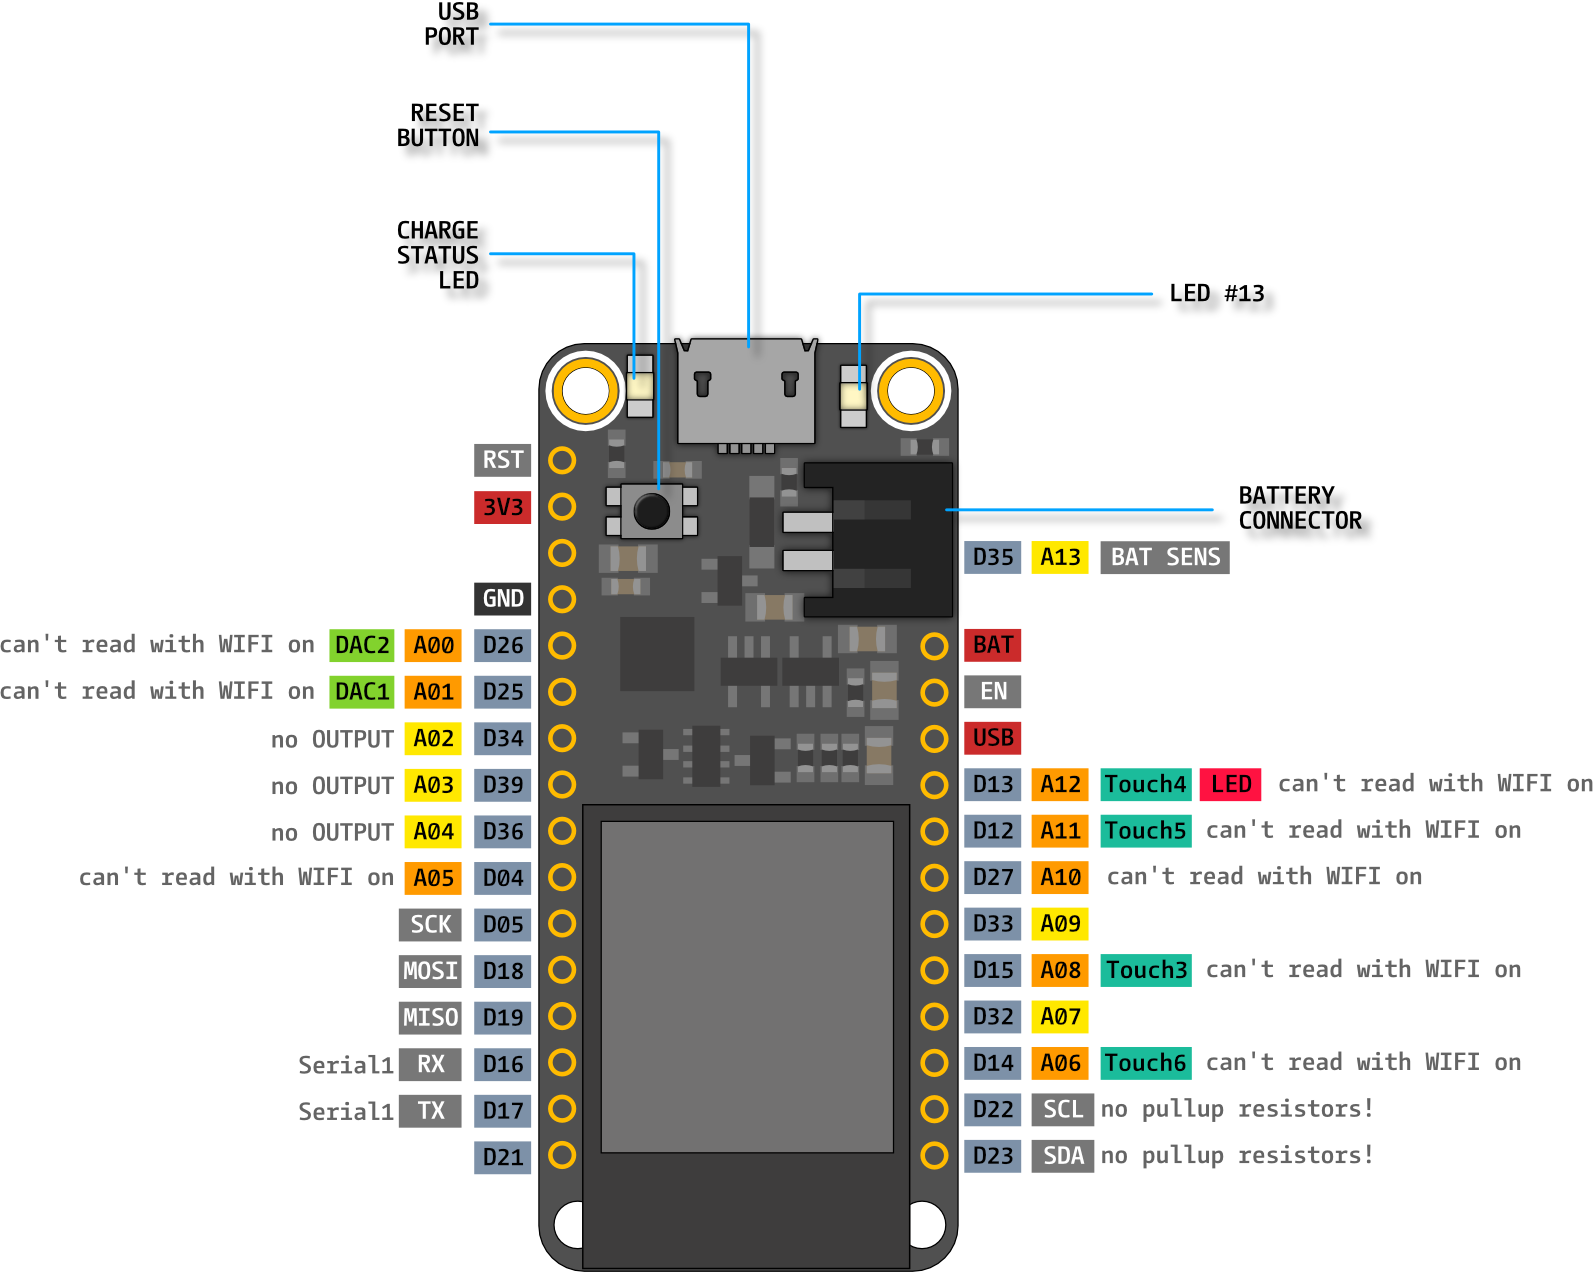
:::spoiler Click the arrow for **more images** [![](https://i.imgur.com/AVvORhx.png)](https://i.imgur.com/AVvORhx.png) ![](https://cdn-learn.adafruit.com/assets/assets/000/041/623/medium800/feather_pinouttop.jpg?1494445721) ![](https://cdn-learn.adafruit.com/assets/assets/000/041/624/medium800/feather_pinoutbot.jpg?1494445728) ::: ## Power You can power your board via USB cable, with a LiPo battery or with both. When the USB power is present, the feather will automatically switch over to USB for power, as well as start charging the battery (if attached). There's also a CHG LED next to the USB jack, which will light up while the battery is charging. This **LED might also flicker if the battery is not connected, it's normal.** To check your battery level you can read **half** of the battery voltage on pin A13. Don't forget to double the voltage you read, since there is a divider. You can find out more about what means the voltage you read [here](https://learn.adafruit.com/li-ion-and-lipoly-batteries/voltages). **Power related pins** **BAT** - This is the positive voltage to/from the JST jack for the optional Lipoly battery, its only powered when the battery is present! **USB** - this is the positive voltage to/from the micro USB jack if connected, is only powered when USB is connected! **3V** - this is the output from the 3.3V regulator. **The regulator can supply 500mA peak but half of that is drawn by the ESP32**, and it's a fairly power-hungry chip. So if you need a ton of power for stuff like LEDs, motors, etc. Use the USB or BAT pins, and an additional regulator ## Using Arduino IDE ![](https://www.arduino.cc/wiki/849deddaf8daab4ca3dd88761cc1c368/ArduinoAPP-01.svg =100x) ### Install Arduino IDE If you haven't yet go ahead and install the Arduino IDE, currently there are two main versions the **Legacy IDE (1.8.X)** and the **Arduino IDE 2.0.X**, in our experience (2022) on some situations v2 is less stable than the more tested v1. You can find both versions for diferent OS's on arduino [downloads](https://www.arduino.cc/en/software) page. ### Serial driver On Windows and Mac computers you need to install the SiLabs CP2104 Driver. You can download it from [here](http://www.silabs.com/products/development-tools/software/usb-to-uart-bridge-vcp-drivers). cThe driver comes in a _zip_ compressed file, be sure to extract it to a separated folder and install it as usual depending on you OS. You will need to reopen the Arduino IDE after driver installation. And in some situations a reboot can help! ### ESP32 board definitions To be able to program ESP32 microcontroller boards from Arduino IDE you need to install the [Arduino core](https://github.com/espressif/arduino-esp32#using-through-arduino-ide) for ESP32. I you want to know more about it you can check their [documentation](https://docs.espressif.com/projects/arduino-esp32/en/latest/getting_started.html). First open Arduino and go to _File → Preferences_, copy the link under this text and paste it in the _Additional Boards Manager URLs_ input frame: ~~~ https://raw.githubusercontent.com/espressif/arduino-esp32/gh-pages/package_esp32_index.json ~~~ :::spoiler Version 2.0.X image ![](https://i.imgur.com/VEcu23v.png) ::: ![](https://i.imgur.com/qkvE3nl.png) Click _OK_ and go to _Tools → Boards → Boards Manager_ search for _esp32_ core and click install. :::spoiler Version 2.0.X image ![](https://i.imgur.com/wCwYULL.png) ::: ![](https://i.imgur.com/T7PxxZd.png) ### Testing the board :::danger Describe blink upload process with screenshots fort selecting port and board. ::: ## Input/Output All the GPIO pins (marked with DXX on the pinout) can be used as an input or output using digitalWrite and digitalRead functions. ### [DigitalWrite](https://www.arduino.cc/reference/en/language/functions/digital-io/digitalwrite/) ```=arduino void setup() { pinMode(BUILTIN_LED, OUTPUT); // Initialize the BUILTIN_LED pin as an output } // the loop function runs over and over again forever void loop() { digitalWrite(BUILTIN_LED, LOW); // Turn the LED on delay(1000); // Wait for a second digitalWrite(BUILTIN_LED, HIGH); // Turn the LED off delay(2000); // Wait for two seconds (to demonstrate the active low LED) } ``` ### [DigitalRead](https://www.arduino.cc/reference/en/language/functions/digital-io/digitalread/) ```=arduino // You can try a digital input with // a push button connected to pin D21 and ground (GND) int pushButton = D21; // the setup routine runs once when you press reset: void setup() { // initialize serial communication Serial.begin(115200); // make the pushbutton's pin an input and activate the internal pullup resistor: pinMode(pushButton, INPUT_PULLUP); } // the loop routine runs over and over again forever: void loop() { // read the input pin: int buttonState = digitalRead(pushButton); // print out the state of the button: Serial.println(buttonState); delay(1); // delay in between reads for stability } ``` ### [AnalogRead](https://www.arduino.cc/reference/en/language/functions/analog-io/analogread/) All the pins named AX (from A0 to A13) can be used as analog inputs, you can try reading your battery voltage, wich is an indicator on battery charge, reading the pin A13 (with the battery connected) ```=arduino // the setup routine runs once when you press reset: void setup() { // initialize serial communication at 115200 bits per second: Serial.begin(115200); } // the loop routine runs over and over again forever: void loop() { // read the input on analog pin A13: int sensorValue = analogRead(A13); // print out the value you read: Serial.println(sensorValue); delay(1); // delay in between reads for stability } ``` ### [AnalogWrite](https://www.arduino.cc/reference/en/language/functions/analog-io/analogwrite/) Analog values as outputs can be achieved usin [PWM](https://en.wikipedia.org/wiki/Pulse-width_modulation) with the analogWrite() function. ```clike int led = LED_BUILTIN; // the PWM pin the LED is attached to int brightness = 0; // how bright the LED is int fadeAmount = 5; // how many points to fade the LED by // the setup routine runs once when you press reset: void setup() { // declare pin to be an output: pinMode(led, OUTPUT); } // the loop routine runs over and over again forever: void loop() { // set the brightness: analogWrite(led, brightness); // change the brightness for next time through the loop: brightness = brightness + fadeAmount; // reverse the direction of the fading at the ends of the fade: if (brightness <= 0 || brightness >= 255) { fadeAmount = -fadeAmount; } // wait for 30 milliseconds to see the dimming effect delay(30); } ``` ## [WiFi](http://www.arduino.cc/en/Reference/WiFi) With this simple example we can try connecting to a WiFi network: ```clike #include <Arduino.h> #include <WiFi.h> void setup() { Serial.begin(115200); WiFi.begin("ssid", "password"); while (WiFi.status() != WL_CONNECTED) { Serial.println("Wifi connecting..."); delay(500); } Serial.println("Wifi connected"); Serial.print("IP Address: "); Serial.println(WiFi.localIP()); } void loop() { // put your main code here, to run repeatedly: } ``` ## Library installation Installing llibraries is done through the _Arduino library manager_ (_Sketch → Include Library → Manage libraries._) :::spoiler Version 2.0.X image ![](https://i.imgur.com/EvPEZii.png) ::: ![](https://i.imgur.com/IoeLv8N.png) ___ :::info **References** Arduino [Built-in Examples](https://docs.arduino.cc/built-in-examples/) documentation Arduino [Language Reference](https://www.arduino.cc/reference/en/) Adafruit HUZZAH32 - ESP32 Feather [Page](https://learn.adafruit.com/adafruit-huzzah32-esp32-feather/overview) Arduino [Libraries Documentation](https://www.arduino.cc/reference/en/libraries/) :::

    Import from clipboard

    Paste your markdown or webpage here...

    Advanced permission required

    Your current role can only read. Ask the system administrator to acquire write and comment permission.

    This team is disabled

    Sorry, this team is disabled. You can't edit this note.

    This note is locked

    Sorry, only owner can edit this note.

    Reach the limit

    Sorry, you've reached the max length this note can be.
    Please reduce the content or divide it to more notes, thank you!

    Import from Gist

    Import from Snippet

    or

    Export to Snippet

    Are you sure?

    Do you really want to delete this note?
    All users will lose their connection.

    Create a note from template

    Create a note from template

    Oops...
    This template has been removed or transferred.
    Upgrade
    All
    • All
    • Team
    No template.

    Create a template

    Upgrade

    Delete template

    Do you really want to delete this template?
    Turn this template into a regular note and keep its content, versions, and comments.

    This page need refresh

    You have an incompatible client version.
    Refresh to update.
    New version available!
    See releases notes here
    Refresh to enjoy new features.
    Your user state has changed.
    Refresh to load new user state.

    Sign in

    Forgot password

    or

    By clicking below, you agree to our terms of service.

    Sign in via Facebook Sign in via Twitter Sign in via GitHub Sign in via Dropbox Sign in with Wallet
    Wallet ( )
    Connect another wallet

    New to HackMD? Sign up

    Help

    • English
    • 中文
    • Français
    • Deutsch
    • 日本語
    • Español
    • Català
    • Ελληνικά
    • Português
    • italiano
    • Türkçe
    • Русский
    • Nederlands
    • hrvatski jezik
    • język polski
    • Українська
    • हिन्दी
    • svenska
    • Esperanto
    • dansk

    Documents

    Help & Tutorial

    How to use Book mode

    Slide Example

    API Docs

    Edit in VSCode

    Install browser extension

    Contacts

    Feedback

    Discord

    Send us email

    Resources

    Releases

    Pricing

    Blog

    Policy

    Terms

    Privacy

    Cheatsheet

    Syntax Example Reference
    # Header Header 基本排版
    - Unordered List
    • Unordered List
    1. Ordered List
    1. Ordered List
    - [ ] Todo List
    • Todo List
    > Blockquote
    Blockquote
    **Bold font** Bold font
    *Italics font* Italics font
    ~~Strikethrough~~ Strikethrough
    19^th^ 19th
    H~2~O H2O
    ++Inserted text++ Inserted text
    ==Marked text== Marked text
    [link text](https:// "title") Link
    ![image alt](https:// "title") Image
    `Code` Code 在筆記中貼入程式碼
    ```javascript
    var i = 0;
    ```
    var i = 0;
    :smile: :smile: Emoji list
    {%youtube youtube_id %} Externals
    $L^aT_eX$ LaTeX
    :::info
    This is a alert area.
    :::

    This is a alert area.

    Versions and GitHub Sync
    Get Full History Access

    • Edit version name
    • Delete

    revision author avatar     named on  

    More Less

    Note content is identical to the latest version.
    Compare
      Choose a version
      No search result
      Version not found
    Sign in to link this note to GitHub
    Learn more
    This note is not linked with GitHub
     

    Feedback

    Submission failed, please try again

    Thanks for your support.

    On a scale of 0-10, how likely is it that you would recommend HackMD to your friends, family or business associates?

    Please give us some advice and help us improve HackMD.


    Thanks for your feedback

    Remove version name

    Do you want to remove this version name and description?

    Transfer ownership

    Transfer to
      Warning: is a public team. If you transfer note to this team, everyone on the web can find and read this note.

        Link with GitHub

        Please authorize HackMD on GitHub
        • Please sign in to GitHub and install the HackMD app on your GitHub repo.
        • HackMD links with GitHub through a GitHub App. You can choose which repo to install our App.
        Learn more  Sign in to GitHub

        Push the note to GitHub Push to GitHub Pull a file from GitHub

          Authorize again
         

        Choose which file to push to

        Select repo
        Refresh Authorize more repos
        Select branch
        Select file
        Select branch
        Choose version(s) to push
        • Save a new version and push
        • Choose from existing versions
        Include title and tags
        Available push count

        Pull from GitHub

         
        File from GitHub
        File from HackMD

        GitHub Link Settings

        File linked

        Linked by
        File path
        Last synced branch
        Available push count

        Danger Zone

        Unlink
        You will no longer receive notification when GitHub file changes after unlink.

        Syncing

        Push failed

        Push successfully