# NVIDIA Sionna
## Installation Steps
Sionna requires [Python](https://www.python.org/) and [Tensorflow](https://www.tensorflow.org/).
In order to run the tutorial notebooks on your machine, you also need [JupyterLab](https://jupyter.org/).
You can alternatively test them on [Google Colab](https://colab.research.google.com/).
Although not necessary, we recommend running Sionna in a [Docker container](https://www.docker.com).
Sionna requires [TensorFlow 2.10-2.15](https://www.tensorflow.org/install) and Python 3.8-3.11. We recommend Ubuntu 22.04. Earlier versions of TensorFlow may still work but are not recommended because of known, unpatched CVEs.
To run the ray tracer on CPU, [LLVM](https://llvm.org) is required by DrJit. Please check the [installation instructions for the LLVM backend](https://drjit.readthedocs.io/en/latest/firststeps-py.html#llvm-backend).
We refer to the [TensorFlow GPU support tutorial](https://www.tensorflow.org/install/gpu) for GPU support and the required driver setup.
### NVIDIA Container Toolkit
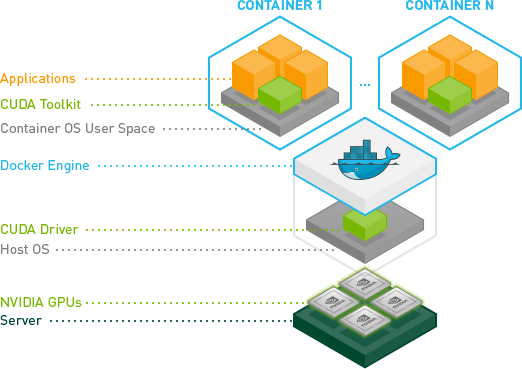
The NVIDIA Container Toolkit enables users to build and run GPU-accelerated containers. The toolkit includes a container runtime library and utilities to automatically configure containers to leverage NVIDIA GPUs.
1. Configure the production repository:
```bash
curl -fsSL https://nvidia.github.io/libnvidia-container/gpgkey | sudo gpg --dearmor -o /usr/share/keyrings/nvidia-container-toolkit-keyring.gpg \
&& curl -s -L https://nvidia.github.io/libnvidia-container/stable/deb/nvidia-container-toolkit.list | \
sed 's#deb https://#deb [signed-by=/usr/share/keyrings/nvidia-container-toolkit-keyring.gpg] https://#g' | \
sudo tee /etc/apt/sources.list.d/nvidia-container-toolkit.list
```
Optionally, configure the repository to use experimental packages:
```bash
sed -i -e '/experimental/ s/^#//g' /etc/apt/sources.list.d/nvidia-container-toolkit.list
```
2. Update the packages list from the repository:
```bash
sudo apt-get update
```
3. Install the NVIDIA Container Toolkit packages:
```bash
sudo apt-get install -y nvidia-container-toolkit
```
### Docker-based installation
1. Install Docker Engine
- Set up Docker's apt repository
```bash
# Add Docker's official GPG key:
sudo apt-get update
sudo apt-get install ca-certificates curl
sudo install -m 0755 -d /etc/apt/keyrings
sudo curl -fsSL https://download.docker.com/linux/ubuntu/gpg -o /etc/apt/keyrings/docker.asc
sudo chmod a+r /etc/apt/keyrings/docker.asc
# Add the repository to Apt sources:
echo \
"deb [arch=$(dpkg --print-architecture) signed-by=/etc/apt/keyrings/docker.asc] https://download.docker.com/linux/ubuntu \
$(. /etc/os-release && echo "$VERSION_CODENAME") stable" | \
sudo tee /etc/apt/sources.list.d/docker.list > /dev/null
sudo apt-get update
```
- Install the Docker packages
```bash
sudo apt-get install docker-ce docker-ce-cli containerd.io docker-buildx-plugin docker-compose-plugin
```
- Post install to run without sudo
```bash
sudo groupadd docker
```
```bash
sudo usermod -aG docker $USER
```
```bash
newgrp docker
```
```bash
docker run hello-world
```
2. Configure the container runtime by using the `nvidia-ctk` command:
```bash
sudo nvidia-ctk runtime configure --runtime=docker
```
The `nvidia-ctk` command modifies the `/etc/docker/daemon.json` file on the host. The file is updated so that Docker can use the NVIDIA Container Runtime.
2. Restart the Docker daemon:
```bash
sudo systemctl restart docker
```
2. Build the Sionna Docker image. From within the Sionna directory, run
```bash
make docker
```
3. Run the Docker image with GPU support
```
make run-docker gpus=all
```
or without GPU:
```
make run-docker
```
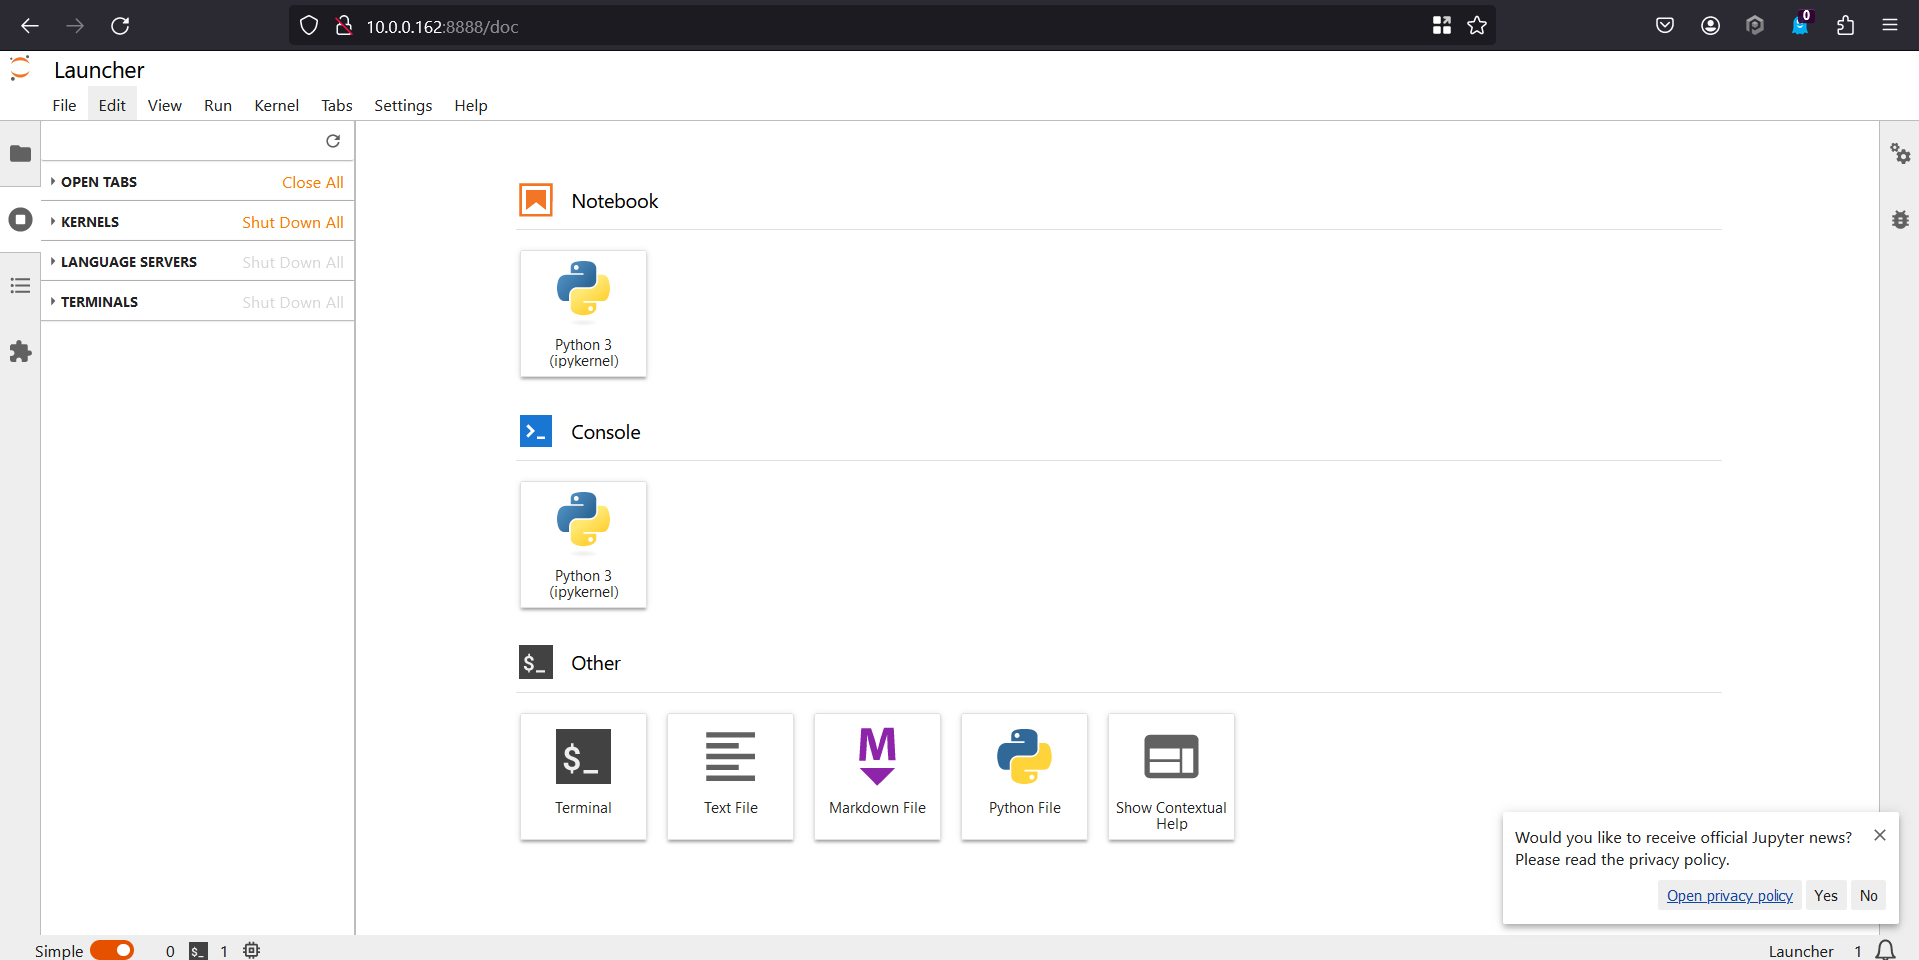
This will immediately launch a Docker image with Sionna installed, running JupyterLab on port 8888.
4. Browse through the example notebooks by connecting to [http://10.0.0.162:8888/lab](http://127.0.0.1:8888) in your browser.
### Diagram Constellation - Hello World
1. Import Sionna:
```python=
import os
gpu_num = 0 # Use "" to use the CPU
os.environ["CUDA_VISIBLE_DEVICES"] = f"{gpu_num}"
os.environ['TF_CPP_MIN_LOG_LEVEL'] = '3'
# Import Sionna
try:
import sionna
except ImportError as e:
# Install Sionna if package is not already installed
import os
os.system("pip install sionna")
import sionna
# IPython "magic function" for inline plots
%matplotlib inline
import matplotlib.pyplot as plt
```
2. Let us first create a BinarySource to generate a random batch of bit vectors that we can map to constellation symbols:
```python=
batch_size = 1000 # Number of symbols we want to generate
num_bits_per_symbol = 4 # 16-QAM has four bits per symbol
binary_source = sionna.utils.BinarySource()
b = binary_source([batch_size, num_bits_per_symbol])
b
```
3. Next, let us create a Constellation and visualize it:
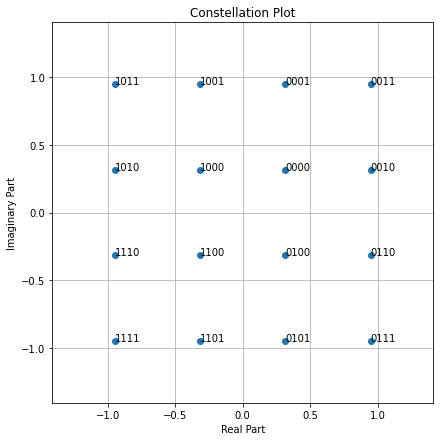
```python=
constellation = sionna.mapping.Constellation("qam", num_bits_per_symbol)
constellation.show();
```
3. We now need a Mapper that maps each row of b to the constellation symbols according to the bit labeling shown above.
```python=
mapper = sionna.mapping.Mapper(constellation=constellation)
x = mapper(b)
x[:10]
```
3. Let us now make things a bit more interesting a send our symbols over and AWGN channel:
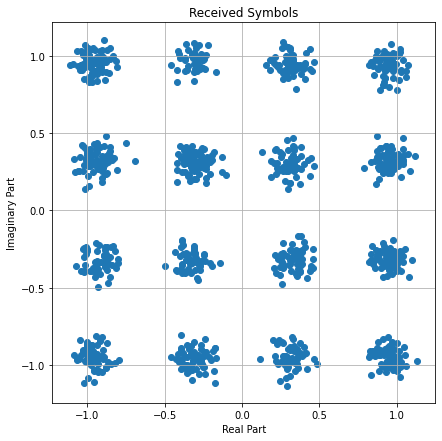
```python=
awgn = sionna.channel.AWGN()
ebno_db = 15 # Desired Eb/No in dB
no = sionna.utils.ebnodb2no(ebno_db, num_bits_per_symbol, coderate=1)
y = awgn([x, no])
# Visualize the received signal
import matplotlib.pyplot as plt
import numpy as np
fig = plt.figure(figsize=(7,7))
ax = fig.add_subplot(111)
plt.scatter(np.real(y), np.imag(y));
ax.set_aspect("equal", adjustable="box")
plt.xlabel("Real Part")
plt.ylabel("Imaginary Part")
plt.grid(True, which="both", axis="both")
plt.title("Received Symbols");
```
## Sionna - Basic Operation
### Getting Started with Sionna
### Differentiable Communication Systems
### Advanced Link-level Simulations
### Toward Learned Receivers
### Basic MIMO Simulations
### Pulse-shaping Basics
### Optical Channel with Lumped Amplification
## Ray Tracing
### Introduction to Sionna RT
### Tutorial on Diffraction
### Tutorial on Scattering
##