---
tags: main, gsoc
---
<!--{%hackmd hackmd-dark-theme %}-->
# Google Summer Of Code 2022 experience at VideoLAN
:::success
- It's been a while since I wrote a blog post! (2 year since [Fast Convolutional Neural Network with Numpy](https://hackmd.io/@machine-learning/blog-post-cnnumpy-fast) and [Automatic differentiation engine](https://hackmd.io/@machine-learning/blog-post-yaae) !)
- Today will be a bit different as I will describe my journey and work during the 2022 edition of the Google Summer Of Code under the supervision of [**Alexandre Janniaux (unidan)**](https://github.com/alexandre-janniaux) and [**Jean-Baptiste Kempf (j-b)**](https://fr.wikipedia.org/wiki/Jean-Baptiste_Kempf) from the [VLC team](https://www.videolan.org/index.fr.html) and [**Pierre-Loup Cabarat**](https://www.researchgate.net/profile/Pierre-Loup-Cabarat) from [INSA Rennes](https://www.insa-rennes.fr/graduate-school-of-engineering.html).
- **Readers will learn about performance in general, my process of learning new (mostly low-level) materials and software engineering tricks that can be useful in everyday development. I will also dive into the technical coding details I did for this Google Summer Of Code.**
:::
> - Shoutout to [**Tsiry Mayet (Maugrim)**](https://www.linkedin.com/in/tsiry-mayet/?originalSubdomain=fr) for taking the time to read my blog post and give meaningful feedbacks. (even though it isn't his field of expertise !)
# I/ Learning the materials
## `Film grain application & synthesis`
- My work focuses on Versatile Video Coding (VVC), a next generation video compression codec, for which I will write SIMD code in C (using intrinsics) and in x86-64 assembly for optimization purposes.
- More precisely, I worked on the application and the synthesis of film grain.
- To better understand what it means, let's briefly explain the process of a video codec.
- A video codec is composed of two parts: an encoder and a decoder.
- Compressing a video file involves passing the input video to the encoder, which will change the representation of your video so that it is easier for your decoder to reconstruct it at a lower spatial cost (which usually reduces the file size while trying to maintain the best quality).
- If one wants to compress a video with film grain (like old school tv style) such as the following: {%youtube IBKj-P_ePfo %}
Then, recent video codecs (i.e: AV1, VVC) will automatically remove the grain, encode, and generate it back at decoding stage to save up bandwidth. As an example, [Netflix saves around 30% of the data during transmission by doing so](http://www.pixelsham.com/2022/07/23/netflix-removes-movie-noise-saves-30-bandwidth-and-adds-it-back-again/).
- Film grain accounts for a small part in a video codec. Therefore, it was easier for me to get started into the project. Otherwise, it would be almost impossible without proper video coding expertise. All the logic happened in the file [`pp_film_grain.c`](https://github.com/OpenVVC/OpenVVC/blob/master/libovvc/pp_film_grain.c).
## `x86-64`
- Here comes the challenging part. To complete this GSOC, I needed to learn just enough (let's say 60%) to start coding.
- I am quite satisfied with the knowledge I have gained, so here are some tips on how to proceed:
- ==**Invest time in dev tooling**==: You must be comfortable using your debugger. In my case, I used [GDB](https://www.sourceware.org/gdb/) augmented with [gdb-dashboard](https://github.com/cyrus-and/gdb-dashboard) plus some customs commands for automation, all this to make debugging less painful. Here is an example of how it looks:
- <p><a href="https://raw.githubusercontent.com/3outeille/gsoc_2022_vlc/master/assets/gdb.jpg"> <div style="text-align: center"><img src="https://raw.githubusercontent.com/3outeille/gsoc_2022_vlc/master/assets/gdb.jpg" width="100%"></div></a></p>
- ==**Write snippet/gist of code**==: I can't stress this enough, nothing beats practice especially if you are a more hands-on learner like me. One thing I did and that helped me a lot was to code a little snippet, let's say `dot_product`, pass it to [godbolt](https://godbolt.org/z/qa3bKbMc1) and analyzes the generated assembly code. Since it is a valid code, you can step through the code using your favorite debugger and try to understand what each line means.
- <p><a href="https://raw.githubusercontent.com/3outeille/gsoc_2022_vlc/master/assets/godbolt.png"> <div style="text-align: center"><img src="https://raw.githubusercontent.com/3outeille/gsoc_2022_vlc/master/assets/godbolt.png" width="100%"></div></a></p>
> left: C code / middle: x86-64 code / right: SIMD x86-64 code
- ==**Keep a tab open for the reference manual**==: Coding in assembly is challenging because you have complete control over your machine. With great power comes great responsability, that is why you need to respect the conventions defined in the [x86-64 System V Application Binary Interface](https://refspecs.linuxbase.org/elf/x86_64-abi-0.99.pdf) in order for your code to run smoothly.
- ==**Don't be afraid to ask for help**==: big shoutout to [Peter Cordes](https://stackoverflow.com/users/224132/peter-cordes) for his investment in the [x86 StackOverflow](https://stackoverflow.com/questions/tagged/x86).
## `SIMD intrinsics`
- Part of my work will consist of writing code using **SIMD intrinsics**.
> - Here are valuable ressources to learn SIMD intrinsics:
> - [Intel intrinsic guide](https://www.intel.com/content/www/us/en/docs/intrinsics-guide/index.html#ig_expand=2327,4363,6942,4363,4294,6121,6872,6828,6872,6848&techs=SSE,SSE2,SSE3,SSSE3,SSE4_1,SSE4_2&cats=Store)
> - [x86 Intrinsics Cheat Sheet](https://db.in.tum.de/~finis/x86-intrin-cheatsheet-v2.1.pdf)
> - Please refer to `x86-64` part for the learning process.
- Let's explain briefly what are SIMD intrinsics:
- **SIMD** stands for *Single instruction Multiple Data*. Instead of working with a single scalar value, you will work with multiple data at the same time and perform the same operation on them in parallel, yielding a proportional increase in performance. The most low-level way to use SIMD is to use the assembly vector instructions directly.
- Instead, we will use **intrinsics** which are mapping to these assembly vector instructions but in C-style way, available in modern C/C++ compilers.
- Most **SIMD intrinsics** follow a naming convention similar to `_mm[size]_<action>_<type>`.
> In example, `_mm_add_epi16` will "add two 128-bit vectors of 16-bit extended packed integers (short type)".
- Your CPU is capable of doing so because it supports an extension to the x86 instruction set called "SSE" (Streaming SIMD Extensions).
> SSE is one of the many so-called “SIMD extensions” for x86. There is also, AVX and AVX512 extensions for example.
- SSE originally added 8 new 128-bit registers known as `xmm0-xmm7`. The AMD64 extensions from AMD (originally called x86-64) later added 8 registers `xmm8-xmm15` (this will be ported to Intel 64 architecture as well).
<p><a href="https://raw.githubusercontent.com/3outeille/gsoc_2022_vlc/master/assets/simd.png"> <div style="text-align: center"><img src="https://raw.githubusercontent.com/3outeille/gsoc_2022_vlc/master/assets/simd.png" width="100%"></div></a></p>
- Since registers are 128-bits wide, you can either load/fetch:
- 1 value of size 128-bit.
- 2 values of size 64-bit.
- 4 values of size 32-bit.
- 8 values of size 16-bit.
- 16 values of size 8-bit.
- ==An important thing to remember using SIMD instrinsics is that you are limited to only 1 vector register(`xmm0`)==
# II/ Workflow setup
## `x86inc.asm`
- Now that I have learnt enough, we can start to get our hands dirty. My mentors advise me to read the [dav1d](https://code.videolan.org/videolan/dav1d) code to familiarize myself with how real assembly development looks like in a software.
- ==**The reflex to have here in my opinion is to see if there is a test suite and then go through it with your debugger to understand the flow of the program, how things are structured.**== I found using a pen a paper to track down which functions were called, quite useful.
- `dav1d` writes x86-64 SIMD code by using an abstraction provided by the [`x86inc.asm`](https://github.com/videolan/dav1d/blob/master/src/ext/x86/x86inc.asm) file.
- `x86inc.asm` enables the developer to write hand-written assembly on x86 easier by unifying the differents syntax between x86 in Windows/Linux and the differents version of vectorized instructions sets (SSE, SSE2, SSE3, SSSE3, SSE4.1, SSE4.2 ...)
> - Here is an awesome [guide](https://blogs.gnome.org/rbultje/2017/07/14/writing-x86-simd-using-x86inc-asm/) to get started.
- To be honest, I find it useful to expand the macros by hand (as `x86inc.asm` is mostly composed of macros) to get a better feel on how things work.
- For example, to understand how a function declared with `x86inc.asm` is called in the C side, I isolated the code in a [gist](https://gist.github.com/3outeille/c65a1a81635d1caf0a8072e179bcb869#file-prologue-asm) and expanded the macros using `nasm -E prologue.asm`.
- From this, we can deduce that the syntax to declare a function in `x86inc.asm` is as follow: `cglobal function_name, #args (%1), #regs (%2), #xmm_regs (%3), [stack_size,] (%4) arg_names... (%5-*)`
- Thus, `cglobal sad_16x16, 4, 7, 5, src, src_stride, dst, dst_stride, src_stride3, dst_stride3, cnt` means:
- automatically loads 4 arguments (`src, src_stride, dst, dst_stride`) into registers
- uses 3 additional register (`src_stride3, dst_stride3, cnt`)
- 5 vector registers (m0-m4)
- perform no allocation of stack space.
- Here are the mapping of variables to registers:
- `src` => r0 (rdi)
- `src_stride` => r1 (rsi)
- `dst` => r2 (rdx)
- `dst_stride` => r3 (rcx)
- `src_stride3` => r4 (R8)
- `dst_stride3` => r5 (R9)
- `cont` => r6 (rax)
## `Sanity check setup`
- All my work will be done on the [OpenVVC](https://github.com/OpenVVC/OpenVVC) repository. Therefore, after making sense of the part I have to work on, I decided to setup some sanity check to make sure that my feature works as intended.
- Since the OpenVVC decoder outputs an image at the end, one can think of performing a [`diff(1)`](https://man7.org/linux/man-pages/man1/diff.1.html) between the reference image and your function output image.
- Even though this method is useful to make sure the function works properly, it gives almost no useful informations for the developer in case of a bug.
:::warning
- I don't use a small custom dummy image as input for debugging because I don't know whether or not my custom image will activate the flags to generate film grain ! That's why I decided to stick with the sample that my mentor provided me.
:::
<p><a href="https://raw.githubusercontent.com/3outeille/gsoc_2022_vlc/master/assets/meme.jpg"> <div style="text-align: center"><img src="https://raw.githubusercontent.com/3outeille/gsoc_2022_vlc/master/assets/meme.jpg" width="50%"></div></a></p>
- That's where logging comes into play. Since I am dealing with images (matrices), we can print each pixel value in a log file. This way, you can use `diff` between the 2 log files to see the differences. Really useful, especially when you are debugging multi-threaded program.
:::info
- Debugging a multi-threaded program can be a pain in the ass. Here's a protocol I've put together to help you get started:
- Suppose your `diff log_ref log_res` output the following:

- Using your debugger, place a `watchpoint` (in my case: `watch ($xmm1.v4_int32[1])==14`).
> `breakpoint` are set for function or line of code while `watchpoints` are set on variables.
- Once the `watchpoint` is triggered and the value found, **each time you `step into` your debugger, generate a core file with `generate-core-file <number>`**. This will let you replay the debugging session as much as you want.
- Replay the debugging session and compare with the output of reference code line by line.
:::
## `Benchmark`
### Setup
- Since we will be writing performant code, we need to measure how fast it is compared to the baseline function.
- To do so, I wrote the structure `BenchWrapper` containing my benchmark function as a function pointer so that I don't need to change the structure of the existing code to bench. {%gist 3outeille/a9d7ddcbc9797ad5d04bae3812163160 %}
- An example of how one will call the benchmark function:
```c=
#include "../examples/bench_decorator.h"
...
{
// call the function `pp_process_frame` 1000 times with 100 iterations for each call.
// pp_process_frame(sei, frame_p);
struct BenchWrapper bw = { 1000, 100, &pp_process_frame };
bench_decorator(bw, "pp_process_frame", sei, frame_p);
}
```
- [perf-record(1)](https://man7.org/linux/man-pages/man1/perf.1.html) will be used to gather performance statistics over all those runs.
- I also used the Linux perf GUI [Hotspot](https://github.com/KDAB/hotspot) for performance analysis, useful to pinpoint potential hot spots. We will go over each tab of the GUI:
- 
- `Summary`: shows top hotpost and display system information.
- `Bottom up`: shows all functions that call `ov_clip_uintp2`
- <p><a href="https://raw.githubusercontent.com/3outeille/gsoc_2022_vlc/master/assets/bottom_up.png"> <div style="text-align: center"><img src="https://raw.githubusercontent.com/3outeille/gsoc_2022_vlc/master/assets/bottom_up.png" width="100%"></div></a></p>
- `Top Down`: shows what `fg_blend_stripe` calls.
- <p><a href="https://raw.githubusercontent.com/3outeille/gsoc_2022_vlc/master/assets/top_down.png"> <div style="text-align: center"><img src="https://raw.githubusercontent.com/3outeille/gsoc_2022_vlc/master/assets/top_down.png" width="100%"></div></a></p>
- `Flame graph`: shows a collection of stack traces/call stacks.
- <p><a href="https://raw.githubusercontent.com/3outeille/gsoc_2022_vlc/master/assets/flame_graph.png"> <div style="text-align: center"><img src="https://raw.githubusercontent.com/3outeille/gsoc_2022_vlc/master/assets/flame_graph.png" width="100%"></div></a></p>
- A stack trace is represented as a column of boxes, where each box represents a function (a stack frame).
- The y-axis shows the stack depth from bottom to top. The top box shows the function that was on-CPU when the stack trace was collected, and everything beneath is the caller/parent function.
- The x-axis covers the collection of stack traces. **It does not show the passage of time**
- The width of each function box shows the frequency at which that function was present in the stack traces. **Functions with wide boxes were more present in the stack traces than those with narrow boxes**
> To learn about flame graph, please read [Brendan Gregg awesome post](https://queue.acm.org/detail.cfm?id=2927301).
- `cycles:u(self)/cycles:u(incl.)`: In `Top down`, you can see 2 columns:
- `cycles:u(self)`: total program time passed in the function.
- `cycles:u(incl.)`: total program time passed in the function without taking into account callee functions/sub-functions.
- It is better visualised on a flame graph:
- <p><a href="https://raw.githubusercontent.com/3outeille/gsoc_2022_vlc/master/assets/flame_graph.png"> <div style="text-align: center"><img src="https://raw.githubusercontent.com/3outeille/gsoc_2022_vlc/master/assets/flame_graph.png" width="100%"></div></a></p>
- `cycles:u(self)`: corresponds to `ov_clip_uintp2` (which includes the other `ov_clip_uintp2` and `fg_blend_stripe` calls)
- `cycles:u(incl.)`: corresponds to only `fg_blend_stripe` (which exclude the 2 `ov_clip_uintp2` calls)
> Thus, it makes sense to not have `cycles:u(self)` in `Bottom up` because we are showing who are calling my function.
- `Caller/Callee`:
- <p><a href="https://raw.githubusercontent.com/3outeille/gsoc_2022_vlc/master/assets/caller_callee.png"> <div style="text-align: center"><img src="https://raw.githubusercontent.com/3outeille/gsoc_2022_vlc/master/assets/caller_callee.png" width="100%"></div></a></p>
- You have 2 tabs:
- `caller`: cost of calling `fg_blend_stripe`.
- `callee`: cost of calling the sub-function of `fg_blend_stripe` and its location in the code (the line `pp_film_grain.c:629` is responsible for 29.6% of the time spent in `fg_blend_stripe` only (`cycles:u(incl.)`) which is 38.1%)
> Example: ==The function `fg_blend_stripe` accounts for **21.4% of the program total time (`cycles:u(self)`)** in which **16.8% is spent on `ov_clip_uintp2` and 83.2% on the function itself.**==
---
### Theory
- Now that we are more familiar with `Hotspot`, ==**How does one interpret speedup ?**==. Let's define the following:
- $T_{ref}$: total reference program time.
- $T_{opt}$: total optimized program time.
- $P_{ref}$: function representation in reference program.
- $P_{opt}$: function representation in optimized program.
> - In example, the SSE4 version represents 10% ($P_{opt}$) of the total optimized program time ($T_{opt}$) compared to 25% ($P_{ref}$) of the total time for the reference version ($T_{ref}$)
- The global speedup of the program can be computed as following: $$\text{speedup}_{global} = \frac{\text{(total time in ref program)}}{\text{(total time in opti program)}} = \frac{T_{ref}}{T_{opt}}$$
- **However, how much the function accounts in the total program can influence how our speedup in the function is perceived by the program. Indeed, a speedup of x10 in our function will not necessarily translate into a speedup of x10 in the overall program.**
- This is why computing the speedup of the function as following can be useful: $$\text{speedup}_{fct} = \frac{\text{(total time in ref program)} * \text{(fct % in ref program)}}{\text{(total time in opti program)} * \text{(SIMD fct % in opti program)}} = \frac{T_{ref}* P_{ref}}{T_{opt}* P_{opt}}$$
- This way, we can see that:
- The higher $P_{ref}$ is, the higher my speedup will be. ==In other words, if my function accounts for 90% of my program, then the speedup of my function will be significant.==
> $$\frac{T_{ref}}{T_{opt}} * \frac{90}{10} = \frac{T_{ref}}{T_{opt}} * 9$$
- The smaller $P_{ref}$ is, the smaller my speedup will be. ==In other words, if my function accounts for 11% of my program, then the speedup of my function will be unsignificant.==
> $$\frac{T_{ref}}{T_{opt}} * \frac{11}{10} = \frac{T_{ref}}{T_{opt}} * 1.1$$
> **One can see $P_{ref}$ as a weighting of how much the speedup of our function will be reflected in the program.**
- From this, we can deduce that even if our function has a speedup of x10 but the function accounts for nothing in the program, then the speedup will not be noticeable in the program.
> - This implies a diminishing returns in optimizing the same function over and over (especially if it accounts for nothing in the reference program).
- ==**However, this is not the case anymore when all other parts of the program are as well optimized because our function will now account for more in our program.**==
- ==**The more we optimize other parts, the more our already optimized function will account in the whole program, and the more its speedup will be reflected in the whole program**==.
- This is best understood with the following example:
- Suppose a function which takes 50% of the total time of your program. You succeed to speedup the function by half. Now the function accounts for 33% of your total time and not 25%.
<a href="https://raw.githubusercontent.com/3outeille/gsoc_2022_vlc/master/assets/theory.jpg"> <div style="text-align: center"><img src="https://raw.githubusercontent.com/3outeille/gsoc_2022_vlc/master/assets/theory.jpg" width="50%"></div></a>
> - If your function takes 5s and the whole program 10s, then your function now takes 2.5s and your program 7.5s.
---
# III/ Technical coding details
- Let's dive into the important part. The function to optimize is `fg_grain_apply_pic()` which is called by `pp_process_frame()`. Main hot spots in `fg_grain_apply_pic()` are:
<div style="text-align: center"><img src="https://raw.githubusercontent.com/3outeille/gsoc_2022_vlc/master/assets/hotspots.png" width="100%"> </div>
<br>
> **Remark**: The function `ov_clip_uintp2()` is called in `fg_blend_stripe` and `fg_compute_block_avg` but is used in a different way. One at granular level and one at vectorized level.
---
## `fg_simulate_grain_blk8x8`
- Here is the reference version of `fg_simulate_grain_blk8x8()`. {%gist 3outeille/b9c41a7d079a5e0127a8c3189e291029 %}
- Given an array `grainStripe`, we want to fill only a subset of this array (of size `8 x xSize`) at the offset `grainStripeOffsetBlk8`.
- Let's take`xSize=8` for convenience. We will fill each cell of `grainStripe` with a`fg_data_base` value (chosen based on some `idx_offset`) that will then be *scaled* and *right shifted*.
- Here is an illustration to make things clearer:
<div style="text-align: center"><img src="https://raw.githubusercontent.com/3outeille/gsoc_2022_vlc/master/assets/fg_simulate_grain_blk8x8_ref.gif" width="100%"> </div>
### SIMD C version
#### Algorithm
:::success
- The full Pull request for this part can be found at [[GSOC] fg simulate grain blk8x8 sse4 #9](https://github.com/OpenVVC/OpenVVC/pull/9/commits/daac813be23f760c3de2c380f549aa5e7ac0a01f).
:::
{%gist 3outeille/7e91686b44dba99e93d11ac428b9f26f %}
- Here, instead of going through each row of the block 1 by 1 (as the previous illustration show), we will deal with 4 rows at the time and load 4 values (see below gif) from `fg_data_base` at the same time.
- We then perfom the *scaling* and *right shifting* on those values before writing to `grainStripe`
- One important thing to note here is the logic that happens at **line 25-26**. The register is 128-bits wide, which mean that we have to load 128-bits at a time. As `fg_data_base` is of type `int8_t`, using this register will fetch 16 of these values (128/8).
- I decided to use `_mm_loadu_si64` which will load 8 values in `int8_t` section such as following:
> Actually, I could have used `_mm_loadu_si32` but it doesn't work for older version of gcc <= 11 (see this [stackoverflow post](https://stackoverflow.com/questions/72837929/mm-loadu-si32-not-recognized-by-gcc-on-ubuntu))
<p><a href="https://raw.githubusercontent.com/3outeille/gsoc_2022_vlc/master/assets/int8_section.png"> <div style="text-align: center"><img src="https://raw.githubusercontent.com/3outeille/gsoc_2022_vlc/master/assets/int8_section.png" width="100%"></div></a></p>
- Since we are fetching more value than we need (8 instead of 4), we will have to keep only the lower 32-bits which is done by calling `_mm_cvtepi8_epi32` and store the result in `fg_data_X_lo`.
<p><a href="https://raw.githubusercontent.com/3outeille/gsoc_2022_vlc/master/assets/int32_section.png"> <div style="text-align: center"><img src="https://raw.githubusercontent.com/3outeille/gsoc_2022_vlc/master/assets/int32_section.png" width="100%"></div></a></p>
<div style="text-align: center"><img src="https://raw.githubusercontent.com/3outeille/gsoc_2022_vlc/master/assets/fg_simulate_grain_blk8x8_simd.gif" width="100%"> </div>
#### Benchmark
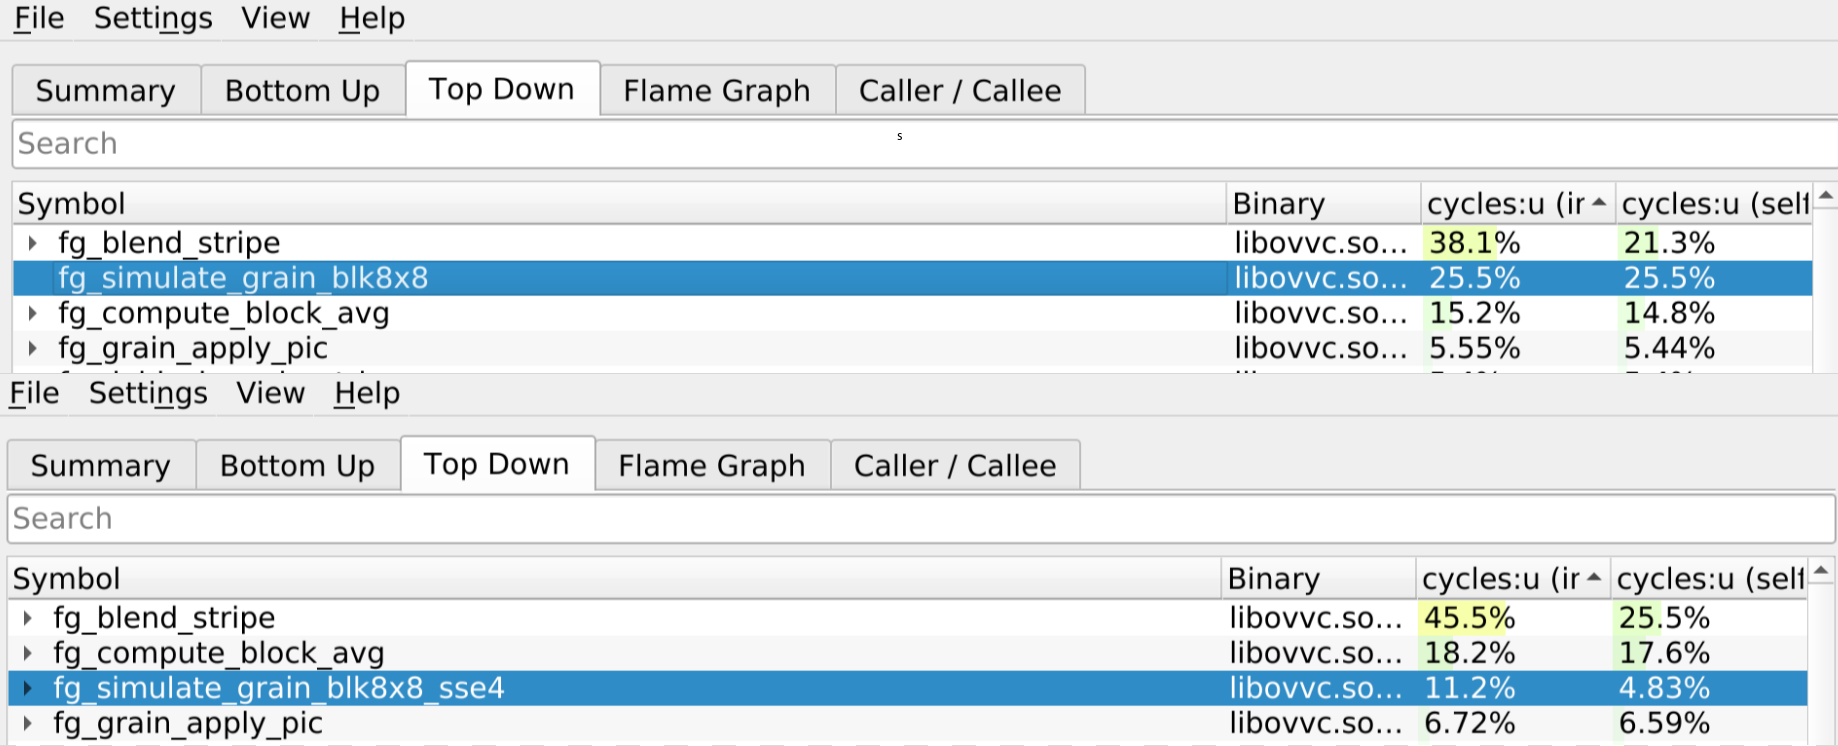
> Top: Reference version / Bottom: SSE4 version
- When comparing the performance between the reference function and the SSE4 function, we can see that our optimized version now accounts for 11.2% of the total program time compared to 25.5% before.
---
## `fg_compute_block_avg`
- Here is the reference version of `fg_compute_block_avg()`. {%gist 3outeille/310cc7f707b3324e7f5c7bfdfa482618 %}
- It simply compute the average inside a block, nothing fancy here. Notice that `ov_clip_uintp2` is called only after the average is computed (granular level) which means that we don't need to deal with it.
### SIMD C version
#### Algorithm
:::success
- The full Pull request for this part can be found at [[GSOC] fg compute block avg sse4 #8](https://github.com/OpenVVC/OpenVVC/pull/8/commits/687566bd8fec48c3baf568f07fc9f6b21595b62d).
:::
{%gist 3outeille/b7caebf6a6dcb5ee43b1d4465c03a632 %}
- In the reference version, the function returns an `int16_t` but we accumulate on `uint32_t blockAvg`
- Thus, I decided to accumulate on `int16_t` (**Line 4**) to fetch more values (8 instead of 4) during `_mm_loadu_si128` call. Doing so forces us to perform a cast into `uint32_t` when calling `ov_clip_uintp2`.
- When performing the horizontal sum, we do `_mm_hadd_epi16` 3 times in a row to get the final sum. However, the final sum will be in all elements of the register but t'as not an issue, we just need to copy the lower 32-bit integer using `_mm_cvtsi128_si32` in order to get only one value.
#### Benchmark
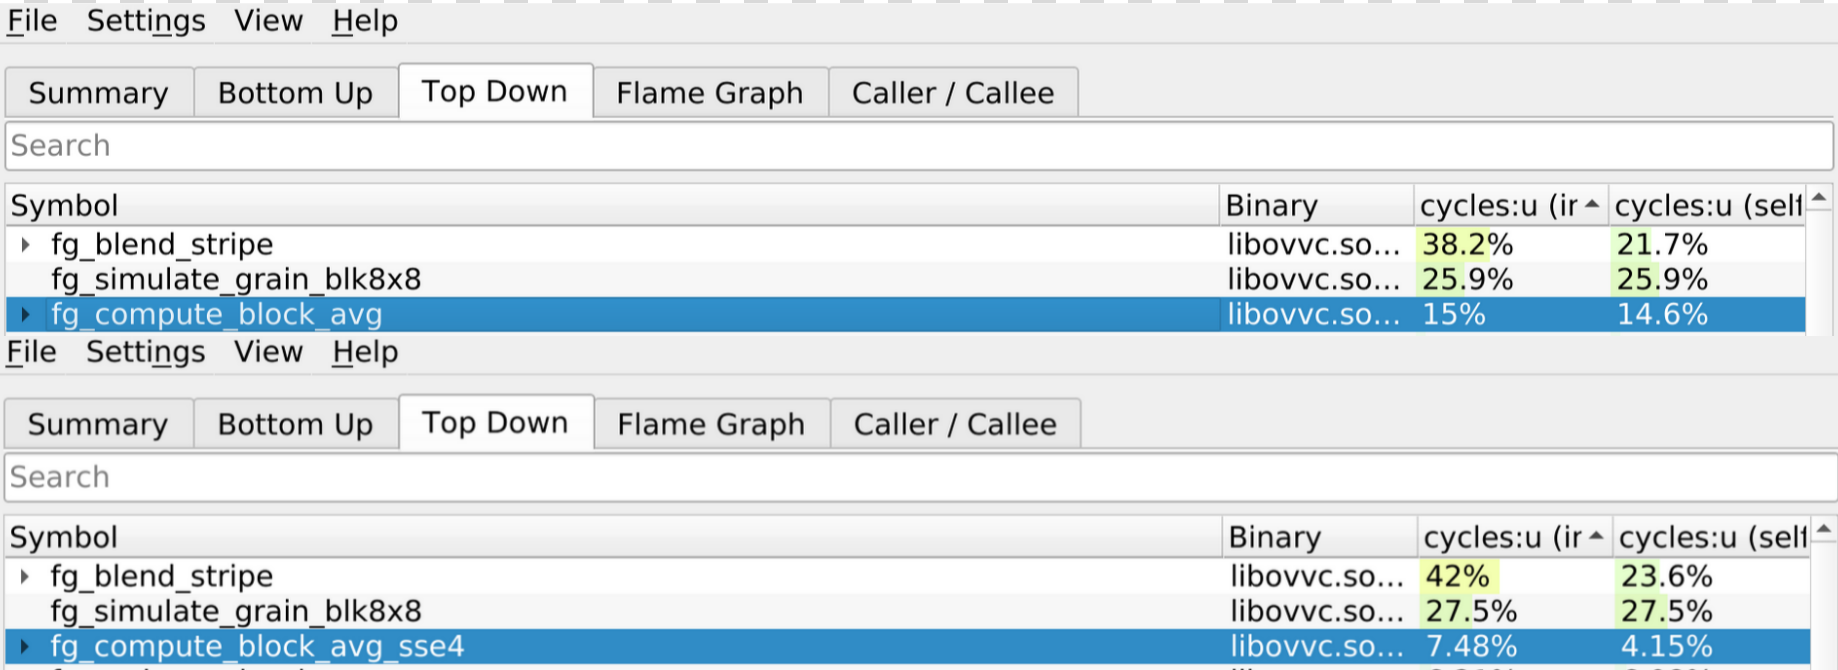
> Top: Reference version / Bottom: SSE4 version.
- When comparing the performance between the reference function and the SSE4 function, we can see that our optimized version now accounts for 7.48% of the total program time compared to 15% before.
### SIMD x86 version
#### Algorithm
:::success
- The full code can be find here [[GSOC] x86inc fg compute block avg sse4 #11](https://github.com/OpenVVC/OpenVVC/pull/11/commits/a5d353f99111ec720c50db625aa607911da56e07). Unfortunately, it is too long to be displayed here.
:::
- For the x86 version, we have access to far more registers now (we will use 8 registers `xmm0-7`).
- Before delving into the algorithm, we have to talk about the context the function is called: {%gist 3outeille/2fd3f5f3ce72a620d8d359c3d8411c0b %}
- We are looping over a block of `16x16` inside which, `fg_compute_block_avg` is called to compute the average on a block of maximum shape `8x8` (because of the clipping operation) at 4 different locations:
```
[blkId = 0]: (yOffset8x8, xOffset8x8) = (0, 0)
[blkId = 1]: (yOffset8x8, xOffset8x8) = (0, 8)
[blkId = 2]: (yOffset8x8, xOffset8x8) = (8, 0)
[blkId = 3]: (yOffset8x8, xOffset8x8) = (8, 8)
```
<div style="text-align: center">
<img src="https://raw.githubusercontent.com/3outeille/gsoc_2022_vlc/master/assets/fg_compute_block_avg_x86.gif">
</div>
<br>
- Since block average is done over a block of `8x8` and we have 8 vector registers, we no longer need for loops. For each vector register, we will load 8 values at the time.
#### Benchmark
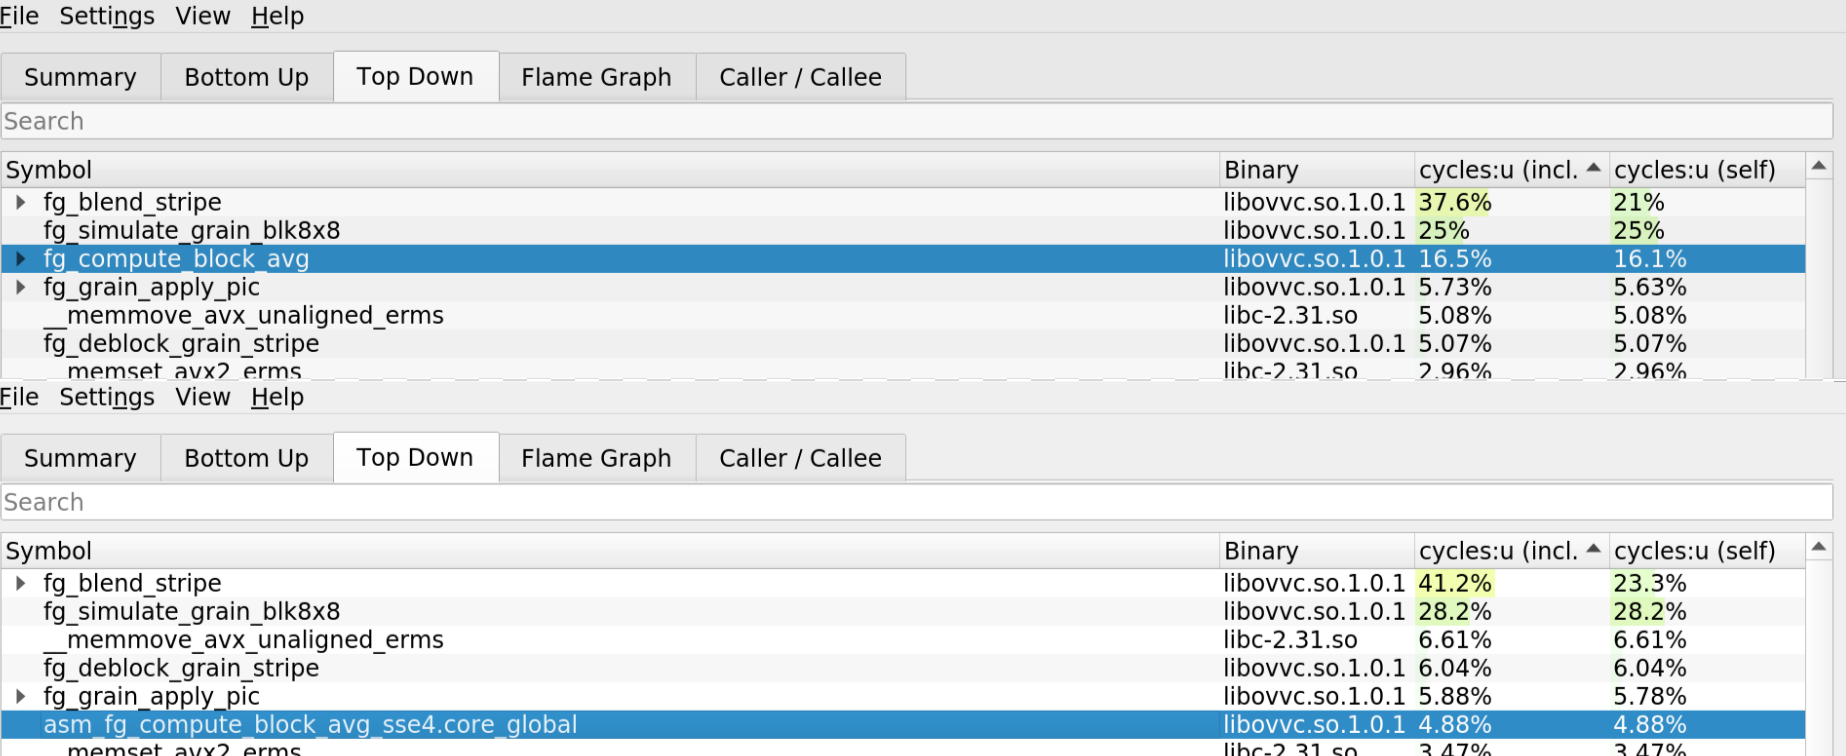
> Top: Reference version / Bottom: SSE4 x86 version.
- When comparing the performance between the reference function and the sse4 function, we can see that our optimized version now accounts for 4.8% of the total program time compared to 16.5%.
- It is even faster than the SIMD intrinsic version, which accounted for 7.48% of the total program time.
---
## `fg_blend_stripe`
- Here is the reference version of `fg_blend_stripe()` with `ov_clip_uintp2()`. {%gist 3outeille/653cf99656e7bca9ffe09a83fb5fc973 %}
- From reading the code, we can deduce the following:
- We are going through each pixel of the matrix of size `blockHeight x widthComp`.
> In fact, the function is called in the program in such a way both dimensions are guaranteed to be a multiple of 8 (for vectorization purpose).
- For each pixel, we are:
- shifting the value by `(bitDepth - 8)`.
- Add an *offset* to the value.
- performing a *clipping* operation on the value.
- *casting down* to `int16_t`.
- *writting* to output array.
- Notice that this time, `ov_clip_uintp2()` is called in the for loop which means that we have to vectorized it as well.
### SIMD C version
#### Algorithm
:::success
- The full Pull request for this part can be found at [[GSOC] fg blend stripe sse4 #12](https://github.com/OpenVVC/OpenVVC/pull/12/commits/c4fd1bb187865f22e78520f71757b1475915bdc0).
:::
{%gist 3outeille/c1f62980eadf5b03a931ff009beb4f12 %}
- The algorithm can be understood as follow:
- **Line 15**: Since the dimensions are guaranted to be a multiple of 8, we can use SSE instructions to process multiple values at the same time (in our case, 4 values because `grainStripe` is of type `int32_t` and remember, `xmm` registers are 128-bits wide)
- **Line 13**: This is why we increment the inner loop by 4 (because we load 4 values).
:::warning
- An attentive reader may ask why the outer loop at **line 11** is only incremented by 1 and not 4.
- I tried both versions and they yield similar performance. Thus, I decided to stick with the "increment by 1" version as it makes the code easier to read.
- My guess on why it performs the same: you only have 1 register available (a.k.a `xmm0`) when using SIMD intrinsics. It will make sense to use "increment by 4" version if you have more registers at hand to iterate over multiple rows (`cf SIMD x86 version`) at the same time.
:::
- **Line 17**: here we perform the *left shift* on 4 values at the same time.
- **Line 20-26**: We add an *offset* to our 4 values. Be careful here, `srcSampleOffsetY` is of type `int16_t`, thus we need to upcast to `int32_t` first otherwise we will load 8 values instead of 4.
- **Line 28-42**: We are performing the *clipping* on the 4 values.
> - We can save up computation by only creating the `mask` once at **Line 5-9**.
- **Line 44-49**: *write* the 4 values in output array while casting them down to `int16_t`.
#### Benchmark
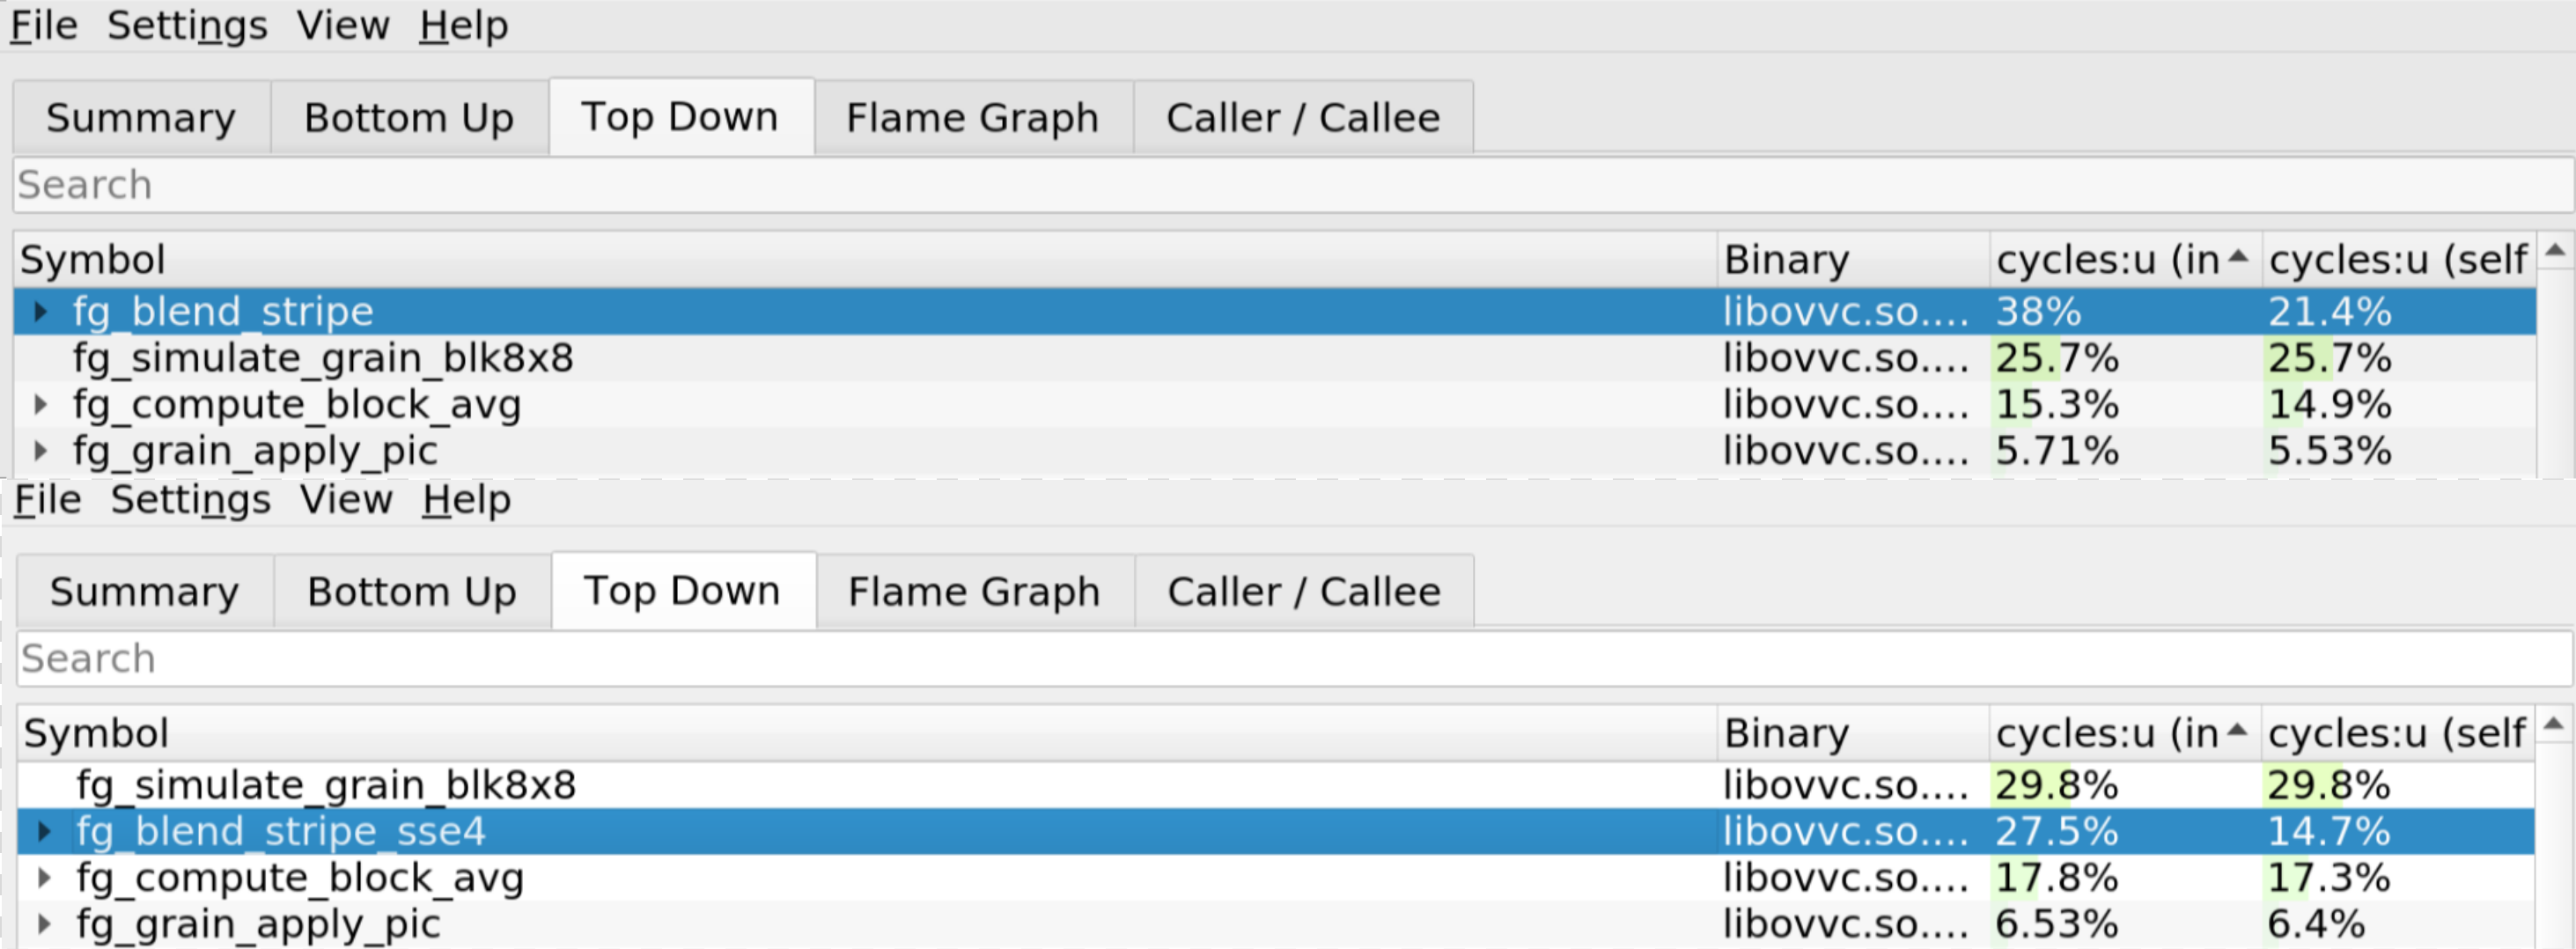
> Top: Reference version / Bottom: SSE4 version.
- When comparing the performance between the reference function and the SSE4 function, we can see that our optimized version now accounts for 27.5% of the total program time compared to 38% before.
### SIMD x86 version
#### Algorithm
:::success
- The full code can be find here [[GSOC] x86inc fg blend stripe sse4 #13](https://github.com/OpenVVC/OpenVVC/pull/13/commits/92589b1adb8ed52e8b6bf3e44e34c34ff295605d). Unfortunately, it is too long to be displayed here.
:::
- For the x86 version, we have access to far more registers now (we will use 8 registers `xmm0-7`). Thus, we can think of the following algorithm:
- Suppose the dimensions are `8 x 16` (8 rows and 16 columns).
- Then, for the 4 first rows, we will use 2 couple of vector regisers at the same time (`xmm0, xmm1`, `xmm2-xmm3`, `xmm4, xmm5`, `xmm6-xmm7`) to load 8 `int32_t` values for each row (resulting in a total of 32 values loaded).
- We then proceed to do the same computation as previous version (*left shift*, add *offset*, *clipping*, *cast down* to `int16_t`, *write* to output array)
- When we are done, increment by 8 to go to next columns.
- Once we are done with all columns, we add 4 to go the next rows.
- We repeat the process until all rows are visited.
- Here is an illustration to make things clearer:
<div style="text-align: center">
<img src="https://raw.githubusercontent.com/3outeille/gsoc_2022_vlc/master/assets/fg_blend_stripe_x86.gif">
</div>
<br>
:::warning
- However, there are some important points to talk about:
1. When working with vectorized instructions, make sure **your adresses are 16-bytes aligned**, otherwise it will segfault any time you try use vector instructions !
2. Since `x86inc.asm` will move arguments to registers, we find ourselves running short of registers when developing. To solve this problem, we can put our variables (`grainSample`, `lhs`, `row`, `col`, `left shift`) in the stack as following:
- <div style="text-align: center">
<img src="https://raw.githubusercontent.com/3outeille/gsoc_2022_vlc/master/assets/stack.jpg">
</div>
:::
#### Benchmark
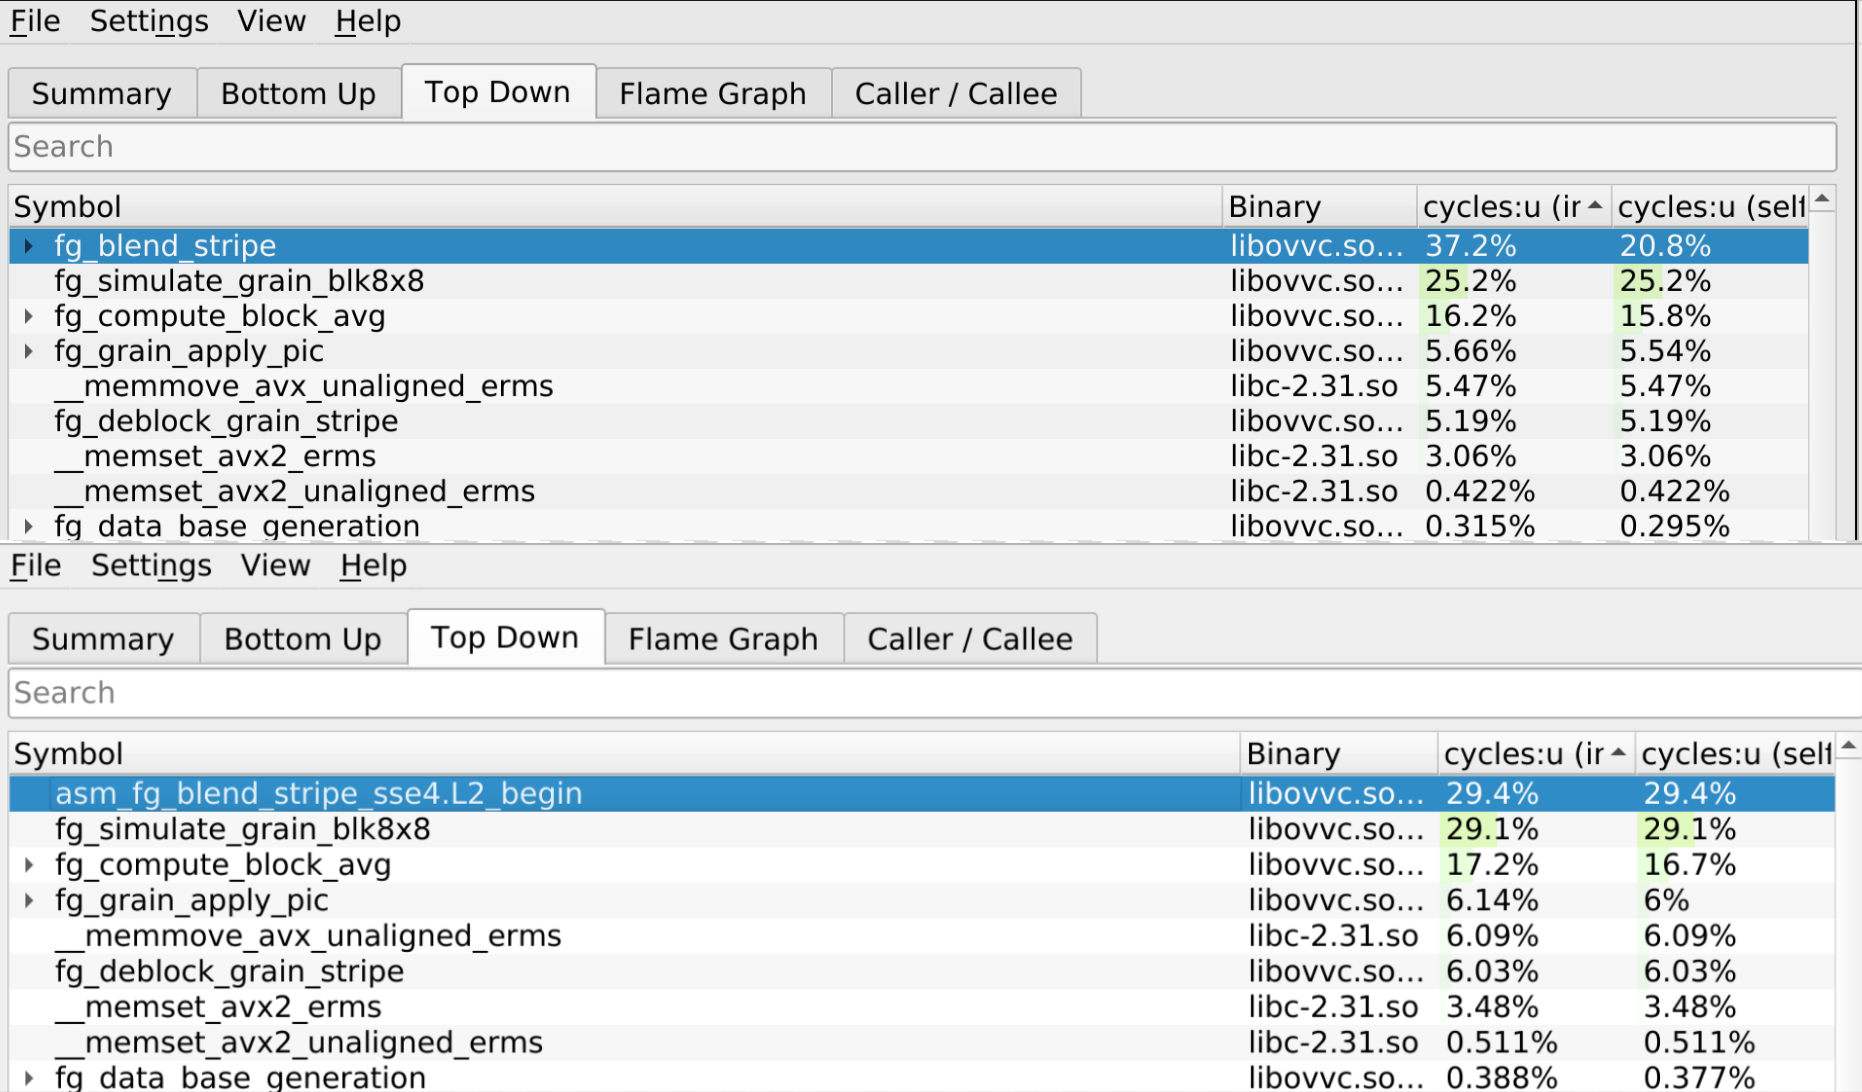
> Top: Reference version / Bottom: SSE4 x86 version.
- When comparing the performance between the reference function and the sse4 function, we can see that our optimized version now accounts for 29.4% of the total program time compared to 37.2% before.
- However, it seems to be performing the same as the intrinsics version while using way more registers.
- Due to time constraint, I didn't have the time to investigate why they yield similar performance. An educated guess will be that my function is performing too many write operations :exclamation:
---
# IV/ Conclusion
- This summer of code was a great experience because I was able to better hone my software engineering skills and learnt a lot about open source development. It was also a great opportunity to learn x86 assembly (something I would never think of doing) and performance in general.
- For those who want to be involved in GSOC with VideoLAN, don't be scared ! You don't need any knowledge about video coding. Plus, they make sure to make you work on features that are easier to get start with (such as mine).
- Finally, I also want to thank Alexandre for being here to answer all my questions, Jean-Baptiste for giving me the opportunity to participate in this GSOC edition and Pierre-Loup Cabarat for being my OpenVVC mentor!