---
tags: machine-learning
---
# Convolutional Neural Network with Numpy (Fast)
<div style="text-align: center">
<img src="https://raw.githubusercontent.com/valoxe/image-storage-1/master/blog-deep-learning/cnnumpy-fast/0.png" width="80%">
</div>
> In the [previous post](https://hackmd.io/@machine-learning/blog-post-cnnumpy-slow), we have seen a naive implementation of Convolutional Neural network using Numpy.
>
> Here, we are going to implement a faster CNN using Numpy with the im2col/col2im method.
>
> To see the full implementation, please refer to my [repository](https://github.com/3outeille/CNNumpy).
>
> Also, if you want to read some of my blog posts, feel free to check them at my [blog](https://3outeille.github.io/deep-learning/).
# I) Forward propagation
:::info
- The main objective here is to ensure that the reader develops a strong intuition about how im2col/col2im works so that he can write them by himself.
- Thus, I decided to be less **rigorous** in my explanation to make things **clearer**.
- We will refer to the term "**level**" as a whole horizontal kernel slide from left to right.
- We will only discuss **average pooling** layer here (even though same logic can be applied on max pooling).
:::
## 1) Convolutional layer
- In the naive implementation, we used a lot of nested "For loops" which makes our code very slow.
- An approach could be to trade some memory for more speedup.
- Here are the following steps:
- **A.** ==Transform our input image into a matrix (im2col).==
- **B.** ==Reshape our kernel (flatten).==
- **C.** ==Perform matrix multiplication between reshaped input image and kernel.==
- We are going to see how it works intuitively and then how to implement it using Numpy.
## ☰ Intuition
- As an example, we will perform a convolution between an (1,3,4,4) input image and kernels of shape (2,3,2,2).
### A) <ins>Transform our input image into a matrix (im2col)</ins>
- Here is how it works:
<div style="text-align:center">
<img src="https://raw.githubusercontent.com/valoxe/image-storage-1/master/blog-deep-learning/cnnumpy-fast/1.gif">
<figcaption>Figure 1: Input image transformed into matrix</figcaption>
</div>
<br>
- How do we do that in Numpy? An efficient way to do so is by the help of [multi-dimensional arrays indexing](https://docs.scipy.org/doc/numpy/user/basics.indexing.html). For example,
```python
>>> y = np.arange(35).reshape(5,7)
>>> y
array([[ 0, 1, 2, 3, 4, 5, 6],
[ 7, 8, 9, 10, 11, 12, 13],
[14, 15, 16, 17, 18, 19, 20],
[21, 22, 23, 24, 25, 26, 27],
[28, 29, 30, 31, 32, 33, 34]])
>>> y[np.array([0,2,4]), np.array([0,1,2])]
array([0, 15, 30]) # 0 = (0,0) / 15 = (2,1) / 30 = (4,2)
```
- Thus, the idea is to use **the multi-dimensional arrays indexing** property to transform our input image into a matrix.
- Indeed, we can notice few things:
- **Firstly**, the indices for each input image channel is the same. Thus, we can focus ourselves only on the first channel since the result will be the same for the others.
<div style="text-align:center">
<img src="https://raw.githubusercontent.com/valoxe/image-storage-1/master/blog-deep-learning/cnnumpy-fast/2.png" width="90%">
</div>
- **Secondly**, we can observe a certain pattern in the indices (<a style="color:red">i</a>, <a style="color:#FF1493">j</a>) when we slide our kernel.
<br>
- <a style="color:red"><ins>Index i</ins></a>:
- At level 1, we have:
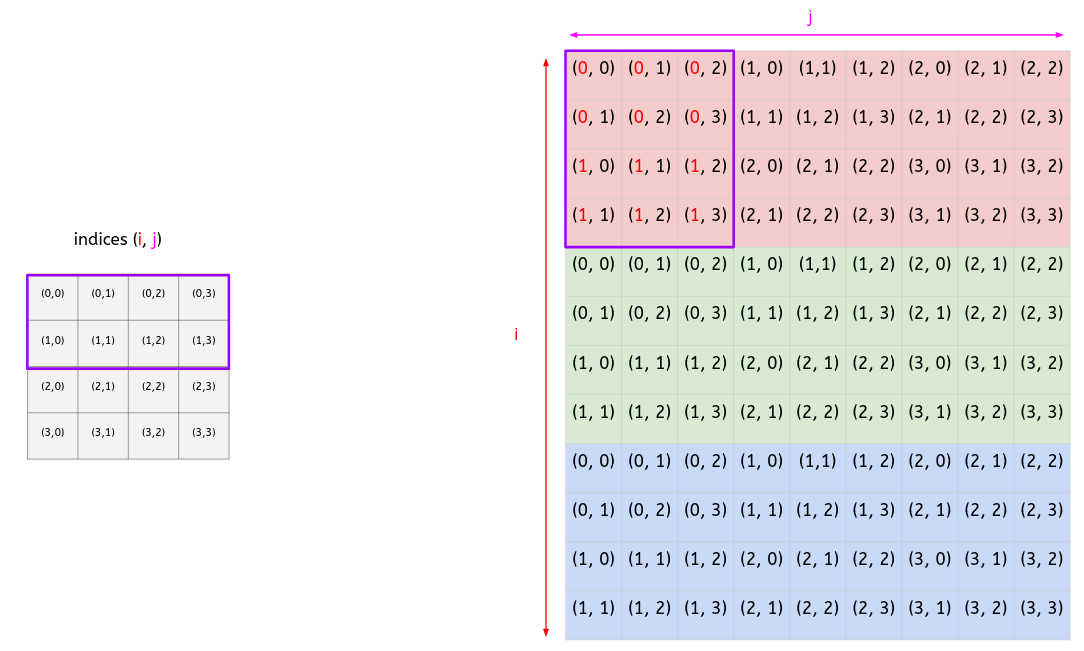
- At level 2, we have:
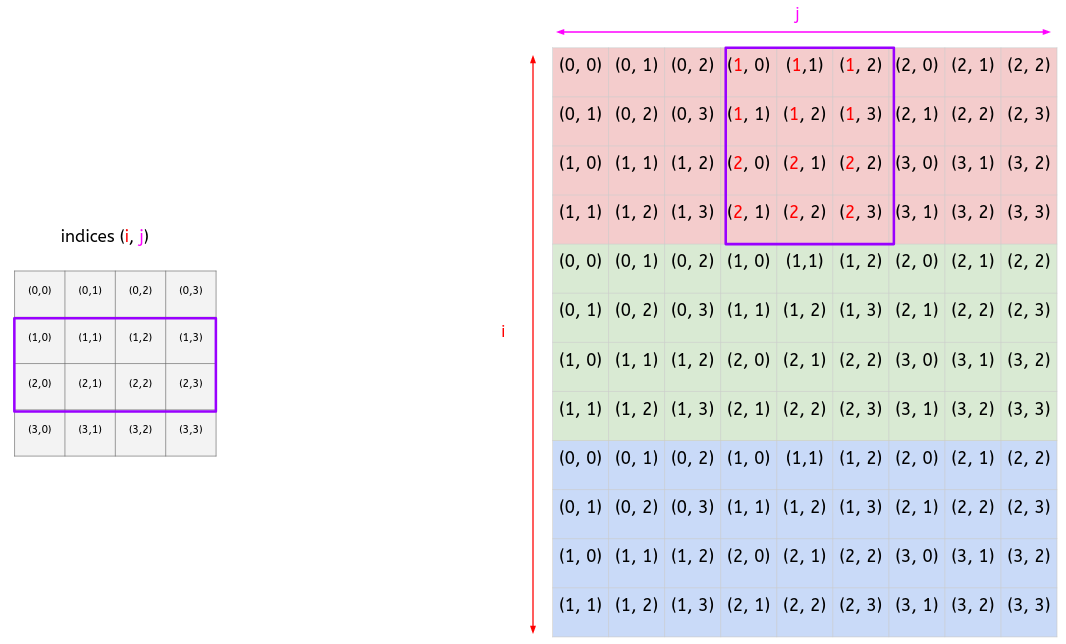
- At level 3, we have:
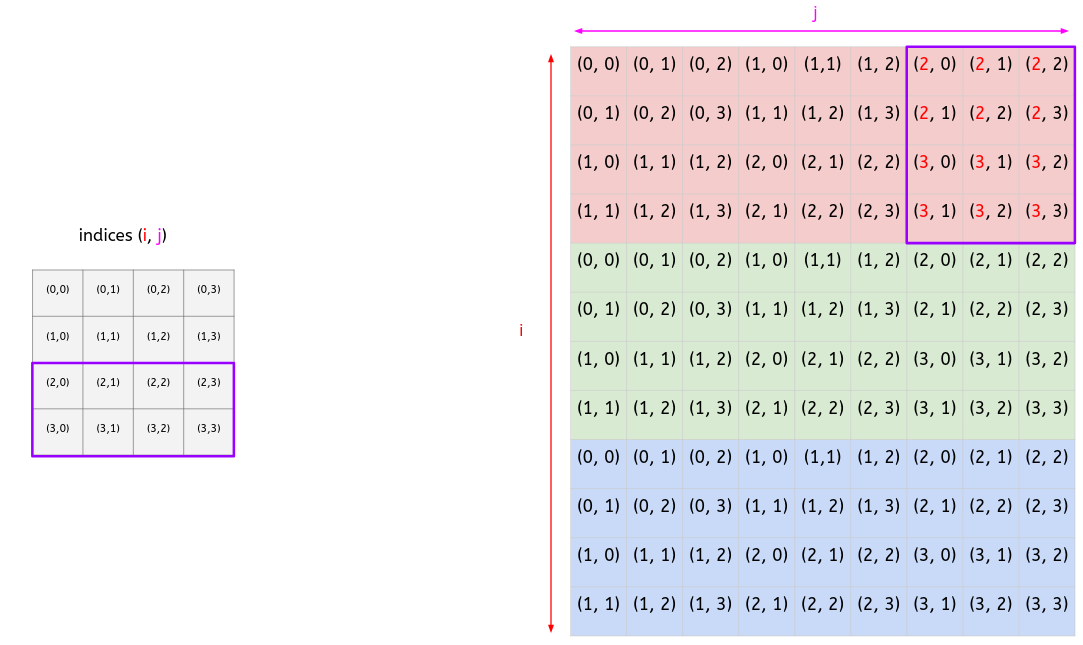
- <a style="color:red"><ins>Conclusion:</ins></a>
- We start with a [0, 0, 1, 1] vector at level 1.
- **At each level, we increase the vector by 1.**
<br>
- <a style="color:#FF1493"><ins>Index j</ins></a>:
- At level 1, we have:
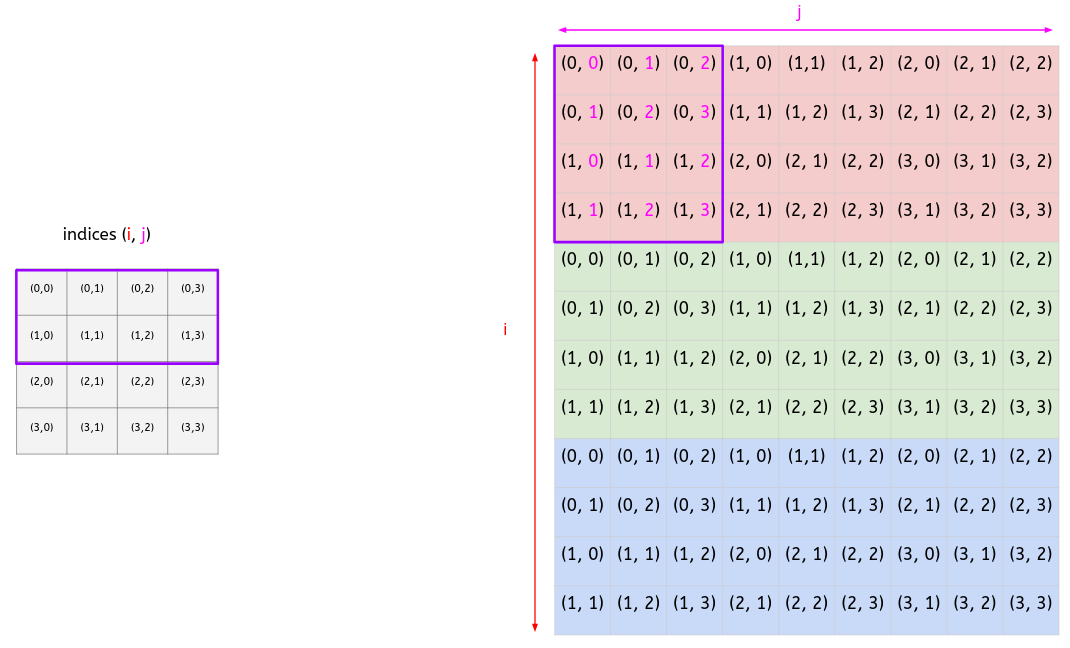
- At level 2, we have:

- At level 3, we have:
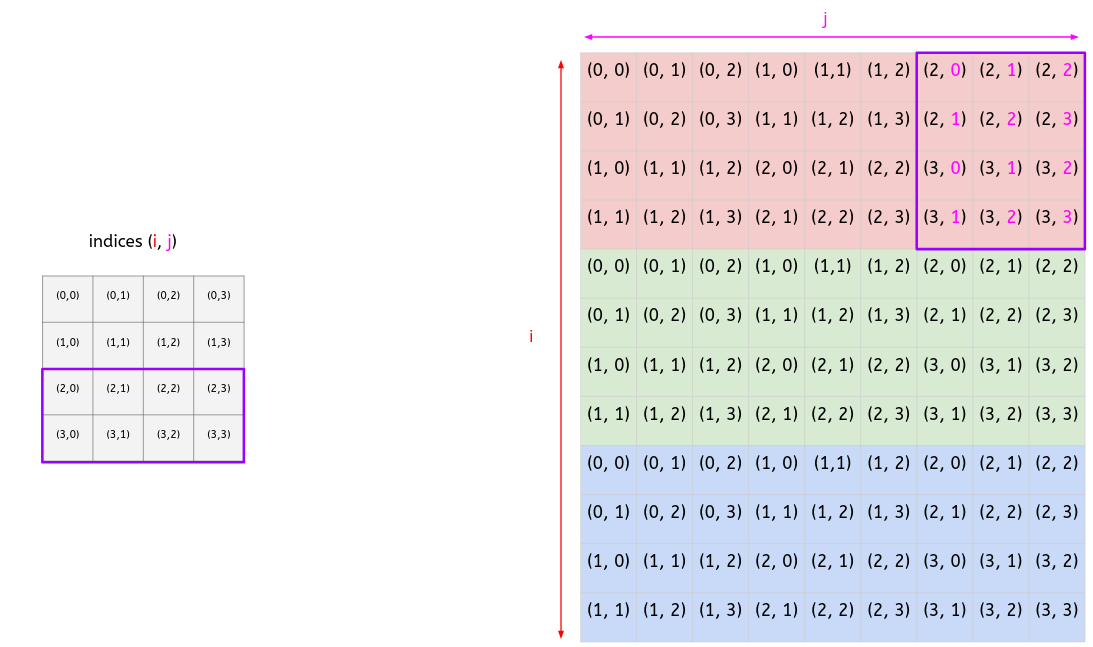
- <a style="color:#FF1493"><ins>Conclusion:</ins></a>
- At the level 1, there is a total of 3 slides.
- For slide 1, we have a [0,1,0,1] vector.
- For slide 2, we have a [1,2,1,2] vector.
- For slide 3, we have a [2,3,2,3] vector.
- **We can notice an increase of 1 at each slide.**
- **At each level, we keep the same pattern.**
---
- Thus, even if it's not rigorous, we can intuitively think of a general formula for an **(n,n) image convolve to $X$ filters of shape (k, k)**.
<br>
- <a style="color:red"><ins>For index i</ins></a>:
<br>
- We start with at level 1 with the following vector:
$$[\underbrace{0,0,...0}_{k},\underbrace{1,1,...1}_{k},...,\underbrace{k-1,k-1,...,k-1}_{k}]$$
- ==**At each level, we increase this vector by 1**==
<br>
- <a style="color:#FF1493"><ins>For index j</a></ins>:
<br>
- At level 1, there is a total of n-k slides.
<br>
- For slide 1, we have a $[\underbrace{0,1,...,k-1,...,0,1,...,k-1}_{k}]$ vector.
- For slide 2, we have a $[\underbrace{1,2,...,k,...,1,2,...,k}_{k}]$ vector.
- ...
- For slide n-k, we have a $[\underbrace{n-k,n-k+1,...,n-1,...,n-k,n-k+1,...,n-1}_{k}]$ vector.
- ==**At each level, we keep the same pattern.**==
<br>
- The numbers of filters $X$ do not have any effect in this part. We will see that it's quite simple to deal with it during the kernel reshaping step.
- If you have $M$ images ($M > 1$), you will have the same matrix but stack horizontally $M$ times.
<div style="text-align:center">
<img src="https://raw.githubusercontent.com/valoxe/image-storage-1/master/blog-deep-learning/cnnumpy-fast/9.gif">
</div>
### B) <ins>Reshape our kernel (flatten)</ins>
- Here is how it works:
<div style="text-align:center">
<img src="https://raw.githubusercontent.com/valoxe/image-storage-1/master/blog-deep-learning/cnnumpy-fast/10.png" width="80%">
<figcaption>Figure 2: Reshaped version of the 2 kernels</figcaption>
</div>
<br>
- As you can see, each filter is flattened and then stacked together. Thus, for $X$ filter, we will flatten and stack $X$ filters together.
### C) <ins>Matrix multiplication between reshaped input and kernel</ins>
- Now, we only need to perform a matrix multiplication.
<div style="text-align:center">
<img src="https://raw.githubusercontent.com/valoxe/image-storage-1/master/blog-deep-learning/cnnumpy-fast/11.gif">
<figcaption>Figure 3: Matrix multiplication</figcaption>
</div>
<br>
- At the end, we need to reshape our matrix back to an image.
- ==Be aware the `np.reshape()` method doesn't return the expected result here (elements in wrong order). A little bit of numpy gymnastic solves the problem.==
## ☰ Implementation
- The most difficult part of im2col is to **transform our input image into a matrix.**
- To do so, we will use `np.tile()` and `np.repeat()` methods from Numpy. Here is how they work:
```python
>>> y = np.arange(5)
>>> y
array([0, 1, 2, 3, 4])
>>> np.tile(y, 2)
array([0, 1, 2, 3, 4, 0, 1, 2, 3, 4])
>>> np.repeat(y, 2)
array([0, 0, 1, 1, 2, 2, 3, 3, 4, 4])
```
- Now, let's explain the process visually.
:::info
**Reminder:**
- We want to perform a convolution between an (1,3,4,4) input image kernels of shape (2,3,2,2).
:::
- For index i:
<div style="text-align:center">
<img src="https://raw.githubusercontent.com/valoxe/image-storage-1/master/blog-deep-learning/cnnumpy-fast/12-a.png">
</div>
<br>
<div style="text-align:center">
<img src="https://raw.githubusercontent.com/valoxe/image-storage-1/master/blog-deep-learning/cnnumpy-fast/12-b.png">
</div>
<br>
<div style="text-align:center">
<img src="https://raw.githubusercontent.com/valoxe/image-storage-1/master/blog-deep-learning/cnnumpy-fast/12-c.gif">
</div>
<br>
- For index j:
<div style="text-align:center">
<img src="https://raw.githubusercontent.com/valoxe/image-storage-1/master/blog-deep-learning/cnnumpy-fast/13-a.png">
</div>
<br>
<div style="text-align:center">
<img src="https://raw.githubusercontent.com/valoxe/image-storage-1/master/blog-deep-learning/cnnumpy-fast/13-b.png">
</div>
<br>
<div style="text-align:center">
<img src="https://raw.githubusercontent.com/valoxe/image-storage-1/master/blog-deep-learning/cnnumpy-fast/13-c.gif">
</div>
<br>
- Now, we can transform our input image into a matrix.
<div style="text-align:center">
<img src="https://raw.githubusercontent.com/valoxe/image-storage-1/master/blog-deep-learning/cnnumpy-fast/14.gif">
</div>
<br>
---
Here is the code to implement **im2col**:
```python=
def get_indices(X_shape, HF, WF, stride, pad):
"""
Returns index matrices in order to transform our input image into a matrix.
Parameters:
-X_shape: Input image shape.
-HF: filter height.
-WF: filter width.
-stride: stride value.
-pad: padding value.
Returns:
-i: matrix of index i.
-j: matrix of index j.
-d: matrix of index d.
(Use to mark delimitation for each channel
during multi-dimensional arrays indexing).
"""
# get input size
m, n_C, n_H, n_W = X_shape
# get output size
out_h = int((n_H + 2 * pad - HF) / stride) + 1
out_w = int((n_W + 2 * pad - WF) / stride) + 1
# ----Compute matrix of index i----
# Level 1 vector.
level1 = np.repeat(np.arange(HF), WF)
# Duplicate for the other channels.
level1 = np.tile(level1, n_C)
# Create a vector with an increase by 1 at each level.
everyLevels = stride * np.repeat(np.arange(out_h), out_w)
# Create matrix of index i at every levels for each channel.
i = level1.reshape(-1, 1) + everyLevels.reshape(1, -1)
# ----Compute matrix of index j----
# Slide 1 vector.
slide1 = np.tile(np.arange(WF), HF)
# Duplicate for the other channels.
slide1 = np.tile(slide1, n_C)
# Create a vector with an increase by 1 at each slide.
everySlides = stride * np.tile(np.arange(out_w), out_h)
# Create matrix of index j at every slides for each channel.
j = slide1.reshape(-1, 1) + everySlides.reshape(1, -1)
# ----Compute matrix of index d----
# This is to mark delimitation for each channel
# during multi-dimensional arrays indexing.
d = np.repeat(np.arange(n_C), HF * WF).reshape(-1, 1)
return i, j, d
def im2col(X, HF, WF, stride, pad):
"""
Transforms our input image into a matrix.
Parameters:
- X: input image.
- HF: filter height.
- WF: filter width.
- stride: stride value.
- pad: padding value.
Returns:
-cols: output matrix.
"""
# Padding
X_padded = np.pad(X, ((0,0), (0,0), (pad, pad), (pad, pad)), mode='constant')
i, j, d = get_indices(X.shape, HF, WF, stride, pad)
# Multi-dimensional arrays indexing.
cols = X_padded[:, d, i, j]
cols = np.concatenate(cols, axis=-1)
return cols
def forward(self, X):
"""
Performs a forward convolution.
Parameters:
- X : Last conv layer of shape (m, n_C_prev, n_H_prev, n_W_prev).
Returns:
- out: previous layer convolved.
"""
m, n_C_prev, n_H_prev, n_W_prev = X.shape
n_C = self.n_F
n_H = int((n_H_prev + 2 * self.p - self.f)/ self.s) + 1
n_W = int((n_W_prev + 2 * self.p - self.f)/ self.s) + 1
X_col = im2col(X, self.f, self.f, self.s, self.p)
w_col = self.W['val'].reshape((self.n_F, -1))
b_col = self.b['val'].reshape(-1, 1)
# Perform matrix multiplication.
out = w_col @ X_col + b_col
# Reshape back matrix to image.
out = np.array(np.hsplit(out, m)).reshape((m, n_C, n_H, n_W))
self.cache = X, X_col, w_col
return out
```
## 2) Pooling layer
- We can make the average pooling operation faster by using **im2col** method.
- ==Be aware that the `np.reshape()` method doesn't return the expected result here (elements in wrong order). A little bit of numpy gymnastic solves the problem.==
<div style="text-align:center">
<img src="https://raw.githubusercontent.com/valoxe/image-storage-1/master/blog-deep-learning/cnnumpy-fast/1-pool.png">
</div>
---
Here is the implementation code:
```python=
def forward(self, X):
"""
Apply average pooling.
Parameters:
- X: Output of activation function.
Returns:
- A_pool: X after average pooling layer.
"""
self.cache = X
m, n_C_prev, n_H_prev, n_W_prev = X.shape
n_C = n_C_prev
n_H = int((n_H_prev + 2 * self.p - self.f)/ self.s) + 1
n_W = int((n_W_prev + 2 * self.p - self.f)/ self.s) + 1
X_col = im2col(X, self.f, self.f, self.s, self.p)
X_col = X_col.reshape(n_C, X_col.shape[0]//n_C, -1)
A_pool = np.mean(X_col, axis=1)
# Reshape A_pool properly.
A_pool = np.array(np.hsplit(A_pool, m))
A_pool = A_pool.reshape(m, n_C, n_H, n_W)
return A_pool
```
# II) Backward propagation
:::warning
- This part will be tougher than the previous one.
- However, if you have read the <a href="https://hackmd.io/@bouteille/ByusmjZc8" style="color:red">previous post</a> about the naive implementation of Convolutional Neural network using Numpy, it should be fine.
- Along the way, you will often encounter a **"Be aware"** sentence about reshaping. I strongly advise you to run and play with `unit_tests.py` to understand why these numpy gymnastics were required.
:::
## 1) Convolutional layer
:::info
**Reminder:**
- We performed a convolution between (1,3,4,4) input image and kernels of shape (2,3,2,2) which output an (2,3,3) image.
- During the backward pass, the (2,3,3) image contains the error/gradient (**"dout"**) which needs to be back-propagated to the:
- (1,3,4,4) input image (layer).
- (2,3,2,2) kernels.
:::
## ⋆ Layer gradient: Intuition
- The formula to compute the layer gradient is:
$$\boxed{\frac{\partial L}{\partial I} = Conv(K, \frac{\partial L}{\partial O})}$$
- $\frac{\partial L}{\partial I}$: Input gradient.
- $K$: Kernels.
- $\frac{\partial L}{\partial O}$: Output gradient.
- $Conv$: Convolution operation.
- To do so, we will proceed as follow:
- **A.** ==Reshape dout ($\frac{\partial L}{\partial O}$).==
- **B.** ==Reshape kernels `w` into single matrix `w_col`.==
- **C.** ==Perform matrix multiplication between reshaped `dout` and kernel.==
- **D.** ==Reshape back to image (**col2im**).==
- We are going to see how it works intuitively and then how to implement it using Numpy.
### A) <ins>Reshape `dout`</ins>
- During backward propagation, the output of the forward convolution contains the error that needs to be back-propagated.
<div style="text-align:center">
<img src="https://raw.githubusercontent.com/valoxe/image-storage-1/master/blog-deep-learning/cnnumpy-fast/15.png" width="80%">
</div>
### B) <ins>Reshape `w` into `w_col`</ins>
<div style="text-align:center">
<img src="https://raw.githubusercontent.com/valoxe/image-storage-1/master/blog-deep-learning/cnnumpy-fast/16.png">
</div>
### C) <ins>Perform matrix multiplication between reshaped `dout` and `w_col`</ins>
- In order to perform to perform the matrix multiplication, we need to transpose `w_col`.
- We will denoted the output as `dX_col`.
<div style="text-align:center">
<img src="https://raw.githubusercontent.com/valoxe/image-storage-1/master/blog-deep-learning/cnnumpy-fast/17.gif">
</div>
<br>
- ==Notice that we are in fact, broadcasting the error in `dout` to each kernel as we did in the naive implementation.==
<div style="text-align:center">
<img src="https://raw.githubusercontent.com/valoxe/image-storage-1/master/blog-deep-learning/cnnumpy-fast/18.gif">
</div>
<br>
### D) <ins>Reshape back to image (col2im)</ins>
- ==Here, **col2im** is more than a simple backward operation of im2col. Indeed, we have to take care of cases where errors will overlap with others.==
- As we can see in the previous gif, the (14,14,6) image has overlapping window. We need to reproduce the same effect !
<div style="text-align:center">
<img src="https://raw.githubusercontent.com/valoxe/image-storage-1/master/blog-deep-learning/cnnumpy-fast/19.gif">
</div>
<br>
## ⋆ Layer gradient: Implementation
- The most difficult part of **col2im** is to reshape our matrix back to an image because it requires us to take care of the overlapping gradient.
- An efficient and elegant way to do so is to use the [np.add.at](https://numpy.org/doc/stable/reference/generated/numpy.ufunc.at.html) method from Numpy. Here is a short example of how it works:
```python=
>>> indices = [
[0,4,1], # rows.
[3,2,4] # columns.
]
>>> X = np.zeros((5,6))
>>> np.add.at(X, indices, 1)
>>> X
array([[0, 0, 0, 1, 0, 0],
[0, 0, 0, 0, 1, 0],
[0, 0, 0, 0, 0, 0],
[0, 0, 0, 0, 0, 0],
[0, 0, 1, 0, 0, 0]])
```
- We will proceed as follow:
- Create a matrix filled with 0 of the same shape as input image (add padding if needed).
- `X_padded`: (1,3,4,4) with pad=0.
- Use **get_indices()** which returns index matrices, necessary to transform our input image into a matrix.
- `i`: (12,9)
- `j`: (12,9)
- `d`: (12,1)
- Retrieve `dX_col` batch dimension by splitting it `N` (number of images) times. For example, if you have `N` images, then:
- `dX_col`: (12, 9) => (N, 12, 9)
- ==Be aware that the `np.reshape()` method doesn't return the expected result here (elements in wrong order). A little bit of numpy gymnastic solves the problem.==
- Use `i,j,d` matrices as argument in `np.add.at` to reshape our matrix back to input image.
- Refer to step ==[D) Reshape back to image (col2im)](#D-Reshape-back-to-image-col2im)== for `np.add.at` method visualization.
- Remove padding from new image if needed.
## ○ Kernel gradient: Intuition
- The formula to compute the kernel gradient is:
$$\boxed{\frac{\partial L}{\partial K} = Conv(I, \frac{\partial L}{\partial O})}$$
- $\frac{\partial L}{\partial K}$: Kernels gradient.
- $I$: Input image.
- $\frac{\partial L}{\partial O}$: Output gradient.
- $Conv$: Convolution operation.
- To do so, we will:
- **A.** ==Reshape dout ($\frac{\partial L}{\partial O}$).==
- **B.** ==Apply **im2col** on `X` to get `X_col`.==
- **C.** ==Perform matrix multiplication between reshaped `dout` and `X_col` to get `dw_col`.==
- **D.** ==Reshape `dw_col` back to `dw`.==
- We are going to see how it works intuitively and then how to implement it using Numpy.
### A) <ins>Reshape `dout`</ins>
- ==Be aware that the `np.reshape()` method doesn't return the expect result here (elements in wrong order). A little bit of numpy gymnastic solves the problem.==
<div style="text-align:center">
<img src="https://raw.githubusercontent.com/valoxe/image-storage-1/master/blog-deep-learning/cnnumpy-fast/20.png" width="80%">
</div>
### B) <ins>Apply im2col on `X` to get `X_col`</ins>
<div style="text-align:center">
<img src="https://raw.githubusercontent.com/valoxe/image-storage-1/master/blog-deep-learning/cnnumpy-fast/21.gif">
</div>
### C) <ins>Perform matrix multiplication between reshaped dout and `X_col` to get `dw_col`</ins>
- In order to perform to perform the matrix multiplication, we need to transpose `X_col`.
<div style="text-align:center">
<img src="https://raw.githubusercontent.com/valoxe/image-storage-1/master/blog-deep-learning/cnnumpy-fast/22.png">
</div>
<br>
- ==Notice that we are in fact, broadcasting the error in `dout` to to each “slide” we did during the naive implementation forward propagation over the input==.
<div style="text-align:center">
<img src="https://raw.githubusercontent.com/valoxe/image-storage-1/master/blog-deep-learning/cnnumpy-fast/23.gif">
</div>
### D) <ins>Reshape `dw_col` back to `dw`</ins>
- We simply need to reshape `dw_col` back to its original kernel shape.
<div style="text-align:center">
<img src="https://raw.githubusercontent.com/valoxe/image-storage-1/master/blog-deep-learning/cnnumpy-fast/24.png" width="80%">
</div>
## ○ Kernel gradient: Implementation
- Nothing fancy here.
---
Here is the code to implement the layer and kernel gradient.
```python=
def col2im(dX_col, X_shape, HF, WF, stride, pad):
"""
Transform our matrix back to the input image.
Parameters:
- dX_col: matrix with error.
- X_shape: input image shape.
- HF: filter height.
- WF: filter width.
- stride: stride value.
- pad: padding value.
Returns:
-x_padded: input image with error.
"""
# Get input size
N, D, H, W = X_shape
# Add padding if needed.
H_padded, W_padded = H + 2 * pad, W + 2 * pad
X_padded = np.zeros((N, D, H_padded, W_padded))
# Index matrices, necessary to transform our input image into a matrix.
i, j, d = get_indices(X_shape, HF, WF, stride, pad)
# Retrieve batch dimension by spliting dX_col N times: (X, Y) => (N, X, Y)
dX_col_reshaped = np.array(np.hsplit(dX_col, N))
# Reshape our matrix back to image.
# slice(None) is used to produce the [::] effect which means "for every elements".
np.add.at(X_padded, (slice(None), d, i, j), dX_col_reshaped)
# Remove padding from new image if needed.
if pad == 0:
return X_padded
elif type(pad) is int:
return X_padded[pad:-pad, pad:-pad, :, :]
def backward(self, dout):
"""
Distributes error from previous layer to convolutional layer and
compute error for the current convolutional layer.
Parameters:
- dout: error from previous layer.
Returns:
- dX: error of the current convolutional layer.
- self.W['grad']: weights gradient.
- self.b['grad']: bias gradient.
"""
X, X_col, w_col = self.cache
m, _, _, _ = X.shape
# Compute bias gradient.
self.b['grad'] = np.sum(dout, axis=(0,2,3))
# Reshape dout properly.
dout = dout.reshape(dout.shape[0] * dout.shape[1], dout.shape[2] * dout.shape[3])
dout = np.array(np.vsplit(dout, m))
dout = np.concatenate(dout, axis=-1)
# Perform matrix multiplication between reshaped dout and w_col to get dX_col.
dX_col = w_col.T @ dout
# Perform matrix multiplication between reshaped dout and X_col to get dW_col.
dw_col = dout @ X_col.T
# Reshape back to image (col2im).
dX = col2im(dX_col, X.shape, self.f, self.f, self.s, self.p)
# Reshape dw_col into dw.
self.W['grad'] = dw_col.reshape((dw_col.shape[0], self.n_C, self.f, self.f))
return dX, self.W['grad'], self.b['grad']
```
## 2) Pooling layer
- We first have to reshape our filters and divide by the filter size.
<div style="text-align:center">
<img src="https://raw.githubusercontent.com/valoxe/image-storage-1/master/blog-deep-learning/cnnumpy-fast/25.png" width="80%">
</div>
<br/>
- We then repeat each element "filter size" time.
<div style="text-align:center">
<img src="https://raw.githubusercontent.com/valoxe/image-storage-1/master/blog-deep-learning/cnnumpy-fast/26.png" width="80%">
</div>
<br/>
- Finally, we apply **col2im**.
- ==Be aware that the `np.reshape()` method doesn't return the expected result here (elements in wrong order). A little bit of numpy gymnastic solves the problem.==
<div style="text-align:center">
<img src="https://raw.githubusercontent.com/valoxe/image-storage-1/master/blog-deep-learning/cnnumpy-fast/27.png" width="80%">
</div>
---
Here is the implementation code:
```python=
def backward(self, dout):
"""
Distributes error through pooling layer.
Parameters:
- dout: Previous layer with the error.
Returns:
- dX: Conv layer updated with error.
"""
X = self.cache
m, n_C_prev, n_H_prev, n_W_prev = X.shape
n_C = n_C_prev
n_H = int((n_H_prev + 2 * self.p - self.f)/ self.s) + 1
n_W = int((n_W_prev + 2 * self.p - self.f)/ self.s) + 1
dout_flatten = dout.reshape(n_C, -1) / (self.f * self.f)
dX_col = np.repeat(dout_flatten, self.f*self.f, axis=0)
dX = col2im(dX_col, X.shape, self.f, self.f, self.s, self.p)
# Reshape dX properly.
dX = dX.reshape(m, -1)
dX = np.array(np.hsplit(dX, n_C_prev))
dX = dX.reshape(m, n_C_prev, n_H_prev, n_W_prev)
return dX
```
# III) Performance of fast implementation
- The [naive implementation](https://github.com/3outeille/CNNumpy/tree/master/src/slow) takes around **4 hours for 1 epoch** where the [fast implementation](https://github.com/3outeille/CNNumpy/tree/master/src/fast) takes only **6 min for 1 epoch**.
- For your information, **with the same architecture using Pytorch**, it will take around **1 min for 1 epoch**.