# Introduction to Coding
In [Introduction to Roblox Studio](https://developer.roblox.com/en-us/articles/Creating-Your-First-Game), you learned how to create and manipulate **Parts** in Roblox Studio. Now it’s time to put **scripts** to use to make them do stuff.
In this project, you’ll use a script to make a platform appear and disappear. You could use this in an **obby** - a platforming game - to span a gap that players have to cross. Players should have to time their jumps carefully to get to the other side.
## Setting the Scene
First off, you’ll need a Part to act as the platform. Making and moving Parts should be familiar to you from [Introduction to Roblox Studio](https://developer.roblox.com/en-us/articles/Creating-Your-First-Game) - make sure to check that out before continuing if this is your first project. You don’t need to have a complicated game world aside from the platform - you just need a gap that your players can’t quite jump across.
1. Insert a **Part** using the Toolbar and give it a name like ‘**DisappearingPlatform**’.
2. **Resize** it so that it’s big enough for a player to jump on.
3. **Move** it so that you can reach it and jump on it when testing the game.

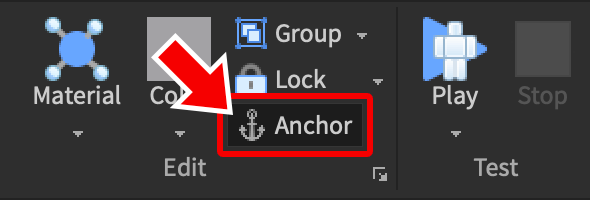
4. Click the [Anchored](https://developer.roblox.com/en-us/api-reference/property/BasePart/Anchored) button in the **Toolbar**.
When a Part is Anchored, it will stay in place no matter what. Your platform would fall to the ground as soon as you press play if it wasn’t anchored. For more about anchoring and Parts, check out [Modeling](google.com).
<span class="new-page"></span>
## Inserting a Script
Code in Roblox is written in a language called **Lua** and is stored and run from **scripts**. You can put scripts anywhere - if you put a script in a Part, Roblox will run the code in the script when the part is loaded into the game.
1. Click the **+** button next to your Part in the **Explorer**, on the right of Roblox Studio.
2. Select **Script** from the menu which appears - this will insert a new script into the platform.
3. **Delete** the default code inside.
<div class="panel panel-info">
<div class="panel-heading">
Naming Scripts and Parts
</div>
<div class="panel-body">
Remember to **rename** Parts and scripts as soon as you create them so you don’t lose track of things in the Explorer. Give them appropriate names, like “Disappear” for the above script.
</div>
</div>
The default code in the script - `print(“Hello world!”)` - will make the words “Hello world!” appear in the Output window at the bottom of Roblox Studio. Naturally, you don’t need this code to be in there if you want this script to make the platform disappear and reappear.
## First Variable
It’s a good idea to start off your script by making a variable for the platform. A variable is a name associated with a value. Once you’ve created a variable, you can use it again and again, and you can change the value if you want to.
- Create a variable for the platform called “platform”.
<pre class="code-line-highlights" data-start="1" data-highlight="1">
local platform = script.Parent
</pre>
A variable is created in Lua by first defining the **name** of the variable, which in this case is platform, then assigning a **value** to the name, which in this case is `script.Parent`.
<div class="panel panel-info">
<div class="panel-heading">
Naming Variables
</div>
<div class="panel-body">
Names for variables are typically written in **camel case**. This is lowercase with every word following the first being capitalized: `justLikeThis`, for example.
</div>
</div>
A value is assigned to a variable using the **=** sign. This doesn’t mean the same as it does in mathematics. Think of equals in coding as meaning ‘is now’ - as in, ‘`platform` is now `script.Parent`’. `local` just means that the variable is only going to be used in this part of the script.
As you might have guessed, `script` refers to the script you’re writing in. The dot means you’re looking at something that is a **member** of the script. A member of an object is a thing that the object is storing - it could be a property of that object, it could be another object, it could be something else entirely.
In this case, the member in question is the script’s **parent**, which essentially means where it is located. The script’s parent is the platform, as that’s where it was created.
## Disappear Function
Time to make the platform disappear. It’s always best to group code for achieving a specific action into a **function**. A function is a block of code with a name. They help you organize your code and use the same code in multiple places without writing it again.
- Declare a function in the script and call it ‘disappear’.
<pre class="code-line-highlights" data-start="1" data-highlight="3-5">
local platform = script.Parent
local function disappear()
end
</pre>
The first line here **declares** the function - it indicates the start of the function and gives it the name `disappear`. The code for a function goes between the first line and the end.
The **parentheses** are empty because this function won’t require any additional information in order to run. You’ll learn more about passing information to functions in a later course.
## Part Properties
When the platform "disappears," it needs to be invisible and players need to fall through it - but you can’t just destroy the platform since it needs to reappear later.
Parts have various properties that can be used here. You can see a Part’s properties if you select it in the Explorer and look at the Properties window.
A Part can be made invisible by changing the [**Transparency**](https://developer.roblox.com/en-us/api-reference/property/BasePart/Transparency#:~:text=The%20Transparency%20property%20controls%20the,BasePart.) property. Transparency can be a value between 0 and 1, where 1 is fully transparent and therefore invisible.
[some illustrative footage like this](https://static.studioplus.io/videos/GProg7.ckh.f190a7bc1441c22e5a72d3f20b1777e5.webm)
The [**CanCollide**](https://developer.roblox.com/en-us/api-reference/property/BasePart/CanCollide) property determines if other parts (and players) can pass right through the part. If you set it to **false**, players will fall through the platform.
[some illustrative footage like this](https://static.studioplus.io/videos/GProg4.ckh.3824f4013c25ce62380885b00c2409f6.webm)
Just like `script.Parent`, properties are accessed using a **dot**, and just like the variable declaration, values are assigned using an equals sign.
1. In the `disappear` function, set the **CanCollide** property of the platform to `false`.
2. On the line following, set the **Transparency** property to **1**.
<pre class="code-line-highlights" data-start="1" data-highlight="4-5">
local platform = script.Parent
local function disappear()
platform.CanCollide = false
platform.Transparency = 1
end
</pre>
<div class="panel panel-success">
<div class="panel-heading">
Indentation
</div>
<div class="panel-body">
You’ll notice that Roblox Studio automatically **indents** your code inside a function. Always make sure that your code is indented like this. It makes your code more readable, and makes it clear where the function begins and ends.
</div>
</div>
## Appear Function
You can easily make the platform **reappear** by writing a function which does the exact opposite of the `disappear()` function.
1. Declare a new function called `appear`.
2. In the function body, set the **CanCollide** property to **true** and the **Transparency** property to **0**.
<pre class="code-line-highlights" data-start="1" data-highlight="8-11">
local platform = script.Parent
local function disappear()
platform.CanCollide = false
platform.Transparency = 1
end
local function appear()
platform.CanCollide = true
platform.Transparency = 0
end
</pre>
## Looping
You've now written two functions - but how do you run the code inside them? Once you’ve declared a function, you can run its code by writing its name with parentheses next to it. For example, `disappear()` would run the disappear function. This is referred to as **calling** a function.
The platform should be constantly disappearing and reappearing, with a few seconds between each change. It’s impossible to write an infinite number of function calls - fortunately, with a **while loop**, you don’t have to.
A while loop runs the code inside it for as long as the **statement** at the top remains true. If you make the statement at the top `true`, it’ll run forever, which is exactly what you need in this case.
- Create a **while true loop** at the end of your script.
<pre class="code-line-highlights" data-start="1" data-highlight="13-15">
local platform = script.Parent
local function disappear()
platform.CanCollide = false
platform.Transparency = 1
end
local function appear()
platform.CanCollide = true
platform.Transparency = 0
end
while true do
end
</pre>
## Calling the Functions
In the while loop, you’ll need to write code to wait a few seconds between the platform disappearing and reappearing. The built-in **wait** function can be used for this. It needs an **argument** between the parentheses for the number of seconds to wait for.
<div class="panel panel-danger">
<div class="panel-heading">
While Loops and Waits
</div>
<div class="panel-body">
Whatever you do, never make a `while true` loop without including a wait - and don’t test your code before you’ve put one in! If you don’t wait inside a `while` loop, your game will **freeze** because Studio will never have a chance to leave the code in your while loop to do anything else.
</div>
</div>
Three seconds is a sensible starting point for the length of time between each platform state.
1. In the while loop, call the `wait` function with **3** as an argument.
2. Call the `disappear` function.
3. Call the `wait` function again with **3** as an argument.
4. Call the `appear` function.
<pre class="code-line-highlights" data-start="1" data-highlight="14-17">
local platform = script.Parent
local function disappear()
platform.CanCollide = false
platform.Transparency = 1
end
local function appear()
platform.CanCollide = true
platform.Transparency = 0
end
while true do
wait(3)
disappear()
wait(3)
appear()
end
</pre>
The code for the platform is now complete! You could duplicate this platform to cover a wider gap in an obby, but you’ll have to change the wait times in each script - otherwise the platforms would all disappear at the same time and players would never be able to cross.
<iframe src="https://player.vimeo.com/video/463054418" width="640" height="480" frameborder="0" allow="autoplay; fullscreen" allowfullscreen></iframe>
You could also create a neat challenge by swapping the disappear and appear calls around in each platform. This would make the platforms alternate, so players would have to time their jumps to match the changes.
<iframe src="https://player.vimeo.com/video/463054942" width="640" height="480" frameborder="0" allow="autoplay; fullscreen" allowfullscreen></iframe>


