# 以位元駕馭能量
## 前言
[電的介紹](https://www.facebook.com/JservFans/photos/a.748881811904822.1073741832.638604962932508/748882008571469/?type=3&theater)
[紮實的基礎是求生之道](https://www.facebook.com/microjserv/posts/10153620270707389)
## 用軟體駕馭各式能量
- [ ] [快速傅立葉轉換和 bit magic](https://hackmd.io/s/ByzoiggIb)
- [ ] 影像處理為例,解說 C 語言的 bit-wise operator 如何影響 rasterization
[動機](https://www.facebook.com/groups/system.software2017/permalink/1517839354948095/)
[真實世界的展現](https://www.facebook.com/groups/system.software2017/permalink/1521693884562642/)
### 手機遊戲中用到的 bit-wise operation

可以從 rasterization, equalizer, 和算術去思考。
* [Jitblt: Efficient Run-time Code Generation for Digital Compositing](http://vpri.org/pdf/tr2008002_jitblt.pdf)
* [GitHub](https://github.com/damelang/jitblt)
- [ ] pipeline-1

- [ ] pipeline-2

* 新的發展: [Blend2D](https://blend2d.com/)
* 2D vector graphics engine written in C++.
* It features a built-in JIT compiler that generates high performance 2D pipelines at runtime, which are much faster than static pipelines used in today's 2D engines. Dynamic pipeline construction is the main difference between Blend2D and other 2D engines, and guarantees the highest possible throughtput by taking advantage of CPU extensions detected at runtime.
* Blend2D provides also a deferred and asynchronous rendering, which makes it seamless to integrate with event-based environments such as node.js and next generation UI toolkits.
像素處理的程式碼片段:
```C
unsigned short blend(unsigned short fg,
unsigned short bg,
unsigned char alpha) {
// Split foreground into components
unsigned fg_r = fg >> 11;
unsigned fg_g = (fg >> 5) & ((1u << 6) - 1);
unsigned fg_b = fg & ((1u << 5) - 1);
// Split background into components
unsigned bg_r = bg >> 11;
unsigned bg_g = (bg >> 5) & ((1u << 6) - 1);
unsigned bg_b = bg & ((1u << 5) - 1);
// Alpha blend components
unsigned out_r = (fg_r * alpha + bg_r * (255 - alpha)) / 255;
unsigned out_g = (fg_g * alpha + bg_g * (255 - alpha)) / 255;
unsigned out_b = (fg_b * alpha + bg_b * (255 - alpha)) / 255;
// Pack result
return (unsigned short) ((out_r << 11) |
(out_g << 5) |
(out_b);
}
```
其中 "Alpha blend components" 可透過改寫為以下:
```C
unsigned out_r = fg_r * a + bg_r * (255 - alpha);
unsigned out_g = fg_g * a + bg_g * (255 - alpha);
unsigned out_b = fg_b * a + bg_b * (255 - alpha);
out_r = (out_r + 1 + (out_r >> 8)) >> 8;
out_g = (out_g + 1 + (out_g >> 8)) >> 8;
out_b = (out_b + 1 + (out_b >> 8)) >> 8;
```
### 案例分析
給定每個 pixel 為 32-bit 的 RGBA 的 bitmap,其轉換為黑白影像的函式為:
```clike
void rgba_to_bw(uint32_t *bitmap, int width, int height, long stride) {
for (int row = 0; row < height; row++) {
for (int col = 0; col < width; col++) {
uint32_t pixel = bitmap[col + row * stride / 4];
uint32_t a = (pixel >> 24) & 0xff;
uint32_t r = (pixel >> 16) & 0xff;
uint32_t g = (pixel >> 8) & 0xff;
uint32_t b = pixel & 0xff;
uint32_t bw = (uint32_t) (r * 0.299 + g * 0.587 + b * 0.114);
bitmap[col + row * stride / 4] = (a << 24) +
(bw << 16) +
(bw << 8) +
(bw);
}
}
}
```
人眼吸收綠色比其他顏色敏感,所以當影像變成灰階時,僅僅將紅色、綠色、藍色加總取平均,這是不夠的,常見的方法是將 red * 77, green * 151 + blue * 28,這三個除數的總和為 256,可使除法變簡單
提出效能改善的方案:
* 建立表格加速浮點數操作 (L1 cache?)
* 減少位移數量
- [ ] 考慮以下寫法
```C
bwPixel = table[rgbPixel & 0x00ffffff] + rgbPixel & 0xff000000;
```
:::info
16 MB; 表格太大
:::
- [ ] 如果先計算針對「乘上 0.299」一類的運算,先行計算後建立表格呢?
```C
bw = (uint32_t) mul_299[r] + (uint32_t) mul_587[g] + (uint32_t) mul_144[b];
bitmap[col + row * strike / 4] = (a << 24) + (bw << 16) + (bw << 8) + bw;
```
:::info
降到 32 KB 以內; cache friendly
:::
### 實作程式碼
原始程式碼: [RGBAtoBW](https://github.com/charles620016/embedded-summer2015/tree/master/RGBAtoBW)
BMP (BitMaP) 檔是是很早以前微軟所開發並使用在 Windows 系統上的圖型格式,通常不壓縮,不像 JPG, GIF, PNG 會有破壞性或非破壞性的壓縮。雖然 BMP 缺點是檔案非常大,不過因為沒有壓縮,即使不借助 OpenCV、ImageMagick 或 .NET Framework 等等,也可以很容易地直接用 Standard C Library 作影像處理。
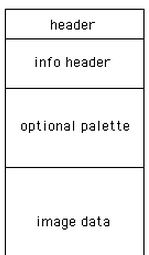
BMP 主要有四個部份組成:
1. Bitmap File Header:Magic Number (’BM’)、file size、Offset to image data
2. Bitmap Info Header:image width and height、the number of bits per pixel、Compression type
3. Color Table (Palette)
4. Image data
- [ ] 原始版本
以下是使用一張 1920x1080 的 BMP 圖片,所得知的檔案資訊:
```
==== Header ====
Signature = 4D42
FileSize = 8294456
DataOffset = 54
==== Info ======
Info size = 40
Width = 1920
Height = 1080
BitsPerPixel = 32
Compression = 0
================
RGBA to BW is in progress....
Save the picture successfully!
Execution time of rgbaToBw() : 0.034494
```
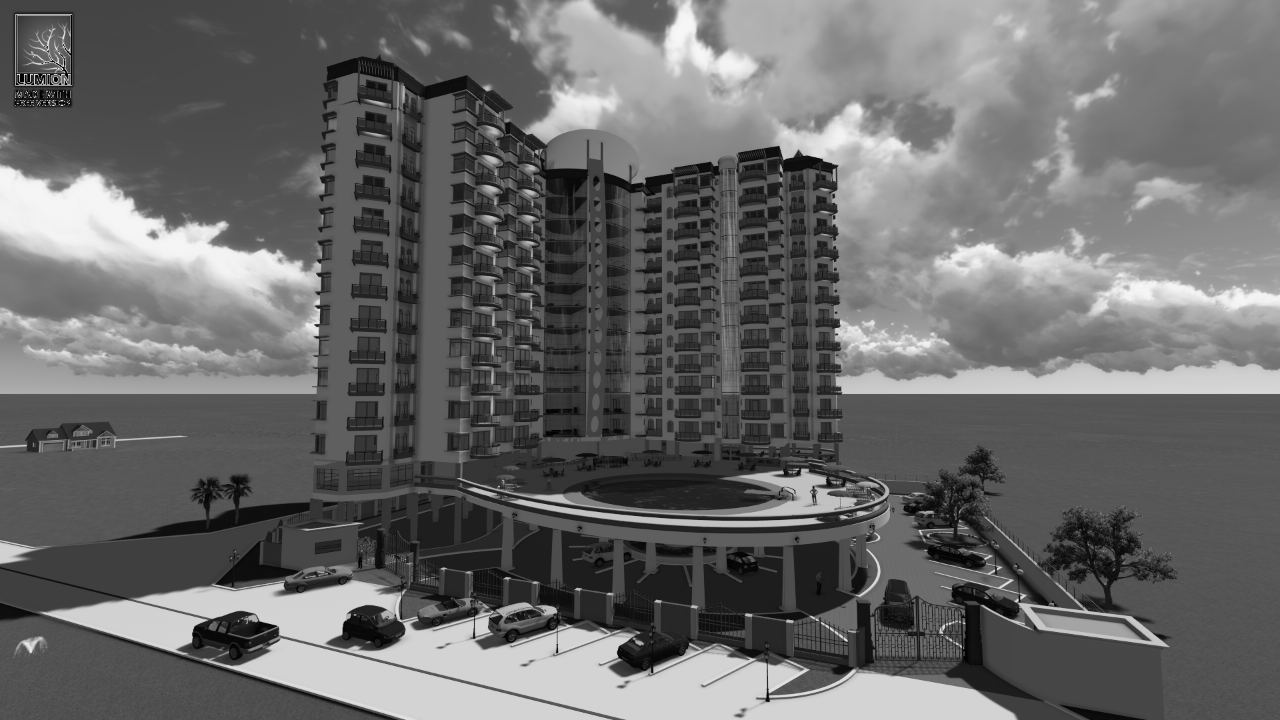
:::info
執行時間:0.034494 sec
:::
- [ ] Version 1: [Lookup Table](https://en.wikipedia.org/wiki/Lookup_table) (LUT)
RGB 分別都是 8 bit,可以建立三個大小為 256 bytes 的 table,這樣就不用在每次轉 bw 過程中進行浮點數運算。
* 原本: `bw = (uint32_t) (r * 0.299 + g * 0.587 + b * 0.114);`
* 查表: `bw = (uint32_t) (table_R[r] + table_G[g] + table_B[b]);`
:::info
執行時間: `0.028148 sec`
:::
- [ ] Version 2
使用 pointer 的 offset 取代原本的繁雜的 bitwise operation。
```C
uint32_t *pixel = bmp->data;
r = (BYTE *) pixel + 2;
g = (BYTE *) pixel + 1;
b = (BYTE *) pixel;
```
:::info
執行時間: `0.020379 sec`
:::
- [ ] Version 3
將上述 Version 1 和 Version 2合併在一起
:::info
執行時間: `0.018061 sec`
:::
- [ ] Version 4 + Version 5
使用 [ARM NEON 指令集](https://developer.arm.com/technologies/neon) 加速,執行環境是 Raspberry Pi 2 (Cortex-A7 x4),這是[實作程式碼](https://github.com/brchiu/RGBAtoBW)。
用 Raspberry Pi 2 測試:
```shell
CC = gcc-4.8
CFLAGS = -O0 -Wall -ftree-vectorize -mcpu=cortex-a7 -mfpu=neon-vfpv4 -mfloat-abi=hard
```
* Original
* Execution time of rgbaToBw(): 0.353600
* Version 1: using RGB table
* Execution time of rgbaToBw(): 0.319600
* Version 2: using pointer arithmetic
* Execution time of rgbaToBw(): 0.251800
* Version 3: versoin1 + versoin2`
* Execution time of rgbaToBw(): 0.226800
* Version 4: NEON
* Execution time of rgbaToBw(): 0.016000
* Version 5: NEON (loop unrolling + PLD)
* Execution time of rgbaToBw(): 0.013200
### 什麼是 NEON?
NEON technology is an advanced **SIMD** (Single Instruction, Multiple Data) architecture for the ARM Cortex-A series processors.
* Registers are considered as **vectors **of **elements **of the same **data type**
* Data types can be: signed/unsigned 8-bit, 16-bit, 32-bit, 64-bit, single precision [floating point](http://www.arm.com/products/processors/technologies/vector-floating-point.php)
* Instructions perform the same** operation **in all **lanes**
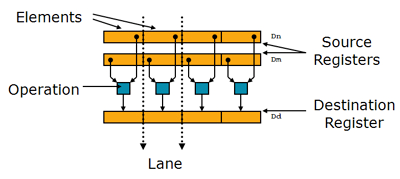
Register :
* 16 x 32-bit general purpose ARM registers (R0-R15).
* 32 x 64-bit NEON registers (D0-D31) OR viewed as 16x128-bit registers (Q0-Q15).
簡言之,有了 NEON instruction set,就可以「同時」操作許多個 8, 16 或 32-bit 的資料,在訊號處理、影像處理、視訊解碼等有很高的應用價值。
首先先看 Version 4 :
將 RGB三色的 weight 丟進 r3 - r5。
`vdup.8` (Vector Duplicate),分別複製到大小為 8 bit 的 NEON register d0 - d2
```
mov r3, #77
mov r4, #151
mov r5, #28
vdup.8 d0, r3
vdup.8 d1, r4
vdup.8 d2, r5
```
`vld4.8` (Vector Load),載入 pixel 的資料到 4 個 8-bit 的 NEON register d4-d7,其中那個 4 是 interleave,因為我們有 ARGB,所以 gap = 4,從下面兩張圖就可以看出 vld 的用法。
再來就是計算 weighted average啦。Vector Multiply 和 Vector Multiply Accumulate
```
@ (alpha,R,G,B) = (d7,d6,d5,d4)
vld4.8 {d4-d7}, [r0]!
vmull.u8 q10, d6, d0
vmlal.u8 q10, d5, d1
vmlal.u8 q10, d4, d2
```
將值除以256就是我們要的灰階值了。
:::info
`vrshrn` (Vector Shift Right by immediate value)
:::
```
vrshrn.u16 d4, q10, #8
```
最後將結果儲存。
:::info
`vst` (Vector Store)
:::
```
vst4.8 {d4-d7}, [r3]!
```
:::info
執行時間: `0.016000 sec`
:::
從上面瀏覽過一遍用到的 NEON instruction set,就可以發現我們都是一次對多個 NEON register 作操作,下面討論分析有比較圖就可以看出效能差距。
再來看 Version 5
:::info
執行時間: 0.013200 sec
:::
### 討論與分析
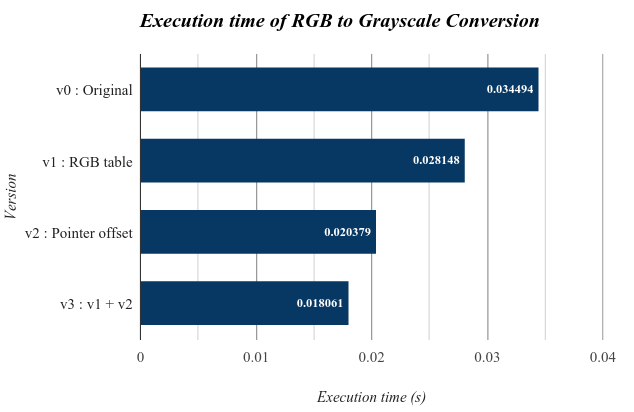
以上各版本執行時間都是 50 次迴圈平均下來的結果,測試檔為 1920x1080 32bit bmp 圖片。可以明顯看到 v2 效能表現比起 v1 來說 還好上許多,可見原始程式中「多次」的 bitwise operation 結果所帶來損耗比起浮點數運算還更多一些。若我們再將浮點數運算改成查表的話,最後時間能進步到 0.018061 sec,幾乎是原來的一半。
另外使用 [perf 效能分析工具](http://wiki.csie.ncku.edu.tw/embedded/perf-tutorial) 來觀察原始版本和 version 3 中 instruction 和 cycle 數量。
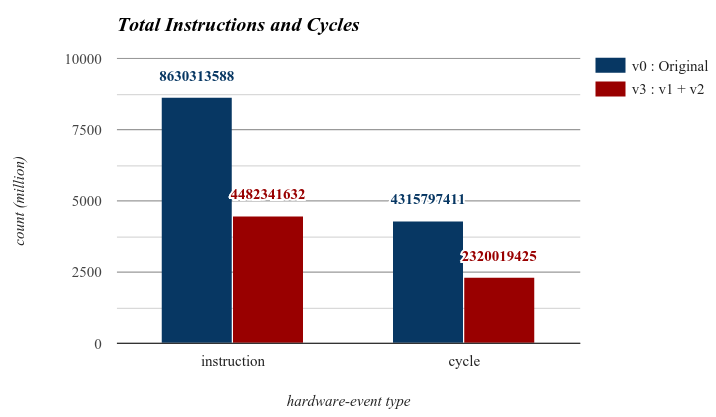
可以看到 version 3 的 instruction 和 cycle 大約都只有原來的一半,這結果也正好反應在上面的執行時間上。
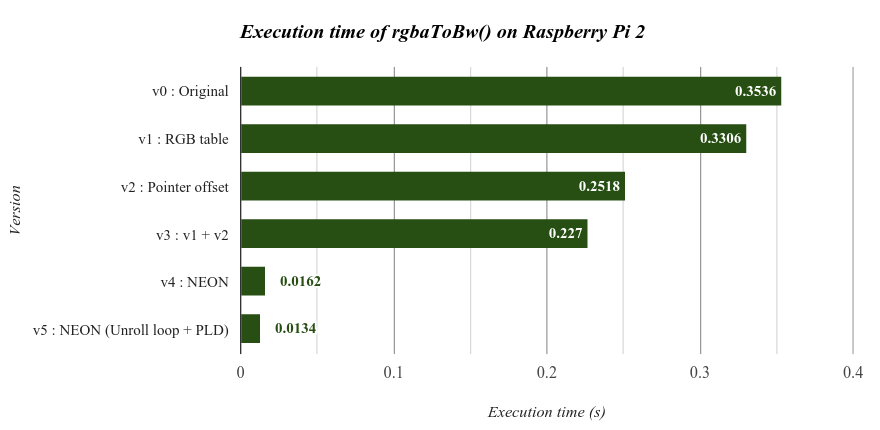
從這張表就可以很清楚了解使用 NEON 指令集加速後所得到的效能增長, Version 4 只花了==原本 `4.6%` 的時間== 就完成彩色轉灰階處理。
 Sign in with Wallet
 Sign in with Wallet