---
tags: ironhack, lecture,
---
<style>
.markdown-body img[src$=".png"] {background-color:transparent;}
.alert-info.lecture,
.alert-success.lecture,
.alert-warning.lecture,
.alert-danger.lecture {
box-shadow:0 0 0 .5em rgba(64, 96, 85, 0.4); margin-top:20px;margin-bottom:20px;
position:relative;
ddisplay:none;
}
.alert-info.lecture:before,
.alert-success.lecture:before,
.alert-warning.lecture:before,
.alert-danger.lecture:before {
content:"👨🏫\A"; white-space:pre-line;
display:block;margin-bottom:.5em;
/*position:absolute; right:0; top:0;
margin:3px;margin-right:7px;*/
}
b {
--color:yellow;
font-weight:500;
background:var(--color); box-shadow:0 0 0 .35em var(--color),0 0 0 .35em;
}
.skip {
opacity:.4;
}
</style>

# Node.js | Basic Authentication & Sessions
## Learning Goals
After this lesson, you will be able to:
- Understand what authentication is, and how it's related to authorization
- Understand what sessions and cookies are
- Understand how authentication, sessions and cookies are all related
- Implement authentication in your web application
## Introduction
:::info lecture
Afin d'éviter d'avoir à échanger nos identifiants avec le serveur à chaque requête, nous allons utiliser un mécanisme à base de cookie + session.
:::
In the previous lesson, we learned about authorization and about its importance. In this lesson, we'll learn what is authentication and how it is directly connected to authorization.

When a user logs into our web app, authentication allows us to know which user (of all users in our system) is visiting the page. While authorization is related to signing up, authentication is related to logging in.
Before we go deeper into the authentication process, we need to learn two new topics that are crucial to it: **sessions** and **cookies**.
## Cookies
:::info lecture
Plutôt que d'échanger ses credentials avec le serveur, à chaque fois que le client souhaite accéder à une ressource privée :
[](https://docs.google.com/drawings/d/1AyzJQ-Ib4uH0kWRGVHPQeD8wIf6MyavSw8wghKDViUM/edit)
NB : Peu sécure + peu pratique
:::
:::info lecture
Nous allons (en tant que client) :
1. Nous identifier via un formulaire de login :
[](https://docs.google.com/drawings/d/1A4P7o1KrXcYSvtPzDaE65w6v5cLDWf6BuqqucTKZk40/edit?folder=0AAQNm5fx5y30Uk9PVA)
👉 **Le serveur nous renverra un cookie que <b>nous conserverons dans le client</b>.**
2. puis dans toutes les requêtes suivantes, le cookie sera transmis au serveur afin que celui-ci nous "reconnaisse" :
[](https://docs.google.com/drawings/d/1JQrepwNt086E4z5_eG8Qv_R6j9gFipF3x9c7vfkWjcQ/edit)
NB : Ce cookie est la preuve pour le serveur que nous nous sommes bien identifié (par le passé).
:::
Cookies are small files which are stored on a user's computer. They are designed to hold a small amount of specific data from a website and can be accessed either by the web server or the client computer.
Cookies are a convenient way to carry information between sessions, without having to burden a server machine with massive amounts of data storage.
We can write and read cookies with the [`cookie`](https://www.npmjs.com/package/cookie) package, and get them from the server with the [`cookie-parser`](https://www.npmjs.com/package/cookie-parser) installed by default through `express-generator`.
Once we send a cookie to the client, we can inspect its information with the [Chrome Dev Tools](https://developer.chrome.com/devtools). They are located in the Dev Tools' `Application` tab:
:::info lecture
Comment inspecter les cookies stockés dans notre navigateur :
:::

:::info lecture
A noter que l'ensemble des cookies d'un domain **sont envoyés automatiquement** lors d'une requête à ce même domaine.
:::
From this tab, you can see the content of the cookies you have in your machine. You can also remove the cookies you don't want to have.
## Session
:::info lecture
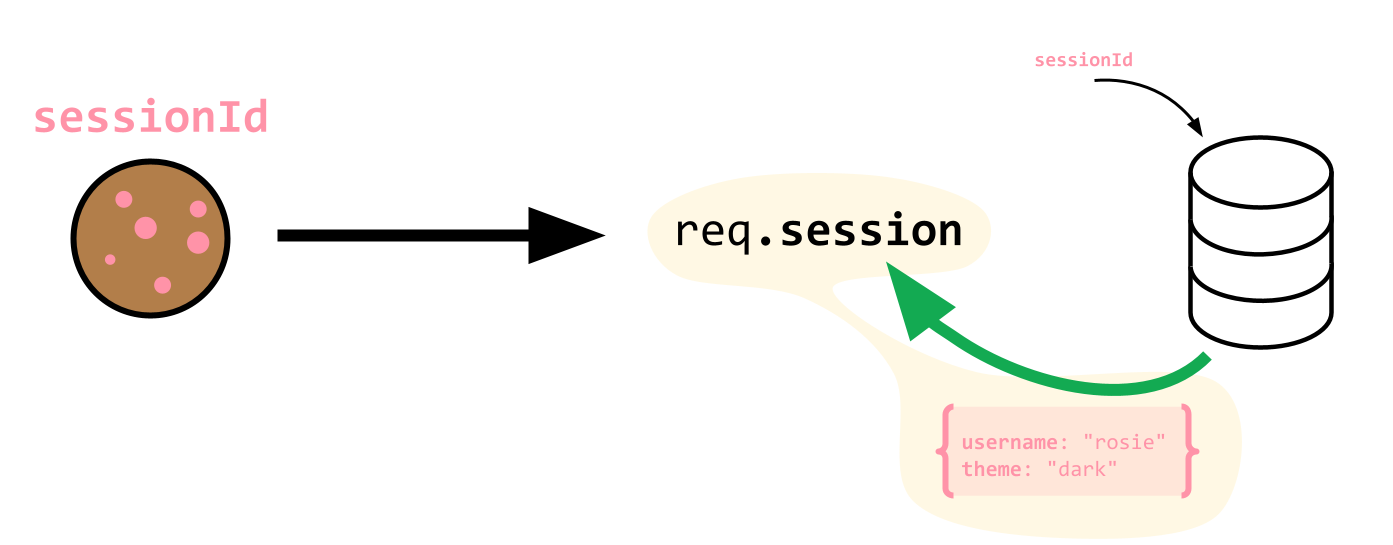
La taille des cookies est limitée en taille. En effet, étant transmis entre chaque requete avec le serveur, il est important qu'ils restent petits afin de ne pas alourdir le traffic.
On limitera donc l'information portée par le cookie à une seule valeur : un ID
[](https://docs.google.com/drawings/d/1DDS40tYGDj5YaXEedLzwHxIiF-QbnEgbHa7thvi1Vlk/edit)
:::
:::info lecture
Cependant, pour chaque utilisateur identifié, nous allons vouloir avoir accès à un nombre non-limité d'informations :
[](https://docs.google.com/drawings/d/1azzj7AhH46grbwTjO_bqJj7jT6HcawmfcoS2YV2CZTE/edit)
[](https://docs.google.com/drawings/d/172eP8VHJFz7IhvLcJlsXLlePFsM1HLT8O4RNE1wpp4g/edit)
:::
:::info lecture
Une session va donc être une mémoire tampon, à l'intérieur de laquelle nous allons pouvoir lire/écrire des informations relative à un client particulier.
:::
A [session](https://en.wikipedia.org/wiki/Session_(computer_science)) is a semi-permanent interactive information interchange between two or more communicating devices, usually a server and a client.
In particular, a login session is the period of activity between a user log-in and log-out of a system. This system could be our Operative System (yes, right now you are in the middle of a session!), or our web application.
:::info lecture
Afin de mettre en place ce mécanisme, nous utiliserons `express-session` + `connect-mongo` en tant que cookie-store.
:::
In the Node.js ecosystem, we can use the [`express-session`](https://www.npmjs.com/package/express-session) package to generate sessions in Express. We will use it in combination with [`connect-mongo`](https://www.npmjs.com/package/connect-mongo) to store session data inside our database.
:::warning
We will see how to configure `express-session` and `connect-mongo` later in this learning unit.
:::
## Log in
Authentication is the process where users provide their credentials (username/email and password) and send them to the server. The user will be authenticated if the username and password are correct. This is done through login.
In the following diagram you can see a basic login process:
:::info lecture
Le flow de login peut ainsi être représenté :
:::
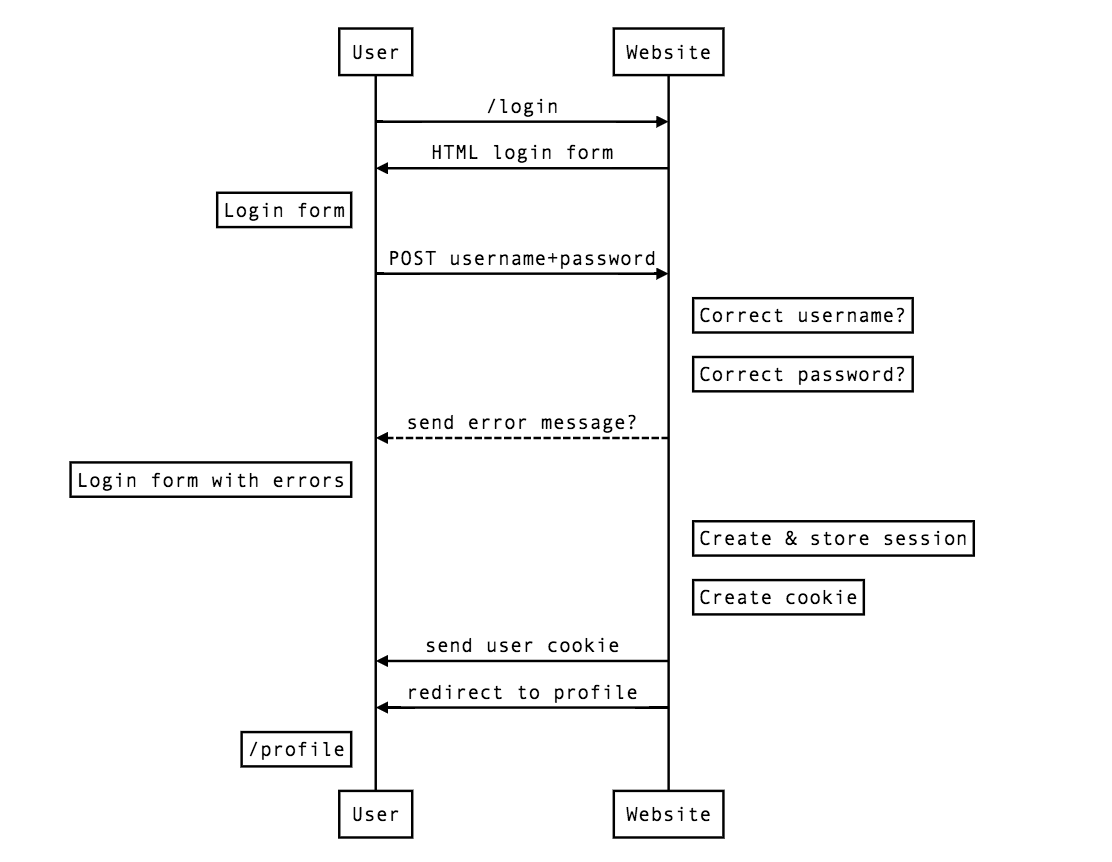
Once the user has been authenticated, we have to create a session to keep the user logged in. In this session we can store all the information we want. It's highly recommended to have the minimum information we need to keep the session.
If the information provided by the user is not correct, the server side has to send an error message to the user indicating that their credentials are wrong.
:::info lecture
Ce n'est ni plus ni moins qu'une représentation plus détaillée de ce que nous avons plus tôt :
[](https://docs.google.com/drawings/d/1A4P7o1KrXcYSvtPzDaE65w6v5cLDWf6BuqqucTKZk40/edit?folder=0AAQNm5fx5y30Uk9PVA)
:::
### Authorization & Authentication
:::info lecture
Passons à la pratique...
:::
<b>Let's keep working with the project from the previous lesson `basic-auth`</b>. In the first step of this project, we created the authorization process. In this learning unit we will complete the circle by adding authentication to the exercise.
#### `app.js` configuration
First of all we need to add the packages we will use to store user's session once they are authenticated. We will use [express-session](https://www.npmjs.com/package/express-session) and [connect-mongo](https://www.npmjs.com/package/connect-mongo) packages to store the session in mongo and keep our users logged in.
First of all we have to add the packages to the project:
:::info lecture
Installons nos packages utiles à mettre en place une session utilisateur :
:::
```shell
$ npm install express-session connect-mongo
```
Now let's require both packages in the top part of our `app.js` file:
:::info lecture
Initialisons-les dans `app.js` :
:::
```javascript
// app.js
const session = require("express-session");
const MongoStore = require("connect-mongo")(session);
```
Now, we have to configure the middleware to enable sessions in Express. Remember we use `app.use()` to configure our middlewares:
:::info lecture
Configurons les règlage de session :
:::
```javascript
// app.js
...
app.use(session({
secret: "basic-auth-secret",
cookie: { maxAge: 60000 },
store: new MongoStore({
mongooseConnection: mongoose.connection,
ttl: 24 * 60 * 60 // 1 day
})
}));
// Middleware Setup
...
```
The session package creates a new session middleware with the specified options. Here are the options we are using:
- **secret**: Used to sign the session ID cookie (*required*)
- **cookie**: Object for the session ID cookie. In this case, we only set the `maxAge` attribute, which configures the expiration date of the cookie (in milliseconds).
- **store**: Sets the session store instance. In this case, we create a new instance of `connect-mongo`, so we can store the session information in our Mongo database.
#### Layout
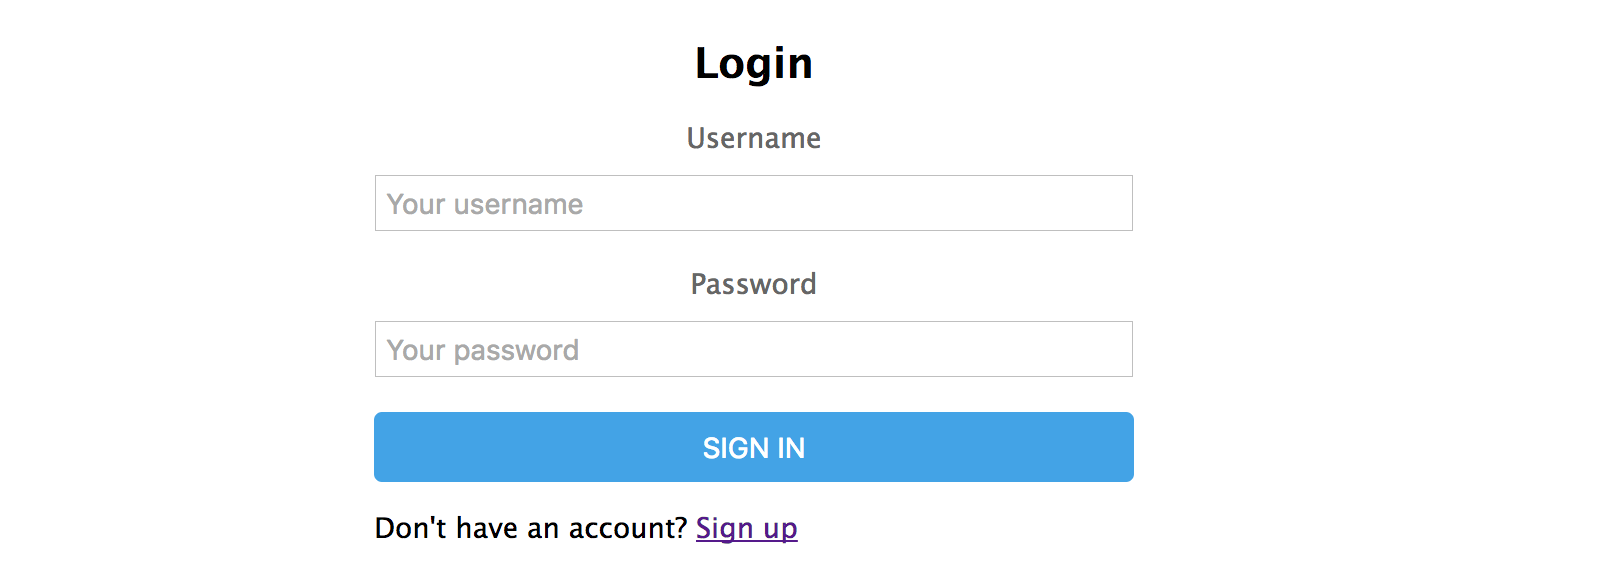
The next step we have to do is to create the login form. We will add the file `views/auth/login.hbs`, and create the following form in it:
:::info lecture
Implémentons notre template de login :
:::
```htmlmixed
{{! views/auth/login.hbs }}
<form action="/login" method="POST" id="form">
<h2>Login</h2>
<label for="username">Username</label>
<input type="text" name="username">
<label for="password">Password</label>
<input type="password" name="password">
{{#if errorMessage }}
<div class="error-message">{{ errorMessage }}</div>
{{/if}}
<button>Sign in</button>
<p class="account-message">
Don't have an account? <a href="/signup">Sign up</a>
</p>
</form>
```
Note how we added the error validations, as we did in the authorization process. Actually, the form is almost the same as the sign up form.
Once the form is created, we need to create the routes to access the login page.
#### Routes
Now let's define the `/login` page to show the form to the users. Remember we have defined the authentication routes in the `routes/auth.js` file:
:::info lecture
Notre route d'affichage du formulaire :
:::
```javascript
// routes/auth.js
router.get("/login", (req, res, next) => {
res.render("auth/login");
});
```
Now, we can see our login form visiting the `http://localhost:3000/login` URL:
:::info
Remember to launch the node server before visit the page with `npm run dev` in the console.
:::
Let's add the POST method to handle the form request. This request will authenticate the user if the username and passwords are correct:
:::info lecture
Ainsi que notre route de traitement du formulaire de login :
:::
```javascript=
router.post("/login", (req, res, next) => {
const theUsername = req.body.username;
const thePassword = req.body.password;
if (theUsername === "" || thePassword === "") {
res.render("auth/login", {
errorMessage: "Please enter both, username and password to sign up."
});
return;
}
User.findOne({ "username": theUsername })
.then(user => {
if (!user) {
res.render("auth/login", {
errorMessage: "The username doesn't exist."
});
return; // STOP
}
if (bcrypt.compareSync(thePassword, user.password)) {
req.session.currentUser = user; // Save the user in the session!
res.redirect("/");
} else {
res.render("auth/login", {
errorMessage: "Incorrect password"
});
}
})
.catch(err => next(err))
});
```
:::info lecture
- L20 : on utilise `bcrypt.compareSync` pour pouvoir comparer le mot de passe saisi à celui crypté en base
- L22 : on stocke dans la session notre `user` <b>afin de ne pas avoir à le chercher en base de nouveau lors des requetes suivantes</b>.
:::
`req.session.currentUser = user;` - Note how we create the user session; the `request` object has a property called session where we can add the values we want to store on it. In this case, we are setting it up with the user's information.
The **presence of the user's information in the session** is what we are going to use to check for a logged in user in the other parts of the app.
Once the user is logged in, we will redirect them to the main page in our site. We don't have any pages, so let's create them.
#### Home page
:::info lecture
Créons la homepage vers laquelle l'utilisateur sera redirigée une fois loggué...
:::
Let's create a very simple home page with the three following links:
- **Sign up**: we will direct the users to the sign up form.
- **Login**: we will direct the users to the login form.
- **Protected page**: the destination page will require to be authenticated to visit it. If you are not authenticated, it will redirect you to the login page.
So the home page, in `views/index.hbs` will have the following HTML:
:::info lecture
le template :
:::
```htmlmixed
{{! views/index.hbs }}
<div id="container">
<a href="/signup">Sign up</a>
<a href="/login">Login</a>
<a href="/secret">Protected page (requires authentication!)</a>
</div>
```
Now we can access to `http://localhost:3000/` URL and see the three links we just defined. We will create a protected route to handle `/secret` route we specified in the third link of the home page.
#### Protected routes
:::info lecture
Créons maintenant une page "protégée", ie: **accessible seulement aux utilisateurs connectés**...
:::
First of all, let's create the view in `views/secret.hbs` file. We will show a message to the user indicating he is in a session:
```htmlmixed
{{! views/secret.hbs }}
<div id="container">
<h2>You are in a session!</h2>
</div>
```
We want to prevent the users who are not logged from accessing this page. We can do that by writing our own middleware. In the `routes/index.js` we will define a `ensureIsLogged` middleware to call before the `/secret` route handler:
```javascript=
// routes/index.js
function ensureIsLogged(req, res, next) {
if (req.session.currentUser) {
next();
} else {
res.redirect("/login");
}
}
router.get("/secret", ensureIsLogged, (req, res, next) => {
res.render("secret");
});
...
```
:::info lecture
Le middleware écrit **L3-L9 va vérifier que l'utilisateur est loggué** (en vérifiant la présence de `currentUser` dans `req.session`) avant d'accéder à n'importe quelle route de ce router.
:::
We can use that `ensureIsLogged` anytime before any route handler to make sure the user is logged before rendering the page.
If we start our server and try to visit `/secret`, we will be redirected to the login page. Once we have logged in, we will be able to access to our secret page.

## Logout
To finish up with the lesson, we will add the logout. The logout is the process where the user "closes" the connection between them and the web app. It's the opposite of the login.
Sessions package has a `destroy` method which, when executed, will close the user's session. To do that, we will create the following route in our `routes/auth.js`:
:::info lecture
Enfin, créons une route pour se déconnecter :
:::
```javascript=
// routes/auth.js
router.get("/logout", (req, res, next) => {
req.session.destroy((err) => {
// cannot access session here
res.redirect("/");
});
});
```
:::info lecture
`req.session.destroy` permet de "vider" `req.session` et également effacer le cookie coté client.
:::
As you can see, we have to make a `GET` request to `/logout` route, and once the sessions is closed, we will redirect the user to the login page again.
We can add the link in the HTML as follows:
```htmlmixed
{{! views/index.hbs }}
<a href="/logout">Logout</a>
```
With this, we are done with our exercise. We have completed the whole process of authorization and authentication.
## Summary
In this lesson we got familiar with sessions and cookies, and how they are related to authentication. We have also seen what authentication is and how it works with authorization.
To finish up, we completed the basics of authorization form the previous lesson by completing the exercise, adding the authentication functionality.
## Extra Resources
- [What are cookies?](http://www.whatarecookies.com/)