# Cache 原理和實際影響
contributed by <`piggyking1421`> <`blake11235`>
### 開發環境
```
Architecture: x86_64
CPU 作業模式: 32-bit, 64-bit
Byte Order: Little Endian
CPU(s): 4
On-line CPU(s) list: 0-3
每核心執行緒數:1
每通訊端核心數:4
Socket(s): 1
NUMA 節點: 1
供應商識別號: GenuineIntel
CPU 家族: 6
型號: 158
Model name: Intel(R) Core(TM) i5-7300HQ CPU @ 2.50GHz
製程: 9
CPU MHz: 801.953
CPU max MHz: 3500.0000
CPU min MHz: 800.0000
BogoMIPS: 4991.90
虛擬: VT-x
L1d 快取: 32K
L1i 快取: 32K
L2 快取: 256K
L3 快取: 6144K
NUMA node0 CPU(s): 0-3
```
---
### 從開發環境了解 CPU Cache
#### Cache 介紹
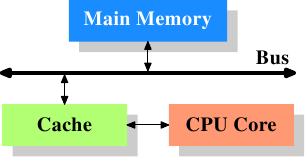
CPU cache 是用於減少處理器存取記憶體所需平均時間的機制

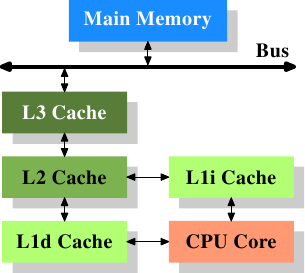
1. level-1 data cache: 一級資料 cache(D$)
2. level-1 inst cache: 一級指令 cache(I$)
3. MMU:記憶體管理單元
4. TLB:translation lookaside buffer
5. level-2 cache: 二級 cache
6. level-3 cache: 三級 cache
根據我的電腦的資訊,可以看到快取記憶體從 **L1 的 32K** 到 **L3 的 6144K**,如此設計並不是沒有道理,Cache 越上層的記憶體越貴,速度越快,容量越小。越下層記憶體越便宜,速度慢,但容量越大。

### Prefetch
---
#### prefetch 的意義
CPU操作資料之前,我們就先將資料以主動的方式提前加載到快取中,便會減少 cache miss 的情況發生,也因此大幅提升效能。
由於軟體工程師對於自己所設計的要加載到 CPU 的資料位置有一定程度的了解,因此才主動的預先將資料 prefetch,但使用預取指令只是按我們自己的想法對 CPU 的數據操作進行補充,也就是說錯誤的使用 prefetch有可能使 CPU 加載到目前不需要的快取的數據,反而降低效率。
#### prefetch 機制
* stride prefetch
直接翻譯的意思是「跨步走」
當 cache miss 發生的時候,在距離發生 cache miss 的**一段位置**的地方,很有可能等等會再次發生。
因此,把距離這個位址**一段位置**的倍數的資料先 prefetch 起來,而 degree of prefetch 代表的是倍數的量,越大表示越 aggressive ,也就是所 prefetch 的資料愈多、愈廣。
```
Prediction : if a memory address is missed, an address that is offset
by a distance from the missed address is likely to be missed in near future
Architecture implementation: when an address miss, prefetch address
that is offset by a distance from the missed address. When there is a
hit in buffer, also prefetch the address that is offset by a distance
from the hit address.
```
* markov prefetch
顧名思義就是馬可夫鍊,當 cache miss 出現,會紀錄在這個位址之後的下一個 cache miss 位址。

* distant prefetch
也就是 markov prefetch 的延伸,但他是記距離上個 cache miss 發生的位址有多遠。
Markov Prefetch 與 Distant Prefetch 屬於一種叫 Table Prefetch 的分類,都是在建表,而且可以畫成有向圖。缺點是這個表可能會存了很久以前發生,但是將來不會再發生的 Cache Miss 紀錄,進而讓表紀錄很多多餘的資料,或是 Prefetch 很多不必要的資訊。
* GHB : global history buffer
也算是一種 table prefetch 的分類,只不過這個 table 是使用 FIFO 的 linked-list 去實作,因此 GHB 還可以實施更多元的 Prefetch。

* STR : streaming prefeching
是一種最常被使用的 hardware prefetch,主要概念是當 cache miss 發生時,stream buffer 會向較低階的 memory 要求 cache miss 附近的 address,也就是把的連續 address 放入一個 buffer 當中,當處理器發現 address 有相關性的時候,會把 prefetched blocks 內的 address 取出。此 prefetching successive blocks 又被稱為 **Sequential Prefetching**。

#### software & hardware prefetch
prefetch 主要分成 SW & HW,不同的資料結構是用於不同的 prefetch 方法,不論是哪種,他們最終目的是要**針對複雜的資料結構,去預測其未來 cache miss 的 address**

#### prefetch 定義
可以分成以下幾種
1. timely:準時,處理器要求時, cache 剛好出現
2. late:遲到,在 prefetched block 之前處理器早已要求
3. early:早到,處理器要求後,prefetched 才出現
4. redundant: cache 內的 data 重複了
5. incorrent: cache 內的 block 完全沒被用到

reference:[cache 介紹](https://hackmd.io/s/HkW3Dr1Rb#Cache-%E4%BB%8B%E7%B4%B9)、[software-pipelining](https://hackmd.io/s/H1d_W-gsg#%E6%9C%89%E7%94%A8%E7%9A%84-Prefetch)
#### Software Prefetch Distance
prefetching 只有在夠早之前被提取出來才有功效,並且需要夠早才能包含 prefetch latency 的時間。

$$
D >= [{l \over s}]
$$
D 被稱作為 prefetch distance,是透過 l prefetching latency,也就是從記憶體到 L1 cache 的時間,除於 s 通過目前迴圈(資料結構)最短距離的時間。若 D 太大,prefetched 會釋出原本有用的 cached blocks,導致資料被覆蓋造成 cache miss。因此 prefetched distance 對於效能與 prefetcher 有非常重要的影響。
---
### Prefetcher 實驗
[prefetcher 程式碼](https://github.com/vonchuang/prefetcher)
此程式碼是針對一個 4X4 的矩陣作旋轉,將 row 和 col 的值互換,並考慮 navie_transopse、sse_prefetch_transpose、sse_prefetch_transpose 的效能
* Makefile
分別有以下三種程式可執行
* navie_transopse
* sse_prefetch_transpose
* sse_prefetch_transpose
皆透過定義巨集 ```#define NAIVE 1``` 、 ```#define SSE 1``` 、 ```#define SSE_PREFETCH 1``` 來分別執行各個 transpose , 將各個 .c include 到 main.c 裡去執行
* cache-test
```perf stat --repeat 10``` 針對以下目標進行分析,重複執行 10 次該程序,並顯示每個 event 的變化區間,以分析 cache miss/hit。
```
cache-misses,cache-references,instructions,cycles,L1-dcache-loads,L1- dcache-load-misses,L1-dcache-prefetches,L1-dcache-prefetch-misses,LLC- loads,LLC-load-misses,LLC-prefetches,LLC-prefetch-misses
```
* main.c
```#include IMPL```依據 Makefile 的 DIMPL 分別 include 不同的 transpose 檔,再依該檔判斷並執行不同的 transpose
```=c
#if defined(NAIVE)
naive_transpose(testin, testout, 4, 4);
#elif defined(SSE)
sse_transpose(testin, testout, 4, 4);
#elif defined(SSE_PREFETCH)
sse_prefetch_transpose(testin, testout, 4, 4);
#endif
```
* naive_transpose.c
```=c
void naive_transpose(int *src, int *dst, int w, int h)
{
for (int x = 0; x < w; x++)
for (int y = 0; y < h; y++)
*(dst + x * h + y) = *(src + y * w + x);
}
```
假設 cache line 為 4 words,1 word 就是 sizeof(int),也就是 4Bytes
可以得到此矩陣為
|src[i][j]|j=0|j=1|j=2|j=3|
|:--:|:--:|:--:|:--:|:--:|
|i=0|0|1|2|3|
|i=1|4|5|6|7|
|i=2|8|9|10|11|
|i=3|12|13|14|15|
將 src 的數值 + row 的值乘 4 + col,輸入相對應的 dst
將程式運作的情形換成一維陣列的 address 操做的話
src + 0x4 + 0 **miss!**
src + 1x4 + 0 **miss!**
src + 2x4 + 0 **miss!**
src + 3x4 + 0 **miss!**
src + 1x4 + 1 **miss!**
src + 2x4 + 1 **miss!**
src + 3x4 + 1 **miss!**
src + 4x4 + 1 **miss!**
src + 1x4 + 2 **miss!**
src + 2x4 + 2 **miss!**
src + 3x4 + 2 **miss!**
src + 4x4 + 2 **miss!**
src + 1x4 + 3 **miss!**
src + 2x4 + 3 **miss!**
src + 3x4 + 3 **miss!**
src + 4x4 + 3 **miss!**
可以發現幾乎每次相鄰的指令所需要的位置都差了 4 ,在換 row 的時候位置還差更遠,超過了我們假設的 cache line,因此在 src 的部份每次都是 cache miss ,影響效率。
dst 的部份
|src[i][j]|j=0|j=1|j=2|j=3|
|:--:|:--:|:--:|:--:|:--:|
|i=0|0|4|8|12|
|i=1|1|5|9|13|
|i=2|2|6|10|14|
|i=3|3|7|11|15|
dst + 0x4 + 0 **miss!**
dst + 0x4 + 1 **hit!**
dst + 0x4 + 2 **hit!**
dst + 0x4 + 3 **hit!**
dst + 1x4 + 0 **miss!**
dst + 1x4 + 1 **hit!**
dst + 1x4 + 2 **hit!**
dst + 1x4 + 3 **hit!**
dst + 2x4 + 0 **miss!**
dst + 2x4 + 1 **hit!**
dst + 2x4 + 2 **hit!**
dst + 2x4 + 3 **hit!**
dst + 3x4 + 0 **miss!**
dst + 3x4 + 1 **hit!**
dst + 3x4 + 2 **hit!**
dst + 3x4 + 3 **hit!**
由於 dst 會先改變 col 的值,所以除了在更換 row 之外,所需的位置相差都只有一,可以放進 cache 裏面,cache miss 約是 25%。
```
./naive_transpose
0 1 2 3
4 5 6 7
8 9 10 11
12 13 14 15
0 4 8 12
1 5 9 13
2 6 10 14
3 7 11 15
naive: 286608 us
Performance counter stats for './naive_transpose' (10 runs):
36,323,247 cache-misses # 84.896 % of all cache refs ( +- 0.42% )
42,785,537 cache-references ( +- 0.34% )
1,448,818,638 instructions # 1.52 insns per cycle ( +- 0.00% )
954,753,577 cycles ( +- 0.49% )
0.407341478 seconds time elapsed ( +- 0.75% )
```
* sse_transpose.c
```=c
void sse_transpose(int *src, int *dst, int w, int h)
{
for (int x = 0; x < w; x += 4) {
for (int y = 0; y < h; y += 4) {
__m128i I0 = _mm_loadu_si128((__m128i *)(src + (y + 0) * w + x));
__m128i I1 = _mm_loadu_si128((__m128i *)(src + (y + 1) * w + x));
__m128i I2 = _mm_loadu_si128((__m128i *)(src + (y + 2) * w + x));
__m128i I3 = _mm_loadu_si128((__m128i *)(src + (y + 3) * w + x));
__m128i T0 = _mm_unpacklo_epi32(I0, I1);
__m128i T1 = _mm_unpacklo_epi32(I2, I3);
__m128i T2 = _mm_unpackhi_epi32(I0, I1);
__m128i T3 = _mm_unpackhi_epi32(I2, I3);
I0 = _mm_unpacklo_epi64(T0, T1);
I1 = _mm_unpackhi_epi64(T0, T1);
I2 = _mm_unpacklo_epi64(T2, T3);
I3 = _mm_unpackhi_epi64(T2, T3);
_mm_storeu_si128((__m128i *)(dst + ((x + 0) * h) + y), I0);
_mm_storeu_si128((__m128i *)(dst + ((x + 1) * h) + y), I1);
_mm_storeu_si128((__m128i *)(dst + ((x + 2) * h) + y), I2);
_mm_storeu_si128((__m128i *)(dst + ((x + 3) * h) + y), I3);
}
}
}
```
矩陣內的資料是 int,所以 32 bytes
* __m128i
在 [emmintrin.h](https://github.com/gcc-mirror/gcc/blob/master/gcc/config/i386/emmintrin.h) 內的一種資料型態
```typedef long long __m128i __attribute__ ((__vector_size__ (16), __may_alias__));```
簡單來說,就是 [SSE](https://zh.wikipedia.org/wiki/SSE) 暫存器的資料型態。
* _mm_loadu_si128
```=c
extern __inline __m128i __attribute__((__gnu_inline__,
__always_inline__, __artificial__))
_mm_loadu_si128 (__m128i_u const *__P)
{
return *__P;
}
```
load in 到 sse 暫存器裏面
* _mm_unpacklo_epi32 / _mm_unpackhi_epi32
```=c
extern __inline __m128i __attribute__((__gnu_inline__,
__always_inline__, __artificial__))
_mm_unpacklo_epi32 (__m128i __A, __m128i __B)
{
return (__m128i)__builtin_ia32_punpckldq128 ((__v4si)__A, (__v4si)__B);
}
```
* _mm_storeu_si128
```
extern __inline void __attribute__((__gnu_inline__,
__always_inline__, __artificial__))
_mm_storeu_si128 (__m128i_u *__P, __m128i __B)
{
*__P = __B;
}
```
將後者的 sse 暫存器的值 store 到某個位置裏面
* 這裡使用 Blocking 來提升效能,將一個程式中的數據組織後加載到 Cache 中,並在這個片中進行所有的讀和寫,然後就丟掉這個片。用以提高 Temporal Locality,在一些沒有 Prefetch 的系統上獲得性能收益。
```
./sse_transpose
0 1 2 3
4 5 6 7
8 9 10 11
12 13 14 15
0 4 8 12
1 5 9 13
2 6 10 14
3 7 11 15
sse: 156674 us
Performance counter stats for './sse_transpose' (10 runs):
14,862,894 cache-misses # 76.874 % of all cache refs ( +- 0.27% )
19,334,067 cache-references ( +- 0.12% )
1,236,929,124 instructions # 1.69 insns per cycle ( +- 0.00% )
732,059,630 cycles ( +- 0.25% )
0.293016506 seconds time elapsed ( +- 0.51% )
```
* sse_prefetch_transpose.c
```=c
void sse_prefetch_transpose(int *src, int *dst, int w, int h)
{
for (int x = 0; x < w; x += 4) {
for (int y = 0; y < h; y += 4) {
#define PFDIST 8
_mm_prefetch(src+(y + PFDIST + 0) *w + x, _MM_HINT_NTA);
_mm_prefetch(src+(y + PFDIST + 1) *w + x, _MM_HINT_NTA);
_mm_prefetch(src+(y + PFDIST + 2) *w + x, _MM_HINT_NTA);
_mm_prefetch(src+(y + PFDIST + 3) *w + x, _MM_HINT_NTA);
}
}
}
```
在使用 上個 sse blocks 的技巧之前,先將資料用軟體的方式放入 cache 裏面
prefetch 指令的主要目的,是提前讓 CPU 載入稍後運算所需要的資料。通常是在對目前的資料進行運算之前,告訴 CPU 載入下一筆資料。這樣就可以讓目前的運算,和載入下一筆資料的動作,可以同時進行。
* _mm_prefetch(char *p, int i)
* p : 存取資料的位置
* i : 選擇事先存取的方式(_MM_HINT_T0,_MM_HINT_T1,_MM_HINT_T2,_MM_HINT_NTA)
* T0 : 事先載入資料到所有層級的 Cache 中
* T1 : 事先載入資料到層級為 2 級及以上的 Cache 中(除了 L1 以外的所有 Cache)
* T2 : 事先載入資料到層級為 3 級及以上的 Cache 中(除了 L1 和 L2 以外的所有 Cache)
* NTA : 事先載入資料到非臨時且靠近 processor 的 Cache 中(通常是 L1 cache 或 L2 cache),可最小化對 Cache 的汙染

```
./sse_prefetch_transpose
0 1 2 3
4 5 6 7
8 9 10 11
12 13 14 15
0 4 8 12
1 5 9 13
2 6 10 14
3 7 11 15
sse prefetch: 53462 us
Performance counter stats for './sse_prefetch_transpose' (10 runs):
7,985,899 cache-misses # 62.299 % of all cache refs ( +- 0.82% )
12,818,659 cache-references ( +- 0.57% )
1,282,884,219 instructions # 2.19 insns per cycle ( +- 0.00% )
584,641,155 cycles ( +- 0.20% )
0.172537169 seconds time elapsed ( +- 0.68% )
```
:::info
todo Raw counters
:::
---
### 以 OpenCV 實現 Prefetch 實驗
上述實驗是以陣列做為 prefetch 的實驗目標,只不過小小的 4x4 矩陣看不太出來奪大的差別,因此我想對更大的矩陣,也就是圖片做操作,觀察 prefetch 對其效能的影響。
參考資料 : [阿洲的OpenCV教學](http://monkeycoding.com/?page_id=12)
* opencv Mat
Mat 是 OpenCV 訂定的資料型態,代表的是矩陣 Matrix 前三個字母,影像其實也可以看成是某個二維陣列,所以在 OpenCV 裡,不論矩陣計算,或是影像處裡的格式,都是以 Mat 類別進行處理
```cv::Mat ```
* opencv 幾何變換 重映射
影像幾何變換是將一幅影像的座標位置,映射到新座標位置,這種幾何變換不改變像素值,只是在平面上進行像素位置的重新安排。可以進行空間變換,像垂直、水平鏡射,製作一個映射表,映射表是一個和輸入圖尺寸相同的影像,值代表影像每個像素的新位置。
```=c
void remap
(InputArray src, OutputArray dst, InputArray map1, InputArray map2,
int interpolation, int borderMode=BORDER_CONSTANT,
const Scalar& borderValue=Scalar())
```
* src:輸入圖。
* dst:輸出圖,型態和輸入圖相同。
* map1:第一個輸入的映射表,型態可為CV_16SC2、CV_32FC1或CV_32FC2,尺寸和輸入圖相同,映射表的值代表的是輸入圖此像素位置要轉移去的新x座標。
* map2:第二個輸入的映射表,型態可為CV_16UC1或 CV_32FC1,尺寸和輸入圖相同,映射表的值代表的是輸入圖此像素位置要轉移去的新y座標。。
* interpolation:內插型態。
* borderMode:邊界模式,預設為BORDER_CONSTANT。
* borderValue:邊界外推值,預設強度為0。
這跟原本的實驗對於矩陣做轉制很像,也是在空間上面做改變
```
0 1 2 3
4 5 6 7
8 9 10 11
12 13 14 15
0 4 8 12
1 5 9 13
2 6 10 14
3 7 11 15
```


原始的重映射程式碼
```=c++
#include <cstdio>
#include <opencv2/opencv.hpp>
using namespace cv;
int main(){
Mat src = imread("winny.jpg");
Mat map_x,map_y;
map_x.create(src.size(), CV_32FC1);
map_y.create(src.size(), CV_32FC1);
for(int iH=0; iH<src.rows; iH++){
for(int iW=0; iW<src.cols; iW++){
map_x.at<float>(iH,iW) = src.cols - iW ;
map_y.at<float>(iH,iW) = src.rows - iH ;
}
}
Mat dst;
remap(src, dst, map_x, map_y, CV_INTER_LINEAR);
imshow("origin", src);
imshow("remap", dst);
waitKey(0);
return 0;
}
```
# [CPU cache](https://lwn.net/Articles/252125/)中文重點提示
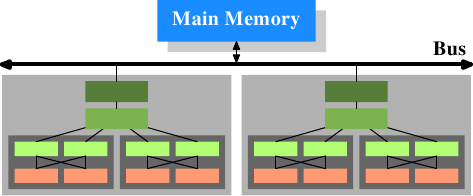
* Cache 提供了加速 CPU 存取記憶體的功能,但隨著 CPU 變成多核、多執行緒,cache 又分成 CPU 共享的 cache 和各自獨立的 cache ,使cache的資料存取不再這麼直觀,也遇到了一些問題。
* 這篇文章從單一執行緒開始,探討 cache size 和 associativity 對 cache miss 和 cycles 的影響,漸進到後面探討多執行緒下的影響。
:::danger
thread 的繁體中文翻譯是「執行緒」,single thread 翻譯為「單一執行緒」
:notes: jserv
:::
:::success
已修正,之後會注意用詞,感謝教授
:::
* 我會先從 cache 如何 mapping memory 開始,講解一些 cache的特性,再逐一對文章中的圖表解釋其探討的點,最後再重現實驗。
## Cache Implementation
當 CPU 需要資料時,會先搜尋 cache ,那 cache 又要如何對照比他大上許多倍的 main memory 呢?
* Cache 結構
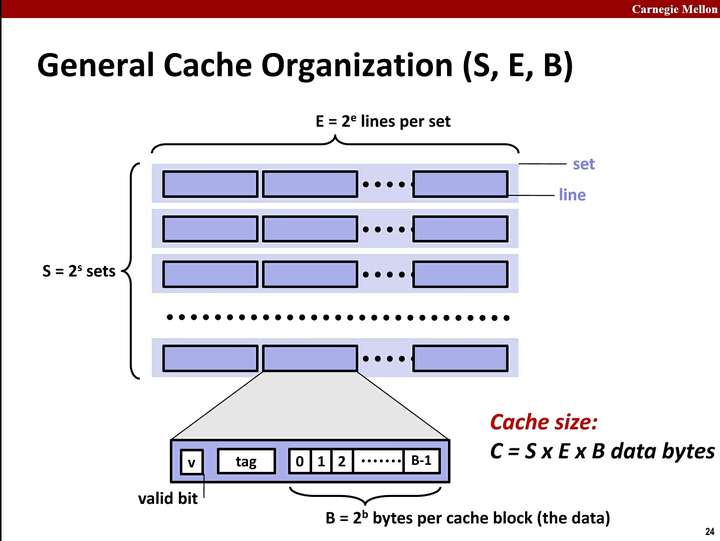
Cache 由 valid bit、tag 和 data 組成 cache line,再由cache line 組成 set, set 組成 cache 。
* Cache line
cache 中操作的最小單位,目前大部分的 cache line 大小都是64 Bytes。若要的資料小於cache line大小,其鄰近的資料也會一起放到 cache line ==> spatial locality
e.g. 如果有一個 大小為 4MB , cache line 為 64 Bytes 的cache,其會有 $4 \times 2^{20} \div 2^{6}=65536$個 cache line。
> 不太確定 cache block 和 cache line 是不是一樣的東西, 是跟包不包含 valid bit、tag 有關嗎? 我看到的好像有不一樣的說法
* valid bit、tag
以一個32bit 的 memory address為例

當 cache line 大小為 $2^O$ Bytes,則較低位的 O 個 bit 做為偏移量。由中間的 S 個 bits 做為 index 決定要放在哪一個 cache set,S的 bit 數量由 set 數 = $2^S$ 決定。剩下的 T bits 做為 tag,用來辨識在 set 中的 cache line 放的是哪一個 memory block 的資料,valid bit 表示該 cache line 為有效的資料。

* Cache有三種 mapping function,是用硬體實作的方式完成。
* 全關聯式(Fully Associative)
記憶體中的一個區塊可對映到 cache 中的任何一個 cache block。
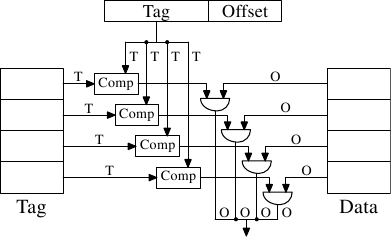

全關聯式中,S=0,因此 Tag 欄位會很大,而在硬體上是用比較器去比較兩個 T bits 的值是否相同,在硬體的實作上會很消耗成本。
* 優點: miss rate 低。
* 缺點:要在 cache 中找到特定的資料,需要將所有 cache block 都搜尋過,速度較慢,且硬體實施成本高,較適合很小型的 cache。
* 直接對映(direct Mapped)
也能叫 One-way set associative,也就是說 memory 每個區塊只會根據地址對映到一個 cache block,是多對一的對映關係。
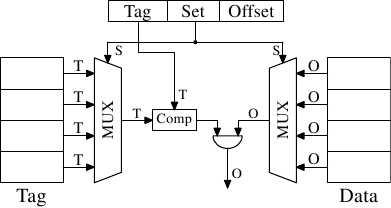
由於一個cache block 只會依照地址對映到較少的 memory block,使用多工器選擇 block ,而因此只需要一個比較器。
* 優點:一個cache block對映較少的 memory block,搜尋較快。
* 缺點:因為多個 memory block對應到一個 cache block,block的資料容易被新的資料替代,miss rate 較高。
* 集合對映式(n-way associative)
記憶體中的一個區塊可對映到 cache 中特定的 n 個 cache block,這 n 個 cache block 形成一個 set。
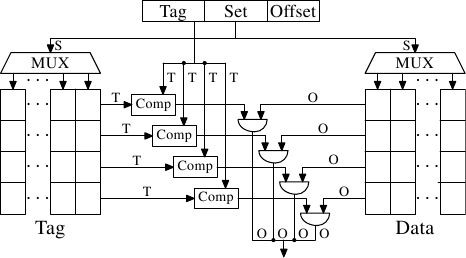
* 優點:在 direct Mapped 和 Fully Associative 做取捨,平衡了搜尋時間和 miss rate。
## Cache Operation
* Exclusive cache v.s. inclusive caches
Cache變多層之後多了一些要考慮的條件。
* Exclusive cache
就是上層的cache不會被下層的包含,L1 的資料不會出現在 L2 中,以此類推。因此,當 L1 cache line 中的資料被替換的時候,L1 的資料會往 L2 放,而若是放入 L2 又造成 L2 cache 的 cache line 原本的資料要被替換到 L3,會造成很多的時間成本。
* inclusive cache
上層的cache被下層的cache完全包含,L2 包含 L1,這種就不會產生要一直向下層替換的時間成本,只要將上層的直接覆蓋掉即可,但資料量就會比 Exclusive cache 能存取的少。
> 詳細可看[Cache inclusion policy](https://en.wikipedia.org/wiki/Cache_inclusion_policy)
* SMP v.s. AMP
單處理器變成多處理器之後也多了要考慮的條件。
由於各個處理器有各自的cache和共享的cache,當要對相同cache line的資料進行操作時,若有一個處理器的cache資料被寫入了,但還沒往下層記憶體寫回,那另一個處理器的cache中的資料就已經過時了 (文章中稱這些叫做 dirty cache line),這時候就會產生問題。
為了解決這些問題,現在已經發展出許多緩存一致性(Cache Coherency)的協議。最重要的是 MESI,後面的文章會提到。
* Symmetric multiprocessing
每個處理器是平等的,各個處理器架構相同,平均的分配協調任務,因為會有相同的任務,需要共享 cache 。
* Asymmetric multiprocessing
每個處理器可能架構不同,可能處理的任務不同,不一定共享cache。
## Measurements of Cache Effects
### 改變 Associativity 和 cache line size 對 cache miss 的影響

這張圖顯示了 Cache line size 和 Associativity 對 L2d cache miss 的影響,可簡單地觀察到在同 Cache Size 下,較大的 Cache line 和 較高的 Associativity 皆會降低 cache miss 次數。另外直接加大 Cache size 也有很明顯的降低 miss 數。
Cache size = Cache line size × Associativity × Number of sets
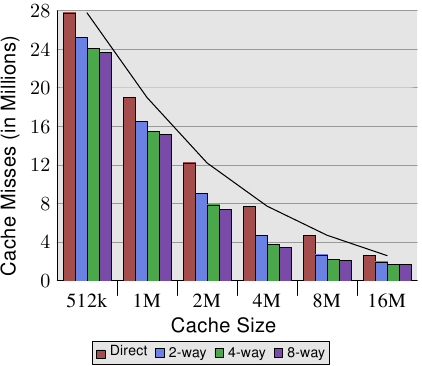
將上表改成用圖的方式比較,此圖是 Cache line size 為 32 Bytes 時的比較圖。
值得注意的是當同 Cache size 時,提高 Associativity 的效益逐漸降低。
> 這裡我不太了解文章對這個結果的解釋
> In general, increasing the associativity of a cache above 8 seems to have little effects for a single-thread workload. With the introduction of multi-core processors which use a shared L2 the situation changes. Now you basically have two programs hitting on the same cache which causes the associativity in practice to be halved (or quartered for quad-core processors). So it can be expected that, with increasing numbers of cores, the associativity of the shared caches should grow.
### Cache Effects 實驗方式

文章中的實驗需要比較 cycle 數判斷執行快慢和進行到哪個 cache,這是 intel 提供的 Pentium M access cycle ,文章中的實驗會稍微參考這個數字,但重要的是各層 Cache 間的差異,而不是他的 cycles,因此稍微參考就好。
```=clike
struct l {
struct l *n;
long int pad[NPAD];
};
```
使用 n 指標串連各個 element,形成 circular list。`pad`是一個一維陣列,利用 `NPAD` 改變一個 element 的大小,並對其中資料進行讀取或是更改。
E.g. 若在64位元系統上,`NPAD=7`,則一個 element 大小為64 bytes.
若 Working set sizes = $2^N$ bytes
則其中的 element 數量=$\frac{2^N}{sizeof \ (strucet \ \ l)}$
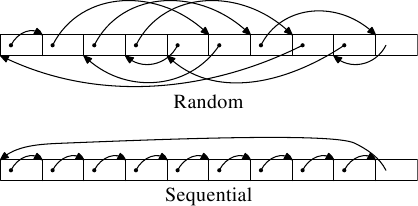
且分成隨機存取和循序存取兩種測試。
### 單一執行緒循序存取
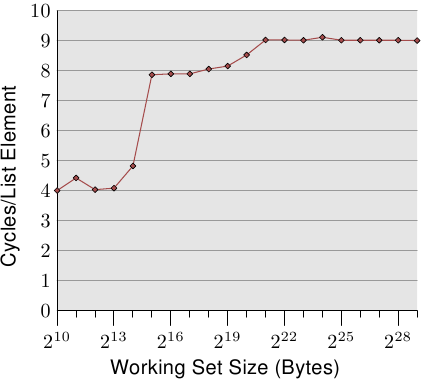
當`NPAD`=0時,對單一 list 進行循序存取。
* 可簡單看到存取的 Cycles per element 約可分成三個層級,分別是
* $小於2^{15}$ bytes.
* $2^{15} \sim 2^{20}$ bytes
* $大於2^{20}$ bytes
* 實驗是在64位元的環境下進行,因此可以解釋成
L1d cache = $2^{14}$ bytes =16 kB
L2 cache = $2^{20}$ bytes =1 MB
由於 Cache 並不會只裝了程式的資料,還會被系統的其他部分使用,因此在圖中層級與層級間並不會有突然的上升,而是漸進的上升。
* 另外看到上面提到的各階層存取 cycles

對照可以看到圖中 L1d 大約是 4 cycles,但 L2 卻只要 9 cycles,是因為使用了連續的儲存區域,因此會受到 processor `prefetch` 下一行 cache line 的影響。
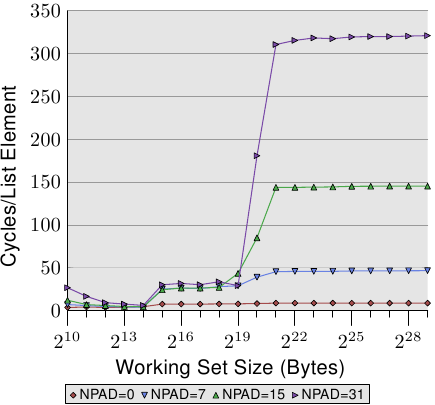
將`NPAD`=各種大小時進行比較,可發現幾個重點
* 在`NPAD`=0 時 L2 的存取時間遠小於 `NPAD`=7,15,31的存取時間。
因為當`npad`=0時,struct size=8 bytes,每次迭代存取下一個element,需要進行八次迭代才會超出一個 cache line,而`npad`=7時,struct size=64 bytes,每次迭代都需要新的cache line,因此`prefetch`失去作用。
* 當 Working set size 大於 L2 cache 時,發現`Npad`的改變對存取時間影響很大,當`NPAD`=31時,其 cycles 甚至超過了main memory 的 240 cycles。
由於當`NPAD`>7時,element的大小會超過一個 cache line,而期會影響`prefetch`的功能,processor 需要辨別什麼什麼是需要 fetch 的,而不去fetch 不需要的cache line。
且 Hardware prefetch 不能跨頁存取,一頁大小為 4KB,當`NPAD`=7 時一頁可以存放64個 element,而`NPAD`=31 時一頁只能放16個 element,因此迭代存取較大的 element 時,會跨越較多的頁。
而存取更多的頁又會受到TLB(Translation Lookaside Buffer)的影響,需要更常去進行虛擬地址的轉換,且還有 TLB miss的情況。因此會大幅延長其存取時間。
### TLB 對循序存取的影響
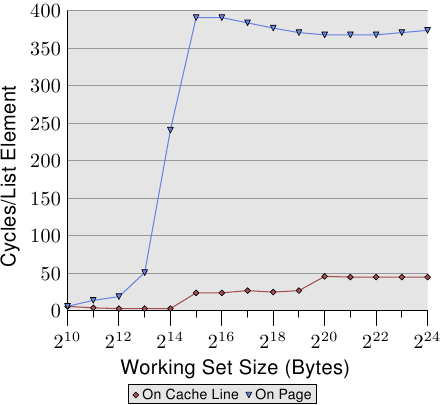
為了看TLB的影響,令`NPAD`=7,極端的比較每個 element 放在不同 cache line,和每個 element 放在不同頁的差別。為了方便比較,此處頁面中 element 以外的部分不更動,且不算進 Working set size 中。
* On cache line 每次迭代都要存取新的 cache line,而 On page 每次迭代都需要從新的 page 存取新的 cache line。
* 當 Working Set Size 到達$2^{13}$ bytes,On page 的存取時間大幅上升,因為 $2^{12}\div64=64$,TLB 只有64項,超過後TLB溢出。能看到需要轉換地址時需要的 cycles per element 和 cache 比大很多。
### prefetch 對循序存取的影響
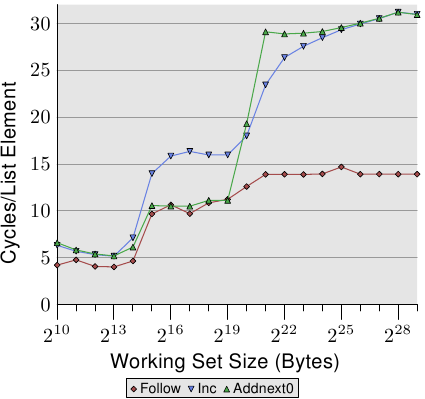
圖中 element 大小為 16 Bytes,三條線分別是
Follow : 如同之前做的,正常的循序存取。
Inc : 除了循序存取,還會遞增現在的element中的`pad[0]`。
Addnext0 : 除了循序存取,還會將下一個 element 的`pad[0]`加到現在的element的`pad[0]`中。
* 若是直觀的猜可能會認為 Addnext0 會花費較多時間,因為每次迭代還要讀取下個 element 中的值。但可在圖中看到 $2^{15}\sim2^{20}$ bytes時 Addnext0 卻比 Inc 快。
原因是當程式要迭代下一次前,下一個element已經被強制 prefetch 到 L1d中,因此只要 Working Set Size 大小能放在 L2 cache 中,Addnext0 的效能便會與原本的 Follow 相近。
> 不是很懂,可能要再看一下 prefetch 的機制
* 另一個值得注意的點是,當 Addnext0 在 $2^{21}$ 的 cycle s per element 為 Follow 的兩倍。
因為只有`Follow`沒有改變 element 的資料,當需要捨棄 cache line 的資料時可以直接捨去,但另外兩者卻需要寫回主記憶體,因此存取時間會是兩倍。
### L2、L3 size 的影響
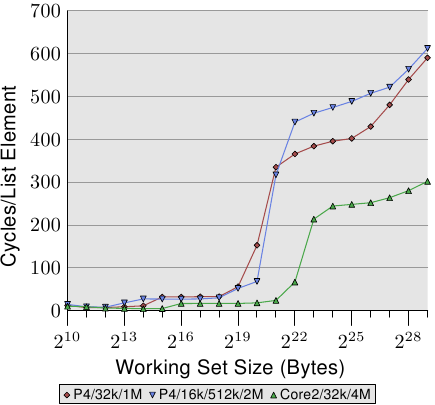
用了三個處理器比較,第一個處理器有 32kB L1d 和 1MB L2。第二個有16kB L1d,512kB L2和2MB L3。Core2處理器具有 32kB L1d 和 4MB L2。
這裡主要觀察的是最後一級 cache 的大小越大,就能負擔到越大的 Working Set Size 才到 main memory 層級,因為 main memory的存取時間遠大於cache。
### 單一執行緒隨機存取
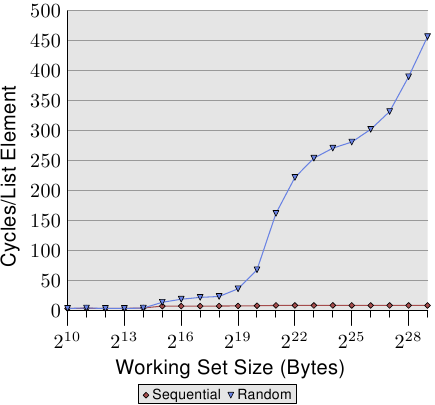
* 隨機存取會造成處理器 prefetch 的失效,造成存取時間大幅上升。
* 隨機存取不像循序存取會有明顯三層平坦的線,而是曲線不斷上升。
## 重現實驗 --- 單一執行緒
### 實驗環境
mmn@mmn:~$ lscpu
Architecture: x86_64
CPU op-mode(s): 32-bit, 64-bit
Byte Order: Little Endian
CPU(s): 4
On-line CPU(s) list: 0-3
Thread(s) per core: 2
Core(s) per socket: 2
Socket(s): 1
NUMA node(s): 1
Vendor ID: GenuineIntel
CPU family: 6
Model: 42
Model name: Intel(R) Core(TM) i5-2410M CPU @ 2.30GHz
Stepping: 7
CPU MHz: 946.166
CPU max MHz: 2900.0000
CPU min MHz: 800.0000
BogoMIPS: 4589.36
Virtualization: VT-x
L1d cache: 32K
L1i cache: 32K
L2 cache: 256K
L3 cache: 3072K
NUMA node0 CPU(s): 0-3
我的電腦是 Sandy Bridge 架構, 有兩個核心,L1 和 L2 cache 是每個核心各有 64K 和256K,L3 cache 是共用cache, 大小為3MB。
待補
## Multi Threaded Measurements
在討論多執行緒的影響前,由於會共用 memory,需要了解 cache 寫回 memory 的方式,分為兩種
* write-through
當資料寫入 cache,也同步寫入 main memory 中。此可以保證 cache 和 main memory 的一致性,但效率較低。
* write-back
利用 dirty bit 紀錄 cache line 是否有更動,而在此 cache line 被刪除前若有更動便寫回 main memory 中。
若是使用 write back,便要考慮多個處理器共用 main memory 的情形,當一個處理器更動了一個 cache line 的內容而尚未寫回 main memory,另一個處理器需要讀取的是已經更動的 cache line 資料,而不是尚未更新的 main memory 資料。又要如何知道這段資料已經在別的處理器的 cache line 被修改了?
### MESI cache coherency protocol
MESI(Modified, Exclusive, Shared, Invalid),將 cache line 分成四種狀態
* Modifiled:此行 cache line 被修改了,和 main memory 中不一致,且只有此行 cache line 有正確資料。
* Exclusive:此行 cache line 資料和 main memory 中相同,資料只在此行 cache line 中。
* Shared:此行 cache line 資料和 main memory 中相同,資料在很多行 cache line 中。
* Invalid:此行 cache line 無效。

狀態受讀取和寫入的請求而改變。
最初 cache line 中是空的,也就是無效(I),由其他處理器是否也加載了此段資料而決定要轉為 Shared 還是 Exclusive。
如果一個處理器改變了 cache line 資料,其狀態變為 Modified。而若是有第二個處理器要求讀取資料,則將狀態改為 Shared ,且將 cache line 的資料給第二個處理器。而若是第二個處理器要求寫入 cache line 且想要寫回 main memory ,則第一個處理器的 cache line 狀態改為 Invaild,這稱為 Request For Ownership (RFO)。
若是有 cache line 在 Shared 狀態,而被要求寫入,變更狀態為 Modified 時,就要將在其他處理器的相同 cache line 資料狀態變更為 Invalid(RFO),以此達到資料一致性,而此種操作顯然會降低效能。
## Reference
* [关于CPU Cache -- 程序猿需要知道的那些事](http://cenalulu.github.io/linux/all-about-cpu-cache/)
* [What Every Programmer Should Know About Memory](http://futuretech.blinkenlights.nl/misc/cpumemory.pdf)
* [淺談memory cache « Opass's Blog](http://opass.logdown.com/posts/249025-discussion-on-memory-cache)
* [Introduction to Computer Systems 15-213/18-243, spring 2009](https://www.cs.cmu.edu/~213/lectures/12-cache-memories.pdf)
* [Effect of CPU caches](https://medium.com/@minimarcel/effect-of-cpu-caches-57db81490a7f)
* [從硬體觀點了解 memory barrier 的實作和效果](https://medium.com/fcamels-notes/%E5%BE%9E%E7%A1%AC%E9%AB%94%E8%A7%80%E9%BB%9E%E4%BA%86%E8%A7%A3-memry-barrier-%E7%9A%84%E5%AF%A6%E4%BD%9C%E5%92%8C%E6%95%88%E6%9E%9C-416ff0a64fc1)