---
title: SystemVerilog for Verification 3rd, by Chris Spear and Greg Tumbush
tags: system-verilog
description: https://link.springer.com/book/10.1007/978-1-4614-0715-7
---
[TOC]
# References
- My study note when I worked in `Realtek` on 2014[^first]
# Preface
## What is this Book About?
It describes how the language works and includes many examples on how to build a basic coverage-driven, constrained-random, layered testbench using Object-Oriented Programming (OOP).
## Who Should Read this Book?
You may have tried to read the SystemVerilog Language Reference Manual but found it loaded with syntax but no guidelines on which construct to choose.
## Why was SystemVerilog Created
在九零年代後期,Verilog Hardware Description Language (HDL) 被廣泛地的使用,來描述硬體並對該硬體做 simulation 及 synthesis。
但前兩個版本 IEEE (1364-1995 及 1364-2001) 只有提供簡單的 構造 (construct) 來建立測試
- 以下擷取自介紹 Verilog HDL IEEE 1364-2001 的書籍[^second], 於節 **2.6.2** 介紹利用 `觸發區塊 (Stimulus Block)` 來檢驗一個 `ripple_carry_counter` 的設計:
```verilog!
module stimulus;
reg clk;
reg reset;
wire (3:0) q:
// 引用設計方塊
ripple carry counter r1 (q, clk, reset) ;
// 控制驅動設計方塊的clk 訊號週期為 10
initial
clk = 1'b0; // 將clk訊號設為0
always
#5 clk = ~clk; // clk 訊號每隔 5個時間單位反相一次
// 控制驅動設計方塊的reset訊號,在時間 0-20及200-220時,為1其
// 時段為0。
initial
begin
reset = 1'b1:
#15 reset = 1'b0;
#180 reset = 1'bl;
#10 reset
= 1'b0;
#20 $finish; //模擬結束
end
//將結果輸出到螢幕上
initial
$monitor ($time, "Output q = %d", q) ;
endmodule
```
然而設計日漸複雜,成長速度已超越該語言提供的驗證的能力,於是有兩個商業的 HVLs 被開發出來,分別是:
1. [`OpenVera`](https://en.wikipedia.org/wiki/OpenVera): 由 `System Science` 推出,其後被 `Synopsis` 收購。
2. [`e`](https://en.wikipedia.org/wiki/E_(verification_language)): 由一位以色列工程師, `Yoav Hollander`,為了他的 EDA software, `Specman`, 於*1992*年所開發的硬體驗證語言;其後被 `Synopsis` 的競爭對手,`Cadence Design Systems` 收購。
在驗證語言上產品的危機(crisis),同樣也發生在設計端,故催生了一個由EDA公司及使用者組成的聯盟(consortium), [Accellera](https://www.accellera.org/);致力於創造下一個世代的 Verilog。
SystemVerilog 的基礎功能是由 OpenVera 語言所捐獻的,故,目前驗證後續的發展有不少是由 Synopsis 所提出,如驗證使用的方法論,`UVM`。
於 2009 年十一月,當時最新的 Verilog LRM 1364-2005, 被合併到 SystemVerilog 的第一版 IEEE standard 1800-2005 中,並以新的 IEEE standard 1800-2009 for SystemVerilog 發佈,**代表現在只有一個語言,SystemVerilog,同時給設計及驗證做使用**
# Chapter 1: Verification Guidelines
> the following slides are scratched from my note[^first]
>

## 1.3 Basic Testbench Functionality

## 1.4 Directed testing

## 1.5 Methodology Basics
- :key: 
- 
:thinking_face: 實際在跑 simulation 如何產生及使用上述兩種 tests :
- [Directed testing](https://hackmd.io/qXQ7KswiQF2q9S9BjzSoKQ?view#14-Directed-testing)
- cases with the same seed, 用於計劃初期
- [Constrained-Random Stimulus](https://hackmd.io/qXQ7KswiQF2q9S9BjzSoKQ?view#16-Constrained-Random-Stimulus)
- case with different **random** seed, 用於計劃中後期
:notes: 關於以上 tests 在計劃中的角色,可參考我的 know-how 中的 [Chapters of Testplan](https://hackmd.io/mSdqwKkLSfCIM_GWfhCwOQ?view#Chapters-of-Testplan)
## 1.6 Constrained-Random Stimulus

- [ ] review/study Chap.6
## 1.7 What Should You Randomize?
最直覺:randomize各資料欄位 --- 只需要呼叫 `$random ()`
:question: 但問題是此選擇在找到 bugs 方面,能得到效果很低
- 通常是打到 HW data path 或 bit-level 的人為的錯誤
:star: 我們必須找到 control logic 的 bugs,才有意義
如以下 design 的輸入:
- Device configuration
- Environment configuration
- Input data
- Protocol exceptions
- Errors and violations
- Delays
### 1.7.1 Device and Environment Configuration
:::info
沒有找到bug的主要原因?因為只有測試
- 正常執行的情況
- 已知的狀態
:::
在真實世界,DUT的 組態 (configuration) 更為 random
- 例如一個 `time-division multiplexor switch` 有 2000 個 input channels 及 12 個 output channel;每個 input 可以當作單一 channel 做使用,或被分成多個 channels 中。
> 故,單一排列組合為:$C^{12}_{1} + C^{12}_{2} + ... + C^{12}_{12}$
> 2000 個 input channels 的排列組合則是 2000 的單一個排列組合結果的冪;總數相當可觀
> > :thinking_face: 故我們的 testcases 是根據 features 所列的
`direct testbench code` 光測試一個 channel,就需要列出幾十行的 code
- :notes: 故可以利用 randomization + loop 的機制來 generate 所有可能的 configurations
環境中其他的 components 也需要 randomize
- E.g., length of the simulation, number of devices, and how they are configured
- :notes: 需要透過 `constraints` 確認產生的 configuration 是合法的
- 另一個實際的例子:I/O switch chip that connected multiple PCI buses to an internal memory bus.
- At the start of simulation they randomly chose the number of PCI buses (1–4), the number of devices on each bus (1–8), and the parameters for each device (master or slave, CSR addresses, etc.).
- :notes: 利用 `functional coverage` 來追蹤已被測試的組合,當作 chip TO sign-off 的依據
### 1.7.2 Input Data
:::info
When you read about random stimulus, you probably thought of ++taking a transaction such as a bus write or ATM cell and filling the data fields with random values++.
:::
- carefully prepare your **transaction classes** as shown in Chapters 5 and 8
- you need to anticipate any layered protocols and error injection, plus scoreboarding and functional coverage.
### 1.7.3 Protocol Exceptions, Errors, and Violations
:::info
預測或加入已知的 Exceptions, Errors 及 Violation 的 checker code;避免時間花在 debugging **設定錯誤** 的地方,當遇到 errors 時,可以透過以下幾種方式處理:
:::
- 印出 warning message
- 利用 assertion 來停止 simulation
- :bulb: my know-how: 若事先不知道會錯的地方,可以利用 timeout counter,避免一直卡在 HW 的某個 state
### 1.7.4 Delays and Synchronization
:::info
How fast should your testbench send in stimulus?
:::
- :key: You should pick **random delays** to help ++catch protocol bugs++.
難以察覺的 bugs 通常位在 ==boundary condition== 發生時
當兩端的++速率不同++時,也有可能出錯;如:
- design 內部有 buffer 來暫存資料,++當滿或空的時候++,design的處理正不正確?
- :notes: 需要 inject buffer full or empty 的情況
### 1.7.5 Parallel Random Testing
:::info
How should you run the tests?
:::
A random test consists of the testbench code ++plus a random seed++.
- 對相同的 test,我們需要給他不同的seed, 才會有不同的 stimuli
若執行的環境有支援 batch queuing system ( `grid server` ),多個 jobs 可以跑在不同的機器上;如果 seed 相同,只是相同的 stimulus 跑了數次,為 redundant 的 tests。
- 在 simulator command 裡加上 `-seed` 即可指定不同 seed
- 因為不同 seed 的 simulations 會產生不一樣結果的檔案,可以將 `random seed` append 到 log file 的檔名來區分;另外,放置這些檔案有兩種方式
- 相同路徑:*不同檔名*
- 不同路徑:*路徑以 seed 命名*,將 test 產生的相同檔名的檔案放在裡面
## 1.8 Functional Coverage

- [ ] coding
## 1.8.1 Feedback from Functional Coverage to Stimulus
:::info
Random test 的進化需要 `feedback`
:::
雖然一個 test 可以透過不同的 random seed 來產生不同的 input sequence,但涵蓋 design space 的範圍還是有限
- :notes: 我們必須分析 functional coverage 的報告,來調整 random constraints,以找到尚未 cover 到的 cases
- 此方法稱作 “coverage-driven verification”,如下圖:

- :thinking_face: my know-how: 盡量不要用 force 訊號搭配 timing 的方式重現 bug;未來換計畫,timing 一變,該 case 想打的 scenario 就跑掉了。
# 1.9 Testbench Components
In simulation, the testbench wraps around the DUT, just as a hardware tester connects to a physical chip. Both the **testbench** and **tester** provide stimulus and capture responses.

- :notes: Difference
- testbench: work over a wide range of levels of abstraction, creating transactions and sequences, which are eventually transformed into bit vectors
- tester: just works at ++the bit level++

- On the other hand, if you are prototyping using FPGAs or emulation, the BFMs do need to be synthesizable.
# 1.10 Layered Testbench
:::info
:key: A key concept for any modern verification methodology is the layered testbench.
Don’t try to write a single routine that can randomly generate all types of stimuli, both legal and illegal, plus inject errors with a multi-layer
protocol. The routine quickly becomes complex and unmaintainable.
In addition, a layered approach allows reuse and encapsulation of Verification IP (VIP) which are
OOP concepts.
:::
## A Flat Tesbench
When you first learned Verilog and started writing tests, they probably looked like
the low-level code in Sample 1.1, which does a simplified APB (AMBA Peripheral
Bus) Write.

:notes: After a few days of writing code like this, you probably realized that it is ==very repetitive==, **so you created tasks for common operations such as a bus write**.
Now your testbench became simpler, as shown in Sample 1.3

## 4 Common layers showed in top-down manner
**Testbench with 4 layers:**

- The blocks in the testbench environment (inside the dashed line of Fig. 1.11) are written at the beginning of development.
- During the project they may evolve and you may add functionality, but these blocks should not change for individual tests.
- This is done by leaving “hooks” in the code so that a test can change the behavior of these blocks without having to rewrite them. You create these hooks with factory patterns (Section 8.2) and callbacks (Section 8.7).
**The four layers are:**
1. Scenario
- What is a scenario? Remember that your job as a verification engineer is to make sure that this device accomplishes its intended task.
2. Functional
- The agent block (called the transactor in the VMM) receives higher-level transactions such as DMA read or write and breaks them into individual commands or transactions.
- :notes: `Checker` 可以放在 `Scoreboard` 中,如介紹 [UVM Scoreboard](https://verificationguide.com/uvm/uvm-scoreboard-example/#UVM_Scoreboard) 的示意圖:
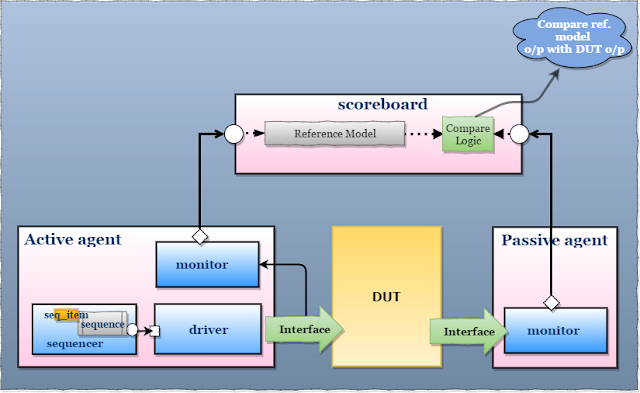
3. The Signal and Command Layers
- The `Driver` drives `DUT` by a command, such as bus read or write
- The `DUT` drives the `monitor` that takes signal transitions and groups them together into commands
- :notes: Assertions also cross the command/signal layer
The Test Layer and Functional Coverage

- The **test** contains the constraints to create the stimulus.
- **Functional coverage** measures the progress of all tests in fulfilling the verification plan requirements.
- The functional coverage code changes through the project as the various criteria complete.
- This code is constantly being modified and thus ++it is not part of the environment++.
## 1.12 Simulation Environment Phases
:::info
When do these parts execute?
You want to clearly define the phases to coordinate the testbench so that all the code for a project works together.
:::
**The three primary phases are**
1. Build
2. Run
3. Wrap-up
# Chapter 2: Data Types
System Verilog introduces new data types with the following benefits.
- Two-state: better performance, reduced memory usage
- Queues, dynamic and associative arrays: reduced memory usage, built-in support forr searching and sorting
- Classes and structures: support for abstract data structures
- Unions and packed structures: allow multiple views of the same data
- Strings: built-in string support
- Enumerated types: code is easier to write and understand
## 2.5 Associate Arrays
- 用處:改善 `sparse data` 造成記憶體空間的浪費:
- 尤其是需要配置一塊非常大的記憶體空間,如:multi-gigabyte address range for a processor
- 如何實作?
利用 `sparse matrix` 的方式來儲存項目:

### Samples
#### 在執行 Sample 2.24 時,發現輸出結果不是預期的按照 2 的冪排列
對應的程式碼:
```verilog=
byte assoc[byte], idx = 1;
initial begin
// Initialize widely scattered values:
// shift left a bit once until the MSB is shifted out
do begin
$display("Before: idx=%h", idx);
assoc[idx] = idx;
idx = idx << 1;
$display("After: idx=%h", idx);
end while (idx != 0);
// Step through all index values with foreach
foreach (assoc[i])
$display("assoc[%h] = %h", i, assoc[i]);
```
輸出結果為:
```shell
assoc[80] = 80
assoc[01] = 01
assoc[02] = 02
assoc[04] = 04
assoc[08] = 08
assoc[10] = 10
assoc[20] = 20
assoc[40] = 40
```
其中第一個成員是 `'h80`, 而非預期的 `'h01`
- 於是查看 **LRM** 在 Associative arrays (4.9) 的說明:
:notes: 於此節的最後有提到:
"The associative array maintains the entries that have been assigned values and ==their relative order according to the index data type==."
> 成員"相對"的順序是根據 **index的資料型態**
Associative array `assoc` 的 `key` 是 **byte**, 而 **byte** 是 "2-state, 8-bit **signed** integer", `'h80` 是一個*負數*, 所以按照*有號整數*的排序,他會在*正數*的前面
#### Sample 2.25 reads a file with strings and builds the associative array
Associative arrays can also be addressed with a string index, similar to [Perl’s hash arrays](https://www.perltutorial.org/perl-hash/).
>Like a [scalar](https://www.perltutorial.org/perl-variables/ "Perl Variable") or an [array variable](https://www.perltutorial.org/perl-array/ "Perl Array"), a hash variable has its own prefix. A hash variable must begin with a percent sign ( `%`).
> ```perl
> my %countries = qw(England English
> France French
> Spain Spanish
> China Chinese
> Germany German);
> ```
> Look-up Perl hash values:
> ```perl
> #!/usr/bin/perl
> use warnings;
> use strict;
> # defines country => language hash
> my %langs = ( England => 'English',
> France => 'French',
> Spain => 'Spanish',
> China => 'Chinese',
> Germany => 'German');
> # get language of England
> my $lang = $langs{'England'}; # English
> print($lang,"\n");
> ```
- You can initialize an associative array with the array literal with ==index:element pairs== as shown in `Sample 2.26`.
如以下用 `%p` format specifier 輸出一個 `Associative array` 的結果:
```verilog
assoc: '{0x1:1, 0x2:2, 0x4:4, 0x8:8, 0x10:16, 0x20:32, 0x40:64}
```
:thinking_face: 用於 `Dynamic array`:
```verilog
dyn = new[5]: '{0, 1, 2, 3, 4}
```
## 2.4 Queues
### :memo: Built-in methods

## 2.6 Array methods
### Array QUERYING functions
:notes: [reference code](https://www.edaplayground.com/x/vinv)
- `$left(array)`: 回傳 dimension 的 msb 的值
- 若與 `$high(array)` 的回傳值一致,代表該 array 是 `little endian`;承上,`$incrament(array)` 的回傳值會為 `1`
- `$right(array)`: 回傳 dimension 的 lsb 的值
- *illustration*:

### 2.6.4 Building a Scoreboard with Array Locator Methods
- [My code for practice](https://www.edaplayground.com/x/9xGJ)
- Update [code](https://www.edaplayground.com/x/wE7x) to meet requirement of `Sample 2.36`
## 2.7 Choosing a Storage Type
- based on `flexibility`, `memory usage`, `speed` and `sorting`
### 2.7.1 Flexibility
- A decision flow chart
:::info
Tips for creating a flow chart:
1. List all conditions
2. List all operations for the above conditions
:::
```flow
st=>start: 開始
cond2=>condition: routines to manipulate arrays?
cond=>condition: consecutive positive integer indices?
op=>operation: fixed-size or dynamic array
cond1=>condition: size is known
op1=>operation: fixed-size array
op2=>operation: dynamic array or associative array
e=>end: 結束
st->cond2
cond2(yes, right)->op2
cond2(no)->cond
cond(yes)->op->cond1
cond(no)->e
cond1(yes)->op1
cond1(no)->op2
```
### 2.7.2 Memory Usage
:information_source: **data type** chosen
- use `2-state` elements
- *data sizes* that are **multiples of `32 bits`**
- based simulators
- `Packed arrays` can also conserve memory
:notes: A decision flow chart
```flow
st=>start: 開始
cond2=>condition: make a big difference in memory usage?
cond1=>condition: larger than a few megabytes
cond=>condition: smaller than a million active elements
op=>operation: fixed-size or dynamic array
op1=>operation: Fixed-size array
op2=>operation: Queue or Associative array
op3=>operation: Queue
op4=>operation: Associative array
e=>end: reconsider your algorithum
st->cond2
cond2(yes)->op2->cond1
cond2(no)->op->cond
cond(yes, right)->op
cond(no)->e
cond1(yes, right)->op4
cond1(no)->op3
```
:star: Storage overhead:
- `dynamic arrays < fixed-sized array < queue < associate array`
--> `queue` and `associate array` need **additional pointers**
### 2.7.3 Speed
:information_source: Choose your array type based on **how many times it is accessed per clock cycle**
#### Storage / Time complexity / Description
- **Fixed-size and Dynamic arrays: O(1)**
Data are stored in contiguous memory, regardless of array size
- **Queue: O(1) ~ O(lg^N^)**
- The *first* and *last* elements can be pushed and popped with almost no overhead. $\rightarrow$ O(1)
- *Inserting* or *removing* elements ++in the middle++ requires many elements to be shifted up or down to make room. $\rightarrow$ O(lg^N^)
- **Associative array: O(lg^N^), slowest**
- When reading and writing associative arrays, the simulator must search for the element in memory.
- The LRM does not specify how this is done, ++but popular ways are *hash tables* and *trees*++.
- :notes: 在下一節 [274-Data-access](https://hackmd.io/qXQ7KswiQF2q9S9BjzSoKQ#274-Data-access) 有提到,若已知`資料`或`索引`,可以提高`associative array` 存取資料的速度
- 例如:利用 `exist` function 來檢查某一個值是否已被寫入陣列;當該值使用完畢後,可用 `delete` 來刪除它
### 2.7.4 Data access
:information_source: Pick the array type based on **how often the value are added to it** --- consider the rate of data from input channal
:notes: A decision flow chart
```flow
st=>start: 開始
cond=>condition: unique and noncontigous value
cond1=>condition: the values are received once
op=>operation: Fixed-size or Dynamic array or Queue
op1=>operation: Associative array
op2=>operation: Fixed-size or dynamic array
op3=>operation: Queue
st->cond
cond(yes, right)->op1
cond(no)->op->cond1
cond1(yes)->op2
cond1(no)->op3
```
- If the **Associative array** is chosen, using the routines `first`, `next`, `prev`, ++you can search an associative array for a value and find successive values++
- :thinking_face:
> 成員"相對"的順序是根據 index的資料型態
> ref.: [在執行-Sample-224-時,發現輸出結果不是預期的按照-2-的冪排列](https://hackmd.io/qXQ7KswiQF2q9S9BjzSoKQ#%E5%9C%A8%E5%9F%B7%E8%A1%8C-Sample-224-%E6%99%82%EF%BC%8C%E7%99%BC%E7%8F%BE%E8%BC%B8%E5%87%BA%E7%B5%90%E6%9E%9C%E4%B8%8D%E6%98%AF%E9%A0%90%E6%9C%9F%E7%9A%84%E6%8C%89%E7%85%A7-2-%E7%9A%84%E5%86%AA%E6%8E%92%E5%88%97)
- :memo: 承上,可以透過 `next`, `prev` routines 找到比目前值 **大** 或 **小** 的值
### Choosing storage based by the applications
> ref. above sections and 2.7.5 Choosing the Best Data Structure
| Application | Property | Corresponding storage type |
|:--------------------------:| ------------------------ | -------------------------- |
| $Content-addressable\ memory$ | Random values or address | Associative arrays |
| $Scoreboard$ | The number of elements ++grows and shrinks a lot++ | Queues (xacts with a fixed ID) or Asscoiative array (if the operations are often on the middle of data) |
| $Network\ packets$ | Fixed size; access sequentially | fixed-size or dynamic array for fixed- or variable-size packets |
| $Sorted\ structure$ | data comes out: *in a predictable order*, *unspecified order*, *never needs to be searched* | Queue, Associative array, mailbox (Section 7.6), respectively |
| $Command names or opcodes from a file$ | translate a string to a *fixed value* | Associative array with string index
### 2.11.1 The Static Cast
The static cast operation converts between two types with no checking of values.
You specify the destination type, an apostrophe, and the expression to be converted as shown in Sample 2.50.
**sample 2.50 Converting between int and real with static cast**
```verilog
int i;
real r;
i = int '(10.0 - 0.1); // cast is optional
r = real '(42); // Verilog has always implicitly converted
//between types such as integer and real
```
### 2.11.2 The Dynamic Cast
# Chapter 4:
## 4.2 The `Interface` Construct
Designs have become so complex that even **the communication between blocks may need to be separated out into separate entities**.
- To model this, ++SystemVerilog uses the interface construct++ that you can think of as ==an intelligent bundle of wires==.
# Chapter 5: Basic OOP
### 5.6.1 Handles and Constructor
- [ ] [What is the difference between: Handle, Pointer and Reference](https://stackoverflow.com/questions/13023405/what-is-the-difference-between-handle-pointer-and-reference)
# Chapter 6: Randomize
# Chapter 7: Threads and Interprocess Communication
## 7.9 Exercises
- 7. Look at Fig. 7.8 “Layered testbench with environment” on page 265 and create the Monitor class. You can make the following assumptions.

a. The Monitor class has knowledge of class OutputTrans with member variables out1 and out2.
b. The DUT and Monitor are connected with an interface called my_bus, with signals out1 and out2.
c. The interface my_bus has a clocking block, cb.
d. On every active clock edge, the Monitor class will sample the DUT outputs, out1 and out2, assign them to an object of type OutputTrans, and place the object in a mailbox.
- 於編譯 Monitor class 時,宣吿一個modport 有 compiling error;如下:
- Source code:
```verilog=18
class Monitor;
mailbox #(OutputTrans) mon2chk;
my_bus.MON busif;
...
```
- Compiling error:
```shell
Error-[SE] Syntax error
Following verilog source has syntax error :
"testbench.sv", 20: token is '.'
my_bus.MON busif;
^
```
- Check solution from the [1012-Testbench-with-Virtual-Interfaces](https://hackmd.io/qXQ7KswiQF2q9S9BjzSoKQ?both#1012-Testbench-with-Virtual-Interfaces)
:accept: [final code on EDA playground](https://www.edaplayground.com/x/HLk3)
# Chapter 9: Functional Coverage
### 9.2.4 Assertion Coverage
Assertions are pieces of declarative code that check the relationships between design
signals, either once or over a period of time. These can be simulated along with the
design and testbench, or proven by formal tools.
- by SystemVerilog Assertion (SVA)
Assertions can
also check arbitration algorithms, FIFOs, and other hardware. These are coded with the `assert property` statement.
Some assertions might look for interesting signal values or design states, such as a
successful bus transaction. These are coded with the `cover property` statement.
You can measure how often these assertions are triggered during a test by using assertion coverage.
- A `cover property` observes sequences of signals, whereas a `cover group` (described below) samples data values and transactions during the simulation.
# 9.3 Functional Coverage Strategies
:notes: Before you write the first line of test code, you need to anticipate what are the
- key design features,
- corner cases, and
- possible failure modes.
Don’t think in terms of data values only; instead, think about **what information is encoded in the design**.
## 9.3.1 Gather Information, not Data
A classic example is a FIFO. How can you be sure you have thoroughly tested a 1K FIFO memory?
> thor·ough | ˈθəroʊ |
> adjective
> complete with regard to every detail; not superficial or partial
:notes: You could measure the values in the read and write indices, ==but there are over a million possible combinations==.
The corner cases for a FIFO are Full and Empty.
- If you can make the FIFO go from Empty (the state after reset) through Full and back down to Empty, you have covered all the levels in between.
Other interesting states involve the indices as they pass between ==all 1’s and all 0’s==.
:notes: You may have noticed that the interesting states are independent of the FIFO size.
:star: Design signals with a large range (more than a few dozen possible values) should be broken down into smaller ranges, plus corner cases.
- For example, your DUT may have **a 32-bit address bus**, but you certainly don’t need to collect 4 billion samples.
- Check for natural divisions such as memory and IO space.
- For **a counter**,
- pick a few interesting values, and always try to rollover counter values from all 1’s back to 0.
## 9.4 Simple Functional Coverage Example
In your System Verilog testbench, sample the values of variables and expressions. These sample locations are known as `cover points`. ++Multiple cover points that are sampled at the same time++ (such as when a
transaction completes) are placed together in a `cover group`.

## 9.5 Anatomy of a Cover Group
- [ ] Study when needing to program
# Chapter 10: Advanced Interfaces
## 10.1.2 Testbench with Virtual Interfaces
A good OOP technique is to create a class that uses a handle to reference an object, rather than a hard-coded object name.
The following program block creates an array of virtual interfaces, vRx and vTx.
==These can now be passed into the constructors for the drivers and monitors.==
```verilog
program automatic test(Rx_if.TB Rx[4], Tx_if.TB Tx[4],
output logic rst);
...
virtual Rx_if.TB vRx[4] = Rx[4];
virtual Tx_if.TB vTx[4] = Tx[4];
initial begin
foreach (mon[i])
mon[i] = new(scb[i].rcv_mbx, i, Tx[i])
end
```
:notes: 利用 `virtual interface` 當作 handle 指向 physical interfaces
:question: 亦可置換成有階層化關係的 interfaces?
# My note
## 如何 Randomize 一個 CPU 的指令?及如何確定設計有驗證乾淨 (by functional converage)?
### Sub-question: 如何 Randomize 一個 CPU 的指令?
- From **5.2 Thinks of Nouns, not Verbs**:
A class may describe a data-centric block such as a bus transaction, network packet, or ==CPU instruction==.
- From **Chapter 6: Randomize**
可以利用 SV 裡的 `class` 類別來描述 ISA 中的一種指令格式,例如 I-type 指令;接著可以將 I-type 的各個欄位宣告成 SV `rand` 變數各別做 randomize,並利用 `constraint` 結構來排除不會發生的情況跟限制 random 值的範圍。
### 如何確定設計有驗證乾淨? (by functional converage)
參考[93-Functional-Coverage-Strategies](https://hackmd.io/qXQ7KswiQF2q9S9BjzSoKQ#93-Functional-Coverage-Strategies),主要的項目為:
- key design features
- corner cases
- possible failure modes
[^first]: [My-study-on-SVTB-for-2nd-ver.-of-this-book](https://drive.google.com/file/d/19Apo57LHzyXVAz4SVJI9qeYG77VXkc__/view?usp=sharing)
[^second]: [Verilog硬體描述語言(二版)](https://www.books.com.tw/products/0010001493)
 Sign in with Wallet


