---
title: UVM study
---
:::info
Ref.:
- [UVM concepts](http://www.learnuvmverification.com/index.php/)
- [Verification Guide: UVM Tutorial](https://verificationguide.com/uvm/uvm-tutorial/)
:::
[TOC]
# UVM introduction
> ref.: [Verification Guide: UVM introduction](https://verificationguide.com/uvm/)
The Universal Verification Methodology (UVM) consists of class libraries needed for the development of well constructed, reusable SystemVerilog based Verification environment.
> In simple words, UVM consists of a set of base classes with methods defined in it, the SystemVerilog verification environment can be developed by extending these base classes.
# UVM Classes
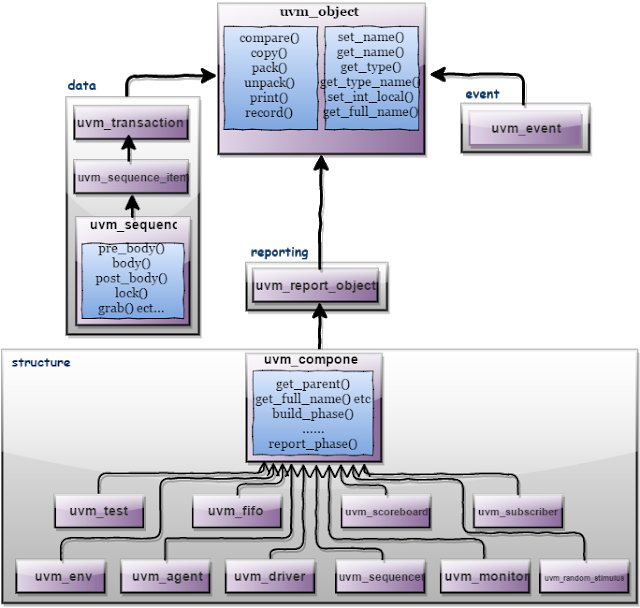
## uvm_object
Core class based operational methods (create, copy, clone, compare, print, record, etc..), instance identification fields (name, type name, unique id, etc.) and random seeding were defined in it.
All uvm_transaction and uvm_component were derived from the uvm_object.
## UVM Class Hierarchy
# UVM Phasing
> Reference: http://www.learnuvmverification.com/index.php/2016/04/29/uvm-phasing/
- UVM Phasing is a continuously evolved concept with time.
- In order to have a consistent Testbench flow, UVM introduces “Phases” to synchronize major functional steps a simulation runs through.These steps are sequential in nature which are executed in the following order:
- **Build Phases**
Where the Testbench is constructed, connected and configured.
- **Run-time Phases**
Stimulus generation & time consuming simulation takes place here.
- **Clean up Phases**
Here the Test results are collected and reported.
## Big Picture

# Difference Between UVM_OBJECT and UVM_COMPONENT
- https://verificationacademy.com/forums/uvm/difference-between-uvmobject-and-uvmcomponent
- uvm_components are "static" in that they are created during build_phase() and persist throughout the simulation. This of them as the class-based equivalent of modules.
- uvm_objects are transient, such as transactions that are created when needed and disappear when not used anymore.
- This behavior is called “overriding” and there are 2 types of overriding is possible with `UVM Factory`
- :sunflower: it happens all the fly at the run time.
# UVM FACTORY
## How it works..?
- we should never ++construct new components and/or transactions++ using *new()* class constructor. Instead it is recommended that – we should make calls to a look-up table to create the requested components and transactions. This special look-up table is called **“Factory”** in UVM.
- To create a component/transaction using Factory, `create()` command is used.
- From the application point of view
UVM Factory facilitates an object of ++one type to be substituted with an object of derived type++ **without having to change the structure of the Testbench or modify the Testbench code**.
## The certain steps to achieve & enable this capability of the UVM Testbench while defining & creating our components/sequences/transactions
1. **Factory Registration**
```verilog
// Registration for a component
class my_comp extends uvm_component;
`uvm_component_utils(my_comp)
...
endclass: my_comp
```
> It is recommended to extend your component class from UVM base classes available e.g uvm_env, uvm_agent, uvm_driver, uvm_monitor, uvm_sequencer etc.
> > :notes: to use based operational methods (create, copy, clone, compare, print, record, etc..), instance identification fields (name, type name, unique id, etc.) and random seeding defined in Core class. [uvm_object](https://hackmd.io/qJ3hScyJRmWfs9PQmgmXCA?view#uvm_object)
```verilog
//// Registration for a sequence
class my_seq extends uvm_sequence #(my_txn);
`uvm_object_utils(my_seq)
...
...
...
endclass: my_seq
//// Registration for a transaction
class
`uvm_object_utils(my_txn)
...
...
...
endclass: my_txn
```
:::info
After registration macro usage, *another important coding convention for UVM Factory* is **the constructor syntax in components and objects**, let see it next:
:::
2. **Default Constructor**
Since **uvm_component and uvm_object constructors are virtual methods** hence user have to follow their prototype template.
:thinking_face: As we know that in UVM *components/objects are constructed during build phase* but Factory constructor should contain default arguments in the definition of the components/objects.
This allows Factory registered component/object to be created inside Factory initially & ==later to be re-assigned to the class properties passed via the create() command as arguments==.
```verilog
class my_comp extends uvm_component;
`uvm_component_utils(my_comp)
// Component Default Constructor
function new (string name = "my_comp", uvm_component parent = null);
super.new(name, parent);
endfunction: new
endclass: my_comp
class my_seq extends uvm_seqeuence #(my_txn);
`uvm_object_utils(my_seq)
// Sequence Default Constructor
function new (string name = "my_seq");
super.new(name);
endfunction: new
endclass: my_seq
class my_txn extends uvm_sequence_item;
`uvm_object_utils(my_txn)
// Transaction Default Constructor
function new (string name = "my_txn");
super.new(name);
endfunction: new
endclass: my_txn
```
3. **Component & Object Creation:**
:::info
Using Factory, hierarchically below components/objects (childs) are created by the immediate higher components/objects (parent).
Hence, next goal would be the Factory supported component and object creation code entry for the child components inside the parent components and objects.
:::
```verilog
class my_agent extends uvm_agent;
`uvm_component_utils(my_agent)
my_driver drvr;
my_monitor moni;
// Component Constructor
function new (string name = "my_agent", uvm_component parent = null);
super.new(name, parent);
endfunction: new
// Build Phase
function void build_phase (uvm_phase phase);
super.build_phase(phase);
// **** HIGHTLIGHT ****
drvr = my_driver::type_id::create("drvr", this);
moni = my_monitor::type_id::create("moni", this);
// **** HIGHTLIGHT ****
endfunction: build_phase
endclass: my_agent
class my_driver extends uvm_driver #(my_txn);
`uvm_component_utils(my_driver)
// Driver Constructor
function new (string name = "my_driver", uvm_component parent = null);
super.new(name, parent);
endfunction: new
// Run Task
task run_phase (uvm_phase phase);
my_txn txn;
// **** HIGHTLIGHT ****
txn = my_txn::type_id::create("txn", this);
// **** HIGHTLIGHT ****
.......;
endtask: run_phase
endclass: my_driver
```
## "overriding" behavior of `Factory`
As we discussed it before, The UVM Factory can be thought of as *a look-up table*, so when normal component construction takes place using `<type>::type_id::create(“<name>”, <parent>);` approach
- **type_id** is used to pick up the Factory component wrapper for the class,
- construct its contents & pass the resultant handle back again to the LHS.
The Factory override changes the way in which lookup happens so that **looking up the original type_id results in a different type_id being used**.
- This technique is primarily based on `Polymorphism`
- :thinking_face: which is the ability to be able to refer to the derived types using a base type handle.
- In practice, an override will only work if the parent class is being overridden by one of its derived classes.
### Type Overriding
==It applies to all the instances of that component type.==
**Syntax**:
```cpp
<original_type>::type_id::set_type_override(<substitute_type>::get_type(), replace);
```
- where “replace” is a bit which is when set equals to 1, enables the overriding of an existing override else existing override is honoured.
**Example UVM Code:**
```verilog
class my_driver extends uvm_driver #(my_txn);
`uvm_component_utils(my_driver)
..
..
endclass: my_driver
class my_updated_driver extends my_driver #(my_txn);
`uvm_component_utils(my_updated_driver)
..
..
endclass: my_updated_driver
class my_agent extends uvm_agent;
`uvm_component_utils(my_agent)
my_driver drvr;
// Agent Constructor
function new (string name, uvm_component parent);
super.new(name, parent);
endfunction: new
// Agent Build Phase
function void build_phase (uvm_phase phase);
super.build_phase(phase);
drvr = my_driver::type_id::create("drvr", this);
endfunction: build_phase
endclass: my_agent
class my_test extends uvm_test;
`uvm_component_utils(my_test)
env e;
function new (string name, uvm_component parent);
super.new(name, parent);
endfunction: new
function void build_phase(uvm_phase phase);
super.build_phase(phase);
my_driver::type_id::set_type_override(my_updated_driver::get_type(),1);
e = env::type_id::create("e", this);
endfunction: build_phase
task run_phase (uvm_phase phase);
...
...
...
endtask: run_phase
endclass: my_test
```
:star: An important point to note here is the order of 2 commands:
- i.e. set_type_override() to be placed before the create() command inside the build_phase() of the my_test class.
### Instance Overriding
- [ ] (TO-NOTE)
### Debugging the UVM Testbench Structure & Factory Content
A great technique to view the structural composition of the Testbench classes and the Factory setup is to call the `this.print()` and `factory.print()` methods in the end_of_elaboration_phase() (as shown in Code below) from the top-level testbench.
```verilog
function void end_of_elaboration_phase(uvm_phase phase);
super.end_of_elaboration_phase(phase);
this.print();
factory.print();
endfunction: end_of_elaboration_phase
```
# UVM_Config_db / Configuration Database
- http://www.verificationguide.com/p/uvm-config-db-configuration-database.html
- The configuration database provide access to a centralized database where type specific information can be stored and received.
# UVM Sequence item

## [Utility & Field Macros](https://verificationguide.com/uvm/uvm-sequence-item/)
### UVM Utility Macros
provide implementations of the `create` method (needed for cloning) and the `get_type_name` method (needed for debugging), etc.
- objects with no field macros,
```verilog
`uvm_object_utils(TYPE)
```
> 提供建立物件相關的 methods
- objects with field macros,
```verilog
`uvm_object_utils_begin(TYPE)
`uvm_field_*(FIELD,FLAG)
`uvm_object_utils_end
```
### UVM Field Macros
The uvm_field_** macros are invoked inside of the `uvm_*_utils_begin` and `uvm_*_utils_end`,
- for the implementations of the methods: copy, compare, pack, unpack, record, print, and etc.
Each uvm_field_* macro is named to correspond to a particular data type: integrals, strings, objects, queues, etc., and each has at least two arguments: **FIELD and FLAG**.
```verilog
`uvm_field_*(FIELD,FLAG);
```
# UVM Sequence
> Ref.: http://www.verificationguide.com/p/uvm-sequence.html
:information_source: A sequence generates a series of sequence_item’s and sends it to the driver via sequencer
- a sequence is parameterized with the type of sequence_item, this defines the type of the item sequence that will send/receive to/from the driver.
## sequence base class
```verilog
virtual class uvm_sequence #(type REQ = uvm_sequence_item, type RSP = REQ ) extends uvm_sequence_base
```
- **example**
```verilog
class write_sequence extends uvm_sequence#(mem_seq_item);
...
...
endclass
```
--> the sequence has **handle** `req` and `rsp` of *mem_seq_item*.
## Sequence Execution
Most important properties of a sequence are,
### body method
--> what the sequence does
### m_sequencer handle:
The m_sequencer handle contains **the reference to the sequencer on which the sequence is running**.
The sequence will get executed upon calling the start of the sequence from the test.
```verilog
sequence_name.start(sequencer_name);
```
- There are Methods, macros and pre-defined callbacks associated with uvm_sequence.
- Users can define the methods(task or function) to pre-defined callbacks. these methods will get executed automatically upon calling the start of the sequence.
- These methods should not be called directly by the user.
Below block diagram shows the order in which the methods will get called **on calling the start** of a sequence.

:notes: `mid_do` and `post_do` are functions, All other are tasks
### Starting The Sequence:
The **handshake between the sequence, sequencer and driver** to send the sequence_item is given below.
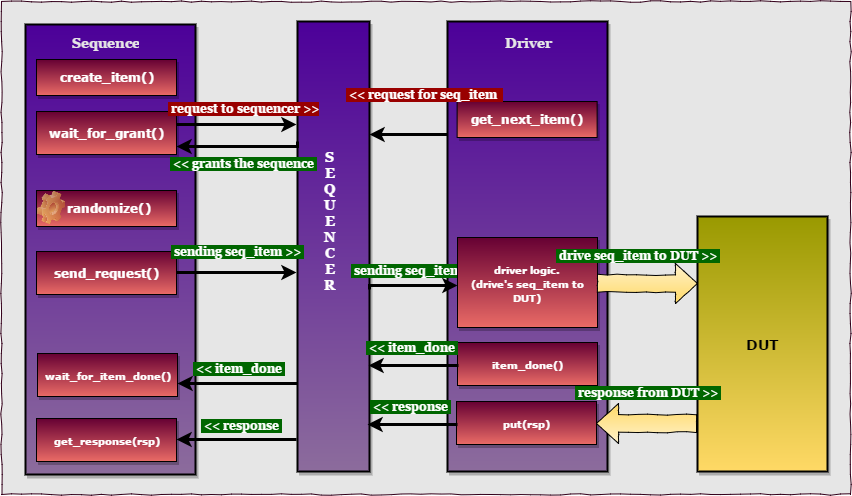
:star: Communication between the Sequence and driver involves below steps,
1. create_item() / create req.
2. wait_for_grant().
3. randomize the req.
4. send the req.
5. (wait for item done.)
6. (get response.)
- :notes: Step 5 and 6 are optional.
#### Writing UVM Sequence
```verilog
class mem_sequence extends uvm_sequence#(mem_seq_item);
`uvm_object_utils(mem_sequence)
//Constructor
function new(string name = "mem_sequence");
super.new(name);
endfunction
virtual task body();
req = mem_seq_item::type_id::create("req"); //create the req (seq item)
wait_for_grant(); //wait for grant
assert(req.randomize()); //randomize the req
send_request(req); //send req to driver
wait_for_item_done(); //wait for item done from driver
get_response(rsp); //get response from driver
endtask
endclass
Note: assert(req.randomize());, will return the assertion error on randomization failure.
```
#### UVM Sequence macros
These macros are used to start sequences and sequence items on default sequencer, **m_sequencer**.
> 因為 `uvm_sequence` 執行的步驟是固定的,所以 UVM 有提供將上述數個步驟 pack 起來的 Macros
以下列出常用的 Macros :
| Macro | Description |
| ----- |:-----------:|
| \`uvm_do(Item/Seq) | On calling \`uvm_do() the above-defined 6 steps will be executed. |
| \`uvm_do_with(Item/Seq,Constraints) | the above macro along with constraints defined in second argument |
| \`uvm_declare_p_sequencer(SEQUENCER) | This macro is used to declare *a variable* **p_sequencer** ==whose type is specified by SEQUENCER==. by using p_sequencer handle, properties of sequencer can be accessed.
#### Writing the sequence using Macro’s
**\`UVM_DO()**
```verilog
class mem_sequence extends uvm_sequence#(mem_seq_item);
`uvm_object_utils(mem_sequence)
// Constructor
function new (string name = "mem_sequence");
super.new(name);
endfunction
virtual task body();
`uvm_do(req);
endtask
endclass
```
### difference between m_sequencer and p_sequencer:
**p_sequencer**
User 可以使用自定義的 `sequencer`, 於 sequence class 中加上:
```verilog
`uvm_declare_p_sequencer(SEQUENCER_NAME)
```
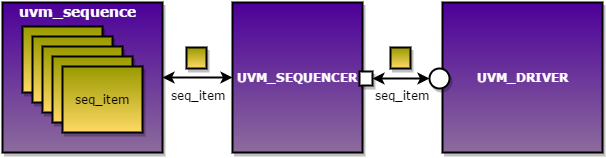
# UVM Sequencer
The sequencer control **the flow of ++request++ and ++response++ sequence items** between ++sequences++ and the ++driver++.
- [UVM: m_sequencer, p_sequencer difference](https://asic4u.wordpress.com/2015/12/31/m_sequencer-p_sequencer-difference/)
:information_source: Lets have a look at the UVM sequence and sequencer hierarchy:


從第二圖可以看到 `sequencer` 繼承自 ==uvm_sequencer_base== 及 ==uvm_component==, *uvm_component* 有 phases;
- :star: 所以這是其中一個 `sequencer` 有 phases 而 sequence 沒有的原因
When we **start** a sequence, we provide an object handle of our user_defined_sequencer. a ==static casting== occurs such that a parent class handle points to child class object:
`m_sequencer = user_defined_sequencer_object`
Now, when referring to sequence, if ==a p_sequencer== is defined, the macro ==\`uvm_declare_p_sequencer== expands to a function that declares a ==user_defined_sequencer== handle known as ==p_sequencer==. This function then casts the m_sequencer (parent class handle) back to p_sequencer (child class handle) using ==dynamic casting (\$cast)==.:
`if(!$cast(p_sequencer, m_sequencer))`
- :notes: scalar types 間的 casting 可用 `static casting` 讓 compiler 檢查;若是 class types 或要將 type 轉成有範圍的數值,可改用 `dynamic casting` run-time時來檢查
- reference the *conclusion* in [chap 3.1.5 dynamic casting in SV 3.1a LRM](https://hackmd.io/VcksXsrUTsK5IGEnn2xFjg#315-cast-dynamic-casting)
# Virtual Sequence
- [How Virtual Sequence Works?](./EwM2FNgTgdgNgLQA4CsBjKCAswDMbkskkE4kQlgATXAI3BCyyA==)
# UVM TLM
## Port Based Data Transfer

- Components generator and driver are implemented as modules.
- These modules are connected using module ports or SV interfaces.
- The *advantage* of this methodology is, the two above mentioned components are **independent**.
- The *disadvantage* of this methodology is, **data transfer is done at lower lever abstraction**.
## Task Based Data Transfer

- The *advantage* of this methodology is **giving a better control and data transfer is done at high level**.
- The *disadvantage* is, **components are using hierarchal paths which do not allow the reusability**.
## TLM interface
- UVM has TLM interfaces which provide the advantages which we saw in the above two data transfer styles.
- Data is transferred at high level. Transactions which are developed by extending the uvm_sequence_item can be transferred between components using method calls.
- **These methods are not hierarchal fixed**, so that components can be reused.
## Example

## Reference: http://www.testbench.in/UT_13_UVM_TLM_1.html
## TLM put () & TLM get () methods and TLM FIFO
- TLM put() & TLM get() methods are blocking in nature.
- What does that mean? In fact, during put() and get() method execution, there is a single process running which passes the control from the port to the export & back again.
- Now there may be situations where Producers and Consumers both are expected to work independently.
- In UVM, TLM provides a channel called “uvm_tlm_fifo” to facilitate this feature.

- Refernce: http://www.learnuvmverification.com/index.php/2015/06/28/tlm-fifo-implementation/
## Port Comparison
- **Put/get ports** are typically used to have **operational** behavior of a system. These ports are used for **one-to-one communication**.
- **Analysis ports** are generally used to **broadcast** the transaction. The **write** method is always **non blocking**. There may be **zero or more connections** to analysis ports.
- References: http://stackoverflow.com/questions/34937677/uvm-ports-put-get-export-analysis
## Of Copies and Clones
- The use model for **clone()** is that, when called on an object, it will return a new object which is a copy of it
- References: http://blog.verificationgentleman.com/2015/09/of-copies-and-clones.html
## On the Fly Reset
- There are two ways in which a reset can be generated in a UVM testbench
1. the first is when **the UVM stimulus thread** is in control of the reset
2. the second is when **the static side of the testbench** generates a reset asynchronously to the flow of the UVM stimulus process.
- General speaking, if the reset is generated under the control of **the UVM testbench**, the stimulus control process can make sure that all of the stimulus generation machinery is **in a quiescent state before asserting the reset signal**.
# UVM Test
## Call graph
run_test();
uvm_test::run_phase.seq.start(tested_sequence)
# UVM TestBench
> Ref.: [UVM TestBecnh example code](https://verificationguide.com/uvm/uvm-testbench-architecture/#UVM_TestBench_to_verify_Memory_Model)
## Build the testbench in top-down way
# Working note
###### `digital_verification` `uvm`
 Sign in with Wallet


