---
tags: ggg, ggg2020, ggg298
---
# GGG298 -- Week 5 - Project organization and file manipulation
[toc]
## Updated Office Hours
('cause I forgot to tell everyone...whoops!)
Shannon's office hours will be from 11am-12pm on Fridays in the DataLab & as needed; just send me an email.
## Learning Objectives
By the end of this lesson, students will:
* understand how to set up a data-driven project
* know how to submit & receive sequencing data from resources on campus
* know how to store and work with mass quantities of data
* understand _why_ to setup projects in a specific manner
* gain an ability to work with subsets of data to test run workflows
## a rough bioinformatics workflow

## Sending and Receiving Data
Here at UC Davis most researchers sequence at the UC Davis [DNA Technologies Core](https://dnatech.genomecenter.ucdavis.edu/). You can find their sample submission form [here](https://dnatech.genomecenter.ucdavis.edu/sample-submission-scheduling/).
When they've sequenced your samples they will hold your sequencing data on [SLIMS lab information management system](https://slims.bioinformatics.ucdavis.edu/) for three months after the sequencing run finishes. Do yourself a favor and download & back it up to a hard disk IMMEDIATELY.
### Downloading data
To download your data **onto a cluster** (i.e. by using slurm) follow [these directions](https://github.com/shannonekj/cluster_computing/blob/master/How2s/How_To-download_data.md).
We don't have data to download from the farm, so we'll be grabbing some from [OSF](https://osf.io/), an open science framework that hosts a small amount of data (5Gb limit).
Let's download some data:
```
mkdir -p ~/298class5
cd ~/298class5
curl -L https://osf.io/srdhb/download -o mini_Alca-torda.tar.gz
tar -xvf mini_Alca-torda.tar.gz
cd mini_A-torda
ls -alh
```
And we should see a list of _Alca torda_ chromosomes.
We got some data! However, the data could have been changed or corrupted in the process of downloading it from the Internet. (This CAN happen, and WILL happen if you do this for long enough!)
We can address this problem by using the `md5sum` command. [md5sum](https://en.wikipedia.org/wiki/Md5sum), in short, is a command that spits out a string of characters to represent a file's fingerprint. If a file with the same name has characters that are different the md5sum will show the difference, so we don't have to find the difference. This is exceptionally valuable when we have files that contain billions of characters.
Let's see what an md5sum looks like:
```
md5sum mini-chr1.fna.gz
```
you should see something exactly like:
> d34e2c570ef79195dfb56b8c258490f8 mini-chr1.fna.gz
Here you can see a string of characters that represent the `mini-chr1.fna.gz` md5sum. The first string of characters is the file's "fingerprint". The second is the name of the file--this is useful when we md5sum multiple files.
If you change even a single byte of the file, the md5sum fingerprint will change _completely_.
So, We can check to make sure the data downloaded successfully by seeing if the string of characters generated by md5sum matches the ones in the `@mini_A-torda.md5` file.
First, take a look at the file:
```
less \@mini_A-torda.md5
```
(press <kbd>Q</kbd> to exit)
We can _check_ a list of md5sum's conatined in a file with the `-c` flag. The command will automatically look for files contained in the list and check the md5sum against the ones printed in the file.
```
md5sum -c \@mini_A-torda.md5
```
But if we navigate into the `data/` directory we can see there is a `mini-chr1.fna.gz` file there too. Are they the same?
**CHALLENGE:** Determine if the two `mini-chr1.fna.gz` scripts are the same.
Anytime you download data you should check to make sure it has downloaded successfully. This includes raw sequence data from a sequencing center, data from collaborators host on a shared space, sequence files from NCBI, transfering data between devices, downloading data from clusters and so on and so forth. (Most sequencing centers will automatically provide md5sum's with your data. If they do not, email to request them!)
We can also make a list of md5sum's for a group of files:
```
cd ~/298class5/mini_A-torda
md5sum mini-chr[1-9]*.fna.gz >> autosomes.md5
```
Here, we've redirected the output of the `md5sum` command to the `autosomes.md5` file. We can then host/send our data with the md5 file for others to ensure the recipients know they've received the same data.
## Storing data
### What do I back up?
* **raw data** -- YES -- you only get them once!
* **results files** -- YES -- they are so useful
* **intermediate files** -- maybe -- they can be used in many different ways
### How big should I expect the files to be?
* **Raw data** will probably be the biggest
* **Results files** depends on what you are doing
* **Metadata** are usually pretty small
* **Intermediate files** are usually smaller than your raw data files but there will be _a lot_ of them
Always, always back up **raw data**. Once the sequencing center deletes the data, it is gone forever!
As such, make sure you've have your data backed up. As soon as you download onto the cluster back it up to another device (or two!).
After you've finished your project you'll probably have some pretty valuable **results files**. Back these up! It is likely that these files won't be nearly as large as our original files and they can often be put on osf.io.
Examples:
| file type | size | # of files| Total Space |
| -------- | -------- | -------- |--------
| Raw Genome Assembly sequencing files| 44Gb | 2 | 88Gb |
| Intermediate files | 12Gb | 2 | 24Gb |
| Assembled Genome | ~550Mb | 1 | 55Mb |
| Raw RAD seq data| 92Gb | 2 | 184Gb |
| Intermediate files from RADseq | ~25Mb | 20,925 | 741Gb |
| Results of PopGen expt | 9.3Mb | 2 | ~20Mb |
Data files will come in a variety of sizes. In general, the largest single files will be the raw data files, you receive from the sequencing center. Individual files in each subsequent step will be smaller (but there might be more of them!) because each step throws out or compresses data.
However, new files are generated at most steps in bioinformatics projects. Because of this, the sheer number of intermediate files can take up a lot of space!
### How often should I backup my data?
**Scripts:** This varies person to person. I suggest posting your scripts to GitHub and to push to GitHub _at least_ everyday you modify your scripts. (This is what we'll teach next week!) GitHub will give you free private repositories as an academic, so you don't need to make things public.
**Raw Data:** Luckily, you'll only need to backup your raw data once. Or maybe twice. Just don't delete it!
**Results:** Again, these only need to be backed up once. However, if you reanalyze your data make sure you save the new results. Or at least the workflow you used to get there.
### Where do I back up my data?
There are a number of places you _can_ backup to, for better or for worse.
_**Small amounts of data (< 100 MB)**_ that you would like version controlled, such as code, can be backed up to GitHub. Note that GitHub is not archival and cannot be used as the permanent post-publication place for your scripts, but there are solutions for that (search "github zenodo").
_**Small amounts of data (100 Mb - 5Gb)**_ can be stored on a project by project basis at the [Open Science Framework](https://osf.io/). Each project is allocated 5Gb of space and there is no limit on number of projects. OSF also supports private and collaborative projects, and can be referred to in publications, so you can use it as your "raw results" location too.
_**Large amounts of data (> 5Gb)**_ The most tangible solution to a bioinformatics problem is to back data up to a (or multiple) hard drives! Data can be stored via your Google Drive account. To store data using storage space that UC Davis has allocated to you, see this [Meet & Analyze Data tutorial](https://mad.oxli.org/t/2019-11-13-how-to-backup-data-on-a-remote-computer/82).
-------------------------------
## Where do I work with large amounts of data?
### High Performance Computing Clusters
aka clusters (or HPCs).
UC Davis has a number of clusters available to students, depending on your department or where your lab has purchased resources:
* farm
* crick
* barbera
**Pros:**
- maintained on campus
- help desk for troubleshooting
**Cons:**
- maintained on campus
- requires an initial buy in to get a significant amount of space & compute
### Amazon Web Service
These are cloud computing services provided by Amazon (what don't they provide!?)
**Pros:**
- Only pay for what you use
- Can have temporary access to supercomputers which _could_ end up costing less than consistent access on a cluster
- great for short-term massive compute needs, if you have the $$
**Cons:**
- no long term storage...unless you want to pay for that too
- must build everything yourself
- no help desk
- have to pay for downloading ("egress charges")
All platforms have pluses and minuses. The one that will work best for you depends on your lab. I prefer the farm, for ease of use & consistency, if your lab will support you.
-------------------------------
## Setting up your project
**QUESTION** Imagine you are at the end of a bioinformatics project, about to write up the manuscript. Looking back over carrying out your experiment(s), what were the top 3-5 most useful things to getting to the point of writing up?
### Things to think about
* multiple projects
* inputs and outputs
* directory structure
* testing analyses
In bioinformatics, _organization is everything_. It allows us to be efficient in setting up experiments, maintain consistency between experiments and, in some cases, repeat a previous analysis.
Here we can see how organization allows for a tidy workspace:
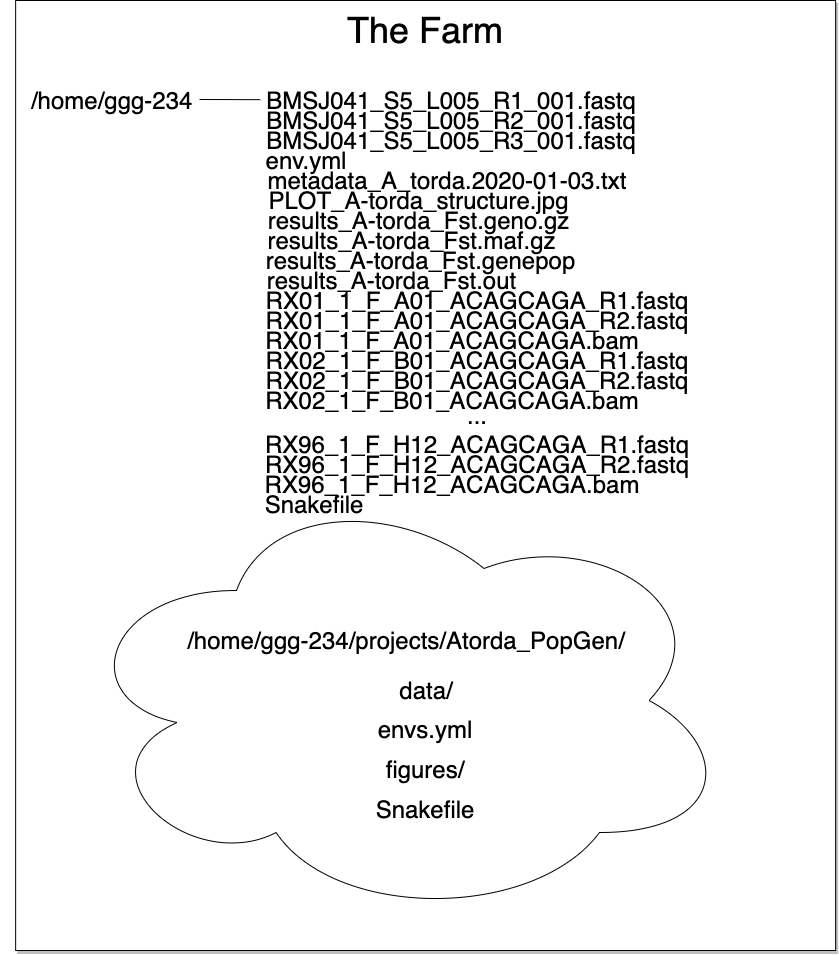
The list of files up top isn't too cringeworthy if you only have one project. But multiple projects or experiments in one directory results in an organizational disater...
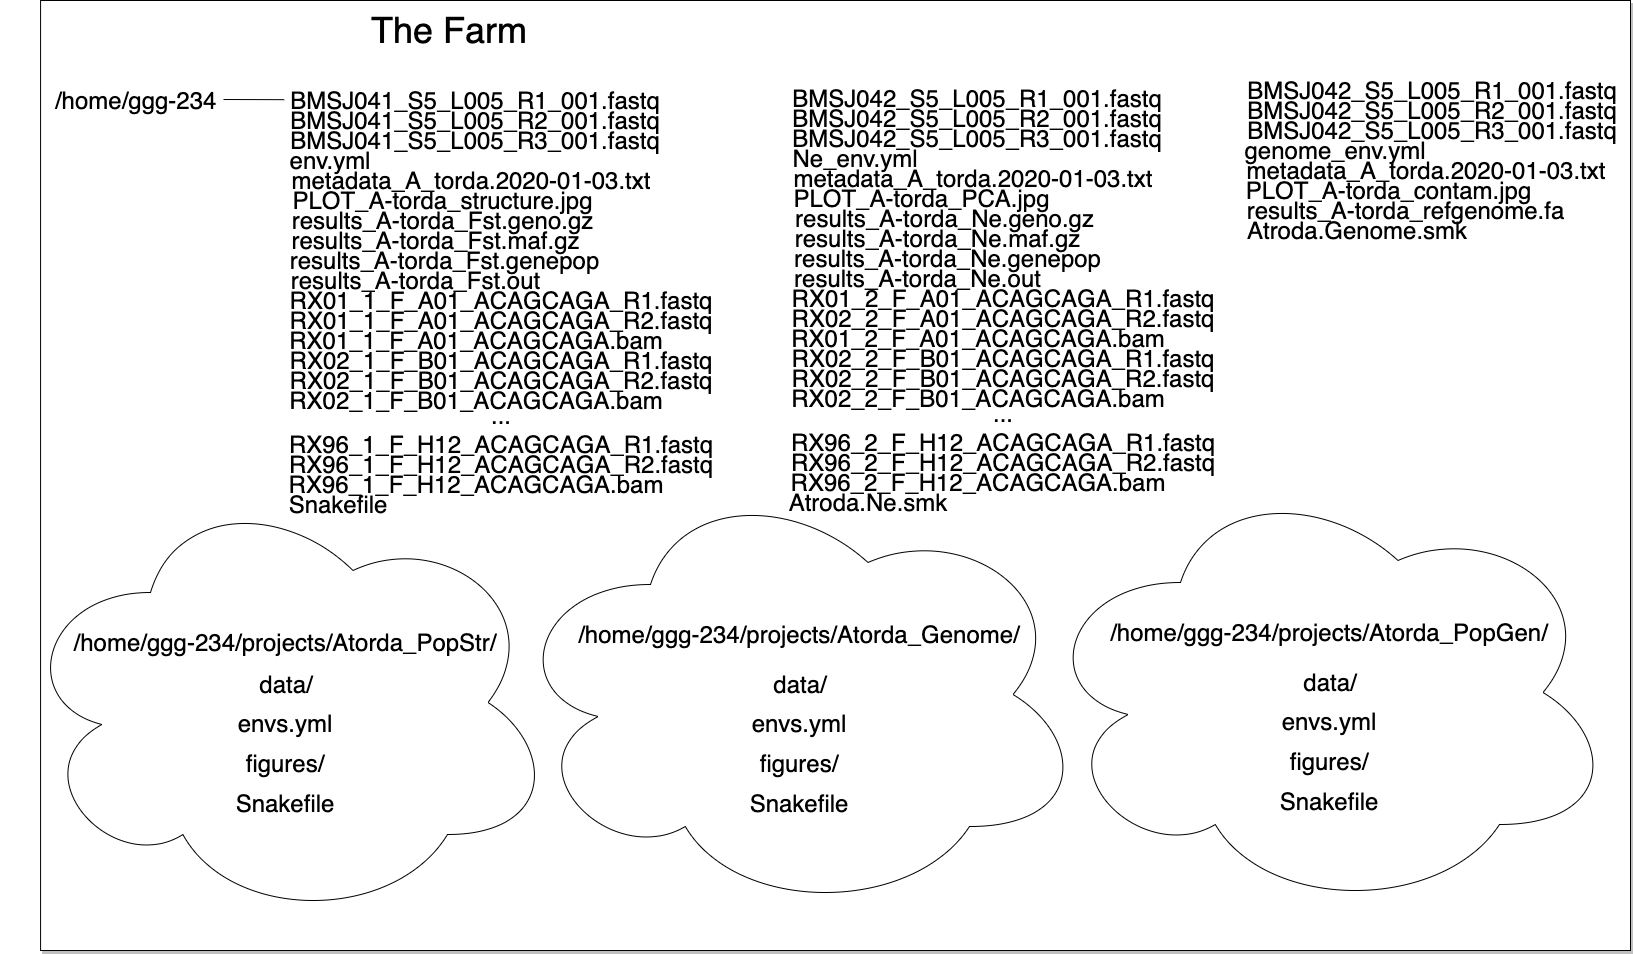
I like to have the following directory structure:

-------------------------------
## Working with data
Let's work with some data on the farm! A brief note: for this lesson we will not be submitting jobs to the farm's job handler (slurm). That is because we are working with very small files. If you work on the farm during your grad school career, all of the analyses you carry out after this class _should_ be submitted through slurm (which we will go over in our farm lesson in a few weeks!).
In this lesson, we are going to be carrying out part of an experiment where we call variants with a subset of E.coli sequencing data.
### Learning objectives
* subset data to test code
* behold the power of Github and snakemake
* understand how to name files
### Testing code
A great way of quickly testing to see if your code is working is by subsetting data.
We can take a small chunk of a file and use it to test if our newly written code works.
Let's grab some data:
```
mkdir -p ~/298class5/yeast/data
cd !$
ln -s /home/ctbrown/data/ggg201b/SRR2584403_1.fastq.gz .
ln -s /home/ctbrown/data/ggg201b/SRR2584404_1.fastq.gz .
ln -s /home/ctbrown/data/ggg201b/SRR2584405_1.fastq.gz .
ln -s /home/ctbrown/data/ggg201b/SRR2584857_1.fastq.gz .
```
These files each have up to 8.5 million lines! So we'll need smaller files to test our code.
```
for i in SRR258*.fastq.gz
do
newname=$(basename $i .fastq.gz).n100000.fq
zcat $i | head -100000 >> ${newname}
done
```
And now we have a subset of all of our fastq files!
#### How GitHub + snakemake + conda can make your (research) life great
(This will look veeeery familiar to GGG 201(b) students :)
Using GitHub, snakemake and conda together can make life a lot easier. We can grab our collaborator's code by cloning their repo:
```
cd ~/298class5/yeast
git clone https://github.com/shannonekj/2020_ggg298_variant_calling.git
cd 2020_ggg298_variant_calling
```
then we'll install a few more pieces of software with conda
```
conda create -y -n fqc-day5 samtools bcftools bwa snakemake-minimal
conda activate fqc-day5
```
and run their Snakefile to test calling variants on the subset file.
```
snakemake -p
```
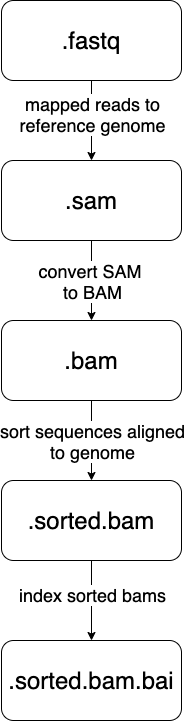
In this one command we've done the following:
* downloaded a reference genome
* indexed the genome
* mapped reads
* aligned the sequencing data to the genome
* sorted aligned reads
* indexed aligned reads
* called variants
And now, in a single command, we have a `variant.vcf` file with all of the variants in the four individuals compared to the reference genome. Pretty neat huh??
(Q: why did this run so quickly?)
### Naming files
Having files with consistent names allows us to do things to them en masse and can also allow us to know what has been done to them. Everyone has a different strategy in what they like their file names to contain and how they go about naming them but here a few suggestions.
#### Prefixes
Use the beginning of your file to your advantage. If you've sequenced individuals yourself, you can name these files according any or all of the following:
* which **individual** they are from
* what **well** in the plate they came from
* the **barcode/tag/library** they have/were a part of
* the **date** of sampling
* which **cohort** they are a member of
An example of this might be something like `Ht_1997_A08_21_ACTGTT.fastq`
Where:
* Ht = species ID (Hypomesus transpacificus)
* 1997 = birth year
* A08 = well number
* 21 = plate number
* ACTGTT = associated barcode
Having some metadata in the file name can allow for efficient groupings when running quality controls (such as testing for batch effects).
If we keep our names consistent between plates/runs could run an analysis on all individuals that were from any of these variables.
#### File endings
The ends of files can be immensely helpful as well. Remember, at the command line, a file's ending ".whatever" exists to inform a human what kind of file/format to expect.
We can use this to our advantage by making the ends of files denote what step(s) has already taken place.
Let's look at the [samtools](http://www.htslib.org/) steps that happen in our Snakefile
-------------------------------
## Additional resources
* [Bioinformatics Data Skills](http://vincebuffalo.org/book/) by Vince Buffalo
* [Best Practices for Sci Comp](https://journals.plos.org/plosbiology/article?id=10.1371/journal.pbio.1001745) (Wilson et al. 2014)
* [Bioinformatics Curriculum Guidelines](https://journals.plos.org/ploscompbiol/article?id=10.1371/journal.pcbi.1003496) (Welch et al. 2014)
----
## File Manipulation
-------------------------------
### Learning Goals
* combine commands to carry out a sequence of steps with `|`
* redirect output of commands to files with `>`
* increase exposure to regular expressions
* commands `for`, `basename`, `echo`
------------------------------------------
### Renaming a bunch of files
For our first task, let's pretend that we want to rename all of the fastq files to be `.fq` files instead (this is a surprisingly useful specific skill, even if you can't immediately think of why you would want to do that!). Here, we get to use two of my favorite commands - 'for' and 'basename'.
`for` lets you do something to every file in a list. To see it in action:
```
for i in *.fastq
do
echo $i
done
```
This is running the command `echo` for every value of the variable 'i', which is set (one by one) to all the values in the expression `*.fastq`.
If we want to get rid of the extension '.fastq', we can use the `basename` command:
```
for i in *.fastq
do
basename $i .fastq
done
```
Now, this doesn't actually rename the files - it just prints out the name, with the suffix '.fastq' removed. To rename the files, we need to capture the new name in a variable::
```
for i in *.fastq
do
newname=$(basename $i .fastq).fq
echo $newname
done
```
What `$( ... )` does is run the command in the middle, and then replace the `$( )` with the output of running the command.
Now we have the old name ($i) and the new name ($newname) and we're ready to write the rename command -- ::
```
for i in *.fastq
do
newname=$(basename $i .fastq).fq
echo mv $i $newname
done
```
***Question:*** why did I use `echo` here?
Now that we're pretty sure it all looks good, let's run it for realz:
```
for i in *.fastq
do
newname=$(basename $i .fastq).fq
mv $i $newname
done
```
and voila, we have renamed all the files!
_Side note:_ you may see backquotes used instead of `$(...)`. It does the same thing but is trickier to get right, so we teach `$(...)` instead of ``...``.
----
Now let's also get rid of the annoying '\_001' that's at the end of the all files. `basename` is all fine and good with the end of files, but what do we do about things in the middle? Now we get to use another one of my favorite commands -- `cut`.
What `cut` does is slice and dice strings. So, for example, :
```
echo hello, world | cut -c5-
```
will print out `o, world`.
But this is kind of a strange construction! What's going on?
Well, `cut` expects to take a bunch of lines of input from a file. By default it is happy to take them in from stdin ("standard input"), so you can specify '-' and give it some input via a pipe, which is what we're doing with echo:
We're taking the output of 'echo hello, world' and sending it to the input of cut with the `|` command ('pipe').
You may have already seen this with head or tail, but many UNIX commands take stdin and stdout.
Let's construct the `cut` command we want to use. If we look at the names of the files, and we want to remove '001' only, we can see that each filename has a bunch of fields separated by '\_'. So we can ask 'cut' to pay attention to the first four fields, and omit the fifth, around the separator (or delimiter) '\_':
```
echo F3D141_S207_L001_R1_001.fq | cut -d_ -f1-4
```
That looks about right -- let's put it into a for loop:
```
for i in *.fq
do
echo $i | cut -d_ -f1-4
done
```
Looking good - now assign it to a variable and append an ending:
```
for i in *.fq
do
newname=$(echo $i | cut -d_ -f1-4).fq
echo $newname
done
```
and now construct the `mv` command:
```
for i in *.fq
do
newname=$(echo $i | cut -d_ -f1-4).fq
echo mv $i $newname
done
```
and if that looks right, run it:
```
for i in *.fq
do
newname=$(echo $i | cut -d_ -f1-4).fq
mv $i $newname
done
```
Ta-da! You've renamed all your files.
----
### Subsetting
Let's do something quite useful - subset a bunch of FASTQ files.
If you look at one of the FASTQ files with head,
```
head F3D0_S188_L001_R1.fq
```
you'll see that it's full of FASTQ sequencing records. Often I want to run a bioinformatices pipeline on some small set of records first, before running it on the full set, just to make sure all the syntax for all the commands works. So I'd like to subset all of these files without modifying the originals.
First, let's make sure the originals are read-only
```
chmod u-w *.fq
```
Now, let's make a 'subset' directory
```
mkdir subset
```
Now, to subset each file, we want to run a 'head' with an argument that is the total number of lines we want to take. In this case, it should be a multiple of 4, because FASTQ records have 4 lines each. Let's take the first 100 records of each file by using `head -400`.
The for loop will now look something like:
```
for i in *.fq
do
echo "head -400 $i > subset/$i"
done
```
If that command looks right, run it for realz:
```
for i in *.fq
do
head -400 $i > subset/$i
done
```
and voila, you have your subsets!
(This is incredibly useful. You have no idea :)
----
**CHALLENGE:** Can you rename all of your files in subset/ to have 'subset.fq' at the end?
(Work in small groups; start from working code; there are several ways to do it; all that matters is getting there!)
A little backtracking...
------------------------
Variables:
You can use either $varname or ${varname}. The latter is useful when you want to construct a new filename, e.g.
```
MY${varname}SUBSET
```
would expand ${varname} and then put MY .. SUBSET on either end, while
```
MY$varnameSUBSET
```
would try to put MY in front of $varnameSUBSET which won't work.
(Unknown/uncreated variables are empty.)
NOTE: `${varname}` is quite different from `$(expression)`! The former is replaced by the value assigned to `varname`; the latter is replaced by the result of running `expression`. So, both _replace_ but they do different things. Think of `$` here as meaning, "replace me with something".
---
We used "$varname" above - what happens if we use single quotes -
e.g. '$varname'?
(Variables are interpreted inside of "", and not inside of ''.)
----
### Pipes and redirection
To redirect stdin and stdout, you can use:
```
> - send stdout to a file
< - take stdin from a file
| - take stdout from first command and make it stdin for second command
>> - appends stdout to a previously-existing file
```
stderr (errors) can be redirected:
```
2> - send stderr to a file
```
and you can also say::
```
>& - to send all output to a file
```
### Editing on the command line:
Most prompts support 'readline'-style editing. This uses emacs control
keys.
Type something out; then type CTRL-a. Now type CTRL-e. Beginning and end!
Up arrows to recall previous command, left/right arrows, etc.
CTRL-r will search backwards for recent commands, too! If you find the exact
command you are looking for, you can hit ENTER to run it again. If you
want to edit it, use CTRL-a or CTRL-e to move to editing mode.
----
CHALLENGE: Another useful command along with 'basename' is 'dirname'. Any idea what
it does?
-----
Working with collections of files; conditionals
-----------------------------------------------
Let's go back to the 'data' directory and play around with loops some more.
```
cd ..
```
`if` acts on things conditionally:
```
for i in *
do
if [ -f $i ]; then
echo $i is a file
elif [ -d $i ]; then
echo $i is a directory
fi
done
```
but what the heck is this `[ ]` notation? That's actually running the 'test' command; try `help test | less` to see the docs. This is a weird syntax that lets you do all sorts of useful things with files -- I usually use it to get rid of empty files.
```
touch emptyfile.txt
```
to create an empty file, and then::
```
for i in *
do
if [ \! -s $i ]; then
echo rm $i
fi
done
```
...and as you can see here, I'm using '!' to say 'not'. (Why do I need to put a backslash in front of it, though??)
Executing things conditionally based on exit status
---------------------------------------------------
Let's create two scripts (you can use 'nano' here if you want) -- in 'success.sh', put:
```
#! /bin/bash
echo mesucceed
exit 0
```
and in 'fail.sh', put:
```
#! /bin/bash
echo mefail
exit 1
```
You can do this with 'heredocs' -- ::
```
cat > success.sh <<EOF
#! /bin/bash
echo mesucceed
exit 0
EOF
cat > fail.sh <<EOF
#! /bin/bash
echo mefail
exit 1
EOF
```
Now make them executable --
```
chmod +x success.sh fail.sh
```
(Somewhat counterintuitively, an exit status of 0 means "success" in UNIX land. Any non-zero exit status is an error.)
You can now use this to chain commands with `&&` and `||` -- :
```
./success.sh && echo this succeeded || echo this failed
./fail.sh && echo this succeeded || echo this failed
```
You can do this with R and python scripts too -- in R, you set the exit status of a script with `quit(status=0, save='no')` and in Python with `sys.exit(0)`. Any failure of the script due to an exception will automatically set the exit status to non-zero.
The exit status of the previous command can be examined with `$?` -- :
```
./success.sh
if [ $? -eq 0 ]; then echo succ; fi
```
```
./success.sh
if [ $? -ne 0 ]; then echo fail; fi
```
Writing shell scripts
---------------------
Always put `set -e` at the top.
Sometimes put `set -x` at the top.
You can take in command line parameters with '$1', '$2', etc. '$\*' gives you all of them at once.
Other things to mention
-----------------------
Scripts exit in a subshell and can't modify your environment variables. If you want to modify your environment, you need to use '.' or 'source'.
Subshells are ways to group commands with ( ... ).
You can use \ to do line continuation in scripts (in R and Python, too!)
History tricks:
```
!! - run previous command
!-1 - run command-before-previous command (!-2 etc.)
!$ - replace with the last word on the previous line
!n - run the nth command in your 'history'
```
The general approach I use
--------------------------
* break the task down into multiple commands
* put commands things in shell scripts, run in serial
* use intermediate i/o files to figure out what's going on!
* use echo to debug!
(But we'll also teach you another way to do automation with snakemake.)
 Sign in with Wallet


