# openai-realtime-conversations
Realtime conversations
Beta
==============================
Learn how to manage Realtime speech-to-speech conversations.
Once you have connected to the Realtime API through either [WebRTC](/docs/guides/realtime-webrtc) or [WebSocket](/docs/guides/realtime-websocket), you can call a Realtime model (such as [gpt-4o-realtime-preview](/docs/models/gpt-4o-realtime-preview)) to have speech-to-speech conversations. Doing so will require you to **send client events** to initiate actions, and **listen for server events** to respond to actions taken by the Realtime API.
This guide will walk through the event flows required to use model capabilities like audio and text generation and function calling, and how to think about the state of a Realtime Session.
If you do not need to have a conversation with the model, meaning you don't expect any response, you can use the Realtime API in [transcription mode](/docs/guides/realtime-transcription).
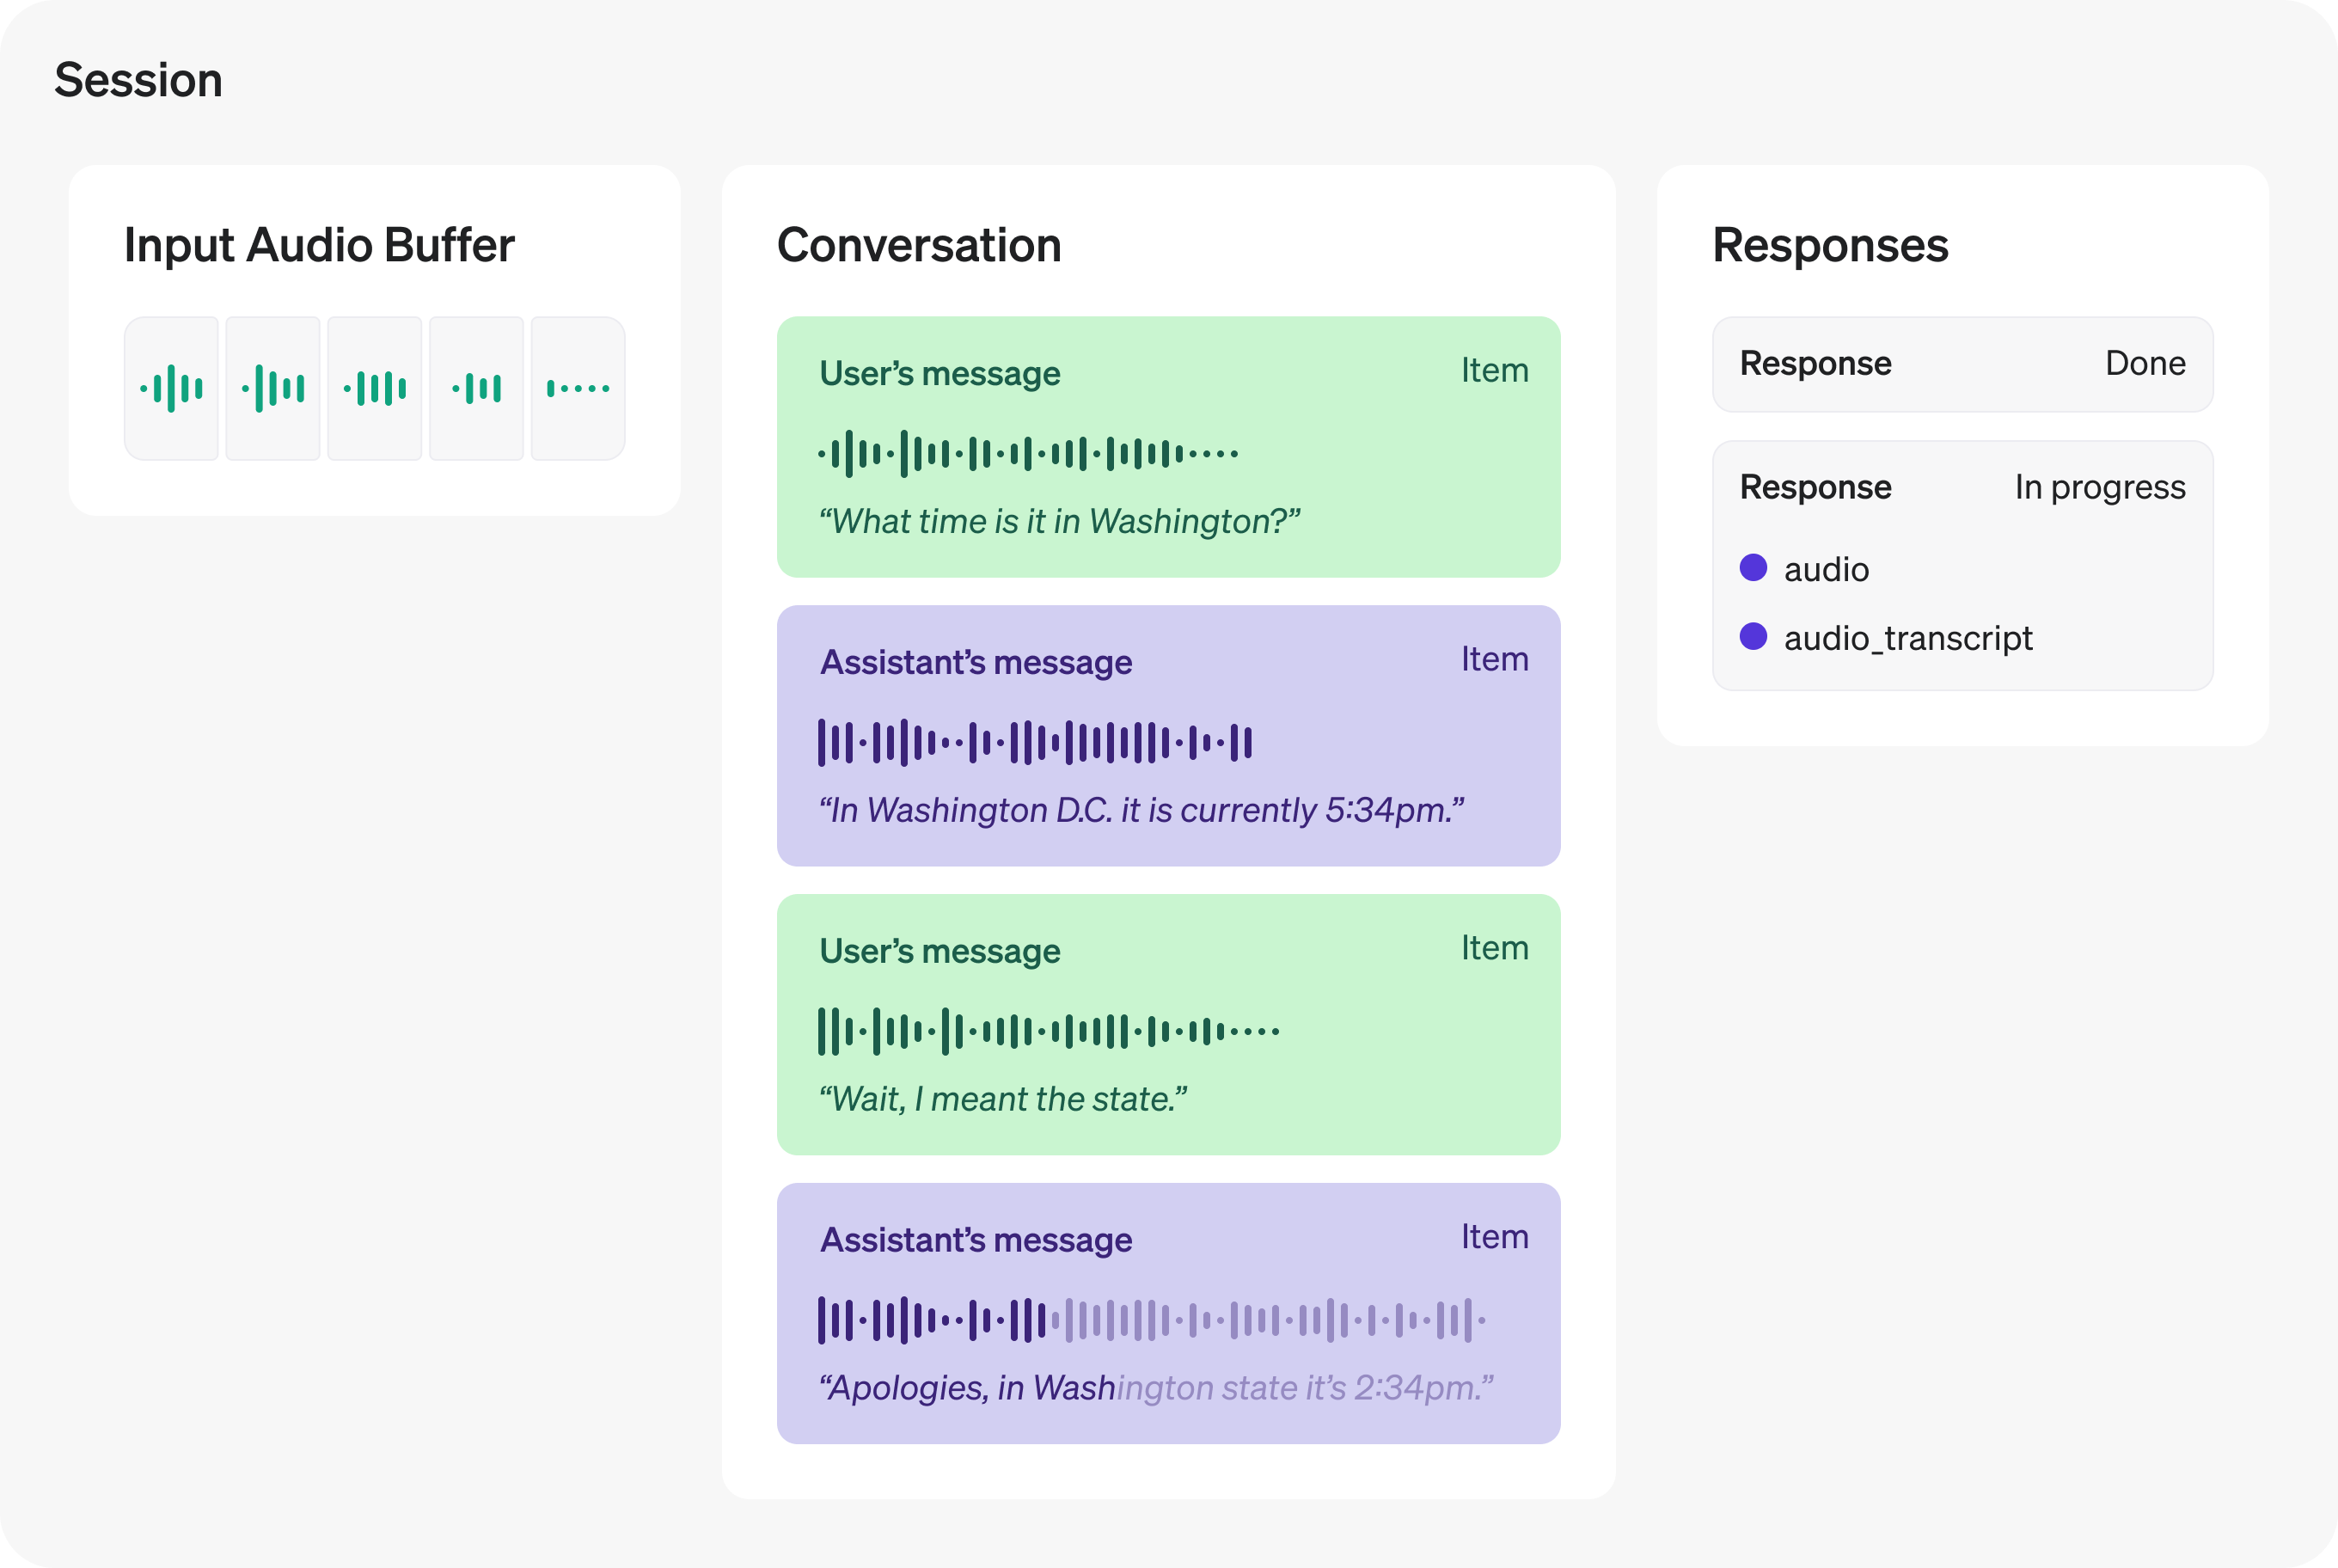
Realtime speech-to-speech sessions
----------------------------------
A Realtime Session is a stateful interaction between the model and a connected client. The key components of the session are:
* The **Session** object, which controls the parameters of the interaction, like the model being used, the voice used to generate output, and other configuration.
* A **Conversation**, which represents user input Items and model output Items generated during the current session.
* **Responses**, which are model-generated audio or text Items that are added to the Conversation.
**Input audio buffer and WebSockets**
If you are using WebRTC, much of the media handling required to send and receive audio from the model is assisted by WebRTC APIs.
If you are using WebSockets for audio, you will need to manually interact with the **input audio buffer** by sending audio to the server, sent with JSON events with base64-encoded audio.
All these components together make up a Realtime Session. You will use client events to update the state of the session, and listen for server events to react to state changes within the session.
Session lifecycle events
------------------------
After initiating a session via either [WebRTC](/docs/guides/realtime-webrtc) or [WebSockets](/docs/guides/realtime-websockets), the server will send a [`session.created`](/docs/api-reference/realtime-server-events/session/created) event indicating the session is ready. On the client, you can update the current session configuration with the [`session.update`](/docs/api-reference/realtime-client-events/session/update) event. Most session properties can be updated at any time, except for the `voice` the model uses for audio output, after the model has responded with audio once during the session. The maximum duration of a Realtime session is **30 minutes**.
The following example shows updating the session with a `session.update` client event. See the [WebRTC](/docs/guides/realtime-webrtc#sending-and-receiving-events) or [WebSocket](/docs/guides/realtime-websocket#sending-and-receiving-events) guide for more on sending client events over these channels.
Update the system instructions used by the model in this session
```javascript
const event = {
type: "session.update",
session: {
instructions: "Never use the word 'moist' in your responses!"
},
};
// WebRTC data channel and WebSocket both have .send()
dataChannel.send(JSON.stringify(event));
```
```python
event = {
"type": "session.update",
"session": {
"instructions": "Never use the word 'moist' in your responses!"
}
}
ws.send(json.dumps(event))
```
When the session has been updated, the server will emit a [`session.updated`](/docs/api-reference/realtime-server-events/session/updated) event with the new state of the session.
||
|session.update|session.createdsession.updated|
Text inputs and outputs
-----------------------
To generate text with a Realtime model, you can add text inputs to the current conversation, ask the model to generate a response, and listen for server-sent events indicating the progress of the model's response. In order to generate text, the [session must be configured](/docs/api-reference/realtime-client-events/session/update) with the `text` modality (this is true by default).
Create a new text conversation item using the [`conversation.item.create`](/docs/api-reference/realtime-client-events/conversation/item/create) client event. This is similar to sending a [user message (prompt) in Chat Completions](/docs/guides/text-generation) in the REST API.
Create a conversation item with user input
```javascript
const event = {
type: "conversation.item.create",
item: {
type: "message",
role: "user",
content: [
{
type: "input_text",
text: "What Prince album sold the most copies?",
}
]
},
};
// WebRTC data channel and WebSocket both have .send()
dataChannel.send(JSON.stringify(event));
```
```python
event = {
"type": "conversation.item.create",
"item": {
"type": "message",
"role": "user",
"content": [
{
"type": "input_text",
"text": "What Prince album sold the most copies?",
}
]
}
}
ws.send(json.dumps(event))
```
After adding the user message to the conversation, send the [`response.create`](/docs/api-reference/realtime-client-events/response/create) event to initiate a response from the model. If both audio and text are enabled for the current session, the model will respond with both audio and text content. If you'd like to generate text only, you can specify that when sending the `response.create` client event, as shown below.
Generate a text-only response
```javascript
const event = {
type: "response.create",
response: {
modalities: [ "text" ]
},
};
// WebRTC data channel and WebSocket both have .send()
dataChannel.send(JSON.stringify(event));
```
```python
event = {
"type": "response.create",
"response": {
"modalities": [ "text" ]
}
}
ws.send(json.dumps(event))
```
When the response is completely finished, the server will emit the [`response.done`](/docs/api-reference/realtime-server-events/response/done) event. This event will contain the full text generated by the model, as shown below.
Listen for response.done to see the final results
```javascript
function handleEvent(e) {
const serverEvent = JSON.parse(e.data);
if (serverEvent.type === "response.done") {
console.log(serverEvent.response.output[0]);
}
}
// Listen for server messages (WebRTC)
dataChannel.addEventListener("message", handleEvent);
// Listen for server messages (WebSocket)
// ws.on("message", handleEvent);
```
```python
def on_message(ws, message):
server_event = json.loads(message)
if server_event.type == "response.done":
print(server_event.response.output[0])
```
While the model response is being generated, the server will emit a number of lifecycle events during the process. You can listen for these events, such as [`response.text.delta`](/docs/api-reference/realtime-server-events/response/text/delta), to provide realtime feedback to users as the response is generated. A full listing of the events emitted by there server are found below under **related server events**. They are provided in the rough order of when they are emitted, along with relevant client-side events for text generation.
||
|conversation.item.createresponse.create|conversation.item.createdresponse.createdresponse.output_item.addedresponse.content_part.addedresponse.text.deltaresponse.text.doneresponse.content_part.doneresponse.output_item.doneresponse.donerate_limits.updated|
Audio inputs and outputs
------------------------
One of the most powerful features of the Realtime API is voice-to-voice interaction with the model, without an intermediate text-to-speech or speech-to-text step. This enables lower latency for voice interfaces, and gives the model more data to work with around the tone and inflection of voice input.
### Voice options
Realtime sessions can be configured to use one of several built‑in voices when producing audio output. You can set the `voice` on session creation (or on a `response.create`) to control how the model sounds. Current voice options are `alloy`, `ash`, `ballad`, `coral`, `echo`, `sage`, `shimmer`, and `verse`. Once the model has emitted audio in a session, the `voice` cannot be modified for that session.
### Handling audio with WebRTC
If you are connecting to the Realtime API using WebRTC, the Realtime API is acting as a [peer connection](https://developer.mozilla.org/en-US/docs/Web/API/RTCPeerConnection) to your client. Audio output from the model is delivered to your client as a [remote media stream](hhttps://developer.mozilla.org/en-US/docs/Web/API/MediaStream). Audio input to the model is collected using audio devices ([`getUserMedia`](https://developer.mozilla.org/en-US/docs/Web/API/MediaDevices/getUserMedia)), and media streams are added as tracks to to the peer connection.
The example code from the [WebRTC connection guide](/docs/guides/realtime-webrtc) shows a basic example of configuring both local and remote audio using browser APIs:
```javascript
// Create a peer connection
const pc = new RTCPeerConnection();
// Set up to play remote audio from the model
const audioEl = document.createElement("audio");
audioEl.autoplay = true;
pc.ontrack = e => audioEl.srcObject = e.streams[0];
// Add local audio track for microphone input in the browser
const ms = await navigator.mediaDevices.getUserMedia({
audio: true
});
pc.addTrack(ms.getTracks()[0]);
```
The snippet above enables simple interaction with the Realtime API, but there's much more that can be done. For more examples of different kinds of user interfaces, check out the [WebRTC samples](https://github.com/webrtc/samples) repository. Live demos of these samples can also be [found here](https://webrtc.github.io/samples/).
Using [media captures and streams](https://developer.mozilla.org/en-US/docs/Web/API/Media_Capture_and_Streams_API) in the browser enables you to do things like mute and unmute microphones, select which device to collect input from, and more.
### Client and server events for audio in WebRTC
By default, WebRTC clients don't need to send any client events to the Realtime API before sending audio inputs. Once a local audio track is added to the peer connection, your users can just start talking!
However, WebRTC clients still receive a number of server-sent lifecycle events as audio is moving back and forth between client and server over the peer connection. Examples include:
* When input is sent over the local media track, you will receive [`input_audio_buffer.speech_started`](/docs/api-reference/realtime-server-events/input_audio_buffer/speech_started) events from the server.
* When local audio input stops, you'll receive the [`input_audio_buffer.speech_stopped`](/docs/api-reference/realtime-server-events/input_audio_buffer/speech_started) event.
* You'll receive [delta events for the in-progress audio transcript](/docs/api-reference/realtime-server-events/response/audio_transcript/delta).
* You'll receive a [`response.done`](/docs/api-reference/realtime-server-events/response/done) event when the model has transcribed and completed sending a response.
Manipulating WebRTC APIs for media streams may give you all the control you need. However, it may occasionally be necessary to use lower-level interfaces for audio input and output. Refer to the WebSockets section below for more information and a listing of events required for granular audio input handling.
### Handling audio with WebSockets
When sending and receiving audio over a WebSocket, you will have a bit more work to do in order to send media from the client, and receive media from the server. Below, you'll find a table describing the flow of events during a WebSocket session that are necessary to send and receive audio over the WebSocket.
The events below are given in lifecycle order, though some events (like the `delta` events) may happen concurrently.
||
|Session initialization|session.update|session.createdsession.updated|
|User audio input|conversation.item.create (send whole audio message)input_audio_buffer.append (stream audio in chunks)input_audio_buffer.commit (used when VAD is disabled)response.create (used when VAD is disabled)|input_audio_buffer.speech_startedinput_audio_buffer.speech_stoppedinput_audio_buffer.committed|
|Server audio output|input_audio_buffer.clear (used when VAD is disabled)|conversation.item.createdresponse.createdresponse.output_item.createdresponse.content_part.addedresponse.audio.deltaresponse.audio_transcript.deltaresponse.text.deltaresponse.audio.doneresponse.audio_transcript.doneresponse.text.doneresponse.content_part.doneresponse.output_item.doneresponse.donerate_limits.updated|
### Streaming audio input to the server
To stream audio input to the server, you can use the [`input_audio_buffer.append`](/docs/api-reference/realtime-client-events/input_audio_buffer/append) client event. This event requires you to send chunks of **Base64-encoded audio bytes** to the Realtime API over the socket. Each chunk cannot exceed 15 MB in size.
The format of the input chunks can be configured either for the entire session, or per response.
* Session: `session.input_audio_format` in [`session.update`](/docs/api-reference/realtime-client-events/session/update)
* Response: `response.input_audio_format` in [`response.create`](/docs/api-reference/realtime-client-events/response/create)
Append audio input bytes to the conversation
```javascript
import fs from 'fs';
import decodeAudio from 'audio-decode';
// Converts Float32Array of audio data to PCM16 ArrayBuffer
function floatTo16BitPCM(float32Array) {
const buffer = new ArrayBuffer(float32Array.length * 2);
const view = new DataView(buffer);
let offset = 0;
for (let i = 0; i < float32Array.length; i++, offset += 2) {
let s = Math.max(-1, Math.min(1, float32Array[i]));
view.setInt16(offset, s < 0 ? s * 0x8000 : s * 0x7fff, true);
}
return buffer;
}
// Converts a Float32Array to base64-encoded PCM16 data
base64EncodeAudio(float32Array) {
const arrayBuffer = floatTo16BitPCM(float32Array);
let binary = '';
let bytes = new Uint8Array(arrayBuffer);
const chunkSize = 0x8000; // 32KB chunk size
for (let i = 0; i < bytes.length; i += chunkSize) {
let chunk = bytes.subarray(i, i + chunkSize);
binary += String.fromCharCode.apply(null, chunk);
}
return btoa(binary);
}
// Fills the audio buffer with the contents of three files,
// then asks the model to generate a response.
const files = [
'./path/to/sample1.wav',
'./path/to/sample2.wav',
'./path/to/sample3.wav'
];
for (const filename of files) {
const audioFile = fs.readFileSync(filename);
const audioBuffer = await decodeAudio(audioFile);
const channelData = audioBuffer.getChannelData(0);
const base64Chunk = base64EncodeAudio(channelData);
ws.send(JSON.stringify({
type: 'input_audio_buffer.append',
audio: base64Chunk
}));
});
ws.send(JSON.stringify({type: 'input_audio_buffer.commit'}));
ws.send(JSON.stringify({type: 'response.create'}));
```
```python
import base64
import json
import struct
import soundfile as sf
from websocket import create_connection
# ... create websocket-client named ws ...
def float_to_16bit_pcm(float32_array):
clipped = [max(-1.0, min(1.0, x)) for x in float32_array]
pcm16 = b''.join(struct.pack('<h', int(x * 32767)) for x in clipped)
return pcm16
def base64_encode_audio(float32_array):
pcm_bytes = float_to_16bit_pcm(float32_array)
encoded = base64.b64encode(pcm_bytes).decode('ascii')
return encoded
files = [
'./path/to/sample1.wav',
'./path/to/sample2.wav',
'./path/to/sample3.wav'
]
for filename in files:
data, samplerate = sf.read(filename, dtype='float32')
channel_data = data[:, 0] if data.ndim > 1 else data
base64_chunk = base64_encode_audio(channel_data)
# Send the client event
event = {
"type": "input_audio_buffer.append",
"audio": base64_chunk
}
ws.send(json.dumps(event))
```
### Send full audio messages
It is also possible to create conversation messages that are full audio recordings. Use the [`conversation.item.create`](/docs/api-reference/realtime-client-events/conversation/item/create) client event to create messages with `input_audio` content.
Create full audio input conversation items
```javascript
const fullAudio = "<a base64-encoded string of audio bytes>";
const event = {
type: "conversation.item.create",
item: {
type: "message",
role: "user",
content: [
{
type: "input_audio",
audio: fullAudio,
},
],
},
};
// WebRTC data channel and WebSocket both have .send()
dataChannel.send(JSON.stringify(event));
```
```python
fullAudio = "<a base64-encoded string of audio bytes>"
event = {
"type": "conversation.item.create",
"item": {
"type": "message",
"role": "user",
"content": [
{
"type": "input_audio",
"audio": fullAudio,
}
],
},
}
ws.send(json.dumps(event))
```
### Working with audio output from a WebSocket
**To play output audio back on a client device like a web browser, we recommend using WebRTC rather than WebSockets**. WebRTC will be more robust sending media to client devices over uncertain network conditions.
But to work with audio output in server-to-server applications using a WebSocket, you will need to listen for [`response.audio.delta`](/docs/api-reference/realtime-server-events/response/audio/delta) events containing the Base64-encoded chunks of audio data from the model. You will either need to buffer these chunks and write them out to a file, or maybe immediately stream them to another source like [a phone call with Twilio](https://www.twilio.com/en-us/blog/twilio-openai-realtime-api-launch-integration).
Note that the [`response.audio.done`](/docs/api-reference/realtime-server-events/response/audio/done) and [`response.done`](/docs/api-reference/realtime-server-events/response/done) events won't actually contain audio data in them - just audio content transcriptions. To get the actual bytes, you'll need to listen for the [`response.audio.delta`](/docs/api-reference/realtime-server-events/response/audio/delta) events.
The format of the output chunks can be configured either for the entire session, or per response.
* Session: `session.output_audio_format` in [`session.update`](/docs/api-reference/realtime-client-events/session/update)
* Response: `response.output_audio_format` in [`response.create`](/docs/api-reference/realtime-client-events/response/create)
Listen for response.audio.delta events
```javascript
function handleEvent(e) {
const serverEvent = JSON.parse(e.data);
if (serverEvent.type === "response.audio.delta") {
// Access Base64-encoded audio chunks
// console.log(serverEvent.delta);
}
}
// Listen for server messages (WebSocket)
ws.on("message", handleEvent);
```
```python
def on_message(ws, message):
server_event = json.loads(message)
if server_event.type == "response.audio.delta":
# Access Base64-encoded audio chunks:
# print(server_event.delta)
```
Voice activity detection
------------------------
By default, Realtime sessions have **voice activity detection (VAD)** enabled, which means the API will determine when the user has started or stopped speaking and respond automatically.
Read more about how to configure VAD in our [voice activity detection](/docs/guides/realtime-vad) guide.
### Disable VAD
VAD can be disabled by setting `turn_detection` to `null` with the [`session.update`](/docs/api-reference/realtime-client-events/session/update) client event. This can be useful for interfaces where you would like to take granular control over audio input, like [push to talk](https://en.wikipedia.org/wiki/Push-to-talk) interfaces.
When VAD is disabled, the client will have to manually emit some additional client events to trigger audio responses:
* Manually send [`input_audio_buffer.commit`](/docs/api-reference/realtime-client-events/input_audio_buffer/commit), which will create a new user input item for the conversation.
* Manually send [`response.create`](/docs/api-reference/realtime-client-events/response/create) to trigger an audio response from the model.
* Send [`input_audio_buffer.clear`](/docs/api-reference/realtime-client-events/input_audio_buffer/clear) before beginning a new user input.
### Keep VAD, but disable automatic responses
If you would like to keep VAD mode enabled, but would just like to retain the ability to manually decide when a response is generated, you can set `turn_detection.interrupt_response` and `turn_detection.create_response` to `false` with the [`session.update`](/docs/api-reference/realtime-client-events/session/update) client event. This will retain all the behavior of VAD but not automatically create new Responses. Clients can trigger these manually with a [`response.create`](/docs/api-reference/realtime-client-events/response/create) event.
This can be useful for moderation or input validation or RAG patterns, where you're comfortable trading a bit more latency in the interaction for control over inputs.
Create responses outside the default conversation
-------------------------------------------------
By default, all responses generated during a session are added to the session's conversation state (the "default conversation"). However, you may want to generate model responses outside the context of the session's default conversation, or have multiple responses generated concurrently. You might also want to have more granular control over which conversation items are considered while the model generates a response (e.g. only the last N number of turns).
Generating "out-of-band" responses which are not added to the default conversation state is possible by setting the `response.conversation` field to the string `none` when creating a response with the [`response.create`](/docs/api-reference/realtime-client-events/response/create) client event.
When creating an out-of-band response, you will probably also want some way to identify which server-sent events pertain to this response. You can provide `metadata` for your model response that will help you identify which response is being generated for this client-sent event.
Create an out-of-band model response
```javascript
const prompt = `
Analyze the conversation so far. If it is related to support, output
"support". If it is related to sales, output "sales".
`;
const event = {
type: "response.create",
response: {
// Setting to "none" indicates the response is out of band
// and will not be added to the default conversation
conversation: "none",
// Set metadata to help identify responses sent back from the model
metadata: { topic: "classification" },
// Set any other available response fields
modalities: [ "text" ],
instructions: prompt,
},
};
// WebRTC data channel and WebSocket both have .send()
dataChannel.send(JSON.stringify(event));
```
```python
prompt = """
Analyze the conversation so far. If it is related to support, output
"support". If it is related to sales, output "sales".
"""
event = {
"type": "response.create",
"response": {
# Setting to "none" indicates the response is out of band,
# and will not be added to the default conversation
"conversation": "none",
# Set metadata to help identify responses sent back from the model
"metadata": { "topic": "classification" },
# Set any other available response fields
"modalities": [ "text" ],
"instructions": prompt,
},
}
ws.send(json.dumps(event))
```
Now, when you listen for the [`response.done`](/docs/api-reference/realtime-server-events/response/done) server event, you can identify the result of your out-of-band response.
Create an out-of-band model response
```javascript
function handleEvent(e) {
const serverEvent = JSON.parse(e.data);
if (
serverEvent.type === "response.done" &&
serverEvent.response.metadata?.topic === "classification"
) {
// this server event pertained to our OOB model response
console.log(serverEvent.response.output[0]);
}
}
// Listen for server messages (WebRTC)
dataChannel.addEventListener("message", handleEvent);
// Listen for server messages (WebSocket)
// ws.on("message", handleEvent);
```
```python
def on_message(ws, message):
server_event = json.loads(message)
topic = ""
# See if metadata is present
try:
topic = server_event.response.metadata.topic
except AttributeError:
print("topic not set")
if server_event.type == "response.done" and topic == "classification":
# this server event pertained to our OOB model response
print(server_event.response.output[0])
```
### Create a custom context for responses
You can also construct a custom context that the model will use to generate a response, outside the default/current conversation. This can be done using the `input` array on a [`response.create`](/docs/api-reference/realtime-client-events/response/create) client event. You can use new inputs, or reference existing input items in the conversation by ID.
Listen for out-of-band model response with custom context
```javascript
const event = {
type: "response.create",
response: {
conversation: "none",
metadata: { topic: "pizza" },
modalities: [ "text" ],
// Create a custom input array for this request with whatever context
// is appropriate
input: [
// potentially include existing conversation items:
{
type: "item_reference",
id: "some_conversation_item_id"
},
{
type: "message",
role: "user",
content: [
{
type: "input_text",
text: "Is it okay to put pineapple on pizza?",
},
],
},
],
},
};
// WebRTC data channel and WebSocket both have .send()
dataChannel.send(JSON.stringify(event));
```
```python
event = {
"type": "response.create",
"response": {
"conversation": "none",
"metadata": { "topic": "pizza" },
"modalities": [ "text" ],
# Create a custom input array for this request with whatever
# context is appropriate
"input": [
# potentially include existing conversation items:
{
"type": "item_reference",
"id": "some_conversation_item_id"
},
# include new content as well
{
"type": "message",
"role": "user",
"content": [
{
"type": "input_text",
"text": "Is it okay to put pineapple on pizza?",
}
],
}
],
},
}
ws.send(json.dumps(event))
```
### Create responses with no context
You can also insert responses into the default conversation, ignoring all other instructions and context. Do this by setting `input` to an empty array.
Insert no-context model responses into the default conversation
```javascript
const prompt = `
Say exactly the following:
I'm a little teapot, short and stout!
This is my handle, this is my spout!
`;
const event = {
type: "response.create",
response: {
// An empty input array removes existing context
input: [],
instructions: prompt,
},
};
// WebRTC data channel and WebSocket both have .send()
dataChannel.send(JSON.stringify(event));
```
```python
prompt = """
Say exactly the following:
I'm a little teapot, short and stout!
This is my handle, this is my spout!
"""
event = {
"type": "response.create",
"response": {
# An empty input array removes all prior context
"input": [],
"instructions": prompt,
},
}
ws.send(json.dumps(event))
```
Function calling
----------------
The Realtime models also support **function calling**, which enables you to execute custom code to extend the capabilities of the model. Here's how it works at a high level:
1. When [updating the session](/docs/api-reference/realtime-client-events/session/update) or [creating a response](/docs/api-reference/realtime-client-events/response/create), you can specify a list of available functions for the model to call.
2. If when processing input, the model determines it should make a function call, it will add items to the conversation representing arguments to a function call.
3. When the client detects conversation items that contain function call arguments, it will execute custom code using those arguments
4. When the custom code has been executed, the client will create new conversation items that contain the output of the function call, and ask the model to respond.
Let's see how this would work in practice by adding a callable function that will provide today's horoscope to users of the model. We'll show the shape of the client event objects that need to be sent, and what the server will emit in turn.
### Configure callable functions
First, we must give the model a selection of functions it can call based on user input. Available functions can be configured either at the session level, or the individual response level.
* Session: `session.tools` property in [`session.update`](/docs/api-reference/realtime-client-events/session/update)
* Response: `response.tools` property in [`response.create`](/docs/api-reference/realtime-client-events/response/create)
Here's an example client event payload for a `session.update` that configures a horoscope generation function, that takes a single argument (the astrological sign for which the horoscope should be generated):
[`session.update`](/docs/api-reference/realtime-client-events/session/update)
```json
{
"type": "session.update",
"session": {
"tools": [
{
"type": "function",
"name": "generate_horoscope",
"description": "Give today's horoscope for an astrological sign.",
"parameters": {
"type": "object",
"properties": {
"sign": {
"type": "string",
"description": "The sign for the horoscope.",
"enum": [
"Aries",
"Taurus",
"Gemini",
"Cancer",
"Leo",
"Virgo",
"Libra",
"Scorpio",
"Sagittarius",
"Capricorn",
"Aquarius",
"Pisces"
]
}
},
"required": ["sign"]
}
}
],
"tool_choice": "auto",
}
}
```
The `description` fields for the function and the parameters help the model choose whether or not to call the function, and what data to include in each parameter. If the model receives input that indicates the user wants their horoscope, it will call this function with a `sign` parameter.
### Detect when the model wants to call a function
Based on inputs to the model, the model may decide to call a function in order to generate the best response. Let's say our application adds the following conversation item and attempts to generate a response:
[`conversation.item.create`](/docs/api-reference/realtime-client-events/conversation/item/create)
```json
{
"type": "conversation.item.create",
"item": {
"type": "message",
"role": "user",
"content": [
{
"type": "input_text",
"text": "What is my horoscope? I am an aquarius."
}
]
}
}
```
Followed by a client event to generate a response:
[`response.create`](/docs/api-reference/realtime-client-events/response/create)
```json
{
"type": "response.create"
}
```
Instead of immediately returning a text or audio response, the model will instead generate a response that contains the arguments that should be passed to a function in the developer's application. You can listen for realtime updates to function call arguments using the [`response.function_call_arguments.delta`](/docs/api-reference/realtime-server-events/response/function_call_arguments/delta) server event, but `response.done` will also have the complete data we need to call our function.
[`response.done`](/docs/api-reference/realtime-server-events/response/done)
```json
{
"type": "response.done",
"event_id": "event_AeqLA8iR6FK20L4XZs2P6",
"response": {
"object": "realtime.response",
"id": "resp_AeqL8XwMUOri9OhcQJIu9",
"status": "completed",
"status_details": null,
"output": [
{
"object": "realtime.item",
"id": "item_AeqL8gmRWDn9bIsUM2T35",
"type": "function_call",
"status": "completed",
"name": "generate_horoscope",
"call_id": "call_sHlR7iaFwQ2YQOqm",
"arguments": "{\"sign\":\"Aquarius\"}"
}
],
"usage": {
"total_tokens": 541,
"input_tokens": 521,
"output_tokens": 20,
"input_token_details": {
"text_tokens": 292,
"audio_tokens": 229,
"cached_tokens": 0,
"cached_tokens_details": { "text_tokens": 0, "audio_tokens": 0 }
},
"output_token_details": {
"text_tokens": 20,
"audio_tokens": 0
}
},
"metadata": null
}
}
```
In the JSON emitted by the server, we can detect that the model wants to call a custom function:
|Property|Function calling purpose|
|---|---|
|response.output[0].type|When set to function_call, indicates this response contains arguments for a named function call.|
|response.output[0].name|The name of the configured function to call, in this case generate_horoscope|
|response.output[0].arguments|A JSON string containing arguments to the function. In our case, "{\"sign\":\"Aquarius\"}".|
|response.output[0].call_id|A system-generated ID for this function call - you will need this ID to pass a function call result back to the model.|
Given this information, we can execute code in our application to generate the horoscope, and then provide that information back to the model so it can generate a response.
### Provide the results of a function call to the model
Upon receiving a response from the model with arguments to a function call, your application can execute code that satisfies the function call. This could be anything you want, like talking to external APIs or accessing databases.
Once you are ready to give the model the results of your custom code, you can create a new conversation item containing the result via the `conversation.item.create` client event.
[`conversation.item.create`](/docs/api-reference/realtime-client-events/conversation/item/create)
```json
{
"type": "conversation.item.create",
"item": {
"type": "function_call_output",
"call_id": "call_sHlR7iaFwQ2YQOqm",
"output": "{\"horoscope\": \"You will soon meet a new friend.\"}"
}
}
```
* The conversation item type is `function_call_output`
* `item.call_id` is the same ID we got back in the `response.done` event above
* `item.output` is a JSON string containing the results of our function call
Once we have added the conversation item containing our function call results, we again emit the `response.create` event from the client. This will trigger a model response using the data from the function call.
[`response.create`](/docs/api-reference/realtime-client-events/response/create)
```json
{
"type": "response.create"
}
```
Error handling
--------------
The [`error`](/docs/api-reference/realtime-server-events/error) event is emitted by the server whenever an error condition is encountered on the server during the session. Occasionally, these errors can be traced to a client event that was emitted by your application.
Unlike HTTP requests and responses, where a response is implicitly tied to a request from the client, we need to use an `event_id` property on client events to know when one of them has triggered an error condition on the server. This technique is shown in the code below, where the client attempts to emit an unsupported event type.
```javascript
const event = {
event_id: "my_awesome_event",
type: "scooby.dooby.doo",
};
dataChannel.send(JSON.stringify(event));
```
This unsuccessful event sent from the client will emit an error event like the following:
```json
{
"type": "invalid_request_error",
"code": "invalid_value",
"message": "Invalid value: 'scooby.dooby.doo' ...",
"param": "type",
"event_id": "my_awesome_event"
}
```


