---
title: C++教學講義-第三週
slideOptions: # 簡報相關的設定
theme: blood # 顏色主題
transition: 'slide' # 換頁動畫
---
TCIRC C++教學講義
===
>[name=張皓凱、沈奕呈][time=Oct 29,2021]
###### tags:`tcirc` `社課` `C++` `台中一中電研社`
---
第三節社課
===
[TOC]
---
## 電研
講義都會公告在社網上
[社網:tcirc.tw](https://tcirc.tw/)
[IG:tcirc_39th](https://www.instagram.com/tcirc_39th/)

[online judge:judge.tcirc.tw](https://judge.tcirc.tw/)
---
## 陣列(array)
當我們只有一個插座,卻有很多插頭,我們會用一個延長線把這些插頭都插到上面
同樣的,我們可以把「相同型態的變數們」一格一格放進「**陣列**」這個資料型態
---
## 一維陣列0️⃣1️⃣2️⃣3️⃣4️⃣5️⃣6️⃣
存在一維陣列裡的內容就像一節節火車車廂裡的乘客
可以靠著車廂編號找到在該節車廂的乘客
同理,要找到陣列中個別的元素(element)的話,就要根據索引(index)標示
---
### 宣告
跟宣告變數的方法一樣,只是多加了一個中括號表示元素個素
```cpp=
//資料型態 陣列名稱[元素個數];
#include<iostream>
using namespace std;
int main(){
int a=1;
int b[6];//宣告
int c[4]{1,2,3,4};//初始化
cout<<c[1];//根據索引輸出第i個的元素
}
```
----
* 宣告時元素個數要用常數(const)而非變數來宣告,不然大小會不一樣
* 當陣列的元素個數過大時需在`main()`外進行宣告
* 因為全域變數(main外)給陣列的格數上限是3e7
* 區域變數(main內)給陣列的格數上限是3e6(3*10^6)
----
what!?😱😱
第一格元素為什麼是2而不是1
```
/*OUTPUT---
2
------------*/
```
----
#### 因為陣列的索引是從0開始

----
#### 這樣就對了😁😁
```cpp=
cout<<c[0]<<c[1]<<c[2]<<c[3];
```
```
/*OUTPUT---
1234
------------*/
```
不過這樣好慢...
聰明的你應該有想到可以用迴圈來輸出整個陣列吧😉
---
### 存取
只要呼叫陣列名稱並標明索引,就可以在陣列的該位置存入或取用元素
- 用法: `陣列名稱[索引值]`
```cpp=
#include<iostream>
using namespace std;
int main(){
int a;
int b[4];
cin>>a;
for(int i=0;i<4;i++)
cin>>b[i];
a+=1;
//陣列b的第0個位置的值設為陣列前四個值的總和
b[0]+=b[1]+b[2]+b[3];
cout<<a;
for(int i=0;i<4;i++)
cout<<b[i];
}
```
---
### 初始化
- 用法:`變數型態 變數名稱[元素個素n]{元素0,元素1, ... ,元素n-1}`
- `{}`裡的每個元素間用 `,` 隔開
----
- 如果有做初始化,則[]內可以不放元素數量,屆時編譯器會依元素數量設定陣列大小
- <font color="#f00">注意:</font>初始化只能在宣告時使用!!!
----
將陣列裡的數全初始化為0
```cpp=
int a[5]{};
```
不用自己數長度的陣列
```cpp=
int b[]{1,7,6,8,9,0};
```
初始化的時機
```cpp=
int c[5]{0,5,7,6,6};//right
c{1,0,0,0,5};//wrong
```
----
<font color="#f00">注意!</font>
- for loop小括號`()`裡的三個要素是用「**分號**」隔開,就像每行程式碼結束的地方要加分號
- array大括號{}裡的元素間是用「**逗號**」隔開,就像用逗號一次宣告多個變數
```cpp=
char array[5]{a,e,i,o,u};
```
----
#### 索引值超過陣列大小
```cpp=
#include<iostream>
using namespace std;
int main(){
int b[4]{1,2,3,4};
for(int i=0;i<10;i++)
cout<<b[i]<<' ';
}
```
----
每個變數都會有個記憶體位置來存它的值,而陣列裡每格的記憶體是連續的(所以可以用索引找到裡面的值)
當索引超過陣列長度,就會把其他記憶體位置的資料覆蓋或輸出(類似於輸出隨機的值)
這種錯誤發生在執行時(run-time error),而不是編譯時(compile-time error),故編譯器無法提供警告
----
跟給補習班錯誤電話號碼的結果一樣糟糕🤪
```
/*OUTPUT---
1 2 3 4 0 0 1 7 1774496 0
------------*/
```
---
## 二維陣列
有些人會在延長線上面的每一格,全插上延長線,來插更多插頭
二維陣列的概念跟這個類似,在一維陣列的每一格放進一個陣列,變成一個像棋盤的二維陣列(不要為了模擬二維陣列玩延長線喔,失火了我們不負責😂)
----
### 宣告
在一維陣列後面,再加一個中括號就行了
```cpp=
int d2[5][3];//五個格子中全掛入長度為三的陣列
//也可以想作 橫向5格 縱向3格的棋盤
```
----
### 存取
二維陣列要標兩個索引
可以用雙重迴圈加快存取
```cpp=
#include<iostream>
using namespace std;
int main(){
int b[3][4]{
{1,20,5,3},
{7,8,88,9},
{9,512,1,1}
};
for(int i=0;i<3;i++){
for(int j=0;j<4;j++)
cout<<b[i][j];
cout<<'\n';
}
}
```
----
```
/*OUTPUT---
12053
78889
951211
------------*/
```
----
### 初始化
```cpp=
int b[3][4]{
{1,20,5,3},
{7,8,88,9},
{9,512,1,1}
};
```
---
## 多維陣列
不管是三維、五維、十維...
你要幾維都做的出來
```
資料型態[d1][d2]...[dn];
初始化時,{}裡放d1個{}
每個d1的{}裡,放d2個{}
每個d2的{}裡,放d3個{}
...
每個dn-1的{}裡,放dn個元素
```
---
## 字串(string)
字串有兩種分類,用法不盡相同,兩種不可直接轉換,需透過特定函式轉換
1. c style string(字元陣列)
2. c++ style string
----
註:寫`c++`建議使用string 取代 char[ ]
----
### c style string(字元陣列)
在c語言中,字串用一個一個字元組成的陣列表示
用法:
```cpp=
#include<iostream>
#include<cstring>
using namespace std;
int main(){
//中括號裡面可以不用寫字串長度
//編譯器會自動判斷長度
char ss[]="abcde";
cout<<ss;//這個不需要索引即可輸出
}
```
```
/*OUTPUT---
abcde
------------*/
```
----
### c++ style string
`c++`提供了string 的資料型態給字串,使用時記得先引入`<cstring>`
用法:
```cpp=
#include<iostream>
#include<cstring>
using namespace std;
int main(){
string ss="abcde";
string single="s";//這個資料型態只能放字串
cout<<ss<<' '<<ss[0];
}
```
```
/*OUTPUT---
abcde a
------------*/
```
---
### 字串串接⛓
字串的串接有兩種方法
1. 用 `+=` 或 `+`
2. 使用`.append()`函數
<font color="#f00">注意! </font> string 初始化後再串接才不會出問題
----
整個字串的串接用 `+=` 或 `+` 就可以了,
而取a字串的片段接在b後的情形使用`.append()`函數
`字串a.apppend()`的括號裡依序放上三個要素--
(字串b,從b的第幾個字元開始,幾個字元)
----
- 一般用法:`str1.append(str2,整數x,整數y)`
- 用法2:`str1.append(str2)`,和+=有一樣效果
悄悄話: `.append()` 真的超方便🤩,可以應付大部分字串處理題目的奇怪要求~~
----
```cpp=
#include<iostream>
#include<cstring>
using namespace std;
int main(){
//string 初始化後再串接才不會出問題
string s="abcdefghi";
string i="123456789";
string New="";//初始化為空字串
New=s+i;//New設為「字串i後接上s字串」的字串
s.append(i,3,5);//在字串s後接上i[3]開始的五個字元
i+=s;//在字串i後接上s字串==i.append(s);
cout<<New<<'\n'<<s<<'\n'<<i;
}
```
```
/*OUTPUT---
abcdefghi123456789
abcdefghi45678
123456789abcdefghi45678
------------*/
```
---
## 量大小
----
### sizeof()
可以用sizeof()函式檢查變數佔的記憶體空間
```cpp=
#include<iostream>
#include<cstring>
using namespace std;
int main(){
char c='1';
char arr[]="1";//中括號裡如果要放數字記得是放2
int i=1;
double d=1;
string ss="1";
cout<<sizeof(c)<<' '<<'\"'<<sizeof(arr)<<'\"'<<' ';
cout<<sizeof(i)<<' '<<sizeof(d)<<' '<<sizeof(ss);
}
```
```
/*OUTPUT---
1 "2" 4 8 32
------------*/
```
----
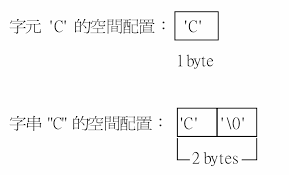
只有元素1的字元陣列佔兩格空間!?🤯
難道字元陣列知道我懶得寫句號,就偷偷幫我寫上了?
沒錯!字元陣列就是這種暖男👍👍
----
### 空字元(\0)
空字元的概念超重要
字串儲存在記憶體時,會在最後面加上字串結束字元'\0'做結尾
----
### .length()
可是用sizeof()函式,不管string的長度多長都是佔32個記憶體阿(╯°□°)╯︵ ┻━┻
所以c++ 有個專門量string長度的函式 `.length()`
用法: `字串名稱.length()`
----
```cpp=
#include<iostream>
#include<cstring>
using namespace std;
int main(){
string ss="12345";
cout<<ss.length();
}
```
```
/*OUTPUT---
5
------------*/
```
----
### .size()
也可以用.size()來量string的長度
不過他不是string專用的,所有STL「容器」都可以用
下學期會有一些STL容器的介紹
---
## 題目練習
(悄悄話:不會的話可以偷偷看一下講義下一頁的提示...)
[b026: 乖乖寫作業](https://judge.tcirc.tw/ShowProblem?problemid=b026)
[b027: 找出學霸](https://judge.tcirc.tw/ShowProblem?problemid=b027)
[b002: 誰比較長?(一)](https://judge.tcirc.tw/ShowProblem?problemid=b002)
----
#### 小技巧:多筆測資
用`while(cin>>n){}`,把`int main(){}`裡的程式碼括住
只要測資裡還有東西沒有cin就會反覆執行裡面的程式碼喔
----
### 提示
- b026:<font color="#FFFFF">也許用for迴圈...就能輕鬆反向輸出摟 </font>
- b027:<font color="#FFFFF">善用變數儲存東西吧</font>
- b028:太基本了不提示
---
## 各種奇怪的輸入
---
### cin
最基本的cin,用於取得輸入,遇到`空格`、`enter`、`tab`(一般是4個空格的長度)就結束,且不會輸入`空白`、`enter`、`tab`。
```cpp=
cin >> 變數名稱;//將值輸入到變數之中
```
---
### cin.get()
用來接收特定數量字元的字串,可以接收`空白`、`tab`,遇到`enter`就結束。
```cpp=
cin.get();//用於捨棄輸入流中不要的字元(包含空白、tab)
cin.get(char c);//將一個字元輸入至c(包含空白、tab)
cin.get(字串名稱,int n);//將n-1個字元輸入到字串中(包含空白、tab)
```
這裡不建議使用`cin.get()`,因為在實際運作上容易因為遇到換行或空格而造成輸入的值與預期的不同。如果想要了解更詳細的實際用法,請參考:[這裡](https://www.cplusplus.com/reference/istream/istream/get/)
---
### cin.getline()
用來接收指定長度的**字元陣列**,會接收`空格`、`tab`,且可以指定結束字元,若無特別指定則為`enter`。
```cpp=
cin.getline(字元陣列字串名, int n);//將n-1個字元輸入到字元陣列中(包含空白、tab)
cin.getline(字元陣列字串名, int n, char c);//輸入一個最長為n-1的字元陣列,若遇到c則立即停止,輸入的字串會不包含c
```
----
```cpp=
#include<iostream>
using namespace std;
int main(){
char c[50];
cin.getline(c, 7, 'a');
cout << c << endl;
cin.getline(c, 5);
cout << c << endl;
}
```
```
/*INPUT---
thfsak jdoe
------------*/
```
```
/*OUTPUT---
thfs
k jd
------------*/
```
---
### getline()
用於輸入一整行到**c++ style的字串**中。
```cpp=
getline(cin, c++ style string);//將一整行輸入到c++ style字串中(包含空白、tab)
```
----
```cpp=
#include<iostream>
#include<cstring>
using namespace std;
int main(){
string s;
getline(cin, s);
cout << s;
getline(cin, s);
cout << s;
}
```
```
/*INPUT---
ttug eeke keikwo;q
shdhd
------------*/
```
```
/*OUTPUT---
ttug eeke keikwo;q
shdhd
------------*/
```
---
## 區塊(block)
宣告變數是寫程式很重要的一件事。其中存在一些規則,必須作注意。
1. 變數要在宣告後才能使用。
2. 宣告的有效範圍是該宣告所在區塊(block),即`{`和`}`之間的範圍。所以綜合第一點:宣告的有效範圍為宣告位置到該block的結束。
3. 可在main函式前做宣告(又稱全域宣告),宣告的變數稱為全域變數。
4. `for loop`的初始化宣告在loop進行時皆可使用。
----

```
/*OUTPUT---
5 7 7 5 3 7 5 0 7 5 1 7 5 2 7 5 3 7 5 4 5 15
------------*/
```
----
小技巧:可以透過編譯器旁邊的加減號來查看區塊
---
## 位元運算
請見PPT
---
### 二進位宣告
想要在C++中宣告二進位的數字,只需要先加上`0b`然後直接輸入二進位的數字就好了,而十六進位的數字一樣能透過加上`0x`來宣告,但此方法只適用於`C++14`以上。
```cpp=
#include<iostream>
using namespace std;
int main(){
int a = 0b1011;//11
int b = 0xA5;//165
}
```
---
### 二進位輸出
在C++中,不論你以何種進位方式宣告,在輸出時皆會以十進位輸出。若希望以二進位輸出則需要用到bitset。
```cpp=
#include<iostream>
#include<bitset>
using namespace std;
int main(){
int a = 85;
cout << bitset<10>(a);
//cout << bitset<輸出位數>(輸出數字);
}
```
---
### 位元運算子
位元運算子中的`AND`、`OR`、`XOR`的寫法加減乘除相同,而`NOT`則是加在變數之前。
```cpp=
#include<iostream>
#include<bitset>
using namespace std;
int main(){
int a=0b10111;
int b=15;
int c=a>>2;
int d=a&b;
int e=~d;
int f=e|b;
int g=a^c;
cout << bitset<6>(a) << "\n" << bitset<6>(b) << "\n" << bitset<6>(c) << "\n" << bitset<6>(d) << "\n" << bitset<6>(e) << "\n" << bitset<6>(f) << "\n"<< bitset<6>(g) << "\n";
a<<=6;//a=a<<6;
cout << bitset<15>(a);
}
```
---
## 題目練習
[b053: 正確的數字](https://judge.tcirc.tw/ShowProblem?problemid=b053)
[c042: i.秘密差(Secret)](https://judge.tcirc.tw/ShowProblem?problemid=c042)
[zero judge:e288: 互補CP](https://zerojudge.tw/ShowProblem?problemid=e288)
### 解答
乖乖寫作業
```cpp=
#include<iostream>
using namespace std;
int main(){
int n;
cin>>n;
long long num[100];
for(int i=0;i<n;i++){
cin >> num[i];
}
for(int i=n-1;i>=0;i--){
cout << num[i] << " ";
}
}
```


