<!-- 
# Git & GitHub | Remote Repositories - forking & cloning -->
## Learning goals
After this lesson, you will be able to:
- *Fork* a remote GitHub repository,
- *Clone* a remote repository to your local machine,
- Create a *pull request* to submit changes to a remote repository that doesn't belong to you.
<br>
## Introduction
GitHub is a platform that helps developers store, manage, and track changes made in their source code and projects using Git. GitHub provides special features and tools that help developers submit, review and track changes in code. These features and tools make it easier for developers to work together on projects.
In this lesson, we'll show you a few features related to working together and using GitHub to track changes to code. You'll also get a chance to try them out by playing with a remote repository.
### What is Forking?
**Forking a repository means taking someone else’s repository with code and creating your copy of it.**
A couple of things to keep in mind:
- Everything related to *forking* happens online on GitHub.
- Remote repositories live on GitHub, so with forking, you are making a copy of someone’s repository hosted on GitHub. The copy that you make by forking will be hosted on your GitHub profile.
<br>
### How to Fork
Forking a repository is super simple. To do this, we'll navigate to [Ironhack’s GitHub practice](https://github.com/ironhack-labs/lab-github-practice) repo. To make a copy of this repository on your GitHub profile click the **Fork** button in the upper-right corner of the page:

<hr>
<br>
In the following dialog, **choose your account** as the place to fork:

<hr>
<br>
## Cloning
### What is Cloning?
**Cloning a repository means taking a remote repository that lives on GitHub and downloading it to your local machine**.
This is usually done for the following reasons:
- You have created a fork of a project, and now you need to copy it to your computer so you can make some changes.
- You are collaborating on a project where someone has invited you to their repo as a *contributor*, such as a private repo at a company, so you need to copy it to your computer and start making some changes.
<br>
### How to Clone
Now that we have forked our own version of the exercise repo, we need to copy it to our computer so we can work on it.
**Step 1: Clone the repository to your local machine**
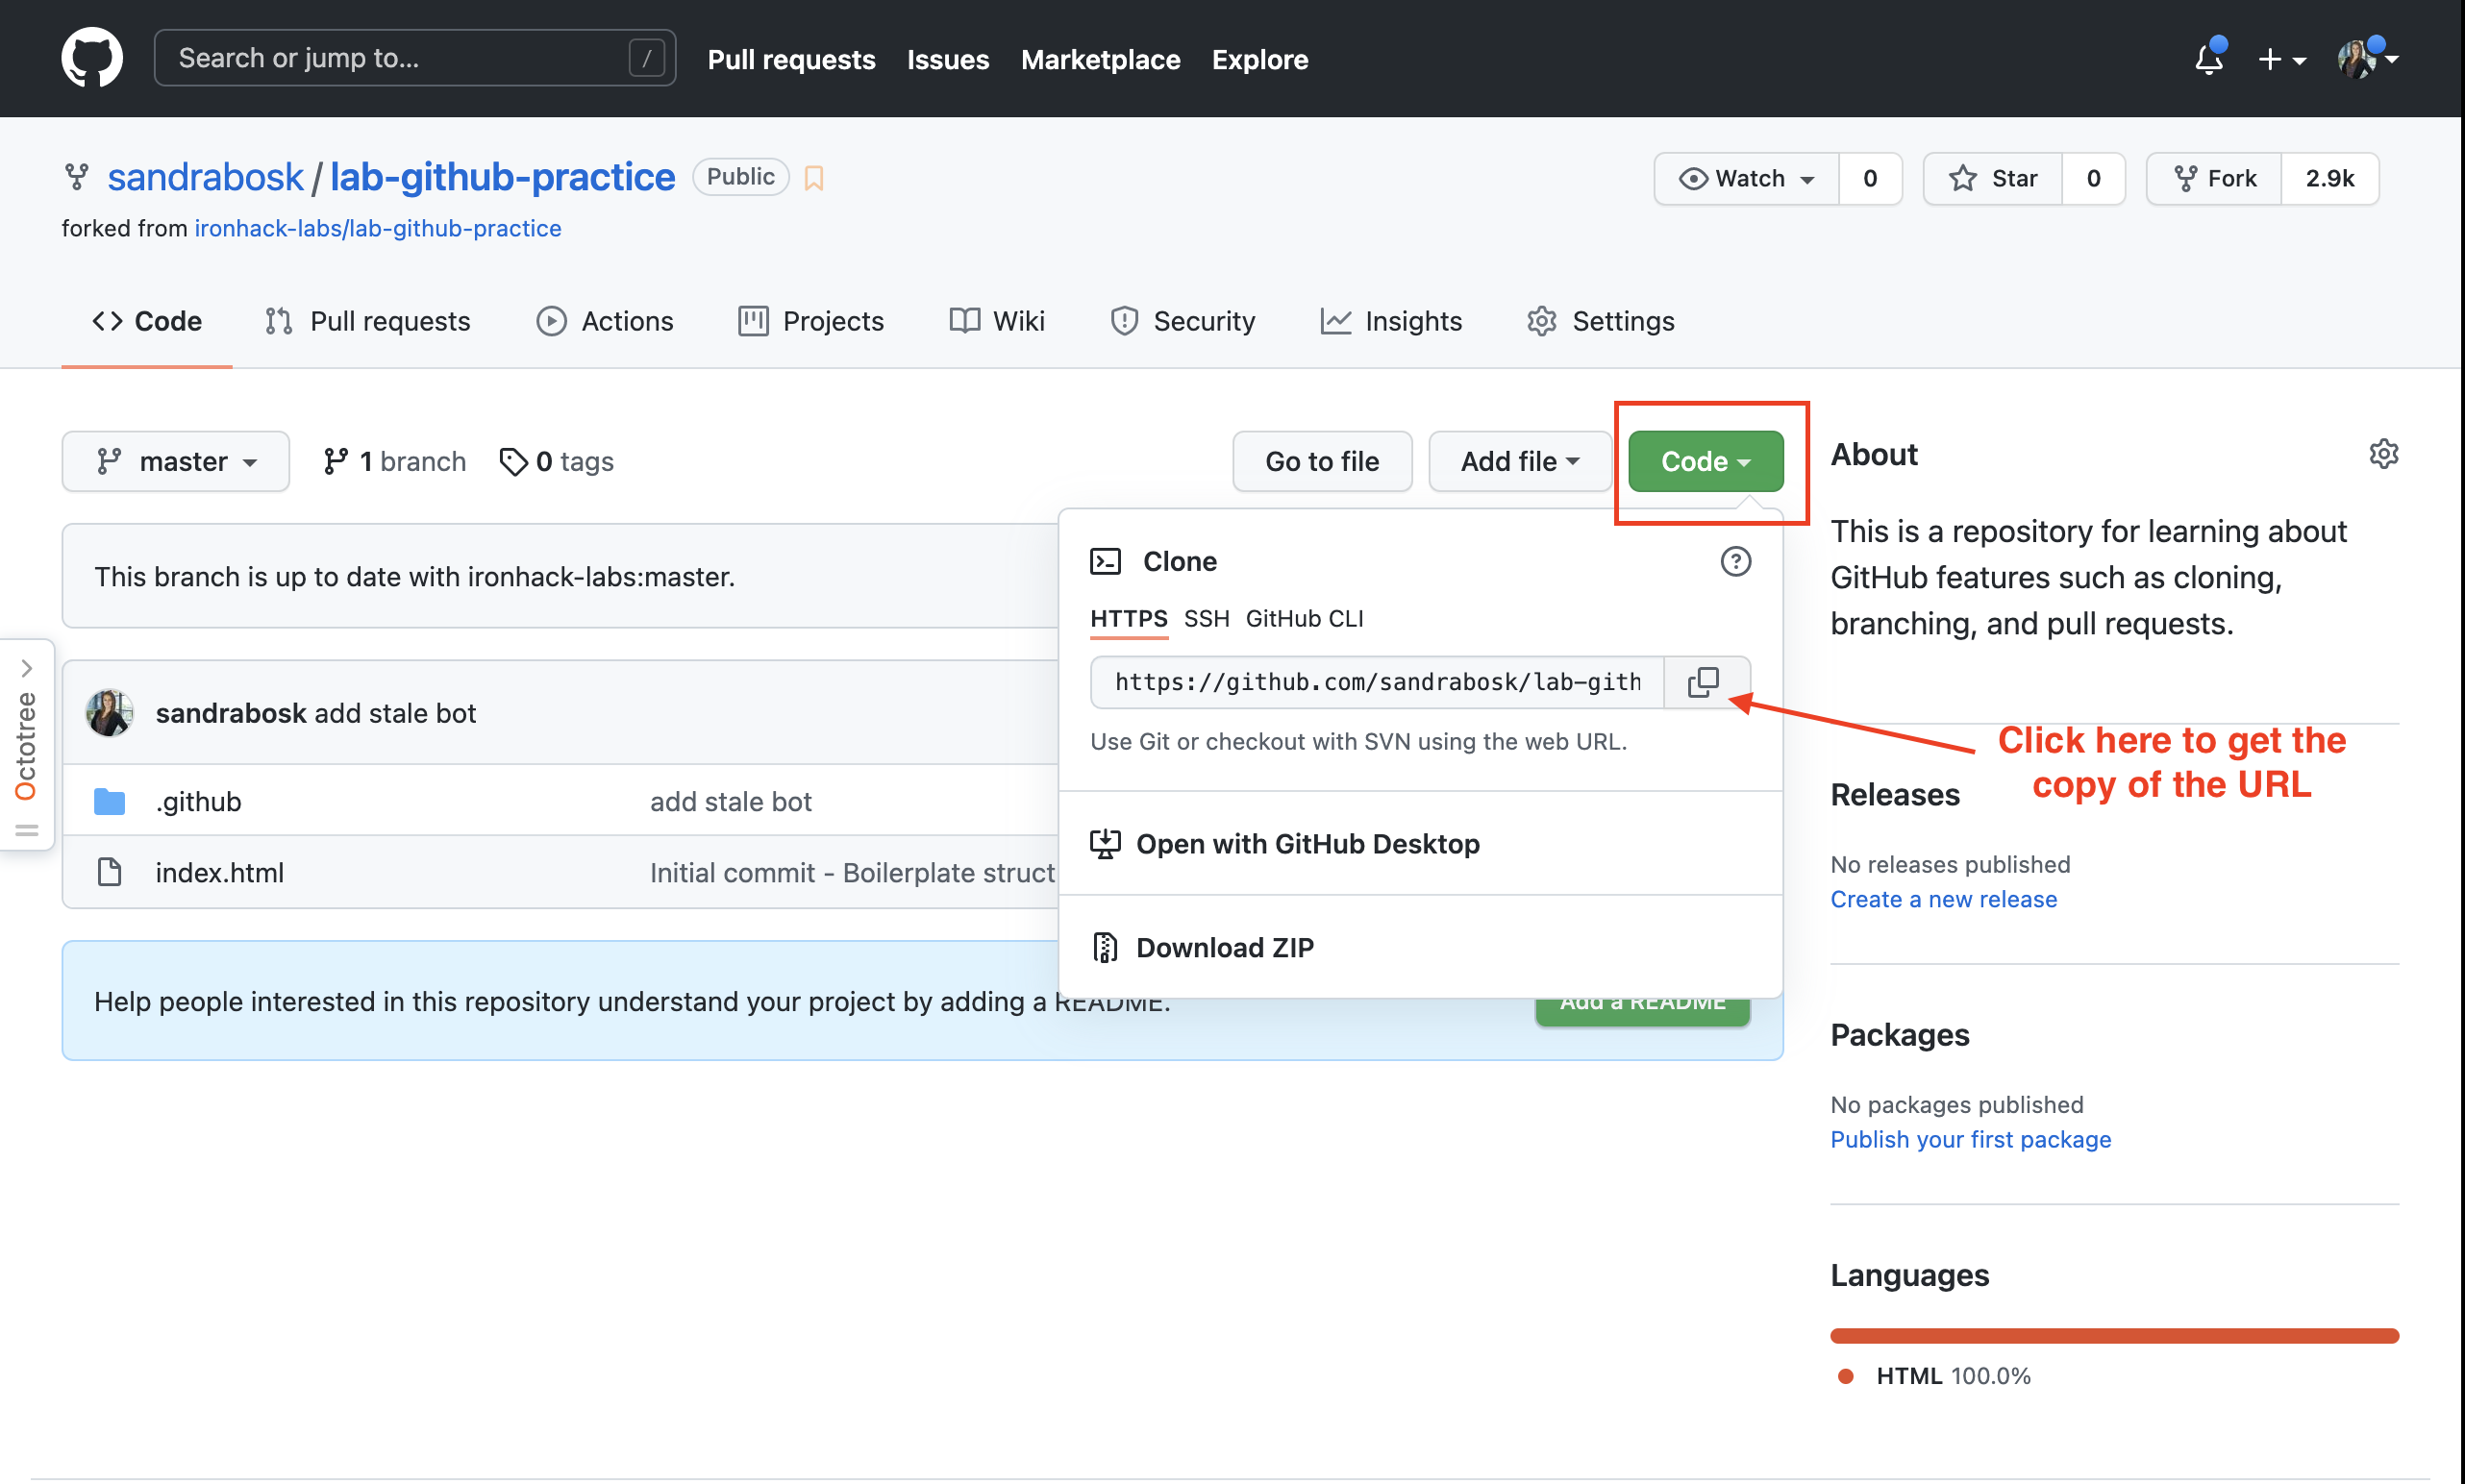
To clone the repository to your local machine, which is the other name for download, click the **Code** button, and copy the link to your clipboard:
<br>
**Step 2: Open the destination folder**
Open your termina, and navigate to the folder on your computer where you want to clone (download) the repo. For example, we could open the Desktop:
```shell
# Navigate to the root folder
cd ~
# Then, navigate to the Desktop folder
cd Desktop
```
<br>
**Step 3: Clone the repository using the command `git clone`. **
To clone the repository we'll use the command `git clone` and the link we copied previously:
```shell
git clone https://github.com/sandrabosk/lab-github-practice.git
```
This will make a copy of the repository in the existing folder. We can verify it by using the `ls` command:
```shell
ls
```
<br>
**Step 4: Open the cloned repository in the VSCode**
Now that we have the repository cloned and downloaded on our local machine, we can open the folder and start working with the code. We'll open it in the VS Code using the Terminal:
```shell
# 1. Change the directory and move to the repository folder:
cd lab-github-practice
# 2. Open the repository folder with VS Code:
code .
```
<br>
### Cloned repository and the original remote repo
A *cloned repository* already has a Git repo in it. You do not need to run `git init`.
In addition to this, the **cloned repository is linked to the original remote repository** on GitHub from which it was cloned.
<br>
## Pull Requests
### What is a Pull Request?
**A pull request is a way of notifying the the original repository owner that you have made some changes and would like to *merge* those changes into their repository, at the owner’s discretion**.
In your professional ventures, open-source projects, and even later in the course, when you collaborate on some group exercises, it can be *very tricky* to manage which changes are made, how they are made, and avoid conflicts when merging changes in the source code.
Pull Requests were created specifically to solve this. With Pull Request, you can submit the updated code for a review and ask that it be added to the original code base, the original repository.
<br>
### How to make Pull Request
Before creating a Pull Request and submitting the updated code, let's make some changes to the code and commit them.
<br>
**Step 1: Make changes to the code locally**
We'll update the `index.html` file available in the repository we cloned to our local machine. We'll update it in the following way:
```html
<!DOCTYPE html>
<html lang="en">
<head>
<meta charset="UTF-8">
<title>Portfolio Page</title>
</head>
<body>
<nav>
<ul>
<li><a href="#">Home</a></li>
<li><a href="#">About</a></li>
<li><a href="#">Contact</a></li>
</ul>
</nav>
<h1>Welcome To Ironhacker's Page</h1>
<section>
<h2>Things I Don't Like</h2>
<ul>
<li>Fish</li>
<li>Heights</li>
<li>Wind</li>
</ul>
</section>
</body>
</html>
```
<br>
**Step 2: Make a snapshot of changes by making a *commit***
Next, we'll make a snapshot (a **commit**) of changes that we made and save them by making a `git commit`:
```shell
# 1. Check the changes made:
git status
# 2. Stage all the changes for the commit (Move to the staging area, for the next commit):
git add .
# 3. Check the changes made once more. Staged changes ready to commit should be green:
git status
# 4. Create a commit - this will make a snapshot of all the staged files (in green):
git commit -m "Add things I like"
```
<br>
**Step 3: Push the new commit containing changes to the original remote repo**
To be able to make a Pull Request and submit our updated code, we first have to push the changes to the repository on GitHub:
```shell
git push origin master
```
<br>
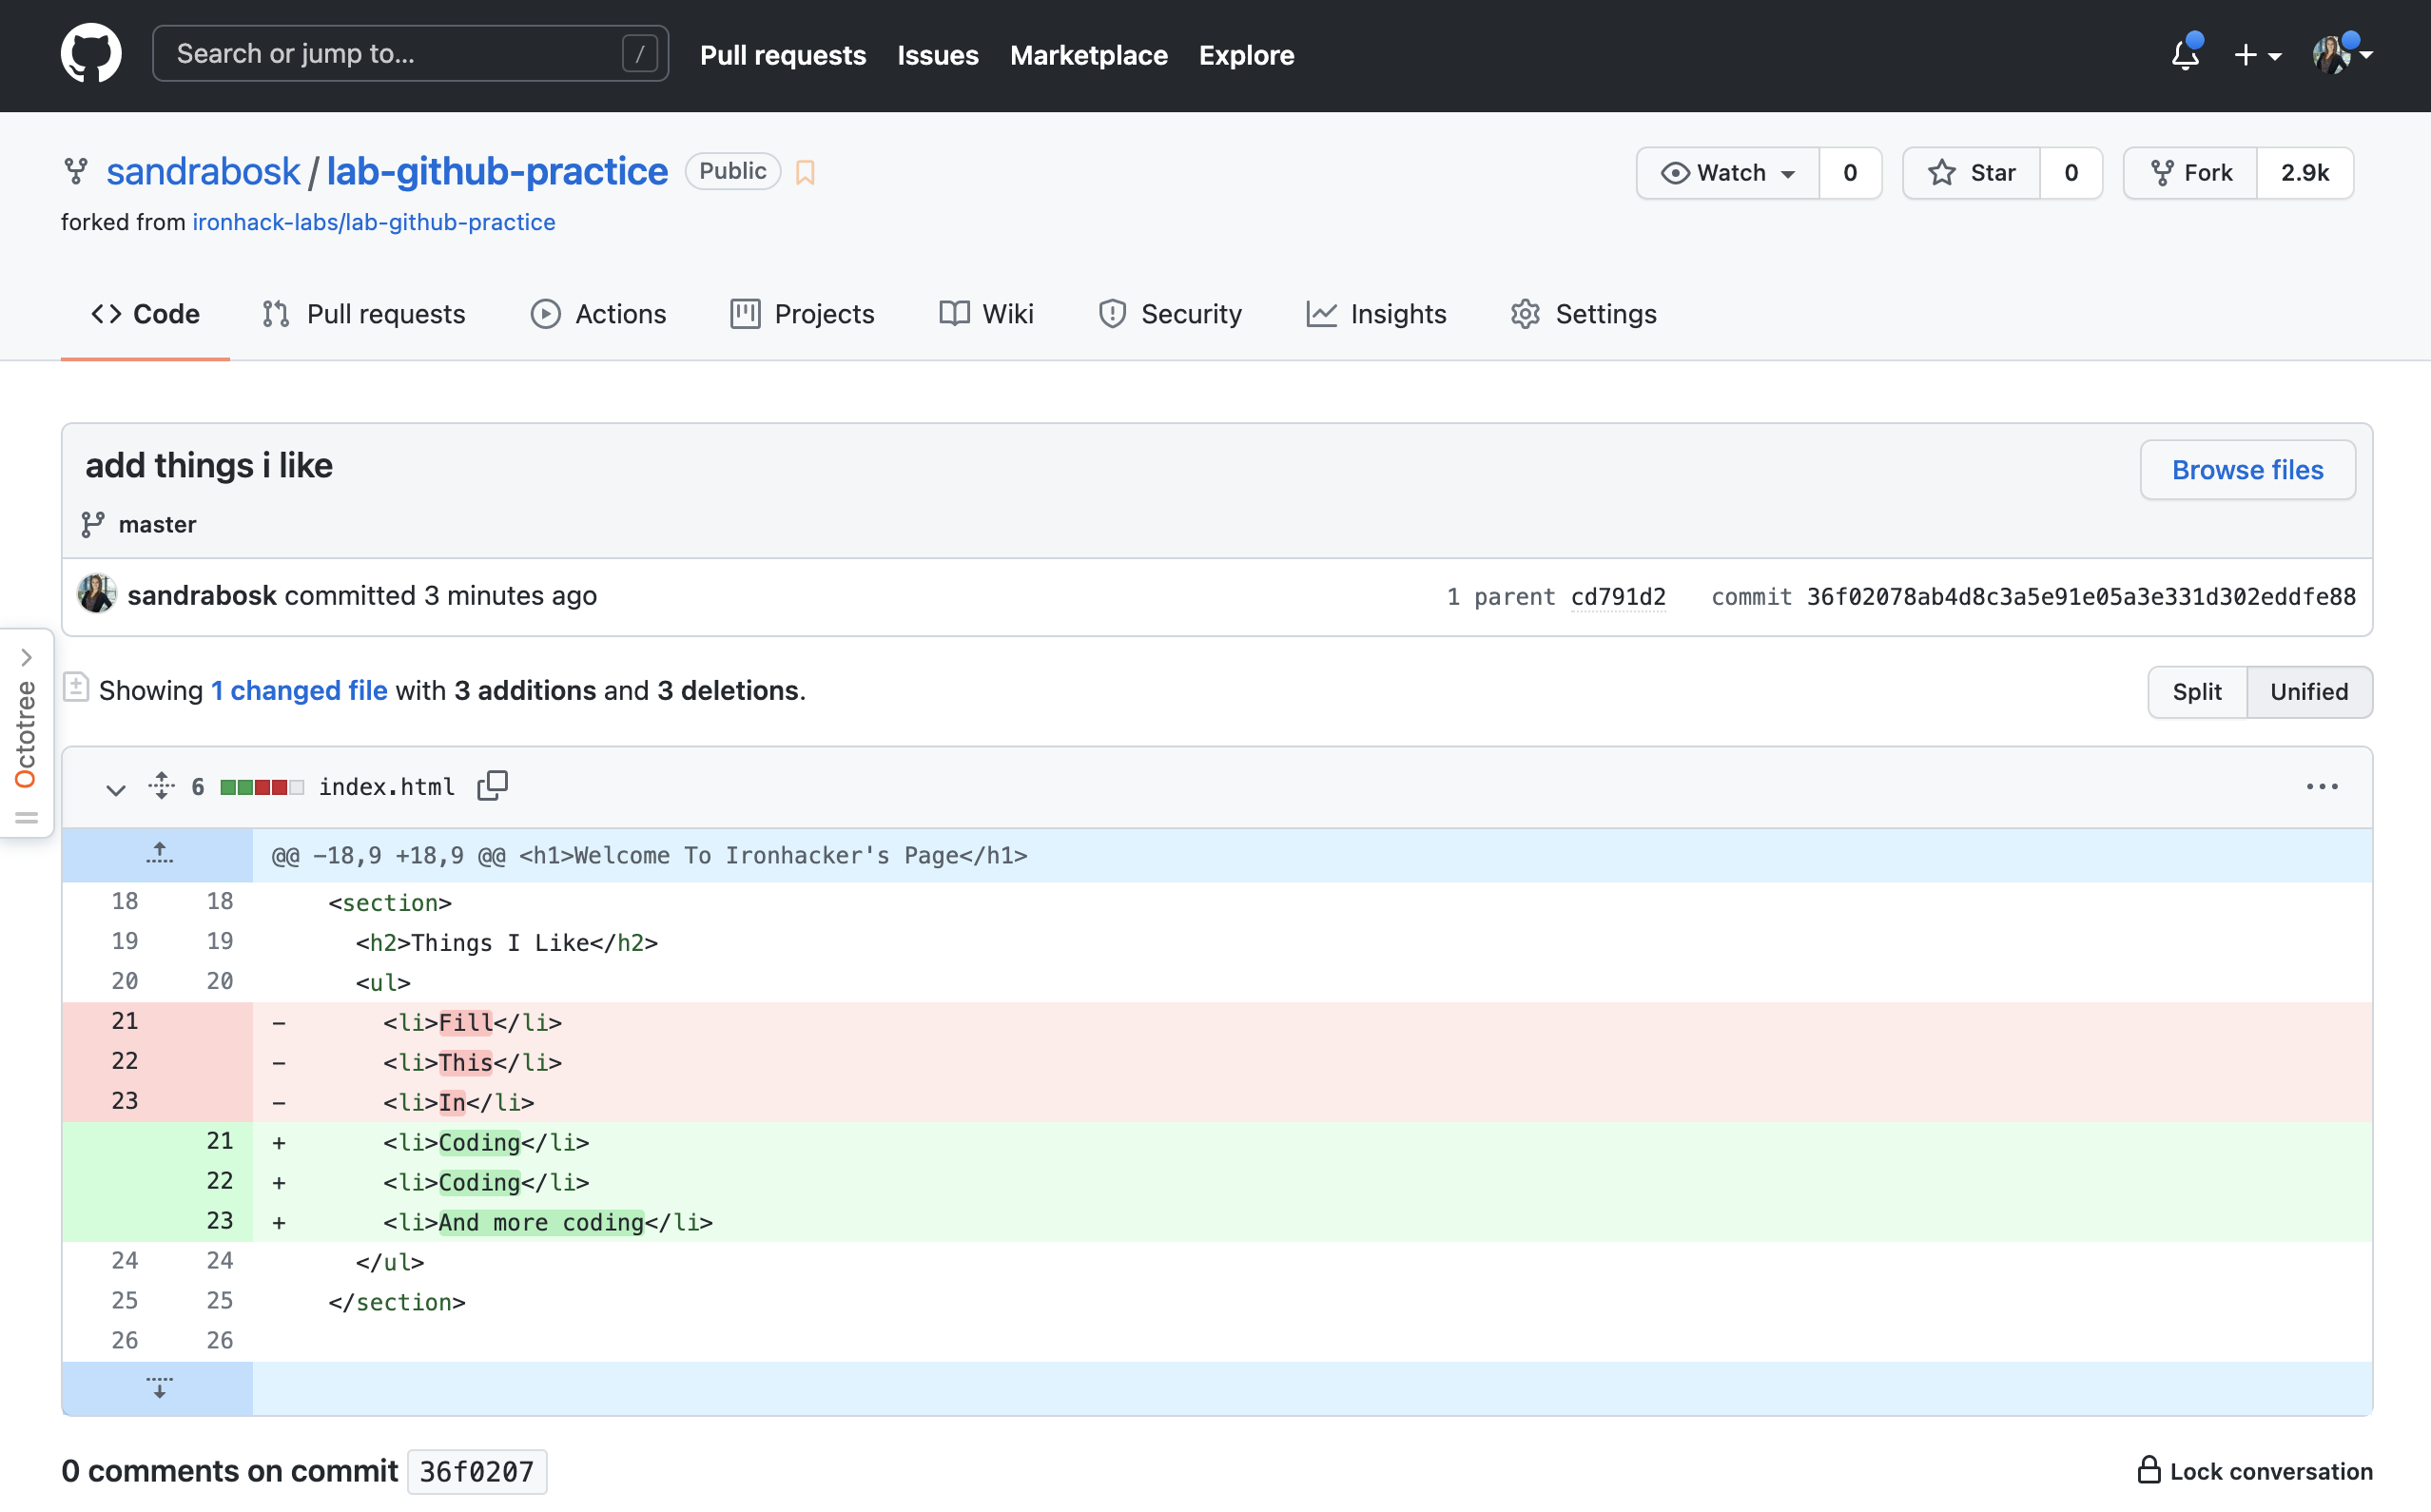
If this succeeded, you will be able to see the commit message you created (image 1) and the changes in the file you made (click on the commit message to see the view as on image 2 below) :

<hr>
<br>
Now you are ready to move on to making the Pull Request.
<br>
**Step 4: Open the repository on GitHub**
To create a Pull Request, open your fork (copy) of the repository on GitHub. Once there, click on the **Pull Request** button.

<br>
**Step 2: Click the "New pull request" button**
On the next screen, click on the **New pull request** button:

<br>
**Step 3: Check the base repository**
Before creating a pull request, we should always double-check the destination repository for our Pull Request. The destination is, by default, set to the original repository.
So far, you don't have to do anything about this, but we want you to be aware of it.
Next, click on the **Create pull request** button:

**Step 4: Create a Pull Request**
The last step is specifying the *title of the Pull request* and an optional *comment* explaining the changes in code we want to submit.
In the Pull request title input, write your name and the message "Practice making a fork, clone and a Pull Request".
Once done, click on the **Create pull request** button to create the Pull Request:

<br>
Congratulations! You've just made your first Pull Request. :tada:
<br>
## Quick Reference
Here are the most important commands you have learned in this lesson:
**Cloning a project**
```shell
git clone <repository-url>
```
<br>
***Note:*** You don’t have to fork someone’s repository to be able to clone it - these two are completely independent commands. You will have to fork first only if it is expected from you to submit/show changes you made and to make them available to other collaborators on the same project. In any other case, you can click on the `Clone or download` button and grab the link and in your terminal run:
```shell
git clone <the-url-of-project-you-want-to-clone>
```
<br>
## Summary
In this lesson, we discussed collaboration on GitHub:
- **Forking** a repository - creating a copy of a remote repository on your GitHub,
- **Cloning** a repository - downloading a remote git repository to your machine using **`git clone`**.
- **Merging** the changes you made locally on your computer and pushed on your GitHub into the forked repo with the original repo using **pull request**.
Collaboration is one of GitHub’s primary purposes. Using the tools that we have highlighted in this lesson, you can do so many things, among which is submitting work at Ironhack and working on a dev team in the real world.
## Extra resources
- [The difference between forking and cloning a repository](https://github.community/t5/Support-Protips/The-difference-between-forking-and-cloning-a-repository/ba-p/1372)


