---
title: OLD HybSeq Protocol
tags: HybSeq
---
# Chicago Botanic Garden Lab HybSeq Protocol
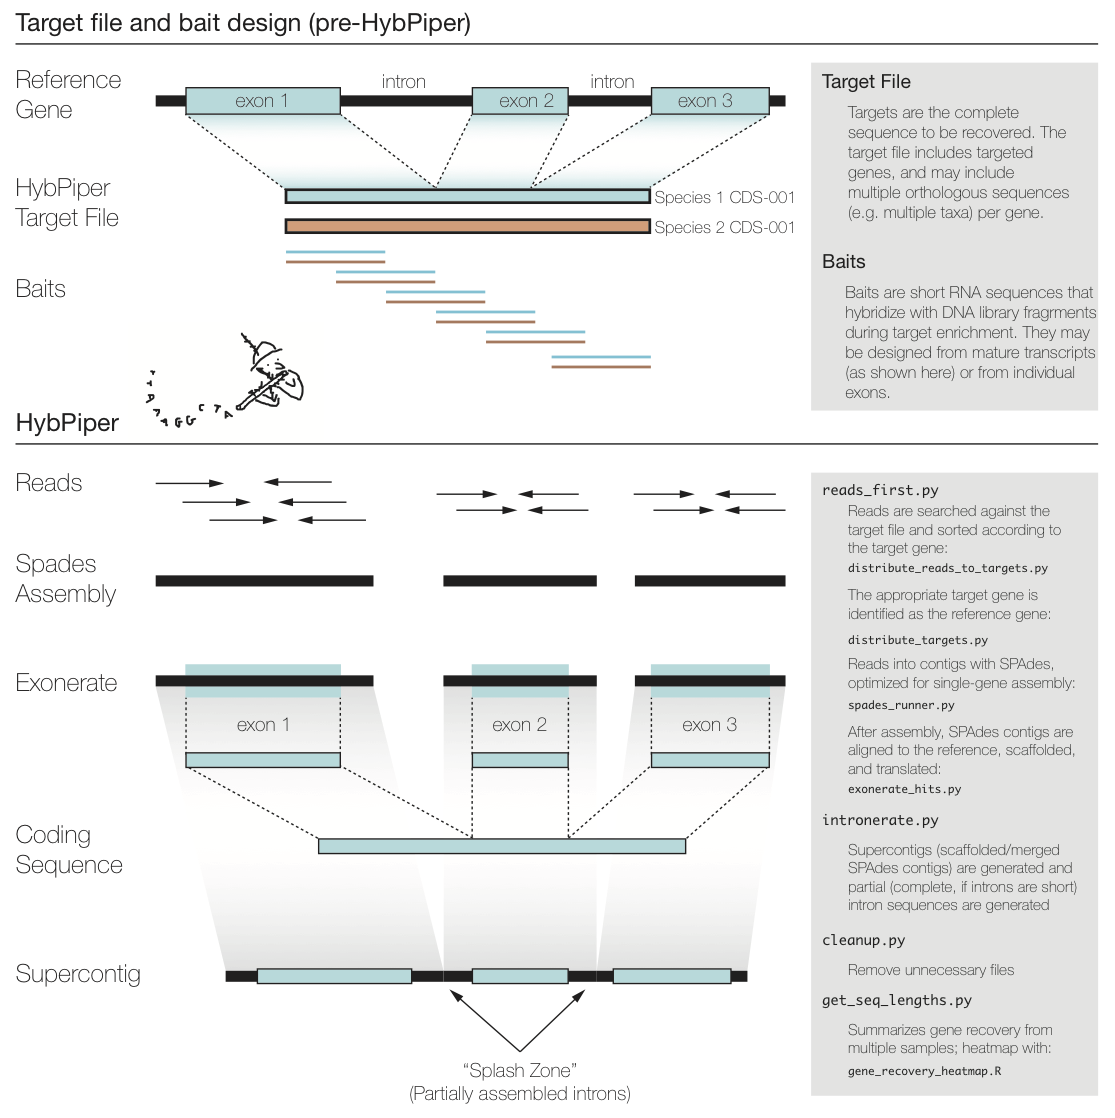
#### Go to the HybPiper wiki here: [Hybpiper Wiki](https://github.com/mossmatters/HybPiper)
## Step 1: Get Familiar with the Server
This is where your data is stored and analysis will be run
Instruction for[ CBG Server](https://docs.google.com/document/d/1ZBrGCZjWsCS2B3qS80d3i5OF2j999T47GHZCIYLZD7A/edit?usp=sharing)
## Step 2: Check the quality of your data
We do this using [Fast QC](https://www.bioinformatics.babraham.ac.uk/projects/fastqc/) and MultiQC
Example Reports:
* Good Illumina Data
* Bad Illumina Data
* Adapter dimer contaminated run
* Small RNA with read-through adapter
* Reduced Representation BS-Seq
* PacBio
* 454
**1)** To use we will need to start by installing miniconda 2 (latest version is miniconda 3, but this installs python3, which is not compatible with hybpiper, so we need miniconda)
```bash= !
yes
```
Answer ‘YES’ to prompts and it will install, and close terminal window and re-open, log back in
**:warning: If you don't allow the initilization (by typing "yes") when prompted, you will not be able to use conda without manually starting the initilizer. To manually start the initializer do the following:**
```bash= !
source /home/<username>/miniconda2/bin/activate
conda init
```
Now conda is the base environment so you should see the following whenever you login to the server:
```bash=
(base) [<username>@Fabronia ~]$
```
**2)** To install FastQC, type
```bash= !
- /conda install -c bioconda fastqc
```
**3)** Then go to your home directory with the samples and make a new folder to hold the reports. For the [name] you may call it whatever you'd like, e.g. `cd /home/fastqc/`.
```bash= !
cd /home/[name]/
mkdir fastqc
```
**4)** To run FastQC on one sample:
```bash= !
fastqc [sample name].fastq.gz --outdir=fastqc/
```
`--outdir=fastqc/` is how you tell FastQC where to put the output files. Make sure to put the name of the folder you created in step 3.
This will produce an HTML and a zip file, both containing the same contents. Opening the HTML file will open a webpage containing the FastQC information. Details on what each section means can be found **[here](https://www.bioinformatics.babraham.ac.uk/projects/fastqc/Help/)**.
**5\)** To run FastQC on a whole folder of samples:
```bash= !
fastqc *.fastq.gz --outdir=fastqc/
```
The `*` simply refers to run the command on any file that ends in `.fastq.gz`.
Also, if you'd like to be able to screen the operation, you can type `screen fastqc *.fastq.gz --outdir=fastqc/`.
## Step 3: Trim data to just quality read (TRIMMOMATIC)
**Trimmomatic** is a tool that is used to trim the ends of our reads. You can specify what to trim, such as the adapters, leading/trailing base pairs with low quality reads, etc.
Read more on the <i class="fa fa-github"></i> ++[trimmomatic github page](https://github.com/usadellab/Trimmomatic)++.
### Installing Trimmomatic
Installing trimmomatic is as simple as downloading it from ++[their website](http://www.usadellab.org/cms/?page=trimmomatic)++.
Download the ++binary++ version of their most recent release, and extract it to wherever you'd like.
### Using Trimmomatic
**1\)** Run 1 accession (R1 and R2) to test trimmomatic using the following:
```bash= !
$ java -jar /[path to trimmomatic folder]/trimmomatic-0.39.jar PE -phred33 [input file 1] [input file 2] [output file 1] [output file 2] [output file 3] [output file 4] ILLUMINACLIP:/[path to trimmomatic folder]/adapters/[specific adapter]:2:30:10 LEADING:3 TAILING:3 SLIDINGWINDOW:5:20 MINLEN:36
```
- The input file names must follow a naming convention
- *_R1_001.fastq *and* *_R2_001.fastq
- *.f.fastq *and* *.r.fastq
- *.1.sequence.txt *and* *.2.sequence.txt
- The specific adapter to insert in the `[specific adapter]` field depends on what was used in the sequencing lab. In my case we used `TruSeq3-PE.fa`.
:::spoiler > Trimmomatic Arguments
- `-threads 6` tells trimmomatic how many CPU threads to use
- `-phred33` refers to the quality metric that the reads use
- `LEADING:3, TRAILING:3` tells trimmomatic to cut off the first and last 3 nucleotides
- `SLIDINGWINDOW:5:20` tells trimmomatic to perform a sliding window of size 15 (I think?)
- `MINLEN:36` reads must be at least 36 nucleotides long to not be discarded immediately
- `brighamia_trimmomatic.sh` is just the name of the shell script I give
:::
**2\)** Run trimmomatic on an entire folder of reads
- To do this make a shell script with a ```for``` loop using the code below:
- First, copy the code below and paste it into a text editor.
- Change the name of the output shell (.sh) script in a text editor. The name of the output shell script is designated after the >> (in this case, the name of the shell script being generated is ```brighamia_trimmomatic.sh```).
For running on the server, this is the same code with Fabronia pathname for Trimmomatic. If working on a different server or on a personal computer, adjust the pathname for Trimmomatic.
```bash= !
for R1 in *R1_001*
do
R2=${R1//R1_001.fastq.gz/R2_001.fastq.gz}
R1paired=${R1//.fastq/_paired.fastq}
R1unpaired=${R1//.fastq/_unpaired.fastq}
R2paired=${R2//.fastq/_paired.fastq}
R2unpaired=${R2//.fastq/_unpaired.fastq}
echo java -jar /opt/Software/Trimmomatic-0.39/trimmomatic-0.39.jar PE -phred33 $R1 $R2 $R1paired $R1unpaired $R2paired $R2unpaired ILLUMINACLIP:/opt/Software/Trimmomatic-0.39/adapters/TruSeq3-PE.fa:2:30:10 LEADING:3 TRAILING:3 SLIDINGWINDOW:5:20 MINLEN:36 >> impatiens_trimmomatic.sh
done
```
- Copy the revised code from the text editor and paste it into terminal and press `enter`.
**:warning:Make sure you are in the folder containing the raw reads! If unsure, type the following code to see if the files are in the directory:** `ls -1`
- Now that the shell script should be in the same directory as your raw reads, set up a screen using the following code:
```bash=
Screen -S <name>
```
- Now run the shell script using the following code:
```bash
sh <shell_script_name>.sh
```
**:bulb: If the above code doesn't work, you may have a permissions issue so try the code below:**
```bash=
$ chmod a+x <shell_script_name>.sh
$ bash <shell_script_name>.sh
```
## Step 4: Preparation for HybPiper
**1)** Housekeeping: Some file names can be excessively long. Now is the time to "clean up" the names to make them easier to work with
**Example of current names**
* 5b_S86_L002_R2_001_paired.fastq.gz
* 5b_S86_L002_R1_001_paired.fastq.gz
* 5b_S86_L002_R2_001_unpaired.fastq.gz
* 5b_S86_L002_R1_001_unpaired.fastq.gz
* 5b_S86_L002_R2_001.fastq.gz
* 5b_S86_L002_R1_001.fastq.gz
```bash= !
#removing the "_001"
for file in *.fastq.gz
do
mv -i "${file}" "${file/R2_001/R2}"
done
#removing the 001 for R1
for file in *.fastq.gz
do
mv -i "${file}" "${file/R1_001/R1}"
done
#removing the "_L002_"
for file in *.fastq.gz
do
mv -i "${file}" "${file/_L002_/_}"
done
#double check that this got them all, some files may have slightly different numbers like L001
#Removing the S123
for file in *.fastq.gz
do
mv -i "${file}" "${file/_S*_R/_R}"
done
for file in *.reads.fasta
do
mv -i "${file}" "${file/combined.fasta_reads/combined_reads}"
done
```
**Example of cleaned names**
* 5b_S86_R2_paired.fastq.gz
* 5b_S86_R1_paired.fastq.gz
* 5b_S86_R2_unpaired.fastq.gz
* 5b_S86_R1_unpaired.fastq.gz
* 5b_S86_R2.fastq.gz
* 5b_S86_R1.fastq.gz
This will save time when doing loops and other scripts
**2)** Before starting HybPiper we need to concatenate the unpaired reads. Use the `cat` command to do this. Modify and use the following code:
```bash= !
for i in 162-1 Abeid2627 ambanizanensis andringitensis anovensis auricoma; do
cat "$i"_R1_unpaired.fastq "$i"_R2_unpaired.fastq > "$i"_unpaired.fastq
done
cat [file1]_R1_001_unpaired.fastq.gz [file2]_R2_002_unpaired.fastq.gz > [Prefix]_unpaired.fastq.gz
```
**3)** You might need to unzip all the files before proceeding.
```bash= !
gunzip *.gz
```
**4)** Check version of python ```python --version```. You should be using Python 2.7.3. If it is a later version do the following:
```bash=
conda deactivate
```
Now check python version ```python --version``` again.
**5)** In some cases the issue when people are working offsite have issues with your environment. Johnathan looked at a hidden “profile” to indicate the path to find hybpiper. Some people need to have this updated.
## Step 5: Running HybPiper
> At this point, make sure you have Hybpiper downloaded.
**HybPiper** is a pipeline meant to capture sequences from libraries using baits. The [**HybPiper wiki**](https://github.com/mossmatters/HybPiper/wiki) goes over installation & tutorial.
To run Hybpiper you will need the following files:
- Baits file
- Paired reads files
- Unpaired reads files
- Possibly a names file
### Step 5.1: reads_first.py-Exonerate
:::info
:female-construction-worker: Behind the scenes
reads_first.py is a wrapper script that:
* Can check if all dependencies are installed correctly. (--check-depend)
* Creates sub-directories.
* Calls downstream analyses
This script will call, in order:
* Blastx (or BWA)
* Distribute_reads_to_targets.py (or distribute_reads_to_targets_bwa.py) - After a BWA search of the raw reads against the target sequences, the reads are sorted according to the successful hits, and distributes the reads into FASTA files ready for assembly.
* Distribute_targets.py - Given a file containing all of the "baits" for a target enrichment, create separate FASTA files with all copies of that bait. Multiple copies of the same bait can be specified using a "-" delimiter.
* Run SPAdes assembler.
* exonerate_hits.py - This script generates alignments of SPAdes contigs against the target sequence.
:::
**1)** Run the python file `reads_first.py` using the following code on **one** accession:
> The first step in the pipeline is running a python file called **reads first**. This python script does a lot of heavy lifting, including mapping the reads, assembling contigs, and then assigning contigs to the baits. It uses: **Both paired end reads (R1, R2), the concatenated unpaired reads**, and a **baits file**.
```bash=1 !
$ cd <directory_with_reads_paired_and_unpaired_and_baits_file>
$ python /opt/Software/HybPiper/reads_first.py -r BRIN-001_R1_paired_dd.fastq BRIN-001_R2_paired_dd.fastq --unpaired BRIN-001_unpaired.fastq -b brighamia_baits.fasta --prefix BRIN-001 --bwa
```
:warning: Change the names of the `.fastq` and `baits.fasta` files as well as the name of the output folder (`--prefix BRIN-001`) in the code above.
:::spoiler Arguments in the script: `reads_first.py`
- `-r` This specifies the paired end reads files
- `--unpaired` This specifies the unpaired read file
- `-b` This specifies the baits file
- `--prefix` reads_first.py creates an output directory (a folder). This will be the name of the folder
- `--bwa` This tells reads_first.py that we are using nucleotide sequences and not amino acid sequences
:::
:::danger
**Error:**
Traceback (most recent call last):
File "/opt/Software/HybPiper/distribute_reads_to_targets_bwa.py", line 4, in module
from Bio import SeqIO
ImportError: No module named Bio
real 0m0.100s
user 0m0.013s
sys 0m0.008s
[CMD] time python /opt/Software/HybPiper/distribute_reads_to_targets_bwa.py USDA-05_S26_unpaired.bam /home/AGrinage/Cleaned_reads/USDA-05_S26_unpaired.fastq
Traceback (most recent call last):
File "/opt/Software/HybPiper/distribute_reads_to_targets_bwa.py", line 4, in module
from Bio import SeqIO
ImportError: No module named Bio
real 0m0.019s
user 0m0.012s
sys 0m0.007s
ERROR: Something went wrong with distributing reads to gene directories.
:::
:::info
:bulb: SOLUTION: Check dependencies
```python /opt/Software/HybPiper/reads_first.py --check-depend```
In this case we need to install biopython
```conda install biopython```
:::
**2)** Run Hybpiper on an entire folder of reads
- To do this make a shell script with a `for` loop using the code below:
- First, copy the code below and paste it into a text editor.
- Change the name of the baits file (Here it is:`brighamia_baits.fasta`) in a text editor.
```bash= !
for file in *R1_paired*
do
file2=${file//R1/R2}
file3=${file//R1paired_dd.fastq/unpaired.fastq}
file4=${file//R1_paired_dd.fastq/}
echo python /opt/Software/HybPiper/reads_first.py -r $file $file2 --unpaired $file3 -b brighamia_baits.fasta --prefix $file4 --bwa >> reads_first.sh
done
```
:::danger
**Error:**
"Records in Fastq files should start with '@' character")
ValueError: Records in Fastq files should start with '@' character
real 0m1.607s
user 0m1.554s
sys 0m0.067s
ERROR: Something went wrong with distributing reads to gene directories.
:::
- Copy the revised code from the text editor and paste it into terminal and press `enter`.
**:warning:Make sure you are in the folder containing the raw reads! If unsure, type the following code to see if the files are in the directory:** `ls -1`
- Now that the shell script should be in the same directory as your raw reads, set up a screen using the following code:
```bash=
Screen -S <name>
```
- Now run the shell script using the following code:
```bash=
sh reads_first.sh
```
> This process is very CPU intensive and will take a while. There is also a lot of information your terminal will output as it's running. For every individual, reads_first will create one folder containing the file outputs. These file outputs will include sequences that were successfully mapped and assembled.
### Step 5.2: Checking for paralogs
```
/opt/Software/HybPiper/paralog_investigator.py $name; done < name_file.txt
```
### Step 5.3: Intronerate
```bash=
for dir in */
do
echo python3 /opt/Software/HybPiper/intronerate.py --prefix $dir >> intronerate.sh
done
```
### Step 5.4: Retrieve Supercontigs (Introns+Exons), Introns, Amino Acids
> This script will get the sequences generated from multiple runs of the HybSeqPipeline (reads_first.py).
Have all of the runs in the same directory (sequence_dir).
It retreives all the gene names from the bait file used in the run of the pipeline. It will output unaligned fasta files, one per gene, to current directory.
:::info
Note: You must specify whether you want the protein (aa) or nucleotide (dna) sequences.
You can also specify 'intron' to retreive the intron sequences,
or 'supercontig' to get intron and exon sequences.
:::
#### Retrieve the supercontigs (introns + exons)
```bash=
python /opt/Software/HybPiper/retrieve_sequences.py Angiosperms353_targetSequences.fasta . supercontig
```
#### Retrieve the introns
```bash=
python /opt/Software/HybPiper/retrieve_sequences.py Angiosperms353_targetSequences.fasta . intron
```
#### Retrieve the dna sequences (exons)
```bash=
python /opt/Software/HybPiper/retrieve_sequences.py Angiosperms353_targetSequences.fasta . dna
```
#### Retrieve the amino acids
```bash=
python /opt/Software/HybPiper/retrieve_sequences.py Angiosperms353_targetSequences.fasta . aa
```
---
## Step 6: Post-Hybpiper
### 6.1: Alignment
Make alignments on fasta files (supercontig, introns, or exons) using [MAFFT](https://https://mafft.cbrc.jp/alignment/software/).
#### Step 1:
```cd``` into the directory with the input (supercontigs, introns, or exons) fasta files
#### Step 2: Run MAFFT on a screen for all files in directory
```bash=
screen
for i in *.fasta; do
mafft --auto ${i} > ${i%.*}_mafft.fasta;
done
```
You should now have separate gene alignments with the following suffix: ```_mafft.fasta```
### 6.2: Generate coalescence tree using ASTRAL
#### 6.2.1: Gene trees
Make gene trees using the previously generated mafft alignment files as the input. We will be using [IQ Tree](https://http://www.iqtree.org/doc/Home) to generate a series of maximum likelihood gene trees.
##### Step 1: Check that you are in the directory with the alignments using ```pwd```.
##### Step 2: Make a screen
```bash=
screen -S gene_trees
```
> Where "gene_trees" is the name of the screen.
##### Step 3: Generate shell script to run IQ Tree on all gene alignments
```bash=
for file in *_mafft.fasta*
do
echo /opt/Software/iqtree-1.6.9-Linux/bin/iqtree -s $file -nt AUTO -m TEST -bb 1000 -wbtl >> iqtree.sh
done
```
> Now you should have a shell script named ```iqtree.sh```.
##### Step 4: Execute shell script ```iqtree.sh```
```bash=
sh iqtree.sh
```
> IQ tree generates the following output files: .bionj, .ckp.gz, .contree, .log, .mldist, .model.gz, . splits.nex, . ufboot, .iqtree, .treefile
The .ufboot --> bootstrap trees, .iqtree --> summary file containing consensus tree, .treefile --> consensus tree in newick format. Use the .treefile for the input file for ASTRAL.
#### 6.2.2: Running ASTRAL
##### Step 1: Generate input file containing all gene trees.
```bash=
cat *.treefile > in.tree
```
```
Note: Make sure you are in the directory containing the gene trees ".treefile".
```
##### Step 2: Remove gene identifiers from accession names
:warning:
Do this step if accessions have gene names in the names. If the gene names are in the names for each accession, ASTRAL will interpret each accession/gene as distinct from the same accession with a different gene.
```bash= !
sed -i 's/-....:/:/g' /ADD/LOCATION/OF/IN/FILE/in.tree
```
##### Step 3: Start a screen
```bash=
screen -S #choose a name
```
##### Step 4: Run Astral
```bash=
java -jar /opt/Software/ASTRAL/Astral/astral.5.5.6.jar -i in.tree -o out.tre 2>out.log
```
---
### Statistical Summary of Reads visit
#### Sequence length - get_seq_lengths.py
A heatmap is one way to get a quick glance of the overall success of HybPiper in recovering coding sequences. To generate the heatmap, we first need to collect the length of coding sequence recovered by HybPiper for each gene and sample. This uses the script get_seq_lengths.py:
```bash=
# ran Katie's Data
python /opt/Software/HybPiper/get_seq_lengths.py Angiosperms353_targetSequences.fasta namelist.txt dna > test_seq_lengths.txt
```
* The test_seq_lengths.txt
* First Line is names of each gene.
* Second line has the length of the target gene, averaged over each "source" for that gene.
* The rest are the length of the sequence recovered by HybPiper for each gene.
* If there was no sequence for a gene, a 0 is entered.
#### Sequence stats hybpiper_stats.py
This script will summarize target enrichment and gene recovery efficiency for a set of samples. The output is a text file with one sample per line and the following statistics:
```bash=
# ran Katie's Data
python /opt/Software/HybPiper/hybpiper_stats.py test_seq_lengths.txt namelist.txt > test_stats.txt
```
* Number of reads
* Number of reads on target
* Percent reads on target
* Number of genes with reads
* Number of genes with contigs
* Number of genes with sequences
* Number of genes with sequences > 25% of the target length
* Number of genes with sequences > 50% of the target length
* Number of genes with sequences > 75% of the target length
* Number of genes with sequences > 150% of the target length
* Number of genes with paralog warnings
NOTE: The number of reads and percent reads on target will only be reported if mapping was done using BWA.
### Intronerate
---
## Troubleshooting
### Issues with running HybPiper
#### reads_first.py
> In this section, errors that are given will not be verbose (i.e., the errors here will be summarized versions, and you might need to dig through terminal output to find the error that matches).
:::danger
**Error: No Module named Bio**
- At the root of it, this error means that the reads_first.py script was unable to locate the BioPython package (shorthand Bio). This could be for a number of reasons:
- It is not installed. This won't be true if you ran `reads_first.py --check-depend` as in the the earlier parts of this workflow.
- The more likely issue is that it is installed, but reads_first.py can't find it. A common issue is that there are multiple versions of python installed on your computer/server, and while Biopython is installed in one version, reads_first.py is using a different version.
- Try typing `python -V` into terminal, and then type `python3 -V`. If your terminal outputs 2 different python versions, this may be the issue.
- If the above is true, type `python` into termianl, and your terminal will become a python script environment, denoted by `>>>`. Type `import Bio` and press enter. If nothing happens, then *this* python version is where BioPython is installed. If termianl outputs an error along the lines of `Error: Module Not Found`, then Biopython is probably installed on the other version of python. At any time, type `quit()` to exit the python environment. If python isn't installed in this version, try typing `python3` in terminal to open up another python environment, this time using the other version. If `import Bio` still gives `Error: Module Not Found`, then BioPython might not be properly installed.
:::
 Google Drive
Gist
Clipboard
Google Drive
Gist
Clipboard
 Sign in via Google
 Sign in via Facebook
 Sign in via X(Twitter)
 Sign in via GitHub
 Sign in via Dropbox
 Sign in with Wallet