RH+SF
      • Sharing URL Link copied
      • /edit
      • View mode
        • Edit mode
        • View mode
        • Book mode
        • Slide mode
        Edit mode View mode Book mode Slide mode
      • Customize slides
      • Note Permission
      • Read
        • Owners
        • Signed-in users
        • Everyone
        Owners Signed-in users Everyone
      • Write
        • Owners
        • Signed-in users
        • Everyone
        Owners Signed-in users Everyone
      • Engagement control Commenting, Suggest edit, Emoji Reply
    • Invite by email
      Invitee

      This note has no invitees

    • Publish Note

      Share your work with the world Congratulations! 🎉 Your note is out in the world Publish Note

      Your note will be visible on your profile and discoverable by anyone.
      Your note is now live.
      This note is visible on your profile and discoverable online.
      Everyone on the web can find and read all notes of this public team.
      See published notes
      Unpublish note
      Please check the box to agree to the Community Guidelines.
      View profile
    • Commenting
      Permission
      Disabled Forbidden Owners Signed-in users Everyone
    • Enable
    • Permission
      • Forbidden
      • Owners
      • Signed-in users
      • Everyone
    • Suggest edit
      Permission
      Disabled Forbidden Owners Signed-in users Everyone
    • Enable
    • Permission
      • Forbidden
      • Owners
      • Signed-in users
    • Emoji Reply
    • Enable
    • Versions and GitHub Sync
    • Note settings
    • Note Insights New
    • Engagement control
    • Make a copy
    • Transfer ownership
    • Delete this note
    • Insert from template
    • Import from
      • Dropbox
      • Google Drive
      • Gist
      • Clipboard
    • Export to
      • Dropbox
      • Google Drive
      • Gist
    • Download
      • Markdown
      • HTML
      • Raw HTML
Menu Note settings Note Insights Versions and GitHub Sync Sharing URL Help
Menu
Options
Engagement control Make a copy Transfer ownership Delete this note
Import from
Dropbox Google Drive Gist Clipboard
Export to
Dropbox Google Drive Gist
Download
Markdown HTML Raw HTML
Back
Sharing URL Link copied
/edit
View mode
  • Edit mode
  • View mode
  • Book mode
  • Slide mode
Edit mode View mode Book mode Slide mode
Customize slides
Note Permission
Read
Owners
  • Owners
  • Signed-in users
  • Everyone
Owners Signed-in users Everyone
Write
Owners
  • Owners
  • Signed-in users
  • Everyone
Owners Signed-in users Everyone
Engagement control Commenting, Suggest edit, Emoji Reply
  • Invite by email
    Invitee

    This note has no invitees

  • Publish Note

    Share your work with the world Congratulations! 🎉 Your note is out in the world Publish Note

    Your note will be visible on your profile and discoverable by anyone.
    Your note is now live.
    This note is visible on your profile and discoverable online.
    Everyone on the web can find and read all notes of this public team.
    See published notes
    Unpublish note
    Please check the box to agree to the Community Guidelines.
    View profile
    Engagement control
    Commenting
    Permission
    Disabled Forbidden Owners Signed-in users Everyone
    Enable
    Permission
    • Forbidden
    • Owners
    • Signed-in users
    • Everyone
    Suggest edit
    Permission
    Disabled Forbidden Owners Signed-in users Everyone
    Enable
    Permission
    • Forbidden
    • Owners
    • Signed-in users
    Emoji Reply
    Enable
    Import from Dropbox Google Drive Gist Clipboard
       Owned this note    Owned this note      
    Published Linked with GitHub
    • Any changes
      Be notified of any changes
    • Mention me
      Be notified of mention me
    • Unsubscribe
    --- tags: robot, build --- # Build: Wiring In this section, you will add brains of the robot: the micro:bit and SparkFun moto:bit and wire everything up for power. 
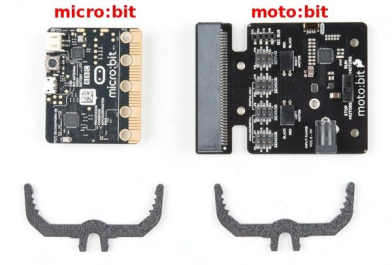
Find the micro:bit, the moto:bit, and the two moto:bit Mounting brackets. -> [![alt text](https://cdn.sparkfun.com/assets/learn_tutorials/1/2/0/4/image38.png)](https://cdn.sparkfun.com/assets/learn_tutorials/1/2/0/4/image38.png) <- 
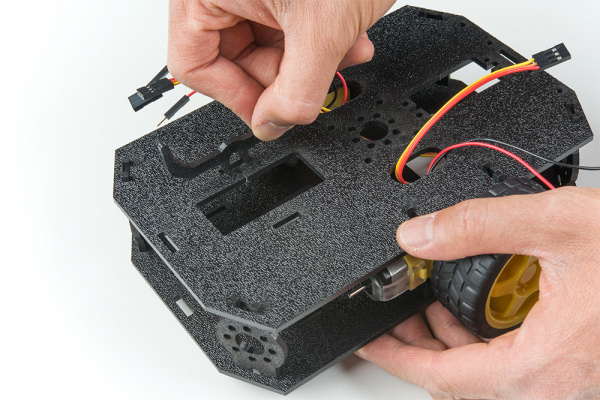
Attach one of the moto:bit Mounts by snapping it into one of the vertical slots in the back of the top chassis near the large rectangular opening. -> [![alt text](https://cdn.sparkfun.com/assets/learn_tutorials/1/2/0/4/image48.jpg)](https://cdn.sparkfun.com/assets/learn_tutorials/1/2/0/4/image48.jpg) <- 
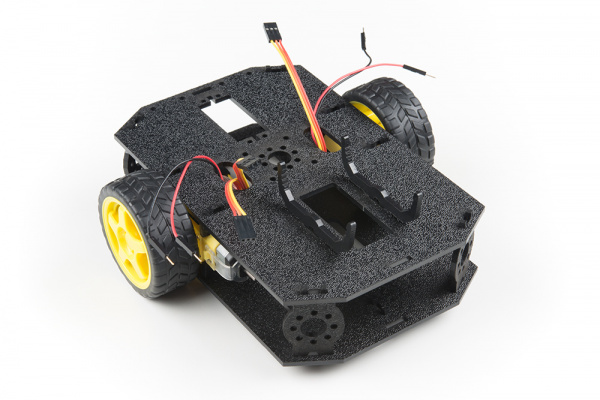
Attach the other moto:bit Mount by snapping it into the other slot: -> [![alt text](https://cdn.sparkfun.com/assets/learn_tutorials/1/2/0/4/image37.jpg)](https://cdn.sparkfun.com/assets/learn_tutorials/1/2/0/4/image37.jpg) <- 
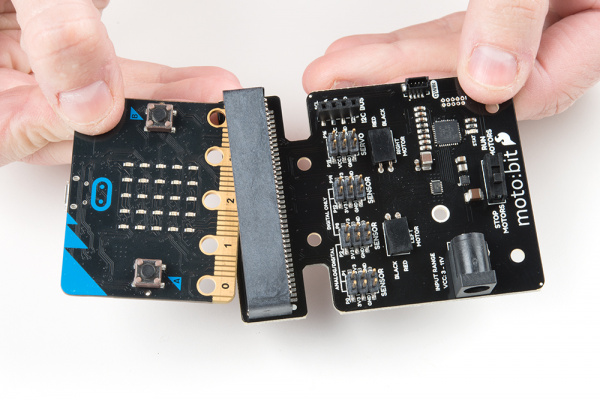
Time to insert your micro:bit into the moto:bit. <div class="alert alert-info"><b>NOTE:</b> the “top” of the moto:bit is the side with the pins and chips and the power input on it, but the “top” of the micro:bit is the side that has the LEDs on it (the side *without* the pins and chips and power input). It is possible to put the micro:bit in upside down, (ask me how I know ;-) so be sure to have it oriented as shown in the image below.</div> -> [![alt text](https://cdn.sparkfun.com/assets/learn_tutorials/1/2/0/4/image25.jpg)](https://cdn.sparkfun.com/assets/learn_tutorials/1/2/0/4/image25.jpg) <- The moto:bit snaps into the second-lowest of the notches on the moto:bit Mounts. Make sure the power jack is facing the left side of the robot. Push gently and evenly until it snaps into place. <!-- youtube(https://youtu.be/-Va7g1q24co?t=780) --> <div class="alert alert-info"><b>NOTE:</b> The extra slots in the moto:bit mounts can be used to hold other robotics controller boards such as the SparkFun RedBoard or the Raspberry Pi.</div> Here’s what everything looks like before connecting the wires: -> [![alt text](https://cdn.sparkfun.com/assets/learn_tutorials/1/2/0/4/image41.jpg)
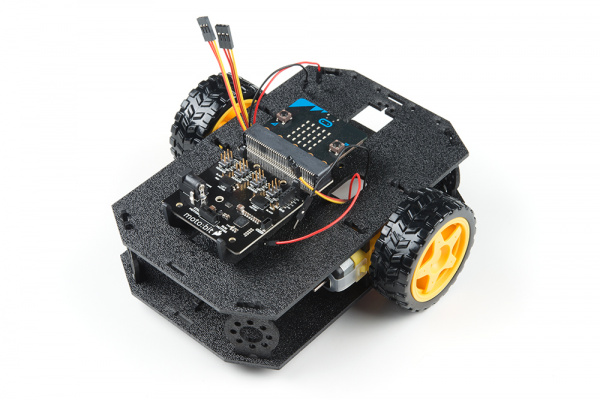
](https://cdn.sparkfun.com/assets/learn_tutorials/1/2/0/4/image41.jpg) <- To hook up the motors, put your robot in front of you with the Sensor Array pointing away from you (as if it were going to drive away from you). While you’re making your connections it’s especially helpful to be able to keep the robot oriented correctly, so if you haven’t done so already, you may want to mark the left front corner of the robot in some way. First, connect the Left Sensor cable bundle (which is the one coming out of the left oval that you didn't mark) to the moto:bit sensor pins labeled P0, 3V3, GND. Since RED was GND when we connected the cable bundle at the sensor end, RED needs to stay GND when we connect the cable bundle at the moto:bit end. Once the cable bundle is plugged in the YELLOW wire should be closest to the front of the robot, and the RED wire should be closest to the rear of the robot, like this: -> [![alt text](https://cdn.sparkfun.com/r/600-600/assets/learn_tutorials/1/2/0/4/image27.jpg)
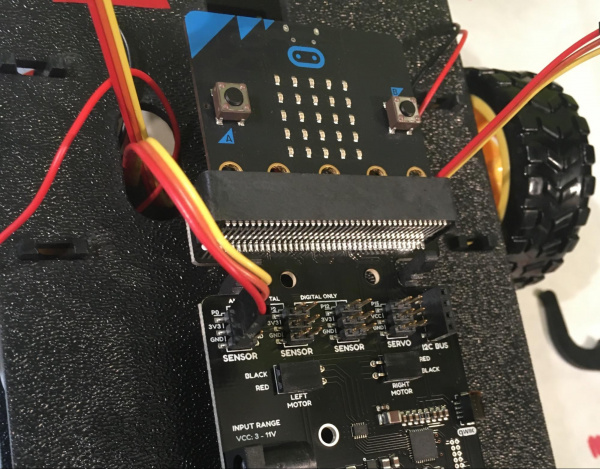
](https://cdn.sparkfun.com/assets/learn_tutorials/1/2/0/4/image27.jpg) <- Then connect the Middle Line Sensor (the cable bundle that does have tape on it coming out of the left hole) with the pins P1, 3V3 and GND, again making sure that the RED wire stays connected to GND: -> [![alt text](https://cdn.sparkfun.com/r/600-600/assets/learn_tutorials/1/2/0/4/image23.jpg)](https://cdn.sparkfun.com/assets/learn_tutorials/1/2/0/4/image23.jpg) <- 
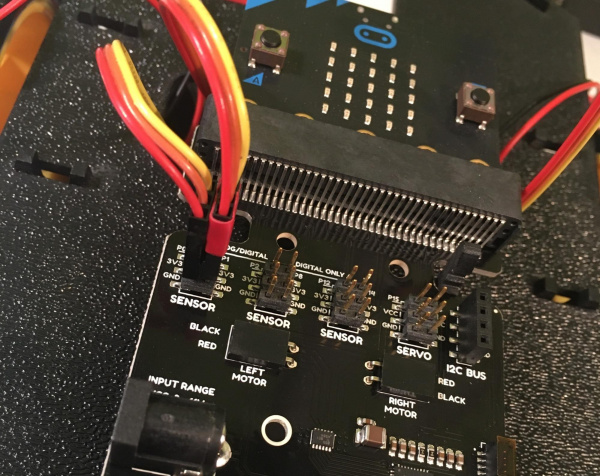
Connect the Right Line Sensor cable bundle (which comes out of the right hole) with the pins P2, 3V3, and GND -> [![alt text](https://cdn.sparkfun.com/r/600-600/assets/learn_tutorials/1/2/0/4/image28.jpg)](https://cdn.sparkfun.com/assets/learn_tutorials/1/2/0/4/image28.jpg) <- Next we’re connecting the motors, which is a little weird, but stick with me. To make a long story short, there’s no way to determine which direction the shaft for each of your two motors will spin before getting it hooked up and running. So, what we’re going to do is hook them up the way the moto:bit board indicates for now. Once we have everything else assembled (and we’re close -- only the power is left to do after this), we’ll load some sample code and see if the motors do what we expect them to do. If they do -- yah! If they don’t, that’s ok too -- we'll go through how to figure out which of the motor(s) is backwards and how to fix it. 
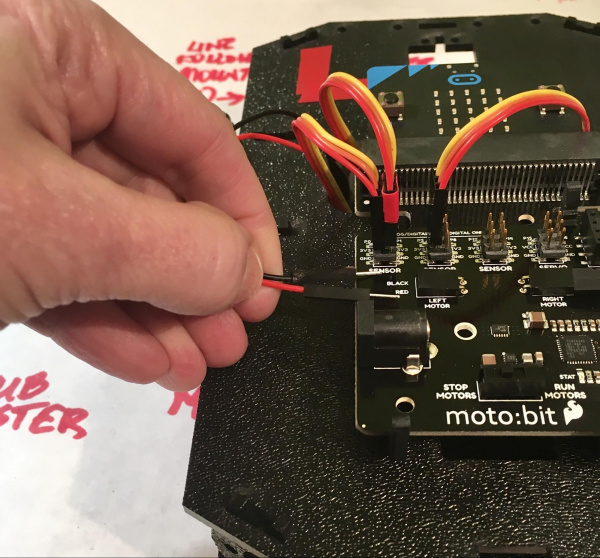
Hook up the left red and black motor wires (which come out of the left hole on the Top Chassis) to the left motor connection on the moto:bit board, plugging the red wire into the hole labeled “red” and the black wire into “black”): -> [![alt text](https://cdn.sparkfun.com/r/600-600/assets/learn_tutorials/1/2/0/4/image49.jpg)](https://cdn.sparkfun.com/assets/learn_tutorials/1/2/0/4/image49.jpg) <- Connect the right red and black motor wires (coming out of the right hole) to the right motor connection on the moto:bit board in the same way: -> [![alt text](https://cdn.sparkfun.com/r/600-600/assets/learn_tutorials/1/2/0/4/image29.jpg)](https://cdn.sparkfun.com/assets/learn_tutorials/1/2/0/4/image29.jpg) <- 
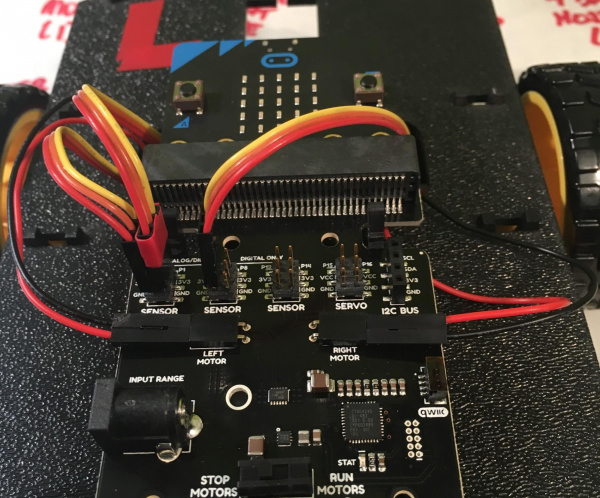
When you’re finished, you’ll have something that looks like this: -> [![alt text](https://cdn.sparkfun.com/r/600-600/assets/learn_tutorials/1/2/0/4/image28.jpg)](https://cdn.sparkfun.com/assets/learn_tutorials/1/2/0/4/image28.jpg) <- ## POWER! Now we need to give your robot some juice. The power -- supplied by 4 (four) AA batteries -- goes into the moto:bit, which then powers the micro:bot. You’ll need the Battery Pack Clip , the 4 AA Battery Holder, and the provided AA batteries: -> [![alt text](https://cdn.sparkfun.com/assets/learn_tutorials/1/2/0/4/image22.png)
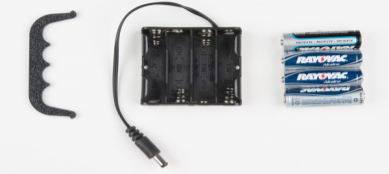
](https://cdn.sparkfun.com/assets/learn_tutorials/1/2/0/4/image22.png) <- 
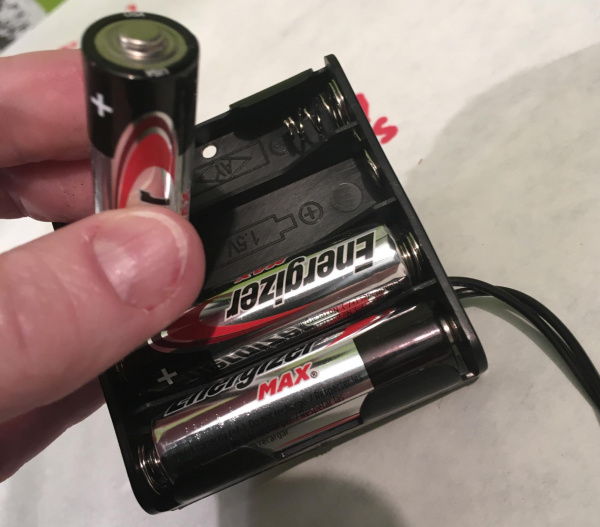
First insert the batteries into the Battery Holder, making sure that you face them in the correct direction, as shown in the diagram on the inside of the holder (the flat end of the battery, which is the negative end, goes against the spring end of the battery case): -> [![alt text](https://cdn.sparkfun.com/r/600-600/assets/learn_tutorials/1/2/0/4/image50.jpg)](https://cdn.sparkfun.com/assets/learn_tutorials/1/2/0/4/image50.jpg) <- With your robot in front of you and pointing away from you, orient the Battery Holder (with batteries) as shown, then insert it into the back cavity of the chassis: -> [![alt text](https://cdn.sparkfun.com/assets/learn_tutorials/1/2/0/4/image39.jpg)
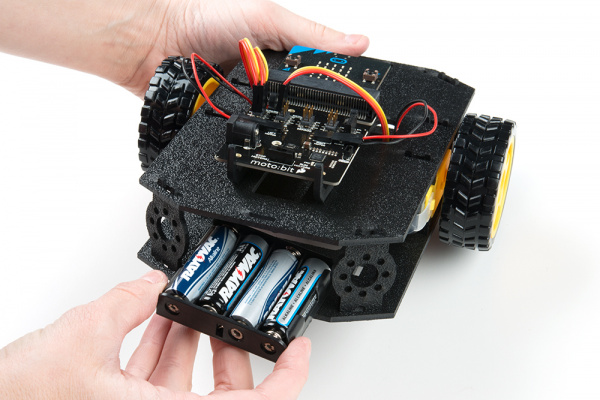
](https://cdn.sparkfun.com/assets/learn_tutorials/1/2/0/4/image39.jpg) <- Position the Battery Holder so that the barrel jack cable comes out on the left side of the robot and the Battery holder sits on top of the hole. Insert the Battery Pack Clip on top of the battery pack (with the open end facing down towards the batteries), twist and position the clip so that it rests on top of the battery pack. -> [![alt text](https://cdn.sparkfun.com/assets/learn_tutorials/1/2/0/4/image46.jpg)](https://cdn.sparkfun.com/assets/learn_tutorials/1/2/0/4/image46.jpg) <- It worked best for me if I reached in through the hole nearest the sensor to hold the battery pack in place with one hand while I used the other to wiggle the Battery Pack clip into place. Push the clip down into the vertical slots in the Bottom Chassis so it snaps in place. -> [![alt text](https://cdn.sparkfun.com/assets/learn_tutorials/1/2/0/4/image45.png)](https://cdn.sparkfun.com/assets/learn_tutorials/1/2/0/4/image45.png) <- 
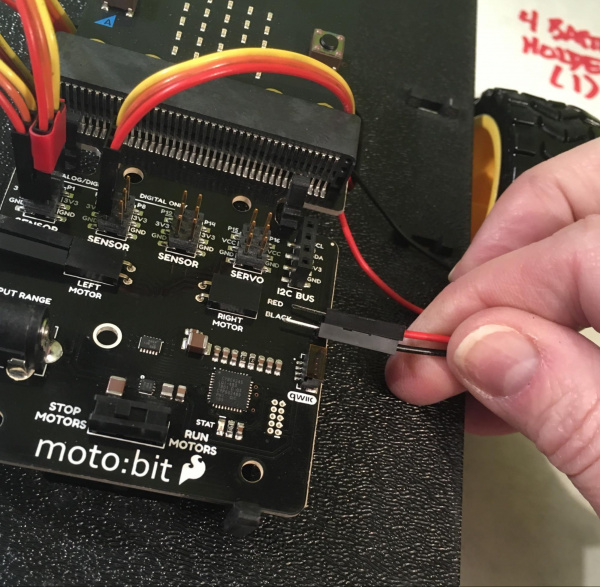
Route the barrel jack cable out of the left side of the chassis and up to the moto:bit and plug the barrel jack cable into the barrel connector on the side of the moto:bit carrier board. -> [![alt text](https://cdn.sparkfun.com/r/600-600/assets/learn_tutorials/1/2/0/4/image19.png)
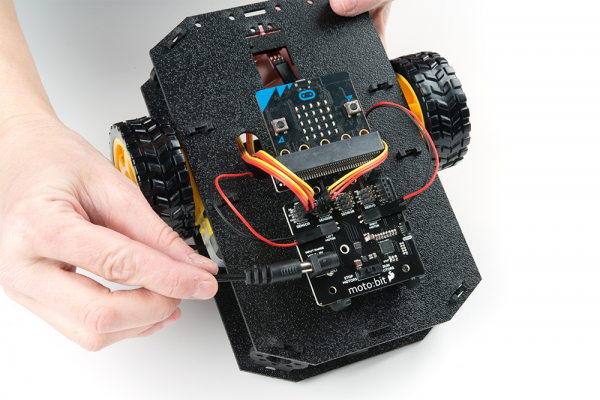
](https://cdn.sparkfun.com/assets/learn_tutorials/1/2/0/4/image19.png) <- <div class="alert alert-info"> <b>Pro Tip:</b> there’s a switch on the moto:bit that you can turn off when you’re not using your robot to save power. <b>Super Pro Tip:</b> even when you turn the power switch off there’s still a small amount of power going to the moto:bit, so to conserve as much battery life as possible, unplug the barrel jack if you’re not going to be using your robot for a while. </div>

    Import from clipboard

    Paste your markdown or webpage here...

    Advanced permission required

    Your current role can only read. Ask the system administrator to acquire write and comment permission.

    This team is disabled

    Sorry, this team is disabled. You can't edit this note.

    This note is locked

    Sorry, only owner can edit this note.

    Reach the limit

    Sorry, you've reached the max length this note can be.
    Please reduce the content or divide it to more notes, thank you!

    Import from Gist

    Import from Snippet

    or

    Export to Snippet

    Are you sure?

    Do you really want to delete this note?
    All users will lose their connection.

    Create a note from template

    Create a note from template

    Oops...
    This template has been removed or transferred.
    Upgrade
    All
    • All
    • Team
    No template.

    Create a template

    Upgrade

    Delete template

    Do you really want to delete this template?
    Turn this template into a regular note and keep its content, versions, and comments.

    This page need refresh

    You have an incompatible client version.
    Refresh to update.
    New version available!
    See releases notes here
    Refresh to enjoy new features.
    Your user state has changed.
    Refresh to load new user state.

    Sign in

    Forgot password

    or

    By clicking below, you agree to our terms of service.

    Sign in via Facebook Sign in via Twitter Sign in via GitHub Sign in via Dropbox Sign in with Wallet
    Wallet ( )
    Connect another wallet

    New to HackMD? Sign up

    Help

    • English
    • 中文
    • Français
    • Deutsch
    • 日本語
    • Español
    • Català
    • Ελληνικά
    • Português
    • italiano
    • Türkçe
    • Русский
    • Nederlands
    • hrvatski jezik
    • język polski
    • Українська
    • हिन्दी
    • svenska
    • Esperanto
    • dansk

    Documents

    Help & Tutorial

    How to use Book mode

    Slide Example

    API Docs

    Edit in VSCode

    Install browser extension

    Contacts

    Feedback

    Discord

    Send us email

    Resources

    Releases

    Pricing

    Blog

    Policy

    Terms

    Privacy

    Cheatsheet

    Syntax Example Reference
    # Header Header 基本排版
    - Unordered List
    • Unordered List
    1. Ordered List
    1. Ordered List
    - [ ] Todo List
    • Todo List
    > Blockquote
    Blockquote
    **Bold font** Bold font
    *Italics font* Italics font
    ~~Strikethrough~~ Strikethrough
    19^th^ 19th
    H~2~O H2O
    ++Inserted text++ Inserted text
    ==Marked text== Marked text
    [link text](https:// "title") Link
    ![image alt](https:// "title") Image
    `Code` Code 在筆記中貼入程式碼
    ```javascript
    var i = 0;
    ```
    var i = 0;
    :smile: :smile: Emoji list
    {%youtube youtube_id %} Externals
    $L^aT_eX$ LaTeX
    :::info
    This is a alert area.
    :::

    This is a alert area.

    Versions and GitHub Sync
    Get Full History Access

    • Edit version name
    • Delete

    revision author avatar     named on  

    More Less

    Note content is identical to the latest version.
    Compare
      Choose a version
      No search result
      Version not found
    Sign in to link this note to GitHub
    Learn more
    This note is not linked with GitHub
     

    Feedback

    Submission failed, please try again

    Thanks for your support.

    On a scale of 0-10, how likely is it that you would recommend HackMD to your friends, family or business associates?

    Please give us some advice and help us improve HackMD.


    Thanks for your feedback

    Remove version name

    Do you want to remove this version name and description?

    Transfer ownership

    Transfer to
      Warning: is a public team. If you transfer note to this team, everyone on the web can find and read this note.

        Link with GitHub

        Please authorize HackMD on GitHub
        • Please sign in to GitHub and install the HackMD app on your GitHub repo.
        • HackMD links with GitHub through a GitHub App. You can choose which repo to install our App.
        Learn more  Sign in to GitHub

        Push the note to GitHub Push to GitHub Pull a file from GitHub

          Authorize again
         

        Choose which file to push to

        Select repo
        Refresh Authorize more repos
        Select branch
        Select file
        Select branch
        Choose version(s) to push
        • Save a new version and push
        • Choose from existing versions
        Include title and tags
        Available push count

        Pull from GitHub

         
        File from GitHub
        File from HackMD

        GitHub Link Settings

        File linked

        Linked by
        File path
        Last synced branch
        Available push count

        Danger Zone

        Unlink
        You will no longer receive notification when GitHub file changes after unlink.

        Syncing

        Push failed

        Push successfully