# 後端基礎 - PHP、SQL、Database
###### tags: `back-end`、`SQL`、`php`、`databasse`
## 前言
本篇記錄關於後端的一些基本知識。
## 後端是什麼?
後端實際上包含下列的三大項
1. 要有一個伺服器來處理 request 與 response
常用的伺服器是 Apache。
2. 寫程式來處理商業邏輯
常用的程式語言是 PHP,PHP 容易學習、方便使用,而且業界常用,因此對於初學者來說,後端學習 php 是優先考量的選擇。
3. 資料庫儲存資料
常用的資料庫為 MySQL。專門設計用來快速儲存資料的資料庫。
---
# UwAmp
一個結合 Apache、PHP、MySQL 的簡易程式: https://www.uwamp.com/en/
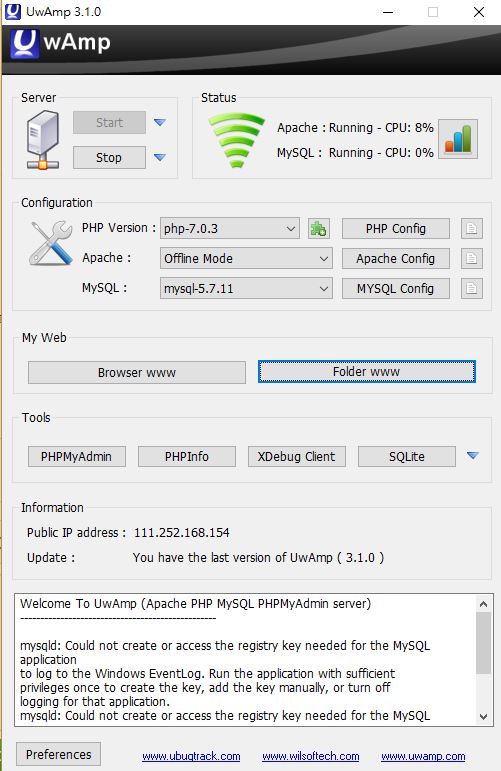
它的介面如上圖。
* `Browser www` 的部份就是顯示 php 檔案內容的地方。
* `Folder www` 按下去會跳出一個資料夾,資料夾裡新增一個資料夾,在新增的資料夾裡加上 php 的檔案,在 php 檔案裡寫上 html 標籤就可以從 `Browser www` 按鈕的頁面看到 html 的內容。然後 html 和 php 語法可以同時寫在 php 檔案裡。
* php 的語法不會顯示在頁面上(除了一些顯示語法,如 `echo`),php 的語法處理完之後,傳到 Server,會經過 Server 的機制,Server 處理完之後,顯現最後的頁面結果。像是下面這段程式碼:
```
<h1>
<?php
echo 'yo';
?>
</h1>
```
結果會是 `yo` 字樣為 h1 標籤大小的內容。也就是和 `<h1>yo</h1>` 是一樣的。
P.S. 記得 PHP Version 選擇最新版本的。
---
# php、server、database、request、response 的關係
Server 端接收到 request 的訊息之後,把這個訊息傳到 php 裡,根據 request 的要求執行 php 程式碼裡相對應的功能,並且把結果傳回到 Server 端,接著 Server 端做 response 的傳送。而 php 在執行時有必要會與 database 請求資料、提取資料。如下示意圖。

---
# PHP 基礎語法
* 在 `.php` 檔案裡,輸入任何單純的文字都會顯示出來,包括字串,還有 html 的語法也可以,除了用 `<?php ?>` 包住的內容才不會顯示在頁面上。
* 在 php 語法的段落最前面一定要加上 `<?php`,尤其是 `php` 字樣最好一併打上,若沒打上可能功能會不完整;而內容的結尾則是用 `?>` 包住。
* php 語法的每一行都要加分號。
### echo
使用 echo 語法可以顯示內容,像是:
```
<?php
echo "<h1>123</h1>";
?>
```
會顯示 h1 標籤大小的 123 字串內容。
### 陣列
```
<?php
$arr = array(1, 'google', 3, 4, 5);
echo $arr[sizeof($arr) - 1];
var_dump($arr);
print_r($arr);
?>
```
* `$arr = array(1, 'google', 3, 4, 5);` 為建立一個新陣列。
* ` echo $arr[sizeof($arr) - 1];` 這之中的 `sizeof()` 回傳陣列長度。
* `var_dump()` 回傳陣列的詳細資料,包括每個陣列的值的索引值、值的型態、值的內容。
* `print_r()` 就是簡易版的 `var_dump()`,只會回傳陣列的值的索引值和值的內容。
### 函式
```
<?php
function add($a, $b) {
return $a + $b;
}
echo add(1, 2);
?>
```
跟 Javascript 語法差不多。
### 範例
顯示一個 0~9 數字的列表:
```
<ul>
<?php
for($i=0; $i<10; $i++) {
echo '<li>' . $i . '</li>';
}
?>
</ul>
```
* 在 php 裡不用先替變數宣告,但是要在每個變數的前面加上「$」字號。
* 在 php 裡的 + 號是用「.」來代替。
* for-loop 其它部分和 Javascript 一樣。
<br>
GET:
```
<?php
$username ='';
if (isset($_GET['username'])) {
$username = $_GET['username'];
}
echo 'username' . $username . '<br>';
if ($username === 'admin') {
echo 'hello admin!';
} else {
echo 'fail';
}
?>
```
* `_GET` 是 PHP 內建的變數,就是串接 API 取得資料的那個 `GET` 。
* `_GET['username']` 意思是要從資料裡面拿取所有有關 `username` 物件的資料。
* `isset()` 用來判定變數是否有被設置。在這個例子是在判定有沒有拿到 GET 回來的資料。
<br>
POST:
```
<?php
$username ='';
if (isset($_POST['username']) && isset($_POST['password'])) {
$username = $_POST['username'];
$password = $_POST['password'];
if ($username === 'admin' && $password === 'admin') {
echo '登入成功';
}
}
?>
<form action='/RZ/index.php' method='POST'>
username: <input name='username' />
password: <input name='password' />
<input type='submit' />
</form>
```
* 程式碼下方設定一個 form 表單,使用的方法是 POST,表單內資料的值填好按送出後,會傳送到 `'/RZ/index.php'` 的頁面。
* `<input name='username' />` 裡面的 `name` 屬性為 POST 上去後的 object,因此若要取得這個 input 的值,必須使用 object 提取方式,如 `$_POST['username']` 的方式。
* 程式碼上方則是判定值(username 和 password)有沒有被設置(存在),也就是表單的值的資料有沒有被 POST 上去,若有被設置的話,就會把表單 POST 的值賦予給 `$username` 和 `$password` 兩個變數。
<br>
可以在 php 程式碼中間斷開,並且在中間放上 html 的標籤:
```
<?php
$username ='';
if (isset($_POST['username']) && isset($_POST['password'])) {
$username = $_POST['username'];
$password = $_POST['password'];
if ($username === 'admin' && $password === 'admin') {
?>
<h1>登入成功</h1>
<?php
} else {
?>
<h1>登入失敗</h1>
<?php
}
}
?>
```
上面 POST 表單的例子,可以說是前端與後端的結合,它的順序是這樣:
index.php => 表單 => POST login.php => 顯示資料
我們把上方的程式碼拆開來分成 `index.php` 和 `login.php` 兩個檔案。
`index.php` 檔案裡面放 html 表單的結構:
```
<form action='/RZ/login.php' method='POST'>
username: <input name='username' />
password: <input name='password' />
<input type='submit' />
</form>
```
在 `index.php` 檔案裡,我們把表單的傳送位置設定到 `login.php` 的位址。
<br>
`login.php` 檔案裡面放入 php 的程式碼作為登入是否成功的判定:
```
<?php
$username ='';
if (isset($_POST['username']) && isset($_POST['password'])) {
$username = $_POST['username'];
$password = $_POST['password'];
if ($username === 'admin' && $password === 'admin') {
?>
<h1>登入成功</h1>
<?php
} else {
header('Location: index.php');
}
}
?>
```
在程式碼當中, `header('Location: index.php');` 這一行指的是,當登入沒有成功的時候,會把頁面轉址回去到 `index.php`,也就是登入畫面。
---
# 資料庫
### 為什麼需要資料庫?
雖然我們可以自己寫程式碼來管理檔案的新增、修改、上傳、刪除,但是資料庫已經有現成的 CRUD 的語法可以使用,且較方便管理。
### 關聯式資料庫、非關聯式資料庫(NoSQL)
常用的關聯式資料庫系統:MySQL、PostgreSQL
常用的非關聯式資料庫系統:NoSQL
NoSQL 指的是資料結構沒有一定,資料的型態不一定要是字串或是數字,也可以是 object、array 等,然後新增新的資料類別也比較方便與彈性。
操控資料庫的語法叫做 SQL(Structural Query Language),每個資料庫系統都有定義的 SQL 語法,大致上每個系統的語法都差不多,只是有些不通用。
以下 CRUD 語法的粗體字都是 SQL 的關鍵字(keywords),不可取代與竄改。
#### 查詢
**select** phone **from** users **where** name=peter
整個句子的意思是:「從 users 裡面找到 name 是 peter 的那列(row),並且把 phone 這個欄位(column)的值取出來。」
**select** * **from** users
意思是:「從 users 裡面找到所有列,並且把**所有欄位**的值取出來。」
#### 刪除
**delete from** users **where** name=peter
意思是:「刪除 users 裡面,name 是 peter 的那列。」
#### 更新
**update** users **set** phone=123 **where** name=peter
意思是:「更新 users 裡面,name 是 peter 的那列,把 phone 設為 123。」
#### 新增
**insert into** users(name, phone) **values** (peter, 1234)
意思是:「新增一筆記錄。name 是 peter;phone 是 1234。」
#### or 和 and
**select** phone **from** users **where** name=peter or name=mandy
意思是:「name 是 peter 的那列或者是 name 是 mandy 的那列都會被選到。」
### phpMyAdmin
一個資料庫的圖形介面,方便管理資料庫的資料,並且有現成的指令,下指令也方便。
在 phpMyAdmin 裡面建立新資料庫時,注意編碼與排序請選擇「utf8_unicode_ci」。
---
# 用 PHP 來操作 MySQL
```
<?php
$servername = "localhost";
$username = "root";
$password = "root";
$dbname = "mentor";
$conn = new mysqli($servername, $username, $password, $dbname);
if ($conn->connect_error) {
die("Connection failed: " . $conn->connect_error);
}
$sql = "SELECT * from users";
$result = $conn->query($sql);
if ($result->num_rows > 0) {
while($row = $result->fetch_assoc()) {
echo "id:" . $row["id"] . ', username:' . $row['username'] . '<br>';
}
} else {
echo "0 results";
}
?>
```
* $servername = "localhost";
$username = "123";
$password = "123";
$dbname = "mentor";
這四行是用來作為 MySQL 登入的需求的變數值。 `$servernmae` 就是 MySQL 的伺服器名稱;`$username` 是 MySQL 使用的帳號;`$password` 是 MySQL 使用的密碼;`$dbname` 則是資料庫名稱。
* `$conn = new mysqli($servername, $username, $password, $dbname);` 使用 php 的 `mysqli` 方法把登入的資訊(變數)放到 `$conn` 物件裡。
* if ($conn->connect_error) {
die("Connection failed: " . $conn->connect_error);
}
用來判定如果連線失敗,會使用 `die` 這個方法取消 php 傳遞,並且把失敗的訊息給印出來。
* `$sql = "SELECT * from users";` 建立一個 MySQL 操作資料的字串,放到 `$sql` 變數中。
* `$result = $conn->query($sql);` 針對 `$conn` ,也就是伺服器裡的 `$dbname` 這個資料庫做 `$sql` 這個操作資料的方式的請求,並且把操作後的內容放到 `$result` 這個變數。
* `if ($result->num_rows > 0)` , `num_rows` 是 `$result` 的資料的筆數,也就是說此行在判定是否至少有一筆資料。
* `$row = $result->fetch_assoc())` ,對 `$result` 使用 `fetch_assoc()` 方法,這個方法功用是把 `$result`的每一筆資料一一照順序取出來。然後傳到 `$row` 變數裡 ,然後下面的 `echo` 就會印出每一個 `$row` 的資料內容。
新增列數:
```
$sql = "INSERT INTO users (username) VALUE ('huli')";
if ($conn->query($sql)) {
echo "New record created suceessfully";
} else {
echo "Error:" . $sql . "<br>" . $conn->error;
}
```
* `$sql = "INSERT INTO users (username) VALUE ('huli')";` 是 MySQL 的新增資料語法。
* `if ($conn->query($sql)) `,把 `$sql` 新增的資料請求到 `$conn`,假如有請求成功則為 `true`。
* `else {echo "Error:" . $sql . "<br>" . $conn->error;}`
判定當新增的資料沒有成功時,發生錯誤的時候就把 `$conn` 的錯誤訊息(error) echo 出來。
## Require、Require_once
因為 MySQL 登入資訊幾乎會很常用到,因此我們可以把這些資訊放到另一個 php 檔案。
```
$servername = "localhost";
$username = "root";
$password = "root";
$dbname = "mentor";
```
然後在要引用登入資訊的 php 檔案中輸入 ` require('登入資訊的 php 檔名')`,這個語法的意思有點像是 node.js 模組的請求,差別只在說這個 require 的意思像是「從那邊複製資料貼上到這個 php 檔名」的感覺。
不過實務上通常會採用 `require_once('檔名)` 的寫法,這個寫法意思就是裡面的檔案內容只會在 require 的檔案中被引用一次而已,這樣可以避免重複的內容被貼上來。
以下為範例:
```
<?php
require_once('conn.php');
if ($conn->connect_error) {
die("Connection failed: " . $conn->connect_error);
}
$sql = "SELECT * from users";
$result = $conn->query($sql);
if ($result->num_rows > 0) {
while($row = $result->fetch_assoc()) {
echo "id:" . $row["id"] . ', username:' . $row['username'] . '<br>';
}
} else {
echo "0 results";
}
```
`conn.php `的檔案內容則是:
```
<?php
$servername = "localhost";
$username = "root";
$password = "root";
$dbname = "mentor";
$conn = new mysqli($servername, $username, $password, $dbname);
?>
```
---
# 簡單實作登入與註冊
登入與註冊功能的檔案分成四個:index.php、login.php、register.php、conn.php
`conn.php` 裡面放登入 MySQL 資料庫的資料:
```
<?php
$servername = "localhost";
$username = "root";
$password = "root";
$dbname = "mentor";
$conn = new mysqli($servername, $username, $password, $dbname);
?>
```
`index.php` 則是放登入與註冊的表格的 index 結構:
```
<h1>登入</h1>
<form action='/RZ/login.php' method='POST'>
username: <input name='username' />
password: <input name='password' type="password" />
<input type='submit' />
</form>
<h1>註冊</h1>
<form action='/RZ/register.php' method='POST'>
username: <input name='username' />
password: <input name='password' type="password"/>
<input type='submit' />
</form>
```
`login.php` 是放登入功能的檔案:
```
<?php
require_once('conn.php');
$username = $_POST['username'];
$password = $_POST['password'];
$sql = "SELECT * from users where username='" . $username . "' and password='" . $password ."'";
$result = $conn->query($sql);
if ($result->num_rows > 0) {
echo '登入成功';
} else {
header('Location: index.php');
}
?>
```
`register.php` 是放註冊功能的檔案:
```
<!-- 重複帳號的部分還沒解決 -->
<?php
require_once('conn.php');
$username = $_POST['username'];
$password = $_POST['password'];
$sqlSelect = "SELECT * FROM users where username='" . $username . "'" ;
if ($username && $password ) {
$sqlInsert = "INSERT INTO users(username,password) VALUES('$username','$password')";
$result = $conn->query($sqlInsert);
if ($result) {
echo 'Register success';
} else {
echo 'Register failed';
}
} else {
echo '請輸入正確的格式' ;
?>
<br>
<a href="index.php">Back to register</a>
<?php
}
?>
```
---
# SQL 的一些語法
### 正常化 Normalization
把資料庫中的表格分成很多表格,這樣在修改的時候才會比較好修改,而每個表格之間需要建立彼此的關聯,因此採用這這種方式的資料顧叫做「關聯式資料庫」。
### index
幫欄位增加索引,方便資料庫搜尋欄位。可以同時把兩個欄位設定相同的索引。
### Primary index
在 phpMyAdmin 叫做「主鍵」,被設定為主鍵的欄位是表格當中最重要的欄位,一個表格只會有一個主鍵的欄位。
## 內建函式
### COUNT
數選定欄位的個數。
`SELECT COUNT(id) FROM users`
### SUM
針對選定的欄位,把每個 row 的數值做加總。
`SELECT SUM(id) FROM users`
### AVG
針對選定的欄位,把每個 row 的數值加總後做平均計算。
`SELECT AVG(id) FROM users`
### CONCAT
可以顯示兩個欄位合併的結果。
`SELECT CONCAT(id,username) FROM user`
## 非函式的查詢
### between
用在數字的查詢,以一個範圍搜尋。
`SELECT * FROM `users` WHERE `id ` BETWEEN 0 AND 10;` 就會顯示 id 欄位是在 0~10 的所有列。
### in
列出和 in 裡面所有相符的值的結果的列。
`SELECT * FROM `users` WHERE id in(1,57)` 就會顯示在 id 欄位中有 1 或是 57 的列。
### NOT in
列出和 in 裡面所有不相符的值的結果的列。
`SELECT * FROM `users` where id NOT in(2)` 就會顯示在 id 欄位中不包括有 2 的列。
### like
用在字串的查詢。
`SELECT * FROM `users` where username like '%a%'` 會顯示在 username 的欄位中有「a」字元的列。
`SELECT * FROM `users` where username like 'a%'` 會顯示在 username 的欄位中以「a」字元為開頭的列。
## Join
把兩個表格做連結,交集、聯集那些。
### Inner Join 交集
列出所選的兩個表格的欄位有相同資料的列。
`SELECT comments.id,comments.content, users.nickname FROM comments JOIN users ON
comments.user_id = users.id`
針對 comments 和 users 的表格,以 comments 表格的 user_id 欄位等於 users 表格的 id 欄位為主,列出兩個表格所選的對應欄位(comments 的 id, comments 的 content, users 的 nickname)。
可以這麼寫,只是不容易看出是使用 Inner Join:
`SELECT comments.id,comments.content, users.nickname FROM comments, users WHERE comments.user_id = users.id`
### LEFT (outer) Join
保留左邊的表格的所有資料。
`SELECT comments.id,comments.content, users.nickname FROM comments LEFT JOIN users ON
comments.user_id = users.id`
### RIGHT (outer) Join
保留右邊的表格的所有資料。
`SELECT comments.id,comments.content, users.nickname FROM comments RIGHT JOIN users ON
comments.user_id = users.id`
## Sort 排序
### 升冪排列
`SELECT * FROM users ORDER BY id ASC`
### 降冪排列
`SELECT * FROM users ORDER BY id DESC`
## 分頁
回傳前 30 筆資料
`SELECT * FROM users LIMIT 30`
回傳 61~90 筆資料
`SELECT * FROM users LIMIT 30 OFFSET 60` 意思是跳過 60 筆資料,從第 61 筆開始回傳 30 筆的資料。
`SELECT * FROM users LIMIT 60, 30`
## 改名
把 users 表格裡面,欄位 created_at 改名為 time;nickname 改名為 name
`SELECT created_at as time, nickname as name FROM users`
也可以用在 JOIN 的改名
`SELECT c.id, c.content, u.nickname as name FROM comments as c, users as u WHERE c.user_id = u.id`
## VIEW
建立一張虛擬的 Table 表格,可以檢視各種 Table Join 後的表格,並把它存在資料庫當中儲存。通常用作需要經常使用這個表格來審閱,或者是你只想開放特定的資料給資料庫觀看權限的人看。
`CREATE VIEW view表格的名稱 AS SQL語法`
如果是使用 Myadmin 的資料庫介面,在 table 的部份會多出一項「檢視表」的分類,而這個檢視表可以做進一步的排列表格的選取動作,但是不能更改 table 的結構、刪除、更新等等動作。
再加上這些檢視表有個缺點,如果下一個人來接手的話,可能會不曉得這個檢視表合併了哪些 table 組合而成的,因此必須加以審慎做註解或是 table 的管理。
## Stored Procedure
像是 SQL 的 function,和內建 function 不同的地方在於它可以取代整個 sql 的語法。
假如 `SELECT * FROM order where user_id = ?` 這個語法很常使用到,我們除了可以在 php 檔案裡寫 function 外,還可以使用 Stored Procedure:
```
DELIMITER //
CREATE PROCEDURE GetOrders(id INT)
BEGIN
SELECT * FROM orders WHERE user_id = id;
END //
DELIMITER ;
```
* `DELIMITER` 意思是把分段符號改成 //(預設是 ;),因為 sql query 那段有個分號的關係會導致原本的預設會讓最後的 END 被分行,有點像是我們的字串是用雙引號包住的話,如果中間要再加上其他字串的引號那就要使用單引號的概念。記得最後要再改回「;」的預設。
* 大寫字串都是定義好的預設字。
* `GetOrders(id INT)`,`GetOrders` 是這個 Stored Procedure 之後若被呼叫所使用的名稱。INT 則是 id 的變數型態。
呼叫這個 Stored Procedure 則是使用:`CALL GetOrders(1)`
然而 Stored Procedure 和 VIEW 一樣會被存放在資料庫當中,如果是使用 Myadmin 的資料庫介面,先點選 database 的名稱,會有個「預存程序」,點下去就會看到所有的 Stored Procedure 都被放在那邊。
它的缺點就是如果要更改或是 debug 會很不方便,因為同時要看程式碼又要看資料庫裡面的 Stored Procedure,等於兩邊跑。因此建議 Stored Procedure 和 VIEW 都不要亂用,除非團隊有人在管理後端的資料庫。
## Triggers
事件前/後要做的事,方便記錄一些 log,知道更改前後的差別,或是不小心改到參數忘記原本的參數時,還可以有個 log 去觀看。
```
DELIMITER //
CREATE TRIGGER trigger名稱
BEFORE(AFTER) UPDATE ON products
FOR EACH ROW
BEGIN
INSERT INTO products_audit(product_id, name, price, action)
VALUES(OLD.id, OLD.name, OLD.price, 'UPDATE');
END //
DELIMITER ;
```
* `BEFORE UPDATE ON products` 這行指的是,在 `products` 這個 table update 以前,要做什麼動作;另外還有 AFTER,意思和 BEFORE 相反,在執行後要做什麼動作。
* `FOR EACH ROW` 指的是,針對 `products` 這個 table 的所有 row 進行下列動作。
* `BEGIN` 和 `END` 中間要放的就是事件前/後要做的事。其中 OLD 指的是事件變更資料以前的資料,我要拿這個舊資料放到現在要做的動作上;另外還有 NEW,意思和 OLD 相反,要拿事件變更資料後的資料。
## 疑難雜症區
### 顯示的中文變成 ???,可以加入這行:
`mysqli_set_charset($conn, "utf8")`
或是:
` $conn->query('SET NAMES UTF8');`
### 用「.」的字串拼接太麻煩,可以這麼做:
`$sql = "select from users where name='$name'"`
或者是使用 sprintf
### 時區有問題可以加入:
`$conn->query("SET time_zone = '+08:00'");`
 Sign in with Wallet


