# Building a Google Meet Clone with Strapi 5 and Next.js - Part 1
Welcome to this comprehensive tutorial series where we'll build a Google Meet clone using Strapi 5 and Next.js. In this first part, we'll focus on setting up a backend using Strapi 5, which will handle our user authentication, meeting management, and real-time messaging features.
For reference purposes, here's the outline of this blog series:
- Part 1: [Setting Up the Backend and Frontend with Strapi 5 and Next.js](https://).
- Part 2: [Real-Time Features, Video Integration, and Screen Sharing](https://).
## Prerequisites
Before we begin, make sure you have the following installed:
- [Node](https://nodejs.org/en) and [npm](https://www.npmjs.com/) are installed on your computer.
- [Postman](https://www.postman.com/) for API testing.
- You should be familiar with Next.js and Strapi CMS CRUD operations. You can check out [Getting Started With Next.js and Strapi 5: beginner's guide](https://strapi.io/blog/getting-started-with-next-js-and-strapi-5-beginner-s-guide).
## Project Overview
In this series, we’ll be building a Google Meet app with Strapi 5 and Next.js that will feature:
- User authentication and authorization
- Real-time video conferencing
- Screen sharing capabilities
- Chat messaging during meetings
- Meeting scheduling and management
- User presence indicators
Here is the folder structure for the app we'll be building throughout this tutorial.
```bash
📦google-meet-clone-backend
┣ 📂config
┃ ┣ 📜admin.ts
┃ ┣ 📜api.ts
┃ ┣ 📜database.ts
┃ ┣ 📜middlewares.ts
┃ ┣ 📜plugins.ts
┃ ┣ 📜server.ts
┃ ┗ 📜socket.ts
📂src
┃ ┣ 📂api
┃ ┃ ┣ 📂meeting
┃ ┃ ┃ ┣ 📂content-types
┃ ┃ ┃ ┃ ┗ 📂meeting
┃ ┃ ┃ ┃ ┃ ┗ 📜schema.json
┃ ┃ ┃ ┣ 📂controllers
┃ ┃ ┃ ┃ ┣ 📜custom.ts
┃ ┃ ┃ ┃ ┗ 📜meeting.ts
┃ ┃ ┃ ┣ 📂routes
┃ ┃ ┃ ┃ ┣ 📜custome.ts
┃ ┃ ┃ ┃ ┗ 📜meeting.ts
┃ ┃ ┃ ┗ 📂services
┃ ┃ ┃ ┃ ┗ 📜meeting.ts
┃ ┃ ┣ 📂socket
┃ ┃ ┃ ┗ 📂services
┃ ┃ ┃ ┃ ┗ 📜socket.ts
┃ ┃ ┗ 📜.gitkeep
┣ 📜.env
┣ 📜.gitignore
┣ 📜package-lock.json
┣ 📜package.json
┗ 📜tsconfig.json
```
Below is a demo of what we will build by the end of this blog series.

## Setting Up Strapi 5 Project
Let's start by creating a new Strapi project. Open your terminal and run:
```bash
npx create-strapi@latest google-meet-clone-backend
```
The above command will prompt you to select the preferred configuration for your Strapi project. Your selection should look the the screenshot below:
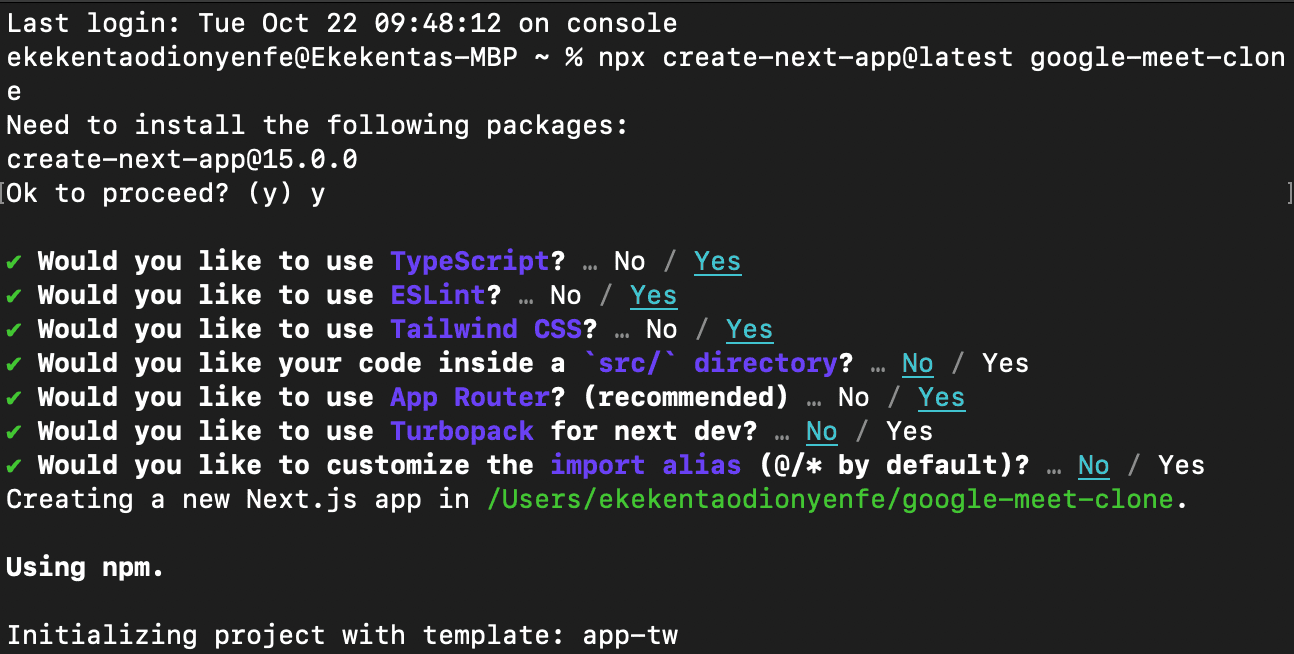
After going through the prompts, the command will scaffold a new Strapi project with TypeScript support. Once the installation is complete, change the directory to the project folder and start and open the admin panel in your browser.
```bash
cd google-meet-clone-backend
npm run develop
```
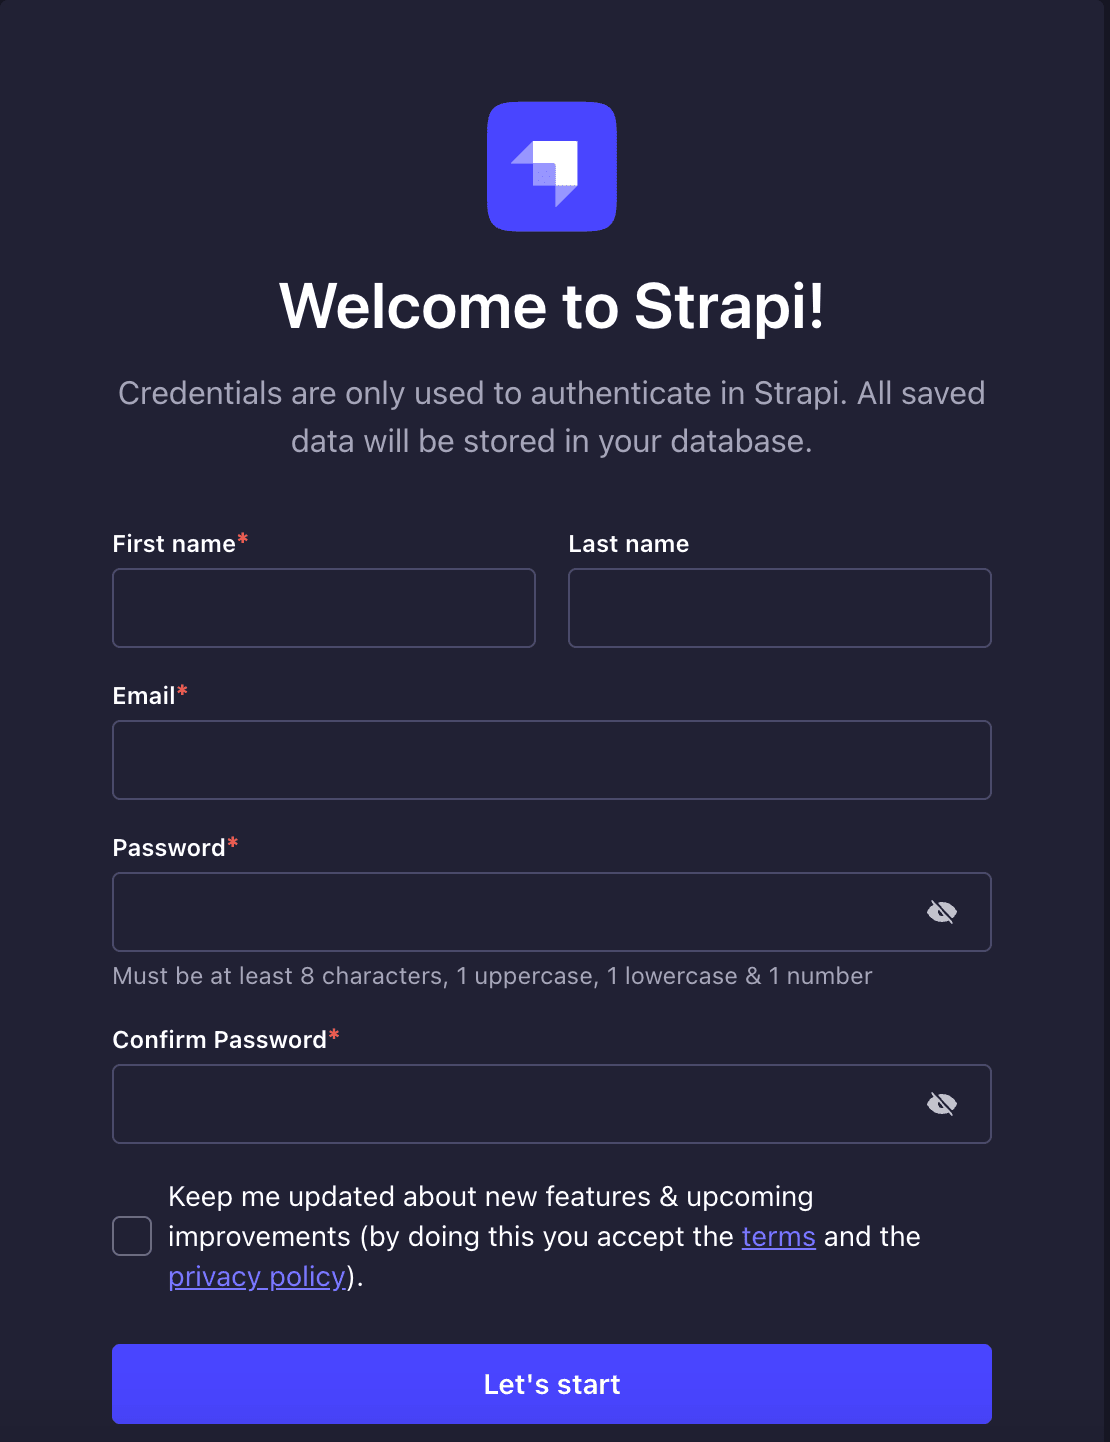
Now enter your details and click the **Get Started** button to access the Strapi admin panel.
## Creating Meeting Collection Type
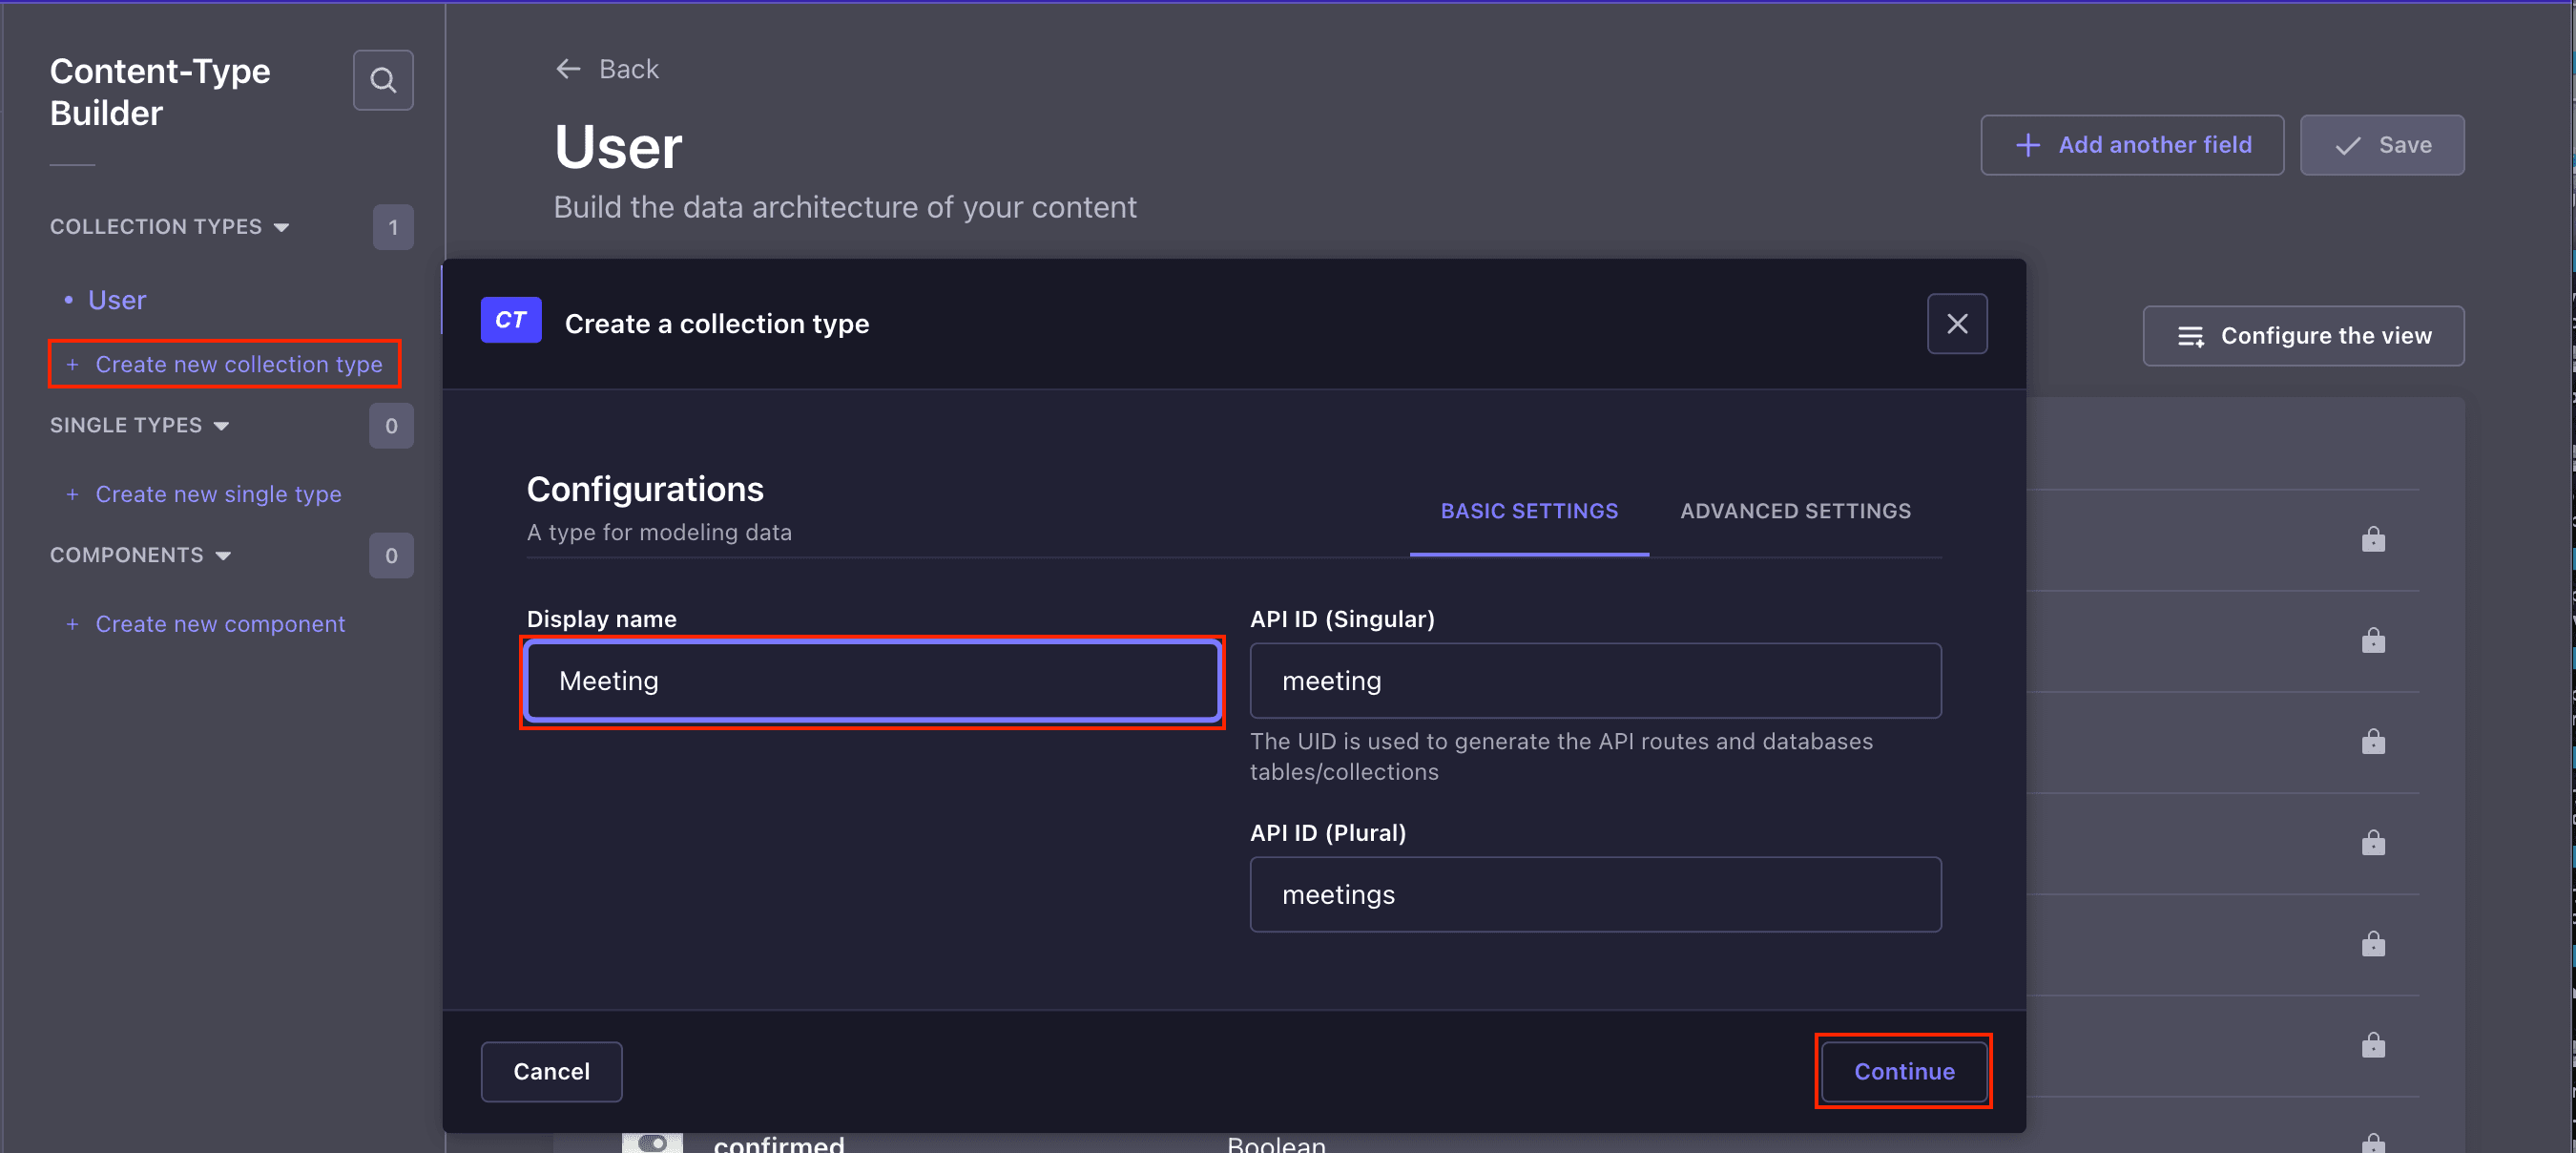
Now, let's create the Meeting content type. To do that, click on the **Create new collection type** tab from your Admin panel to create a **Meeting** collection for your application and click **Continue**.
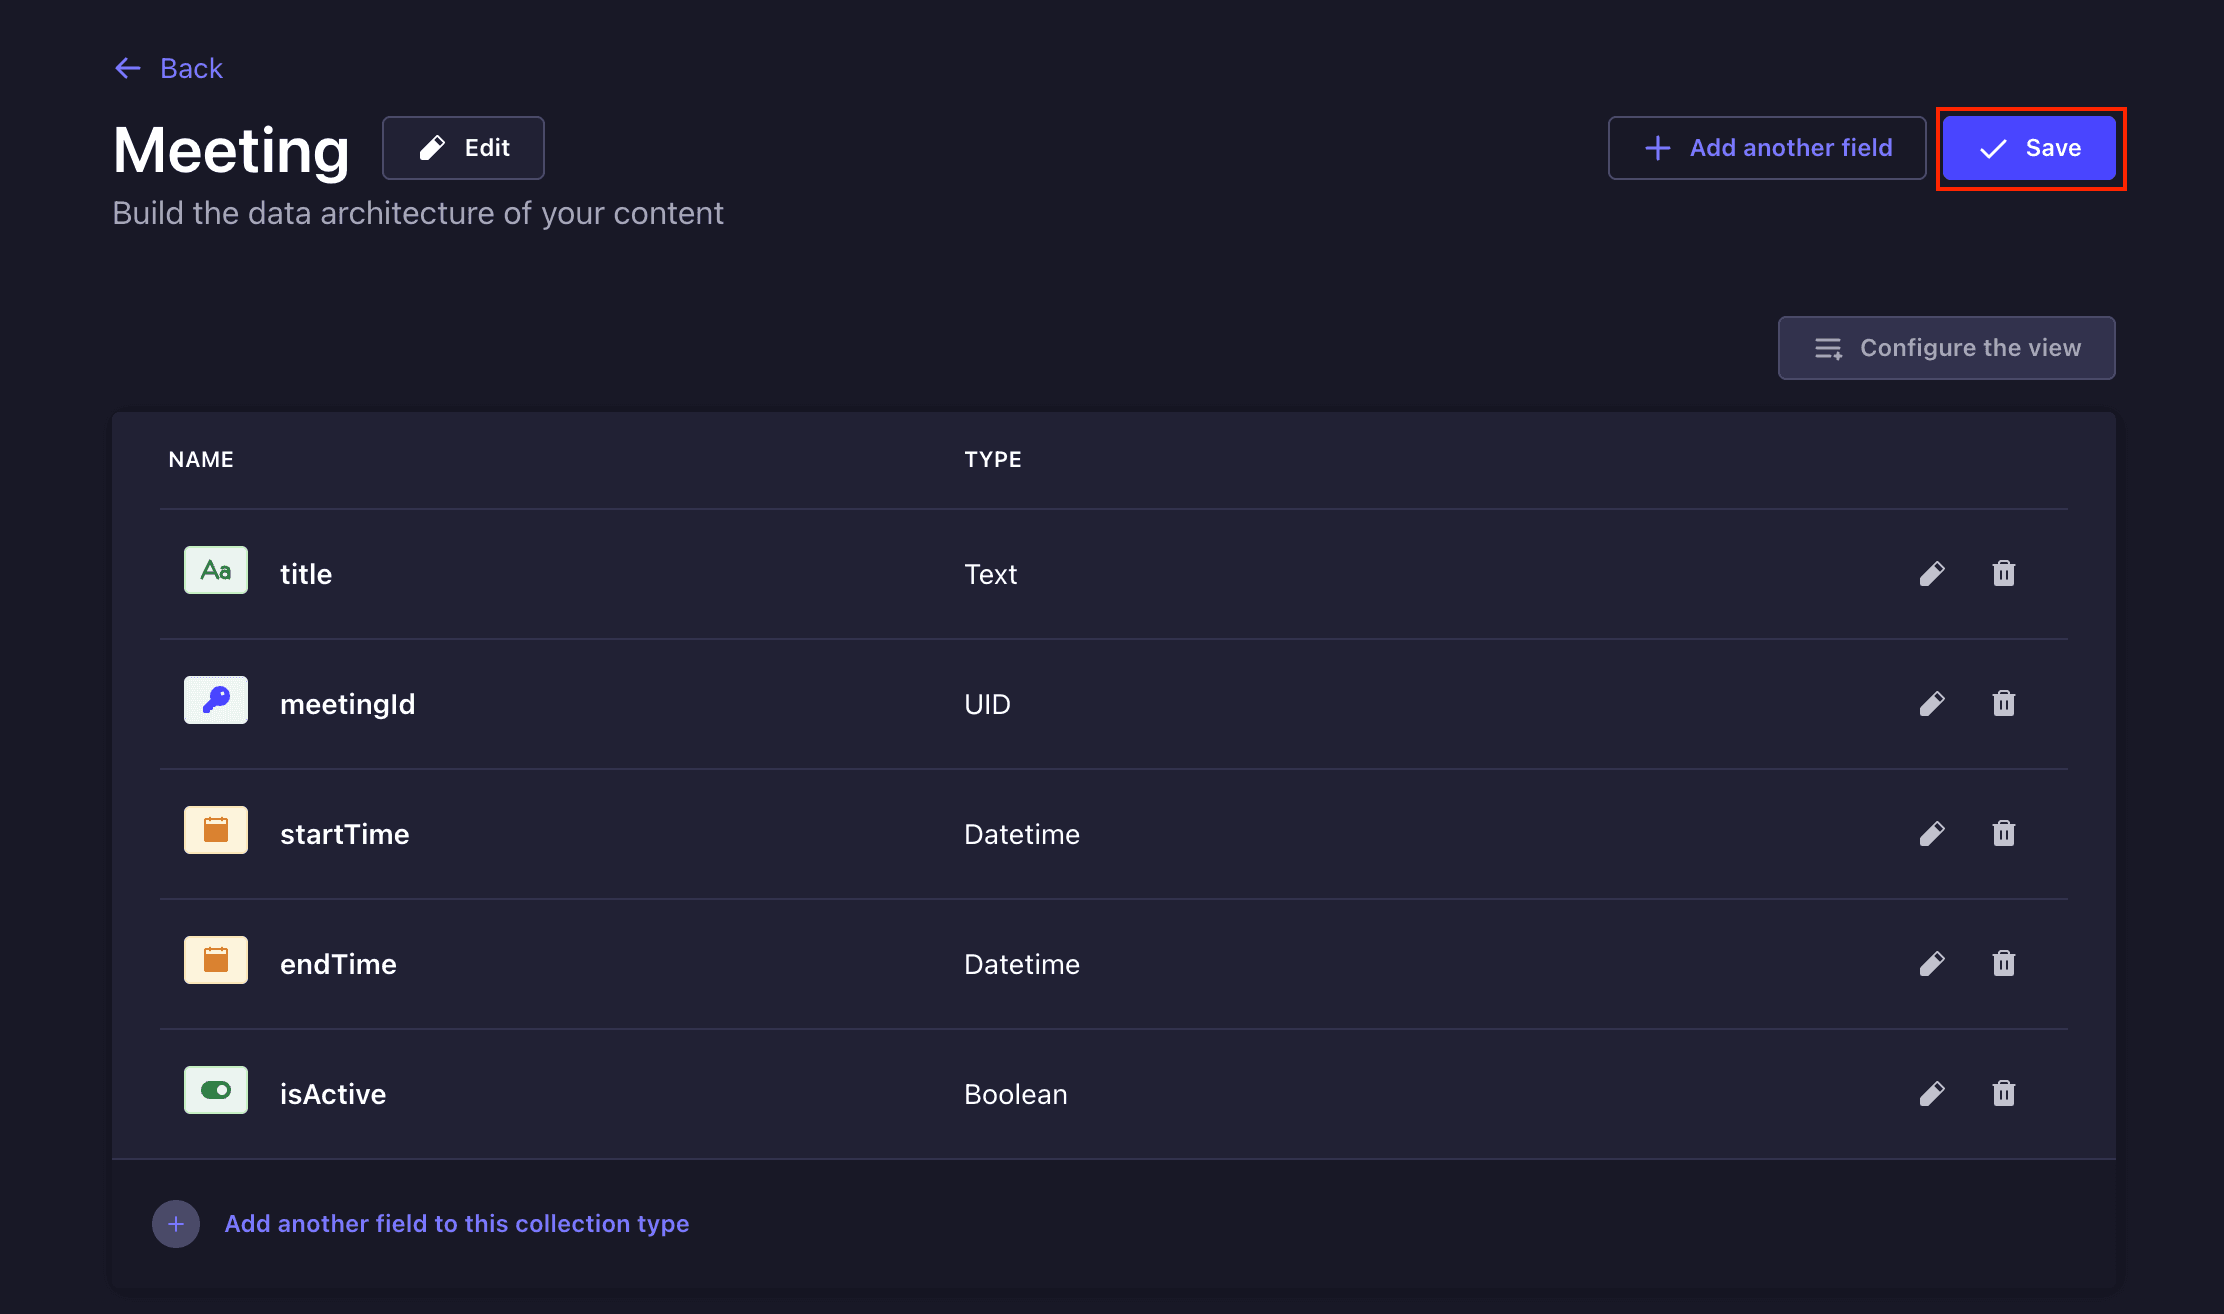
Add the following fields to **Meeting** collection type and click the **Save** button:
| Field | Type |
| -------- | -------- |
| `title` | short text |
| `meetingId` (targetField: title) | uid |
| `startTime` | datetime |
| `endTime` | datetime |
| `isActive` | boolean |
### Creating Data Relationships
I left out some fields in our **User** and **Meeting** collections because they are relations fields. I needed us to cover them separately. For the **User** Collection, the fields are:
- `meetings`: The meetings created by users
For the **Meeting** collection, the fields are:
- `host`: The creator of the meeting.
- `participants`: The users who are joining the meeting.
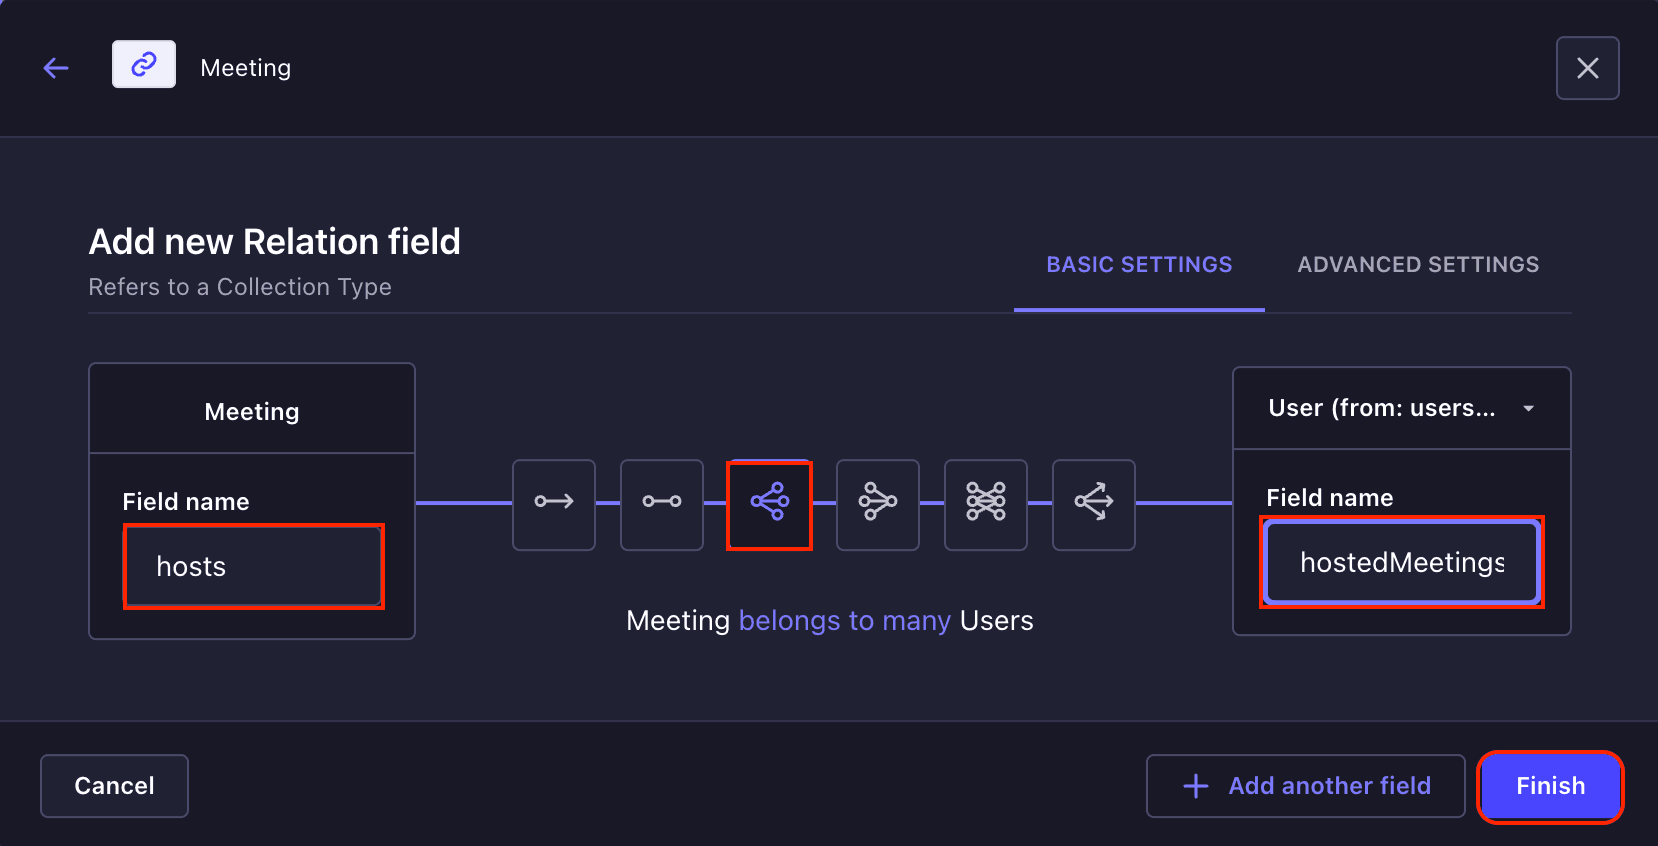
### Adding Relation Field Between **User** and **Meeting** Collection Types
To add the relation fields to the User collection, click on the **Meeting -> Add new fields** from **Content-Type Builder -> User** page. Select a **Relations** from the fields modal, and add a new relation field named **meetings**, which will be a **many-to-many** relationship with the **Meeting** collection. This is so that a user can join other users' meetings, and another can also join their meetings. Now click on the **Finish** button and **Save** button to save the changes.

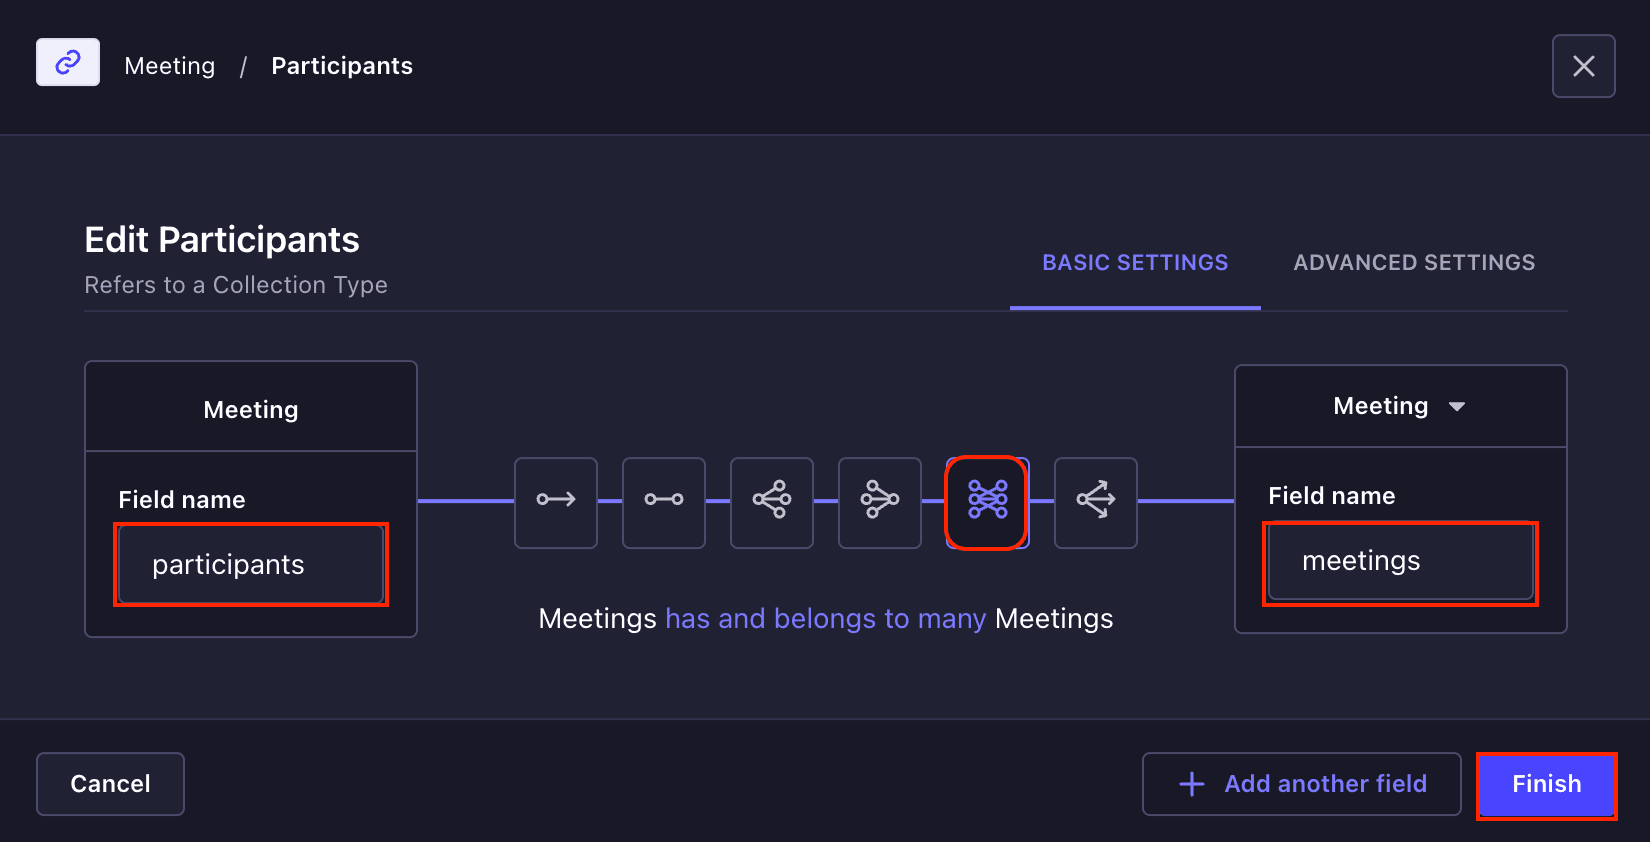
### Adding Relation Field in Meeting Collection
For the **Meeting** collection, click on the **Meeting** -> **Add new fields** from the Content-Type Builder page. Click on the **Add new field** button select a **Relation** from the fields modal and add a new relation field named **host**, which will be a **many-to-One** relationship with the **User** collection. Then click on the **Finish** button and **Save** button to save the changes.
To create the **participants** relation field, you need also repeat this process. But this **participants** collection will be a **many-to-many** relationship.
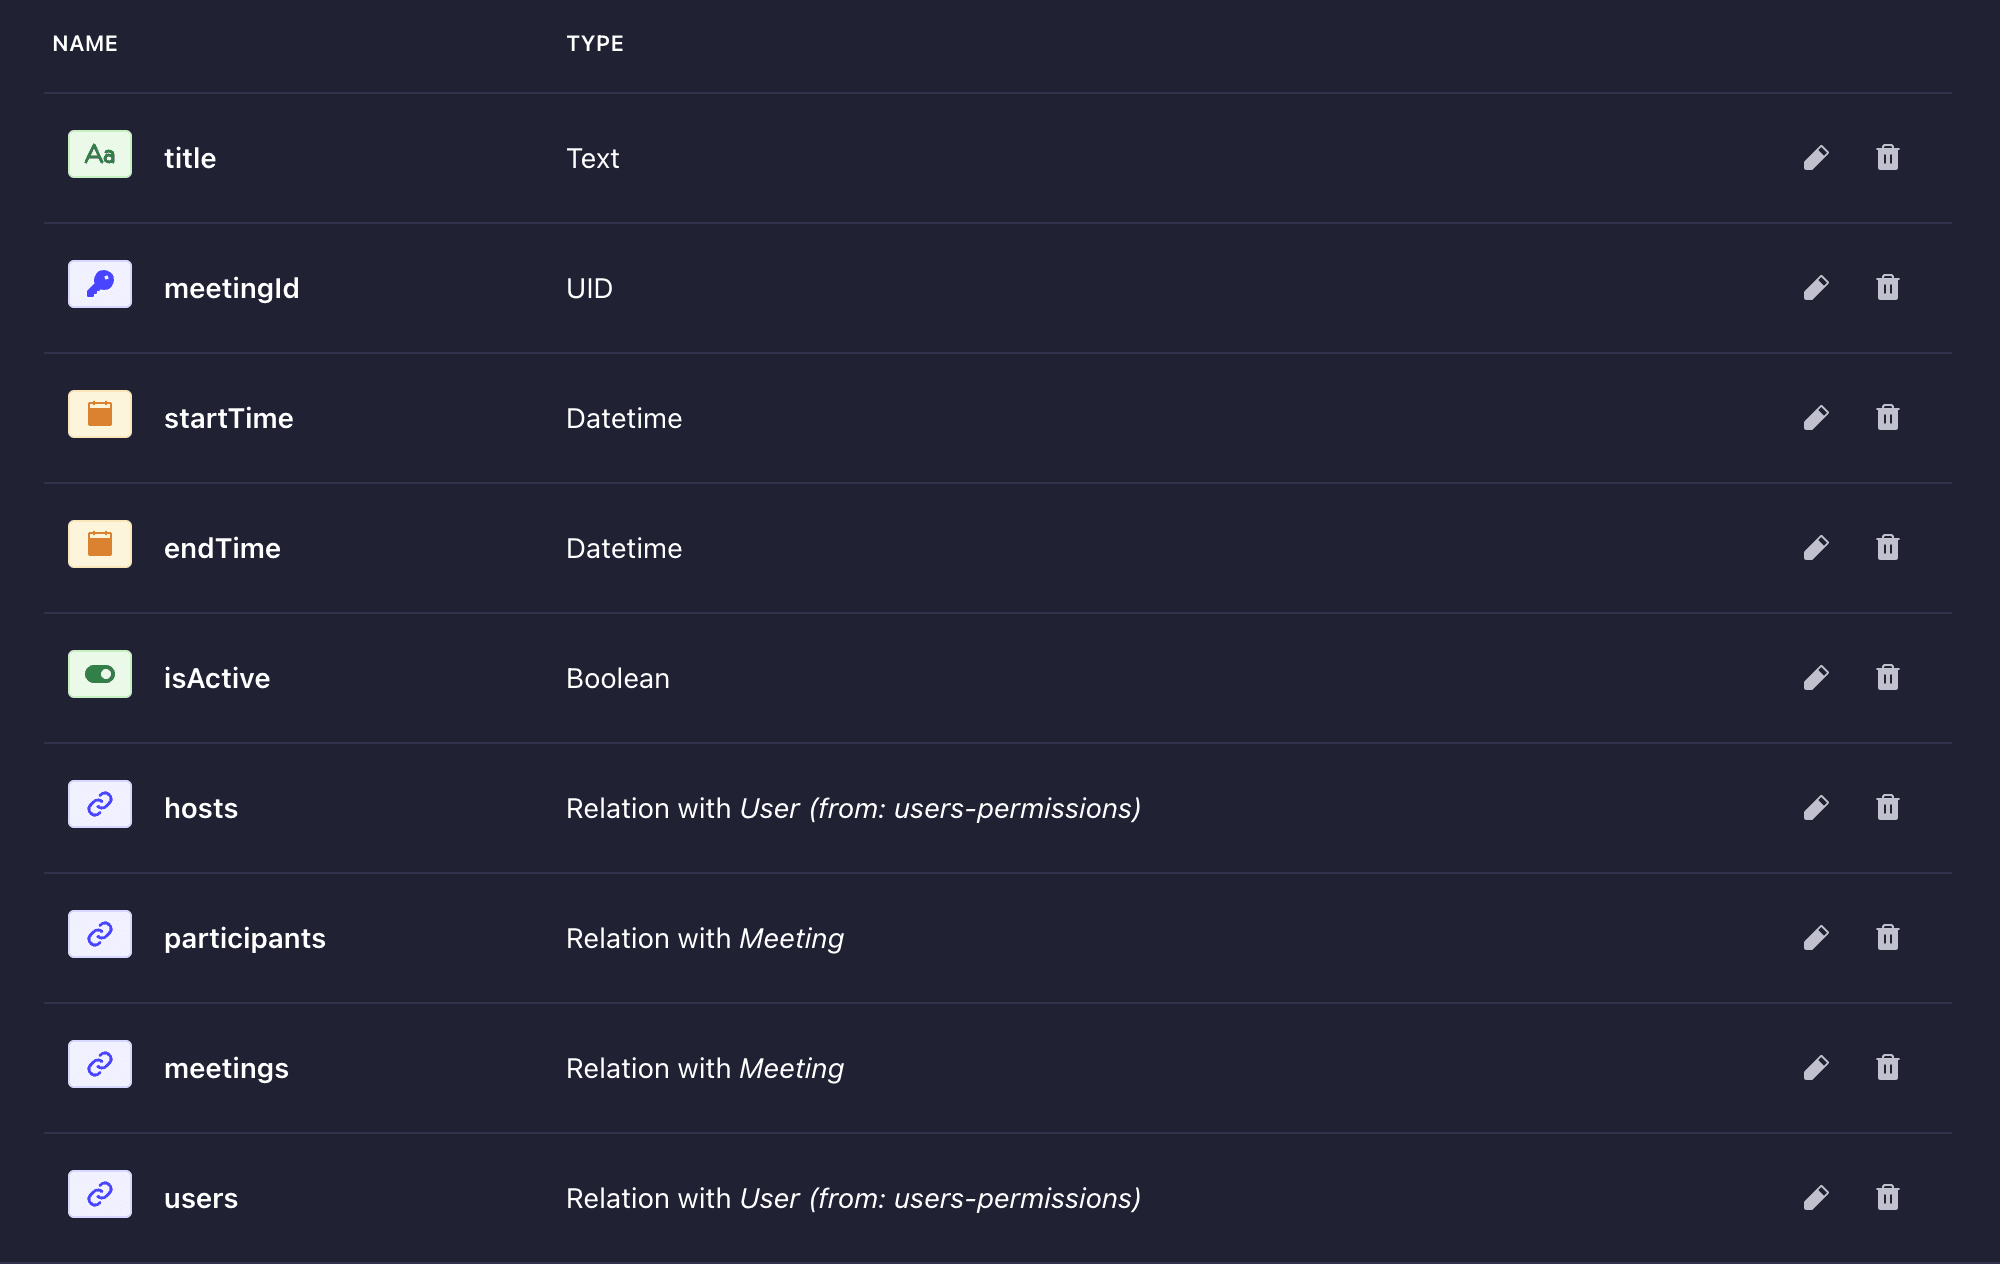
After the fields, your **Meeting** collection will look like the screenshot below:
## Creating the Meeting Controller
Let's add custom logic for meeting management. Create `./src/api/meeting/controllers/custom.js` and add the code snippets below to create a new meeting:
```typescript
import { factories } from "@strapi/strapi";
export default factories.createCoreController(
"api::meeting.meeting",
({ strapi }) => ({
async create(ctx) {
try {
const {
title,
startTime,
endTime,
participantEmails = [],
} = ctx.request.body.data;
const user = ctx.state.user;
console.log("came here");
if (!user) {
return ctx.unauthorized("You must be logged in to create a meeting");
}
// Validate required fields
if (!startTime || !endTime) {
return ctx.badRequest("Start time and end time are required");
}
// Validate time logic
const start = new Date(startTime);
const end = new Date(endTime);
if (start >= end) {
return ctx.badRequest("End time must be after start time");
}
if (start < new Date()) {
return ctx.badRequest("Start time cannot be in the past");
}
// Find users by email
const userIds = new Set([user.documentId]);
const invalidEmails = [];
if (participantEmails && participantEmails.length > 0) {
const users = await strapi
.query("plugin::users-permissions.user")
.findMany({
where: {
email: {
$in: participantEmails,
},
},
select: ["documentId", "email"],
});
// Track which emails were found
const foundEmails = new Set(users.map((user) => user.email));
// Add found user IDs to the set
users.forEach((user) => userIds.add(user.documentId));
// Track invalid emails
invalidEmails.push(
...participantEmails.filter((email: any) => !foundEmails.has(email))
);
}
// Create the meeting
const meeting = await strapi.documents("api::meeting.meeting").create({
data: {
title,
startTime,
meetingId: title.toLowerCase().replace(/\s+/g, "-"),
endTime,
isActive: false,
hosts: user.id,
participants: {
connect: Array.from(userIds),
},
publishedAt: new Date(),
},
status: "published",
populate: ["hosts", "participants"],
});
// Return meeting data along with any invalid emails
return {
data: meeting,
meta: {
invalidEmails: invalidEmails.length > 0 ? invalidEmails : undefined,
},
};
} catch (error) {
console.error("Meeting creation error:", error);
ctx.throw(
500,
error instanceof Error
? error.message
: "An error occurred while creating the meeting"
);
}
},
}
```
The above code handles the creation of new meetings. We would have used the default API created by Strapi and simply sent an API request, but we needed to use users' emails to add them to the participant's list, keep track of invalid emails, and slugifying the title to create a `meetingId` value.
Then add the route in `./src/api/meeting/routes/custom.js`:
```typescript
export default {
routes: [
{
method: "POST",
path: "/meetings",
handler: "custom.create",
auth: true,
},
],
};
```
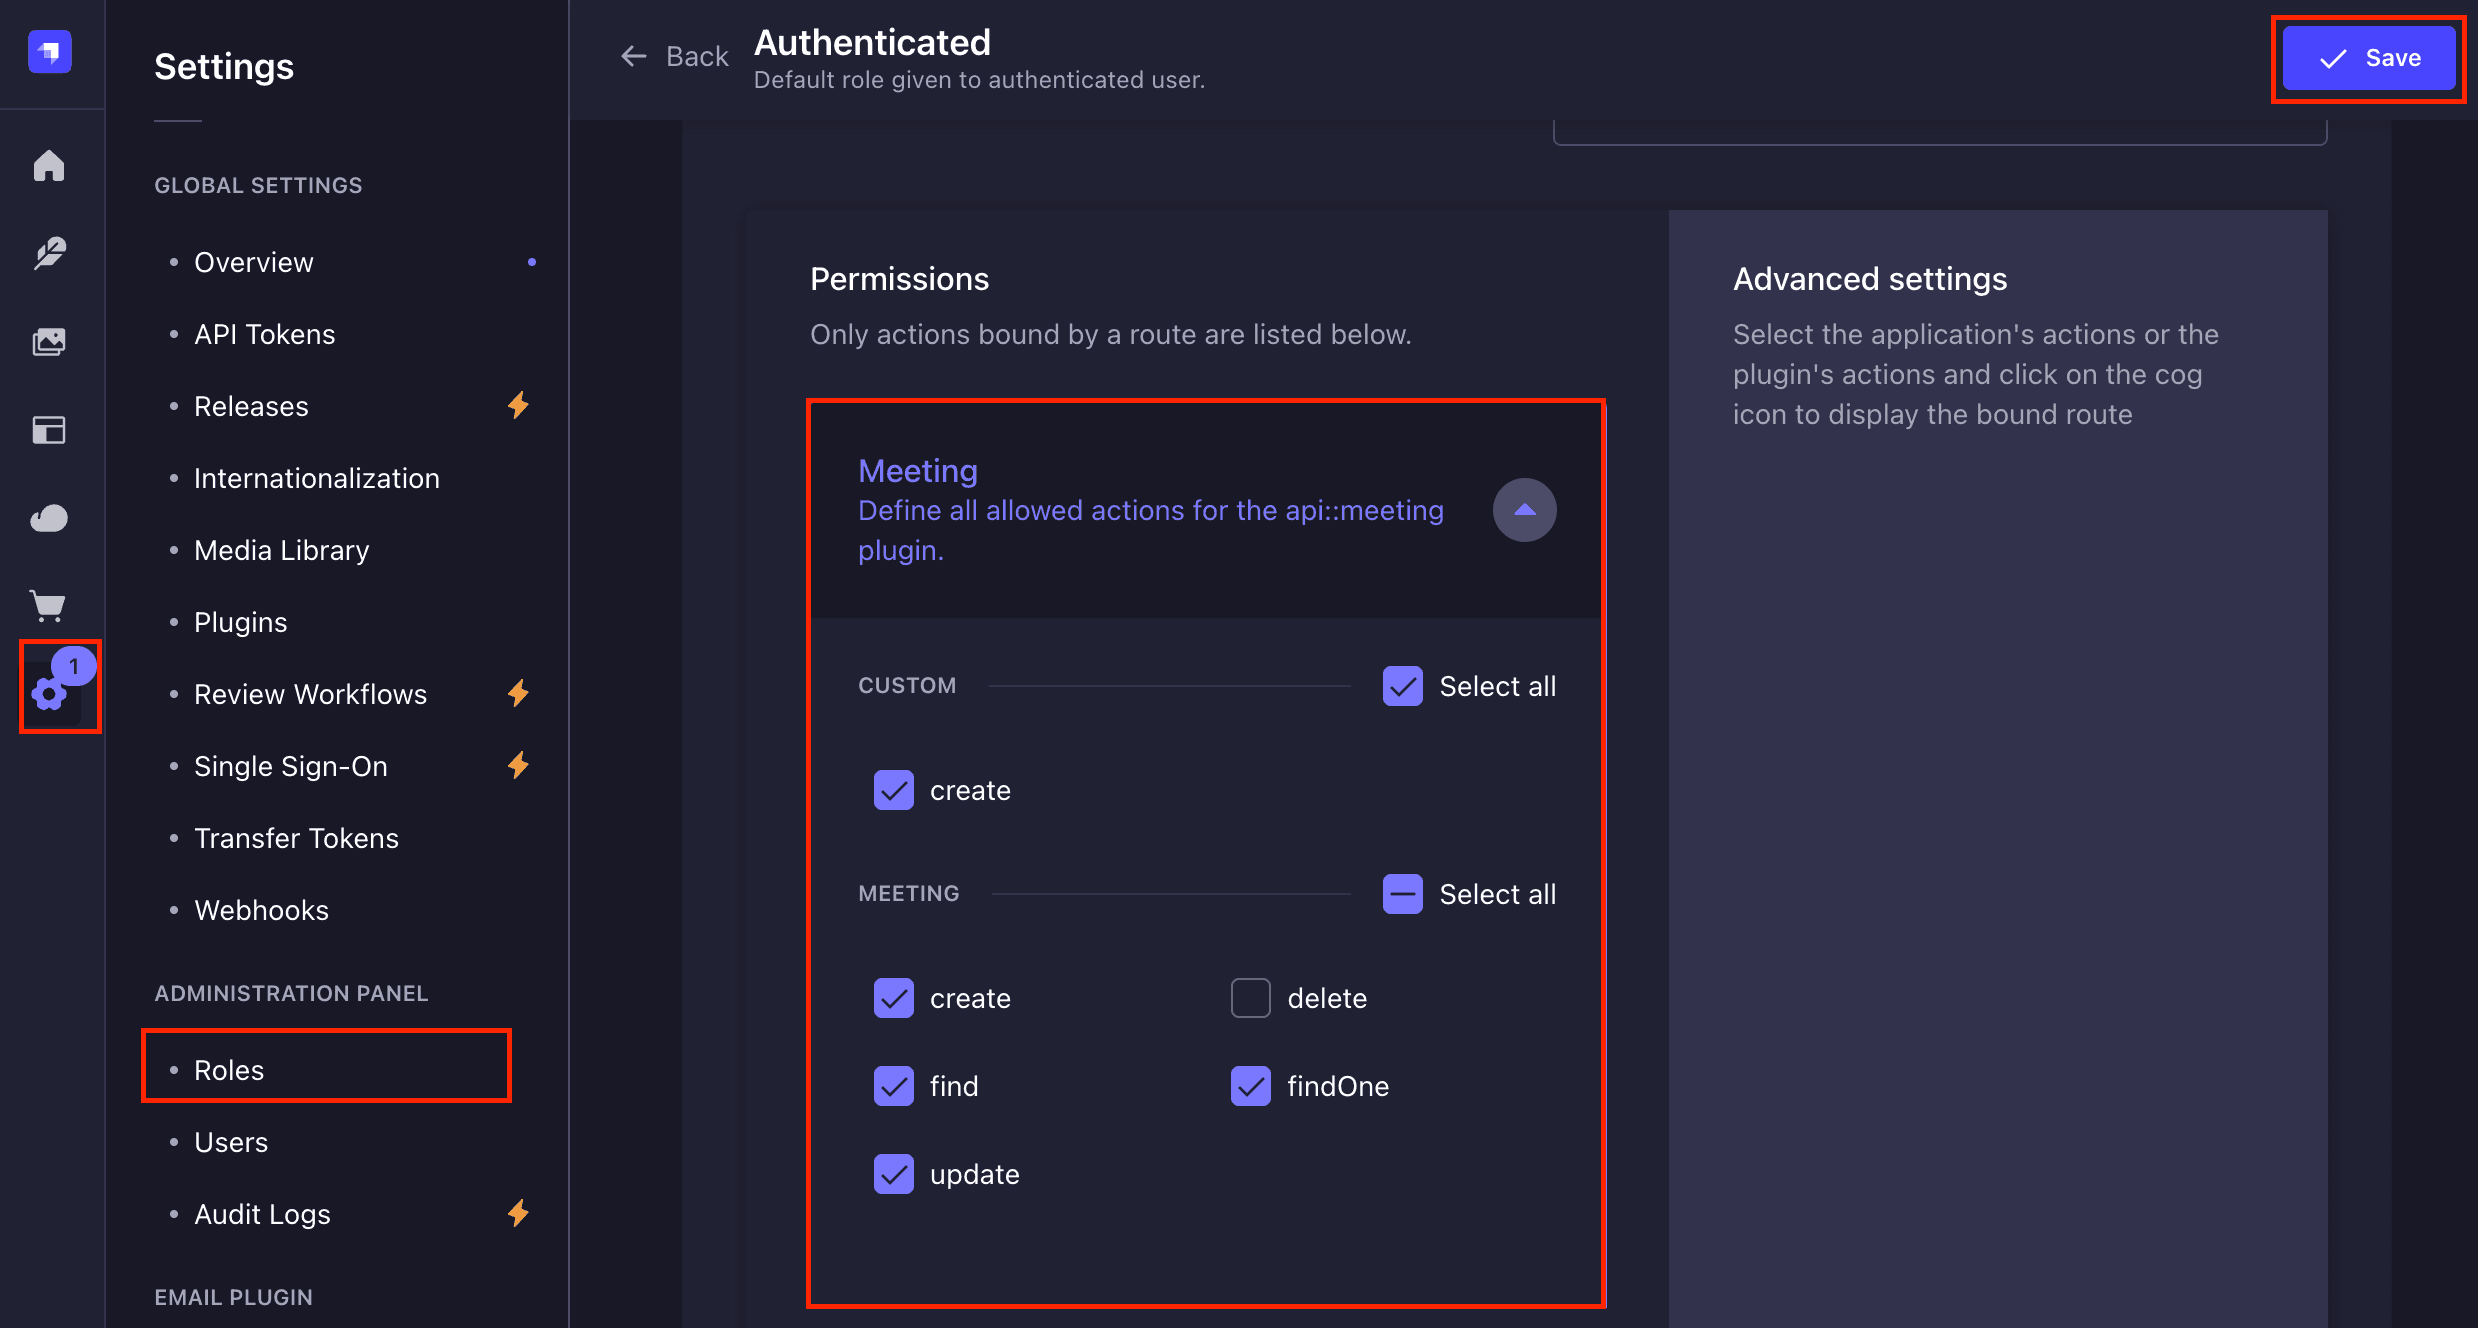
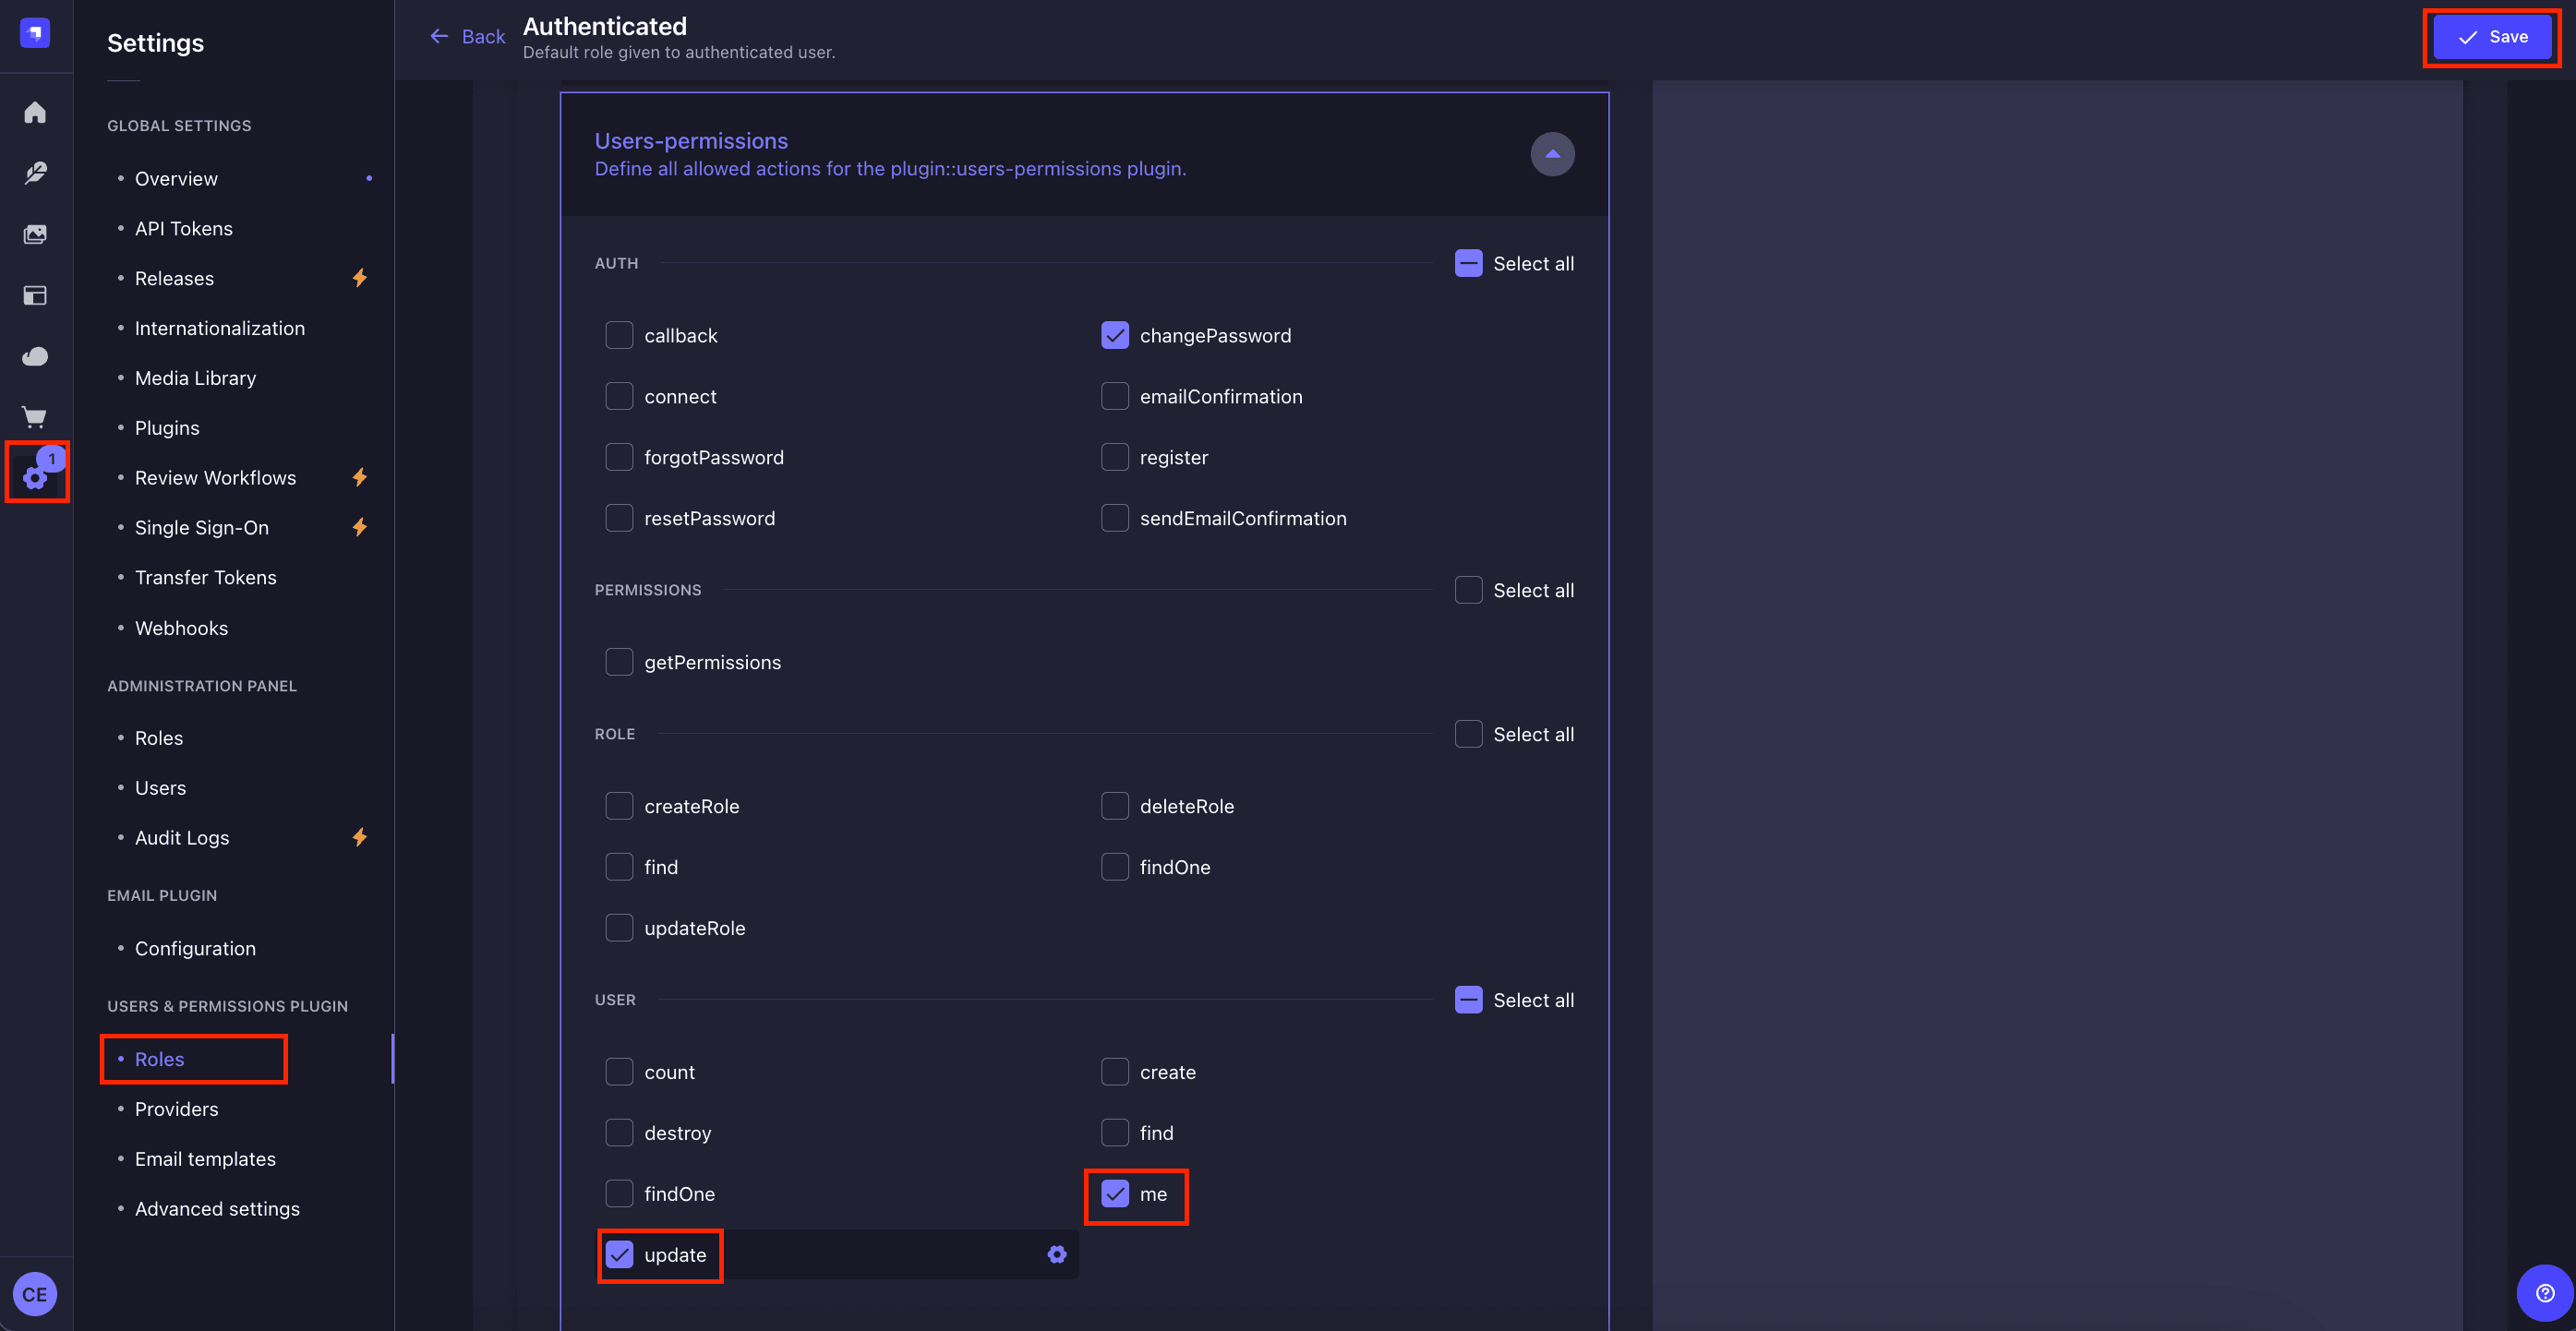
## Setting Up Permissions
Strapi provides authorization for your collections out of the box, you only need to specify what kind of access you give users. Navigate to ***Settings → Users & Permissions Plugin → Roles*** and configure the following permissions for authenticated users role:
**Meeting:**
- `find`, `findOne` (for viewing meetings)
- `create` (for creating new meetings)
- `update` (for modifying meeting details)
- `create` (for creating new meetings)
- User (Users-permissions):
- `me` (for accessing my profile)
- `update` (for updating profile)
- `find` (for accessing the details of others in the meeting)
We're done with part one of this blog series. Stay tuned for Part 2, where we'll continue this tutorial by building the front end using Next.js and connecting it to our Strapi backend.
In the next section, we'll build a responsive frontend using Next.js, create the user interfaces, implement authentication, and handle meeting listing and creating new meetings.
---
## Create a New Next.js Project
Let's create a new Next.js project with TypeScript and Tailwind CSS:
```bash
px create-next-app@latest google-meet-frontend --typescript --tailwind --app
cd google-meet-frontend
```
Then, install the required project dependencies:
```bash
npm install @tanstack/react-query axios jwt-decode @headlessui/react lucide-react clsx tailwind-merge zustand @types/js-cookie js-cookie
```
Here is a brief overview of the dependencies and what they will do:
- **[@tanstack/react-query](https://www.npmjs.com/package/@tanstack/react-query)**: Manages API data fetching, caching, and synchronization
- **[axios](https://www.npmjs.com/package/axios)**: Makes HTTP requests to our backend
- **[jwt-decode](https://www.npmjs.com/package/jwt-decode)**: Decodes JWT tokens for authentication
- **[@headlessui/react](https://www.npmjs.com/package/@headlessui/react)**: Provides unstyled, accessible UI components
- **[lucide-react](https://www.npmjs.com/package/lucide-react)**: Modern icon library for React
- **[clsx](https://www.npmjs.com/package/clsx)**: Helps build className strings conditionally
- **[tailwind-merge](https://www.npmjs.com/package/tailwind-merge)**: Merges Tailwind CSS classes without conflicts.
- **[zustand](https://www.npmjs.com/package/zustand)**: Simple state management solution
### Project Structure
Once the project is created and the required dependencies is installed, let's organize our project structure:
```bash
📦google-meet-frontend
┣ 📂app
┃ ┣ 📂auth
┃ ┃ ┣ 📂login
┃ ┃ ┃ ┗ 📜page.tsx
┃ ┃ ┣ 📂register
┃ ┃ ┃ ┗ 📜page.tsx
┃ ┃ ┗ 📜layout.tsx
┃ ┣ 📂meetings
┃ ┃ ┣ 📂[id]
┃ ┃ ┃ ┗ 📜page.tsx
┃ ┃ ┣ 📂new
┃ ┃ ┃ ┗ 📜page.tsx
┃ ┃ ┗ 📜page.tsx
┃ ┣ 📜layout.tsx
┃ ┗ 📜page.tsx
┣ 📂components
┃ ┣ 📂meeting
┃ ┃ ┣ 📜chat.tsx
┃ ┃ ┣ 📜controls.tsx
┃ ┃ ┗ 📜participant-list.tsx
┃ ┣ 📜header.tsx
┃ ┗ 📜providers.tsx
┣ 📂lib
┃ ┣ 📜api-client.ts
┃ ┗ 📜cookie-manager.ts
┣ 📂store
┃ ┣ 📜auth-store.ts
┃ ┗ 📜meeting-store.ts
┣ 📂types
┃ ┗ 📜index.ts
┣ 📜.env.local
┣ 📜middleware.ts
```
Then create a `.env.local` file in your project root and add the following environment variables:
```bash
NEXT_PUBLIC_STRAPI_URL=http://localhost:1337
NEXT_PUBLIC_API_URL=http://localhost:1337/api
```
## Handling Authentication and Authorization
Strapi provides different types of authentication and authorization, for the demonstration in this tutorial, we'll use the **Password-based authentication** and **API Keys** authorization. To learn more about Strapi authentication, check out the Strapi blog on [A Beginner's Guide to Authentication and Authorization in Strapi](https://strapi.io/blog/a-beginners-guide-to-authentication-and-authorization-in-strapi).
### Setting Up User Authentication
Let's create our authentication store using Zustand. Create a `store/auth-store.ts` file and add the code snippets:
```typescript
import { cookieManager } from "@/lib/cookie-manager";
import { create } from "zustand";
import { createJSONStorage, persist } from "zustand/middleware";
interface User {
id: number;
email: string;
username: string;
avatar?: string;
}
interface AuthState {
user: User | null;
token: string | null;
isInitialized: boolean;
setAuth: (user: User, token: string) => void;
logout: () => void;
}
export const useAuthStore = create<AuthState>()(
persist(
(set) => ({
user: null,
token: null,
isInitialized: false,
setAuth: (user, token) => {
set({ user, token, isInitialized: true });
cookieManager.setAuthCookie(user, token);
},
logout: () => {
set({ user: null, token: null, isInitialized: true });
cookieManager.clearAuthCookie();
},
}),
{
name: "auth-storage",
storage: createJSONStorage(() => localStorage),
partialize: (state) => ({
user: state.user,
token: state.token,
}),
}
)
);
```
The above code creates an authentication store using Zustand's `create` and `persist` middleware. The `useAuthStore` hook creates a persistent state container with null initial values for the user and token, along with `isInitialized` flag. It exposes two functions: `setAuth` which takes a `User` object and `token` string to update the authentication state and syncing cookies using `cookieManager.setAuthCookie`, and `logout` which nullifies the user and token and clears cookies using `cookieManager.clearAuthCookie`. The `persist` configuration named `auth-storage` uses `localStorage` to persist data.
Then create the cookie manager in the `lib/cookie-manager.ts` to manage users' cookies with the code:
```typescript
import Cookies from "js-cookie";
export const cookieManager = {
setAuthCookie: (user: any, token: string) => {
Cookies.set(
"auth-storage",
JSON.stringify({
state: { user, token },
}),
{
expires: 7,
path: "/",
sameSite: "strict",
}
);
},
clearAuthCookie: () => {
Cookies.remove("auth-storage", { path: "/" });
},
};
```
Now you need to create an API client in `lib/api-client.ts`. It will allow you reuse the pre-configured Axios instance that will handle authentication by automatically adding the JWT token from your Zustand auth store to the request headers. It also uses the base URL from your environment variables for all API calls to Strapi.
```typescript
import axios from 'axios';
import { useAuthStore } from '@/store/auth-store';
const apiClient = axios.create({
baseURL: process.env.NEXT_PUBLIC_API_URL,
});
apiClient.interceptors.request.use((config) => {
const token = useAuthStore.getState().token;
if (token) {
config.headers.Authorization = `Bearer ${token}`;
}
return config;
});
export default apiClient;
```
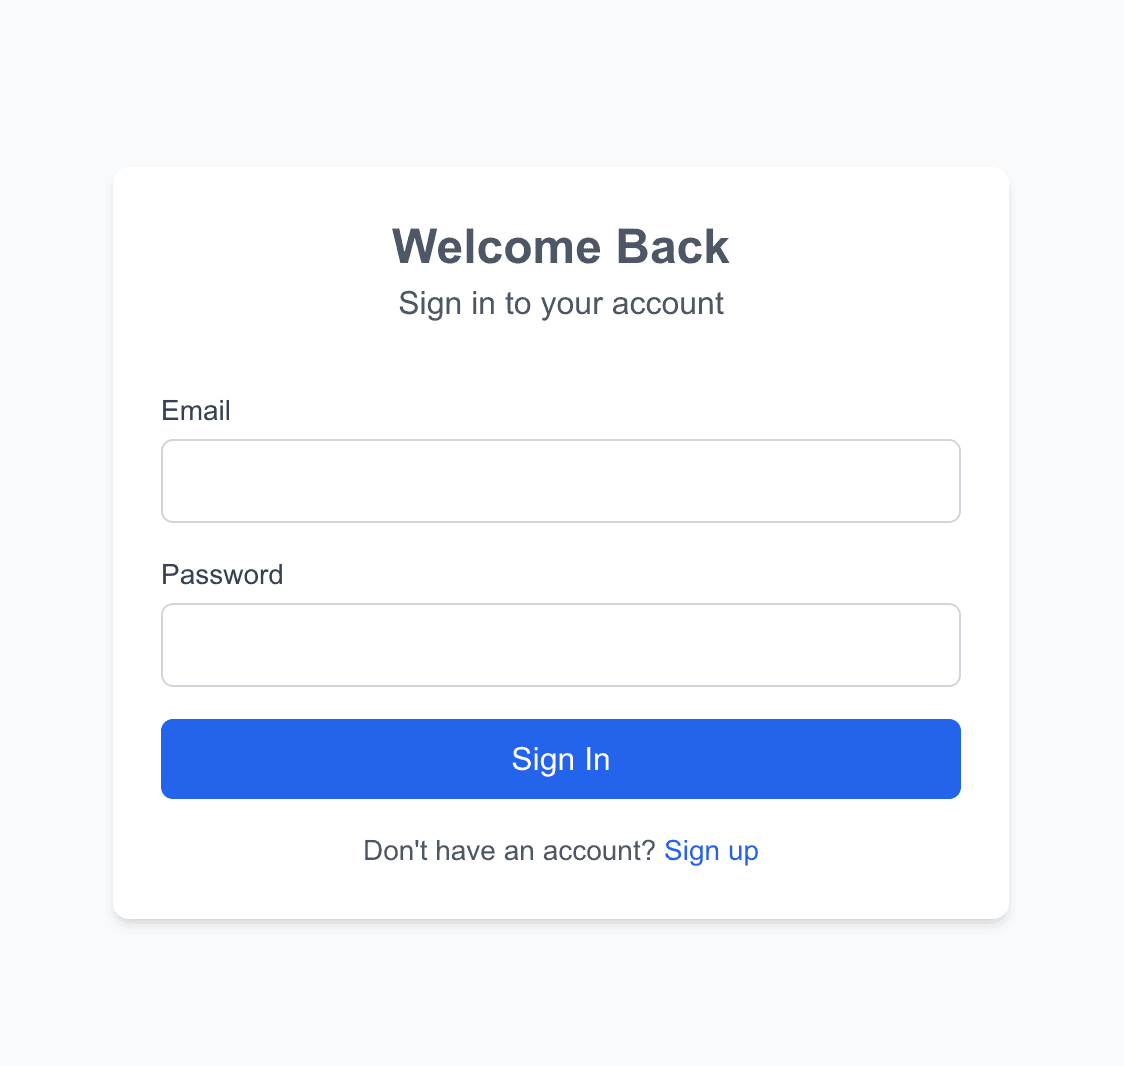
### Creating Login Page
Create a page in `app/auth/login/page.tsx` and add the code snippet for the login page to allow users log in to the application.
```typescript
"use client";
import { useState } from "react";
import { useRouter, useSearchParams } from "next/navigation";
import Link from "next/link";
import apiClient from "@/lib/api-client";
import { useAuthStore } from "@/store/auth-store";
export default function LoginPage() {
const [email, setEmail] = useState("");
const [password, setPassword] = useState("");
const [isLoading, setIsLoading] = useState(false);
const [error, setError] = useState("");
const router = useRouter();
const searchParams = useSearchParams();
const redirectUrl = searchParams.get("redirect") || "/meetings";
const setAuth = useAuthStore((state) => state.setAuth);
const handleSubmit = async (e: React.FormEvent) => {
e.preventDefault();
setIsLoading(true);
setError("");
try {
const response = await apiClient.post("/auth/local", {
identifier: email,
password,
});
setAuth(response.data.user, response.data.jwt);
router.push(redirectUrl);
} catch (error: any) {
setError(error.response?.data?.error?.message || "Failed to login");
} finally {
setIsLoading(false);
}
};
return (
<div className="min-h-screen flex items-center justify-center bg-gray-50">
<div className="max-w-md w-full p-6 bg-white rounded-lg shadow-md">
<div className="text-center mb-8">
<h1 className="text-2xl font-bold text-gray-600">Welcome Back</h1>
<p className="text-gray-600">Sign in to your account</p>
</div>
{error && (
<div className="mb-4 p-3 bg-red-100 text-red-700 rounded-md">
{error}
</div>
)}
<form onSubmit={handleSubmit} className="space-y-4">
<div>
<label
htmlFor="email"
className="block text-sm font-medium text-gray-700"
>
Email
</label>
<input
type="email"
id="email"
value={email}
onChange={(e) => setEmail(e.target.value)}
className="mt-1 block w-full text-gray-700 rounded-md border border-gray-300 px-3 py-2 focus:border-blue-500 focus:ring-1 focus:ring-blue-500"
required
/>
</div>
<div>
<label
htmlFor="password"
className="block text-sm font-medium text-gray-700"
>
Password
</label>
<input
type="password"
id="password"
value={password}
onChange={(e) => setPassword(e.target.value)}
className="mt-1 block w-full text-gray-700 rounded-md border border-gray-300 px-3 py-2 focus:border-blue-500 focus:ring-1 focus:ring-blue-500"
required
/>
</div>
<button
type="submit"
disabled={isLoading}
className="w-full bg-blue-600 text-white py-2 px-4 rounded-md hover:bg-blue-700 disabled:opacity-50"
>
{isLoading ? "Signing in..." : "Sign In"}
</button>
</form>
<p className="mt-4 text-center text-sm text-gray-600">
Don't have an account?{" "}
<Link
href="/auth/register"
className="text-blue-600 hover:text-blue-700"
>
Sign up
</Link>
</p>
</div>
</div>
);
}
```
The above code will require users to log in with their email and password, and then send a `POST` request to the Strapi authentication endpoint (`/auth/local`) to log users in. Then on successfully login, it will update the `auth-store` to save the user's access token.
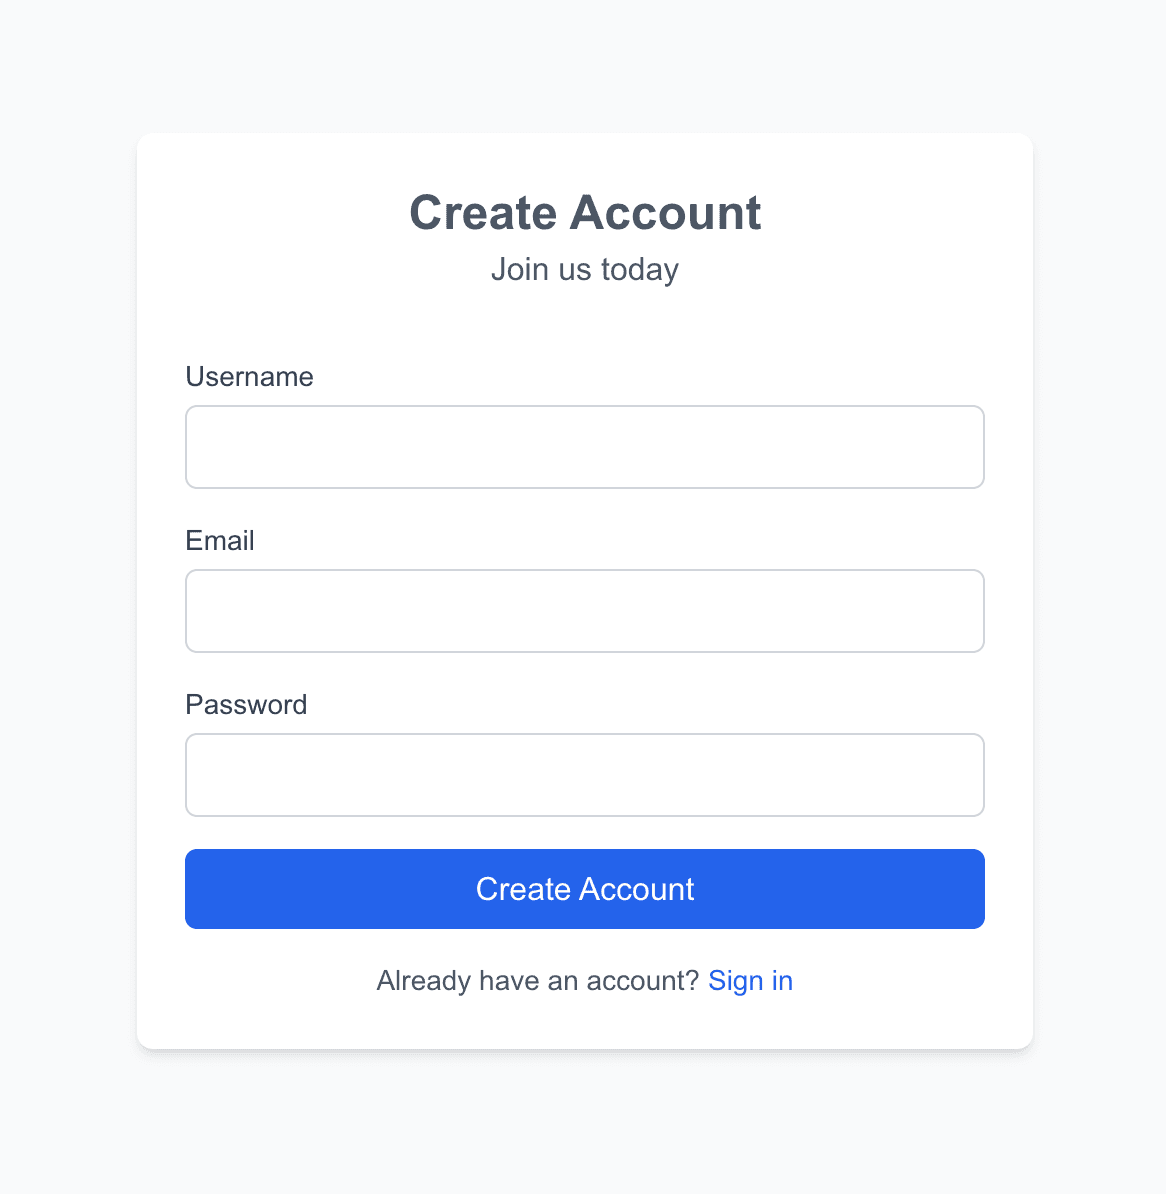
### Creating the Register Page
Next, create the user registration page in the `app/auth/register/page.tsx` to allow users create an account:
```typescript
"use client";
import { useState } from "react";
import { useRouter } from "next/navigation";
import Link from "next/link";
import apiClient from "@/lib/api-client";
import { useAuthStore } from "@/store/auth-store";
export default function RegisterPage() {
const [email, setEmail] = useState("");
const [password, setPassword] = useState("");
const [username, setUsername] = useState("");
const [isLoading, setIsLoading] = useState(false);
const [error, setError] = useState("");
const router = useRouter();
const setAuth = useAuthStore((state) => state.setAuth);
const handleSubmit = async (e: React.FormEvent) => {
e.preventDefault();
setIsLoading(true);
setError("");
try {
const response = await apiClient.post("/auth/local/register", {
username: username,
email,
password,
});
setAuth(response.data.user, response.data.jwt);
router.push("/meetings");
} catch (error: any) {
setError(error.response?.data?.error?.message || "Failed to register");
} finally {
setIsLoading(false);
}
};
return (
<div className="min-h-screen flex items-center justify-center bg-gray-50">
<div className="max-w-md w-full p-6 bg-white rounded-lg shadow-md">
<div className="text-center mb-8">
<h1 className="text-2xl font-bold text-gray-600">Create Account</h1>
<p className="text-gray-600">Join us today</p>
</div>
{error && (
<div className="mb-4 p-3 bg-red-100 text-red-700 rounded-md">
{error}
</div>
)}
<form onSubmit={handleSubmit} className="space-y-4">
<div>
<label
htmlFor="username"
className="block text-sm font-medium text-gray-700"
>
Username
</label>
<input
type="text"
id="username"
value={username}
onChange={(e) => setUsername(e.target.value)}
className="mt-1 block w-full rounded-md border text-gray-700 border-gray-300 px-3 py-2 focus:border-blue-500 focus:ring-1 focus:ring-blue-500"
required
/>
</div>
<div>
<label
htmlFor="email"
className="block text-sm font-medium text-gray-700"
>
Email
</label>
<input
type="email"
id="email"
value={email}
onChange={(e) => setEmail(e.target.value)}
className="mt-1 block w-full rounded-md border text-gray-700 border-gray-300 px-3 py-2 focus:border-blue-500 focus:ring-1 focus:ring-blue-500"
required
/>
</div>
<div>
<label
htmlFor="password"
className="block text-sm font-medium text-gray-700"
>
Password
</label>
<input
type="password"
id="password"
value={password}
onChange={(e) => setPassword(e.target.value)}
className="mt-1 block w-full rounded-md border text-gray-700 border-gray-300 px-3 py-2 focus:border-blue-500 focus:ring-1 focus:ring-blue-500"
required
/>
</div>
<button
type="submit"
disabled={isLoading}
className="w-full bg-blue-600 text-white py-2 px-4 rounded-md hover:bg-blue-700 disabled:opacity-50"
>
{isLoading ? "Creating account..." : "Create Account"}
</button>
</form>
<p className="mt-4 text-center text-sm text-gray-600">
Already have an account?{" "}
<Link
href="/auth/login"
className="text-blue-600 hover:text-blue-700"
>
Sign in
</Link>
</p>
</div>
</div>
);
}
```
The above will require users to register with their `username`, `email`, and `password`. We send a `POST` request to the Strapi register auth route (`/aut/register`) Once their account is registered, we update we grab their **API Key** update the `auth-store`, and redirect them to the meetings page.
Now create an `authLayouth` component in the `app/auth/layout.tsx` to render the authentication pages:
```typescript
export default function AuthLayout({
children,
}: {
children: React.ReactNode;
}) {
return <div className="min-h-screen bg-gray-50">{children}</div>;
}
```
### Protected Route Middleware
Create a middleware to protect routes in `middleware.ts` allowing authenticated users to access the meetings pages:
```typescript
import { NextResponse } from "next/server";
import type { NextRequest } from "next/server";
export function middleware(request: NextRequest) {
const authState = request.cookies.get("auth-storage")?.value;
let isAuthenticated = false;
if (authState) {
try {
const parsedAuthState = JSON.parse(authState);
isAuthenticated = !!(
parsedAuthState.state?.token && parsedAuthState.state?.user
);
} catch (error) {
console.error("Error parsing auth state:", error);
}
}
const isAuthPage =
request.nextUrl.pathname.startsWith("/auth/login") ||
request.nextUrl.pathname.startsWith("/auth/register");
if (!isAuthenticated && !isAuthPage) {
const loginUrl = new URL("/auth/login", request.url);
loginUrl.searchParams.set("/auth/redirect", request.nextUrl.pathname);
return NextResponse.redirect(loginUrl);
}
if (isAuthenticated && isAuthPage) {
return NextResponse.redirect(new URL("/", request.url));
}
return NextResponse.next();
}
export const config = {
matcher: ["/", "/meetings/:path*", "/auth/login", "/auth/register"],
};
```
The above middleware handles authentication routing by checking a cookie named `auth-storage` which contains the user's auth state. The middleware will run before the pages load, verifying if the user is authenticated by looking for a valid token and user object in the parsed cookie. It redirects unauthenticated users to the login page (while preserving their intended destination as a URL parameter).
## Creating Meeting Pages
Now that users can register and login, let's proceed to creating the meeting pages to allow users create new meetings and join and manage meetings.
### Creating Meeting Types
First, create a **Meeting**, **User**, **MeetingParticipant** and **ChatMessage** types in the `types/index.ts` directory with code snippet below:
```typescript
export interface User {
id: number;
email: string;
username: string;
avatar?: string;
}
export interface Meeting {
id: number;
title: string;
meetingId: string;
startTime: string;
endTime: string;
isActive: boolean;
createdAt: string;
updatedAt: string;
host: {
data: {
id: number;
username: string;
email: string;
};
participants: {
data: Array<{
id: number;
username: string;
email: string;
}>;
};
};
}
export interface MeetingParticipant {
id: number;
username: string;
isAudioEnabled: boolean;
isVideoEnabled: boolean;
isScreenSharing: boolean;
}
export interface ChatMessage {
id: string;
userId: number;
text: string;
timestamp: number;
username: string;
}
```
### Creating App Layout Components
Next, create a `Header` component in `components/header.tsx`. This **Header** component will be reused across the meetings pages:
```typescript
'use client';
import Link from 'next/link';
import { useAuthStore } from '@/store/auth-store';
import { LogOut, User } from 'lucide-react';
export function Header() {
const { user, logout } = useAuthStore();
if (!user) return null;
return (
<header className="border-b">
<div className="container mx-auto px-4 h-16 flex items-center justify-between">
<Link href="/meetings" className="font-semibold text-xl">
Meet Clone
</Link>
<div className="flex items-center gap-4">
<div className="flex items-center gap-2">
<User size={20} />
<span>{user.displayName}</span>
</div>
<button
onClick={logout}
className="flex items-center gap-2 text-red-600 hover:text-red-700"
>
<LogOut size={20} />
<span>Logout</span>
</button>
</div>
</div>
</header>
);
}
```
Then create a Providers for the state management using tanstack in the `components/providers.tsx`:
```typescript
'use client';
import { QueryClient, QueryClientProvider } from '@tanstack/react-query';
import { PropsWithChildren } from 'react';
const queryClient = new QueryClient();
export function Providers({ children }: PropsWithChildren) {
return (
<QueryClientProvider client={queryClient}>
{children}
</QueryClientProvider>
);
}
```
Now update the main app layout component in `app/layout.tsx`:
```typescript
import { Inter } from 'next/font/google';
import { Providers } from '@/components/providers';
import { Header } from '@/components/header';
const inter = Inter({ subsets: ['latin'] });
export default function RootLayout({
children,
}: {
children: React.ReactNode;
}) {
return (
<html lang="en">
<body className={inter.className}>
<Providers>
<Header />
<main className="container mx-auto px-4 py-8">
{children}
</main>
</Providers>
</body>
</html>
);
}
```
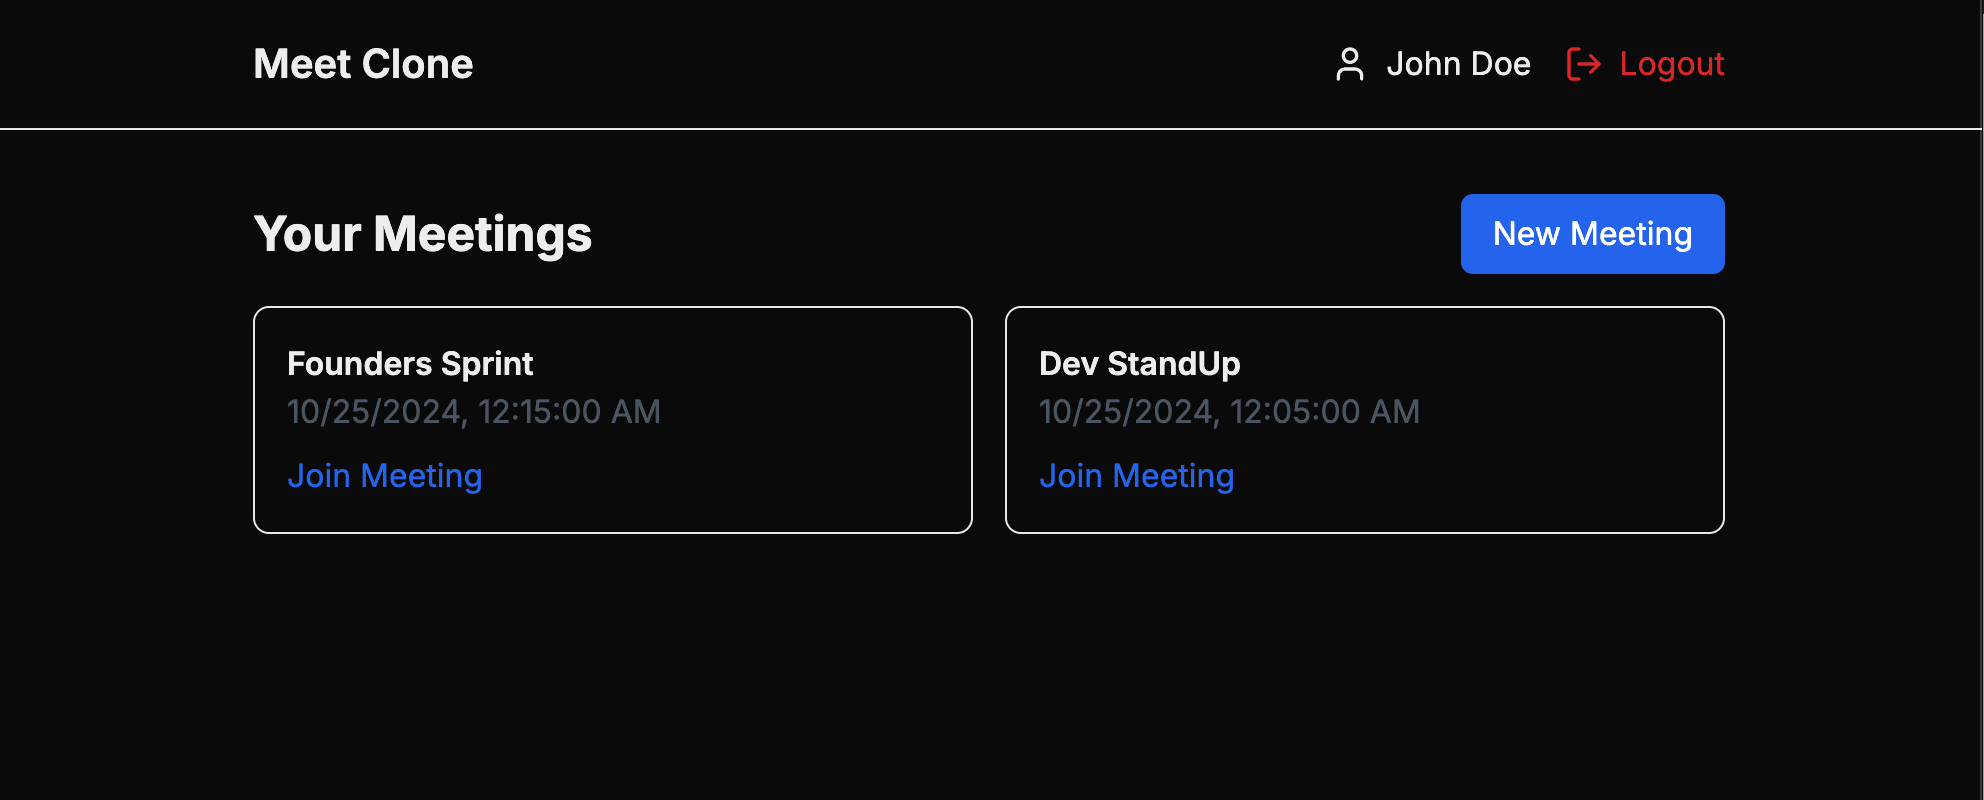
This is what your page will look like now.

### Creating a Meeting Page
Create a meeting page in `app/meetings/page.tsx` to display all user's meetings, a button to create new meetings, and a link to join meetings:
```typescript
"use client";
import { useQuery } from "@tanstack/react-query";
import apiClient from "@/lib/api-client";
import Link from "next/link";
import { Meeting } from "@/types";
import { useAuthStore } from "@/store/auth-store";
export default function MeetingList() {
const authState = useAuthStore((state) => state.user);
const { data: meetings, isLoading } = useQuery({
queryKey: ["meetings"],
queryFn: async () => {
const response = await apiClient.get(
`/meetings?filters[participants][id][$eq]=${authState?.id}&populate=*`
);
return response.data.data;
},
});
if (isLoading) {
return <div>Loading meetings...</div>;
}
return (
<div className="space-y-4">
<div className="flex justify-between items-center">
<h2 className="text-2xl font-bold">Your Meetings</h2>
<Link
href="/meetings/new"
className="bg-blue-600 text-white px-4 py-2 rounded-md hover:bg-blue-700"
>
New Meeting
</Link>
</div>
<div className="grid gap-4 md:grid-cols-2 lg:grid-cols-3">
{meetings?.map((meeting: Meeting) => (
<div
key={meeting.id}
className="border rounded-lg p-4 hover:shadow-md transition-shadow"
>
<h3 className="font-semibold">{meeting.title}</h3>
<p className="text-gray-600">
{new Date(meeting.startTime).toLocaleString()}
</p>
<Link
href={`/meetings/${meeting.meetingId}`}
className="text-blue-600 hover:underline mt-2 inline-block"
>
Join Meeting
</Link>
</div>
))}
</div>
</div>
);
}
```
The above code will send a a `GET` request to your Strapi backend to fetch all the meetings that the active your is a participant using the Strapi **[filter](https://docs-v4.strapi.io/dev-docs/api/entity-service/filter)** query and populate all the relation fields using the **[populate](https://docs.strapi.io/dev-docs/api/rest/populate-select)** query.
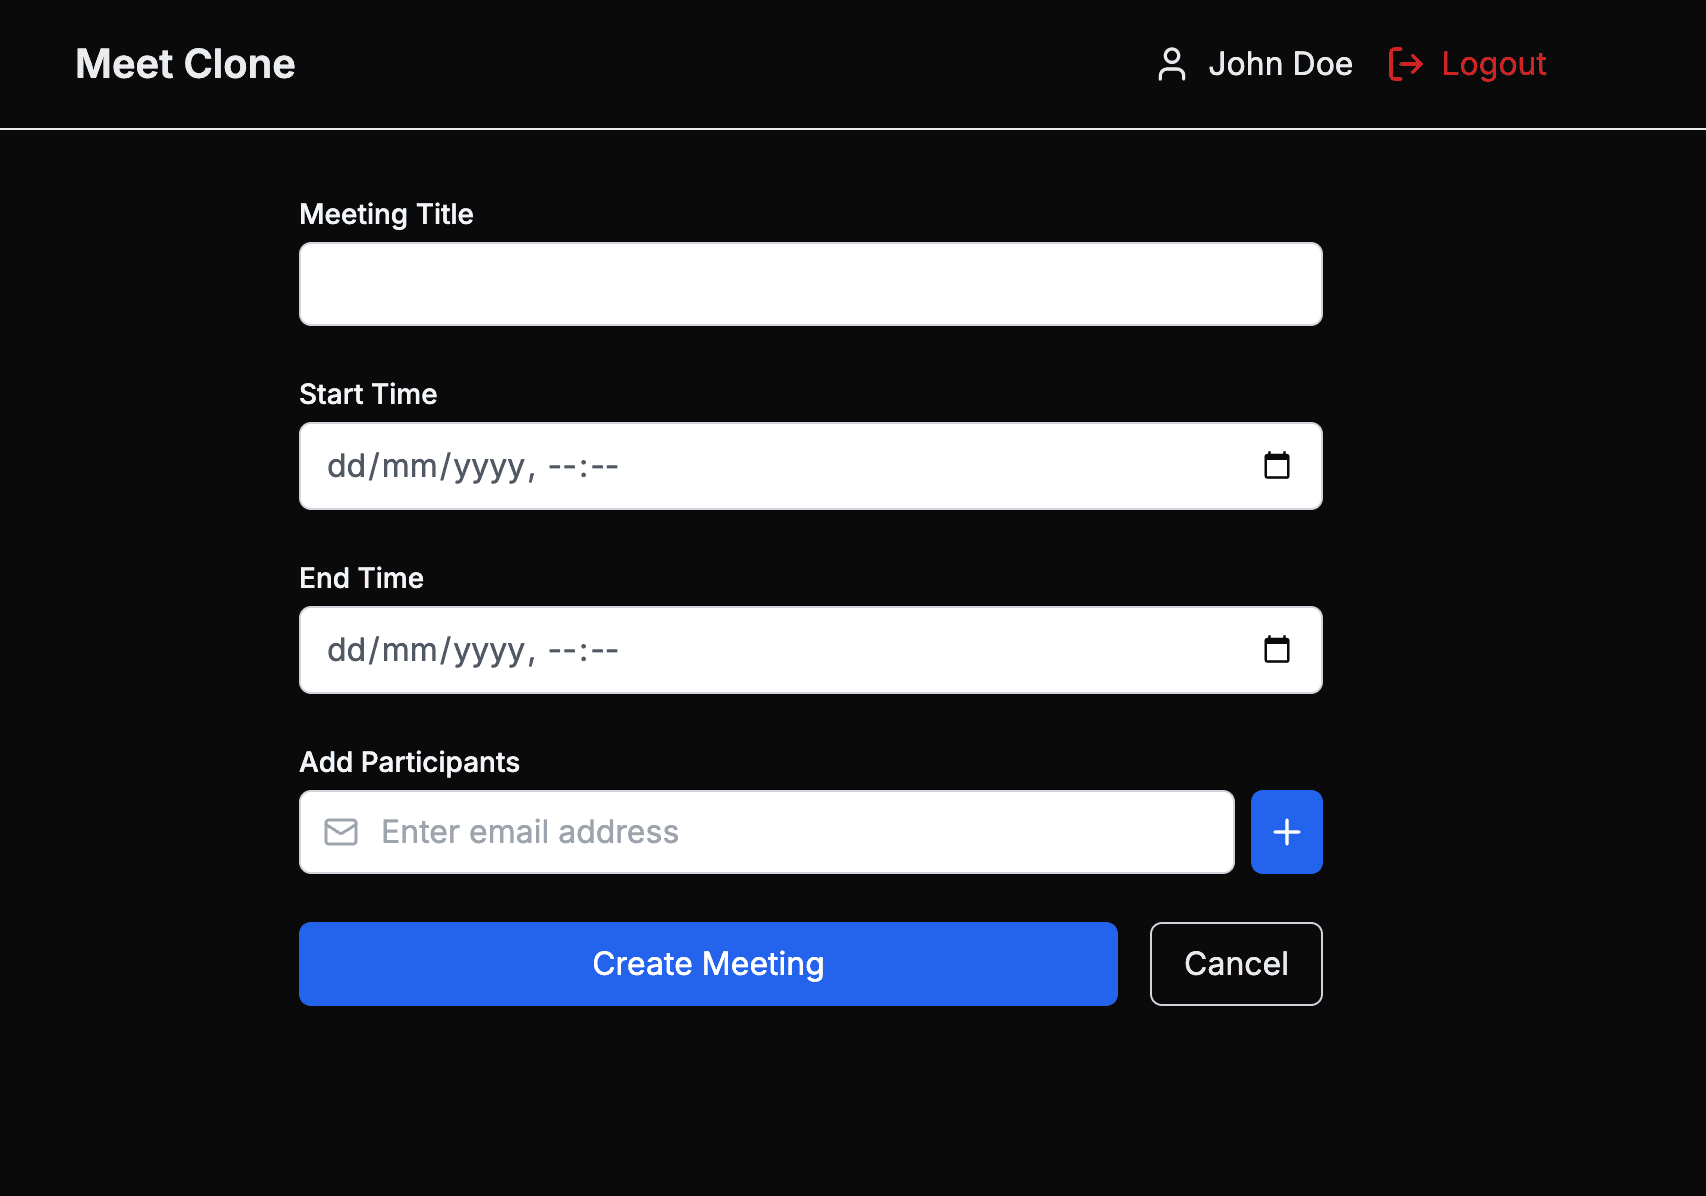
### Creating a New Meeting
Create a new meeting page in `app/meetings/new/page.tsx` to allow users create meetings and add participants:
```typescript
"use client";
import { useState } from "react";
import { useRouter } from "next/navigation";
import { X, Plus, Mail, Loader2 } from "lucide-react";
import apiClient from "@/lib/api-client";
interface FormErrors {
title?: string;
startTime?: string;
endTime?: string;
email?: string;
}
export default function NewMeetingForm() {
const [title, setTitle] = useState("");
const [startTime, setStartTime] = useState("");
const [endTime, setEndTime] = useState("");
const [email, setEmail] = useState("");
const [participantEmails, setParticipantEmails] = useState<string[]>([]);
const [errors, setErrors] = useState<FormErrors>({});
const [isLoading, setIsLoading] = useState(false);
const router = useRouter();
const validateEmail = (email: string) => {
const emailRegex = /^[^\s@]+@[^\s@]+\.[^\s@]+$/;
return emailRegex.test(email);
};
const addParticipant = () => {
if (!email.trim()) {
setErrors({ ...errors, email: "Email is required" });
return;
}
if (!validateEmail(email)) {
setErrors({ ...errors, email: "Invalid email format" });
return;
}
if (participantEmails.includes(email)) {
setErrors({ ...errors, email: "Email already added" });
return;
}
setParticipantEmails([...participantEmails, email.trim()]);
setEmail("");
setErrors({ ...errors, email: undefined });
};
const removeParticipant = (emailToRemove: string) => {
setParticipantEmails(participantEmails.filter(email => email !== emailToRemove));
};
const validateForm = () => {
const newErrors: FormErrors = {};
if (!title.trim()) {
newErrors.title = "Title is required";
}
if (!startTime) {
newErrors.startTime = "Start time is required";
}
if (!endTime) {
newErrors.endTime = "End time is required";
}
if (startTime && endTime && new Date(startTime) >= new Date(endTime)) {
newErrors.endTime = "End time must be after start time";
}
if (startTime && new Date(startTime) < new Date()) {
newErrors.startTime = "Start time cannot be in the past";
}
return newErrors;
};
const handleSubmit = async (e: React.FormEvent) => {
e.preventDefault();
const formErrors = validateForm();
if (Object.keys(formErrors).length > 0) {
setErrors(formErrors);
return;
}
setIsLoading(true);
try {
const response = await apiClient.post("/meetings", {
data: {
title,
startTime,
endTime,
isActive: false,
participantEmails,
},
});
if (response.data.meta?.invalidEmails?.length > 0) {
// Handle invalid emails if needed
console.warn("Some emails were invalid:", response.data.meta.invalidEmails);
}
router.push("/meetings");
} catch (error) {
console.error("Failed to create meeting:", error);
// You might want to show an error notification here
} finally {
setIsLoading(false);
}
};
return (
<form onSubmit={handleSubmit} className="space-y-6 max-w-lg mx-auto">
<div>
<label className="block text-sm font-medium text-gray-100">
Meeting Title
</label>
<input
type="text"
value={title}
onChange={(e) => setTitle(e.target.value)}
className={`mt-1 block w-full rounded-md border text-gray-600 border-gray-300 px-3 py-2 ${
errors.title ? 'border-red-500' : ''
}`}
required
/>
{errors.title && (
<p className="mt-1 text-sm text-red-500">{errors.title}</p>
)}
</div>
<div>
<label className="block text-sm font-medium text-gray-100">
Start Time
</label>
<input
type="datetime-local"
value={startTime}
onChange={(e) => setStartTime(e.target.value)}
className={`mt-1 block w-full rounded-md border text-gray-600 border-gray-300 px-3 py-2 ${
errors.startTime ? 'border-red-500' : ''
}`}
required
/>
{errors.startTime && (
<p className="mt-1 text-sm text-red-500">{errors.startTime}</p>
)}
</div>
<div>
<label className="block text-sm font-medium text-gray-100">
End Time
</label>
<input
type="datetime-local"
value={endTime}
onChange={(e) => setEndTime(e.target.value)}
className={`mt-1 block w-full rounded-md border text-gray-600 border-gray-300 px-3 py-2 ${
errors.endTime ? 'border-red-500' : ''
}`}
required
/>
{errors.endTime && (
<p className="mt-1 text-sm text-red-500">{errors.endTime}</p>
)}
</div>
<div>
<label className="block text-sm font-medium text-gray-100">
Add Participants
</label>
<div className="flex gap-2">
<div className="flex-1">
<div className="relative">
<Mail className="absolute left-3 top-1/2 transform -translate-y-1/2 text-gray-400" size={18} />
<input
type="email"
value={email}
onChange={(e) => setEmail(e.target.value)}
onKeyPress={(e) => {
if (e.key === 'Enter') {
e.preventDefault();
addParticipant();
}
}}
placeholder="Enter email address"
className={`mt-1 block w-full rounded-md border text-gray-600 border-gray-300 pl-10 pr-3 py-2 ${
errors.email ? 'border-red-500' : ''
}`}
/>
</div>
{errors.email && (
<p className="mt-1 text-sm text-red-500">{errors.email}</p>
)}
</div>
<button
type="button"
onClick={addParticipant}
className="mt-1 p-2 bg-blue-600 text-white rounded-md hover:bg-blue-700"
>
<Plus size={20} />
</button>
</div>
{participantEmails.length > 0 && (
<div className="mt-3 space-y-2">
{participantEmails.map((email) => (
<div
key={email}
className="flex items-center justify-between p-2 bg-gray-700 rounded-md"
>
<span className="text-sm text-gray-200">{email}</span>
<button
type="button"
onClick={() => removeParticipant(email)}
className="text-gray-400 hover:text-red-500"
>
<X size={16} />
</button>
</div>
))}
</div>
)}
</div>
<div className="flex gap-4">
<button
type="submit"
disabled={isLoading}
className="flex-1 bg-blue-600 text-white py-2 px-4 rounded-md hover:bg-blue-700 disabled:opacity-50 disabled:cursor-not-allowed flex items-center justify-center gap-2"
>
{isLoading ? (
<>
<Loader2 className="animate-spin" size={20} />
Creating...
</>
) : (
'Create Meeting'
)}
</button>
<button
type="button"
onClick={() => router.push("/meetings")}
className="px-4 py-2 border border-gray-300 rounded-md hover:bg-gray-700"
>
Cancel
</button>
</div>
</form>
);
}
```
The above code creates a new meeting that uses the `apiClient` we set up earlier. It manages form state for meeting details (`title`, `start/end` times) and `participant` emails using React's `useState` hooks. The form includes client-side validation for emails and meeting times, with a neat feature that lets users add multiple participant emails through a dynamic list interface. When the form is submitted, it validates all inputs, sends the data to the server using the `apiClient`, and handles invalid email responses.
Now update your `app/page.tsx` file to render the `MeetingsPage`:
```typescript
import MeetingsPage from "./meetings/page";
export default function Home() {
return <MeetingsPage />;
}
```
## Github Source Code
The complete source code for this tutorial is available on [GitHub](https://github.com/icode247/google-meet-clone).
## Conclusion
We've successfully set up the backend for our Google Meet clone using Strapi 5. We've created the necessary content types, implemented custom authentication features, and added meeting management functionality.
We've implemented the following:
- User authentication with Zustand
- Protected routes with middleware
- Meeting management interface, listing meetings, and creating new meetings.
- Responsive UI with Tailwind CSS
In the next and final part, we'll add real-time video conferencing using [WebRTC](https://webrtc.org/), Chat functionality, Screen sharing capabilities, Meeting controls and participant management.
 Sign in with Wallet


