# Projection Matrix
要把3D物體投射到電腦2D的螢幕上,要辦到這件事情就是要靠我們的投影矩陣來達成,基本上就是把原本在觀察座標(View coordinate)的頂點轉換到裁剪座標(Clip coordinate)。
投影矩陣分為兩種,一種是正交投影(Orthogonal)和透視投影(Perspective)兩種,差別在於正交投影裡面的平行線就是平行線永不相交;而透視投影比較貼近現實,越遠的東西會越小,且也會逐漸聚在中心成一個點。
因為裁剪坐標是齊次座標(Homogeneous coordinate)的一種,所以除了x, y, z之外還會多一個 w 分量,接著要轉回常見的三維座標,這時會做透視除法(Perspective division),將 x, y 與 z 都除以 w 分量,才會變成標準設備座標(Normalize Device Coordinate),然後再經過所謂的視口變換(Viewport transform),才會是最後的螢幕座標(Screen Coordinate)。
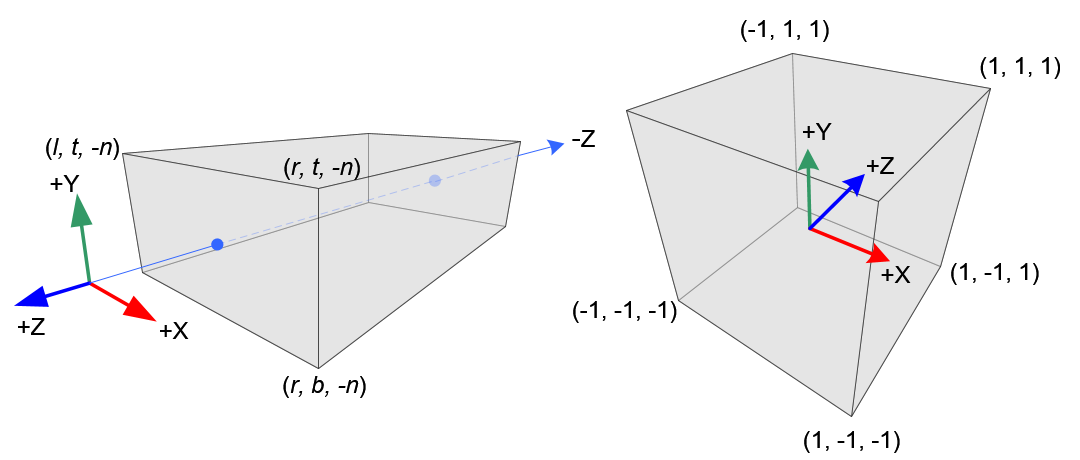
投影矩陣通常都會需要6個參數,分別是: left, right, bottom, top, near, far。
特別注意,我們假設在裁剪空間的一點 $P_p(x_p, y_p, z_p, w_p)$,如果 $x_p, y_p, z_p$ 任數值大於 $w_p$ 或小於 $-w_p$ 都會被裁剪掉,所以就不會呈現在畫面上了。
那至於投影矩陣是如何生成的,這裡將講解其原理過程:
> 以下投影矩陣將是以 OpenGL 為範例說明,想了解 DirectX 的話請看這裡。
## Perspective
先來探討透視投影,因為這比較難。
我們假設6個參數分別為:$l, r, b, t, n, f$,這些參數的意思就是告訴我們要把在x軸 $[l, r]$ 映射到 $[-1, 1]$;y軸 $[b, t]$ 映射到 $[-1, 1]$ ;z軸 $[-n, -f]$ 映射到 $[-1, 1]$ 的意思。

>特別注意觀察空間是屬於右手座標系統,也就是說Z軸是朝攝影機(攝影機看向Z負軸),而NDC則是屬於左手座標系統,所以Z軸會是相反的,所以 near 和 far 要記得變負數。
可以知道的是說我們要把在觀察座標上的點映射到我們的近平面上,我們先不要管 y 的部分先看 z 軸,它的部分很簡單,就是統一變成 $-n$,但 x 怎麼處理呢?我們可以利用**相似三角形(Similar Triangles)**,下圖中有咖啡色和紫色框起來的三角形,這兩個三角形的三個角度都一樣,只是長度不一樣,所以根據性質這兩個三角形的三個邊彼此是有比例關係的,所以算法如下:

$$
\frac{x_p}{x_e} = \frac{-n}{z_e} => x_p = -\frac{n}{z_e}x_e
$$
所以說y軸的話同理,你只需要從不同角度去看(由x正軸向x負軸看去即可),得:
$$
\frac{y_p}{y_e} = \frac{-n}{z_e} => y_p = -\frac{n}{z_e}y_e
$$
這時你會發現,$x_p$ 和 $y_p$ 都是依賴於 $z_e$,因為它們都有除以 $-z_e$ ,我們也知道當裁剪空間要轉換成 NDC 時也會除以 $w_p$ ,所以我們可以讓 $w_p = -z_e$,這樣也可推導出投影矩陣的第四列:
$$
\begin{bmatrix}\cdot & \cdot & \cdot & \cdot \\ \cdot & \cdot & \cdot & \cdot \\ \cdot & \cdot & \cdot & \cdot \\ 0 & 0 & -1 & 0 \end{bmatrix}
$$
而接下來換求 $x_{ndc}$ 和 $y_{ndc}$,因為 $x_p$ 和 $y_p$ 都是要映射至 NDC 的 $-1$ 到 $1$ 之間,我們就採用線性轉換的方式(y=ax+b),記住 $x$ 軸是 $[l, r]$ 變成 $[-1, 1]$;$y$ 軸是 $[b, t]$ 變成 $[-1, 1]$:
$$
x_{ndc} = \frac{1-(-1)}{r-l}x_p + \beta
$$
帶入 $(r, 1)$ 進去 $(x_p, x_{ndc})$ 化簡得:
$$
1 = \frac{2r}{r-l} + \beta
$$
之後求$\beta$:
$$
\beta = 1 - \frac{2r}{r-l} = \frac{r-l}{r-l} - \frac{2r}{r-l} = \frac{-l-r}{r-l} = -\frac{r+l}{r-l}
$$
所以我們得出式子:
$$
x_{ndc} = \frac{2x_p}{r-l} - \frac{r+l}{r-l}
$$
y軸基本上也同理:
$$
y_{ndc} = \frac{1-(-1)}{t-b}y_p + \beta
$$
帶入 $(t, 1)$ 進去 $(y_p, y_{ndc})$ 化簡得:
$$
1 = \frac{2t}{t-b} + \beta
$$
之後求$\beta$:
$$
\beta = 1 - \frac{2t}{t-b} = \frac{t-b}{t-b} - \frac{2t}{t-b} = \frac{-b-t}{t-b} = -\frac{t+b}{t-b}
$$
所以我們得出式子:
$$
y_{ndc} = \frac{2y_p}{t-b} - \frac{t+b}{t-b}
$$
接著,代入我們剛剛算好的 $x_p$ 和 $y_p$:
$$
x_{ndc} = \frac{2 \cdot \frac{nx_e}{-z_e}}{r-l} - \frac{r+l}{r-l} = \frac{2n \cdot x_e}{(r-l)(-z_e)} - \frac{r+l}{r-l}
$$
$$
= \frac{\frac{2n}{r-l} \cdot x_e}{-z_e} + \frac{\frac{r+l}{r-l} \cdot z_e}{-z_e} = \left( \underbrace{\frac{2n}{r-l} \cdot x_e + \frac{r+l}{r-l} \cdot z_e}_{x_c} \right) \cdot \frac{1}{-z_e}
$$
---
$$
y_{ndc} = \frac{2 \cdot \frac{ny_e}{-z_e}}{t-b} - \frac{t+b}{t-b} = \frac{2n \cdot y_e}{(t-b)(-z_e)} - \frac{t+b}{t-b}
$$
$$
= \frac{\frac{2n}{t-b} \cdot y_e}{-z_e} + \frac{\frac{t+b}{t-b} \cdot z_e}{-z_e} = \left( \underbrace{\frac{2n}{t-b} \cdot y_e + \frac{t+b}{t-b} \cdot z_e}_{y_c} \right) \cdot \frac{1}{-z_e}
$$
如此一來我們就可以推導出我們的投影矩陣的第一二列了:
$$
\begin{bmatrix}\frac{2n}{r-l} & 0 & \frac{r+l}{r-l} & 0 \\ 0 & \frac{2n}{t-b} & \frac{t+b}{t-b} & 0 \\ \cdot & \cdot & \cdot & \cdot \\ 0 & 0 & -1 & 0 \end{bmatrix}
$$
現在我們只要找出第三列即可,但與先前不一樣的是,因為我們把觀察空間中的 $z$ 值統一映射到近平面 $-n$ 上,但我們還是需要獨一的 $z$ 值來進行後續的深度測試(Depth test)。這邊 $z$ 值並不依賴於 $x$ 和 $y$ 值,所以我們只能借助 $w$ 來取得 $z_{ndc}$ 與 $z_e$ 之間的關係:
$$
\begin{bmatrix}x_c\\y_c\\z_c\\w_c\end{bmatrix} = \begin{bmatrix}\frac{2n}{r-l} & 0 & \frac{r+l}{r-l} & 0 \\ 0 & \frac{2n}{t-b} & \frac{t+b}{t-b} & 0 \\ 0 & 0 & A & B \\ 0 & 0 & -1 & 0 \end{bmatrix} \cdot \begin{bmatrix}x_e\\y_e\\z_e\\w_e\end{bmatrix} \quad , \quad z_{ndc} = z_c / w_c = \frac{Az_e + Bw_e}{-z_e}
$$
在觀察空間,$w_e$等於1,所以說等式會變成這樣:
$$
z_{ndc} = \frac{Az_e + B}{-z_e}
$$
現在我們只需要找出A跟B的值就好,我們代入$(z_e, z_{ndc}) = (-n, -1)和(-f, 1)$,我們會得到以下方程式:
$$
\frac{-An + B}{n} = -1 \quad => \quad -An + B = -n \\
\frac{-Af + B}{f} = 1 \quad => \quad -Af + B = f
$$
我們藉由等式1可知:
$$
B = An - n
$$
代入等式2後可得:
$$
-Af + (An - n) = f \quad => \quad -(f - n)A = f + n
$$
$$
A = -\frac{f+n}{f-n}
$$
然後再把A代回等式1求B:
$$
\frac{f+n}{f-n}n + B = -n \\
=> \quad B = -n - \frac{f+n}{f-n}n \\ = -\left(1 + \frac{f+n}{f-n} \right)n \\ =-\frac{f-n+f+n}{f-n}n \\ = -\frac{2fn}{f-n}
$$
恭喜,我們將整個透視矩陣求出來啦:
$$
\begin{bmatrix}\frac{2n}{r-l} & 0 & \frac{r+l}{r-l} & 0 \\ 0 & \frac{2n}{t-b} & \frac{t+b}{t-b} & 0 \\ 0 & 0 & -\frac{f+n}{f-n} & -\frac{2fn}{f-n} \\ 0 & 0 & -1 & 0 \end{bmatrix}
$$
然而我們可以再化簡,通常投射矩陣的方錐體(Frustum)通常是對稱的,所以說$r = -l$, $t = -b$,所以我們可以得出以下結論:
$$
r + l = 0, r - l = 2r; \quad t + b = 0; t - b = 2t;
$$
所以最終的透視矩陣為:
$$
\begin{bmatrix}\frac{n}{r} & 0 & 0 & 0 \\ 0 & \frac{n}{t} & 0 & 0 \\ 0 & 0 & \frac{-(f+n)}{f-n} & \frac{-2fn}{f-n} \\ 0 & 0 & -1 & 0 \end{bmatrix}
$$
> 特別注意 $z_e$ 和 $z_{ndc}$ 的關係,它們彼此之間是一個非線性的關係,所以說當一個物體很近時它的 $z$ 精度會很高,但距離一拉長精度卻會大幅降低。
### Field Of View
而現今的透視投影需要的是四個參數:視野廣度(FOV)、畫面比例(Aspect Ratio)、近平面 $n$ 以及遠平面 $f$。視野廣度可以代表人眼睛的可見範圍,通常指的是【垂直視野的夾角】,通常設定為$45^\circ$,因為看起來比較正常,FOV越小可見範圍就會越小,所以畫面看起來就像是放大(Zoom In)的感覺,而數值越大看起來畫面就會開始變形。注意:FOV不可大於等於180度。
> 人的垂直視野大概是$40^\circ$,最大可到$70^\circ$。
所以說知道了FOV我們就可以求出投影矩陣需要的 $t$ 與 $b$,我們使用三角函數的方式來推算:

我們如果要求 $t$ 值,就需要知道 $\overline{BC}$ 長度為何,而我們可以發現,它是 $\angle CAB$ 的對邊(Opposite),所以$\overline{AB}$ 為鄰邊(Adjacent)、$\overline{AC}$ 為斜邊(Hypotenuse);而我們知道 $\tan$ 是對邊除以鄰邊,那我們只要將 $\tan$ 與鄰邊相乘幾可求出對邊長,至於鄰邊長為何,我們可以知道它就是 $n$ ,公式如下:
$$
\tan(\frac{FOV}{2}) = \frac{\overline{BC}}{\overline{AB}} = \frac{t}{n} \\
=> t = \tan(\frac{FOV}{2}) \cdot n
$$
因為是相呼對稱,所以 $b = -t$,如此一來我們垂直高度已經求出了!。
再來,就是要求水平寬度,如果你的畫面(攝影機、螢幕、視窗大小)是正方形的,那恭喜你很簡單,寬度等於高度,所以:
$$
r = t, \quad l = -r
$$
但現今的螢幕通常是長方形的,比例也不完全相同,所以我們需要長寬比(Aspect Ratio),透過它來推算我們的寬應該要是多少:
$$
r = t \cdot Aspect, \quad l = -r;
$$
> 注意我們這邊所講的長寬比,預設都是寬除以高哦!
所以說,我們的透視矩陣變為:
$$
\begin{bmatrix}
\frac{n}{\tan(FOV / 2) \cdot n \cdot Aspect} & 0 & 0 & 0 \\
0 & \frac{n}{\tan(FOV / 2) \cdot n} & 0 & 0 \\
0 & 0 & \frac{-(f+n)}{f-n} & \frac{-2fn}{f-n} \\
0 & 0 & -1 & 0
\end{bmatrix}
$$
然後化簡最終就變成:
$$
\begin{bmatrix}
\frac{1}{\tan(FOV / 2) \cdot aspect} & 0 & 0 & 0 \\
0 & \frac{1}{\tan(FOV / 2)} & 0 & 0 \\
0 & 0 & \frac{-(f + n)}{f-n} & \frac{-2fn}{f-n} \\
0 & 0 & -1 & 0
\end{bmatrix}
$$
> 因為 FOV 度數會除以 2,所以當 FOV 為 $180^\circ$ 時,會變成 $\tan{90^\circ}$,注意這在數學是無意義的,而當度數大於180時,$\tan$ 出來的數值都會是負的,這也不合邏輯。
### Code
程式碼如下(Implement on C++):
```cpp=
glm::mat4 GetPerspectiveProjMatrix(float fovy, float ascept, float znear, float zfar) {
glm::mat4 proj = glm::mat4(1.0f);
proj[0][0] = 1 / (tan(fovy / 2) * ascept);
proj[1][0] = 0;
proj[2][0] = 0;
proj[3][0] = 0;
proj[0][1] = 0;
proj[1][1] = 1 / (tan(fovy / 2));
proj[2][1] = 0;
proj[3][1] = 0;
proj[0][2] = 0;
proj[1][2] = 0;
proj[2][2] = -(zfar + znear) / (zfar - znear);
proj[3][2] = (-2 * zfar * znear) / (zfar - znear);
proj[0][3] = 0;
proj[1][3] = 0;
proj[2][3] = -1;
proj[3][3] = 0;
return proj;
}
```
> 注意要此程式要 include glm,另外 OpenGL 採用的矩陣是 Column-Major Order(指的是記憶體的 Layout)。
## Orthogonal
正交投影相對來說就簡單了許多,它就像是一個長方體你直接擷取,裡面所有東西都要投射到近平面上,但完全不會產生越遠的物體越小這種視覺效果,平行線就是平行,原理如下:
所以說三軸基本上都是簡單的線性轉換,$x$ 軸是 $[l, r]$ 變成 $[-1, 1]$;$y$ 軸是 $[b, t]$ 變成 $[-1, 1]$;$z$ 軸是 $[-n, -f]$ 變成 $[-1, 1]$:
$$
x_{ndc} = \frac{1-(-1)}{r-l}x_e + \beta \\
y_{ndc} = \frac{1-(-1)}{t-b}y_e + \beta \\
z_{ndc} = \frac{1-(-1)}{-f-(-n)}z_e + \beta \\
$$
基本上就是各別帶入 $(r, 1)$、$(t, 1)$、$(-f, 1)$ 去計算,這邊過程就不特別贅述了,最後求出的式子為:
$$
x_{ndc} = \frac{2x_e}{r-l} - \frac{r+l}{r-l} \\
y_{ndc} = \frac{2y_e}{t-b} - \frac{t+b}{t-b} \\
z_{ndc} = \frac{-2z_e}{f-n} - \frac{f+n}{f-n} \\
$$
而 $w$ 值對於正交投影也不用有什麼特殊計算,就繼續等於 1 即可,所以正交投影矩陣為:
$$
\begin{bmatrix}
\frac{2}{r-l} & 0 & 0 & -\frac{r+l}{r-l} \\
0 & \frac{2}{t-b} & 0 & -\frac{t+b}{t-b} \\
0 & 0 & -\frac{2}{f-n} & -\frac{f+n}{f-n} \\
0 & 0 & 0 & 1
\end{bmatrix}
$$
那如果說是相互對稱的話,$r = -l$, $t = -b$,所以我們可以得出以下結論:
$$
r + l = 0, r - l = 2r; \quad t + b = 0; t - b = 2t;
$$
所以最終的正交投影矩陣為:
$$
\begin{bmatrix}
\frac{1}{r} & 0 & 0 & 0 \\
0 & \frac{1}{t} & 0 & 0 \\
0 & 0 & -\frac{2}{f-n} & -\frac{f+n}{f-n} \\
0 & 0 & 0 & 1
\end{bmatrix}
$$
### Code
程式碼如下(Implement on C++):
```cpp=
glm::mat4 GetOrthoProjMatrix(float left, float right, float bottom, float top, float near, float far) {
glm::mat4 proj = glm::mat4(1.0f);
proj[0][0] = 2 / (right - left);
proj[1][0] = 0;
proj[2][0] = 0;
proj[3][0] = - (right + left) / (right - left);
proj[0][1] = 0;
proj[1][1] = 2 / (top - bottom);
proj[2][1] = 0;
proj[3][1] = - (top + bottom) / (top - bottom);
proj[0][2] = 0;
proj[1][2] = 0;
proj[2][2] = -2 / (far - near);
proj[3][2] = - (far + near) / (far - near);
proj[0][3] = 0;
proj[1][3] = 0;
proj[2][3] = 0;
proj[3][3] = 1;
return proj;
}
```
## Inverse Depth buffer
我們可以在片段著色器中獲取深度值,該值介於0到1之間:
```glsl=
gl_FragCoord.z
```
一般來說我們的投影矩陣就會把物品的 $z$ 值映射到近平面與遠平面之間,預設就是非線性的,如果想要將深度值改為線性模式,我們就必須要先反轉掉投影矩陣的轉換。
首先我們先將深度值從 Screen coordinates 轉為 NDC,這邊只是做做簡單的域值轉換,$[0, 1]$ 到 $[-1, 1]$:
$$
z_{ndc} = 2z_w - 1;
$$
目前我們只是從 Window Coordinates 轉換成 Normalized Device Coordinates,而我們必須逆轉換投影矩陣對 $z_e$ 的非線性轉換,我們知道它的公式為:
$$
z_{ndc} = (\frac{f+n}{n-f} \cdot z_e + \frac{2fn}{n-f} ) \cdot \frac{1}{-z_e}
$$
化簡後得:
$$
z_{ndc} = -\frac{z_e(f+n) + 2fn}{z_e(n-f)}
$$
接著開始逆向推倒:
$$
z_{ndc} \cdot z_e(n-f) = -(z_e(f+n) + 2fn) \\
=> z_{ndc}z_en - z_{ndc}z_ef = -z_ef - z_en - 2fn \\
=> z_{ndc}z_en - z_{ndc}z_ef + 2fn = -z_ef - z_en \\
=> 2fn = -z_ef - z_en - z_{ndc}z_en + z_{ndc}z_ef \\
=> 2fn = -z_e(f + n + z_{ndc}n - z_{ndc}f) \\
=> \frac{2fn}{(f + n + z_{ndc}n - z_{ndc}f)} = -z_e \\
=> z_e = -\frac{2fn}{(f + n - z_{ndc}(f - n))} \\
$$
最後,我們所求出來的 $z_e$ 是在觀察世界,相機面向負 $z$ 軸,所以$z_e$ 為負,但用於計算深度時,我們要將其乘上 $-1$,所以實作於 code 時語法如下:
```glsl=
float z = gl_FragCoord.z * 2.0 - 1.0;
float linearDepth = (2.0 * far * near) / (far + near - z * (far - near));
```
## Reference
http://www.songho.ca/opengl/gl_projectionmatrix.html
https://www.scratchapixel.com/lessons/3d-basic-rendering/perspective-and-orthographic-projection-matrix/opengl-perspective-projection-matrix
https://learnopengl.com/Advanced-OpenGL/Depth-testing
###### tags: `OpenGL`
 Sign in with Wallet


