## 概述
在上一篇 [自底向上学习以太坊(一):从助记词到Calldata](https://hackmd.io/@4seasstack/learneth01) 中,我们介绍了助记词、私钥、公钥、地址和交易的 ABI 编码部分。
以下代码显示了目前最常见的执行层交易的 [EIP1559](https://eips.ethereum.org/EIPS/eip-1559) 交易类型。以下字段中的 `signature` 部分已经在此前进行了介绍,而 `payload` 一般符合我们在上一节内介绍的 ABI 编码。但存在部分情况,比如 EOA 之间进行信息交流时,`payload` 代表信息而不是调用合约的 `data`。
```python
@dataclass
class Transaction1559Payload:
chain_id: int = 0
signer_nonce: int = 0
max_priority_fee_per_gas: int = 0
max_fee_per_gas: int = 0
gas_limit: int = 0
destination: int = 0
amount: int = 0
payload: bytes = bytes()
access_list: List[Tuple[int, List[int]]] = field(default_factory=list)
signature_y_parity: bool = False
signature_r: int = 0
signature_s: int = 0
@dataclass
class Transaction1559Envelope:
type: Literal[2] = 2
payload: Transaction1559Payload = Transaction1559Payload()
```
在本节中,我们将主要介绍去其余的字段,主要集中在以下内容:
1. `signer_nonce` 参数,该参数控制交易顺序,相当多有趣的问题会出现在 `nonce` 设置上
2. `gas` 有关参数,我们将特别介绍执行层交易的 EIP-1559 规范,此规范引入了 `max_priority_fee_per_gas` 和 `max_fee_per_gas` 交易参数,以及在区块中引入了一系列参数如 `gas_target` 等
在本节的最后,我们会讨论 RLP 编码,这部分内容与交易签名内容和交易编码有直接关系。RLP 编码是以太坊执行层底层最常用的编码方法。
## Nonce
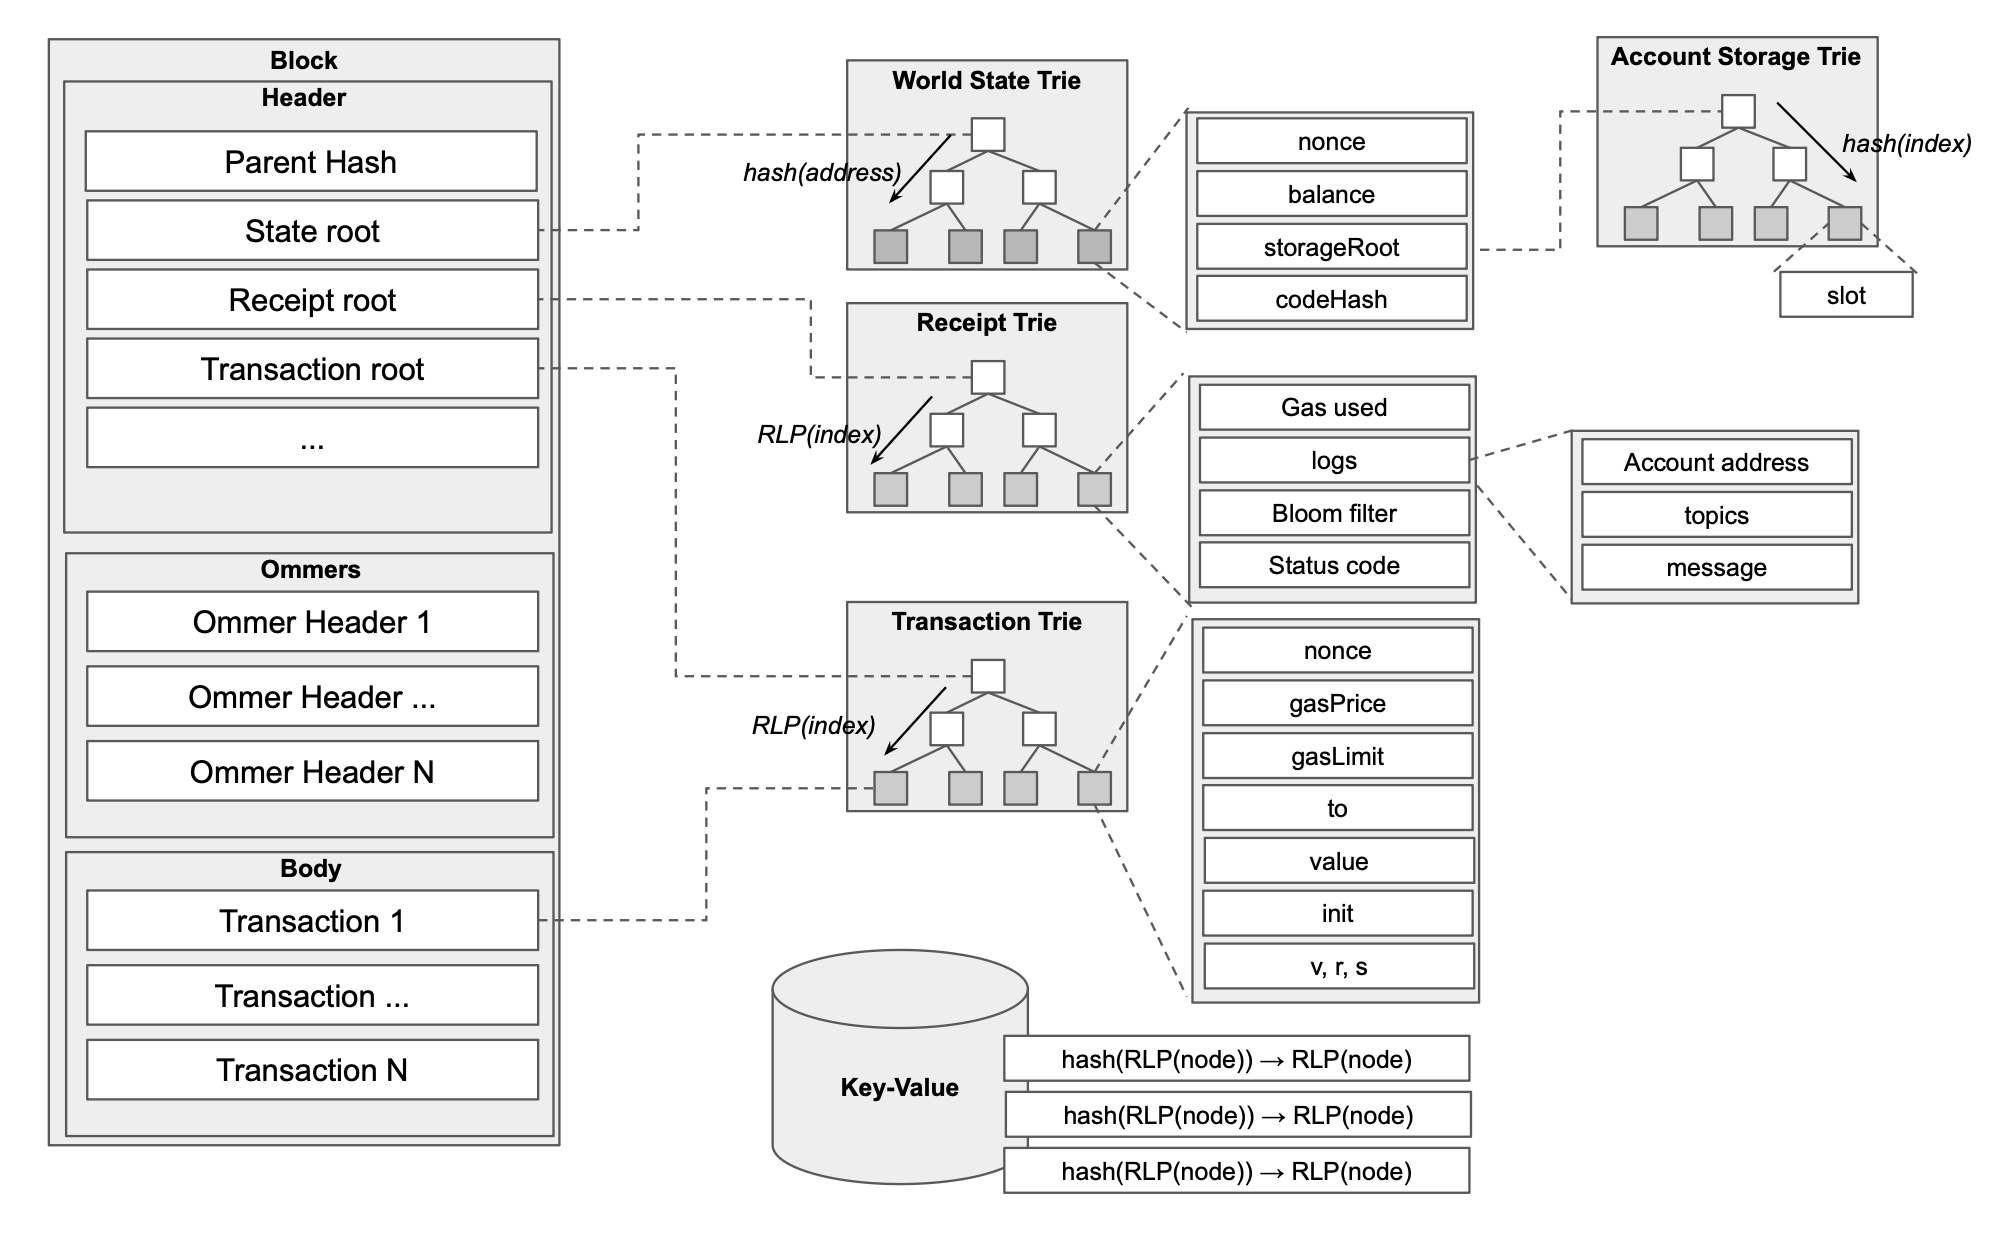
在以太坊状态中,所有的状态都可以使用下图表示:
对于 EOA 而言,Account 的 `nonce` 是一个重要的账户状态,我们可以通过 `cast nonce` 获取某一个地址的 Nonce 值:
```bash
cast nonce 0xd8dA6BF26964aF9D7eEd9e03E53415D37aA96045 --rpc-url https://eth.drpc.org
```
上述命令的返回值可以被认为是该地址在过去发送的所有交易的数量。实际上,以太坊是允许我们在任意区块处回放交易或者读取数据,所以大部分 `cast` 指令,包括 `cast nonce` 指令都可以传入 `--block` 参数来实现在过去区块内读取数据的功能,比如:
```bash
cast nonce 0xd8dA6BF26964aF9D7eEd9e03E53415D37aA96045 -B 23615120 --rpc-url https://eth.drpc.org
```
上述返回值为 `1599`。当然,对于 `cast call` 等指令,我们在过去区块进行调用则要求使用的 RPC 服务商开启了归档功能。大部分情况下,我们使用的节点都是全节点,全节点只会保留过去一定数量(一般为 256 区块,但 reth 会保留过去 10064 区块的状态来保证 RPC 调用,具体可以参考 [Reth 文档](https://reth.rs/run/faq/pruning#rpc-support))的所有信息,我们可以在一定范围内任意回溯进行读取调用,而归档节点具有真正的全数据,可以在任意过去区块内进行调用。但是需要注意,全节点内只是影响上图中 World State 内的部分,仍会保留全部的 `event` 等数据。
我们首先讨论 Nonce 最基础的属性,即节点会按照 Nonce 的顺序执行交易。我们可以首先使用 `anvil` 启动本地测试网,然后使用 `cast send` 指令直接发送间断 nonce 的交易。
```bash
cast send 0xa0Ee7A142d267C1f36714E4a8F75612F20a79720 --value 0.05ether --nonce 1 --private-key $PRIVATE_KEY --async
cast send 0xa0Ee7A142d267C1f36714E4a8F75612F20a79720 --value 0.05ether --nonce 2 --private-key $PRIVATE_KEY --async
```
上述命令中的 `--async` 是因为默认情况下 `cast` 指令会在同步情况下进行交易,发起交易后会一直阻塞终端等待交易的返回值,而使用 `--async` 时,Foundry 会直接返回交易哈希然后退出。假如我们不带着 `--async` 使用 `cast send` 命令,那么我们就会一直被卡住在终端直到超时。
我们使用 `cast tx-pool inspect` 指令观察当前内存池内的交易情况,我们活动的输出如下:
```json
TxpoolInspect {
pending: {
0xf39fd6e51aad88f6f4ce6ab8827279cfffb92266: {
"1": TxpoolInspectSummary {
to: Some(
0xa0ee7a142d267c1f36714e4a8f75612f20a79720,
),
value: 50000000000000000,
gas: 21000,
gas_price: 2000000001,
},
"2": TxpoolInspectSummary {
to: Some(
0xa0ee7a142d267c1f36714e4a8f75612f20a79720,
),
value: 50000000000000000,
gas: 21000,
gas_price: 2000000001,
},
},
},
queued: {},
}
```
我们可以看到由于 `0xf39fd6e51aad88f6f4ce6ab8827279cfffb92266` 并没有发送 `nonce = 0` 的交易,所有后续所有的交易都被卡在内存池内,我们可以直接发起 `nonce = 0` 的交易观察一下结果:
```bash
Transaction: 0xd60b73887a9f123d3a6fdb041b2067f9a8804cef7db22a0d8bb1386c75e5fb24
Gas used: 21000
Transaction: 0x6016b5ad9e0252718272c7320555d0b9fe9b471d17770a6d68d17893026f080b
Gas used: 42000
Transaction: 0x04ed1d0bef7695fc2aee3cf09fb505fbf0226fe8a760ae354996054f02fad659
Gas used: 63000
```
我们可以看到所有内存池内的交易都已经被执行打包上链。当然,一般很难出现 nonce 断裂(有时被称为 nonce gap)导致的交易无法被执行,一般来说只有在开发者手动介入 Nonce 生成时才会出现这种问题。在后文中,我们将介绍如何手动控制 nonce 值来实现一些特殊目的,所以假如读者使用了后文中的方案有可能遇到 nonce 断裂的情况。
一种刚常见的情况时使用 nonce 值解决交易被卡在内存池的情况。我们首先在 Sepolia 测试网内构建一笔会被卡在内存池内的交易:
```bash
cast send 0x11475691C2CAA465E19F99c445abB31A4a64955C --value 0.0005ether --gas-price 8 --priority-gas-price 0 --async --account sepolia
```
此处的 `--gas-price` 应该被设置为目前最新区块的 base fee 而 `--priority-gas-price 0` 的目标是通过不给定优先费用来实现交易卡在内存池的目的。在后文中,我们会称此处使用 `--gas-price` 给定的值为 `max_fee_per_gas`。接下来,我们可以使用 `cast tx` 指令观察到该交易的 `blockHash` 为空,这说明交易没有被打包。此时我们可以通过以下命令观察到一些不同:
```bash
cast nonce 0xdFaF16328A960703F59ee35a7B5953b2483007Ee
cast nonce 0xdFaF16328A960703F59ee35a7B5953b2483007Ee -B pending
```
上述两条命令返回值更好差 `1`,此处的 `-B pending` 指令是指根据当前 mempool 的情况计算地址的 nonce 值。我们可以通过以下命令直接替换还在内存池内的交易:
```bash
cast send 0x11475691C2CAA465E19F99c445abB31A4a64955C --value 0.0005ether --gas-price 15 --priority-gas-price 15 --async --account sepolia --nonce $NONCE
```
实际上,我们可以将还在内存池内的交易替换为任意交易。当我们遇到交易因为 gas 较低被卡在内存池中时,我们可以利用上述方法替换自己的交易。
在 [EIP7702](https://eips.ethereum.org/EIPS/eip-7702) 引入后,EOA 的nonce 连续性被破坏了。简单来说,EIP7702 中引入的 `SET_CODE_TX_TYPE` 交易。该交易形式如下:
```
rlp([chain_id, nonce, max_priority_fee_per_gas, max_fee_per_gas, gas_limit,
destination, value, data, access_list, authorization_list, signature_y_parity,
signature_r, signature_s])
```
我们可以注意到该交易内容中包含 `authorization_list` 一项,该项内容如下:
```python
assert auth.chain_id < 2**256
assert auth.nonce < 2**64
assert len(auth.address) == 20
assert auth.y_parity < 2**8
assert auth.r < 2**256
assert auth.s < 2**256
```
所有位于 `auth` 内部的地址都会在验证签名正确后都会在 EOA 对应的 `code` 状态内写入一段特定代码用于委托调用,我们在后文介绍 `delegatecall` 时会继续分析 EIP7702 的工作原理。在此处,我们需要知道所有位于 `authorization_list` 内部且可以通过签名校验的账户都会 nonce 增加 1。
而且与正常交易一致,发送 `SET_CODE_TX_TYPE` 类型交易的 EOA 的 nonce 也会自增 1。这意味着用户 A 假如在 `authorization_list` 内填入自己的地址,那么发起一次交易会导致 nonce 增加 2. 这打破了过去一次交易只会将 EOA 的 nonce 增加 1 的常规情况。
EIP-7702 前,geth 等客户端会利用 nonce 快速判断用户的交易是否可以被执行,这是因为 nonce 增加一定意味着用户 ETH 余额的降低,反之账户 ETH 余额的降低一定意味着 nonce 增加。我们可以使用 `nonce` 计算出当前用户需要支付的 ETH 数量与账户余额是否匹配。geth 内 `ValidateTransactionWithState` 中存在如下代码:
```go
spent := opts.ExistingExpenditure(from)
if prev := opts.ExistingCost(from, tx.Nonce()); prev != nil {
bump := new(big.Int).Sub(cost, prev)
need := new(big.Int).Add(spent, bump)
if balance.Cmp(need) < 0 {
return fmt.Errorf("%w: balance %v, queued cost %v, tx bumped %v, overshot %v", core.ErrInsufficientFunds, balance, spent, bump, new(big.Int).Sub(need, balance))
}
} else {
need := new(big.Int).Add(spent, cost)
if balance.Cmp(need) < 0 {
return fmt.Errorf("%w: balance %v, queued cost %v, tx cost %v, overshot %v", core.ErrInsufficientFunds, balance, spent, cost, new(big.Int).Sub(need, balance))
}
// Transaction takes a new nonce value out of the pool. Ensure it doesn't
// overflow the number of permitted transactions from a single account
// (i.e. max cancellable via out-of-bound transaction).
if opts.UsedAndLeftSlots != nil {
if used, left := opts.UsedAndLeftSlots(from); left <= 0 {
return fmt.Errorf("%w: pooled %d txs", ErrAccountLimitExceeded, used)
}
}
}
```
但是显然 EIP7702 打破了上述 nonce 与账户余额的互逆关系,我们可以通过第三方调用使用 EIP7702 的账户,实现不增加账户 nonce 的情况下直接将账户内的 ETH 全部转移出去。这带来了潜在的 DoS 攻击向量,攻击者可以发起一连串交易到节点内部,然后在某个时刻利用 7702 合约调用清空账户资产导致后续所有内存池内的交易都因为余额不足而失效。所以 EIP7702 建议节点限制使用 EIP7702 合约委托账户的内存池交易数量。以下代码显示了 geth 内的限制,简单来说只允许 EIP7702 账户最多在内存池内存在一笔 pending 交易:
```go
// checkDelegationLimit determines if the tx sender is delegated or has a
// pending delegation, and if so, ensures they have at most one in-flight
// **executable** transaction, e.g. disallow stacked and gapped transactions
// from the account.
func (pool *LegacyPool) checkDelegationLimit(tx *types.Transaction) error {
from, _ := types.Sender(pool.signer, tx) // validated
// Short circuit if the sender has neither delegation nor pending delegation.
if pool.currentState.GetCodeHash(from) == types.EmptyCodeHash && !pool.all.hasAuth(from) {
return nil
}
pending := pool.pending[from]
if pending == nil {
// Transaction with gapped nonce is not supported for delegated accounts
if pool.pendingNonces.get(from) != tx.Nonce() {
return ErrOutOfOrderTxFromDelegated
}
return nil
}
// Transaction replacement is supported
if pending.Contains(tx.Nonce()) {
return nil
}
return txpool.ErrInflightTxLimitReached
}
```
对于智能合约工程师而言,假如 EOA 进行合约部署交易,那么部署合约的地址只与交易发起者的地址和 nonce 有关。我们可以直接使用 `cast` 命令进行计算:
```bash
cast compute-address 0xdFaF16328A960703F59ee35a7B5953b2483007Ee --nonce 0
```
在本节的最后,我们介绍 Nonce 在开发过程中的使用和管理。大部分情况下,开发者都不需要手动管理 `nonce` 值,一般框架在发起交易时会自动帮开发者处理。但是这种自动管理往往都依赖于 RPC 交互获得返回值,具体来说,`viem` 等框架会调用 `eth_getTransactionCount` 方法获得返回值并以此作为 nonce 的基础,相关代码如下:
```typescript
if (parameters.includes('nonce') && typeof nonce === 'undefined' && account) {
if (nonceManager) {
const chainId = await getChainId()
request.nonce = await nonceManager.consume({
address: account.address,
chainId,
client,
})
} else {
request.nonce = await getAction(
client,
getTransactionCount,
'getTransactionCount',
)({
address: account.address,
blockTag: 'pending',
})
}
}
```
但在时间敏感性应用构建时,我们就需要考虑手动管理的方法,即手动指定上文代码内的 `nonceManager`。以下代码就是一个需要使用 `nonceManager` 的案例:
```typescript
import { createWalletClient, http, parseEther } from "viem";
import { anvil } from "viem/chains";
import { privateKeyToAccount } from "viem/accounts";
const account = privateKeyToAccount(
"0xac0974bec39a17e36ba4a6b4d238ff944bacb478cbed5efcae784d7bf4f2ff80",
);
const walletClient = createWalletClient({
chain: anvil,
account,
transport: http(),
});
[...new Array(3)].map(async (_) => {
const hash = await walletClient.sendTransaction({
to: "0xa0Ee7A142d267C1f36714E4a8F75612F20a79720",
value: parseEther("0.05"),
});
console.log(hash);
});
```
该代码在执行后只会成功执行第一笔交易,剩下的交易都会触发如下报错:
```
URL: http://127.0.0.1:8545
Request body: {"method":"eth_sendRawTransaction","params":["0x02f873827a6980843b9aca00848321560082520894a0ee7a142d267c1f36714e4a8f75612f20a7972087b1a2bc2ec5000080c080a04cef89fcd6eb8976db24a0284f88059683953f32ebc95326019be48826991410a05519dad361fead743ca858f49f4530f4c565162f4abd4d705e3320ddc4d13a96"]}
Details: nonce too low
```
`nonce too low` 的报错提醒我们发送的交易 `nonce` 值存在问题,出现这种报错的原因是在 typescript 我们进行异步交易发送,此时所有交易受制于 RPC 调用返回值的缓存问题,后续交易都使用了同一个 `nonce` 值。所以解决方法是切换为本地的 `nonceManager` 而不是借助于 RPC 服务返回值。`nonceManager` 的接口要求如下:
```typescript
export type NonceManager = {
/** Get and increment a nonce. */
consume: (
parameters: FunctionParameters & { client: Client },
) => Promise<number>
/** Increment a nonce. */
increment: (chainId: FunctionParameters) => void
/** Get a nonce. */
get: (chainId: FunctionParameters & { client: Client }) => Promise<number>
/** Reset a nonce. */
reset: (chainId: FunctionParameters) => void
}
```
我们可以直接使用 `viem` 已经编写好的 `nonceManager` 组件,将上述代码修改为:
```typescript
const account = privateKeyToAccount(
"0xac0974bec39a17e36ba4a6b4d238ff944bacb478cbed5efcae784d7bf4f2ff80",
{
nonceManager: createNonceManager({
source: jsonRpc(),
}),
},
);
```
## Gas
Gas 是 EVM 工程师最关心的问题之一。由于图灵机存在停机问题,简单来说,我们无法预先知道某一段代码是否可以在一段时间内停止执行,所以我们引入了 Gas 概念。我们不在数学上研究一段代码何时会结束运行,而是给定一定数量 gas(total gas),并规定每一个 EVM opcode 所需要的 gas。每执行一个 opcode,我们就会 total gas 内减去当前 opcode 消耗的 gas,我们一般称上述减法的结果为 `gasleft` 。当代码执行结束或者 gasleft 为 0 时,我们就停止 EVM 执行。
对于 opcode 所需要 gas 数量问题,最简单的方法是直接查询 [evm.codes](https://www.evm.codes/) 内的 `Minimum Gas` 栏目,或者更好的办法是直接阅读 [execution-specs](https://github.com/ethereum/execution-specs)。该规范使用 Python 语言描述了以太坊执行层内的所有标准,比如 [prague/vm/gas.py](https://github.com/ethereum/execution-specs/blob/forks/osaka/src/ethereum/forks/prague/vm/gas.py) 就描述了 Prague 升级后的 gas 情况:
```python
GAS_JUMPDEST = Uint(1)
GAS_BASE = Uint(2)
GAS_VERY_LOW = Uint(3)
GAS_STORAGE_SET = Uint(20000)
GAS_STORAGE_UPDATE = Uint(5000)
```
> 我的个人习惯是对于简单的如 `swap` / `jumpi` 等 gas 计算较为简单的 opcode 直接使用 evm.codes 给出的结果,但对于 `mstore` / `sstore` / `call` 等复杂 opcode 的 gas 计算,我一般选择直接阅读 python 版本的 spec
在此处,我们阅读一些 EVM 内最昂贵的操作码 `SSTORE` 的 gas 计算方法。该 opcode 的作用是写入以太坊状态。我们可以将以太坊状态视为一个 Key-Value 数据库,`sstore(key, value)` 会接受 key 和 value 两个参数并将其写入以太坊状态。
```python
def sstore(evm: Evm) -> None:
"""
Stores a value at a certain key in the current context's storage.
Parameters
----------
evm :
The current EVM frame.
"""
# STACK
key = pop(evm.stack).to_be_bytes32()
new_value = pop(evm.stack)
if evm.gas_left <= GAS_CALL_STIPEND:
raise OutOfGasError
state = evm.message.block_env.state
original_value = get_storage_original(
state, evm.message.current_target, key
)
current_value = get_storage(state, evm.message.current_target, key)
gas_cost = Uint(0)
if (evm.message.current_target, key) not in evm.accessed_storage_keys:
evm.accessed_storage_keys.add((evm.message.current_target, key))
gas_cost += GAS_COLD_SLOAD
if original_value == current_value and current_value != new_value:
if original_value == 0:
gas_cost += GAS_STORAGE_SET
else:
gas_cost += GAS_STORAGE_UPDATE - GAS_COLD_SLOAD
else:
gas_cost += GAS_WARM_ACCESS
# Refund Counter Calculation
if current_value != new_value:
if original_value != 0 and current_value != 0 and new_value == 0:
# Storage is cleared for the first time in the transaction
evm.refund_counter += int(GAS_STORAGE_CLEAR_REFUND)
if original_value != 0 and current_value == 0:
# Gas refund issued earlier to be reversed
evm.refund_counter -= int(GAS_STORAGE_CLEAR_REFUND)
if original_value == new_value:
# Storage slot being restored to its original value
if original_value == 0:
# Slot was originally empty and was SET earlier
evm.refund_counter += int(GAS_STORAGE_SET - GAS_WARM_ACCESS)
else:
# Slot was originally non-empty and was UPDATED earlier
evm.refund_counter += int(
GAS_STORAGE_UPDATE - GAS_COLD_SLOAD - GAS_WARM_ACCESS
)
charge_gas(evm, gas_cost)
if evm.message.is_static:
raise WriteInStaticContext
set_storage(state, evm.message.current_target, key, new_value)
# PROGRAM COUNTER
evm.pc += Uint(1)
```
我们可以按照以下逻辑分析上述代码:
1. 操作的存储槽如果不在 `access lists` 中,则 gas 增加 `GAS_COLD_SLOAD = 2100` ,但在这笔交易后续的数据写入过程中则不需要再次缴纳此费用
2. 在此交易内,用户第一次修改某个存储槽内容,如果该存储槽在交易前为空,则用户需要缴纳 `GAS_STORAGE_SET = 20000`;而如果此存储槽在交易前不为空,则用户缴纳 `GAS_STORAGE_UPDATE(5000) - GAS_COLD_SLOAD(2100) = 2900`
3. 在此交易内,用户第 n 次(n > 1) 修改存储槽内容,则只需要缴纳 `GAS_WARM_ACCESS = 100`
此处的 `access lists` 就是在本文开始部分展示的 `Transaction1559Payload` 内的 `access_list` 字段。我们可以通过向该字段填入地址和 storage slot 实现在交易中预先为 storage slots 支付 `GAS_COLD_SLOAD` 。该机制的存在是有其历史原因的。[EIP-2929](https://eips.ethereum.org/EIPS/eip-2929) 增加 `GAS_COLD_SLOAD` 机制,这增加了 `sstore` 的成本。这导致过去一些古老的直接将 gas 数值固定的合约会因为 gas 问题无法执行,所以在 [EIP-2930](https://eips.ethereum.org/EIPS/eip-2930) 内引入了 `access lists` 机制来避免该部分问题。需要注意的是,`TX_ACCESS_LIST_STORAGE_KEY_COST = 1900`,所以使用 `access list` 机制会为每一个 slots 的初次访问带来 200 gas 折扣。
上述 `sstore` 代码的后半部分在处理 Gas Refund 问题。Gas Refund 会在交易结束后用于抵扣交易过程中的 gas 消耗。此处需要特别注意,我们不会使用 gas left + gas refund 作为当前 EVM 剩余 gas。在交易过程中,只有 gas left 会被视为可被使用 gas 而 gas refund 只会在交易结束后抵消一部分 gas 消耗:
```python
# For EIP-7623 we first calculate the execution_gas_used, which includes
# the execution gas refund.
tx_gas_used_before_refund = tx.gas - tx_output.gas_left
tx_gas_refund = min(
tx_gas_used_before_refund // Uint(5), Uint(tx_output.refund_counter)
)
tx_gas_used_after_refund = tx_gas_used_before_refund - tx_gas_refund
# Transactions with less execution_gas_used than the floor pay at the
# floor cost.
tx_gas_used_after_refund = max(
tx_gas_used_after_refund, calldata_floor_gas_cost
)
tx_gas_left = tx.gas - tx_gas_used_after_refund
gas_refund_amount = tx_gas_left * effective_gas_price
# For non-1559 transactions effective_gas_price == tx.gas_price
priority_fee_per_gas = effective_gas_price - block_env.base_fee_per_gas
transaction_fee = tx_gas_used_after_refund * priority_fee_per_gas
# refund gas
sender_balance_after_refund = get_account(
block_env.state, sender
).balance + U256(gas_refund_amount)
```
上述代码中的 `calldata_floor_gas_cost` 是 Prague 升级的 [EIP-7623](https://eips.ethereum.org/EIPS/eip-7623) 引入的,该机制用于避免 L2 仍使用 calldata 作为 DA 层。在 EIP-7623 引入前,交易使用的 gas(`gasUsed`) 计算方法如下:
```go
tx.gasUsed = (
21000
+ STANDARD_TOKEN_COST * tokens_in_calldata
+ execution_gas_used
+ isContractCreation * (32000 + INITCODE_WORD_COST * words(calldata))
)
```
但在 EIP-7623 引入后,交易的 `gasUsed` 计算如下:
```go
tx.gasUsed = (
21000
+
max(
STANDARD_TOKEN_COST * tokens_in_calldata
+ execution_gas_used
+ isContractCreation * (32000 + INITCODE_WORD_COST * words(calldata)),
TOTAL_COST_FLOOR_PER_TOKEN * tokens_in_calldata
)
)
```
此处的 `TOTAL_COST_FLOOR_PER_TOKEN = 10`。该机制的作用原理是 L2 发布的 calldata 只具有数据作用,所以这种交易的 `execution_gas_used` 几乎为 0,目前引入 EIP-7623 后,我们通过 `TOTAL_COST_FLOOR_PER_TOKEN * tokens_in_calldata` 对这种只发布数据的 calldata 交易进行惩罚,而正常交易因为 `execution_gas_used` 都较大,所以并不会显著受到影响。从上述公式中,我们可以看到即使交易内不包含任何 calldata 也不会触发任何合约交互,那么该交易的 gas 为 21000,实际上这就是 ETH 转账交易。
回到 `sstore` 的 gas refund 机制,该 Gas Refund 机制必须发生在 `current_value` 与 `new_value` 不同的情况下,在这种情况下,gas refund 可以使用以下语言描述:
1. `original_value != 0` 的情况下,`new_value == 0`,等同于清空了 storage,此时 `refund_counter` 会增加 `GAS_STORAGE_CLEAR_REFUND = 4800`. 当然,假如合约又将已清空的 storage 内写入非零数据,那么 Gas Refund 会被撤销
2. `original_value == new_value` 的情况下,等同于复原 storage。此时,假如 `original_value == 0`,那么 `refund_counter` 会增加 `GAS_STORAGE_SET - GAS_WARM_ACCESS` ,而假如 `original_value != 0` ,那么 `refund_counter` 会增加 `GAS_STORAGE_UPDATE - GAS_COLD_SLOAD - GAS_WARM_ACCESS`
Gas 与用户实际支付的 ETH 数量之间还存在 `gas price` 的联系。在 spec 内存在如下代码:
```python
effective_gas_fee = tx.gas * effective_gas_price
gas = tx.gas - intrinsic_gas
increment_nonce(block_env.state, sender)
sender_balance_after_gas_fee = (
Uint(sender_account.balance) - effective_gas_fee - blob_gas_fee
)
set_account_balance(
block_env.state, sender, U256(sender_balance_after_gas_fee)
)
```
我们可以看到与我们的认知不符,以太坊实际上会首先按照 `tx.gas` 直接收取 ETH,然后在 EVM 执行结束后根据用户真实的 gas 使用情况进行 refund 处理。
在 EIP-1559 交易中,交易内部包含 `max_priority_fee_per_gas` 和 `max_fee_per_gas` 两部分。为了理解这部分内容,我们需要对 EIP-1559 后的以太坊区块 gas 进行介绍。在 EIP-1559 升级后,以太坊内部 gas 被划分为两部分:
1. Base Fee 基础交易费用,假如给定的 gas 小于 base fee,那么当前区块一定无法被打包,base fee 部分会被 burn 以实现 ETH 通缩
2. Priority Fee 优先费用,优先费用会作为打包者额外收益
对于以太坊节点而言,计算 Base Fee 是需要共识的。我们
```python
def calculate_base_fee_per_gas(
block_gas_limit: Uint,
parent_gas_limit: Uint,
parent_gas_used: Uint,
parent_base_fee_per_gas: Uint,
) -> Uint:
"""
Calculates the base fee per gas for the block.
Parameters
----------
block_gas_limit :
Gas limit of the block for which the base fee is being calculated.
parent_gas_limit :
Gas limit of the parent block.
parent_gas_used :
Gas used in the parent block.
parent_base_fee_per_gas :
Base fee per gas of the parent block.
Returns
-------
base_fee_per_gas : `Uint`
Base fee per gas for the block.
"""
parent_gas_target = parent_gas_limit // ELASTICITY_MULTIPLIER
if not check_gas_limit(block_gas_limit, parent_gas_limit):
raise InvalidBlock
if parent_gas_used == parent_gas_target:
expected_base_fee_per_gas = parent_base_fee_per_gas
elif parent_gas_used > parent_gas_target:
gas_used_delta = parent_gas_used - parent_gas_target
parent_fee_gas_delta = parent_base_fee_per_gas * gas_used_delta
target_fee_gas_delta = parent_fee_gas_delta // parent_gas_target
base_fee_per_gas_delta = max(
target_fee_gas_delta // BASE_FEE_MAX_CHANGE_DENOMINATOR,
Uint(1),
)
expected_base_fee_per_gas = (
parent_base_fee_per_gas + base_fee_per_gas_delta
)
else:
gas_used_delta = parent_gas_target - parent_gas_used
parent_fee_gas_delta = parent_base_fee_per_gas * gas_used_delta
target_fee_gas_delta = parent_fee_gas_delta // parent_gas_target
base_fee_per_gas_delta = (
target_fee_gas_delta // BASE_FEE_MAX_CHANGE_DENOMINATOR
)
expected_base_fee_per_gas = (
parent_base_fee_per_gas - base_fee_per_gas_delta
)
return Uint(expected_base_fee_per_gas)
```
我们会首先计算当前的区块的 gas 目标 `parent_gas_target`,目标值会被设定在 `parent_gas_limit / 2` 的数值。目前 `parent_gas_limit` 被共识为 4500 万 gas,但是目前下一次 [Fusaka 升级](https://ethereum.org/roadmap/fusaka/#set-default-gas-limit-to-60-million) 准备引入 [EIP-7935](https://eips.ethereum.org/EIPS/eip-7935) 将 gas limit 设置为 6000 万 gas。
> 6000 万 gas limit 不是以太坊社区直接决定的,这背后包括一系列来自 [ethPandaOps](https://ethpandaops.io/) 的数据和研究进行支持,比如:
>
> 1. [60M Gas Limit on Sepolia & Hoodi](https://ethpandaops.io/posts/60m-gas-sepolia-hoodi/)
> 2. [Scaling Ethereum: The Path to 45M Gas Limit and Beyond](https://ethpandaops.io/posts/gaslimit-scaling/)
>
> 另一个有趣事实是 [EIP-3756](https://eips.ethereum.org/EIPS/eip-3756) 将区块的 gas limit 设置为 3000 万 gas,但后续由 [Pump the Gas](https://pumpthegas.org/) 多次组织以太坊社区成员共识更高的 gas limit,他们首先提议 36M gas limit 然后在最近提议 45M gas limit,这些提议都被社区共识。我们可以在 [gaslimit](https://gaslimit.pics/) 网站上看到目前验证者的 gas limit 情况
当我们具有 `parent_gas_target` 后,我们会根据上一个区块的是否达成目标决定当前区块的 gas 值,具体分为以下两种情况:
第一种情况是 `parent_gas_used == parent_gas_target` 。这种情况意味着上一个区块恰好满足目标要求,所以当前区块的 gas 与 `parent_base_fee_per_gas` 一致,并不需要 gas 调整。
第二种情况是 `parent_gas_used != parent_gas_target`。在这种情况下,我们需要调整 `base_fee_per_gas`。首先,我们需要计算 `gas_used_delta`,该数值等同于上一个区块使用的 gas 与目标 gas 的差值,然后我们会计算 `gas_used_delta / parent_gas_target` 的数值,最后使用该数值除 8 后的结果与 `parent_base_fee_per_gas` 相乘计算出最终的 `base_fee_per_gas_delta`。
举一个极端案例,假如上一个区块被全部占满,那么 `gas_used_delta / parent_gas_target = 1`,进一步计算 `base_fee_per_gas_delta = 1 / 8 = 12.5%`,这意味着当前区块的 base fee per gas 会被设置为上一个区块的 112.5%. 在严重拥堵情况下,以太坊可以连续几个区块被填满,gas 会以 1.125 的指数级增长。
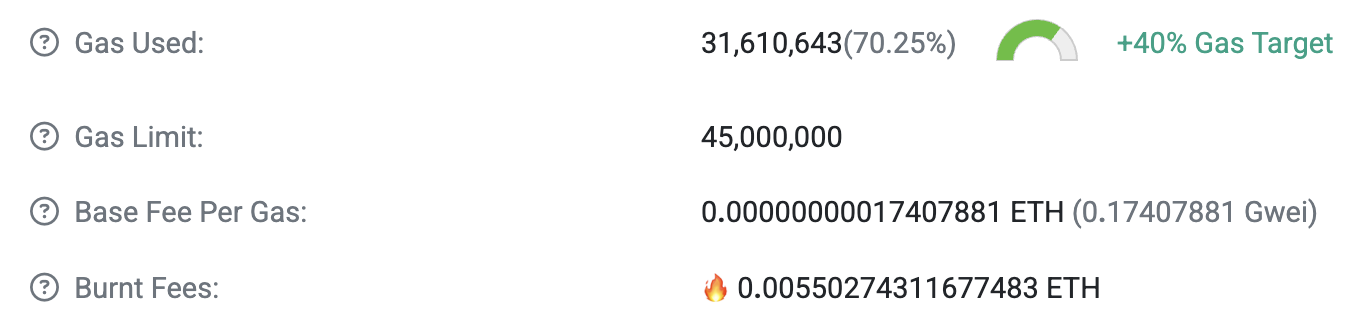
以 [区块 23662050](https://etherscan.io/block/23662050) 为例,该区块的 Gas Used 为 `31,610,643`,那么可以计算出 `gas_used_delta = 9110643`,进一步可以计算出 ``gas_used_delta / parent_gas_target = 40.4917%`,进一步计算可以获得下一个区块的 base fee per gas 的数值应该是 `18288974`. 该数值与区块链浏览器显示 [区块 23662051](https://etherscan.io/block/23662051) 的几乎一致。不一致性来自计算误差,读者可以尝试在更高的计算精度下进行计算。
这就是以太坊的 gas 机制,对于节点而言,节点只需要计算 base fee per gas 即可,区块内打包的交易的 gas 不得低于区块的 base fee per gas,这是由区块共识机制决定的,即使使用 MEV 中继服务商发送交易也需要满足该要求。在上文中,我们介绍了以太坊 EIP1559 交易允许用户给定 `max_priority_fee_per_gas` 和 `max_fee_per_gas` 两部分。这些数据的功能是什么?
`max_priority_fee_per_gas` 用于向节点内存池说明当前交易最多可以支付的优先费用,而 `max_fee_per_gas` 用于规定用户交易的 base fee。简单来说,`max_fee_per_gas = base_fee + max_priority_fee_per_gas`。换言之,用户发起的交易并没有真正约定 base fee,而节点通过 `max_fee_per_gas` 判断当前交易是否可以被纳入内存池,假如用户的 `max_fee_per_gas < block.base_fee_per_gas` 意味着用户所预期支付的最高 gas 仍无法满足区块要求,这种交易可以直接返回报错。
对于 `max_fee_per_gas > block.base_fee_per_gas` 的情况,内存池会计算 `effective_gas_price`,计算方法如下:
```python
priority_fee_per_gas = min(
tx.max_priority_fee_per_gas,
tx.max_fee_per_gas - block_env.base_fee_per_gas,
)
effective_gas_price = priority_fee_per_gas + block_env.base_fee_per_gas
max_gas_fee = tx.gas * tx.max_fee_per_gas
```
简单来说,`max_priority_fee_per_gas` 规定了最高的 `priority_fee`,但在某些情况下,由于 `base_fee_per_gas` 的存在,所以节点内的交易真实的 `priority_fee` 会被修正为 `tx.max_fee_per_gas - block_env.base_fee_per_gas`. 一般来说,我们会将 `max_fee_per_gas` 视为一种对波动 base fee 的适应。我们可以通过拉高 `max_fee_per_gas` 避免自己的交易因为 base fee 问题被逐出内存池,Binance 就使用了该策略,比如 [此交易](https://etherscan.io/tx/0x638ae491931482910a4041a4c185675a590683202b8d1292b1b4b95747386b9e):

在一些资料中,比如 BlockNative 建议 `max_fee_per_gas` 使用以下方法计算:
```
Max Fee = (2 * Base Fee) + Max Priority Fee
```
上述公式可以保证及时连续 6 个满区块,用户的交易仍可以上链。在大部分情况下,我们都会使用 gwei 作为 gas 的单位,满足 1 gwei = 1000000000 wei 的换算关系。
在本节的最后,我们讨论一下交易在内存池(mempool) 内的情况。geth 的内存池存在以下基础配置:
```go
// DefaultConfig contains the default configurations for the transaction pool.
var DefaultConfig = Config{
Journal: "transactions.rlp",
Rejournal: time.Hour,
PriceLimit: 1,
PriceBump: 10,
AccountSlots: 16,
GlobalSlots: 4096 + 1024, // urgent + floating queue capacity with 4:1 ratio
AccountQueue: 64,
GlobalQueue: 1024,
Lifetime: 3 * time.Hour,
}
```
其中 `Journal` 代表内存池持久化的文件名,而 `Rejournal` 代表间隔多长时间进行一次持久化。`PriceLimit` 代表内存池接受到最小 gas price 交易,而 `PriceBump` 代表我们使用 nonce 进行交易替换,替换后的交易相比替换前的交易 gas price 应该上涨的百分比,假如替换交易的 gas price 上涨低于 10% 内存池会抛出错误。而 `AccountSlots` 代表在 pending 队列中单个账户最多可以保存的交易数量,而 `GlobalSlots` 类似,指的是 pending 队列中最多可以包含多少笔交易。所谓 Pending 队列指的是满足 base fee 要求可以随时打包进入区块的交易,与之对应的另一个概念是 `Queue`,该队列内保存有当前区块不可打包但可能在未来可以被打包的交易。最后的 `Lifetime` 指的是单笔交易在内存池可以存续的最长时间。默认情况下,在内存池内存续大于 3 小时的交易就会被清理。
## RLP 编码
RLP 编码是构建以太坊交易的核心技术,因为以太坊内的所有的交易都使用 RLP 编码方法。相关的交易编码方法如下:
```python
def encode_transaction(tx: Transaction) -> LegacyTransaction | Bytes:
"""
Encode a transaction into its RLP or typed transaction format.
Needed because non-legacy transactions aren't RLP.
Legacy transactions are returned as-is, while other transaction types
are prefixed with their type identifier and RLP encoded.
"""
if isinstance(tx, LegacyTransaction):
return tx
elif isinstance(tx, AccessListTransaction):
return b"\x01" + rlp.encode(tx)
elif isinstance(tx, FeeMarketTransaction):
return b"\x02" + rlp.encode(tx)
elif isinstance(tx, BlobTransaction):
return b"\x03" + rlp.encode(tx)
elif isinstance(tx, SetCodeTransaction):
return b"\x04" + rlp.encode(tx)
else:
raise Exception(f"Unable to encode transaction of type {type(tx)}")
```
此处我们主要介绍 EIP1559 类型的交易,即上述代码内的 `FeeMarketTransaction`。该类型交易具体的编码如下:
```
0x02 || rlp([chain_id, nonce, max_priority_fee_per_gas, max_fee_per_gas, gas_limit, destination, amount, data, access_list, signature_y_parity, signature_r, signature_s])
```
这是交易的最终形式,我们首先解决 [上一次课程](https://hackmd.io/@4seasstack/learneth01) 中没有解决的问题,即我们到底使用私钥对那些内容签名。使用 `ox` 库可以写出如下代码:
```typescript
import { Hex, Rlp, Secp256k1, TransactionEnvelopeEip1559, Value } from "ox";
import { serialize } from "ox/TransactionEnvelopeEip4844";
const envelope = TransactionEnvelopeEip1559.from({
chainId: 1,
maxFeePerGas: 10n,
maxPriorityFeePerGas: 1n,
nonce: 0n,
to: "0x70997970c51812dc3a010c7d01b50e0d17dc79c8",
value: Value.fromEther("1.5"),
gas: 21000n,
});
const signature = Secp256k1.sign({
payload: TransactionEnvelopeEip1559.getSignPayload(envelope),
privateKey:
"0xac0974bec39a17e36ba4a6b4d238ff944bacb478cbed5efcae784d7bf4f2ff80",
});
console.log(TransactionEnvelopeEip1559.serialize(envelope));
console.log(TransactionEnvelopeEip1559.getSignPayload(envelope));
```
上述代码会首先计算出待签名内容和待签名内容的哈希值。输出如下:
```bash
0x02e70180010a8252089470997970c51812dc3a010c7d01b50e0d17dc79c88814d1120d7b16000080c0
0xc8d7c7125cbd0b6000ca0d2fb766218de5166c2e192ba043bbd6c425fbdc7e17
```
此处的 `0x02e70180010a8252089470997970c51812dc3a010c7d01b50e0d17dc79c88814d1120d7b16000080c0` 可以是 `0x02 || RLP Data` 获得的。而 RLP 编码的内容可以在 geth 源代码进行签名内容的介绍,此处的代码如下:
```go
func (tx *DynamicFeeTx) sigHash(chainID *big.Int) common.Hash {
return prefixedRlpHash(
DynamicFeeTxType,
[]any{
chainID,
tx.Nonce,
tx.GasTipCap,
tx.GasFeeCap,
tx.Gas,
tx.To,
tx.Value,
tx.Data,
tx.AccessList,
})
}
```
上述代码的 `DynamicFeeTxType = 0x02`,此处我们可以使用 `cast from-rlp e70180010a8252089470997970c51812dc3a010c7d01b50e0d17dc79c88814d1120d7b16000080c0` 获得如下结果:
```
["0x01","0x","0x01","0x0a","0x5208","0x70997970c51812dc3a010c7d01b50e0d17dc79c8","0x14d1120d7b160000","0x",[]]
```
在此处,我们就需要介绍 RLP 编码的规则。RLP 编码的全称是 Recursive-length prefix. RLP 只负责对以下内容进行编码:
1. 字符串(`String`),在编码过程中会被转换为纯粹的二进制数据字节
2. 列表(`list`)
我们主要介绍 RLP 解码过程,流程如下:
1. 根据输入的第一个字节(即前缀)判断解码的数据类型、实际数据的长度和偏移量
2. 根据数据类型和偏移量进行解码
3. 根据第一步返回的实际数据长度寻找下一个前缀并重复解码流程
接下来我们介绍二进制字节解码的规则:
1. 前缀在`[0x00, 0x7f]`范围内,我们认为其自身就是数据,且解码类型为单个二进制字节
2. 前缀为`0x80`,解码数据为空值(如`uint(0)`、`""`等)
3. 前缀为`[0x81, 0xb7]`,解码数据为字符串且前缀后跟长度等于前缀减去 `0x80` 的字符串
4. 前缀为`[0xb8, 0xbf]`,解码数据为字符串,读取前缀后将前缀与`0xb7`相减获得字符串数据的长度,然后按照计算出的长度读取真实的字符串数据
5. 前缀为 `[0xc0, 0xf7]`,解码出的数据为列表,且列表内包含的数据长度等于前缀前去 `0xc0`
6. 前缀为 `[0xf8, 0xff]`,解码出的数据也是列表,但列表的长度为前缀后第一个字节
按照上述方法我们可以对上文内的签名内容进行手动解码:
```
e7 -> 39 bytes list
01
80 -> 0x
01
0a
82 -> 2 bytes
5208
94 -> 20 bytes
70997970c51812dc3a010c7d01b50e0d17dc79c8
88 -> 8 bytes
14d1120d7b160000
80 -> 0x
c0 -> []
```
解码过程已经在上述代码段内进行了介绍。我们签名的内容就是上述 RLP 编码后进行 keccak256 哈希的结果。等待我们完成签名后,我们会将签名与最初的 `envelope` 编码在一起,获得最终的交易:
```typescript
const serialized = TransactionEnvelopeEip1559.serialize(envelope, {
signature,
});
console.log(serialized);
```
我们可以看到上述输出为:
```
0x02f870827a690101843b9aca008252089470997970c51812dc3a010c7d01b50e0d17dc79c88814d1120d7b16000080c001a04cc4d83ac425c0116b2e406fdb9770cb9fdcd5dac3ea89ae075cc88ff492132da01378b296bbcf9bf2ef9159e35a353351f36f99fad47c5de43b5acc8f53450245
```
上述内容就是本节最初出现:
```
0x02 || rlp([chain_id, nonce, max_priority_fee_per_gas, max_fee_per_gas, gas_limit, destination, amount, data, access_list, signature_y_parity, signature_r, signature_s])
```
我们可以对上述内容进行 keccak256 哈希获得交易哈希(transcation hash)。在 spec 内存在如下代码:
```python
def get_transaction_hash(tx: Bytes | LegacyTransaction) -> Hash32:
"""
Compute the hash of a transaction.
This function takes a transaction as a parameter and returns the
keccak256 hash of the transaction. It can handle both legacy transactions
and typed transactions (`AccessListTransaction`, `FeeMarketTransaction`,
etc.).
"""
assert isinstance(tx, (LegacyTransaction, Bytes))
if isinstance(tx, LegacyTransaction):
return keccak256(rlp.encode(tx))
else:
return keccak256(tx)
```
当然,我们可以使用以下命令解码非 `0x02` 部分:
```bash
cast from-rlp f870827a690101843b9aca008252089470997970c51812dc3a010c7d01b50e0d17dc79c88814d1120d7b16000080c001a04cc4d83ac425c0116b2e406fdb9770cb9fdcd5dac3ea89ae075cc88ff492132da01378b296bbcf9bf2ef9159e35a353351f36f99fad47c5de43b5acc8f53450245
```
输出如下:
```
["0x7a69","0x01","0x01","0x3b9aca00","0x5208","0x70997970c51812dc3a010c7d01b50e0d17dc79c8","0x14d1120d7b160000","0x",[],"0x01","0x4cc4d83ac425c0116b2e406fdb9770cb9fdcd5dac3ea89ae075cc88ff492132d","0x1378b296bbcf9bf2ef9159e35a353351f36f99fad47c5de43b5acc8f53450245"]
```
该输出也符合我们的预期。
## World State Tire
在本次课程的最后,我们处理 World State Tire 的 proof 问题。本节部分介绍来自论文 [Ethereum Data Structures](https://arxiv.org/abs/2108.05513) 内的部分章节。重新展示如下以太坊状态全景图:

此处我们需要事先了解 `nibbles` ,所谓 `nibbles` 指的是半字节(4 bit),直观上每一个 `nibbles` 其实就是一个 16 进制表示下的数字。在以太坊 World Trie 内部,我们使用 `nibbles` 作为前缀树的路径。
以太坊的 Merkle-Paricia-Trie Tree(以下简称 MPT Tree) 具有以下形式:

在 MPT Tree 内部,存在以下三种节点:
1. `LeafNode` 由 `rest_of_key` 和 `value` 构成,作为叶节点使用 `value` 直接存储数据,在 geth 内被称为 `hashNode`
2. `ExtensionNode` 由 `key_segment` 和 `next node` 构成,用于压缩路径,比如上文中的 `d3` 压缩,其中 `subnode` 指向下一个节点,在 geth 内被称为 `shortNode`
3. `BranchSubnodes` 是最常见的节点,用于根据 `nibbles` 指向下一个需要查找的节点。在 geth 内被称为 `fullNode`
以上图为例,当我们需要 `a77d337` 的值时,我们会按照以下流程寻找到具体的值:
```
a7 -> Root Extension Node
7 -> Branch Node
d3 -> Extension Node
3 -> Branch Node
7 -> Leaf Node
```
简单来说,我们首先进入 root extension node,然后发现我们消耗了 `a7` 两个 `nibbles`,然后前往 Branch Node。进入 Branch Node 后,我们根据 `a7` 之后的 `7` 选择读取 Branch Node 的 7 号位置,并进入该位置对应的下一个节点,以此类推,我们可以通过遍历需要查找节点的 ID 获得最终结果。在 geth 内部存在如下代码:
```go
key = keybytesToHex(key)
for len(key) > 0 && tn != nil {
switch n := tn.(type) {
case *shortNode:
if !bytes.HasPrefix(key, n.Key) {
// The trie doesn't contain the key.
tn = nil
} else {
tn = n.Val
prefix = append(prefix, n.Key...)
key = key[len(n.Key):]
}
nodes = append(nodes, n)
case *fullNode:
tn = n.Children[key[0]]
prefix = append(prefix, key[0])
key = key[1:]
nodes = append(nodes, n)
case hashNode:
// Retrieve the specified node from the underlying node reader.
// trie.resolveAndTrack is not used since in that function the
// loaded blob will be tracked, while it's not required here since
// all loaded nodes won't be linked to trie at all and track nodes
// may lead to out-of-memory issue.
blob, err := t.reader.Node(prefix, common.BytesToHash(n))
if err != nil {
log.Error("Unhandled trie error in Trie.Prove", "err", err)
return err
}
// The raw-blob format nodes are loaded either from the
// clean cache or the database, they are all in their own
// copy and safe to use unsafe decoder.
tn = mustDecodeNodeUnsafe(n, blob)
default:
panic(fmt.Sprintf("%T: invalid node: %v", tn, tn))
}
}
```
在此处,我们需要介绍一种特殊的用于 Tire 中 `Extension` 和 `Leaf` 的编码方法,这种编码方法被称为 `Hex Prefix Encoding`,该编码方法会对 nibble 进行操作,具体编码可以按照下表:
| Prefix | Payload | Node type | path length | |
| ---------- | ------------------ | --------- | ----------- | ---- |
| $[0, 0]$ | $[x_1x_2][x_3x_4]$ | Extension | Even | |
| $[1, x_1]$ | $[x_2x_3][x_4x_5]$ | Extension | Odd | |
| $[2, 0]$ | $[x_1x_2][x_3x_4]$ | Leaf | Even | |
| $[3, x_1]$ | $[x_2x_3][x_4x_5]$ | Leaf | Odd | |
我们可以通过编码后的结果快速判断当前节点类型和所处的 path 长度情况。接下来,我们观察一个示例:
```bash
cast proof 0xAFD48f565e1aC63f3e547227c9AD5243990f3D40 -B 23662880
```
注意上述命令需要给定 `ETH_RPC_URL` 环境变量。上述内容会输出一个庞大的 Merkle Proof,如下:
```json
{"address":"0xafd48f565e1ac63f3e547227c9ad5243990f3d40","balance":"0x90bdc1aa6ca47d9","codeHash":"0xc5d2460186f7233c927e7db2dcc703c0e500b653ca82273b7bfad8045d85a470","nonce":"0x12","storageHash":"0x56e81f171bcc55a6ff8345e692c0f86e5b48e01b996cadc001622fb5e363b421","accountProof":["0xf90211a030457aad4392c334ddbb3a38e7e3269700d85fbfb5ca52be2ae10f362f7e4c44a06f8a24bd6e8231dbd85a14e8e4c3b0f56b3fd652672405d0b25fb567d1c8dd19a0e4f4fd755d3565e1e17983c1015c9b09c3258ee3bf4ca75e07f0de7ec218c723a08b43f0c1edf7a7870d313b5ab9db94ec16fa9aefc0015bd9b68aa74c81e710caa0805ff2ad328ed518bb52cea221f0e5b185e06ee608c02ada9454e7e912c65dfaa0b68d6538864c973f0255bd4f3b409eaf2e38d372e08e6d3492799e89490031eda002ad8816484bc4ed4a7431a6156590bf6f7a4c1e107fee96013a3104119d7793a00eac5cf973e3283d81a2291ccde5186eb2252a123d744d60bc31a7a426157328a0d5884c8cb499212b012d717af81e72817456ebcded3860684eb8402ee2727604a072a353becef760e4bd3fab753025810e9642b9c9e41e97e8e9c23e5f5ade2384a024c1f488ccdbedaf408b935793c3273c46f08bf25bcbc37a9817bc6358eafba5a0be862daf78cf21014d4db293d703801193ca23be4e269252b0e63a99295fb4cfa0b8614d24795a0ee922f187847ced6f70bcfaba808ad7d2aef48ffa36bff2d39fa04b47c49049ed4614d435140d4714d63139212f2e60d9d4f078f0b2dc66095662a014e871edce801f7623fbc6ca5695002c313bd5e5c6fa0d06224d551f69d9e864a03fe56ec67ea184a74eae96a1454ae8513bd112ef4ea220b8e08965f1a3ab629080","0xf90211a04c11f9d52cfe4523eec1916f1d40688759fbc840e1c1a86fcb4820762b9868f8a068018b88d1ef04a4cf8aaea85f16efb40427fae5f17631c4c7ef3725c234ddc5a03aa86dd626b86a370aafdf280b1cb3906d56d44ced0f577d620ba2eeb7a4dbc6a0f4987c666c2b97dc8a11a4492e2c4f9dafb092449b3937db4e1c37b10bedd76da0cef5b1c30cf451d069814912f717ae52ac49619188cd9f3a03bb0b92f42d3153a0deb0ea7519ade36454352ae36123b2c1dc568bf6e3c8a968f2302e50eb99bba1a04b0ea468d3b0b59343fd2533262250dac2d6f22b6111107585b22daf7753a98ca0617aceb8aee9770b01713ec30ce3a1866b0de4de8a64561a72957918d4c3ca8ea04ff8ad8d9c4aa86d0da3d1a1fadb3be2aee5ebc2acdad91c0180264b375f2bd5a00260c81056fda347f1b8e6c46f2d861265907f4b31a82b323d845e30920db7a4a05bf2d69bf04d7e95c4a25cfb13fedcec46918b0df78eb373282e1d7242aab173a0b97716a9ff95ce045204eeaf476f7b780656ff2171e44818c7d979efb1ee483fa0acd0a0a9369222f959005898540ecf473b25235d9c53ca0f1f18d3fe4586016aa0f50bd11062dff46b95ebdb54abecaa24e3aee3711b6dc9e635319a11020bd584a0ec7ffc6c3985112eddae1a347c151db04114e954c62ecf1497190f00c0bdde39a04042a39a58135c44bc404534188c599c40c9ba084e9bab675377508f970a0e9680","0xf90211a02720d0fdd5a8393c0f8b92a91f52a10eddc58220786750d134df3626fe71639aa06c4277a9aa51f7e5b6bba8ae357440806a11ccd722b6ff2bb3ac3db9559514f4a09a3799db0cf6dba64beaebee96b449494843148ac45eb5e4aa2542cb66c51e4ea08de004c8bf717787279aaaf212f3f8dfcafb68b41579d91c7b12eb560aaa0b26a014b7343b7961b95f2ada104516eb388f489d2bdc69a4bc1bce09cbe10c1509b7a0c15fae3b6c2ccdffc5d47e468ed7580914496c396fb4dc63d8d99bf4abe0af17a0d282816d69d0450aae8f55f675d0780a87a29cd4556c16d5c062f9fce2256ac8a02d4294664480e6e5d8a64c22f9663c3e54d861b9b54f3399e4a1206c7faa34b7a060b0c596d8e94b6d0ad06e0d6f2f4b37485d8169526f40e127b6cec47a892c84a0bed4b9f73d0df503ca0541221674ab193e51976815bb85fb7265589a3ccbe373a01f30d56ac9667bf0a8e6d56c0646e161807899e5c2d58a379d54cd29a1d7d902a0b99ae001642ac856b00304e3b6fd57b2d3a8d7b37d883ac3ae698bc0586ac3f3a09b8c2ed9453a9dfc730be67ae240ebecfcbb65265252b142f32c9fdec574e8eea0c3f85eee6555ed39ceffbe62778ee138baa988066ea85b562a351d13ea866056a08f799b5615e8596d4ed8e11886bee0ca4c2d88c08496833faa5c4e0c31c95746a018b9203a023c1108b784a9baac18bf83df7b05d522253eb74df3509033f9ad8a80","0xf90211a0ae6b50c4bbf46850b45f5593eb0a1b98c5090594cac5d7ebc073a660925ac43aa0aae9ce5e6b75f5c2374059e82a55fdbf7690628572e779f6646d2c84fbbc67dda0eea4f452f3cd655eca1602b5ef3f6a4f42c6a9694f02d774d097357708013076a0df3910d22f091ee196c89d68e360defaf2c6e960190d75938adeb54744546f40a026a7ffe67e31baf81c3caa4d099aba762a85f45730a3c18711694f3c0643d69da01adb5d12731a98127d59bb8e7b6bc485a232961cf8adf5141dc9995b7424edbea050aa346e69e08c67e51418e794c4ac90dd680f69d6c2c8671df78041dfdfc963a0ad4a1a998860876ac2bffe1e8560bb38f262b2d80b2c6248996f8c2c364e7b6ea09328c9212bc427887563a555af5c409f40c489f1e686c83b41f952da3023655da0a8ee16e2620e66973d368fb0b56470d0efb1c15cbf3565ffedb23d248c70546ea07f64f7cc40897de6235c6689937755829a1d928a28d43323c947148696a85b1aa0161ff648f7ee6b7f0defb2d10a227fe24474cc6391d3f683c8b8ac1a24ce49e0a0997d96224164a05a5709943567568d72610b9c02d91964897537209a882ce59ba061dae0cc4f4980b2877921c5b10c224f454b1a0c1c8edb07349774add58739e4a079a7b819c3d607d241c6e5fe87a32a5298d6a8657856a73592ef5d057737d49ca04e6bd2189b1cc564f66d6315b0d315b3f6eed1d92d6131db00446fba4fac01db80","0xf90211a0401b9ba59725b901fd074707cd668587b48d4aeff51f9ad4cd2bc475013b4ed5a0645174c0cd311d60f68de7c8e71028e96f6a3bd7ed8145df9b7dc38b0f7743aba0eaafa7b120b8441814cccd27010a055e7ef87684bb9335108a69e8dc0fa32644a0b234876505170f656ba55c6b0f4c841e0785d30e1e35fc58c8bbd10fdd638c74a05cd8306032f5803f73c288276dae16d2411ce309a297148dd2fdcaa8970f4a0aa08e06867916b912570ac00485f5236b17ebb34ca7e1627c5e4cfd0a8aa1e70707a029a5435a3e6e96d54b61828b1b28585cb7853024df2140a37046467fabb80766a07f70e8680687f7c5658736101bc2f99571bb82f00308faa651ee23f344eb6929a04688be2b096324cc646a98458400b4f25a489500b0d1e5603ac5cf49cfbbfd05a069a4a4ce630abda4d7a6dd7a9fd966ca652e5c18d9f8dcb3d4d1e41b42ad1abca07bd1f8e63d00194e4ca305948b4abe2e69e051b3247e42c7412df13a241ff4c3a008b4d63bd0c7ef2238066b73279f7fac474abfc452fa067755b555616e6f332aa0d1da92c404dfbc561852b72921480926cdd676d84d419645e6433a03acf1ebb4a0076057640f577941b587a9e9f3f74b19d459b38c894df8b8cd35a771d0792149a0370f521c6879d5d36b2fb561252dae94f0b4793435cd48cbdf1b2b5f9a1f25dea040ef776f35f0917aed3278bf9fad7195a436b2b5904eca5dd9a4f35c4008cd6d80","0xf90211a064acf5898e76ac608a17ce972e8ab7c505f1256366a1acfd2a0559d66107bf6ba030cc0874f20df73456b2814c01da25563fb6934eda039b804b823b2ea8c7aa70a04c552c0bb9f8ec748378e4754db3b6781935b5dfaf99901b1784f423d8aeda01a030f78d2588546626c0a893891891d6926d5fbfb1e98c4d8cef5b983aff0cb8b1a02fa467e7d41b7f3cfa18e417fb4baedc2fe76befbd464fa10ee1fcf2e9bdef28a02e1c11bf7e897ecfbf1adf901f11d0c5ab91772139032f59dbb21b0d8f896dbfa0e3c07cd87c00f650a9aca038045175f542aa32f045b515370772e6acf632c212a0838bbbf43d6e7d051a7230c5bca106ce361e03b4c7c468c16da0437bf6bc0871a0813e31d62daddca8744d561b70eeab6d27d7044d7b396bda347999792a6341f6a022c1e42848f716c6e9dd2669bea026faba53712273c976a3c6929051c94ea468a0f14322a4ba7005b60a3097cf14aa5033d8eb644721c60e53b898fbab5327f8f1a0800c0ceeb9da5cbe385f4e4ac3bd4ca0d32643ee3ac64839ff0900976a94f53ba0535ae818e96b8fb43d2f1e2e82c9e79ed2fb81b13a04671a2e22fa63e22dad26a068ca5b83f748fbfd5297b7f196faf65ae075cefc3996dad676ba09f7c061bfa4a0eb8f831726cd576d10c386402fdc07386627531e2b027031be51edafc3e39d68a0c24c09d6cd9a2069d74e363e652d13bb7b1fb011ae6d0b6eab658ba59f16a67f80","0xf90191a0aada1c214ed7f882fb83d040f90dbe1145d18c3a3d940d6e2294c0bbad08b047a01059cc1c32feaef828718445b7a961cd441b30773253f53dae92470fb8f7205580a06d67cea844112a894706b1236121fe91e606b27f28d0ab252b2a79abb6a4b89da0890baaafab8692b86a62c486e752d5f68e086043ded60880a6c06d3f34b5c6cda0f58eecf3c09d3b74f555e3269ec2669eb5a036fb57f1b1512ca8c4f1517220e5a060bf8c8be29916dbf5188f539d996447d585d4e5705280b419a493c9015a9c768080a030dad8b87ff9538e20a5ff97e75cfa957879aaf60b9b030b83fef56816a9f899a0703ab5cc9565fbd6d6fe27aec3eaf5e2d89b0a7b8dbf164ff86220b86db918a3a0a11f9fca2d2e6bf52b486f3640d09a22cd431452b3319c2a5c3d1ac2e9a4e302a0da4eccbb0fe383e4e0e113907ec2def2ac0f03c7350b2e07c97c834218742467a012e3f4c13c2c7b9fa51d434deacc0d2a8ab478da230e8b2581c712f2efb3d8f3a08c2cfee6a20e76db4bee371f59c80e9ec46fcb9ea39d8f197a530f573e3a3f3c8080","0xf86e9d37570108ccfce47110a901202a6248fe3250cb9a6cecea1c9bba45f0e9b84ef84c1288090bdc1aa6ca47d9a056e81f171bcc55a6ff8345e692c0f86e5b48e01b996cadc001622fb5e363b421a0c5d2460186f7233c927e7db2dcc703c0e500b653ca82273b7bfad8045d85a470"],"storageProof":[]}
```
我们可以先看最底部的内容,该层内容实际上是包含 `0xAFD48f565e1aC63f3e547227c9AD5243990f3D40` 账户数据的内容:
```
0xf86e9d37570108ccfce47110a901202a6248fe3250cb9a6cecea1c9bba45f0e9b84ef84c1288090bdc1aa6ca47d9a056e81f171bcc55a6ff8345e692c0f86e5b48e01b996cadc001622fb5e363b421a0c5d2460186f7233c927e7db2dcc703c0e500b653ca82273b7bfad8045d85a470
```
我们需要注意的是,World State Trie 所有内容都使用了 RLP 编码,所以此处我们可以对上述内容进行解码:
```bash
cast from-rlp 0xf86e9d37570108ccfce47110a901202a6248fe3250cb9a6cecea1c9bba45f0e9b84ef84c1288090bdc1aa6ca47d9a056e81f171bcc55a6ff8345e692c0f86e5b48e01b996cadc001622fb5e363b421a0c5d2460186f7233c927e7db2dcc703c0e500b653ca82273b7bfad8045d85a470
```
上述命令返回值如下:
```
["0x37570108ccfce47110a901202a6248fe3250cb9a6cecea1c9bba45f0e9","0xf84c1288090bdc1aa6ca47d9a056e81f171bcc55a6ff8345e692c0f86e5b48e01b996cadc001622fb5e363b421a0c5d2460186f7233c927e7db2dcc703c0e500b653ca82273b7bfad8045d85a470"]
```
我们首先分析上述返回值的第二部分,再次调用 `cast from-rlp` 命令,我们可以得到如下输出:
```
["0x12","0x090bdc1aa6ca47d9","0x56e81f171bcc55a6ff8345e692c0f86e5b48e01b996cadc001622fb5e363b421","0xc5d2460186f7233c927e7db2dcc703c0e500b653ca82273b7bfad8045d85a470"]
```
上述返回值依次是 `nonce` / `balance` / `storage root` / `code hash`。因为此处的地址是一个 EOA 地址,所以 `code hash` 等同于空值的哈希结果 `cast keccak 0x`,而 `storage root` 等同于空 RLP 编码的哈希值 `cast keccak 0x80`。
在 World State Trie 内部,所有的 leaf node 的 ID 实际上都是地址的哈希值,此处我们使用 `cast keccak 0xAFD48f565e1aC63f3e547227c9AD5243990f3D40`,我们可以获得如下结果:
```
0xd593cac7570108ccfce47110a901202a6248fe3250cb9a6cecea1c9bba45f0e9
```
而 `0x37570108ccfce47110a901202a6248fe3250cb9a6cecea1c9bba45f0e9` 作为 Leaf Node,所以此处包含一个 `3` 或者 `20` 前缀,此处显然是包含 3 前缀,去掉前缀,我们可以得到真正的节点 ID:
```
7570108ccfce47110a901202a6248fe3250cb9a6cecea1c9bba45f0e9
```
这实际上与上文计算出的 `cast keccak 0xAFD48f565e1aC63f3e547227c9AD5243990f3D40` 是几乎一致的:
```
d593cac7570108ccfce47110a901202a6248fe3250cb9a6cecea1c9bba45f0e9
7570108ccfce47110a901202a6248fe3250cb9a6cecea1c9bba45f0e9
```
所以在 World State Trie 内部,节点依次消耗 `d` -> `5` -> `9` -> `3` -> `c` -> `a` -> `c` 才找到最终我们数据的存储位置。我们可以简单尝试了对 proof 内的倒数第二项进行分析,实际上该项是一个 full node,解码后为:
```
["0xaada1c214ed7f882fb83d040f90dbe1145d18c3a3d940d6e2294c0bbad08b047","0x1059cc1c32feaef828718445b7a961cd441b30773253f53dae92470fb8f72055","0x","0x6d67cea844112a894706b1236121fe91e606b27f28d0ab252b2a79abb6a4b89d","0x890baaafab8692b86a62c486e752d5f68e086043ded60880a6c06d3f34b5c6cd","0xf58eecf3c09d3b74f555e3269ec2669eb5a036fb57f1b1512ca8c4f1517220e5","0x60bf8c8be29916dbf5188f539d996447d585d4e5705280b419a493c9015a9c76","0x","0x","0x30dad8b87ff9538e20a5ff97e75cfa957879aaf60b9b030b83fef56816a9f899","0x703ab5cc9565fbd6d6fe27aec3eaf5e2d89b0a7b8dbf164ff86220b86db918a3","0xa11f9fca2d2e6bf52b486f3640d09a22cd431452b3319c2a5c3d1ac2e9a4e302","0xda4eccbb0fe383e4e0e113907ec2def2ac0f03c7350b2e07c97c834218742467","0x12e3f4c13c2c7b9fa51d434deacc0d2a8ab478da230e8b2581c712f2efb3d8f3","0x8c2cfee6a20e76db4bee371f59c80e9ec46fcb9ea39d8f197a530f573e3a3f3c","0x","0x"]
```
我们可以直接检索该列表的第 `c` 项,返回值为 `0xda4eccbb0fe383e4e0e113907ec2def2ac0f03c7350b2e07c97c834218742467`. 我们可以计算一下刚刚分析的包含账户数据的 proof 最后一项的哈希值:
```bash
cast keccak 0xf86e9d37570108ccfce47110a901202a6248fe3250cb9a6cecea1c9bba45f0e9b84ef84c1288090bdc1aa6ca47d9a056e81f171bcc55a6ff8345e692c0f86e5b48e01b996cadc001622fb5e363b421a0c5d2460186f7233c927e7db2dcc703c0e500b653ca82273b7bfad8045d85a470
```
结果刚好是 `0xda4eccbb0fe383e4e0e113907ec2def2ac0f03c7350b2e07c97c834218742467`。这就是 World State Trie 的工作原理。简单来说,我们将地址哈希后的结果作为节点 ID 并按照前缀树的规则找到该节点,寻找该节点所经过的路径会作为 proof 构成部分内抛出来。上层节点会指向下层节点的哈希值,由此构成了 Merkle Tree 的功能,假如任意数据被更新,那么 World State Trie 内的与该节点有关的 path 就会被更新。
顺便一提,我们可以直接哈希计算 proof 的第一项,在上述 proof 中即为:
```bash
cast keccak 0xf90211a030457aad4392c334ddbb3a38e7e3269700d85fbfb5ca52be2ae10f362f7e4c44a06f8a24bd6e8231dbd85a14e8e4c3b0f56b3fd652672405d0b25fb567d1c8dd19a0e4f4fd755d3565e1e17983c1015c9b09c3258ee3bf4ca75e07f0de7ec218c723a08b43f0c1edf7a7870d313b5ab9db94ec16fa9aefc0015bd9b68aa74c81e710caa0805ff2ad328ed518bb52cea221f0e5b185e06ee608c02ada9454e7e912c65dfaa0b68d6538864c973f0255bd4f3b409eaf2e38d372e08e6d3492799e89490031eda002ad8816484bc4ed4a7431a6156590bf6f7a4c1e107fee96013a3104119d7793a00eac5cf973e3283d81a2291ccde5186eb2252a123d744d60bc31a7a426157328a0d5884c8cb499212b012d717af81e72817456ebcded3860684eb8402ee2727604a072a353becef760e4bd3fab753025810e9642b9c9e41e97e8e9c23e5f5ade2384a024c1f488ccdbedaf408b935793c3273c46f08bf25bcbc37a9817bc6358eafba5a0be862daf78cf21014d4db293d703801193ca23be4e269252b0e63a99295fb4cfa0b8614d24795a0ee922f187847ced6f70bcfaba808ad7d2aef48ffa36bff2d39fa04b47c49049ed4614d435140d4714d63139212f2e60d9d4f078f0b2dc66095662a014e871edce801f7623fbc6ca5695002c313bd5e5c6fa0d06224d551f69d9e864a03fe56ec67ea184a74eae96a1454ae8513bd112ef4ea220b8e08965f1a3ab629080
```
获得结果是 [区块 23662880](https://etherscan.io/block/23662880) 的 state root 值。
## 总结
在本次课程中,我们主要介绍了以下内容:
1. 以太坊内的 Nonce 与 Nonce Gap 问题,特别是 Viem 内的 `nonceManager`
2. 以太坊 Base Fee 与 Gas Price 机制
3. RLP 编码机制与以太坊交易的构建
4. World State Tire 的原理与 Proof 问题


