Taiwan Arma Players Community
      • Sharing URL Link copied
      • /edit
      • View mode
        • Edit mode
        • View mode
        • Book mode
        • Slide mode
        Edit mode View mode Book mode Slide mode
      • Customize slides
      • Note Permission
      • Read
        • Owners
        • Signed-in users
        • Everyone
        Owners Signed-in users Everyone
      • Write
        • Owners
        • Signed-in users
        • Everyone
        Owners Signed-in users Everyone
      • Engagement control Commenting, Suggest edit, Emoji Reply
      • Invitee
    • Publish Note

      Share your work with the world Congratulations! 🎉 Your note is out in the world Publish Note

      Your note will be visible on your profile and discoverable by anyone.
      Your note is now live.
      This note is visible on your profile and discoverable online.
      Everyone on the web can find and read all notes of this public team.
      See published notes
      Unpublish note
      Please check the box to agree to the Community Guidelines.
      View profile
    • Commenting
      Permission
      Disabled Forbidden Owners Signed-in users Everyone
    • Enable
    • Permission
      • Forbidden
      • Owners
      • Signed-in users
      • Everyone
    • Suggest edit
      Permission
      Disabled Forbidden Owners Signed-in users Everyone
    • Enable
    • Permission
      • Forbidden
      • Owners
      • Signed-in users
    • Emoji Reply
    • Enable
    • Versions and GitHub Sync
    • Note settings
    • Engagement control
    • Transfer ownership
    • Delete this note
    • Insert from template
    • Import from
      • Dropbox
      • Google Drive
      • Gist
      • Clipboard
    • Export to
      • Dropbox
      • Google Drive
      • Gist
    • Download
      • Markdown
      • HTML
      • Raw HTML
Menu Note settings Sharing URL Help
Menu
Options
Versions and GitHub Sync Engagement control Transfer ownership Delete this note
Import from
Dropbox Google Drive Gist Clipboard
Export to
Dropbox Google Drive Gist
Download
Markdown HTML Raw HTML
Back
Sharing URL Link copied
/edit
View mode
  • Edit mode
  • View mode
  • Book mode
  • Slide mode
Edit mode View mode Book mode Slide mode
Customize slides
Note Permission
Read
Owners
  • Owners
  • Signed-in users
  • Everyone
Owners Signed-in users Everyone
Write
Owners
  • Owners
  • Signed-in users
  • Everyone
Owners Signed-in users Everyone
Engagement control Commenting, Suggest edit, Emoji Reply
Invitee
Publish Note

Share your work with the world Congratulations! 🎉 Your note is out in the world Publish Note

Your note will be visible on your profile and discoverable by anyone.
Your note is now live.
This note is visible on your profile and discoverable online.
Everyone on the web can find and read all notes of this public team.
See published notes
Unpublish note
Please check the box to agree to the Community Guidelines.
View profile
Engagement control
Commenting
Permission
Disabled Forbidden Owners Signed-in users Everyone
Enable
Permission
  • Forbidden
  • Owners
  • Signed-in users
  • Everyone
Suggest edit
Permission
Disabled Forbidden Owners Signed-in users Everyone
Enable
Permission
  • Forbidden
  • Owners
  • Signed-in users
Emoji Reply
Enable
Import from Dropbox Google Drive Gist Clipboard
   owned this note    owned this note      
Published Linked with GitHub
Subscribed
  • Any changes
    Be notified of any changes
  • Mention me
    Be notified of mention me
  • Unsubscribe
Subscribe
--- title: Plmod 宙斯教學 tags: [reference link] --- <style> .two-column-layout { column-count: 2; /* Set column number */ column-gap: 20px; max-width: 100%; overflow: hidden; } .three-column-layout { column-count: 3; /* Set column number */ column-gap: 20px; max-width: 100%; overflow: hidden; } .four-column-layout { column-count: 4; /* Set column number */ column-gap: 20px; max-width: 100%; overflow: hidden; } /* Media query for mobile devices */ @media (max-width: 768px) { .three-column-layout { column-count: 1; /* Switch to single column on small screens */ column-gap: 0; /* Optional: Set gap to 0 for single column */ } } .three-column-layout ul, .three-column-layout ol { margin-top: 0; padding-left: 20px; } .three-column-layout strong { font-weight: bold; } .three-column-layout em { font-style: italic; } .two-column-layout h1, .two-column-layout h2, .two-column-layout h3, .two-column-layout h4, .two-column-layout h5, .two-column-layout h6 { margin-top: 0; } </style> # High Command 介紹 :::info :information_source: 詳細操作-原文: [Arma 3 - High Command 介紹文](https://community.bistudio.com/wiki/Arma_3:_High_Command) ::: 高級指揮部 (HC) 允許玩家扮演指揮官的角色。作為高級指揮官,玩家可以控制多個小隊和團隊. ## HC介面概覽 :::warning 本段落介紹操作方式可能與模組(Plmod)有所不同請自行甄別 ::: Ctrl + 空白鍵 可以切換HC介面開/關 (注意左下角隊伍欄變化) ![image](https://community.bistudio.com/wikidata/images/6/61/A3_HighCommand_CommandMenu.png) 0. 選擇HC小隊 > ~(Tab鍵上方那顆), F0, F1, F..., F10 > 可以換頁, 換頁後同理 1. 設定路徑點 > 地圖中可以看到: 小隊位置, 以及目前指定的路徑點 > 點擊小隊 + 地圖任意點左鍵即可改變路徑點 > ![image](https://community.bistudio.com/wikidata/images/a/a5/A3_HighCommand_MapView.png) 2. 請求SITREP > 將顯示時間、群組圖示和群組成員. > ![image](https://community.bistudio.com/wikidata/images/a/a0/A3_HighCommand_SITREP.png) 
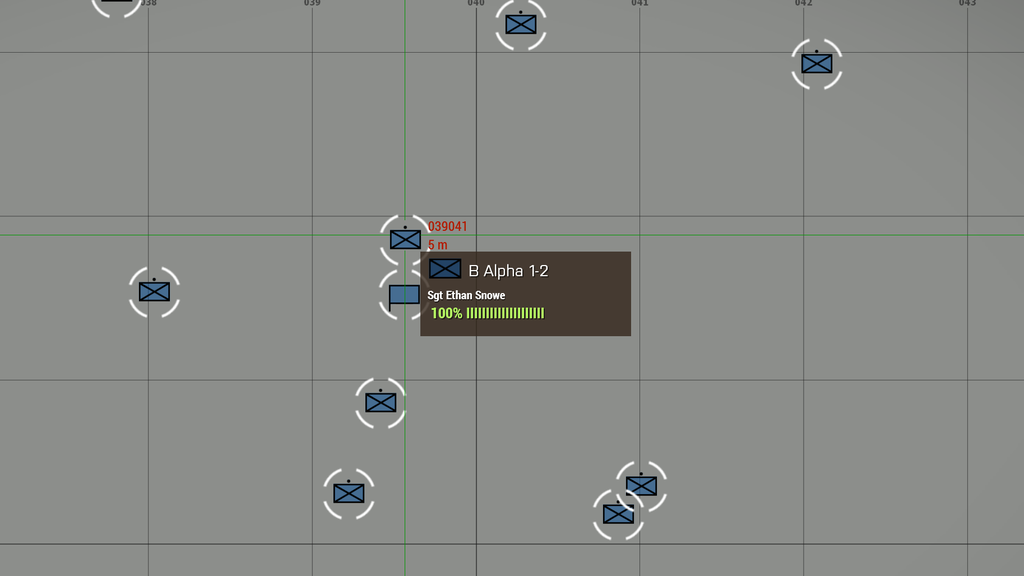
3. 即時隊伍狀態 (將滑鼠移至小隊圖標上方) >![image](https://community.bistudio.com/wikidata/images/thumb/0/05/A3_HighCommand_MapUnitStatus.png/1024px-A3_HighCommand_MapUnitStatus.png) ### HC小隊圖標-種類 <div class="three-column-layout"> > Infantry >![image](https://community.bistudio.com/wikidata/images/4/4d/a3_fm_b_inf.png) > Armor >![image](https://community.bistudio.com/wikidata/images/c/c7/a3_fm_b_armor.png) > Motorized Infantry >![image](https://community.bistudio.com/wikidata/images/9/9d/a3_fm_b_motor_inf.png) > Mechanized Infantry >![image](https://community.bistudio.com/wikidata/images/1/19/a3_fm_b_mech_inf.png) > UAV >![image](https://community.bistudio.com/wikidata/images/1/19/a3_fm_b_uav.png) > Artillery >![image](https://community.bistudio.com/wikidata/images/f/f1/a3_fm_b_artillery.png) > Recon >![image](https://community.bistudio.com/wikidata/images/8/8f/a3_fm_b_recon.png) > Helicopters >![image](https://community.bistudio.com/wikidata/images/b/be/a3_fm_b_air.png) > Airplanes >![image](https://community.bistudio.com/wikidata/images/3/35/a3_fm_b_plane.png) </div> ### HC小隊圖標-小隊規模 <div class="three-column-layout"> 1. Fireteam (2-4) > ![image](https://community.bistudio.com/wikidata/images/b/b3/a3_fm_group_0.png) 2. Section (> 4) > ![image](https://community.bistudio.com/wikidata/images/8/84/a3_fm_group_1.png) 3. Squad (> 12) > ![image](https://community.bistudio.com/wikidata/images/d/d1/a3_fm_group_2.png) 4. Platoon (> 25) > ![image](https://community.bistudio.com/wikidata/images/d/d1/a3_fm_group_2.png) 5. Company (> 60) > ![image](https://community.bistudio.com/wikidata/images/1/1e/a3_fm_group_4.png) </div> # 模組介紹 (Plmod-修改版) ![image](https://images.steamusercontent.com/ugc/1470941573389316668/83090C6D8DF88F39C35C08A2C9984BA918BC451A/?imw=5000&imh=5000&ima=fit&impolicy=Letterbox&imcolor=%23000000&letterbox=false) ## 模組-功能簡介 ![image](https://images.steamusercontent.com/ugc/1470941573389336059/1E0C5BBE143FA5B4D31AE5C66FF5AF879C11C504/?imw=5000&imh=5000&ima=fit&impolicy=Letterbox&imcolor=%23000000&letterbox=false) ![image](https://images.steamusercontent.com/ugc/1470941573389334363/F4DB47592B33733EE57BFEC4CC8BD01B5BF74DB7/?imw=5000&imh=5000&ima=fit&impolicy=Letterbox&imcolor=%23000000&letterbox=false) >與原版功能差異: (刪除線表示被移除的功能) > 1. 額外小隊圖標,顯示隊伍狀態 > 2. 小隊自定義腳本任務 > 3. 改進的 SITREP 顯示更多信息,例如彈藥數量 > 4. 高級指揮小組溝通和分享目標訊息 > 5. 為小組組長提供遠端攝影機視圖 (選擇小隊 Home/End 切換視角) > 6. 群組重組,例如從命令選單中新增和刪除群組 > 7. 車速選單 > 8. AT兵從AT助手補給 > 9. ~~部隊從彈藥攜帶者補給(僅限 Vanilla 派系)~~ > .重新實現為尋找地面屍體/箱子 僅補給彈藥 > 10. 虛擬支援系統 (部分關閉, 剩下小隊迫砲支援) > 11. ~~醫療系統(盟友可以喪失行動能力並復活)~~ > 12. ~~設立傷患收集點(CCP)來治療受傷的盟友~~ > . 與ACE醫療系統衝突 > 13. ~~車輛救援系統~~ > . 防止載具銷毀[使用腳本方式原地重生受損車輛/人員], 干擾任務進行 # 模組-工作坊連結 :::success [Plmod_CBA - Steam工作坊連結](https://steamcommunity.com/sharedfiles/filedetails/?id=3477900951) ::: # 模組-安裝方法 1. 確認於A3啟動器中掛載 "Plmod_CBA" 2. 確認按鍵設定 (只需進行一次) >![image](https://hackmd.io/_uploads/SkGt9WM-xg.png) :::info :information_source: >High Command介面開啟快捷鍵預設為 "Ctrl + SpaceBar" > >需要修改按鍵設定以開啟選單 : >ESC > 設定-下拉選單 > 按鍵設定 > 鍵盤-控制/指揮-下拉選單 > 開啟選單(移動, 目標, ... , 回復) ::: # 模組-使用限制與功能/操作方式介紹 ## TAPC 伺服器-使用限制 僅供宙斯在COOP伺服器舉辦任務時使用, 預設開啟宙斯介面時註冊HC模塊 若要舉辦宙斯任務請洽TAPC - DC群組, 聯絡@事務官 (已於COOP伺服器白名單) ## 關於AI模組 因Vcom, Lamb, ... 等AI模組會複寫小隊狀態, 路徑點等不建議在宙斯端安裝 (會不受控制) ## 關於區域性 (Locality) AI單位的命令與控制, 受限於網路限制大多高頻率控制指令被限定於*Local (其他人的電腦不能命令你的AI, 部分指令無效) 1.宙斯放置的單位是在宙斯電腦上運算的 2.宙斯斷線後, 單位會自動被轉移到伺服器端 3.單位轉移需要時間, 若轉移的太頻繁會出現*同步BUG 4.本模組使用自定義腳本任務 皆為Local Effect (僅單位在你的電腦上運算時有效) > 同步BUG: > 轉移單位時裝備同步錯誤, 該單位會變成裸男 (身上甚麼都沒有) > Local 定義: > 執行腳本的電腦, 單位在該電腦運算即為 Local > Remote 定義: > 執行腳本的電腦, 單位不在該電腦運算即為 Remote :::info [Locality BIS-A3 Wiki](https://community.bistudio.com/wiki/Multiplayer_Scripting#Locality) ::: ## 如何從宙斯中同步AI小隊至HC >宙斯端HC成功註冊訊息: >![image](https://hackmd.io/_uploads/BkfIEMfbee.png) >自動同步: >宙斯介面下切換按鍵-F7 >單位放置後即自動同步 > >由上至下分別是: 自動同步-開啟 / 關閉 >![image](https://hackmd.io/_uploads/SJodNGzZll.png) >手動同步: >宙斯介面下選擇隊伍後按下同步按鍵-F8 # 模組-選單功能/模塊-介紹 ## 如何選擇小隊 >確保HC小隊欄可見/開啟 切換按鍵: Ctrl + SpaceBar(空白鍵) > > "~" (TAB鍵上面那顆): 選擇全部小隊 > F1 (選擇欄位中第一隻小隊), F2 (...), ..., F10
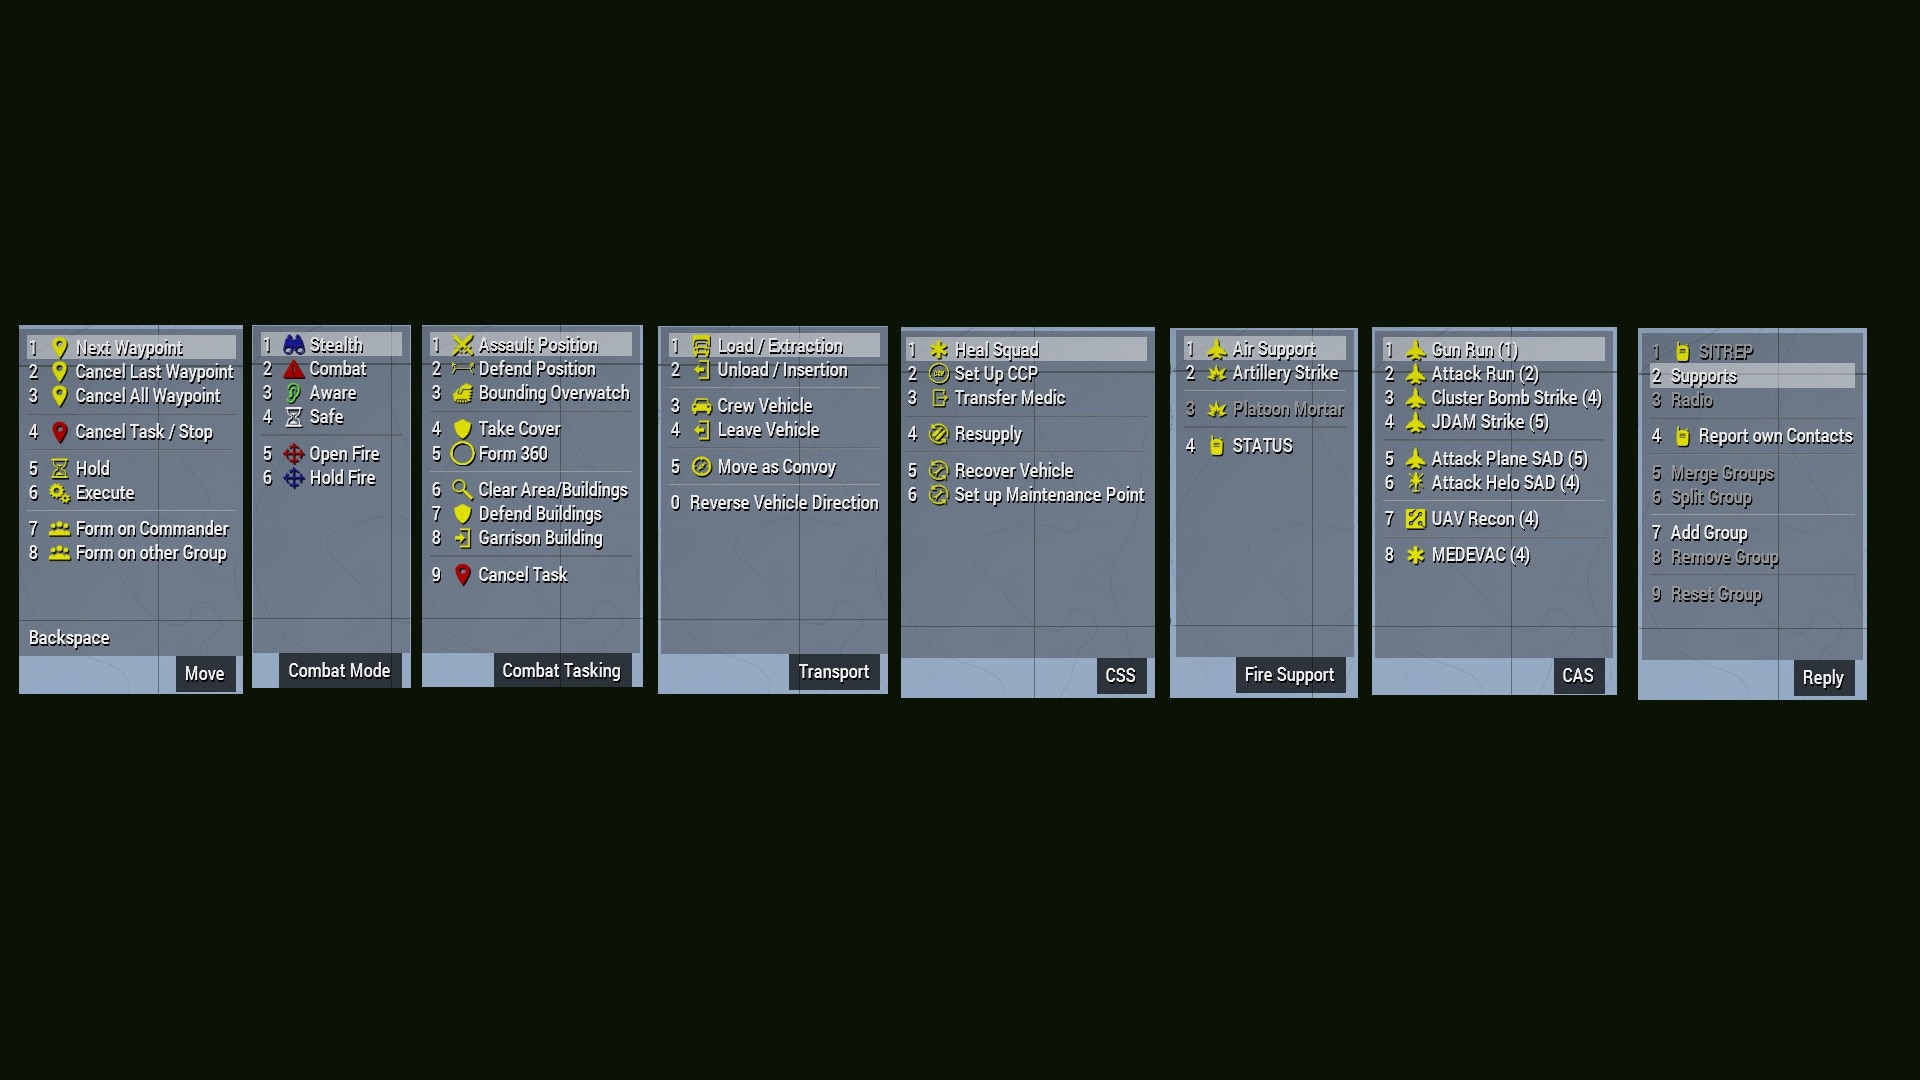
 >![image](https://i.imgur.com/hWRz1Y5.png) ## 模組-HC小隊-主選單 <div class="two-column-layout"> >![image](https://i.imgur.com/F8iYvCu.jpeg) > 此選單指令使用方式: A. 點選小隊圖標開啟選單 B. 滾輪選至特定功能 C. 滑鼠左鍵點擊於玩家地圖 </div> 1. 設定小隊路徑點 >![image](https://i.imgur.com/eBx34lh.png) > 路徑點-右鍵 可以選擇取消路徑點 >![image](https://i.imgur.com/aR3tHS8.png) 2. 要求小隊觀察點選位置 (左鍵點擊後小隊自動調整姿態, 觀察目標位置) >![image](https://i.imgur.com/qu9VZuy.png) 3. 要求小隊脫離戰鬥至點選位置 >![image](https://i.imgur.com/vgO39GC.png) 4. 要求小隊步行前往指定位置 (使用DoMove) >![image](https://i.imgur.com/9FlzLxP.png) 5. Supports (A3原廠-支援選單) 6. 觀察 + 壓制點選位置 >目前僅在執行任務時 (有右下角任務圖標時才起作用) 7. 自動側翼攻擊 - 遊蕩模式(藍色圖標) (安全距離 ~400m) >![image](https://i.imgur.com/tP1aRg9.png) >會自動尋找合適山坡後, 轉換成防守模式 > 8. 自動側翼攻擊 - 接近模式 (安全距離 ~100m) >![image](https://i.imgur.com/MMYmtuI.png) >自動尋找至目標側翼100公尺處, 採掩蔽路徑 <div class="four-column-layout"> >自動側翼攻擊 - 狀態: 執行接近路徑點 >![image](https://i.imgur.com/6DceU6L.png) >自動側翼攻擊 - 狀態: 執行遊蕩路徑點 >![image](https://i.imgur.com/PvNB14h.png) >自動側翼攻擊 - 狀態: 暫停移動/觀察中 >![image](https://i.imgur.com/cvQses9.png) >自動側翼攻擊 - 狀態: 路徑點尋找失敗 >![image](https://i.imgur.com/fAhjfG4.png) </div> 9. 自動尋找附近掩蔽物 10. 肅清指定房屋 >![image](https://i.imgur.com/oLLbluG.png) >(點擊處為紅線交點處房屋) 11. 以玩家裝備為準更換整支隊伍的裝備 ## 模組-HC小隊-移動選單 <div class="two-column-layout"> >![image](https://i.imgur.com/Ms8D0oG.jpeg) 1. 跳過目前路徑點 2. 取消最後一個路徑點 3. 取消所有路徑點 4. 取消所有路徑點/所有任務/重製小隊 5. 關閉AI尋路功能 ("PATH") 6. 開啟AI尋路功能 ("PATH") </div> . >7. 自動跟隨玩家小隊 >![image](https://i.imgur.com/CE2TVms.png) >8. 自動跟隨選擇小隊 >![image](https://i.imgur.com/KCciX8R.png) >(將黃線連接至下一個小隊) ## 模組-HC小隊-戰鬥模式選單 <div class="two-column-layout"> >![image](https://i.imgur.com/uIjkZCc.jpeg) 1. 將小隊切換至潛行-避免開火 2. 將小隊切換至戰鬥-追擊目標 3. 將小隊切換至警戒-等待威脅 4. 將小隊切換至安然-忽略目標 5. 將小隊切換至警戒+自由開火(保持隊型) 6. 將小隊切換至安然+禁止開火 </div> ## 模組-HC小隊-戰鬥模式選單 <div class="two-column-layout"> >![image](https://i.imgur.com/Z6dnaK6.jpeg) </div> . >1. 突擊模式-行進間射擊 關閉AI("AutoCombat") >第一點:點擊攻擊位置 >![image](https://i.imgur.com/0Gf0gRE.png) >![image](https://i.imgur.com/YJIrRef.png) 2. >2-1. 防守模式-英國式線列步槍陣 關閉AI("PATH") >第一點: 選擇防守位置 >第二點: 選擇小隊觀察位置 >![image](https://i.imgur.com/FehByXH.png) <div class="two-column-layout"> >防守模式-狀態: 集結中-禁止開火 >![image](https://i.imgur.com/ajRVLBt.png) >防守模式-狀態: 禁止移動-自由開火 >![image](https://i.imgur.com/GDNnSGf.png) </div> >2-2. 防守模式-架設固定式武器 (目前支援任何固定式武器-背包形式) >需要至少3人 以MK6迫砲為例(隊長, 砲管-背包, 砲架-背包) >:::danger >:warning: 砲手, 助手(帶背包的兩個人), 不能是隊長 >::: <div class="two-column-layout"> >隊伍準備: >MK6 3人小組 >![image](https://i.imgur.com/y3TLBCC.png) >左鍵選擇防守位置 >![image](https://i.imgur.com/zycHUa8.png) > >左鍵觀察位置 + .. >Shift鍵(架設固定武器模式) >![image](https://i.imgur.com/sDtJdWl.png) >等待武器架設完成 >![image](https://i.imgur.com/ao7CwPw.png) </div> >![image](https://i.imgur.com/Q0UVSln.png) >取消架設使用 (停止任務 / 停止路徑點-任務) >==*取消後須等待所有防守地圖標消失 (等待其變回步兵圖標)== 3. 移動式掩護-拆成多個Team交互推進 >第一點:點擊推進位置 >![image](https://i.imgur.com/JNt1jCM.png) > 4. 就地掩護 5. 圍成一個圈, 警戒四周 >![image](https://i.imgur.com/InrDC66.png) <div class="two-column-layout"> >就地掩護-狀態: 隊型編排中 >![image](https://i.imgur.com/bOfFvF7.png) >就地掩護-狀態: 隊型編排完成 >![image](https://i.imgur.com/vNHBSUA.png) </div> 7. 搜尋區域/區域內房屋 >選擇區域中心點即可 >![image](https://i.imgur.com/813QdCD.png) 8. 倚靠房屋防禦某個方向 >選擇區域中心點 >![image](https://i.imgur.com/2rTiFjd.png) >選擇防守方向 >![image](https://i.imgur.com/lncT1wX.png) 10. 進入區域房屋駐守 >在地圖上選擇駐防房屋 >![image](https://i.imgur.com/07ecEFM.png) 12. 取消目前任務 ## 模組-HC小隊-運輸任務選單 <div class="two-column-layout"> >![image](https://i.imgur.com/Tz8FJXi.jpeg) \*1. 運輸模式-選擇搭乘載具 (作為乘客) \*2. 要求載具小組將自移動至... 3. 要求小隊駕駛載具 (作為駕駛/射手) 4. 要求小隊離開載具 5. 將多支載具小組編成車隊並前往... 6. 進入附近固定式武器 7. 拆卸已進入的固定式武器 (攜帶在身上) </div> 1. 運輸模式-選擇搭乘載具/載具小組 >小隊準備: 火力組\*1, 運輸組\*1 (小鳥直升機) >![image](https://i.imgur.com/CxTdXNx.png) >火力組選擇載具 並轉移至 "運輸模式" 搭乘直升機 (卡車任務圖標) >![image](https://i.imgur.com/hW9dh05.png) >![image](https://i.imgur.com/56andSM.png) 2. 要求載具小組將自移動至... >需求: 被運輸組別需要進入 "搭乘模式" (卡車任務圖標) >![image](https://i.imgur.com/56andSM.png) >操作: 要求運輸組將自己運輸至地圖上某位置 >![image](https://i.imgur.com/jA4pZ2H.png) >運輸組進入 "運輸模式" 並開始運輸 (空中載具落地圖標) >![image](https://i.imgur.com/hiH1jSl.png) >火力組落地並自動進入戒護模式 >![image](https://i.imgur.com/QMyMVaD.png) >運輸組:RTB >![image](https://i.imgur.com/rJYuZfh.png) >完成運輸任務, 直升機落地 >![image](https://i.imgur.com/6es9DDi.png) ## 模組-HC小隊-補給維護選單 <div class="three-column-layout"> >![image](https://i.imgur.com/GBL6MjH.jpeg) </div> 1. 自動尋找區域內補給點(100m) 補給點可能為載具/屍體/箱子 >選擇尋找中心點即可 >![image](https://i.imgur.com/CR8kCKc.png) ## 模組-HC小隊-火力支援選單 <div class="two-column-layout"> >![image](https://i.imgur.com/GxtnkjM.jpeg) 1. 要求空中支援 (預設關閉) 2. 要求火炮支援 (預設關閉) 3. 要求排部迫砲支援 (需要有任何使用火炮的單位) </div> 3. >小隊使用M109A6 >![image](https://i.imgur.com/rO0Oy9Z.png) <div class="two-column-layout"> >裝填模式: >循環選擇 砲彈種類 / 射擊次數 >![image](https://i.imgur.com/PGy1Go1.png) >發射模式: >選擇 射擊單位 / 射擊次數 >![image](https://i.imgur.com/0bjBZcn.png) </div> >點選射擊單位後, 選擇砲擊位置 >![image](https://i.imgur.com/yQjCuZi.png) <div class="two-column-layout"> >砲擊地圖圖標-狀態: 發射中, 等待落地時間 >![image](https://i.imgur.com/PPHArl1.png) >砲擊地圖圖標-狀態: 過近過遠/無法發射 >![image](https://i.imgur.com/gAlRMog.png) </div> ## 模組-HC小隊-小隊管理選單 <div class="two-column-layout"> >![image](https://i.imgur.com/0EyzVac.jpeg) 1. 要求回報小隊狀態 2. 原廠A3 支援清單 3. 原廠A3 小隊無線電 4. 要求回報已知目標 5. 合併所選小隊 6. 拆分小隊 (一人一組) 7. 將選擇小隊加入HC 8. 將小隊移出HC並歸還伺服器 9. 重製選擇小隊 </div> <!-- Imgur 不給我上傳圖片了 :( >1. 要求回報小隊狀態 (SITREP) > --> # 疑難雜症-QA >Q: 為什麼我看不到 HC小隊欄, Ctrl + 空白鍵也沒用? >A: 你不是宙斯(開啟一次宙斯介面 等待HC註冊完成), 或著你目前沒有小隊可以顯示. >Q: 飛機CAS/虛擬火炮功能要怎麼開? >A: 使用任務自定義CBA設定檔, (pl_cas_enabled=pl_arty_enabled=true). >Q: 其他玩家會不會看到AI在頻道裡的對話? >A: 不會. >Q: OCAP會不會記錄到在宙斯端使用的地圖標點? >A: 不會, 所有地圖標記使用OCAP預設系統黑名單前綴. >Q: 有3D宙斯了, 為什麼我需要這東西? >A: 自定義任務腳本可以讓AI更聽話, 執行宙斯手控不來的戰術) >Q: 為什麼AI醫官會自己亂跑? >A: 本模組中包含使AI醫官治療友軍的功能. >Q: 不小心點錯按紐, 可以解除嗎? >A: 只要有出現提示GUI, 皆可使用ESC退出 (沒有副作用). >Q: 為什麼我可以在地圖上看到其他玩家的標記? >A: 本模組預設對宙斯開啟 "玩家標記" 方便宙斯操作. >Q: 看起來好麻煩, 是不是要修改任務才能用HC? >A: 不需要只要宙斯介面開得起來, 就會自動產生HC. >Q: 作弊按鈕實際功能是甚麼呀,測試的時候沒看出實際功能 >A: 需要目標區中有目標才會有效果, 它會讓AI直接獲得目標資訊並開始壓制 (有榴彈用榴彈, 有RPG開始打RPG) >Q: 自動同步功能好像有時候會沒作用,放兵不會自動同步 >A: 同步需要時間需要耐心等待幾秒鐘, 或者你可以選擇再次手動同步 方法一. 宙斯裡選擇小隊 + F8(手動同步) 方法二. 點選該小隊 > 管理選單(0) - Add Squad(新增小隊) > 選擇該小隊 (選單同步小隊) >Q: 我看完了, 但還是找不到模組連結 :( >A: [Plmod_CBA - Steam工作坊](https://steamcommunity.com/sharedfiles/filedetails/?id=3477900951) >Q: 如果出BUG了怎麼辦? >A: TAPC-討論區 @Lepasdz, 並詳細說明/討論.

Import from clipboard

Paste your markdown or webpage here...

Advanced permission required

Your current role can only read. Ask the system administrator to acquire write and comment permission.

This team is disabled

Sorry, this team is disabled. You can't edit this note.

This note is locked

Sorry, only owner can edit this note.

Reach the limit

Sorry, you've reached the max length this note can be.
Please reduce the content or divide it to more notes, thank you!

Import from Gist

Import from Snippet

or

Export to Snippet

Are you sure?

Do you really want to delete this note?
All users will lose their connection.

Create a note from template

Create a note from template

Oops...
This template has been removed or transferred.
Upgrade
All
  • All
  • Team
No template.

Create a template

Upgrade

Delete template

Do you really want to delete this template?
Turn this template into a regular note and keep its content, versions, and comments.

This page need refresh

You have an incompatible client version.
Refresh to update.
New version available!
See releases notes here
Refresh to enjoy new features.
Your user state has changed.
Refresh to load new user state.

Sign in

Forgot password

or

By clicking below, you agree to our terms of service.

Sign in via Facebook Sign in via Twitter Sign in via GitHub Sign in via Dropbox Sign in with Wallet
Wallet ( )
Connect another wallet

New to HackMD? Sign up

Help

  • English
  • 中文
  • Français
  • Deutsch
  • 日本語
  • Español
  • Català
  • Ελληνικά
  • Português
  • italiano
  • Türkçe
  • Русский
  • Nederlands
  • hrvatski jezik
  • język polski
  • Українська
  • हिन्दी
  • svenska
  • Esperanto
  • dansk

Documents

Help & Tutorial

How to use Book mode

Slide Example

API Docs

Edit in VSCode

Install browser extension

Contacts

Feedback

Discord

Send us email

Resources

Releases

Pricing

Blog

Policy

Terms

Privacy

Cheatsheet

Syntax Example Reference
# Header Header 基本排版
- Unordered List
  • Unordered List
1. Ordered List
  1. Ordered List
- [ ] Todo List
  • Todo List
> Blockquote
Blockquote
**Bold font** Bold font
*Italics font* Italics font
~~Strikethrough~~ Strikethrough
19^th^ 19th
H~2~O H2O
++Inserted text++ Inserted text
==Marked text== Marked text
[link text](https:// "title") Link
![image alt](https:// "title") Image
`Code` Code 在筆記中貼入程式碼
```javascript
var i = 0;
```
var i = 0;
:smile: :smile: Emoji list
{%youtube youtube_id %} Externals
$L^aT_eX$ LaTeX
:::info
This is a alert area.
:::

This is a alert area.

Versions and GitHub Sync
Get Full History Access

  • Edit version name
  • Delete

revision author avatar     named on  

More Less

Note content is identical to the latest version.
Compare
    Choose a version
    No search result
    Version not found
Sign in to link this note to GitHub
Learn more
This note is not linked with GitHub
 

Feedback

Submission failed, please try again

Thanks for your support.

On a scale of 0-10, how likely is it that you would recommend HackMD to your friends, family or business associates?

Please give us some advice and help us improve HackMD.


Thanks for your feedback

Remove version name

Do you want to remove this version name and description?

Transfer ownership

Transfer to
    Warning: is a public team. If you transfer note to this team, everyone on the web can find and read this note.

      Link with GitHub

      Please authorize HackMD on GitHub
      • Please sign in to GitHub and install the HackMD app on your GitHub repo.
      • HackMD links with GitHub through a GitHub App. You can choose which repo to install our App.
      Learn more  Sign in to GitHub

      Push the note to GitHub Push to GitHub Pull a file from GitHub

        Authorize again
       

      Choose which file to push to

      Select repo
      Refresh Authorize more repos
      Select branch
      Select file
      Select branch
      Choose version(s) to push
      • Save a new version and push
      • Choose from existing versions
      Include title and tags
      Available push count

      Pull from GitHub

       
      File from GitHub
      File from HackMD

      GitHub Link Settings

      File linked

      Linked by
      File path
      Last synced branch
      Available push count

      Danger Zone

      Unlink
      You will no longer receive notification when GitHub file changes after unlink.

      Syncing

      Push failed

      Push successfully