Bhargavi Chinnappa
    • Create new note
    • Create a note from template
      • Sharing URL Link copied
      • /edit
      • View mode
        • Edit mode
        • View mode
        • Book mode
        • Slide mode
        Edit mode View mode Book mode Slide mode
      • Customize slides
      • Note Permission
      • Read
        • Only me
        • Signed-in users
        • Everyone
        Only me Signed-in users Everyone
      • Write
        • Only me
        • Signed-in users
        • Everyone
        Only me Signed-in users Everyone
      • Engagement control Commenting, Suggest edit, Emoji Reply
    • Invite by email
      Invitee

      This note has no invitees

    • Publish Note

      Share your work with the world Congratulations! 🎉 Your note is out in the world Publish Note

      Your note will be visible on your profile and discoverable by anyone.
      Your note is now live.
      This note is visible on your profile and discoverable online.
      Everyone on the web can find and read all notes of this public team.
      See published notes
      Unpublish note
      Please check the box to agree to the Community Guidelines.
      View profile
    • Commenting
      Permission
      Disabled Forbidden Owners Signed-in users Everyone
    • Enable
    • Permission
      • Forbidden
      • Owners
      • Signed-in users
      • Everyone
    • Suggest edit
      Permission
      Disabled Forbidden Owners Signed-in users Everyone
    • Enable
    • Permission
      • Forbidden
      • Owners
      • Signed-in users
    • Emoji Reply
    • Enable
    • Versions and GitHub Sync
    • Note settings
    • Note Insights New
    • Engagement control
    • Transfer ownership
    • Delete this note
    • Save as template
    • Insert from template
    • Import from
      • Dropbox
      • Google Drive
      • Gist
      • Clipboard
    • Export to
      • Dropbox
      • Google Drive
      • Gist
    • Download
      • Markdown
      • HTML
      • Raw HTML
Menu Note settings Note Insights Versions and GitHub Sync Sharing URL Create Help
Create Create new note Create a note from template
Menu
Options
Engagement control Transfer ownership Delete this note
Import from
Dropbox Google Drive Gist Clipboard
Export to
Dropbox Google Drive Gist
Download
Markdown HTML Raw HTML
Back
Sharing URL Link copied
/edit
View mode
  • Edit mode
  • View mode
  • Book mode
  • Slide mode
Edit mode View mode Book mode Slide mode
Customize slides
Note Permission
Read
Only me
  • Only me
  • Signed-in users
  • Everyone
Only me Signed-in users Everyone
Write
Only me
  • Only me
  • Signed-in users
  • Everyone
Only me Signed-in users Everyone
Engagement control Commenting, Suggest edit, Emoji Reply
  • Invite by email
    Invitee

    This note has no invitees

  • Publish Note

    Share your work with the world Congratulations! 🎉 Your note is out in the world Publish Note

    Your note will be visible on your profile and discoverable by anyone.
    Your note is now live.
    This note is visible on your profile and discoverable online.
    Everyone on the web can find and read all notes of this public team.
    See published notes
    Unpublish note
    Please check the box to agree to the Community Guidelines.
    View profile
    Engagement control
    Commenting
    Permission
    Disabled Forbidden Owners Signed-in users Everyone
    Enable
    Permission
    • Forbidden
    • Owners
    • Signed-in users
    • Everyone
    Suggest edit
    Permission
    Disabled Forbidden Owners Signed-in users Everyone
    Enable
    Permission
    • Forbidden
    • Owners
    • Signed-in users
    Emoji Reply
    Enable
    Import from Dropbox Google Drive Gist Clipboard
       Owned this note    Owned this note      
    Published Linked with GitHub
    • Any changes
      Be notified of any changes
    • Mention me
      Be notified of mention me
    • Unsubscribe
    ## Setup WhatsApp This guide will walk you through the process of creating a WhatsApp Business account and setting up your own chatbot for WhatsApp. In this article, you will learn: * [How to create WhatsApp business account](#account) * [How to add WhatsApp numbers for testing](#testing) * [How to test WhatsApp chatbot](#chatbot) ## Prerequisites to setup WhatsApp channel To set up a WhatsApp channel, you need to have an active WhatsApp business account: * Create a WhatsApp Business account * Create a Facebook Business Manager account * Verify your WhatsApp business account with Facebook ## 1. Connect your WhatsApp business account Follow the these steps to connect your chatbot to WhatsApp business account (WABA): 1. On the switcher, click **Channels**. <img src="https://i.imgur.com/kv01RDY.png" alt="drawing" width="90%"/> 2. On the Messaging page, click **WhatsApp Messenger > Get Started**.  <img src="https://i.imgur.com/14XbqIg.png" alt="drawing" width="90%"/> 3. Choose your account type from the drop-down and enable the checkbox to ensure that you have read the above information. Click on **Connect WhatsApp**. <img src="https://i.imgur.com/BQwpnxC.jpg" alt="drawing" width="90%"/> :::note Ensure that you have admin access to the Facebook business manager account. ::: 4. Login to your Facebook account that is linked with your WhatsApp business manager account. <img src="https://i.imgur.com/Lqov4YW.png" alt="drawing" width="50%"/> 5. Click on **Get started** to proceed with the next steps. <img src="https://i.imgur.com/L8hKZeO.png" alt="drawing" width="50%"/> 6. Read the terms and conditions of WhatsApp Business and Meta and click on **Continue**. <img src="https://i.imgur.com/Er17Zwe.png" alt="drawing" width="50%"/> 7. Select an existing Business Manager account or create a new account to start with. <img src="https://i.imgur.com/qyp074p.png" alt="drawing" width="40%"/> 8. Create a new WABA and click on **Continue**. You can also select an existing WABA if you already have one with Yellow.ai. <img src="https://i.imgur.com/p0nEs2n.png" alt="drawing" width="50%"/> 9. The information you provided will be verified, and while verifying, you will see a message **Verifying your information**. <img src="https://i.imgur.com/KcCKCf4.png" alt="drawing" width="60%"/> 10. Click on **Continue to step 2** to proceed further. <img src="https://i.imgur.com/D4ZmNvm.png" alt="drawing" width="90%"/> 11. In **WhatsApp Business Display Name**, enter a valid display name for your WhatsApp account. The name you provide will be displayed on your WhatsApp business account. Refer to the [naming guidelines](https://www.facebook.com/business/help/757569725593362) to provide the appropriate name. <img src="https://i.imgur.com/CtbvpMf.png" alt="drawing" width="50%"/> 12. Choose your business **Category** and enter the business description to create your WhatsApp business profile > Click on **Continue**. :::note: Note that, you can later edit the information on the Yellow.ai platform. ::: <img src="https://i.imgur.com/z0iSidb.png" alt="drawing" width="60%"/> 13. Enter a phone that you want to register. Ensure that it does not have a WhatsApp account, and is able to receive incoming messages or voice calls for OTP verification <img src="https://i.imgur.com/hdo6P8e.png" alt="drawing" width="50%"/> :::note Make sure that the phone number you provide is not currently connected to any WhatsApp account. If it is already connected, disconnect it from your WhatsApp account before proceeding. ::: 15. Enter the OTP received on the number via your preferred method. Choose the retries wisely as its limited to 3 attempts in 24hrs. <img src="https://i.imgur.com/DnIuZZD.png" alt="drawing" width="50%"/> 16. Once the verification is successfully completed, click **OK**, and the platform will display the WhatsApp business account details. <img src="https://i.imgur.com/R9iT4B8.png" alt="drawing" width="50%"/> 17. You will be redirected to the **Messaging** page. On the popup screen choose the name of the business account, phone number associated, and click **Connect**. <img src="https://i.imgur.com/CNm6g2g.png" alt="drawing" width="90%"/> * Once the account is created, you can view your account on the **WhatsApp messenger** page. <img src="https://i.imgur.com/ezgp1Qy.png" alt="drawing" width="90%"/> 18. To add multiple numbers by clicking on **+ Add Number** at the top right corner. <img src="https://i.imgur.com/0wkbQHP.png" alt="drawing" width="90%"/> 19. To see the business details click on view more. You can also edit the provided details based on your requirements. <img src="https://i.imgur.com/LfIwYrC.png" alt="drawing" width="90%"/> ### 1.1 Create Facebook Business Manager (FBM) account If you have already created the account, login to FBM. If not, follow the steps to create an FBM account. 1. Go to [Facebook Business Manager](https://business.facebook.com/overview) and click **Create Account**. 2. Provide your name, business name, and business email ID. 3. Enter your business details to create the FBM account. 4. Now, you have created the FBM. ### 1.2 Verify Business account with Facebook 1. In the FBM (Facebook Business Manager), go to **More Tools > Business Settings > Select your Business**. 
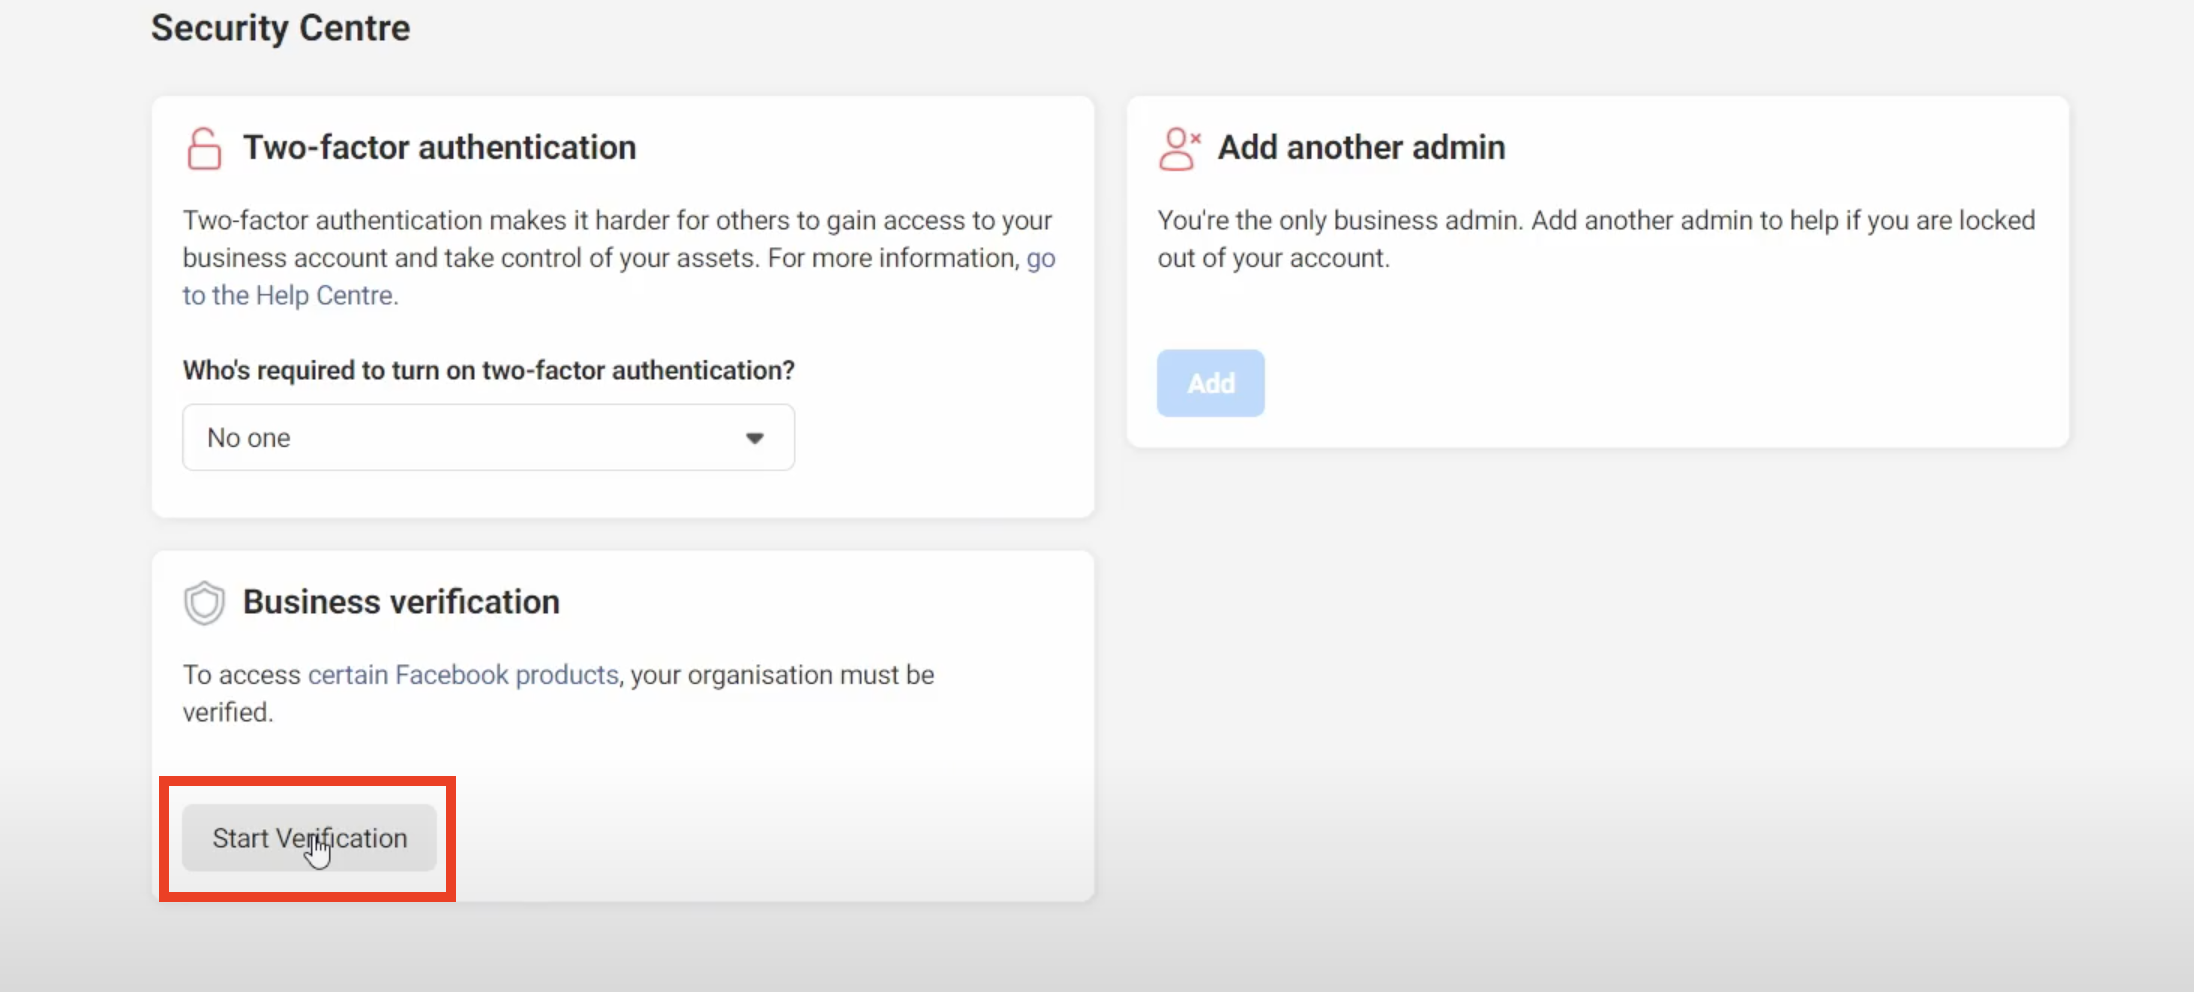
2. Click on **Security Centre**. ![](https://cdn.yellowmessenger.com/KkAtqbeljfoI1620219338763.png) 
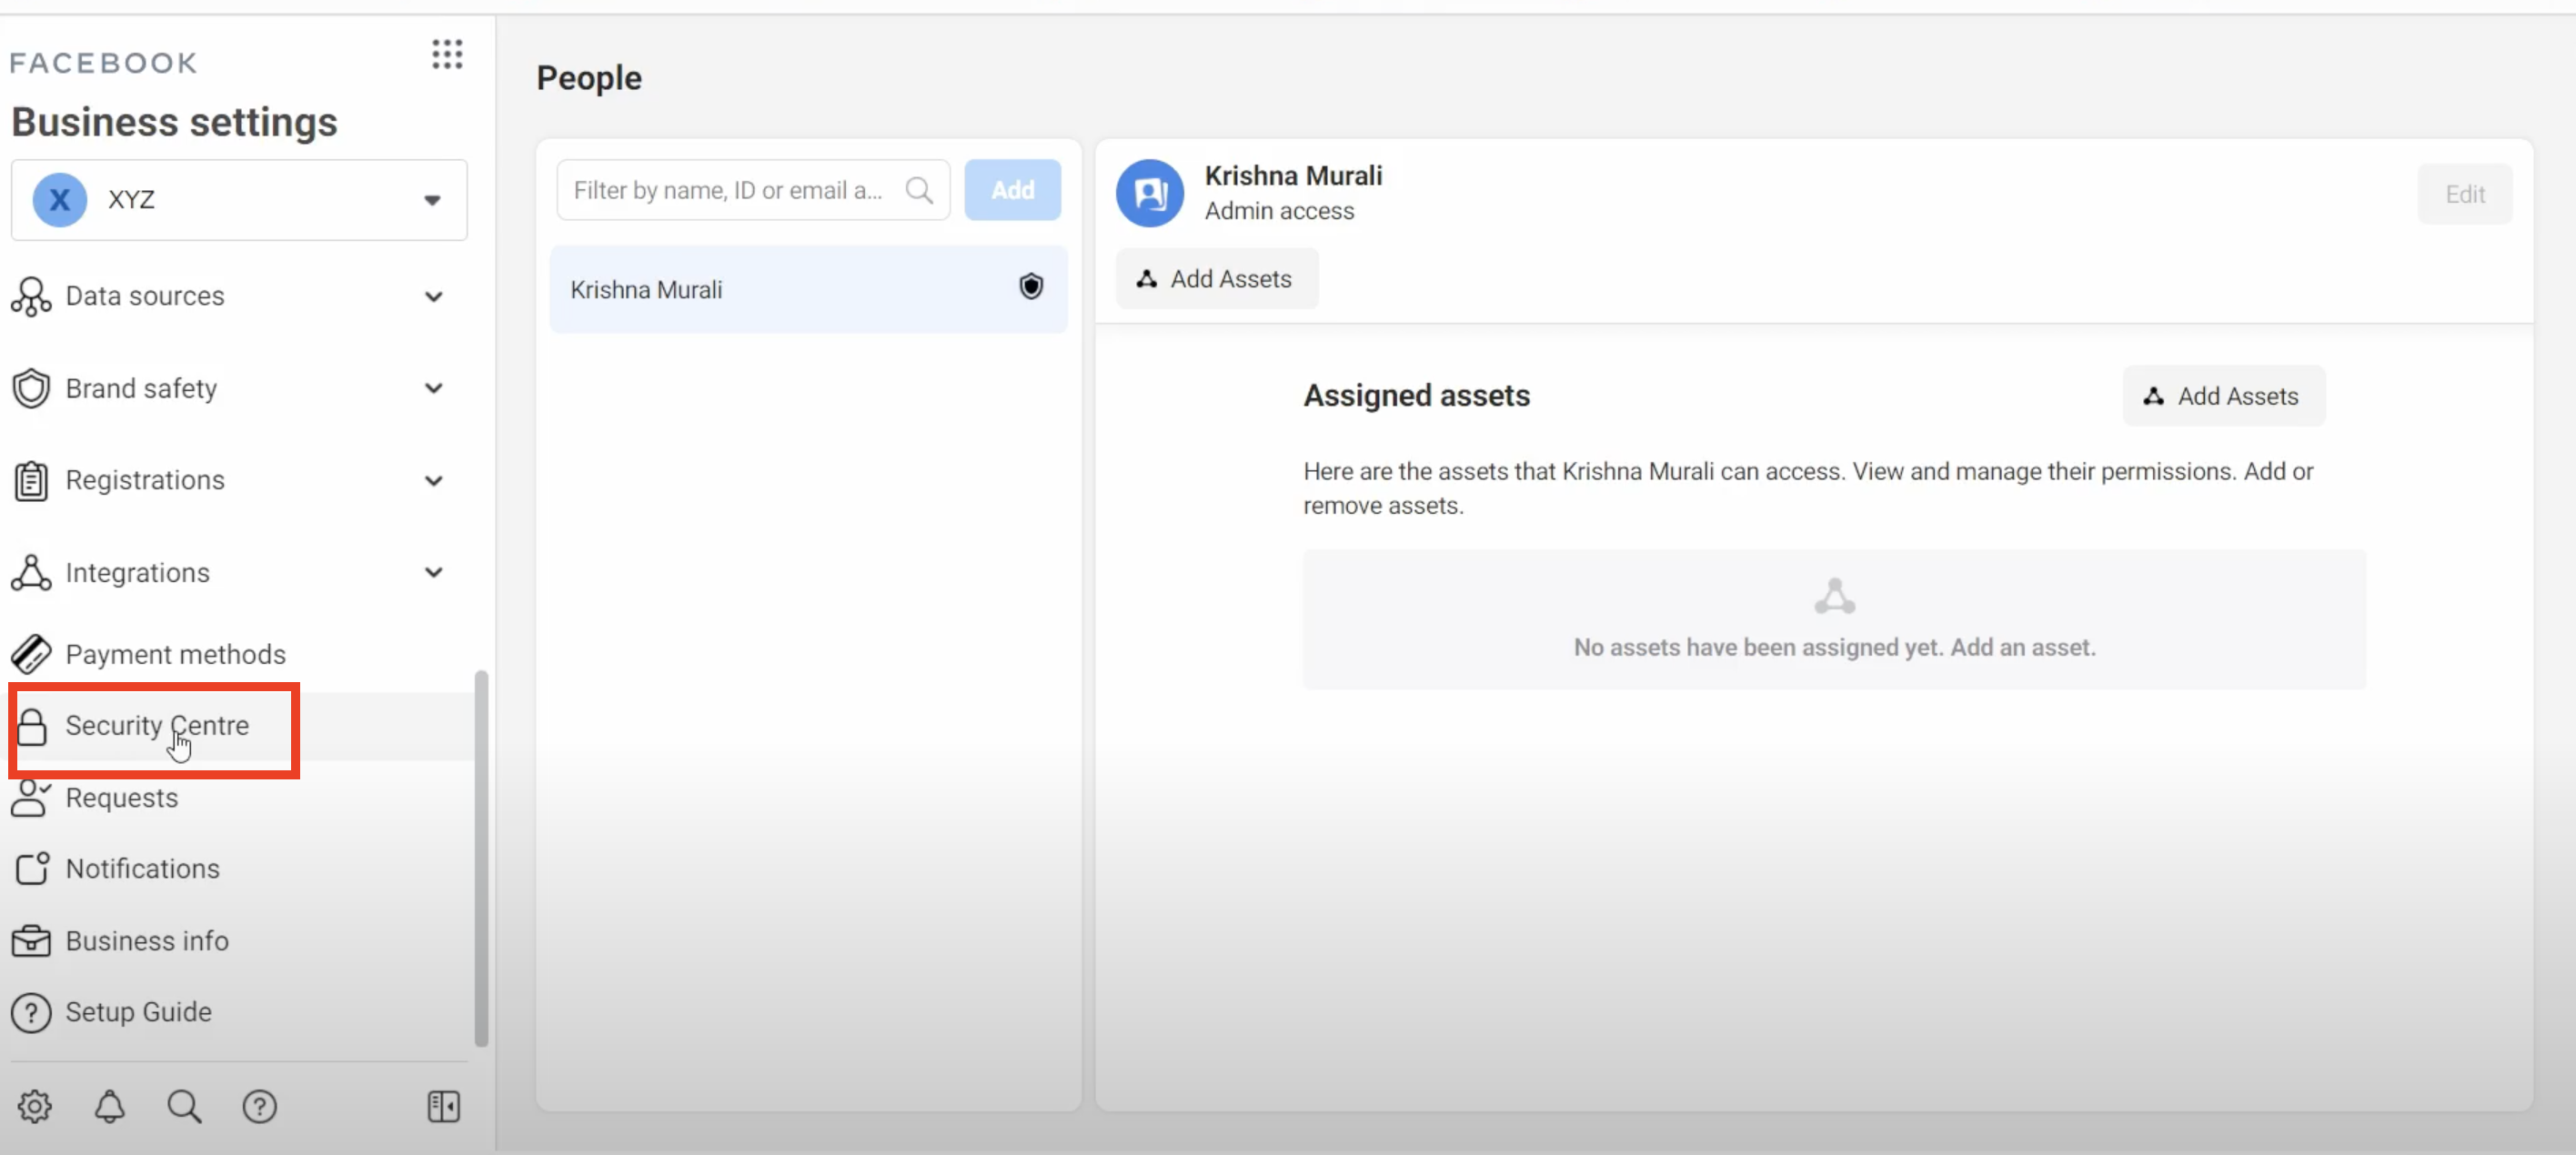
3. Click **Start verification**. ![](https://cdn.yellowmessenger.com/4lUE9WFC5jTX1620219352063.png) 4. Provide the legal business details and click **Next**. ![](https://i.imgur.com/zNoQ10s.png) 5. Look for your business on the list. This is listed based on the business name you provided. If your business is listed, select it and go to step 6. If not visible, click **None of these** and directly **jump to step 7**. ![](https://cdn.yellowmessenger.com/NOqzxCypg7kz1620219379343.png) 
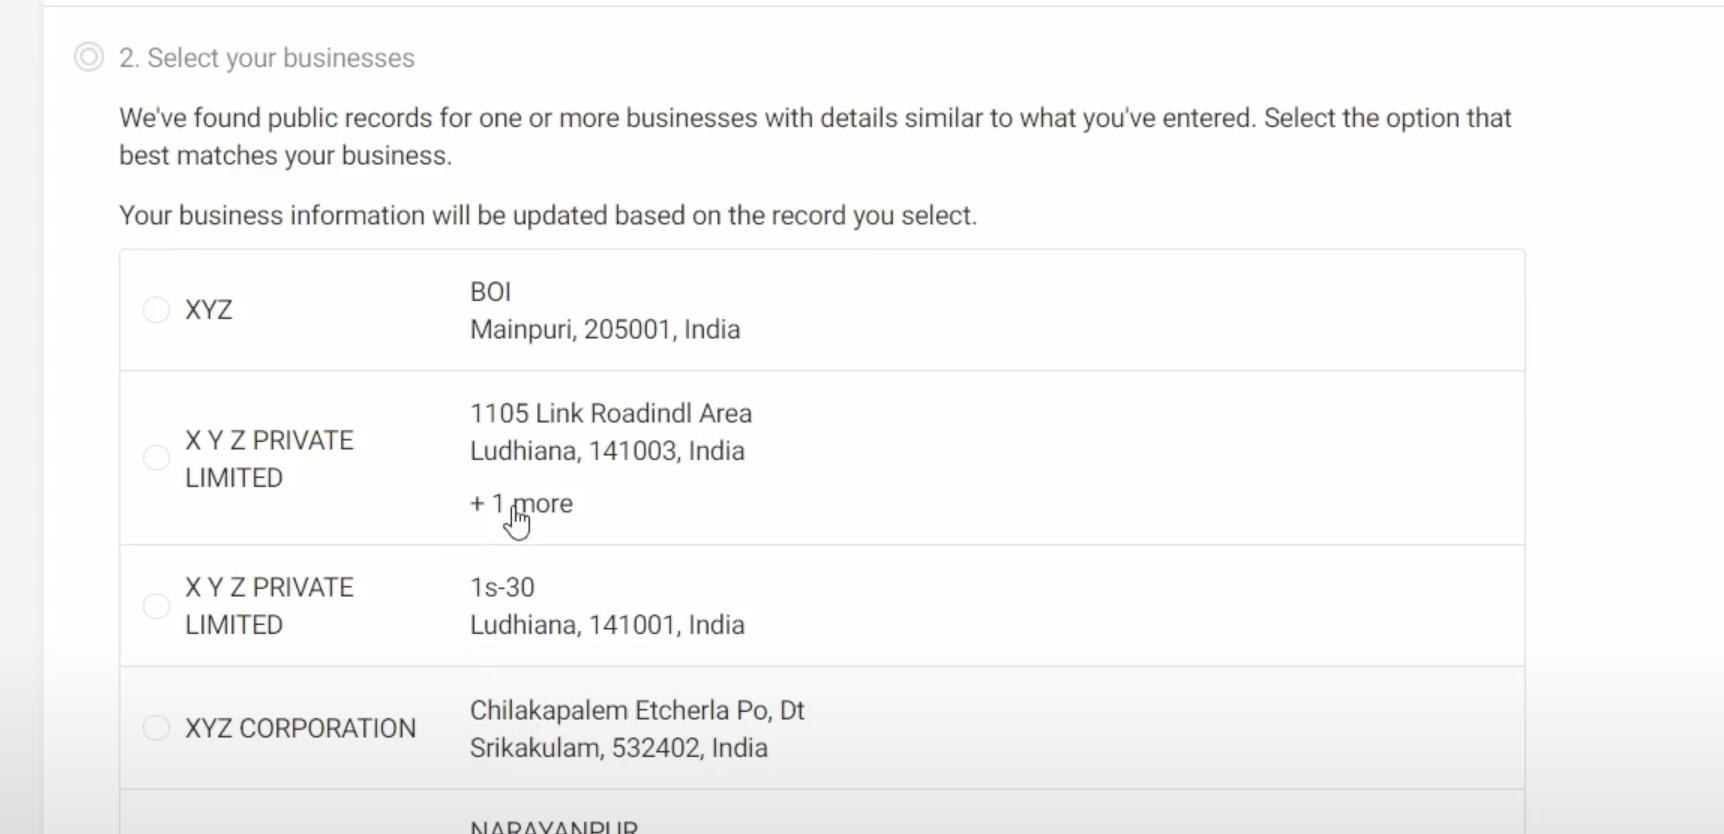
6. Confirm the business details such as business name, address, and phone number. After this, **jump to step 8**. ![](https://i.imgur.com/2a6zHV3.png) 7. Select the document language, and you can either upload or drag and drop relevant legal business documents from your folder for the Facebook team to review. Click [here](https://www.facebook.com/business/help/159334372093366) for more information on accepted legal documents. ![](https://i.imgur.com/zQJWL1p.png) 8. Choose how to get the **verification code via email or phone**, and enter the code. ![](https://i.imgur.com/UdiJ3V8.png) Enter the verification code you have received. ![](https://i.imgur.com/xIIA6ih.png) To cancel the verification request, go to **Security Center > Cancel**. ![](https://i.imgur.com/dCA8zjm.png) ## 2. Add WhatsApp numbers for testing purposes Yellow.ai allows you to test your WhatsApp bot in Development mode before pushing the changes to the Live environment. You can add upto ten testing numbers. 1. In Channels, select <b>WhatsApp messenger</b> in the *Live* environment. 2. Click on the **more options** icon and select **Edit**. ![](https://i.imgur.com/gPwidHR.png) 3. **Enable development mode** using the toggle button. <center><img src="https://i.imgur.com/aLV9n2I.png" width="80%"/></center> 4. Choose the **Development bot ID** that you want to use for testing purposes. 5. Enter the number in **Developer whatsapp number**. 6. To add more WhatsApp business numbers, click **Add phone numbers**. 7. Click **Save**. ## 3. Test your bot on WhatsApp After connecting your bot to WhatsApp, you can test your bot to ensure all the flows you configured are working as intended. #### Prerequisite * Ensure that you have trained the bot with intents and configured the flows with the same intent. To test your bot on WhatsApp, follow these steps: 1. On the WhatsApp channel page, ensure that your number is connected. ![](https://i.imgur.com/wYzUZU5.png) 2. Go to Studio, select the flow that you want to test. ![](https://i.imgur.com/kHPPeM1.png) 3. Select **WhatsApp** from the website drop-down. ![](https://i.imgur.com/5AqYfGt.png) 4. Scan the QR code using your mobile phone. The bot opens in your WhatsApp. <img src="https://i.imgur.com/sym9SMt.png" alt="drawing" width="50%"/> 5. Start the conversation to test your bot. A message shows a double tick once it is sent to the bot, and the bot will respond back with the configured flow. <img src="https://i.imgur.com/J6vb0lA.jpg" alt="drawing" width="50%"/> 6. If you see a single tick or a double tick, but the bot is still not responding, navigate to the Inbox module in the platform and select **Bot messages** in the **Chats** section. Here, you can view the entire conversation between the bot and user. ![](https://i.imgur.com/SGqIOn2.png)

    Import from clipboard

    Paste your markdown or webpage here...

    Advanced permission required

    Your current role can only read. Ask the system administrator to acquire write and comment permission.

    This team is disabled

    Sorry, this team is disabled. You can't edit this note.

    This note is locked

    Sorry, only owner can edit this note.

    Reach the limit

    Sorry, you've reached the max length this note can be.
    Please reduce the content or divide it to more notes, thank you!

    Import from Gist

    Import from Snippet

    or

    Export to Snippet

    Are you sure?

    Do you really want to delete this note?
    All users will lose their connection.

    Create a note from template

    Create a note from template

    Oops...
    This template has been removed or transferred.
    Upgrade
    All
    • All
    • Team
    No template.

    Create a template

    Upgrade

    Delete template

    Do you really want to delete this template?
    Turn this template into a regular note and keep its content, versions, and comments.

    This page need refresh

    You have an incompatible client version.
    Refresh to update.
    New version available!
    See releases notes here
    Refresh to enjoy new features.
    Your user state has changed.
    Refresh to load new user state.

    Sign in

    Forgot password

    or

    By clicking below, you agree to our terms of service.

    Sign in via Facebook Sign in via Twitter Sign in via GitHub Sign in via Dropbox Sign in with Wallet
    Wallet ( )
    Connect another wallet

    New to HackMD? Sign up

    Help

    • English
    • 中文
    • Français
    • Deutsch
    • 日本語
    • Español
    • Català
    • Ελληνικά
    • Português
    • italiano
    • Türkçe
    • Русский
    • Nederlands
    • hrvatski jezik
    • język polski
    • Українська
    • हिन्दी
    • svenska
    • Esperanto
    • dansk

    Documents

    Help & Tutorial

    How to use Book mode

    Slide Example

    API Docs

    Edit in VSCode

    Install browser extension

    Contacts

    Feedback

    Discord

    Send us email

    Resources

    Releases

    Pricing

    Blog

    Policy

    Terms

    Privacy

    Cheatsheet

    Syntax Example Reference
    # Header Header 基本排版
    - Unordered List
    • Unordered List
    1. Ordered List
    1. Ordered List
    - [ ] Todo List
    • Todo List
    > Blockquote
    Blockquote
    **Bold font** Bold font
    *Italics font* Italics font
    ~~Strikethrough~~ Strikethrough
    19^th^ 19th
    H~2~O H2O
    ++Inserted text++ Inserted text
    ==Marked text== Marked text
    [link text](https:// "title") Link
    ![image alt](https:// "title") Image
    `Code` Code 在筆記中貼入程式碼
    ```javascript
    var i = 0;
    ```
    var i = 0;
    :smile: :smile: Emoji list
    {%youtube youtube_id %} Externals
    $L^aT_eX$ LaTeX
    :::info
    This is a alert area.
    :::

    This is a alert area.

    Versions and GitHub Sync
    Get Full History Access

    • Edit version name
    • Delete

    revision author avatar     named on  

    More Less

    Note content is identical to the latest version.
    Compare
      Choose a version
      No search result
      Version not found
    Sign in to link this note to GitHub
    Learn more
    This note is not linked with GitHub
     

    Feedback

    Submission failed, please try again

    Thanks for your support.

    On a scale of 0-10, how likely is it that you would recommend HackMD to your friends, family or business associates?

    Please give us some advice and help us improve HackMD.


    Thanks for your feedback

    Remove version name

    Do you want to remove this version name and description?

    Transfer ownership

    Transfer to
      Warning: is a public team. If you transfer note to this team, everyone on the web can find and read this note.

        Link with GitHub

        Please authorize HackMD on GitHub
        • Please sign in to GitHub and install the HackMD app on your GitHub repo.
        • HackMD links with GitHub through a GitHub App. You can choose which repo to install our App.
        Learn more  Sign in to GitHub

        Push the note to GitHub Push to GitHub Pull a file from GitHub

          Authorize again
         

        Choose which file to push to

        Select repo
        Refresh Authorize more repos
        Select branch
        Select file
        Select branch
        Choose version(s) to push
        • Save a new version and push
        • Choose from existing versions
        Include title and tags
        Available push count

        Pull from GitHub

         
        File from GitHub
        File from HackMD

        GitHub Link Settings

        File linked

        Linked by
        File path
        Last synced branch
        Available push count

        Danger Zone

        Unlink
        You will no longer receive notification when GitHub file changes after unlink.

        Syncing

        Push failed

        Push successfully