# Celo 201 - Build an NFT Minter Dapp with React
In this learning module, we will build the frontend for an NFT minting contract.
This tutorial will walk you through building an NFT minter with Celo. The project will be a monorepo, meaning that the Hardhat contract environment will be in the same repository as the React frontend.
We will be able to deploy an NFT contract to the Celo Alfajores network and interact with it from the frontend.
The minter will be able to mint NFTs with attributes for the Celo Alfajores network and show all NFTs that have been minted as well as who currently owns them.
The finished minter dapp will behave like this:
### Prerequisites
You will need the following for this learning module:
- [Node JS](https://nodejs.org/en/download/) - Please make sure you have Node.js v12 or higher installed.
- Understanding of Solidity and the Celo Blockchain.
- Know how to use Hardhat to develop Solidity contracts.
- You should have a basic understanding of [React](https://reactjs.org/): know how to use JSX, props, state, lifecycle methods, and hooks.
### Tech Stack
We will use the following tech stack in this tutorial:
- [Hardhat](https://hardhat.org/) - A Solidity development environment.
- [React](https://reactjs.org/) - A JavaScript library for building user interfaces.
- [Bootstrap](https://getbootstrap.com/) - A CSS framework.
- [useContractKit](https://github.com/celo-org/use-contractkit) - A React hook to interact with the Celo Blockchain.
- [IPFS](https://ipfs.io/) - A distributed file storage system.
## 1. Project Setup
In the first section of this tutorial, we will set up the project and install the necessary dependencies.
1. Clone the repository:
```sh
git clone https://github.com/dacadeorg/celo-react-boilerplate.git
```
2. Navigate to the directory:
```sh
cd celo-react-boilerplate
```
3. Install the dependencies:
```sh
npm install
```
4. Create an environment variable for your mnemonic.
- Create a file named `.env` in the root directory of the project.
- Add your mnemonic into the file, like this:
```
MNEMONIC="YOUR_SECRET_RECOVERY_PHRASE"
```
In this case, we are using a mnemonic from an account created on Metamask. You can copy it from your Metamask account settings. An account created on the Celo extension wallet will not work.
You can find more details about the whole process in the [NFT Contract Development with Hardhat](https://hackmd.io/exuZTH2hTqKytn2vxgDmcg) learning module.
5. Run the boilerplate.
If you have a Metamask wallet installed that is connected to the Celo network, Alfajores, and have Celo testnet tokens, you can test the boilerplate now.
Let's deploy our `counter` contract to the Celo Alfajores testnet:
```sh
npx hardhat run --network alfajores scripts/deploy.js
```
Next, start the dapp:
```sh
npm start
```
The boilerplate should now behave like this:
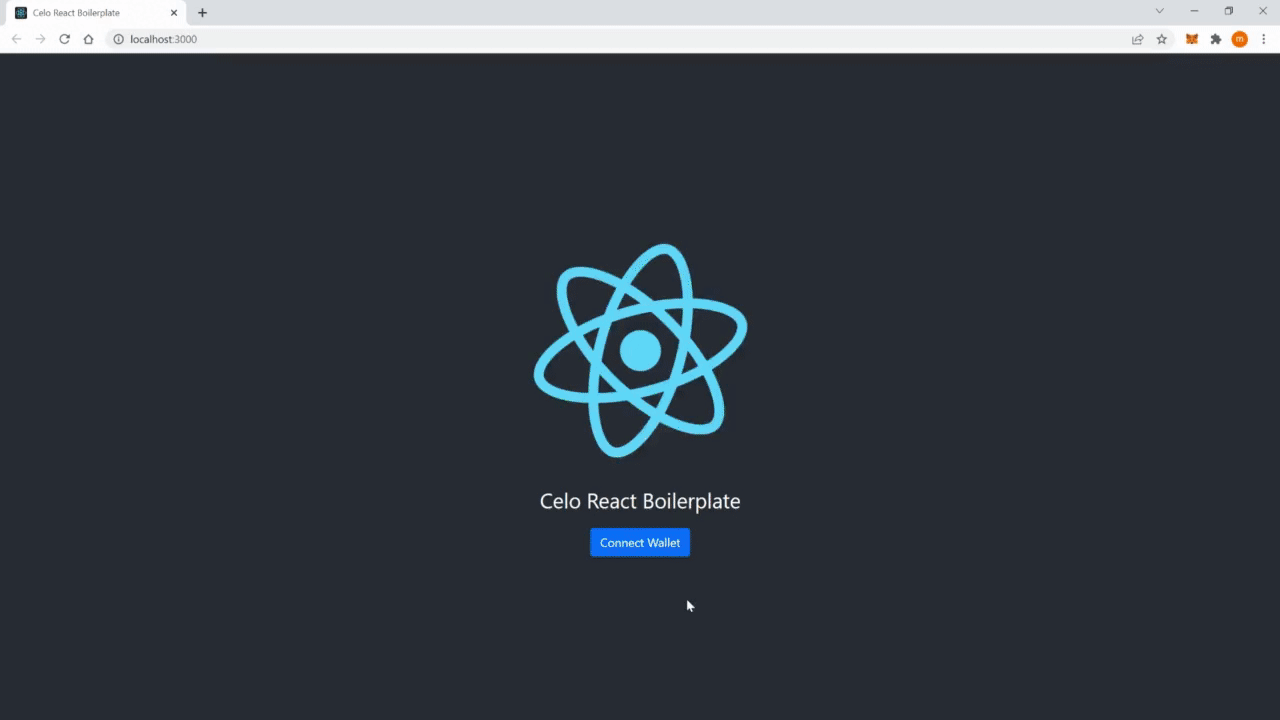
Let's see how the boilerplate works.
### Folder Structure
Your project should now have the following folder structure:
```
├── contracts
├── public
├── scripts
├── src
└── test
```
It is useful to have finished our learning module: [NFT Contract Development with Hardhat](https://hackmd.io/exuZTH2hTqKytn2vxgDmcg). The `contracts`, `scripts`, and `test` folders belong to the Hardhat environment and are explained in more detail in that module.
The `contracts` folder contains the smart contracts that Hardhat uses. In the case of the boilerplate, this is an example `Counter` smart contract.
The `scripts` folder contains the scripts that Hardhat uses to deploy the smart contracts. In the case of the boilerplate, this is an example `deploy.js` script.
The `test` folder contains the tests that Hardhat uses to test the smart contracts. In the case of the boilerplate, this is an example `counter-test.js` script.
The `src` folder contains the React frontend.
The `public` folder contains the compiled static files that the web server will serve.
## 2. Boilerplate
This section will look into the boilerplate that we just installed.
Inside the `src` directory, we find the following folders and the index.js and App.js files:
```
├── src
│ ├── components
│ ├── contracts
│ ├── hooks
│ ├── utils
│ ├── index.js
│ └── App.js
```
In the following sub-sections, we will go through the files and folders and explain what they are used for. However, we will not go into the code of all files to save time and space.
Let's start by going through the `index.js`.
### 2.1 index.js
In the `index.js` file, we import the React library and the `App` component, as well as CSS files for styling and `ContractKitProvider`, `Alfajores` and `NetworkNames` from `use-contractkit`.
In order to connect to a Celo network, we need to wrap the `ContractKitProvider` around the `App` component:
```js
...
ReactDOM.render(
<React.StrictMode>
<ContractKitProvider
networks={[Alfajores]}
network={{
name: NetworkNames.Alfajores,
rpcUrl: "https://alfajores-forno.celo-testnet.org",
graphQl: "https://alfajores-blockscout.celo-testnet.org/graphiql",
explorer: "https://alfajores-blockscout.celo-testnet.org",
chainId: 44787,
}}
dapp={{
name: "Celo React Boilerplate",
description: "A React Boilerplate for Celo Dapps",
}}
>
<App />
</ContractKitProvider>
</React.StrictMode>,
document.getElementById("root")
);
...
```
The `use-contractkit` provides a `network` variable that contains the network configuration. We can use this to connect to the Celo testnet Alfajores.
### 2.2 App.js
The `App.js` file is the main entry point for the React frontend. It contains the `App` component, which is the container for all other components.
At the top of the `App.js` file, we import the libraries, components, and hooks we will use. Our `App` component looks like this:
```js
// ...
const App = function AppWrapper() {
const { address, destroy, connect } = useContractKit();
const { balance } = useBalance();
const counterContract = useCounterContract();
return (
<>
<Notification />
{address ? (
<Container fluid="md">
<Nav className="justify-content-end pt-3 pb-5">
<Nav.Item>
<Wallet
address={address}
amount={balance.CELO}
symbol="CELO"
destroy={destroy}
/>
</Nav.Item>
</Nav>
<main>
<Counter counterContract={counterContract} />
</main>
</Container>
) : (
<div className="App">
<header className="App-header">
<Cover connect={connect} />
</header>
</div>
)}
</>
);
};
```
We add the `Notification` component at the top of the JSX of our `App` component. This component is used to display notifications to the user. We will explain the components in more detail in the following sub-sections.
If the user is not connected to the Celo network, we display a cover component and pass `useContractKit`'s `connect` method as a prop to the cover component so that the user can connect to the network with their wallet.
If the user is connected, we display our dapp. Which mainly consists of the navigation with the `Wallet` component and a main element with the `Counter` component.
We pass `useContractKit`'s `address` and `balance.celo` variables as props to the `Wallet` component, as well as the `destroy` method, that enables the user to disconnect from the dapp. The `symbol` prop is used to display the symbol of the token, in this case, `Celo`.
The `Counter` component gets the `counterContract` smart contract instance from our `useCounterContract` custom hook and will display a counter that the user can increment and decrement.
Let's have a look at the components in more detail.
### 2.3 components
Inside the components folder, we find the following files and folders:
```
├── components
│ ├── ui
│ ├── Counter.js
│ ├── Cover.js
│ └── Wallet.js
```
#### 2.3.1 Cover.js
The `Cover.js` file contains the `Cover` component. This component contains a landing page used when the user is not connected to the Celo testnet and features a button to connect.
#### 2.3.2 Wallet.js
The `Wallet` component is a simple component that displays the address as an identicon (a visual representation of the address) and the Celo balance of the account that the dapp is connected to. If we toggle the `Wallet` component, we will see the truncated (shortened) address and a button to disconnect the account.
The `address`, `amount`, `symbol` and `destroy` props are passed to the `Wallet` component from the `App` component.
#### 2.3.3 Counter.js
The `Counter.js` file contains the `Counter` component, which is used to display the current value of a counter, and two buttons to increment and decrement the counter.
We use the `counterContract` prop to access an instance of the `Counter` smart contract. With the instance of the contract and the `performAction` method, we can call the `increaseCount` and `decreaseCount` methods of the smart contract.
#### 2.3.4 ui
The `ui` folder contains the following files:
```
├── ui
│ ├── Identicon.js
│ ├── Loader.js
│ └── Notification.js
```
The `Identicon` component is used to display the address as an identicon (a visual representation of the address). The identicon is generated using the Metamask's `Jazzicon` library. We use the identicon in the `Wallet` component.
The `Loader` component is used to display a loading animation when we are waiting for a response from the Celo network.
The `Notification` component is used to display notifications to the user. This component uses the `react-toastify` library to display notifications. We implement `Notification` in the `App` component.
### 2.4 hooks
The `hooks` folder contains the following files:
```
├── hooks
│ ├── index.js
│ ├── useBalance.js
│ ├── useContract.js
│ └── useCounterContract.js
```
#### 2.4.1 useBalance.js
The `useBalance.js` file contains the `useBalance` custom hook. This hook is used to get the balance of the account that the dapp is connected to. We use contractkit's `kit` method `getTokenBalance` to query the balances of Celo tokens. The `useBalance` hook is implemented in the `App` component.
#### 2.4.2 useContract.js
The `useContract.js` file contains the `useContract` custom hook. This hook is used to get an instance of a smart contract. `useContract` needs an `abi` and a `contractAddress` as props. Then we can use `kit.web3.eth.contract` to create an instance of the smart contract. The `useContract` hook is implemented in the `useCounterContract` custom hook that we are going to look at next.
This hook is very generic and can be used to get an instance of any smart contract.
#### 2.4.3 useCounterContract.js
The `useCounterContract.js` file contains the `useCounterContract` custom hook. This hook imports the abi and contract address from json files that are generated by the Hardhat deploy script. With the abi and contract address, we can create and export an instance of the `Counter` smart contract.
The `useCounterContract` hook is implemented in the `App` component.
Let's have a look at some utility functions next.
### 2.5 utils
The `utils` folder contains the following files:
```
├── utils
│ ├── constants.js
│ ├── counter.js
│ └── index.js
```
These files contain constants and utility functions that are used in the dapp.
#### 2.5.1 index.js
The `index.js` file contains the functions `truncateAddress` and `formatBigNumber`. These functions are used to shorten an address and convert a very large number to a human-readable format.
#### 2.5.2 constants.js
The `constants.js` file for now just contains the `CELO_DECIMALS` constant, which stores the number of decimals Celo tokens have. We use this constant in the `formatBigNumber` function.
#### 2.5.3 counter.js
In the `counter.js` file, we implement the `increaseCount` and `decreaseCount` functions. These functions get the `counterContract` instance and `useContractKit`'s `performAction` as props, so we can call the `increaseCount` and `decreaseCount` methods of the smart contract.
The `counter.js` file is used in the `Counter` component.
Now we can adapt the boilerplate to our needs.
## 3. Minter contract
In this section, we will create the smart contract for the minter dapp, create tests for the smart contract and deploy it to the Celo testnet.
We will keep this chapter brief; a more detailed explanation of NFTs and Hardhat development is provided in the [NFT Contract Development with Hardhat](https://hackmd.io/exuZTH2hTqKytn2vxgDmcg) learning module.
### 3.1 Contract
Inside the `contracts` folder in our root directory, we find the `MyContract.sol` file. Delete that file and create a new one, called `MyNFT.sol`. Add the following code to the file:
```solidity
// SPDX-License-Identifier: MIT
pragma solidity ^0.8.2;
import "@openzeppelin/contracts/token/ERC721/ERC721.sol";
import "@openzeppelin/contracts/token/ERC721/extensions/ERC721Enumerable.sol";
import "@openzeppelin/contracts/token/ERC721/extensions/ERC721URIStorage.sol";
import "@openzeppelin/contracts/access/Ownable.sol";
import "@openzeppelin/contracts/utils/Counters.sol";
contract MyNFT is ERC721, ERC721Enumerable, ERC721URIStorage, Ownable {
using Counters for Counters.Counter;
Counters.Counter private _tokenIdCounter;
constructor() ERC721("MyNFT", "MNFT") {}
function safeMint(address to, string memory uri) public onlyOwner {
uint256 tokenId = _tokenIdCounter.current();
_tokenIdCounter.increment();
_safeMint(to, tokenId);
_setTokenURI(tokenId, uri);
}
// The following functions are overrides required by Solidity.
function _beforeTokenTransfer(address from, address to, uint256 tokenId)
internal
override(ERC721, ERC721Enumerable)
{
super._beforeTokenTransfer(from, to, tokenId);
}
function _burn(uint256 tokenId) internal override(ERC721, ERC721URIStorage) {
super._burn(tokenId);
}
function tokenURI(uint256 tokenId)
public
view
override(ERC721, ERC721URIStorage)
returns (string memory)
{
return super.tokenURI(tokenId);
}
function supportsInterface(bytes4 interfaceId)
public
view
override(ERC721, ERC721Enumerable)
returns (bool)
{
return super.supportsInterface(interfaceId);
}
}
```
This contract is a simple NFT contract that has, among other things, the following features:
- It has a `mint` function that mints an NFT to a given address. Each NFT has a unique ID generated by the `_tokenIdCounter` counter.
- It has a `tokenURI` function that returns the url of the NFT metadata.
- It imports the `ER721Enumerable` contract that allows us to keep track of all the NFTs that have been minted.
You can find more details about this contract in the [NFT Contract Development with Hardhat](https://hackmd.io/exuZTH2hTqKytn2vxgDmcg) learning module.
We import contracts from the `@openzeppelin/contracts` library. To use them, we need to add them to our project first:
```sh
npm install @openzeppelin/contracts
```
Now we can compile the contract with the following command:
```sh
npx hardhat compile
```
After a successful compilation, you should see the following output:
```
Solidity compilation finished successfully
```
### 3.2 Tests
Let's add some tests for our contract. Inside the `tests` folder in our root directory, we delete the `contracts-test.js` file and create a new one called `nft-test.js`. Add the following code to the file:
```js
const { expect } = require("chai");
const { ethers } = require("hardhat");
describe("MyNFT", function () {
this.timeout(50000);
let myNFT;
let owner;
let acc1;
let acc2;
this.beforeEach(async function () {
// This is executed before each test
// Deploying the smart contract
const MyNFT = await ethers.getContractFactory("MyNFT");
[owner, acc1, acc2] = await ethers.getSigners();
myNFT = await MyNFT.deploy();
});
it("Should set the right owner", async function () {
expect(await myNFT.owner()).to.equal(owner.address);
});
it("Should mint one NFT", async function () {
expect(await myNFT.balanceOf(acc1.address)).to.equal(0);
const tokenURI = "https://example.com/1";
const tx = await myNFT.connect(owner).safeMint(acc1.address, tokenURI);
await tx.wait();
expect(await myNFT.balanceOf(acc1.address)).to.equal(1);
});
it("Should set the correct tokenURI", async function () {
const tokenURI_1 = "https://example.com/1";
const tokenURI_2 = "https://example.com/2";
const tx1 = await myNFT.connect(owner).safeMint(acc1.address, tokenURI_1);
await tx1.wait();
const tx2 = await myNFT.connect(owner).safeMint(acc2.address, tokenURI_2);
await tx2.wait();
expect(await myNFT.tokenURI(0)).to.equal(tokenURI_1);
expect(await myNFT.tokenURI(1)).to.equal(tokenURI_2);
});
});
```
In the first test, if the NFT contract was deployed correctly and the owner of the NFT is the same address as the address that deployed the contract, then the test should pass. In the second test, we mint an NFT and check if it is minted correctly to the first account. In the third test, we mint two NFTs and check if the tokenURI is set correctly.
We explain the tests for this contract in more detail in the [NFT Contract Development with Hardhat](https://hackmd.io/exuZTH2hTqKytn2vxgDmcg) learning module.
Now we can run the tests with the following command:
```sh
npx hardhat test
```
If the tests pass, you should see something similar to the following output:
```
MyNFT
✓ Should set the right owner
✓ Should mint one NFT (60ms)
✓ Should set the correct tokenURI (93ms)
3 passing (1s)
```
### 3.3 Deploying the contract
In this section, we will deploy the contract to the Celo Alfajores testnet and store the address and the ABI of the contract so that we can use them in the following sections.
Inside the `scripts` folder in our root directory, we need to change the content of the `deploy.js` file, so we deploy our `MyNFT` contract. Change the code inside the file to the following:
```js
const hre = require("hardhat");
async function main() {
const MyNFT = await hre.ethers.getContractFactory("MyNFT");
const myNFT = await MyNFT.deploy();
await myNFT.deployed();
console.log("MyNFT deployed to:", myNFT.address);
storeContractData(myNFT);
}
function storeContractData(contract) {
const fs = require("fs");
const contractsDir = __dirname + "/../src/contracts";
if (!fs.existsSync(contractsDir)) {
fs.mkdirSync(contractsDir);
}
fs.writeFileSync(
contractsDir + "/MyNFT-address.json",
JSON.stringify({ MyNFT: contract.address }, undefined, 2)
);
const MyNFTArtifact = artifacts.readArtifactSync("MyNFT");
fs.writeFileSync(
contractsDir + "/MyNFT.json",
JSON.stringify(MyNFTArtifact, null, 2)
);
}
main()
.then(() => process.exit(0))
.catch((error) => {
console.error(error);
process.exit(1);
});
```
We deploy the contract to an address that is generated by the `hardhat` tool and store the address and the ABI of the contract in the `src/contracts` folder.
The next step is to deploy the contract with the following command:
```sh
npx hardhat run --network alfajores scripts/deploy.js
```
If the deployment was successful, you should see something similar to the following output:
```
MyNFT deployed to: 0xa489D2cf2df2F843C72980542c934F1f89b6DdfE
```
If we look at the `src/contracts` folder, we should see the following files:
- `MyNFT-address.json`: This file contains the address of the contract.
- `MyNFT.json`: This file contains the ABI of the contract.
We can delete the `CounterAddress.json` file and the `Counter.json` file.
That's it! Now you can use the contract in the next sections.
## 4. Minter UI
In this section, we will create a UI that allows us to mint and view the NFTs that have been minted. Inside the `src/components` folder, we create a new folder called `minter`. Inside the folder, we create a new folder called `nfts`. This is where we will create the UI for the NFTs.
### 4.1 nfts/index.js
The `index.js` file is the main component of the minter UI, which contains the UI's logic and is the container for the components that display NFTs and the minting form.
At the top of file, we handle our imports:
```js
import { useContractKit } from "@celo-tools/use-contractkit";
import React, { useEffect, useState, useCallback } from "react";
import { toast } from "react-toastify";
import PropTypes from "prop-types";
import AddNfts from "./Add";
import Nft from "./Card";
import Loader from "../../ui/Loader";
import { NotificationSuccess, NotificationError } from "../../ui/Notifications";
import {
getNfts,
createNft,
fetchNftContractOwner,
} from "../../../utils/minter";
import { Row } from "react-bootstrap";
// ...
```
We import the `AddNfts` and `Nft` components, as well the `getNfts`, `createNft` and `fetchNftContractOwner` functions from the `utils` folder; which we will create later in this tutorial.
Next, we create our main component with its state:
```js
// ...
const NftList = ({ minterContract, name }) => {
const { performActions, address } = useContractKit();
const [nfts, setNfts] = useState([]);
const [loading, setLoading] = useState(false);
const [nftOwner, setNftOwner] = useState(null);
// ...
```
The `NftList` component expects a `minterContract` prop, which is the instance of the `MyNFT` contract, and a `name` prop, which is the name of the NFT collection we want to display.
As previously described, we use the `useContractKit` hook to get the address of the user and the `performActions` function to perform actions on the `minterContract` contract.
Then we use the `useState` hook to fetch the `nfts`, which is the list of NFTs that have been minted, and the `loading` state to manage a loading indicator while the `nfts` are being fetched. The `nftOwner` state is used to store the address of the owner of the NFT contract.
Next, we create a callback function that fetches the NFTs from the `minterContract` contract:
```js
// ...
const getAssets = useCallback(async () => {
try {
setLoading(true);
const allNfts = await getNfts(minterContract);
if (!allNfts) return;
setNfts(allNfts);
} catch (error) {
console.log({ error });
} finally {
setLoading(false);
}
}, [minterContract]);
// ...
```
The callback function returns a memoized function that only changes if the `minterContract` contract changes.
We set the `loading` state to `true` while the NFTs are being fetched. Then we set the `nfts` state to the list of NFTs that have been minted with the `getNfts` function that we imported earlier.
Now we add a function that creates a new NFT:
```js
// ...
const addNft = async (data) => {
try {
setLoading(true);
await createNft(minterContract, performActions, data);
toast(<NotificationSuccess text="Updating NFT list...." />);
getAssets();
} catch (error) {
console.log({ error });
toast(<NotificationError text="Failed to create an NFT." />);
} finally {
setLoading(false);
}
};
// ...
```
The function mints a new NFT by calling the `createNft` function, which we imported earlier, and passing the `minterContract` contract, the `performActions` function, and the `data` object. The `data` object contains the NFT's metadata.
Next, we create a function that fetches the owner of the NFT contract and a `useEffect` hook that calls the `getAssets` and `fetchContractOwner` functions when `minterContract`, `address`, `getAssets`, or `fetchContractOwner` change:
```js
// ...
const fetchContractOwner = useCallback(async (minterContract) => {
// get the address that deployed the NFT contract
const _address = await fetchNftContractOwner(minterContract);
setNftOwner(_address);
}, []);
useEffect(() => {
try {
if (address && minterContract) {
getAssets();
fetchContractOwner(minterContract);
}
} catch (error) {
console.log({ error });
}
}, [minterContract, address, getAssets, fetchContractOwner]);
// ...
```
Now we can display the NFTs:
```js
// ...
if (address) {
return (
<>
{!loading ? (
<>
<div className="d-flex justify-content-between align-items-center mb-4">
<h1 className="fs-4 fw-bold mb-0">{name}</h1>
{nftOwner === address ? (
<AddNfts save={addNft} address={address} />
) : null}
</div>
<Row xs={1} sm={2} lg={3} className="g-3 mb-5 g-xl-4 g-xxl-5">
{nfts.map((_nft) => (
<Nft
key={_nft.index}
nft={{
..._nft,
}}
/>
))}
</Row>
</>
) : (
<Loader />
)}
</>
);
}
return null;
};
// ...
```
We display the `name` of the collection as the page's title.
If the user is the owner of the NFT contract, we display the `AddNfts` component, which is a component that allows the user to mint a new NFT. We pass the `addNft` function and the `address` of the user as props to the component.
Then we map the list of `nfts` to the `Nft` component, which is a component that displays the NFT's metadata. We pass the `_nft` object's metadata as props to the component.
Finally, we make sure that the props are from the right type, that the default props are set to `null`, and export the component:
```js
// ...
NftList.propTypes = {
minterContract: PropTypes.instanceOf(Object),
updateBalance: PropTypes.func.isRequired,
};
NftList.defaultProps = {
minterContract: null,
};
export default NftList;
```
That's it!
You can find the complete code of the file [here](https://github.com/dacadeorg/celo-nft-minter/blob/master/src/components/minter/nfts/index.js).
Next, we add a `Card` component to display the NFT's metadata.
### 4.2 nfts/Card.js
We create a new file, `Card.js`, in the `nfts` directory. This file will contain the `Card` component, which is used to display the NFT's metadata:
```js
import React from "react";
import PropTypes from "prop-types";
import { Card, Col, Badge, Stack, Row } from "react-bootstrap";
import { truncateAddress } from "../../../utils";
import Identicon from "../../ui/Identicon";
const NftCard = ({ nft }) => {
const { image, description, owner, name, index, attributes } = nft;
return (
<Col key={index}>
<Card className=" h-100">
<Card.Header>
<Stack direction="horizontal" gap={2}>
<Identicon address={owner} size={28} />
<span className="font-monospace text-secondary">
{truncateAddress(owner)}
</span>
<Badge bg="secondary" className="ms-auto">
{index} ID
</Badge>
</Stack>
</Card.Header>
<div className=" ratio ratio-4x3">
<img src={image} alt={description} style={{ objectFit: "cover" }} />
</div>
<Card.Body className="d-flex flex-column text-center">
<Card.Title>{name}</Card.Title>
<Card.Text className="flex-grow-1">{description}</Card.Text>
<div>
<Row className="mt-2">
{attributes.map((attribute, key) => (
<Col key={key}>
<div className="border rounded bg-light">
<div className="text-secondary fw-lighter small text-capitalize">
{attribute.trait_type}
</div>
<div className="text-secondary text-capitalize font-monospace">
{attribute.value}
</div>
</div>
</Col>
))}
</Row>
</div>
</Card.Body>
</Card>
</Col>
);
};
NftCard.propTypes = {
// props passed into this component
nft: PropTypes.instanceOf(Object).isRequired,
};
export default NftCard;
```
This component is pretty simple. We get the NFT's metadata, the `image`, `description`, `owner`, `name`, `index`, and `attributes` from the `nft` prop.
Then we display the metadata as a bootstrap `Card` component. We truncate the `owner` address to make it easier to read, with the `truncateAddress` function we mentioned earlier. The user can also create arbitrary attributes for the NFT, which we map and display; the other values should be self-explanatory.
Next, we will create a component to create new NFTs.
### 4.3 nfts/Add.js
Create a new file `Add.js` in the `nfts` directory.
This file will contain the `AddNfts` component, which we will use to mint a new NFT.
When the user clicks the `Add` button, we will display a modal with a form for the metadata of the NFT.
First, we do our imports:
```js
import React, { useState } from "react";
import PropTypes from "prop-types";
import { Button, Modal, Form, FloatingLabel } from "react-bootstrap";
import { uploadToIpfs } from "../../../utils/minter";
const COLORS = ["Red", "Green", "Blue", "Cyan", "Yellow", "Purple"];
const SHAPES = ["Circle", "Square", "Triangle"];
// ...
```
We import the `uploadToIpfs` function from the `utils` folder that we will create later.
Then we create two arrays, one for the `COLORS` and one for the `SHAPES`, with some values that we will use as attributes for the NFT.
Next, we create the `AddNfts` component:
```js
// ...
const AddNfts = ({ save, address }) => {
const [name, setName] = useState("");
const [ipfsImage, setIpfsImage] = useState("");
const [description, setDescription] = useState("");
const [attributes, setAttributes] = useState([]);
const [show, setShow] = useState(false);
// ...
```
We create state variables for the metadata of the NFT and a boolean variable that we use to store the state of the modal.
Now need some utility functions:
```js
// ...
// check if all form data has been filled
const isFormFilled = () =>
name && ipfsImage && description && attributes.length > 2;
// close the popup modal
const handleClose = () => {
setShow(false);
setAttributes([]);
};
// display the popup modal
const handleShow = () => setShow(true);
// add an attribute to an NFT
const setAttributesFunc = (e, trait_type) => {
const { value } = e.target;
const attributeObject = {
trait_type,
value,
};
const arr = attributes;
// check if attribute already exists
const index = arr.findIndex((el) => el.trait_type === trait_type);
if (index >= 0) {
// update the existing attribute
arr[index] = {
trait_type,
value,
};
setAttributes(arr);
return;
}
// add a new attribute
setAttributes((oldArray) => [...oldArray, attributeObject]);
};
// ...
```
We create a function that checks if all the form data has been filled and two functions that we use to open (`handleShow`) and close (`handleClose`) the popup modal.
We also need a function (`setAttributesFunc`) that handles the functionality to add attributes to the NFT.
In the next step, we will create the form that will be displayed in the popup modal:
```js
// ...
return (
<>
<Button
onClick={handleShow}
variant="dark"
className="rounded-pill px-0"
style={{ width: "38px" }}
>
<i className="bi bi-plus"></i>
</Button>
{/* Modal */}
<Modal show={show} onHide={handleClose} centered>
<Modal.Header closeButton>
<Modal.Title>Create NFT</Modal.Title>
</Modal.Header>
<Modal.Body>
<Form>
<FloatingLabel
controlId="inputLocation"
label="Name"
className="mb-3"
>
<Form.Control
type="text"
placeholder="Name of NFT"
onChange={(e) => {
setName(e.target.value);
}}
/>
</FloatingLabel>
<FloatingLabel
controlId="inputDescription"
label="Description"
className="mb-3"
>
<Form.Control
as="textarea"
placeholder="description"
style={{ height: "80px" }}
onChange={(e) => {
setDescription(e.target.value);
}}
/>
</FloatingLabel>
<Form.Control
type="file"
className={"mb-3"}
onChange={async (e) => {
const imageUrl = await uploadToIpfs(e);
if (!imageUrl) {
alert("failed to upload image");
return;
}
setIpfsImage(imageUrl);
}}
placeholder="Product name"
></Form.Control>
<Form.Label>
<h5>Properties</h5>
</Form.Label>
<Form.Control
as="select"
className={"mb-3"}
onChange={async (e) => {
setAttributesFunc(e, "background");
}}
placeholder="Background"
>
<option hidden>Background</option>
{COLORS.map((color) => (
<option
key={`background-${color.toLowerCase()}`}
value={color.toLowerCase()}
>
{color}
</option>
))}
</Form.Control>
<Form.Control
as="select"
className={"mb-3"}
onChange={async (e) => {
setAttributesFunc(e, "color");
}}
placeholder="NFT Color"
>
<option hidden>Color</option>
{COLORS.map((color) => (
<option
key={`color-${color.toLowerCase()}`}
value={color.toLowerCase()}
>
{color}
</option>
))}
</Form.Control>
<Form.Control
as="select"
className={"mb-3"}
onChange={async (e) => {
setAttributesFunc(e, "shape");
}}
placeholder="NFT Shape"
>
<option hidden>Shape</option>
{SHAPES.map((shape) => (
<option
key={`shape-${shape.toLowerCase()}`}
value={shape.toLowerCase()}
>
{shape}
</option>
))}
</Form.Control>
</Form>
</Modal.Body>
<Modal.Footer>
<Button variant="outline-secondary" onClick={handleClose}>
Close
</Button>
<Button
variant="dark"
disabled={!isFormFilled()}
onClick={() => {
save({
name,
ipfsImage,
description,
ownerAddress: address,
attributes,
});
handleClose();
}}
>
Create NFT
</Button>
</Modal.Footer>
</Modal>
</>
);
};
// ...
```
This part has a lot of code, but it's pretty straightforward. We create a modal that will be displayed when the user clicks on the `+` button. Inside the modal, we display a form that handles the input of the metadata of the NFT.
If the user clicks on the `Create NFT` button, we check if all the form data has been filled, and if it has, we call the `save` function to create the NFT.
You can find the complete code of the file [here](https://github.com/dacadeorg/celo-nft-minter/blob/master/src/components/minter/nfts/Add.js).
Finally, we make sure that the props are from the right type and export the component:
```js
// ...
AddNfts.propTypes = {
save: PropTypes.func.isRequired,
address: PropTypes.string.isRequired,
};
export default AddNfts;
```
Done! We now have built the UI for our minter; in the next section, we will build the logic.
## 5. Minter Logic
In this section, we will create the logic of the minter.
### 5.1 hooks/useMinterContract.js
Inside the `hooks` folder in our `src` directory, we can delete the `useCount` and `useCounterContract` files and create a new one called `useMinterContract`. Add the following code to it:
```js
import { useContract } from "./useContract";
import MyNFTAbi from "../contracts/MyNFT.json";
import MyNFTContractAddress from "../contracts/MyNFT-address.json";
export const useMinterContract = () =>
useContract(MyNFTAbi.abi, MyNFTContractAddress.MyNFT);
```
This code is pretty straightforward. We import the `useContract` hook that we discussed earlier and pass the ABI and the address of the contract to the `useContract` function. Now we can create a custom hook that will return the contract instance.
### 5.2 hooks/index.js
Now we also need to export the `useMinterContract` hook. We can do this by replacing the `useCounterContract` with `useMinterContract` in the `hooks/index.js` file.
```js
export * from "./useMinterContract";
export * from "./useBalance";
export * from "./useContract";
```
Let's continue with the real logic of the minter.
### 5.3 hooks/minter.js
Inside the `utils` folder in our `src` directory, we can delete the `counter.js` file and create a new one called `minter.js`.
In our `minter.js` file, we will start with our imports:
Let's start again with our imports:
```js
import { create as ipfsHttpClient } from "ipfs-http-client";
import axios from "axios";
const client = ipfsHttpClient("https://ipfs.infura.io:5001/api/v0");
// ...
```
We import the `ipfs-http-client` library and the `axios` library. We will use the `axios` library to make requests to an IPFS node.
IPFS is a peer-to-peer distributed content storage network. It is a protocol that allows users to store and share data. We will use IPFS to store the metadata of our NFTs and images for the NFTs. We initialize the IPFS `client`.
Let's install both `ipfs-http-client` and `axios`:
```sh
npm install ipfs-http-client axios
```
Next, let's add a `createNft` function that will mint an NFT:
```js
// ...
export const createNft = async (
minterContract,
performActions,
{ name, description, ipfsImage, ownerAddress, attributes }
) => {
await performActions(async (kit) => {
if (!name || !description || !ipfsImage) return;
const { defaultAccount } = kit;
// convert NFT metadata to JSON format
const data = JSON.stringify({
name,
description,
image: ipfsImage,
owner: defaultAccount,
attributes,
});
try {
// save NFT metadata to IPFS
const added = await client.add(data);
// IPFS url for uploaded metadata
const url = `https://ipfs.infura.io/ipfs/${added.path}`;
// mint the NFT and save the IPFS url to the blockchain
let transaction = await minterContract.methods
.safeMint(ownerAddress, url)
.send({ from: defaultAccount });
return transaction;
} catch (error) {
console.log("Error uploading file: ", error);
}
});
};
// ...
```
As parameters for our function, we will need the `minterContract` and the `performActions` method from the `useContractKit` hook. We also need the metadata of the NFT. With `defaultAccount`, we will get the address of the account that is currently connected to the dapp via the wallet.
We call `performActions` to create the transaction that will interact with our contract and mint the NFT.
First, we convert the metadata to the JSON format (`data`), then we upload the JSON to IPFS (`added`) and store the path of the JSON on IPFS in the `url` variable.
Now that we have the IPFS `url` with the metadata, we can mint the NFT.
To mint the NFT, we call the `safeMint` method our `minterContract` contract. We pass the `ownerAddress` and the `url` as parameters. The first parameter determines to which address the NFT will be minted, and the second parameter is the token URI with the metadata. We will make the transactions with the address of the connected account (`defaultAccount`).
With the following function, we will add the ability to upload a local image to IPFS:
```js
// ...
export const uploadToIpfs = async (e) => {
const file = e.target.files[0];
if (!file) return;
try {
const added = await client.add(file, {
progress: (prog) => console.log(`received: ${prog}`),
});
return `https://ipfs.infura.io/ipfs/${added.path}`;
} catch (error) {
console.log("Error uploading file: ", error);
}
};
// ...
```
This part is pretty straightforward. If the user has selected an image, we get the file from the `e` event and upload it to IPFS. We get the `added` object from the IPFS client and return the path of the file.
We also need one function to fetch all NFTs that have been minted from our contract. We will call this function `getNfts`:
```js
// ...
export const getNfts = async (minterContract) => {
try {
const nfts = [];
const nftsLength = await minterContract.methods.totalSupply().call();
for (let i = 0; i < Number(nftsLength); i++) {
const nft = new Promise(async (resolve) => {
const res = await minterContract.methods.tokenURI(i).call();
const meta = await fetchNftMeta(res);
const owner = await fetchNftOwner(minterContract, i);
resolve({
index: i,
owner,
name: meta.data.name,
image: meta.data.image,
description: meta.data.description,
attributes: meta.data.attributes,
});
});
nfts.push(nft);
}
return Promise.all(nfts);
} catch (e) {
console.log({ e });
}
};
// ...
```
We first need to know how many NFTs our `minterContract` has minted in total. We can get this number by calling the `totalSupply` method since our contract has implemented the `ERC721Enumerable` interface.
Then, we loop through all the NFTs and fetch the data we want to display. We create a new promise for each NFT, and we call the `tokenURI` method of the `minterContract` contract. We pass the index of the NFT as a parameter for the tokenID and call the `fetchNftMeta` and `fetchNftOwner` functions that we will create next.
Finally, when all the promises are resolved, we return the array of NFTs.
Now let's add the `fetchNftMeta` function:
```js
// ...
export const fetchNftMeta = async (ipfsUrl) => {
try {
if (!ipfsUrl) return null;
const meta = await axios.get(ipfsUrl);
return meta;
} catch (e) {
console.log({ e });
}
};
// ...
```
We call the `axios` library to fetch the metadata from IPFS and return it.
Finally, we create two functions to fetch the owner of an NFT and the owner of the NFT contract:
```js
// ...
export const fetchNftOwner = async (minterContract, index) => {
try {
return await minterContract.methods.ownerOf(index).call();
} catch (e) {
console.log({ e });
}
};
export const fetchNftContractOwner = async (minterContract) => {
try {
let owner = await minterContract.methods.owner().call();
return owner;
} catch (e) {
console.log({ e });
}
};
```
The difference between the `fetchNftOwner` and the `fetchNftContractOwner` functions is that the `fetchNftOwner` function will return the address of the owner of the NFT. In contrast, the `fetchNftContractOwner` function will return the address of the owner of the NFT contract. Only the contract owner will be able to mint a new NFT. But we also want to display the address of the current owner of the NFT.
You can find the complete code of the file [here](https://github.com/dacadeorg/celo-nft-minter/blob/master/src/utils/minter.js).
Now we have implemented all the functions we need for our NFT dapp. In the next section, we will put everything together and clean up the project.
## 6. Finishing the Minter Dapp
Let's finish our minter dapp. First, we clean up our components:
In our `components` directory we can remove the `Counter.js` component since we don't need it anymore. We can also move the `Cover.js` component to the minter folder.
The components minter folder should look like this now:
```
├── minter
│ ├── nfts
│ │ ├── Add.js
│ │ ├── Card.js
│ │ └── index.js
│ └── Cover.js
```
Let's adapt our `Cover.js` component a bit to fit the new purpose of the dapp.
### 6.1 Cover.js
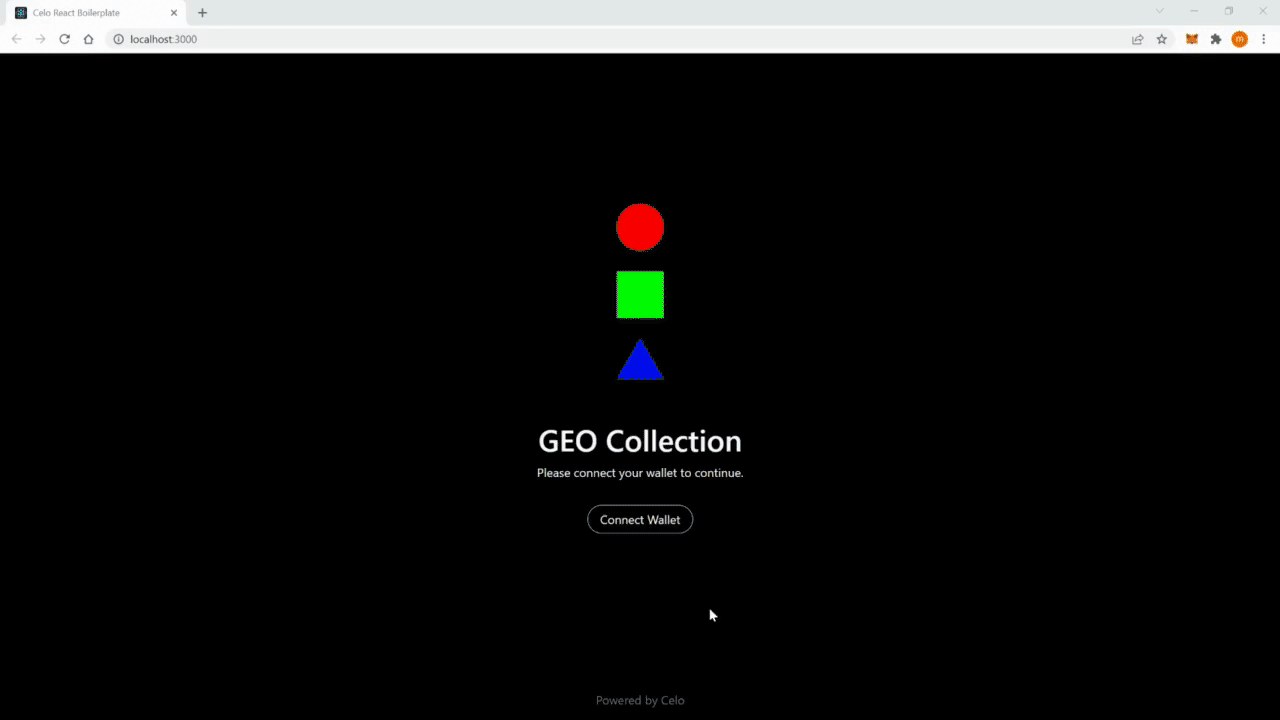
Our dapp should have a nice cover image. To start, let's create a new folder for our assets, where we can store the cover image. We will create it in the `src` folder, call it `assets` and create a new folder inside it called `img`. Inside this folder, save an image for the cover. In this example, we use this [image](https://github.com/dacadeorg/celo-nft-minter/blob/master/src/assets/img/nft_geo_cover.png) and call it `nft_geo_cover.png` because we want to create an NFT collection of geometric forms.
Let's open our `Cover.js` component and change the code to look like this:
```js
import React from "react";
import { Button } from "react-bootstrap";
import PropTypes from "prop-types";
const Cover = ({ name, coverImg, connect }) => {
if (name) {
return (
<div
className="d-flex justify-content-center flex-column text-center "
style={{ background: "#000", minHeight: "100vh" }}
>
<div className="mt-auto text-light mb-5">
<div
className=" ratio ratio-1x1 mx-auto mb-2"
style={{ maxWidth: "320px" }}
>
<img src={coverImg} alt="" />
</div>
<h1>{name}</h1>
<p>Please connect your wallet to continue.</p>
<Button
onClick={() => connect().catch((e) => console.log(e))}
variant="outline-light"
className="rounded-pill px-3 mt-3"
>
Connect Wallet
</Button>
</div>
<p className="mt-auto text-secondary">Powered by Celo</p>
</div>
);
}
return null;
};
Cover.propTypes = {
name: PropTypes.string,
};
Cover.defaultProps = {
name: "",
};
export default Cover;
```
We add a `name` and `coverImg` property to the `Cover` component, so we display the name and cover image of the dapp. We will define these properties in the `App.js` component.
### 6.2 App.js
We need to adjust the `App.js` file in our `src` folder to use our new components and implement their functionality.
Let's start with the import statements:
```js
import React from "react";
import { Container, Nav } from "react-bootstrap";
import { useContractKit } from "@celo-tools/use-contractkit";
import { Notification } from "./components/ui/Notifications";
import Wallet from "./components/Wallet";
import Cover from "./components/minter/Cover";
import Nfts from "./components/minter/nfts";
import { useBalance, useMinterContract } from "./hooks";
import coverImg from "./assets/img/nft_geo_cover.png";
import "./App.css";
// ...
```
We change the path to the `Cover` component to the `minter` folder. We add the `NFTs` component instead of the `Counter` component. We replace the `useCounterContract` hook with the `useMinterContract` hook. And we also add the `coverImg` with the image we created saved earlier.
Let's adapt our App component with its state next:
```js
// ...
const App = function AppWrapper() {
const { address, destroy, connect } = useContractKit();
const { balance, getBalance } = useBalance();
const minterContract = useMinterContract();
// ...
```
We add the `getBalance` function to get the current balance of the wallet and replace the `counterContract` with the `minterContract`, and its hook.
Finally, we return the App component:
```js
// ...
return (
<>
<Notification />
{address ? (
<Container fluid="md">
<Nav className="justify-content-end pt-3 pb-5">
<Nav.Item>
<Wallet
address={address}
amount={balance.CELO}
symbol="CELO"
destroy={destroy}
/>
</Nav.Item>
</Nav>
<main>
<Nfts
name="GEO Collection"
updateBalance={getBalance}
minterContract={minterContract}
/>
</main>
</Container>
) : (
<Cover name="GEO Collection" coverImg={coverImg} connect={connect} />
)}
</>
);
};
export default App;
```
Here we replace the `Counter` component with the `Nfts` component and add the `coverImg` and `name` props to the `Cover` component.
You can find the complete code of the file [here](https://github.com/dacadeorg/celo-nft-minter/blob/master/src/App.js).
### 6.3 Optimizing the Dapp
We can do a little bit of optimization to our dapp. In the `public` directory, we can add our `favicon.ico`, `logo192.png`, `logo512.png`, and `manifest.json` files that fit our project.
We could also change the `title` and `description` of our dapp in the `index.html` file in the `public` directory and the name in the `package.json` file.
### 6.4 Testing the Dapp
Let's test our dapp and check if everything is working as expected.
First, we deploy the NFT contract that we want to use to the Celo Alfajores network.
```sh
npx hardhat run --network alfajores scripts/deploy.js
```
Now we can start our dapp locally:
```sh
npm start
```
Your dapp should be running on [http://localhost:3000](http://localhost:3000).
Test your Dapp by connecting and minting an NFT. It should behave like this:

## 7. Deploying to GitHub Pages
In the last section, we will briefly look at how to deploy our dapp to GitHub Pages.
1. First, add your project to GitHub. If you don't know how to do this, check out this [GitHub guide](https://docs.github.com/en/get-started/importing-your-projects-to-github/importing-source-code-to-github/adding-an-existing-project-to-github-using-the-command-line).
2. Install the [gh-pages](https://www.npmjs.com/package/gh-pages) package. This will allow us to deploy our dapp to GitHub Pages.
```bash
npm install gh-pages
```
3. In the package.json file, add the following lines:
- At the top of the file, add the following line:
```
"homepage": "https://${GithubUsername}.github.io/${RepositoryName}",
```
Replace `${GithubUsername}` and `${RepositoryName}` with your GitHub username and the repository name.
- add the following lines at the bottom of the `scripts` section:
```
"predeploy": "npm run build",
"deploy": "gh-pages -d build"
```
4. Push your changes to GitHub.
5. Run `npm run deploy` to deploy your dapp to a new GitHub Pages branch.
6. Go to your repository on github.com and follow the instructions: 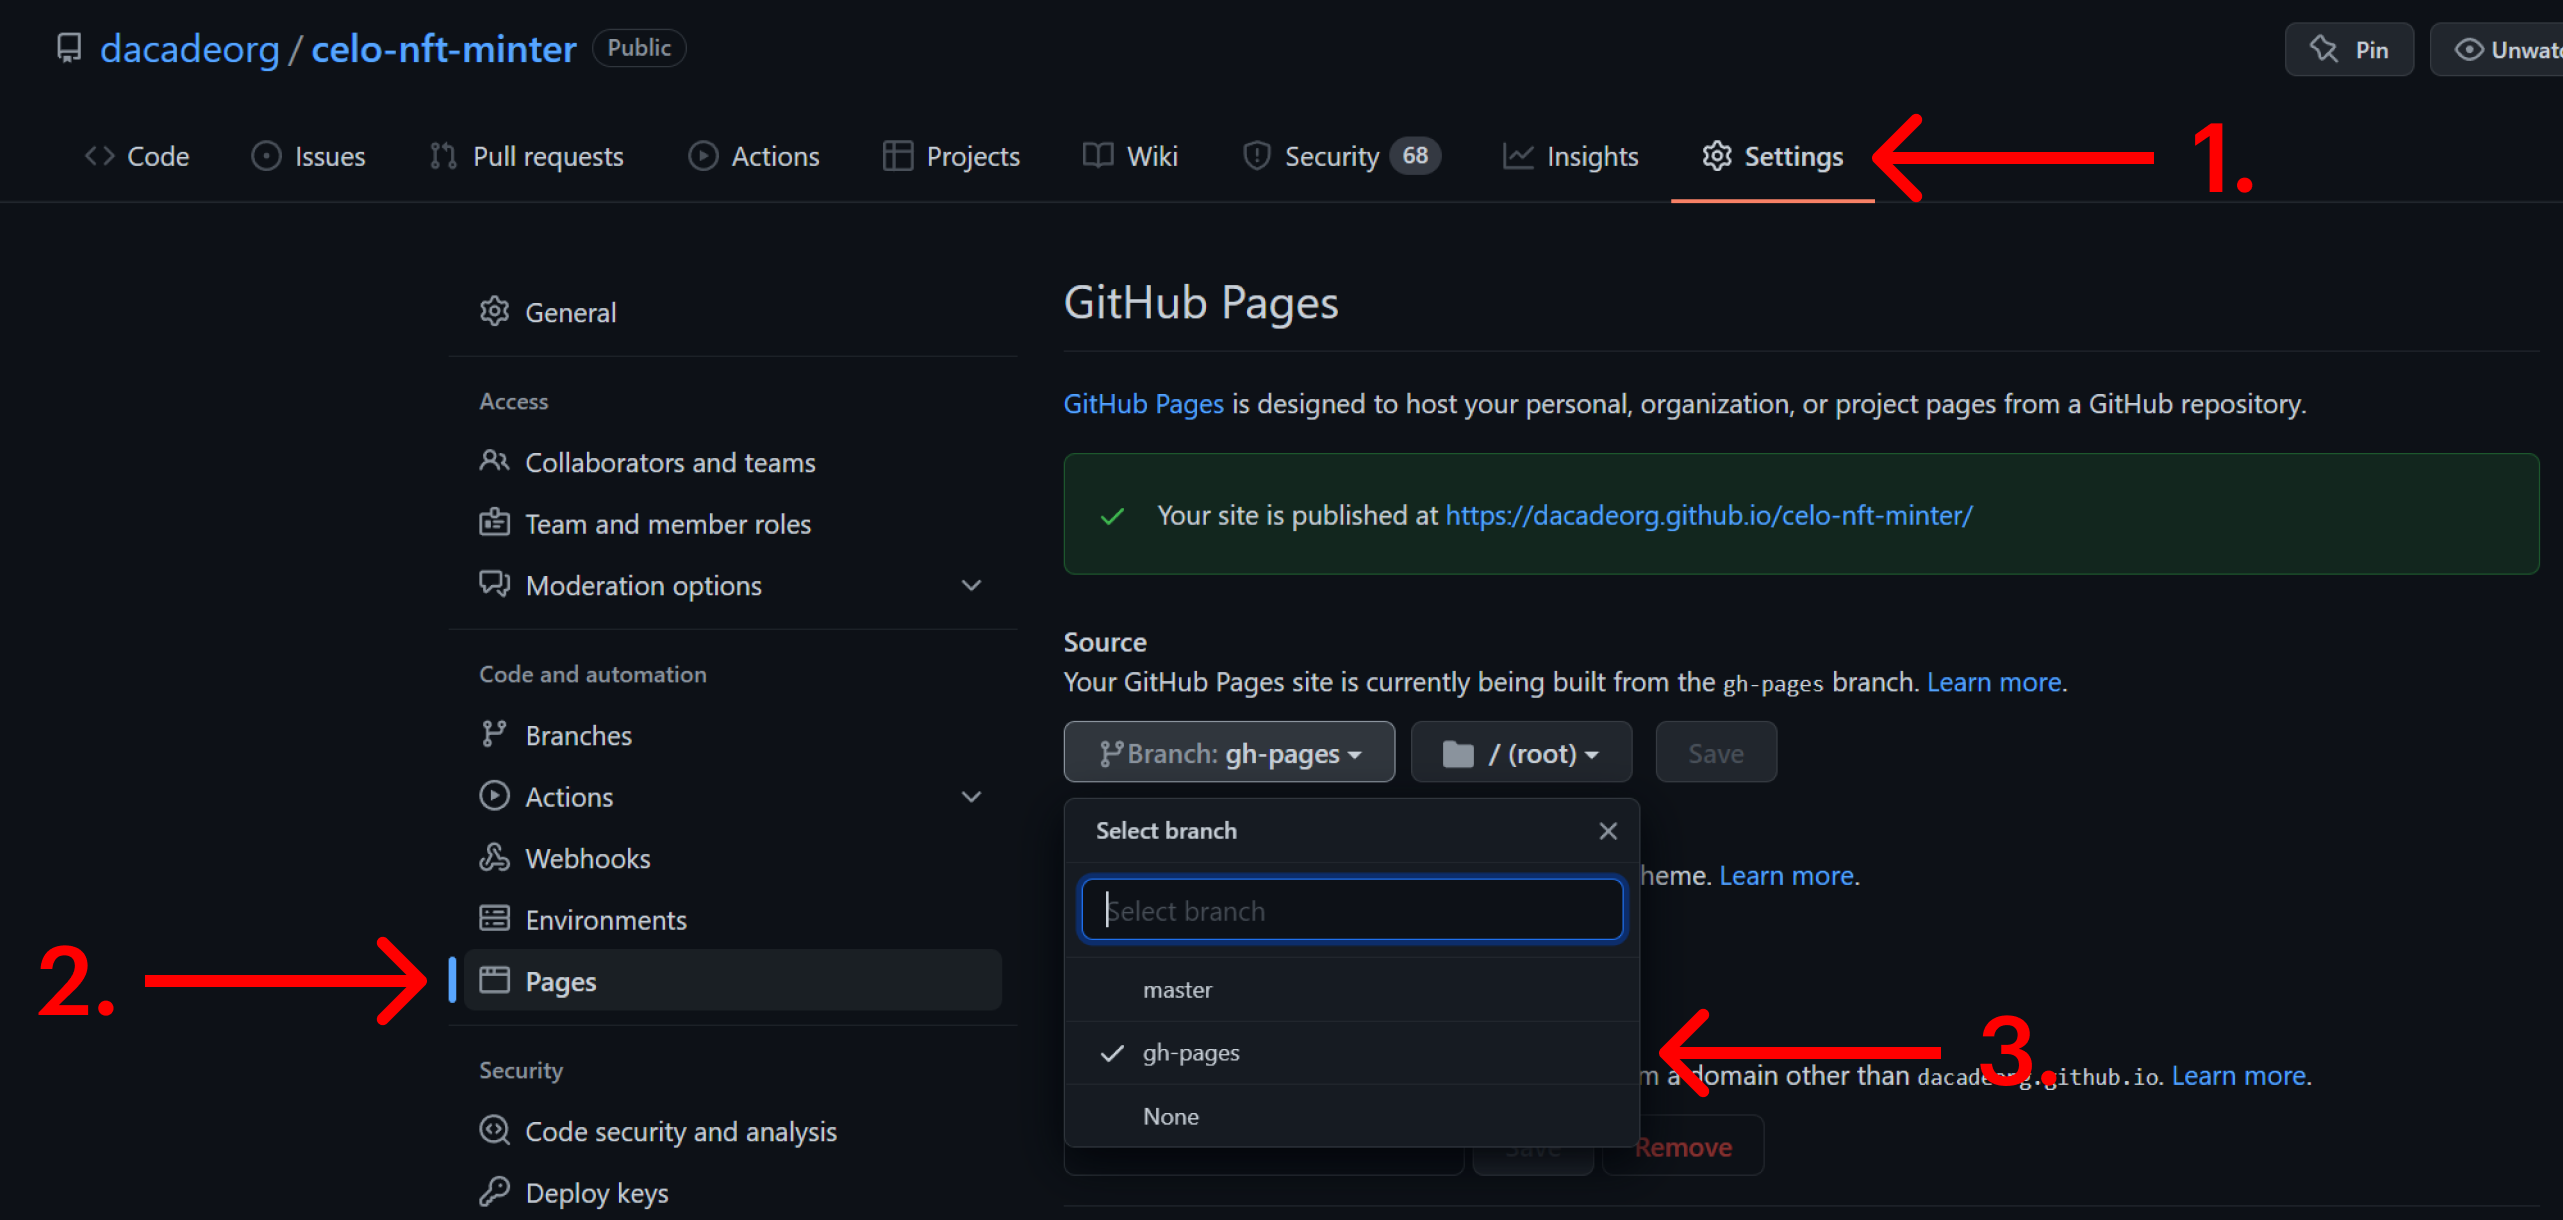
- Click on settings.
- Navigate to the "Pages" section.
- Select the gh-pages branch as the default branch for your new page.
- Click "Save".
Done! Now you should be able to see your dapp on `https://${GithubUsername}.github.io/${RepositoryName}`.
Awesome! You have successfully created your NFT minter dapp. Now you can go ahead and create your own NFT dapp in our challenge, receive feedback and earn some cUSD!
 Sign in with Wallet


