---
tags: Python
title: LINE Notify - Python 爬蟲基礎教學
description: 國立中興大學資訊科學研習社1091學期起的一次主題社課
image: 'https://i.imgur.com/aYRt5aY.png'
slideOptions:
allottedMinutes: 1 # 預計整份簡報花幾分鐘
---
<style>
.markdown-body hr, .markdown-body table br, .slides [title='*'], .markdown-body .slideONLY, h1 br, .slides .slide, .slides summary h2 {display:none}
summary h1, summary h2 {display:inline;border-bottom:0!important}
.slides h1 br,.slides .slideONLY{display:inline!important}
.slides details p{font-size:66%!important}
.slides details a{background-color:white;padding:0 5px}
</style>
<!-- .slide: data-background="#00bd00" -->
<!--觀看次數-->

###### [@NCHUIT/](/@NCHUIT '*')[Python 教學/](/@NCHUIT/py '*')
:::spoiler {state=open}<h1>LINE Notify</h1>
<div class='slideONLY'>
<i class="fa fa-fw fa-google"></i>meet.google.com/czn-pbav-zvr <i class='fa fa-fw fa-google'></i>colab.research.google.com
<i class="fa fa-book"></i> 網頁 md.nchuit.cc/line-notify/edit?view <i class="fa fa-tv"></i> 簡報 md.nchuit.cc/line-notify
</div>
[ToC]
:::
<!--
| <i class="fa fa-fw fa-wpforms"></i>報名/簽到防疫表單 | <i class="fa fa-fw fa-wpforms"></i>入社表單 | <i class="fa fa-fw fa-comments-o"></i>回饋單/貓貓磁扣調查 |
|:-:|:-:|:-:|
| [](https://forms.gle/bghmKYxjc9v7m9WE8) | [](https://reurl.cc/q1keqn) | [](http://reurl.cc/VjYNGZ) |
-->
###### 本教學中部分辭彙由VJ親自翻譯及選用,可能與網絡上某些內容有出入,特此說明。
> [name=VJ(世路)]
----
## [爬蟲](https://zh.wikipedia.org/wiki/%E7%B6%B2%E8%B7%AF%E7%88%AC%E8%9F%B2)是什麼?
每個我們在網絡上看到的網頁,其實背後都有一台伺服器,藉由向伺服器發送 **請求(`request`)** 後運用程式分析伺服器的 **回應(`response`)** 的內容,繼而呈現給開發者或使用者想要得到的資訊,這一系列動作稱為 **[網頁抓取](https://zh.wikipedia.org/wiki/%E7%BD%91%E9%A1%B5%E6%8A%93%E5%8F%96)**,而爬蟲則是將其進一步自動化的系統。本頁面將教授大家如何進行網頁抓取,而爬蟲就有待各位再進一步的開發。
----
## 爬蟲需知
----
[HTTP](https://zh.wikipedia.org/wiki/%E8%B6%85%E6%96%87%E6%9C%AC%E4%BC%A0%E8%BE%93%E5%8D%8F%E8%AE%AE)
: **H**yper**T**ext **T**ransfer **P**rotocol(超文本傳輸協定),縮寫:HTTP,是全球資訊網絡數據通信的基礎。
[HTTPS](https://zh.wikipedia.org/wiki/%E8%B6%85%E6%96%87%E6%9C%AC%E4%BC%A0%E8%BE%93%E5%AE%89%E5%85%A8%E5%8D%8F%E8%AE%AE)
: **H**yper**T**ext **T**ransfer **P**rotocol **S**ecure,經由**實聯制**進行通訊,但利用SSL/TLS來加密封包,更安全。
----
[URL(網址)](https://zh.wikipedia.org/wiki/%E7%BB%9F%E4%B8%80%E8%B5%84%E6%BA%90%E5%AE%9A%E4%BD%8D%E7%AC%A6)
: **U**niform **R**esource **L**ocator(統一資源定位符),俗稱網頁位址,簡稱**網址**,是網際網路上標準的資源的位址(Address),如同在網路上的門牌。
[URI](https://zh.wikipedia.org/wiki/%E7%BB%9F%E4%B8%80%E8%B5%84%E6%BA%90%E6%A0%87%E5%BF%97%E7%AC%A6)
: **U**niform **R**esource **I**dentifier(統一資源標識符),用於標識某一網際網路資源名稱的字串。簡單來說,它就是[檔案路徑](https://zh.wikipedia.org/wiki/%E8%B7%AF%E5%BE%84_(%E8%AE%A1%E7%AE%97%E6%9C%BA%E7%A7%91%E5%AD%A6))。
這種標識格式讓我們可以對網路中(一般指全球資訊網)的資源通過特定的協定進行++互動操作++。URI 的最常見的形式就是 URL,經常指定為非正式的網址。
----
[](https://www.design-hu.com/web-news/domain.html)
URL的完整格式如下:
```
[協定]://[使用者:密碼@][伺服器位址][:埠號]/[檔案路徑][?請求參數][#元素ID]
```
###### 其中[使用者@]、[使用者:密碼@]、[:埠號]、[檔案路徑]、==[?請求參數]==、[#元素ID]都屬於選填項。
---
----
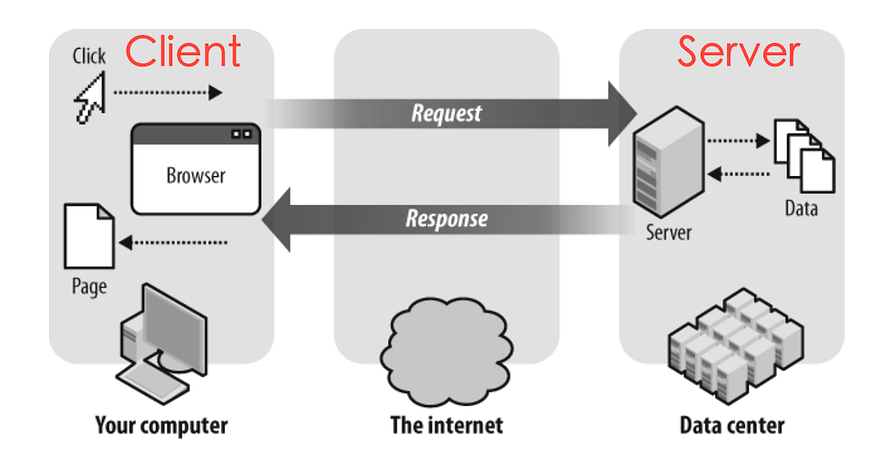
### 請求與回應
HTTP 的基本運作方式就像上圖一樣,我們開啟網頁、或在網頁上做特定的操作的時候,其實都是在向伺服器發送請求(`request`),而伺服器則會對應 `request` 給予我們回應(`response`)。
回應(`response`)的主要內容就是 ==HTML==。而爬蟲更是進一步的分析它。
###### [*從HTML到MarkDown(建議閱讀)*](/@NCHUIT/mdhtml)
----
### 請求 Request
HTTP 的 `request` 目前共有[八種方法](https://zh.wikipedia.org/wiki/%E8%B6%85%E6%96%87%E6%9C%AC%E4%BC%A0%E8%BE%93%E5%8D%8F%E8%AE%AE#%E8%AF%B7%E6%B1%82%E6%96%B9%E6%B3%95),其中最常用的就是 **`get` 跟 `post`**。
#### `get` & `post` 資料發送概述
+ get -- [headers](https://zh.wikipedia.org/wiki/HTTP%E5%A4%B4%E5%AD%97%E6%AE%B5), [cookies](https://zh.wikipedia.org/wiki/Cookie), [params (英)](https://en.wikipedia.org/wiki/Query_string)
+ post -- headers, cookies, [data (英)](https://en.wikipedia.org/wiki/POST_(HTTP)#Use_for_submitting_web_forms)
:::info
:bulb:提示: Windows 裡,在 Chrome 瀏覽器中按下 `F12` 或 `Ctrl+Shift+I` 可以在 `Network` 頁面檢視所有請求(`requests`)。
:::
----
### ►練習 -- `get` 範例
請求(`requests`) 中的大部分的 `get` 都是在開啟網頁的時候就送出了,這邊以開啟 Google 的主畫面跟進行搜索為例。
###### 試試看打開下面的網頁後按 `F12` 找出那個 `request`。(需要重整才有)
一般的 `get`
: https://www.google.com/search
帶 `params` 的 `get`
: https://www.google.com/search?q=hello
###### 至於為什麼要加 `search` 其實是因為 Google 伺服器有個專門為搜索提供 `get` 的頁面被命名為 `search`,但當 `get` 請求沒有 `params` 的時候,它會自動跳向另一個被命名為 `webhp` 的頁面。
----
[](https://store.line.me/stickershop/product/7034336)
----
### 回應 Response
向伺服器發出請求後,會得到伺服器的回應(`response`),其中值得注意的是 `response` 中 `headers` 裡的 `Set-Cookie`,顧名思義,它就是會設下 cookie。
`cookies` 在瀏覽器中關閉網頁前除非你又送請求不然都會一直按時保留著。
`cookies` 記錄的資料往往是使用者資訊,所以需要隱藏,這也是為什麼頁面會顯示「登入中」的原因。
---
## Python 函式庫 [`requests`](https://requests.readthedocs.io/en/latest/)
###### 在 Python 中引用函式庫 `requests` 就可以用程式的方式來送出請求。
### 安裝([colab](https://colab.research.google.com/) 不用)
```
pip install requests
```
----
### 語法
#### get
```
requests.get(url[,headers,cookies,params,...])
```
#### post
```
requests.post(url[,headers,cookies,data,...])
```
`[]` : 選用
[更多方法的語法(英)](https://www.w3schools.com/python/module_requests.asp)
----
### 引用及使用
###### 送出 `get` 請求後輸出回應的 *HTML 元素*。
#### 一般的 `get`
```python=
import requests
網址 = 'https://www.google.com'
回應 = requests.get(網址)
#其實平常還要附上 headers 跟 cookies 送出
#但 Google 的這個頁面沒有限制。
print(回應.text) #印不完,這個等下會講
print(type(回應)) #看它的資料型態
print(vars(回應)) #看它的屬性
```
###### `get()` 回傳給我們的是函式庫 `requests` 定義好的一個被命名為 `Response` 的 [`class`](/@NCHUIT/py5/edit?view#%E8%A3%9C%E5%85%85%E4%B8%BB%E9%A1%8C-%E7%89%A9%E4%BB%B6)
----
#### 帶表單資料 `params` 的 `get`
```python=
import requests
網址 = 'https://www.google.com/search'
表單 = { 'q':'hello' } #dict
回應 = requests.get(url=網址, params=表單)
# 同 get https://www.google.com/search?q=hello
print(回應.text)
```
###### 由於 `requests` 函式庫寫的函式引數很多,而且除了網址以外都是選用的,通常我們都會直接用[關鍵字定義參數](/@NCHUIT/py4/edit?view#%E9%97%9C%E9%8D%B5%E5%AD%97%E5%8F%83%E6%95%B8)。
----
### 短一點?
```python=
from requests import get#
回應 = get('https://www.google.com')
print(回應.text)
```
###### 但它看起來像亂碼??
---
## <i class="fa fa-fw fa-html5"></i>HTML
<table><tr><td style='font-size:90%'><b>H</b>yper<b>T</b>ext <b>M</b>arkup <b>L</b>anguage (超文本標記語言),是一種用於建立網頁的標準<b>標記語言</b>。<br>瀏覽器可以讀取HTML檔案,並將其彩現成<b>視覺化</b>網頁。<a href='https://zh.wikipedia.org/wiki/HTML'>維基百科</a><h6>HTML描述了一個網站的結構語意隨著線索的呈現,使之成為一種標記語言而<em>非程式語言</em>。</h6></td><td><img src='https://upload.wikimedia.org/wikipedia/commons/thumb/8/84/HTML.svg/800px-HTML.svg.png' style="display:inline"></td></tr></table>
* 最新版本: 5.2/ 5.3(工作草案); 2017年12月14日,4年前
* 初始版本: 1993年,28年前
----
### HTML 元素
[維基百科](https://zh.wikipedia.org/wiki/HTML%E5%85%83%E7%B4%A0)
HTML 中,一個 HTML 元素是整個 HTML 檔案的一個基本組成單元。
HTML 檔案採用採用==樹狀結構==安排 HTML 元素。
常見的 HTML 元素有**標題**、**段落**、**連結**、**列表**、**嵌入媒體**等等。
:::info
🕹快捷鍵: 在 <i class="fa fa-fw fa-chrome"></i>Chrome 或 <i class="fa fa-fw fa-internet-explorer"></i>Edge 瀏覽器中按下 <kbd>F12</kbd> 或 <kbd>Ctrl + Shift + I</kbd> 可以在 `Elements`(元素) 頁面檢視所有 HTML 元素。
:::
----
<img height='600' src='https://upload.wikimedia.org/wikipedia/commons/thumb/5/5a/DOM-model.svg/800px-DOM-model.svg.png' style='background-color:gray'>
----
### 例子(標題)
段落 [連結](https://google.com) <span style="color:red">紅色</span>
+ 清單項目**甲**
+ 清單項目*乙*
1. 列表項目***甲***
2. 列表項目~~乙~~

----
### <i class="fa fa-fw fa-gamepad"></i>動動手: 檢查方法1 - 選單>檢查
|<i class="fa fa-fw fa-chrome"></i>Chrome|<i class="fa fa-fw fa-internet-explorer"></i>Edge|
|:-:|:-:|
|<img style="display:inline" width="200" src="https://i.imgur.com/Utx18BP.png">|<img style="display:inline" width="200" src="https://i.imgur.com/5TQdPUX.png">|
:::info
🕹快捷鍵: 在 <i class="fa fa-fw fa-chrome"></i>Chrome 或 <i class="fa fa-fw fa-internet-explorer"></i>Edge 瀏覽器中按下 <kbd>F12</kbd> 或 <kbd>Ctrl + Shift + I</kbd> 可以在 `Elements`(元素) 頁面檢視所有 HTML 元素。
:::
----
### <i class="fa fa-fw fa-gamepad"></i>動動手: 檢查方法2 - 選取工具
|<i class="fa fa-fw fa-chrome"></i>Chrome|<i class="fa fa-fw fa-internet-explorer"></i>Edge|
|:-:|:-:|
|<img style="display:inline" width="200" src="https://i.imgur.com/u7MUrsr.png">|<img style="display:inline" width="200" src="https://i.imgur.com/JIuGjD4.png">|
:::info
🕹快捷鍵: 在 <i class="fa fa-fw fa-chrome"></i>Chrome 或 <i class="fa fa-fw fa-internet-explorer"></i>Edge 瀏覽器中按下 <kbd>Ctrl + Shift + C</kbd> 可以直接啟動選取模式。
:::

----
### ►練習
試用讀寫檔將剛剛輸出的內容存成副檔名為 `.html` 檔案後打開。
```python
from requests import get
回應 = get('https://www.google.com')
print(回應.text)
with open('檔名.html', 'w') as 檔案:
檔案.write(回應.text)
```
###### colab 找檔案請打開側邊欄。
----
### ►練習
試將剛剛的 HTML 檔案打開後找到通往搜索++圖片頁面++的 <i class="fa fa-fw fa-link"></i>超連結 [`<a>`](https://www.w3schools.com/tags/att_a_href.asp) 元素。
 
:::info
🕹快捷鍵: 在 <i class="fa fa-fw fa-chrome"></i>Chrome 或 <i class="fa fa-fw fa-internet-explorer"></i>Edge 瀏覽器中按下 <kbd>Ctrl + Shift + C</kbd> 可以直接啟動選取模式。
:::
---
## Python 函式庫 [`bs4`](https://www.crummy.com/software/BeautifulSoup/bs4/doc.zh/#id14)
###### 在 Python 中引用函式庫 `bs4` 就可以分析回應。
### 安裝(colab 不用)
```
pip install bs4
```
----
### 引用及使用
###### 送出 `get` 請求後輸出回應的文字。
```python=
import requests, bs4
回應 = requests.get('https://www.google.com')
解析 = bs4.BeautifulSoup(回應.text)
#print(回應.text)
print(解析.text)
```
----
### 短一點?
```python=
from requests import get
from bs4 import BeautifulSoup as bs#
解析 = bs(get('https://www.google.com').text)
print(解析.text)
```
----
### 查找元素
#### 選取全部符合條件的元素 [`find_all()`](https://www.crummy.com/software/BeautifulSoup/bs4/doc.zh/#find-all)
```python=
from requests import get
from bs4 import BeautifulSoup as bs
解析 = bs(get('https://www.google.com/').text)
查找結果 = 解析.find_all('a', string='圖片')
#print(解析.text)
print(查找結果) #[<a ...>圖片</a>] 回傳的是裝滿搜索結果的容器
print(type(查找結果)) #當作 list 就好(會取索引就行)
print(查找結果[0])
```
###### 查找 Google 主畫面內文是[圖片](https://www.google.com.tw/imghp?hl=zh-TW&tab=wi)的 *超連結文字* (`<a>...</a>`) 元素。<br>對於 Google 的這個頁面,輸出的結果只有 *通往搜索圖片頁面* 的 *超連結文字* 的一個元素。
----
#### 選取第一個符合條件的元素 [`find()`](https://www.crummy.com/software/BeautifulSoup/bs4/doc.zh/#find)
```python=
from requests import get
from bs4 import BeautifulSoup as bs
解析 = bs(get('https://www.google.com/').text)
查找結果 = 解析.find('a', string='圖片') #colab 請查 'Images'
print(查找結果) #<a ...>圖片</a> 注意沒有[]
print(type(查找結果)) #回傳的是 bs4 定義的元素
print(查找結果['href']) #取到網址
print(查找結果[0]) #這會報錯
```
----
#### <i class="fa fa-fw fa-css3"></i>CSS 選擇器 `.select()` `.select_one()`
CSS 本身不支援 string 內文搜索
+ `select('tag[attr="value"]')`
+ `select('#id[attr="value"]')`
+ `select('.class[attr="value"]')`
+ `select_one('tag[attr="value"]')`
範例待補
###### *[請參閱 BS Doc - CSS 選擇器 (簡)](https://www.crummy.com/software/BeautifulSoup/bs4/doc.zh/#id42)*<br>*[請參閱 w3schools - CSS 選擇器 (英)](https://www.w3schools.com/css/css_selectors.asp)*
---
## POST `data`
另外特別值得注意的是,`get` 的 `params` 資料是能在網址就被看到,而 `post` 的 `data` 資料則是隱藏的,主要作用應該就是要保護送出的**密碼**或其他私隱資料不被他人在網址看到。另外 `cookies` 也是隱藏的,至於為什麼等下會提到。
###### 我們這裡不做深入的介紹,知道這些資料的存在、會複製就好,有興趣再從上面點進去看。網頁抓取需要的是你比照一個網頁的某一個 `request` 中的 `headers` 和 `cookies`,以及資料 `params` 或 `data`,送出這些後達到你想要的效果,所以不完全清楚這些資料的組成也沒關西,只需要知道它們在送出請求時會需要被送出,也可以經由多次嘗試剔除對伺服器而言沒用的資料。
----
### 應用延伸 -- [LINE Notify API](https://notify-bot.line.me/doc/en/)
| methods/headers | 資料 |
| --- | --- |
| Method | POST |
| Content-Type | application/x-www-form-urlencoded<br>或<br>multipart/form-data |
| Authorization | Bearer ==[`access_token`<br>(點我註冊)](https://notify-bot.line.me/my/)== |
----
#### 請求表單資料 - 1
| 參數名稱 | 必要/<br>選用 | 資料型態 | 說明 |
| ------ | --------- | ------- | --- |
| message | 必要 | 字串 | 要發送的訊息,<br>最多 1000 字元 |
| notification<br>Disabled | 選用 | `bool` | 無聲訊息開關。<br>打開`true`,<br>預設關閉`false`。 |
----
#### 請求表單資料 - 2
| 參數名稱 | 必要/選用 | 資料型態 | 說明 |
| ------ | --------- | ------- | --- |
| image<br>Thumbnail | 選用 | 網址 | 略縮圖,最大 240×240px `JPEG` |
| image<br>Fullsize | 選用 | 網址 | 原圖,最大 2048×2048px `JPEG` |
| image<br>File | 選用 | 檔案 | 發送圖片的檔案。限`.png`或`.jpeg` |
----
#### 請求表單資料 - 3
| 參數名稱 | 必要/選用 | 資料型態 | 說明 |
| ------ | --------- | ------- | --- |
| stickerId | 選用 | `Number` | 貼圖 ID。要和<br>貼圖包 ID 一起<br>送上不然不讓發訊息。 |
| sticker<br>PackageId | 選用 | `Number` | 貼圖包 ID。<br>[Sticker List](https://developers.line.biz/zh-hant/docs/messaging-api/sticker-list/) <br>[貼圖商店](https://store.line.me/home/zh-Hant) |
----
#### 回應
| response<br>headers | 資料說明 |
|:------------- | ------- |
| status | 200: 請求成功<br>400: 請求失敗<br>401: 權杖錯誤<br>500: 伺服器錯誤<br>Other: 作業超時或終止 |
###### [HTTP 404](https://zh.wikipedia.org/wiki/HTTP_404): 找不到伺服器<br>Python 函式庫 `requests` 定義給 `Response` 的 `status` 被命名為 `status_code`
---
#### 發送訊息
[權杖點我註冊](https://notify-bot.line.me/my/)
```python=
from requests import post
#權杖(註冊時給的 access_token)
權杖 = 'TQBCWMSFFTos89Eq9FcvItQnGV4FYrh0p3NZczIXFks'
訊息 = 'Hello'
#request 資料準備
網址 = 'https://notify-api.line.me/api/notify'
標頭 = { 'Authorization': 'Bearer '+權杖 }
#標頭['Content-Type']='application/x-www-form-urlencoded'
表單 = { 'message': 訊息 }
回應 = post(網址, headers=標頭, data=表單)
print(回應)
print(回應.text)
print(回應.status_code)
```
----
#### 發送貼圖
```python=
from requests import post
權杖 = 'TQBCWMSFFTos89Eq9FcvItQnGV4FYrh0p3NZczIXFks'
訊息 = '貼圖圖!!!'
貼圖包ID, 貼圖ID = 8525, 16581290
網址 = 'https://notify-api.line.me/api/notify'
標頭 = { 'Authorization': 'Bearer '+權杖 }
表單 = { 'message': 訊息,
'stickerId': 貼圖ID,
'stickerPackageId': 貼圖包ID }
回應 = post(網址, headers=標頭, data=表單)
print(回應.text)
```
----
#### 發送圖片
###### 結合之前的[讀寫檔](/5rX9DydFTfq6InGcKu4VdA?view),我們可以讀檔來發送圖片。
```python=
from requests import post
權杖 = 'TQBCWMSFFTos89Eq9FcvItQnGV4FYrh0p3NZczIXFks'
訊息 = '圖片片!!!'
圖片路徑 = r'.png 或 .jpg 圖片路徑'
網址 = 'https://notify-api.line.me/api/notify'
標頭 = { 'Authorization': 'Bearer '+權杖 }
表單 = { 'message': 訊息 }
檔案 = { 'imageFile': open(圖片路徑, 'rb') }
回應 = post(網址, headers=標頭, data=表單, files=檔案)
檔案['imageFile'].close() #若後面操作太多建議關檔
print(回應.text)
```
----
#### 發送圖片2
```python=
from requests import post
權杖 = 'TQBCWMSFFTos89Eq9FcvItQnGV4FYrh0p3NZczIXFks'
訊息 = '網址圖片!'
原圖網址 = r'https://imgur.dcard.tw/i4AJxskh.jpg'
縮圖網址 = r'https://i.imgur.com/qk1Ugyy.png'
網址 = 'https://notify-api.line.me/api/notify'
標頭 = { 'Authorization': 'Bearer '+權杖 }
表單 = { 'message': 訊息,
'imageFullsize': 原圖網址,
'imageThumbnail': 縮圖網址 }
回應 = post(網址, headers=標頭, data=表單)
print(回應.text)
```
###### API 裡還有其他網址請求跟用法就自己看了吧
----
### ►練習
[](https://developers.line.biz/zh-hant/docs/messaging-api/sticker-list/#package-8525 '8525/16581290') [](https://line.me/R/ti/g/R6Llgs7Tcv) 
註冊權杖後,試將這邊的貼圖和梗圖一次發送給這邊的 LINE 測試群,好讓我知道你完成了。
記得開**無聲**,不然會很吵XD,取消註冊的通知的話就沒辦法。

----
#### 參考
```python=
from requests import get, post
權杖 = 'TQBCWMSFFTos89Eq9FcvItQnGV4FYrh0p3NZczIXFks'
訊息 = 'VJ完成任務!'
貼圖包ID, 貼圖ID = 8525, 16581290
圖片網址 = 'https://imgur.dcard.tw/i4AJxskh.jpg'
圖片路徑 = './img.jpg'
圖片get = get(圖片網址)
with open(圖片路徑, 'wb') as 檔案:
檔案.write(圖片get.content)
網址 = 'https://notify-api.line.me/api/notify'
標頭 = { 'Authorization': 'Bearer '+權杖 }
表單 = { 'notificationDisabled': True, #無聲
'message': 訊息,
'stickerId': 貼圖ID,
'stickerPackageId': 貼圖包ID }
檔案 = { 'imageFile': open(圖片路徑, 'rb') }
回應 = post(網址, headers=標頭, data=表單, files=檔案)
檔案['imageFile'].close()
print(回應.text)
```
---
### ►練習
試寫一支程式重複檢索[批批踢](https://www.ptt.cc/bbs/index.html)八卦板上面的數字,一有變化就發送 Line 通知變更後的人數給*自己*。
:::warning
:warning: 注意: 以免伺服器當機,請從 Python 內建函式庫的 `time` 裡 `import` [`sleep`](https://docs.python.org/3/library/time.html#time.sleep) 以在迴圈中每次請求後加入延時。
:::
```python
from time import sleep
sleep(5)
```
```
sleep(等候秒數:int)
```
----
### 分析網頁、選取元素
###### 在頁面中使用 <kbd>Ctrl+Shift+C</kbd> 選取元素,第一次建議像下面寫,可以幫助理解、和分析網頁。
```python=
from requests import get
from bs4 import BeautifulSoup as bs
解析 = bs(get('https://www.ptt.cc/bbs/index.html').text)
#print(x.text)
查詢1 = 解析.find(string='Gossiping')
print(查詢1) #'Gossiping'
查詢2 = 查詢1.find_next('span')
print(查詢2) #<span class="hl f6">*數字*</span>
查詢結果 = 查詢2.text
print(查詢結果) #*數字*
#縮寫
查詢結果 = 解析.find(string='Gossiping').find_next('span').text
```
----
### 重複檢索
```python=
from requests import get
from bs4 import BeautifulSoup as bs
from time import sleep
最後變動 = '初始'
while True:
解析 = bs(get('https://www.ptt.cc/bbs/index.html').text)
查詢結果 = 解析.find(string='Gossiping').find_next('span').text
if 查詢結果 != 最後變動:
訊息 = '批批踢八卦板 人數:'+最後變動+'->'+查詢結果
print(訊息) #; lineNotify(權杖, 訊息)
最後變動 = 查詢結果
sleep(3) #wait_sec()
#from IPython.display import clear_output
#clear_output(True)
```
----
#### 時間輸出&時差問題
##### 函式庫 `datetime` 的 `class datetime` 有提供 `today()` 函式,輸出會是本地時間。
###### 由於 colab 的伺服器、Google 公司在美國,有時差,需要另外處理。
```python
from datetime import datetime, timedelta
#在 colab 上這樣輸出就是目前台灣時間了
print(datetime.today() + timedelta(hours=8))
```
###### 函式庫 `datetime` 另有提供 `timedelta()` 函式用作 `datetime` 的加法計算。
###### *[colab - `datetimeTW.ipynb` by VJ](https://colab.research.google.com/drive/1USLgR0zywsoy1lwwQxkTfjZ3mRSF631c?usp=sharing)*
----
### 通知函式
###### 為方便大家上手,提供我寫的函式給大家。
```python
lineNotify(權杖,訊息[,響鈴,貼圖包ID,貼圖ID,圖片路徑])
```
```python=
def lineNotify( token:str, message:str, alarm=True,
packageId=0, stickerId=0, img=None ):
from datetime import datetime #by VJ
from requests import post
from json import loads
if((not token) or (not message)):
return print('沒有輸入訊息')
u = 'https://notify-api.line.me/api/notify'
h = { 'Authorization': 'Bearer '+token }
nowMsg = '['+str(datetime.today())+'] '+message
d = { 'message': nowMsg,
'notificationDisabled': not alarm }
if stickerId and packageId:
d['stickerId'] = stickerId
d['stickerPackageId'] = packageId
elif bool(stickerId) != bool(packageId): #XOR
return print('缺少貼圖 ID 或貼圖包 ID')
f = {'imageFile': open(img, 'rb')} if img else None
x = post(u, headers=h, data=d, files=f)
if(img): f['imageFile'].close()
if(x.status_code == 200):
result = '成功發送 LINE 通知: "'+message+'" '
if(img): result += '以及檔案: "'+img+'" '
if(stickerId) : result += '還有貼圖'
else: result = loads(x.text)['message']
print('['+str(datetime.today())+'] '+result)
return result
```
----
### 清除輸出
[](https://store.line.me/stickershop/product/7034336)
----
###### 有時候重複紀錄無用的訊息會造成記憶體的浪費,這時候就需要清除輸出,騰出記憶體空間。
#### colab (.ipynb)
```python
from IPython.display import clear_output
clear_output(True)
```
#### PC
```python
import os
os.system('cls') #Windows
os.system('clear') #Linux / Mac
os.system('cls' if os.name=='nt' else 'clear') #通用
```
---
## Session
相當於你打開瀏覽器,會幫你存下瀏覽網站設定的 cookie
```python
from requests import Session
requests = Session() #可以讓你像沒有from的寫法一樣
# 印出瀏覽器的cookie,當然,你剛打開的瀏覽器怎麼可能會有
print("cookies BEFORE")
[print(k,":",v) for k,v in requests.cookies.items()]
# 送請求
回應 = requests.get('https://www.google.com/')
# 印出回應的標頭
print("headers")
[print(k,":",v) for k,v in 回應.headers.items()]
# 印出瀏覽器的cookie
print("cookies AFTER")
[print(k,":",v) for k,v in requests.cookies.items()]
```
----
### 清掉指定cookie
網域、路徑只能用`vars(cookies)`自己翻

```python
requests.cookies.clear('.google.com','/','NID')
```
### 清空cookies
```python
requests.cookies.clear_session_cookies()
```
### 設定cookie
```python
requests.cookies.set('測試設定cookie名稱', '測試設定cookie值')
```
----
:::spoiler <i class="fa fa-fw fa-gamepad"></i>練習: 我滿18了啊
get帶cookies
```python
from requests
網址='https://www.ptt.cc/bbs/Gossiping/index.html'
回應 = requests.get(網址,cookies={'over18':'1'})
print()
```
Session
```python
from requests import Session
requests = Session()
requests.cookies.set('over18', '1')
網址='https://www.ptt.cc/bbs/Gossiping/index.html'
回應 = requests.get(網址)
```
:::
還是批批踢八卦版:
https://www.ptt.cc/bbs/Gossiping/index.html

這真的只能自己分析出來
 Sign in with Wallet


