## Objectives
* Understand the basics of consuming REST APIs.
* Learn how to use the Postman client to make API calls.
* Learn how to make calls to the Webex API.
## Overview of APIs
An Application Programming Interface (API) is a way for two pieces of software to talk to each other. Think about the ways you typically interface with software. For example, you might open up a web browser to access your email. You might have a specific workflow to open up messages and file them away for later. Each of these workflows has a specific "interface", or way in which you achieve a certain task.

An API is similar in concept. Instead of humans interfacing with software, software interfaces with software. Rather than having a human point and click-through a workflow, an API exposes functionality to another application.

Why would you want to do this?
One reason is that this allows for the development of rich applications with a wide variety of functionality. Let's look at an example:
Suppose you are the creator of a Restaurant Recommendation app and you want to easily integrate the ability to return a list of relevant restaurants in the area with a map application that displays where the restaurants are relative to the user's location. Would you create this functionality from scratch? Probably not.
Doing so would likely take you away from your core expertise. Also, think about all of the risk and learning curve required to build something like that from the ground up. Instead, it would be better to leverage a third party that already offers that functionality, and integrate the functionality into your applications.
A good example is a Maps Server. Rather than build map functionality from scratch, you could use an API provided by the Maps Server to integrate map functionality quickly into your application.
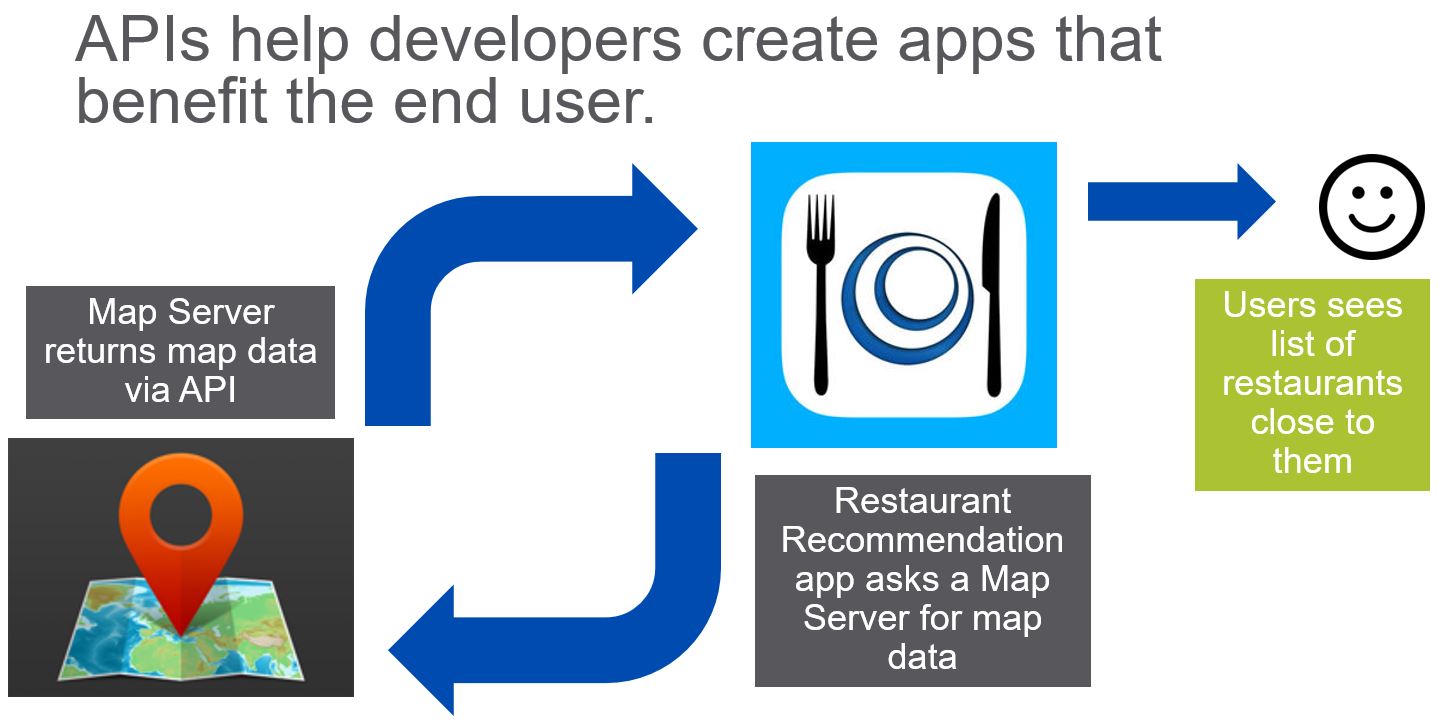
The role of an API here is to act like a contract that enforces a specification. Take a look at this image:
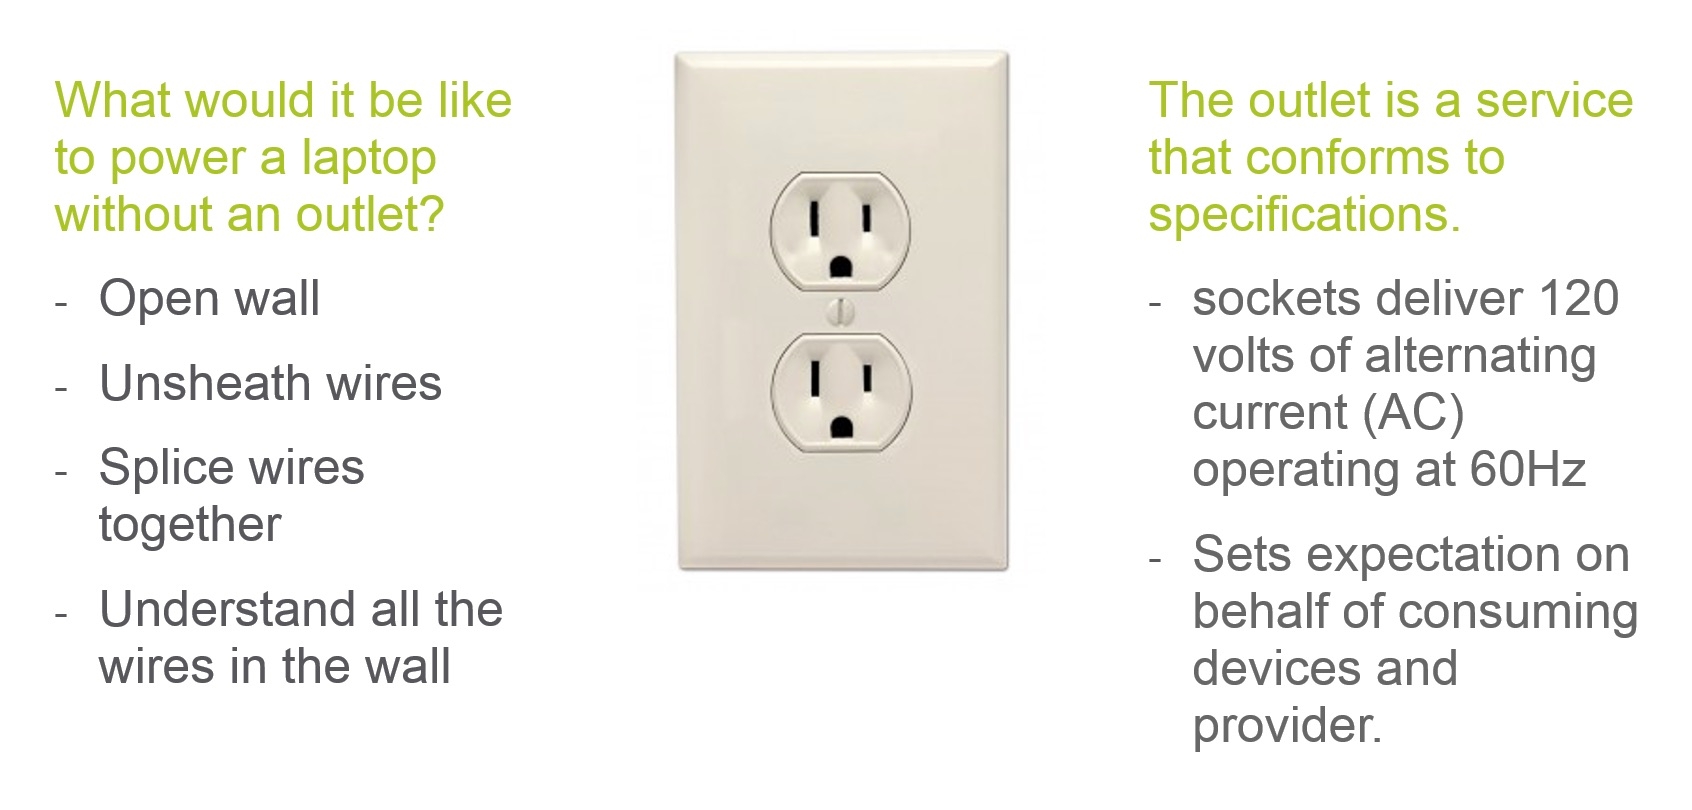
Much like a wall outlet, an API enforces a specification of an interface. An API ensures that software adheres to the proper specifications much like an outlet ensures that devices adhere to the proper electrical specifications regardless of the vendor or device.
## Step 1. Get access to the Webex REST APIs
We are going to use the Webex REST API to start our programmability journey. Webex is a collaboration tool that allows people to chat, call, meet, and share files online.
You need to set up a [Webex developer account](https://developer.webex.com/) in order to explore the Webex REST API.
1. Go to the [Webex Developer website](https://developer.webex.com/).
1. If you do not have an account yet, click **Sign Up**, then **Start for Free** and follow the instructions.
1. Log in with your new credentials.
1. To get your access token, at the top of the page select **Documentation**, then under **API** in the left navigation panel, click **Getting Started**. On the right navigation panel, click **Accounts and Authentication** to view your Personal Access Token.
Select and copy the token that appears:
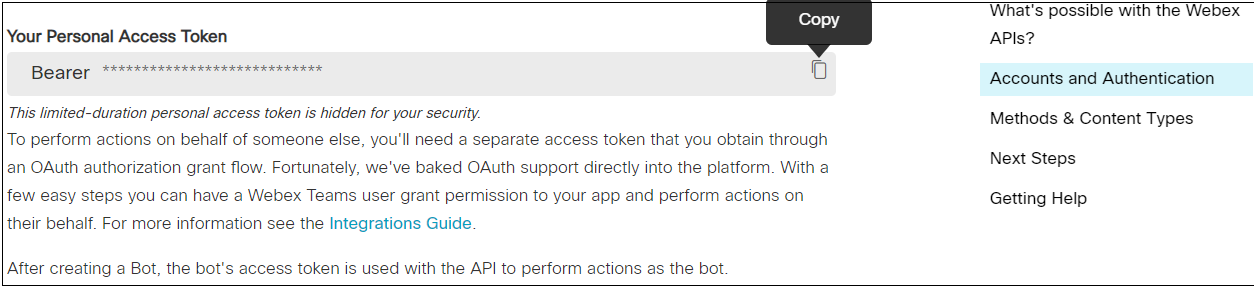
This token allows you to make Webex API requests based on your user login.
<div><Callout type="info">This personal access token should be used only for experimentation and testing - do not use it in any production applications.</Callout></div>
Great! Now that we have the basics of APIs down, let's dive into REST APIs to see how they work.
## Step 2. What is a REST web service?
In general, a web service is a way for two systems to communicate through a defined interface. In the past 20 years, there have been two major types of Web Services – **REST** and **SOAP**. In the last 10 years, the REST approach has become increasingly popular.
What is [REST (Representational State Transfer)](https://en.wikipedia.org/wiki/Representational_state_transfer)?
REST is an architecture style for designing networked applications. A REST web service is a web service that is as easy to call as making an [HTTP](https://en.wikipedia.org/wiki/Hypertext_Transfer_Protocol) request.
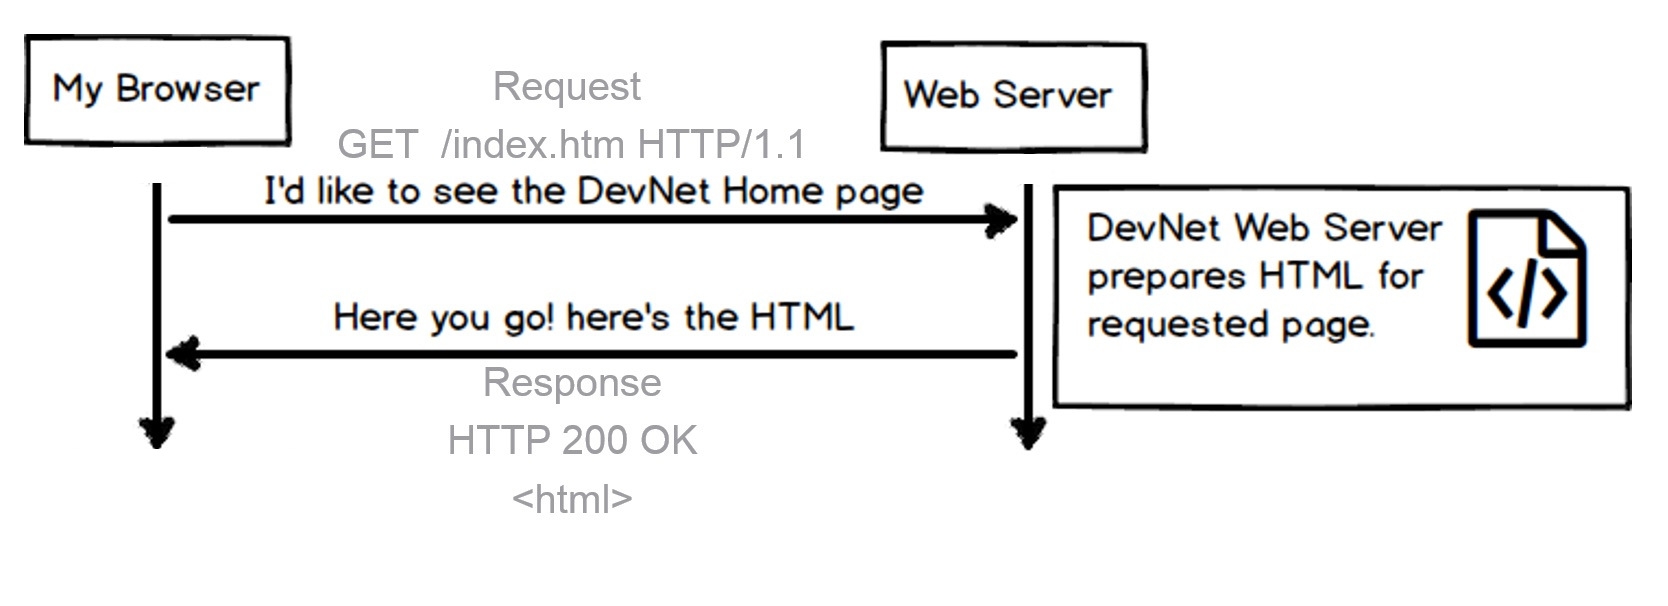
Look at the diagram below. It shows how a browser retrieves web pages. Normally, after a user requests a particular resource in a browser, the appropriate web server responds with the proper HTML to display the page to your client browser.
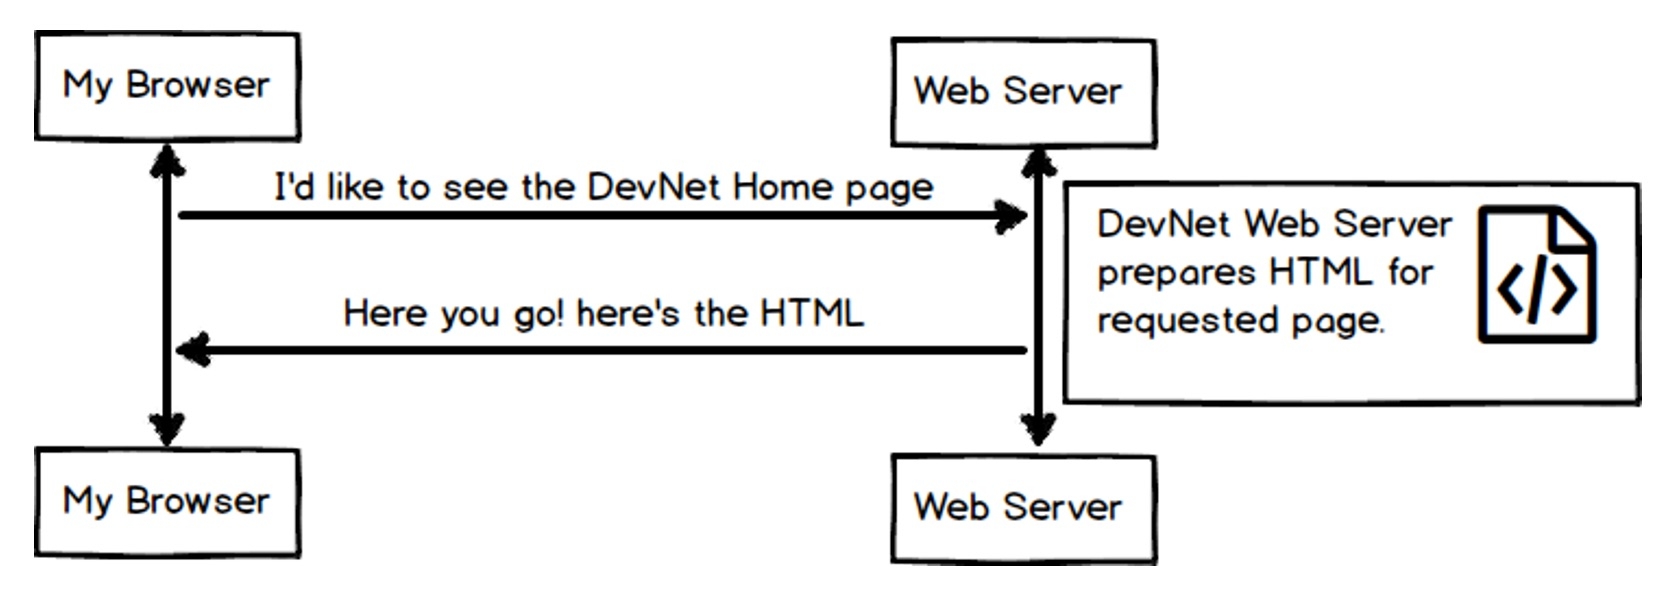
Behind the scenes, HTTP uses CRUD (Create, Read, Update, Delete) operations to request data. In the example below, our browser is issuing a GET operation to read the associated web page. The web server returns the associated data and an HTTP response to the client browser.
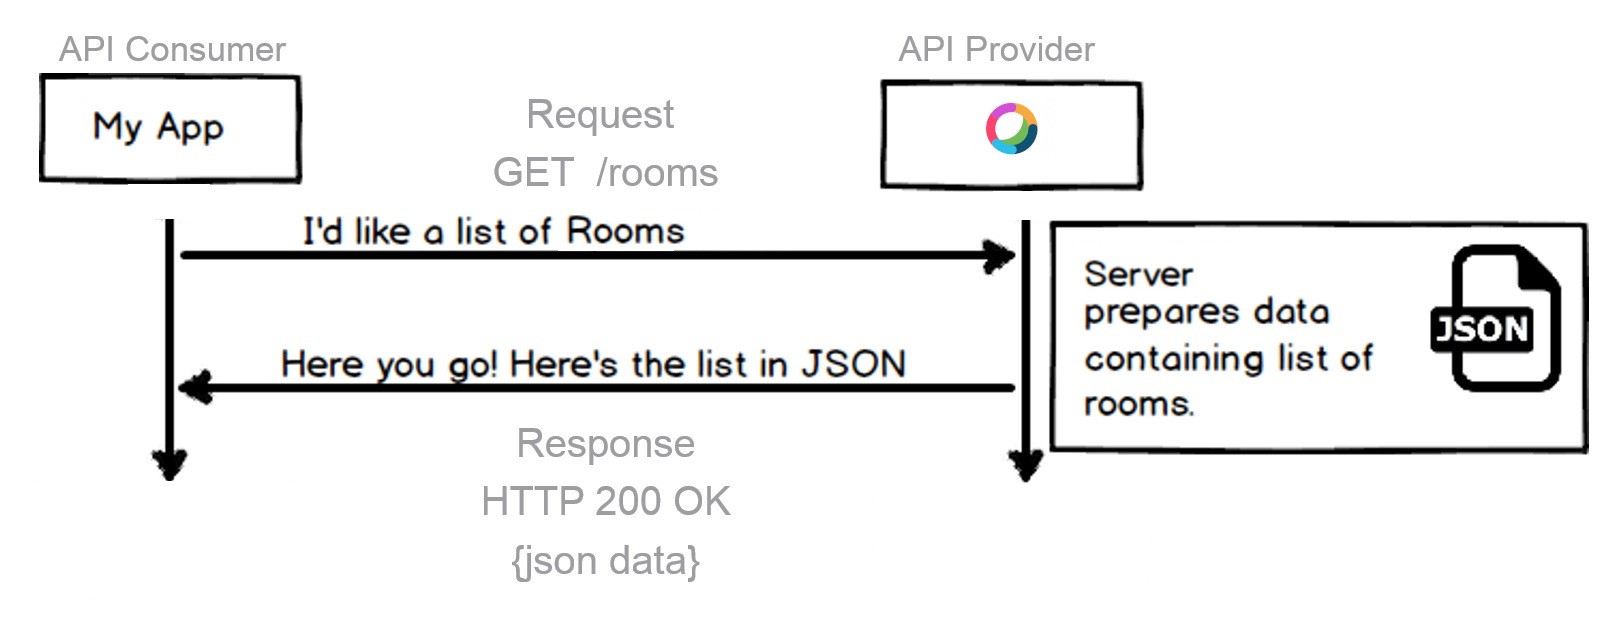
RESTful interfaces offer these same CRUD (Create, Read, Update, Delete) operations using HTTP(S). Browsers are replaced by software to interface with the RESTful service. The diagram below illustrates the same concept. Here, browsers are replaced by software leveraging the REST API.
If you want to know more about REST in general, this is a great [REST tutorial ](http://rest.elkstein.org).
### What is so great about REST?
**REST is easy to use on any platform!**
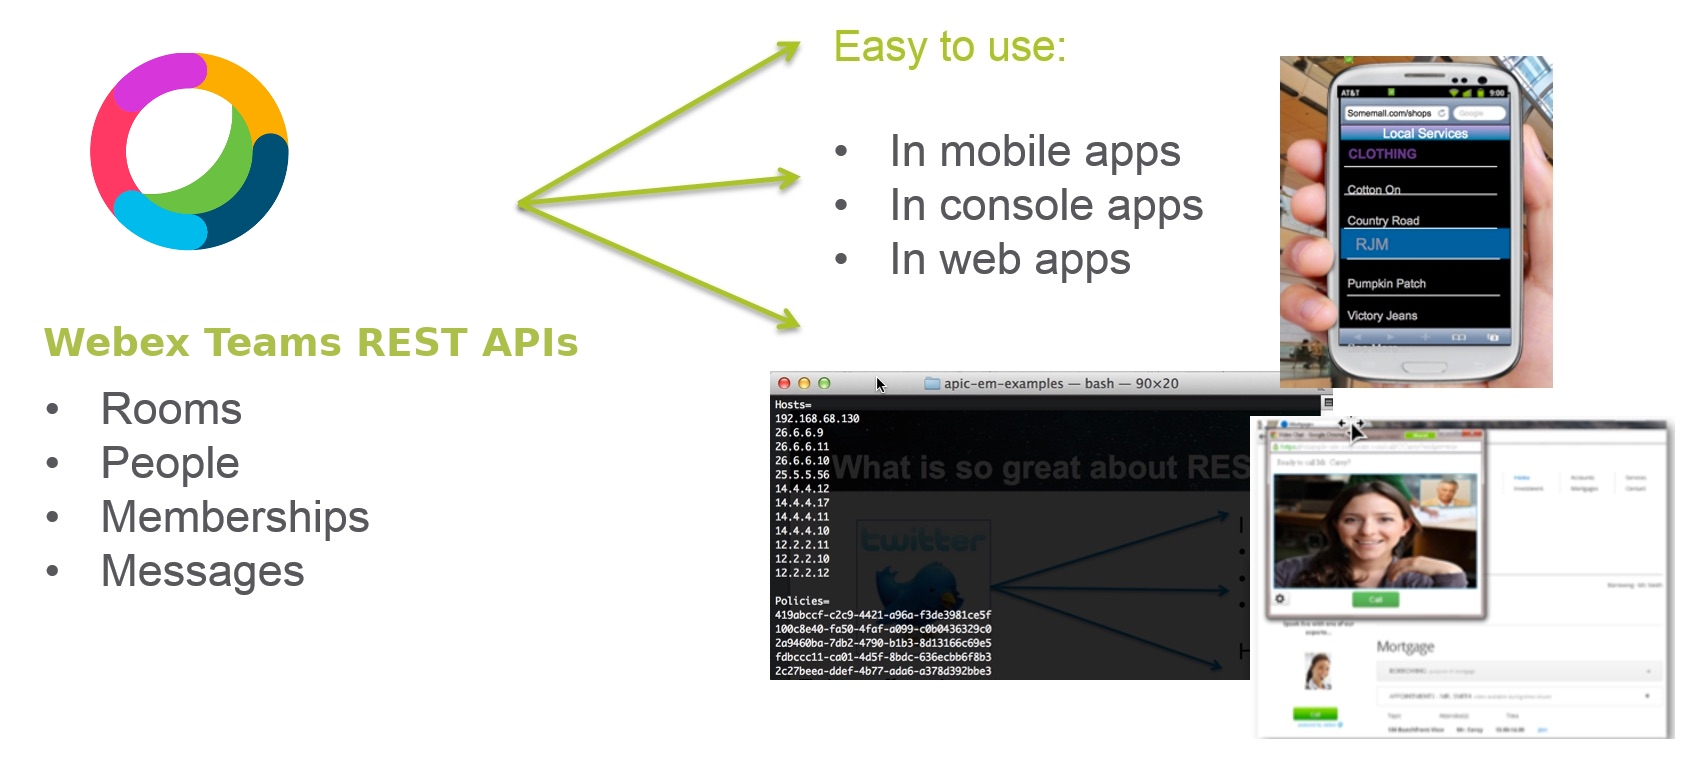
Let's talk about what makes REST APIs so great. First off, the concepts are transferable across a number of platforms. This lab shall focus on the Webex REST API as a tool to learn REST APIs. Webex is a communication platform for collaboration..
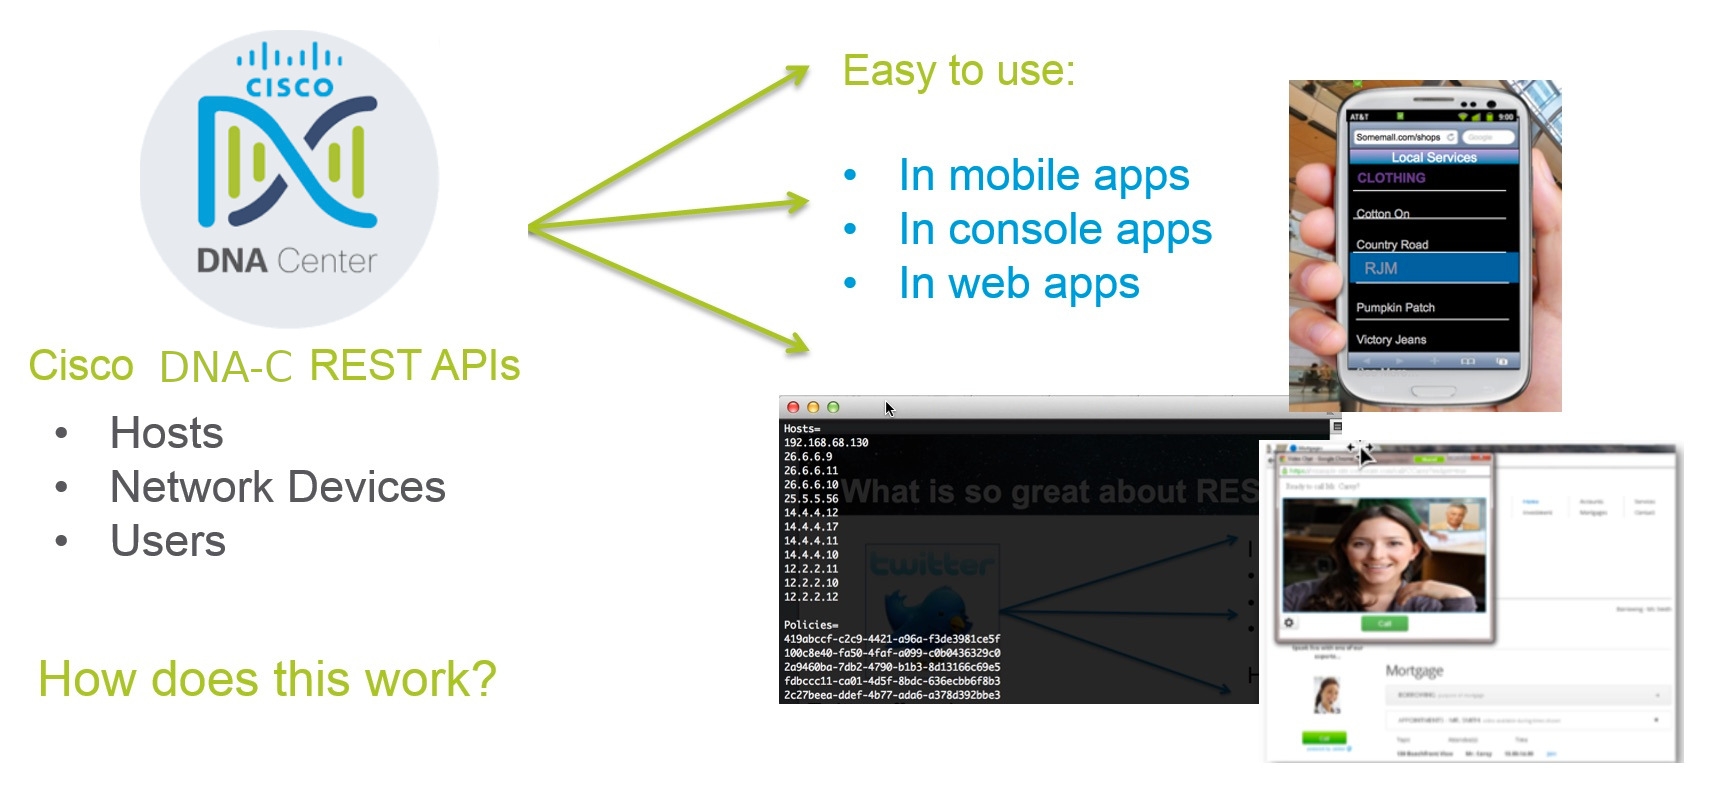
However, REST is also used by a number of networking platforms such as Cisco's DNA Center. While the API and data model of DNA Center differs, the underlying tools are the same.
### How does this work?
Now let's cover how REST APIs work. REST is centered around the HTTP request and response model. Consuming an API is just as simple as making an HTTP request.
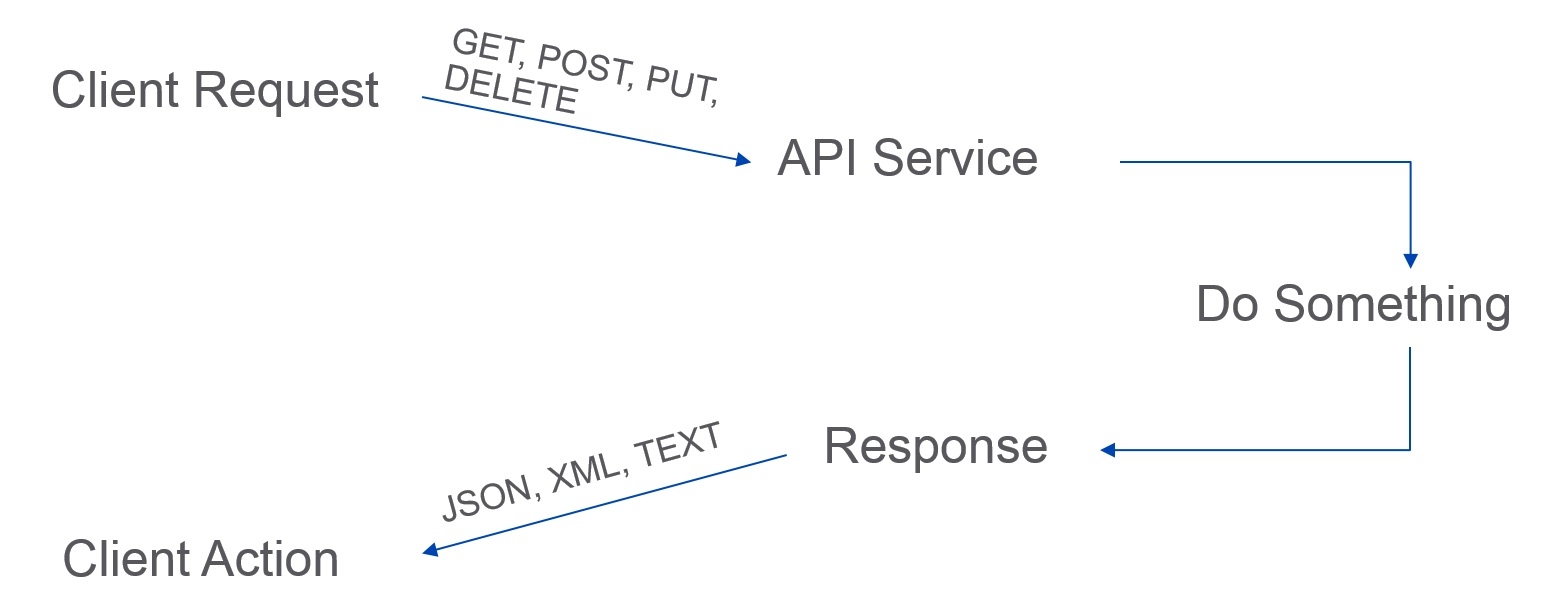
For example, if we make a request to an API Service, then result of the request will be returned to us in the response. The data returned in the response is usually JSON or XML.
([JSON](http://www.json.org/) - JavaScript Object Notation, is a lightweight text-based open standard designed for human-readable data interchange.)
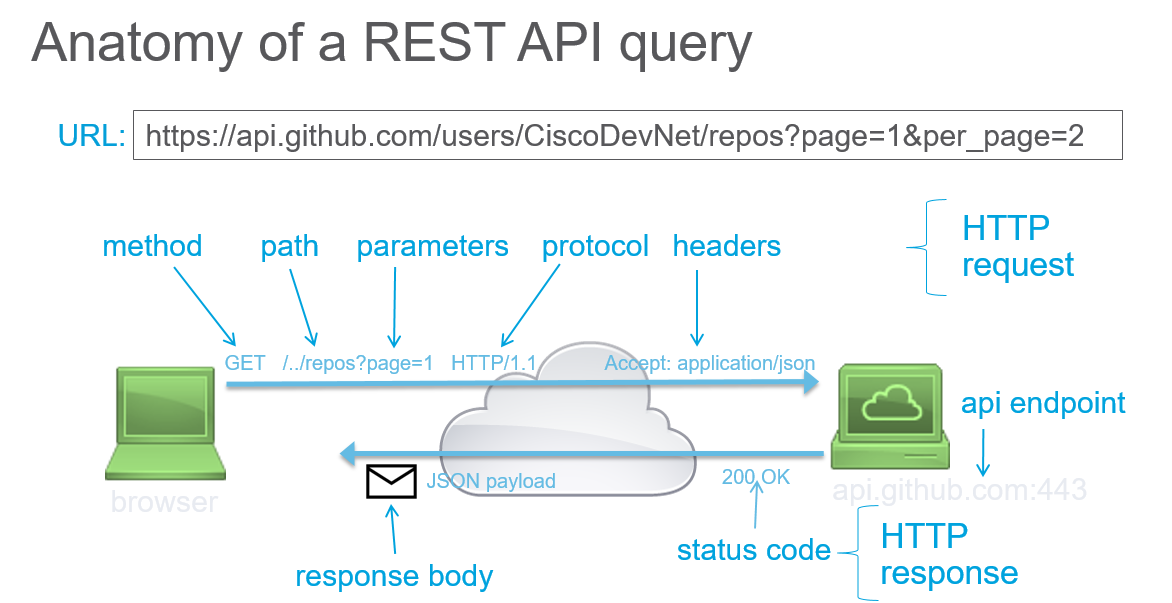
## Step 3. Examine the anatomy of a REST API query
To construct a request, you need to know the following information for the API that you are calling. You can find this information in the API reference documentation.
- **Method**
* GET - Retrieve data
* POST - Create something new
* PUT - Update data
* DELETE - Delete data
- **URL**
* The URL for the REST resource you would like to interact with
* Example: `https://api.github.com/users`
- **URL Parameters**
* The parameters that you can pass as part of the URL.
- **Authentication**
* You need to know the authentication type to use. Basic HTTP, token based, and OAuth are common types.
* Authentication credentials
- **Custom Headers**
* Does the API require you to send any HTTP Headers?
* Example: `Content-Type: application/json`
- **Request Body**
* JSON or XML containing data that is needed to complete request can be sent in the body of the request
### A little about authentication
There are different types of authentication for REST APIs. Authentication is used to control access and access rights to the REST APIs. For example, some users might have read-only access which means that they can use only the parts of the API that read data. Other users might have both read and write access. This means they can use the API to perform operations that not only read data but also add, edit, and delete data. These access rights are typically based on user assigned roles such as **Administrator** where a user would have full rights to change the data. For example, a plain **User** role might have read-only access rights.
#### Types of authentication controls
* **None**: the Web API resource is public, anybody can place call. Generally the case for GET methods, rarely for POST, PUT, DELETE.
* **Basic HTTP**: The username and password are passed to the server in an encoded string.
* Authorization: Basic ENCODEDSTRING
* See [Basic Authentication](https://en.wikipedia.org/wiki/Basic_access_authentication) for more information.
* **Token**: A secret key generally retrieved from the Web API developer portal.
* The keyword may change from one Web API to another: Bearer, token..
* Passed with each API call.
* See [Token Based Authentication](https://scotch.io/tutorials/the-ins-and-outs-of-token-based-authentication) for more information.
* **OAuth**: A sequence flow is initiated to retrieve an access token from an Identity Provider. The token is then passed with each API call.
* Open standard. User rights are associated with the token (OAuth scope).
* The token expires. It can be revoked. It can also be re-issued via a refresh token.
* See [OAuth](https://en.wikipedia.org/wiki/OAuth) for more information.
### API reference documentation
The API Reference Documentation lists all of the publicly available API methods and provides the details on how to make each request. When you start to work with a new API, the API Reference is one of the most important sources of information. For example, you can find the Full API Reference for Webex within the APIs section in the left navigation panel on the [Developer Portal](https://developer.webex.com/docs).
### What is in the response?
The API reference guide includes information about the attributes to be sent and returned. The returned data is defined in the **Response** portion which includes the HTTP status codes along with the data format and attributes.
* **HTTP Status Codes**
* HTTP status codes are used to return success, error, or other [statuses](http://www.w3.org/Protocols/HTTP/HTRESP.html).
* Some common examples are:
* 200 OK
* 202 Accepted/Processing
* 401 Not Authorized
* **Content**
* Often returned in different formats based upon the request. Common formats are: JSON, XML and Text.
* JSON (most commonly used)
```json
{
"data": [
{
"company": "Cisco Systems",
"event": "DevNet Express",
"location": "Las Vegas, NV, USA"
},
{
"company": "Cisco Systems",
"event": "Cisco Live America",
"location": "San Jose, CA, USA"
}
]
}
```
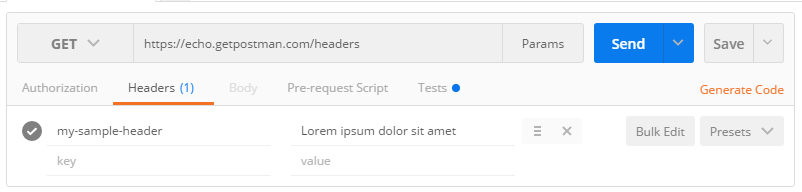
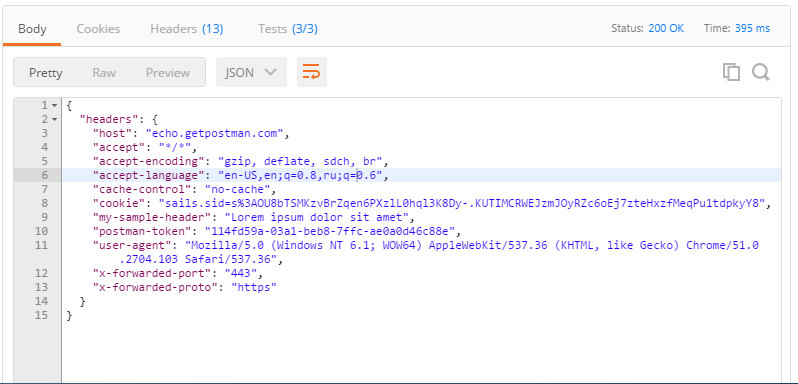
Here is an example that shows a REST API request and response all in the same window::
## Step 4. Use Postman to call the Webex API
As briefly mentioned earlier, **Postman** is an HTTP user interface client that allows you to make HTTP requests. There are many such clients that have similar functionality, but for our purposes we will focus on Postman.
### What is Postman?
Postman provides an easy-to-use interface for learning and interacting with REST APIs.
Users can send API calls and receive responses in the same window. This application can also be used to generate native code for different programming languages such as Python. Postman is useful for entry-level users, as well as seasoned developers - with advanced features such as scripting and automated test suite development.
We will use Postman throughout this and following modules. Take a minute to [download and install Postman](https://www.getpostman.com).
#### The Postman window
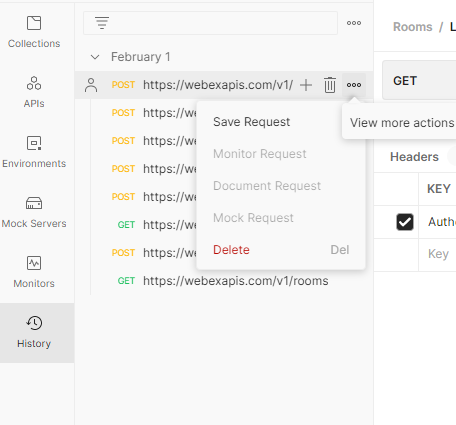
Postman has three main working areas. On the left side of the window you can see tabs arranged vertically. The important tabs here are the **History** and **Collections** tabs. The **History** tab shows a list of your previous calls. If you want to save a particular API call from the History tab, you can click on the call to highlight it, then click the three ellipsis dots, and click `Save Request` to name and save the request.
In the middle of the Postman screen is where all the magic happens. This is where you make the API calls by setting the call method and providing URL information. Under the **Headers** tab you should define all of the necessary key-value pairs to make a successful call. When all of the parameters are set, click the **Send** button.
If the request is correctly formed, after you click **Send** you should see a response on the bottom section of the window. The **Response** pane gives you information such as the **Status** code of the response, how it is formatted (JSON, XML, etc.), as well as the body of the response message.
### Postman test run: call the Webex API
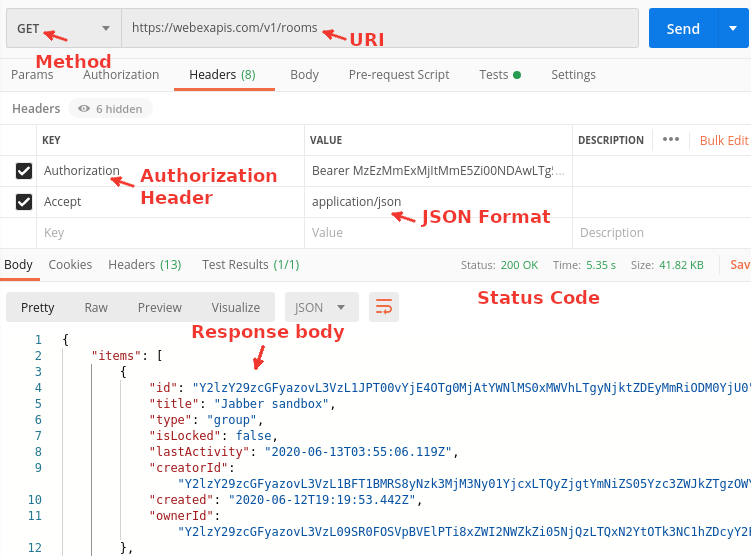
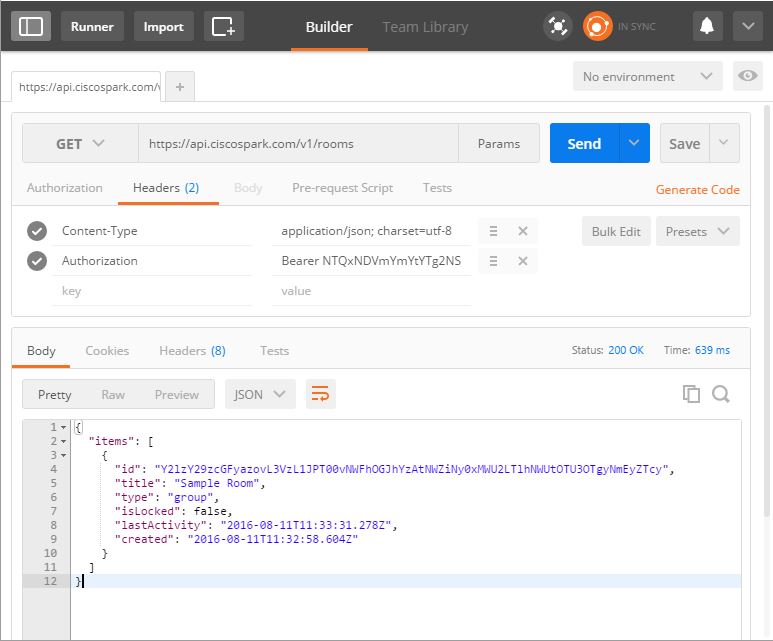
Let's make a call to the Webex API. Look at the screenshot below, it depicts an API call to Webex server. The letters show each step, and the steps are explained below:
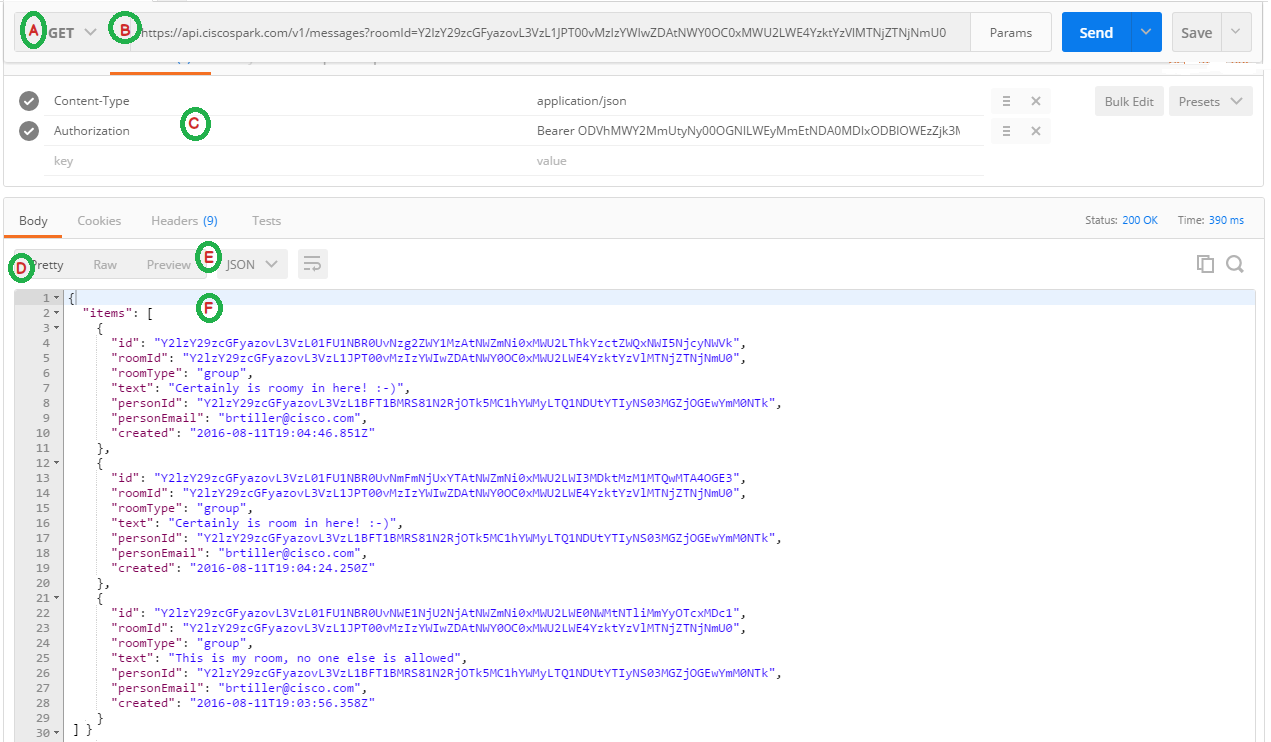
**A** - Shows the REST method to use to send the request. You can select the method from a drop down list. As previously noted, the most common methods are: GET, POST, PUT and DELETE. In this case we want to read in a list of messages posted by a particular user to a particular room. That means for this example we want to use the **GET** method.
**B** - The URL to be called is specified here. The base URL for Webex is:s **https://webexapis.com/v1/**. What follows next is the function to be called which is **messages**. Next is the `roomId` follow by the ID itself in the format of `?roomid={the room id}`
**C** - Webex API requires an **Access Token** in order to make function calls. For that reason, we have added the key named **Authorization** to the headers list. We entered the value `Bearer {the access token}`. The **Content-Type** key specifies what type of formatted content is being sent to the HTTP server. In this case no content is being sent so this header as this is a **GET** (read only) request. At this point the request is ready to be sent and the user would press the **Send** button.
**D and E** - The **Body** contains the data returned from the request. Because the returned format has been selected to be **JSON**, there's various types of ways to format this output. **Raw** output displays the data in the format received. **Pretty** output which is selected here, reformats the data to make it much easier to read.
**F** - The returned JSON content in Pretty format.
### Give it a try!
Follow the steps below to make your first Webex API call using Postman.
1. We're going to make a function call to get the list of Webex rooms that you belong to. Access Webex with your Webex desktop application or the web client at http://teams.webex.com, and log in. If you do not belong to a room, simply create one, and you will automatically be a member. Or ask someone you know to invite you to their room.
2. You'll also need your **Personal Access Token** to make the function call. See Step 1 of this lab for details on getting your token
3. Open Postman
4. Select `GET` from the method drop down
5. In the URL field enter `https://webexapis.com/v1/rooms`
6. In the header field add the key `Authorization`
7. In the value field add the word `Bearer` followed by a space, then paste in your access token
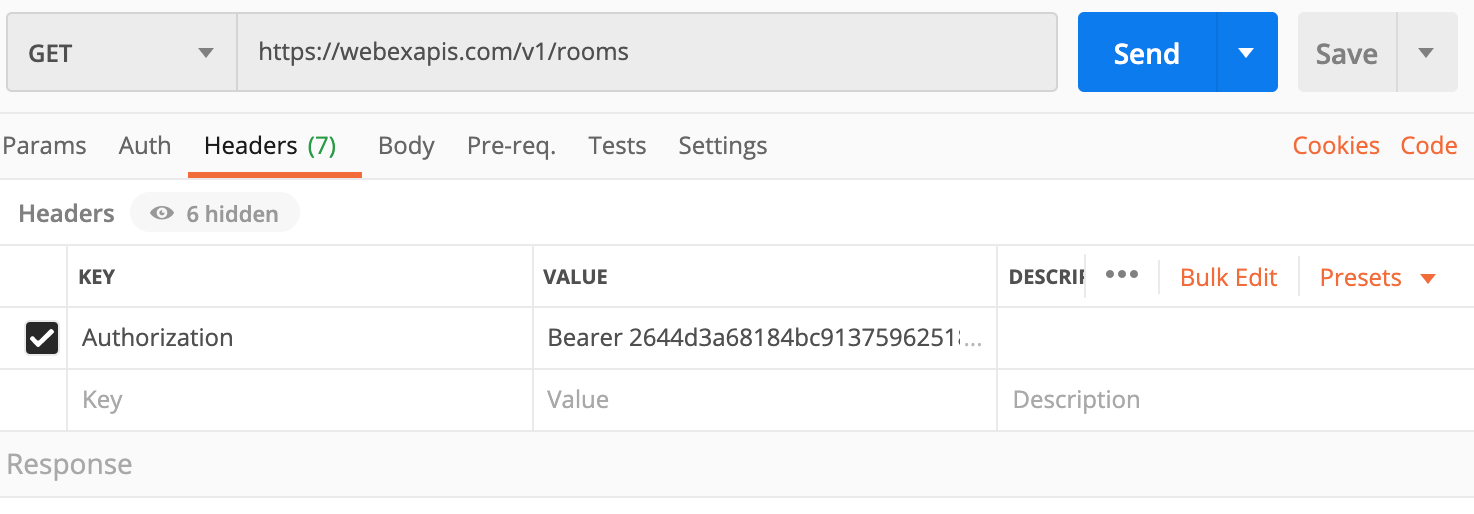
8. Press the **Send** button
9. The result should be similarly to the screenshot show below:
You should receive the list of rooms to which you belong. The data will be in JSON format. If you received an error recheck the steps, making sure that the method, URL, and header information is correct.
Congratulations! You've just made your first API call!


