# Django學習記錄
太久沒有碰網頁後端框架了,真的忘的很快,記錄一下各項配製方法。
而且網路上很多Django的教學為舊版本,希望這篇教學可以幫助到有需要的人們!!
這篇僅是Django最基礎的操作以及運作原理,幫助大家快速上手這個好用的後端框架。
## 0. Why Django? Django和PHP的差別?
Django是一個以Python構建的後端大型框架,可以用各種Python的Package做一些進階功能,而且Python處理字串的能力遠比PHP強的多。
Django是一種MTV的框架:
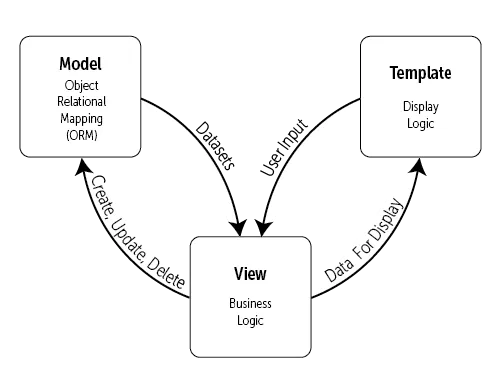
整個框架由Model(資料庫), template(html), View(前端畫面)構成。不同於PHP一個檔案對應到一個網頁(後端),Django則是view.py內的一個function對應到一個網頁,多個function組成一個app,所有app有組成一個Project。
Django的另一特點就是所有的路徑都由後端設定,而不仰仗于檔案實際的位置,因此就算某些檔案路徑不同了也不會影響到網頁。
## 1. 關於Django的Project和App
### Project
一個Project共用網路層面的設定,也就server的主要設定,例如資料庫、網頁Request、或是Url導向。
建立Django project指令如下:
```bash!
django-admin startproject project_name
```
會產生以下的檔案:
```
project_name
├── manage.py //指令集
└── project_name
├── settings.py //主要設定
├── urls.py // 網址路徑設定
├── wsgi.py //web request 設定
├── asgi.py //asynchronize request 設定
```
看不懂檔案的用途沒關係,僅有settings.py比較常用到而已。
wsgi.py用來設定要連到哪一個server(通常是Nginx)。
Project建好使用runserver指令:
```bash!
python manage.py runserver
```
localhost:8000 如果有以下畫面就是成功了!!

備註:
這個runserver只是跑一個暫時性的python server, 方便debug而已。其效能跟安全性都非常差,要上架時還是會需要其他server幫助!!
### App
一個App就是多個功能比較相近的網頁,那究竟哪些網頁才算是功能相近?這沒有一定的規則,只要自己覺得好管理就可以了。
當然想要把所有網頁放在同一個App或是一個網頁一個App也是沒問題的啦~。
創建App的指令:
```bash!
python manage.py startapp app_name
```
記得要跟manage.py同一個路徑下執行。
整個專案資料夾會變成這樣:
```
project_name
├── manage.py //指令集
├── project_name
└── app_name
├── admin.py
├── apps.py
├── models.py
├── tests.py
└── views.py
```
最後記得把新創建的App加到settings.py的installed_app列表內:
```python!
INSTALLED_APPS = [
"django.contrib.admin",
"django.contrib.auth",
"django.contrib.contenttypes",
"django.contrib.sessions",
"django.contrib.messages",
"django.contrib.staticfiles",
"app_name", #新創建的app
]
```
1. admin.py
用來設定Django admin內要顯示的東西,也可以自定義一些csv匯入之類,詳細會在後面Django admin細講。
2. apps.py
幾乎不會動到的設定,可以定義app啟動時的一些function等等。
3. models.py
資料庫的table定義,後面資料庫操作會再細談。
4. tests.py
用來寫一些測試小腳本的檔案,可以用來測試資料庫又不影響到真正的資料,不過我也不會用QQ。
官方文檔:
https://docs.djangoproject.com/en/5.0/intro/tutorial05/
5. views.py
定義各個網頁要怎麼顯示,最重要的一個檔案!!。
可以發現一個App內會有共用的view, models。所以通常我會把常用到一樣table的網頁定義成一個App,或者常用到同一個function的頁面放在同一個App內。
## 2. template和View。
### 構建前端的第一步
先在App資料夾底下新增一個templates資料夾,把index.html檔案放進去:
```
app_name
├──templates
├──index.html
├── admin.py
├── apps.py
├── models.py
├── tests.py
└── views.py
```
index.html如下:
```
<!doctype html>
<html>
<head>
<title>This is the title of the webpage!</title>
</head>
<body>
<p>This is an example paragraph. Anything in the <strong>body</strong> tag will appear on the page, just like this <strong>p</strong> tag and its contents.</p>
</body>
</html>
```
配置好了template, 就要把這個畫面給選染到view上面啦~
view.py:
```python!
from django.shortcuts import render
#新加入的function
def testPage(request):
return render(request, "index.html")
```
這樣就完成了view function跟template的對應,最後把function配置一個url。
urls.py:
```python!
from django.contrib import admin
from django.urls import path
from app_name import views #記得要import app的view
urlpatterns = [
path("admin/", admin.site.urls),
path("home", views.testPage) #給剛剛寫好的function設定一個url
]
```
這時候runserver後,瀏覽器網址輸入localhost:8000/home就可以看到剛剛寫的網頁啦!

所有檔案要被瀏覽器存取,一定都要經過urls.py的分配,這種方法也加強了網頁的安全性。
如果urls內path放空字串,網頁就會被map到localhost:8000。
urls dispatch還有其他進階的用法,詳細看一下官方document:
https://docs.djangoproject.com/en/5.0/topics/http/urls/
### static files
Django內的static files(JS, CSS, IMG)也是統一由框架管理,不再透過file system的相對路徑去存取。
在settings.py裡面找到以下設定:
```python!
STATIC_URL = "static/"
```
這段定義每個app內的static資料夾,可以作為static file存取的路徑。我們在App建立一個static 資料夾,裡面放我們要的css檔案(或是任何靜態文件):
```
app_name
├──templates
├──index.html
├── static
├──index.css
├── admin.py
├── apps.py
├── models.py
├── tests.py
└── views.py
```
index.css:
```css
p {
color: rebeccapurple;
}
```
可以用網址localhost:8000/static/index.css確定是否能存取檔案,若可以則代表static配置正確。

那html中如何引用呢?
首先要在html的最上面加上:
{% load static %}
只要放在static資料夾內的檔案都能用{% static "path_to_file"%}去存取。
```htmlembedded
<link href='{% static "index.css" %}' rel="stylesheet"/>
```

可以看到我們的網頁已經有吃到CSS檔案啦~
img的src也是用同樣的方法去存取。
### include template
如果有一些常用的html code可以獨立成一個html檔案,在需要的時候include就好。像是網站的許多頁面都會用相同的navbar和footer,我們可以分別為footer和navbar創建html檔案。
```
app_name
├──templates
├──index.html
├──navbar.html
├──footer.html
├── static
├──index.css
├── admin.py
├── apps.py
├── models.py
├── tests.py
└── views.py
```
然後在需要的位置include就好:
```htmlembedded!
{% include "navbar.html"%}
<p>This is an example paragraph. Anything in the <strong>body</strong> tag will appear on the page, just like this <strong>p</strong> tag and its contents.</p>
{% include "footer.html"%}
```
但有些template不只一個App需要,需要跨App也能存取該怎麼辦呢?這時候我們就要定義global template dirctory。
在settings.py裡面找到template的設定,把global template dir放到DIRS選項的位置:
```python!
TEMPLATES = [
{
"BACKEND": "django.template.backends.django.DjangoTemplates",
"DIRS": [BASE_DIR / "templates"], #定義global templates的位置
"APP_DIRS": True,
"OPTIONS": {
"context_processors": [
"django.template.context_processors.debug",
"django.template.context_processors.request",
"django.contrib.auth.context_processors.auth",
"django.contrib.messages.context_processors.messages",
],
},
},
]
```
BASE_DIR代表的是Project的位置。有趣的是Django setting內的所有路徑都可以直接用 **/** 符號連接,不需要用OS.path.join()。
APP_DIRS 如果改成False,django就不會再從App內找templates資料夾了,只有DIRS裡面的會被當成template檔案。
***備註***
我常常網頁會用到一大堆plugin,jquery、boostrap、jspanel....,每次都要複製一大堆link code很麻煩,我就會把這些引用的code做成一個template,每個網頁去include就好。
### Global static file
剛剛有提到跨App要存取template要設定Global template,同理跨App要存取static也要設定global static dirs。直接在settings.py加入以下設定:
```python!
STATICFILES_DIRS = [
BASE_DIR / "static_file",
]
```
就可以把project file底下的static_file資料內的開放給所有App存取。
### send data to template
Django可以將要用的資料打包成一個dictionary傳給前端。只要在view function return render時把資料放在最後一個參數。
view.py:
```python!
def testPage(request):
i = [x for x in range(1,10)] #一個0~9的list
data = {
"data1":"資料1",
"data2":"資料2",
"list":i,
}
return render(request, "index.html", data)
```
前端用{{變數}}:
```htmlembedded!
<!doctype html>
{% load static %}
<html>
<head>
<title>This is the title of the webpage!</title>
<link href='{% static "index.css" %}' rel="stylesheet" />
</head>
<body>
{{data2}}
<p>This is an example paragraph. Anything in the <strong>body</strong> tag will appear on the page, just like this <strong>p</strong> tag and its contents.</p>
{{list}}
</body>
</html>
```

如果要取出list內特定index:
```htmlembedded!
{{list.3}}
```
### for tag
或是用for loop tag:
```htmlembedded!
<!doctype html>
{% load static %}
<html>
<head>
<title>This is the title of the webpage!</title>
<link href='{% static "index.css" %}' rel="stylesheet" />
</head>
<body>
{{data2}}
<p>This is an example paragraph. Anything in the <strong>body</strong> tag will appear on the page, just like this <strong>p</strong> tag and its contents.</p>
{% for item in list%}
<p>{{item}}</p>
{% endfor %}
</body>
</html>
```

### if tag
當然有for tag也有if else tag:
```htmlembedded!
{% if ... %}
{% else if ...%}
{% else %}
{% endif %}
```
像是宿舍公共空間借用系統的空間選擇欄位,要依據目前選擇的空間改變selected:

```htmlembedded!
<select class="wide" id="dropdown">
<option value="1" selected="">雨樹L棟會議室</option>
<option value="10">雨樹藝文空間</option>
</select>
```
就是使用for tag以及 if tag完成的:
```htmlembedded=
<select class="wide" id="dropdown">
{% for space in region_space %}
<option value={{space.id}} {% if space.id == request.GET.space_id %} selected {% endif %}>{{space.space_name}}</option>
{% endfor %}
</select>
```
要特別注意的是,對於Django前端的變數還是有資料型態的差別的,所以如果==兩端的資料型態不同,是需要資料型態轉換的!
基本上都和python語法差不多,只是最後都要加上一個end tag。
還有很多酷酷tag和filter,包括變數資料型態的轉換(stringformat)或是變數的運算(add),請參考官方文檔:
https://docs.djangoproject.com/en/5.0/ref/templates/builtins
備註:
MTV這種形式的好處就是前後端做到完全分離,前端code只會有變數跟一些必要的for loop。
### 什麼?前端可以存取POST?
不只是POST, GET、session、cookie,這些跟request有關的都可以直接在template用變數存取。
不過要確定setting.py內的templates context_processors有沒有這個設定:
```python!
"django.template.context_processors.request"
```
這樣就可以在前端用request.POST.name存取POST的內容!!(session, get, cookie同理)
```htmlembedded!
<p id="hidden_id" >{{request.GET.space_id}}</p>
```
### url tag
**補充**:
還有很重要的tag是url tag, 用法:
{% url "site_name" %}
只要給頁面一個別名,就可以用這個tag自動生成去往這個頁面的url。
這東西好用在哪裡呢?以宿服借用系統的navbar為例,點擊navbar上的標題就可以回到主頁。
但是如果用相對路徑,有一些頁面可能../就可以回到主頁,有一些要../../兩次才可以或是更多,如果用絕對路徑domain更改時又要改code,所以我們可以直接給主頁一個url name,在urls.py裡面:
```python!
path("", views.home, name="home"),
```
這樣我們就可以用{% url "home" %}回到主頁:
```htmlembedded=
<nav class="navbar navbar-expand-lg navbar-dark bg-516464">
<div class="container px-5">
<a class="navbar-brand" href="{% url 'home'%}">中山大學宿舍公共空間借用系統</a>
<button class="navbar-toggler" type="button" data-bs-toggle="collapse" data-bs-target="#navbarSupportedContent" aria-controls="navbarSupportedContent" aria-expanded="false" aria-label="Toggle navigation"><span class="navbar-toggler-icon"></span></button>
<div class="collapse navbar-collapse" id="navbarSupportedContent">
<ul class="navbar-nav ms-auto mb-2 mb-lg-0">
<li class="nav-item"><a class="nav-link" href="https://housing-osa.nsysu.edu.tw/">宿服組網站</a></li>
<li class="nav-item"><a class="nav-link" href="https://housing-osa.nsysu.edu.tw/p/412-1092-18050.php?Lang=zh-tw">借用須知</a></li>
</ul>
</div>
</div>
</nav>
```
## 3.資料庫
### 資料庫設定
Django 原先預設是使用sqllite,不過我自己習慣使用MySQL。
在 settings.py內找到DATABASES的設定,並改成:
```python!
DATABASES = {
"default": {
"ENGINE": "django.db.backends.mysql",
"NAME": "databaseName",
"USER": "databaseUser",
"PASSWORD": "databasePassword",
"HOST": "localhost",
"PORT": "portNumber",
}
}
```
若沒有安裝pymysql package:
```bash!
pip install pymysql
```
最後記得要在project/__init__.py 或是 settings.py的最上面補上以下程式,
這段程式的目的是讓python可以直接透過pymysql package去連結資料庫:
```python!
import pymysql
pymysql.install_as_MySQLdb()
```
Django不管你連接什麼資料庫,都會轉為ORM,簡單來說就是一個table就會是一個Python class,table內的column就是class的attribute,這些class定義在app的models.py裡面。
**ps:** ***model就沒分local model或是global model了,如果要用到別的app的model, 直接from app import model就好了。***
```python=
class Space(models.Model):
id = models.AutoField(primary_key=True) # Field name made lowercase.
space_name = models.CharField(max_length=255) # Field name made lowercase.
region = models.CharField(max_length=255)
link = models.CharField(max_length=255, blank=True, null=True)
eng_name = models.CharField(max_length=255)
class Meta:
managed = True #代表需要Django幫你在資料庫建立這個table
db_table = 'Space' #資料庫內table的名字,預設會是django_space
class Register(models.Model):
signature = models.CharField(max_length=255, primary_key=True, null=False, blank=False)
start_time = models.IntegerField() # Field name made lowercase.
space = models.ForeignKey(Space, on_delete=models.CASCADE) # Field name made lowercase. The composite primary key (Space_id, Start_time, Date) found, that is not supported. The first column is selected.
date = models.CharField(max_length=20) # Field name made lowercase.
usable = models.IntegerField()
user_id = models.CharField(max_length=255, blank=True, null=True)
user_name = models.CharField(max_length=255, blank=True, null=True)
user_phone = models.CharField(max_length=255, blank=True, null=True)
user_dormnumber = models.IntegerField(blank=True, null=True)
change_pwd = models.CharField(max_length=255, blank=True, null=True)
class Meta:
managed = True
db_table = 'Register'
unique_together = ('space', 'start_time', 'date') #這三個欄位合在一起必須唯一
class BlackList(models.Model):
stu_id = models.CharField(primary_key=True, max_length=20)
expire_time = models.DateField(blank=True, null=True)
banned_reason = models.CharField(max_length=20, blank=True, null=True)
class Meta:
managed = True
db_table = 'black_list'
```
定義或是修改class後輸入指令:
```bash!
python manage.py makemigrations
python manage.py migrate
```
這時就會看到我們的資料庫多了許多table:

除了Space, Register, black_list以外,其他都可以不用管,那些是django自己產生的一些紀錄。
### 常見的資料庫欄位格式
資料欄位Options常用的有:
<table>
<tr>
<th>選項</th>
<th>意義</th>
</tr>
<tr>
<td>null</td>
<td>是否可以為null</td>
</tr>
<tr>
<td>blank</td>
<td>是否可以為空白字串</td>
</tr>
<tr>
<td>primary_key</td>
<td>是否為pk</td>
</tr>
<tr>
<td>default</td>
<td>欄位預設值</td>
</tr>
<tr>
<td>choices</td>
<td>限定欄位值只能填哪些, 很好用</td>
</tr>
<tr>
<td>unique</td>
<td>欄位值是否唯一</td>
</tr>
</table>
常用的資料型態則有:
```python=
models.AutoField() #autoIncrement Integer
models.CharField() #varchar
models.IntegerField() #Integer
models.DateField() #Date, 在python內可以當datetime.date物件處理
#偷偷抱怨一下,php要處理date真的超級麻煩,所以之前我都用varchar去存日期
models.DateTimeField() #Datetime, 時間加上日期,在python內可以當datetime.datetime物件處理
models.FileField() #Mysql沒有這種欄位,直接可以handle檔案的存取!超讚!!
```
**備註:**
Django不支援multi-key primary key, 所以只能放一個autoincrement的pk, 然後再用unique_together
### 特殊的資料欄位
這些欄位是用來定義relational DB表格之間的關係,像是1對1資料、1對多資料...
Django都會自動轉換成對應的表格,不需要自己從ER diagram轉成table。並且當資料違反原則時會自動報錯。
```python=
models.OneToOneField() #1對1關係
models.ForeignKey() #1對多關係
models.ManyToManyField() #多對多關係,資料庫會自動多建立一個表格
```
這些特殊欄位除了上面提到Option,還多了幾個:
<table>
<tr>
<th>選項</th>
<th>意義</th>
</tr>
<tr>
<td>to</td>
<td>有關係的table</td>
</tr>
<tr>
<td>on_delete</td>
<td>連結的資料消失時採去的動作</td>
</tr>
<tr>
<td> parent_link</td>
<td>繼承用的,不重要我也不會用QQ</td>
</tr>
</table>
詳細更多的Field還有Options請見官方文檔:
https://docs.djangoproject.com/en/5.0/ref/models/fields/#django.db.models.FileField
### Query
Django支援原本的SQL語法或是ORM對資料庫進行Query,個人建議簡單的操作像是SELECT, DELETE, INSERT用ORM,至於比較複雜的JOIN, GROUP_BY, 甚至是AGGREGATION就還是乖乖寫SQL吧!!
#### SELECT
```python!
#SELECT * from space where id = 1 AND space_name = "武嶺會議室";
space = Space.object.filter(id=1, space_name="武嶺會議室")
#SELECT id, space_name from space where id = 1;
space = Space.object.filter(id=1).values("id", "space_name")
```
注意!!以上兩種function回傳不太一樣,前者是QuerySet(類似list的物件),裡面包著Space object;後者是QuerySet裡面包著dict。
例如:
```python!
>>> Blog.objects.filter(name__startswith='Beatles').values('id', 'name', 'tagline')
[{'id': 1, 'name': 'Beatles Blog', 'tagline': 'All the latest Beatles news.'}]
```
注意!!雖然QuerySet物件類似list, 操作也差不多,但在某些function只能接受list還是得要轉換。
**補充(不怎麼重要,可以跳過):**
如果使用values_list,則所有值會攤開成一個tuple:
```python!
>>> Blog.objects.filter(name__startswith='Beatles').values_list('id', 'name')
[(1, 'Beatles Blog')]
```
如果再加上flat=TRUE就會攤開變成:
```python!
>>> Blog.objects.filter(name__startswith='Beatles').values_list('id', 'name', flat=True)
[1, 'Beatles Blog']
```
**補充結束**
#### INSERT INTO/UPDATE
```python!
new_space = Space(id=2, space_name="武嶺交誼廳")
new_space.save()
#INSERT INTO Space (id, space_name) values (2, space_name);
```
也可以用dic創建一個物件,在該物件有一大堆Fields時比較省力:
```python!
record = {
'start_time' : request.POST.get('Start_time'),
'user_id' : request.POST.get('user_id'),
'user_dormnumber' : request.POST.get('user_dormnumber'),
'user_phone' : request.POST.get('user_phone'),
'change_pwd' : request.POST.get('change_pwd'),
'date' : request.POST.get('date'),
'user_name' : request.POST.get('name'),
'usable': 1
}
new_record = Register(**record)
new_record.save()
```
如果要update,只要把物件Query出來修改後,用save()就可以了
#### DELET FROM
```python!
space = Space.object.filter(id=1, space_name="武嶺會議室")
space.delete()
#DELET FROM Space where id=1;
```
### 用SQL QUERY
```python!
from django.db import connection
with connection.cursor() as cursor:
cursor.execute("YOUR SQL STATEMENT")
result = cursor.fetchall()
```
**補充**:
以防有人不知道,python的with是一個專門把檔案、連線物件關住的東西,在離開with時會自動執行cursor.close(),避免連線資源未關閉。
更多進接或是常用操作可以看:
https://www.twblogs.net/a/5b8793c82b71775d1cd7d91c
## 4. 其他網頁response
前面我們view function回傳都是render(),也就是一個網頁頁面。但有時候我們不希望回傳一整個頁面,像是是Ajax request就不需要回傳一個整個頁面,只要一個字串或是一些資料而已,這時候我們就會用HttpResponse(回傳一個字串)或是JsonResponse。
### HttpResponse
例如登入管理者模式的Ajax:
```javascript!
$.ajax({
url : "{% url 'private'%}",
type: "post",
data: {"pwd": pwd, "mode": "login"},
success: function(response) {
alert(response);
location.reload();
},
error: function(jqXHR, textStatus, errorThrown){
alert("AJAX error" + errorThrown);
console.log('Error: ' + errorThrown);
}
});
```
這時private這個view function就會是這樣:
```python!
def admin_mode(request):
if request.method == "POST":
if request.POST.get("mode") == "login":
if request.POST.get("pwd") == "76211194":
request.session['identity'] = "private"
return HttpResponse("登入成功,切換為管理者模式")
else:
return HttpResponse("密碼錯誤!")
else:
request.session['identity'] = "normal"
return HttpResponse("登出成功,切換為一般模式")
else:
raise Http404("Page not exit")
```
### JsonResponse
通常用來回傳資料庫的內容給端。例如我們的預約介面是用Ajax取得預約資料的,view function就會長這樣:
```python=
def get_regist(request):
if request.method == "POST":
space = request.POST.get('id')
all_regist = Register.objects.filter(space=space).values("start_time", "space_id", "date", "user_id", "user_name", "user_phone", "user_dormnumber")
all_regist = list(all_regist)
if request.session['identity'] == "normal":
for record in all_regist:
record['user_id'] = record['user_id'][:-5] + "XXXXX"
record['user_name'] = record['user_name'][0] + "X" + record['user_name'][2:]
record['user_phone'] = ""
return JsonResponse(all_regist, safe=False)
else:
raise Http404("Page not exit")
```
## 5. 那些有點重要但我懶得打的內容
以下這些有可能會用到(和網站安全有關)但是較為繁瑣我懶得打,要麻煩各位自己找一下資料:
1. CSRF token --- Django避免跨站攻擊的機制
2. Django form --- 也是Django避免sql injection的一個東東
## 6. Utility codes
這裡放一些常常用的function和code:
### cursor dicfetchall
cursor.fetchall()回傳的會是一個tuple(tuple()),這樣會不利於取得資料欄位(只能用index很不方便),以下是讓cursor回傳tuple(dict())的code。
```python=
def dicfetchall(cursor):
colums = [col[0] for col in cursor.description]
return [
dict(zip(colums, row))
for row in cursor.fetchall()
]
```


