# Build a simple motion detector that notifies you when triggered
*By: Joel Salo (js225fg)*
### Overview
This project will walk you through how to build a very basic motion detector with notification functionality using LoPy4, MicroPython, Pybytes and Discord with the help of WiFi (explanations for all of the mentioned applications and hardware in their respective sections). Depending on your previous experience with IoT, programming and computers in general the estimated completion time should be around 5-10 hours.
### Objective
I chose to build this device as I've personally never done anything related to IoT before and thought it would be a good first stepping stone to teach myself more about the relation between hardware and software.
The overarching purpose is to understand how data is transferred and how sensors work on a basic level while also serving as a good base to build on for a personal project this fall. Besides the insights regarding IoT as a topic and some new syntax (MicroPython), being able to quickly get a minimum viable product up and running works wonders if you want to have something that's extendable and modular (will for example replace Pybytes with something I'll build myself later this year).
The data will be transmitted from the device to Pybytes (cloud storage, no local server needed) and visualized using their dashboard in order to present it in an appealing manner.
### Material
As this is an introductory project I've chosen to work with a LoPy4 (Fig. 1) as well as a PIR Motion Detector sensor (Fig. 2). Using MicroPython as the programming language of choice enables us to achieve the projects objective with very few lines of code.
| Item | Cost & Purchased at | Description |
| ----------- | ----------- | ----------- |
| LoPy4 & sensor bundle 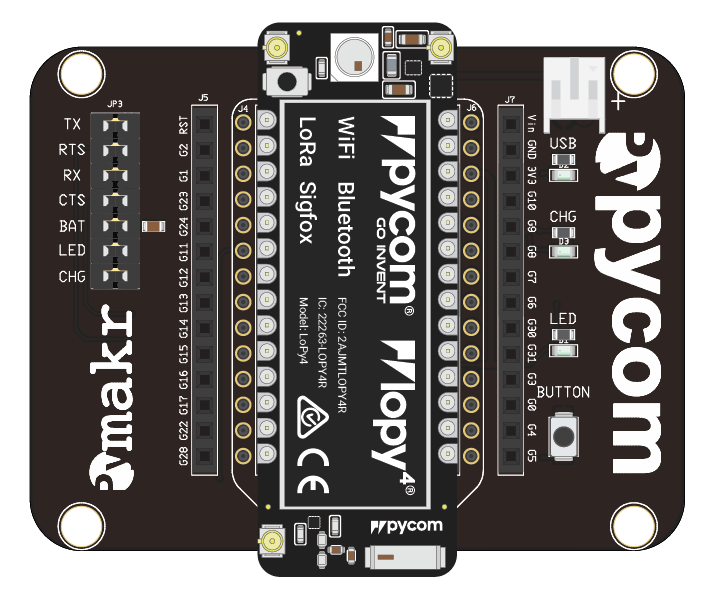<br>*Fig 1. LoPy4 with headers and expansion board* | 949 kr, [Electrokit](https://www.electrokit.com/produkt/lnu-1dt305-tillampad-iot-lopy4-and-sensors-bundle/) | Contains the LoPy4 microcontroller, which is what we will connect to, program and what controls the motion sensor. Functions as the "brain" of our IoT device. Additional sensors (not used in this project) are provided as well if one wants to expand the project further.<br><br> **Also included in the bundle:** <br>– Expansion board (enables connectivity)<br>– Antennae (not used in this project as we will use the built in WiFi capabilities)<br>– Micro USB cable (used to power the device, no battery pack needed)<br>– Jumper wire<br>– Breadboard<br>– Resistors<br>– LEDs |
| <br>PIR Motion Detector HC-SR501 <br><br>*Fig 2. PIR Motion Detector* | 49 kr, [Electrokit](https://www.electrokit.com/produkt/pir-rorelsedetektor-hc-sr501/) | The sensor used in the project. Motion sensor that detects heat signatures from humans and animals. When the sensor detects an increase in temperature compared to its surrounding as well as movement, the sensor port will trigger. |
| <br>Ribbon cable (male - female) <br>*Fig 3. Ribbon cable* | 31 kr, [CDON](https://cdon.se/bygg-verktyg/10-cm-flatkabel-med-hona-hane-kontakter-40-kablar-bred-passar-arduino-p49791060?utm_source=newsletter&utm_medium=message_newsletter&utm_campaign=order_confirmation) | Basic cables used to connect the sensor to the microcontroller. Only male-male cables are included in the bundle (Fig. 1). |
| **Total cost** | 1 029 kr | (+ shipment) |
### Computer setup
The device is programmed using the programming language MicroPython. There is some setup required before we start writing any code in order to get the device up and running.
>*Disclaimer: My OS of choice for this project was Windows. If you're using Linux/MacOS there might be deviations regarding setup and installation, for which I'll try to link an adequate resource. Please note that you may have to look up OS-specific matters elsewhere.*
- **Step 1: Install Node.js**
A plugin (Pymakr, will be explained further down) we will use requires Node.js in order for it to function. Download the installer from [here](https://nodejs.org/en/), I recommend that you download the **LTS** version, not "current", in order to get the latest stable version.
> Linux users: please find your distro [here](https://nodejs.org/en/download/package-manager/) and follow the instructions.
- **Step 2: Install Visual Studio Code**
The IDE (Integrated Development Environment) of choice for the project is Visual Studio Code (VS Code). *Technically* VS Code isn't a proper IDE but a text editor, but for the sake of simplicity that's what we'll refer it as. This is the software in which we will write the code required for our device to do what we want it to do.
> VS Code is cross-platform, please find your OS-specific installation instructions [here](https://code.visualstudio.com/docs/setup/setup-overview).
- **Step 3: Install the Pymakr plugin**
Visit [this link](https://docs.pycom.io/gettingstarted/software/vscode/) and follow steps 3 - 6 in order to install the Pymakr extension for VS Code.<br> Pymakr enables us to communicate with our microcontroller (LoPy4) using VS Code, directly type and execute commands and export our code onto our device. This is how we get the code we write on our computer onto our LoPy4 device.
- **Step 4: Flashing the firmware (not mandatory)**
I put "not mandatory" in the title of this step as this *shouldn't* be necessary if you've purchased a new LoPy4 device (using the bundle link in the previous section for instance).<br> If you have an older device, please see [this link](https://docs.pycom.io/updatefirmware/expansionboard/) for a step-by-step guide showing how this is done. These instructions are cross-platform.
- **Step 5: Update the firmware on your LoPy4 device**
1. Insert the LoPy4 microcontroller into the expansion board as detailed under "Step 1" on [this page](https://docs.pycom.io/gettingstarted/). Please make sure you follow the instructions outlined on the site carefully, as attaching the microcontroller incorrectly will prevent you from following the rest of this tutorial.
2. Connect the USB-cable to the USB port on the expansion board and your computer. <br>*Fig 4. USB-connector on the expansion board*
3. Cross-platform instructions for how to update the firmware on your device is found [here](https://docs.pycom.io/updatefirmware/device/). Download the installer from the link and follow the instructions provided there. No drivers or additional software should be needed on any OS.
### Putting everything together
This will be very short, simple and to the point. As we only have one (1) sensor in the project there is no need to use a breadboard or do any sort of soldering etc. in order to get us up and running.
The way our sensor functions is that two cables will be responsible for powering it, one connected to ground (GND) and one to voltage (VIN in our case, 5V, as we're using USB in order to power our device). If we would've chosen another form of power source, for example battery, the 3.3V connector would've been used instead. A third cable will provide the signal and will be connected between the sensor and a port on the expansion board, in our case P23.
That's basically it, now we can jump ahead to the next section! Kidding, but only a little.
Connect the sensor to your expansion board in the following way: <br>*Fig 5. Circuit diagram [1]*<br>
Please note that the breadboard (the object between the expansion board and the sensor) is not something we use in the project, it's shown to simplify the visualization of connecting cables.
For more details regarding your device, connectivity etc. refer to the official documentation [here](https://docs.pycom.io/gitbook/assets/specsheets/Pycom_002_Specsheets_LoPy4_v2.pdf).
<br>*Fig 6. Connections on the expansion board*
**Black:** VIN
**White:** GND
**Blue:** P23
<br>*Fig 7. Connections on the sensor*
### PIR HC-SR501 Motion Detector
For this project no physical configuration on the sensor is required. If you wish to fine-tune the sensitivity and behavior of the sensor please refer to [this link](https://lastminuteengineers.com/pir-sensor-arduino-tutorial/).
Both sensitivity and time-delay adjustments can be made by turning the "knobs" on the sensor (detailed in the image below).
<br>*Fig 8. Detailed schematic of the motion sensor [2]*<br>
### Platform
As mentioned in the Objective section, the platform of choice for storing and visualizing the data transmitted by our device is [Pybytes](https://pybytes.pycom.io/).
While there are several platforms to choose from, Pybytes is developed and maintained by *Pycom* allowing us to get up and running very quick. Pybytes is very user friendly and easy to use, with no pre-requisite knowledge required and has extremely detailed tutorials and instructions for how to use it.
All our data will be stored in the cloud on their platform, no local storage needed. While Pybytes is free and easy to use, there are of course some drawbacks. Data will be stored for one month and the storage space is limited. For the sake of this project, these are non-issues. 30 days is more than enough regarding backlog of events and visualizing the data and the signals we will send up are so small that storage amount won't present a problem.
They do have paid plans available if one would like to expand upon the usage and scale the application. In my honest opinion though, if you reach a point where this becomes an option you think about, consider looking into other options (ex. building your own web application to present data stored in a database of your choice).
### The code
Don't worry, you don't need to have much prior knowledge in programming in order to get the device to behave the way we want for the sake of this project. As we only have one sensor and a basic use case (detect movement, send data to Pybytes when detection has occurred) not many lines of code are necessary.
While I won't post all the code in this tutorial, everything except `keys.py` is uploaded [on my Github](https://github.com/saloj/homely_motion_sensor).
##### Project structure
There are 3 main files related to program functionality which makes this very light-weight on the programming side:
```
boot.py
main.py
/lib/keys.py
```
`boot.py` is executed when the device is first started (meaning it runs *once*). This file contains the logic for connecting to your WiFi-network.
`main.py` contains the "main" (shocker, right?) part of the code, meaning the logic for detecting motion and alerting Pybytes that an event has occurred.
`keys.py` is a file that lives in a subdirectory (a folder within the project) called `lib`, which is short for "library". This file should never be committed to any remote repository or shared, as it contains your WiFi ssid and password.
##### Python file: boot
The most important logic in this file is contained here:

*Fig 9. WiFi logic*
The above block of code scans all the available WiFi-networks in reach and looks for a matching ssid with the one specified in `keys.py`. If a match is found the device will connect using the password specified in `keys.py`.
##### Python file: main
`main.py` is not a large file either, but the most important *function* in this file is the alert function:

*Fig 10. Alert function*
The above function will print out the elapsed time since the device started together with the string "Motion Detected!" to the developer console, send the specified signal to Pybytes and change the color of the LoPy4's LED.
##### Python file: keys
There are only two lines of code in this file, which consist of two variable declarations. These are then *imported* into `main.py` (meaning the main file will use the two variables defined in this file in order to not expose sensitive information).
```
wifi_ssid = "yourSsidHere"
wifi_password = "yourPasswordHere"
```
Simply replace "yourSsidHere" and "yourPasswordHere" with your actual WiFi SSID and password.
Please note that the quotations are necessary for the code to work as they tell the program that the variables are of the type *string*.
##### Uploading the code onto your device
In order to get the code onto your LoPy4, simply click "Upload project" from the dotted ("...") menu in the top-right of VS Code when you have the project open in the editor and the device is connected to your computer:

*Fig 11. Upload project from VS Code to the device*
### Transmitting the data / connectivity
As previously mentioned, WiFi is the wireless protocol of choice in order to connect to the internet and enable us to send data to the cloud (Pybytes in our case). There are several different wireless protocols, which all have pro's and con's depending on the use case. For us, WiFi follows the trend of "easy to setup and forget" as the device is meant to be used at home where a stable WiFi-connection is always available (unless the ISP does something funny, but I digress).
One of the major benefits of WiFi is that the amount and size of the transmitted data is of little to no concern. While the current state of the project isn't handling large data, this allows us to expand further down the line without worrying about it.
As we're on WiFi, and power our device using USB connected to a power outlet (no batteries), we don't have to concern ourselves with how often we transmit data either. Thus, data is sent every time the sensor is triggered (although there is a 5 second sleep period as shown in the code snippet from `main.py`).
The transport protocols used in the project might not be as easy to notice, as we're depending on a third-party to handle this for us. According to their documentation, Pybytes uses *MQTT* as their transport protocol of choice [3]. MQTT is a lightweight transport protocol commonly used in IoT and microcontrollers, so this comes as no surprise. If you wish to learn more about MQTT I'd recommend you to take a look [here](https://mqtt.org/).
One single, simple, line of code in `main.py` handles this for us:
```
pybytes.send_signal(1, 1)
```
This line calls the *send_signal* function on the pybytes *object* with two arguments. The first argument specifies *which signal* we're passing an event to (will be further elaborated in the next section) while the second argument specifies what we want to tell the receiving end. In our case we simply want to alert that *something* has occurred, but this could just as well be a *string* of text etc. depending on the use case.
Pybytes is great in many ways, another awesome feature they provide is the use of *webhooks*. Webhooks can easily be written and coded by us, but why create something that Pybytes already provide? We use a webhook to get Discord notifications when an event has occurred, outlined below.
```
- Sensor is triggered
- Device calls the alert function in main.py
- Device sends signal to Pybytes
- Pybytes receives the signal and displays it
- Pybytes executes a webhook to a specified Discord server
- Notifications on your phone and/or computer alerts you in real-time
```
Setup of the webhook itself will be detailed in the next section.
### Presenting the data
This section is divided in two parts. The first part addresses visualization in the form of data storage and graphs, while the second concerns itself with Discord and notifications (using webhooks).
##### Visualization
Pybytes will handle displaying and presenting the data for us, allowing us to easily setup and configure graphs of our choice.
First things first, you need to get setup over at Pybytes. Please follow [this guide](https://docs.pycom.io/pybytes/gettingstarted/) through steps 1-3, it's very detailed and user-friendly. Once done, we can start customizing our setup.
1. Go to your device

*Fig 12. Pybytes: Device*
2. Go to the signals menu on your device and click "Define new signal"

*Fig 13. Pybytes: Define new signal*
**Important:** Make sure you enter "1" as the signal or you will have to modify the code in `main.py`.
3. Pybytes can now start receiving signals! They provide you with a default "main table" as seen below:

*Fig 14. Pybytes: Main table*
4. To visualize the data simply click the "Create new display" button on the image shown above
5. Choose the bar graph from the selection (or any other of your choice)
6. Customize your display and click "create", I chose the below (your preference may differ):

*Fig 15. Pybytes: Create graph*
7. Done! Click the "Edit" button, check the "Display on Dashboard" box and you're set

*Fig 16. Pybytes: Visualization finished*
The data will, as previously mentioned, be stored for 30 days at Pybytes and no more tinkering is required. We're almost done! Now for the final part, setting up a webhook on Pybytes that connects to a Discord server channel.
##### Webhook: Discord
I will assume that you are familiar with Discord, if that's not the case please see [this link](https://www.howtogeek.com/364075/how-to-create-set-up-and-manage-your-discord-server/#:~:text=Click%20the%20%E2%80%9CCreate%20a%20Server,re%20automatically%20connected%20to%20it.) for a detailed tutorial regarding server setup etc.
Discord can be downloaded [here](https://discord.com/download).
I recommend installing the app on your phone as well (available where you find apps on your particular device).
Follow [this guide](https://support.discord.com/hc/en-us/articles/228383668-Intro-to-Webhooks) down to, and including, `QUICK EXAMPLE: GITHUB WEBHOOK INTEGRATION` step 1.
Great! You now have Discord, a server, a webhook set up on Discords end in one of your channels and a URL for your webhook. Now what?
1. Copy the webhook URL from Discord
2. Go to the "Integrations" menu and click "Create a new integration" (ignore the existing one on the image below, you won't see it on your end)

*Fig 17. Pybytes: Integration*
3. Select "Webhook"
4. Paste the webhook URL from Discord into the "URL"-field and give your Webhook event a fitting name
5. Click "New Field" under *Body Definition*
6. Name the parameter "content" and give it the value "Motion detected!" (or whatever you desire, this is what will get posted in the Discord channel you've created the webhook for)
7. Scroll all the way down and check the box for your device
8. Click "Create"
Complementary image to help with setting up your webhook:

*Fig 18. Pybytes: Webhook setup*
Done!
Every time your device detects motion a signal will be sent to Pybytes, displayed in the graph you created and posted in the Discord channel where you set up your webhook. Don't forget to enable notifications on your device to get alerts in real-time from your sensor!
Image from my Discord channel:

*Fig 19. Discord: Webhook triggered*
### Finalizing the design
Unfortunately I haven't had access to a 3D-printer (will most likely be able to try one out this fall) and limited supplies, so no casing for the device has been made. If you're creative, you could more or less create what ever you can think of for a case or protective shield for your motion detector.
Here's how it looks at the time of writing:

*Fig 20. Device active*

*Fig 21. Motion triggered*
I learned a lot doing this project and overall it went very well for what it is. As I wrote in the opening section of this tutorial, the plan is to expand the idea during the fall. Some things that I have planned:
- Building my own API to handle communication with the device
- Building my own frontend with authentication/authorization to display the data
- Enabling turning on/off the device remotely through the frontend
- Using a separate relational database to persist data indefinitely
- Add additional sensors/new devices
A lot could've been done differently/better of course, for example using battery to power the device in order to enable more flexible placement/installation as the data load is quite small (this could be downsized even further by increasing the span of how often data is sent to Pybytes). But for the sake of the project, I'm quite happy with the end result.
Looking forward to keep exapanding this over the coming year!
### References
[1] LNU Applied IoT, *github.com*, 2021. [Online]. "Sensor examples, HC-SR501":
https://github.com/iot-lnu/applied-iot/tree/master/sensor-examples/HC-SR501%20-%20PIR%20Sensor/connection
[Accessed: July 31, 2021]
**Note:** Edited existing diagram using https://fritzing.org/
[2] Lastminuteengineers, *lastminuteengineers.com*, 2021. [Online]. "How HC-SR501 PIR Sensor Works & How To Interface It With Arduino": https://lastminuteengineers.com/wp-content/uploads/arduino/PIR-Sensor-Pinout-with-Jumper-Setting-Sensitivity-Time-Adjustment-BISS0001-IC-Labeling-Diagram.png
[Accessed: July 31, 2021]
[3] Pycom, *pycom.io*, 2021. [Online]. "MQTT": https://docs.pycom.io/tutorials/networkprotocols/mqtt/
[Accessed: August 1, 2021]


