# Use Setup Tasks to provide a first-class on-boarding experience for merchants
As a plugin author you'll often have one or more set up tasks you want to guide your user through to get the most out of your plugin. The challenge is making sure users see your tasks, and also making sure they complete them all.
The WooCommerce home screen is a consolidated landing space for users to get their store set up and effectively manage day-to-day operations for their business. Adding setup tasks to the task list alongside the usual setup steps will draw users to complete your tasks and also help them keep track of how far through the setup process they are.
We've built the user experience for you, so all that's left is just to plug your tasks in!
## Getting started
In this post we'll talk briefly about the setup task list and go through the steps to create your own setup task for display in the WooCommerce home screen.
If your extension has a setup task associated with it, you can display it in the task list, this will prompt a merchant to go through important steps required to setup your extension.
### Step 1: Register your task in PHP
The first thing you'll need to do is **register** the task on the PHP side. So you'll need to add your callback to the filter `woocommerce_get_registered_extended_tasks`.
In PHP it will look like this:
```
add_filter( 'woocommerce_get_registered_extended_tasks', 'pluginprefix_your_method_to_register_the_task', 10, 1 );
```
And the method to add your task will be like this:
```
function pluginprefix_your_method_to_register_the_task( $registered_tasks_list_items ) {
$new_task_name = 'your_task_name';
if ( ! in_array( $new_task_name, $registered_tasks_list_items, true ) ) {
array_push( $registered_tasks_list_items, $new_task_name );
}
return $registered_tasks_list_items;
}
```
### Step 2 - Add the task in JavaScript.
Now you have to add your task to the tasks list in JS. So you have to add a filter to `woocommerce_admin_onboarding_task_list` with your task.
The code will look like:
```
const myTask = {
key: 'example',
title: 'Example',
content: 'This is an example task.',
container: <Task />,
completed: false,
visible: true,
additionalInfo: 'Additional info here',
time: '2 minutes',
isDismissable: true,
onDismiss: () => console.log( "The task was dismissed" ),
type: 'extension'
},
addFilter(
'woocommerce_admin_onboarding_task_list',
'plugin-domain',
( tasks ) => {
return [
...tasks,
myTask,
];
}
);
```
The extended setup tasks will have:
| Name | Type | Required | Description |
| -------- | -------- | -------- | -------- |
| `key` | String | Yes | Identifier. |
| `title` | String | Yes | Task title. |
| `content` | String | No | The content that will be visible in the `Extensions setup` list. |
| `container` | Component | Yes | The task component that will be visible after selecting the item. |
| `completed` | Boolean | Yes | Whether the task is completed or not. |
| `visible` | Boolean | Yes | Whether the task is visible or not. |
| `additionalInfo` | String | No | Additional information. |
| `time` | String | Yes | Time it takes to finish up the task. |
| `isDismissable` | Boolean | No | Whether the task is dismissable or not. If `false` the `Dismiss` button won't be visible. |
| `onDismiss` | Function | No | Callback method that it's triggered on dismission. |
| `type` | String | Yes | Type of task list item, `setup` items will be in the store setup and `extension` in the extensions setup. |
## Summary
In summary you only need to:
##### *Register* your task on the *PHP* side.
<details>
<summary>Your PHP file should have these things</summary>
```
/**
* Register the task list item.
*/
function register_task_item() {
add_filter( 'woocommerce_get_registered_extended_tasks', 'pluginprefix_your_method_to_register_the_task', 10, 1 );
}
add_action( 'admin_enqueue_scripts', 'register_task_item' );
/**
* Unregister task.
*/
function pluginprefix_deactivate() {
remove_filter( 'woocommerce_get_registered_extended_tasks', 'pluginprefix_your_method_to_register_the_task', 10, 1 );
}
register_deactivation_hook( __FILE__, 'deactivate_task' );
```
</details>
##### *Add* the *component*, the *filter addition* and the task list *item configuration* on your *JS* side
<details>
<summary>And your JS file</summary>
```
/**
* Create your component that will be visible after clicking the task list item.
*/
const TaskComponent = () => {
return (
<p> This is a component </p>
);
};
/**
* Configure the task list item.
*/
const myTask = {
key: 'example',
title: 'Example',
content: 'This is an example task.',
container: <TaskComponent />,
completed: false,
visible: true,
additionalInfo: 'Additional info here',
time: '2 minutes',
isDismissable: true,
onDismiss: () => console.log( "The task was dismissed" ),
type: 'extension'
},
/**
* Add your item to the tasks list.
*/
addFilter(
'woocommerce_admin_onboarding_task_list',
'plugin-domain',
( tasks ) => {
return [
...tasks,
myTask,
];
}
);
```
</details>
### More help
To get an example of the extended setup task list in your site, you can run the following in your terminal:
```
npm run example -- --ext=add-task
```
And activate the plugin: `WooCommerce Admin Add Task Example`.
The code that creates the extension is [here](https://github.com/woocommerce/woocommerce-admin/tree/main/docs/examples/extensions/add-task).
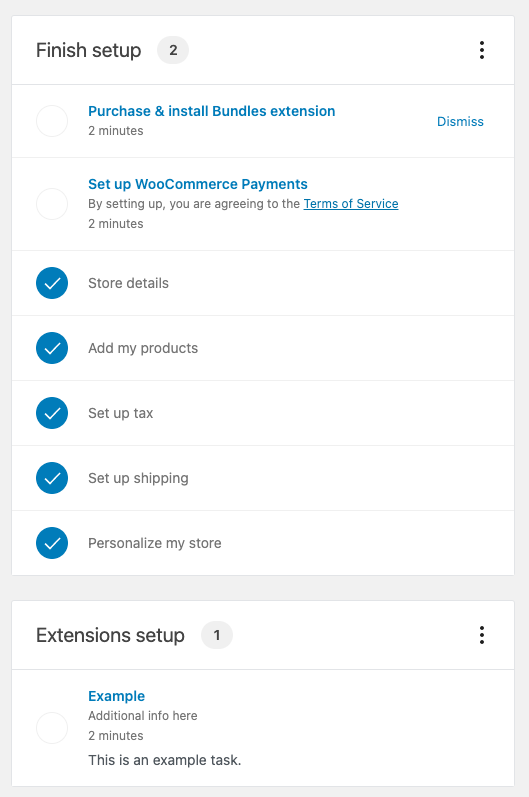
An extension setup task like below will be created.

- In the example, we can find 2 files, a [JS](https://github.com/woocommerce/woocommerce-admin/blob/main/docs/examples/extensions/add-task/js/index.js) file and a [PHP](https://github.com/woocommerce/woocommerce-admin/blob/main/docs/examples/extensions/add-task/woocommerce-admin-add-task-example.php) one.
The `PHP file` creates a plugin (named `WooCommerce Admin Add Task Example` ) that [loads the JS file](https://github.com/woocommerce/woocommerce-admin/blob/main/docs/examples/extensions/add-task/woocommerce-admin-add-task-example.php#L23-L34), sets/gets an [`isComplete` variable](https://github.com/woocommerce/woocommerce-admin/blob/main/docs/examples/extensions/add-task/woocommerce-admin-add-task-example.php#L37) and registers the new task [by adding the filter `woocommerce_get_registered_extended_tasks`](https://github.com/woocommerce/woocommerce-admin/blob/main/docs/examples/extensions/add-task/woocommerce-admin-add-task-example.php#L41). The method `register_task_item` will add the new task to the registered extended task list.
- In the `JS file`, there will be: the task list [item configuration](https://github.com/woocommerce/woocommerce-admin/blob/main/docs/examples/extensions/add-task/js/index.js#L79-L91), [a filter](https://github.com/woocommerce/woocommerce-admin/blob/main/docs/examples/extensions/add-task/js/index.js#L73) to add the new item to the task list, [the component](https://github.com/woocommerce/woocommerce-admin/blob/main/docs/examples/extensions/add-task/js/index.js#L49-L68) that will be shown after clicking the list item and a [couple of buttons](https://github.com/woocommerce/woocommerce-admin/blob/main/docs/examples/extensions/add-task/js/index.js#L57-L63) (in the component) with their [onClick methods](https://github.com/woocommerce/woocommerce-admin/blob/main/docs/examples/extensions/add-task/js/index.js#L16-L47) to modify the `isComplete` state.
## Features

* Every task needs to be registered (through the filter `woocommerce_get_registered_extended_tasks`).
* Every time a new extension task element is added the list will be shown, even if it was hidden before.
* The `Dismiss` functionality will show an `Undo` snackbar and trigger the `onDimsiss` callback.
* The `onDismiss` prop will be a method that is triggered just after pressing the `Dismiss` button in the task item.
 Sign in with Wallet


