---
tags: mbl, stamps
---
[toc]
# Installing software on computers with conda - updated for MBL STAMPS 2024
---
This two hour lab will show students how to install and manage
software using the conda installation system. We will give examples of
installing Python and R software, and managing conda environments on
remote systems.
This lesson was adopted from [a lesson](https://github.com/ngs-docs/2021-GGG298/tree/latest/Week3-conda_for_software_installation) co-authored by Shannon Joslin for GGG 298 at UC Davis. There is also a really nice binder-based tutorial [on the NIH CFDE training Web site](https://training.nih-cfde.org/en/latest/General-Tools/Introduction-to-Conda/)!
Learning objectives:
* learn the basics of software installation, software dependencies, and isolation environments
* learn about conda and how to use it
* learn about conda-forge and bioconda and how to install software from them
* learn to use conda to manage R and Python installations
Other references:
* [Remote Computing (August 2021) version of the conda lesson](https://ngs-docs.github.io/2021-august-remote-computing/installing-software-on-remote-computers-with-conda.html)
* [ANGUS 2019 lesson](https://angus.readthedocs.io/en/2019/conda_tutorial.html)
* [Why you need Python Environments and How to Manage Them with Conda](https://www.freecodecamp.org/news/why-you-need-python-environments-and-how-to-manage-them-with-conda-85f155f4353c/)
----
Outline:
## Why is software installation hard?
There are many reasons!
It's a confusing ecosystem of operating systems (Mac OS X, many versions of Linux, Windows)
Many software has many dependencies (e.g. just consider base language -- C++, Java, Python, R, and their different versions)
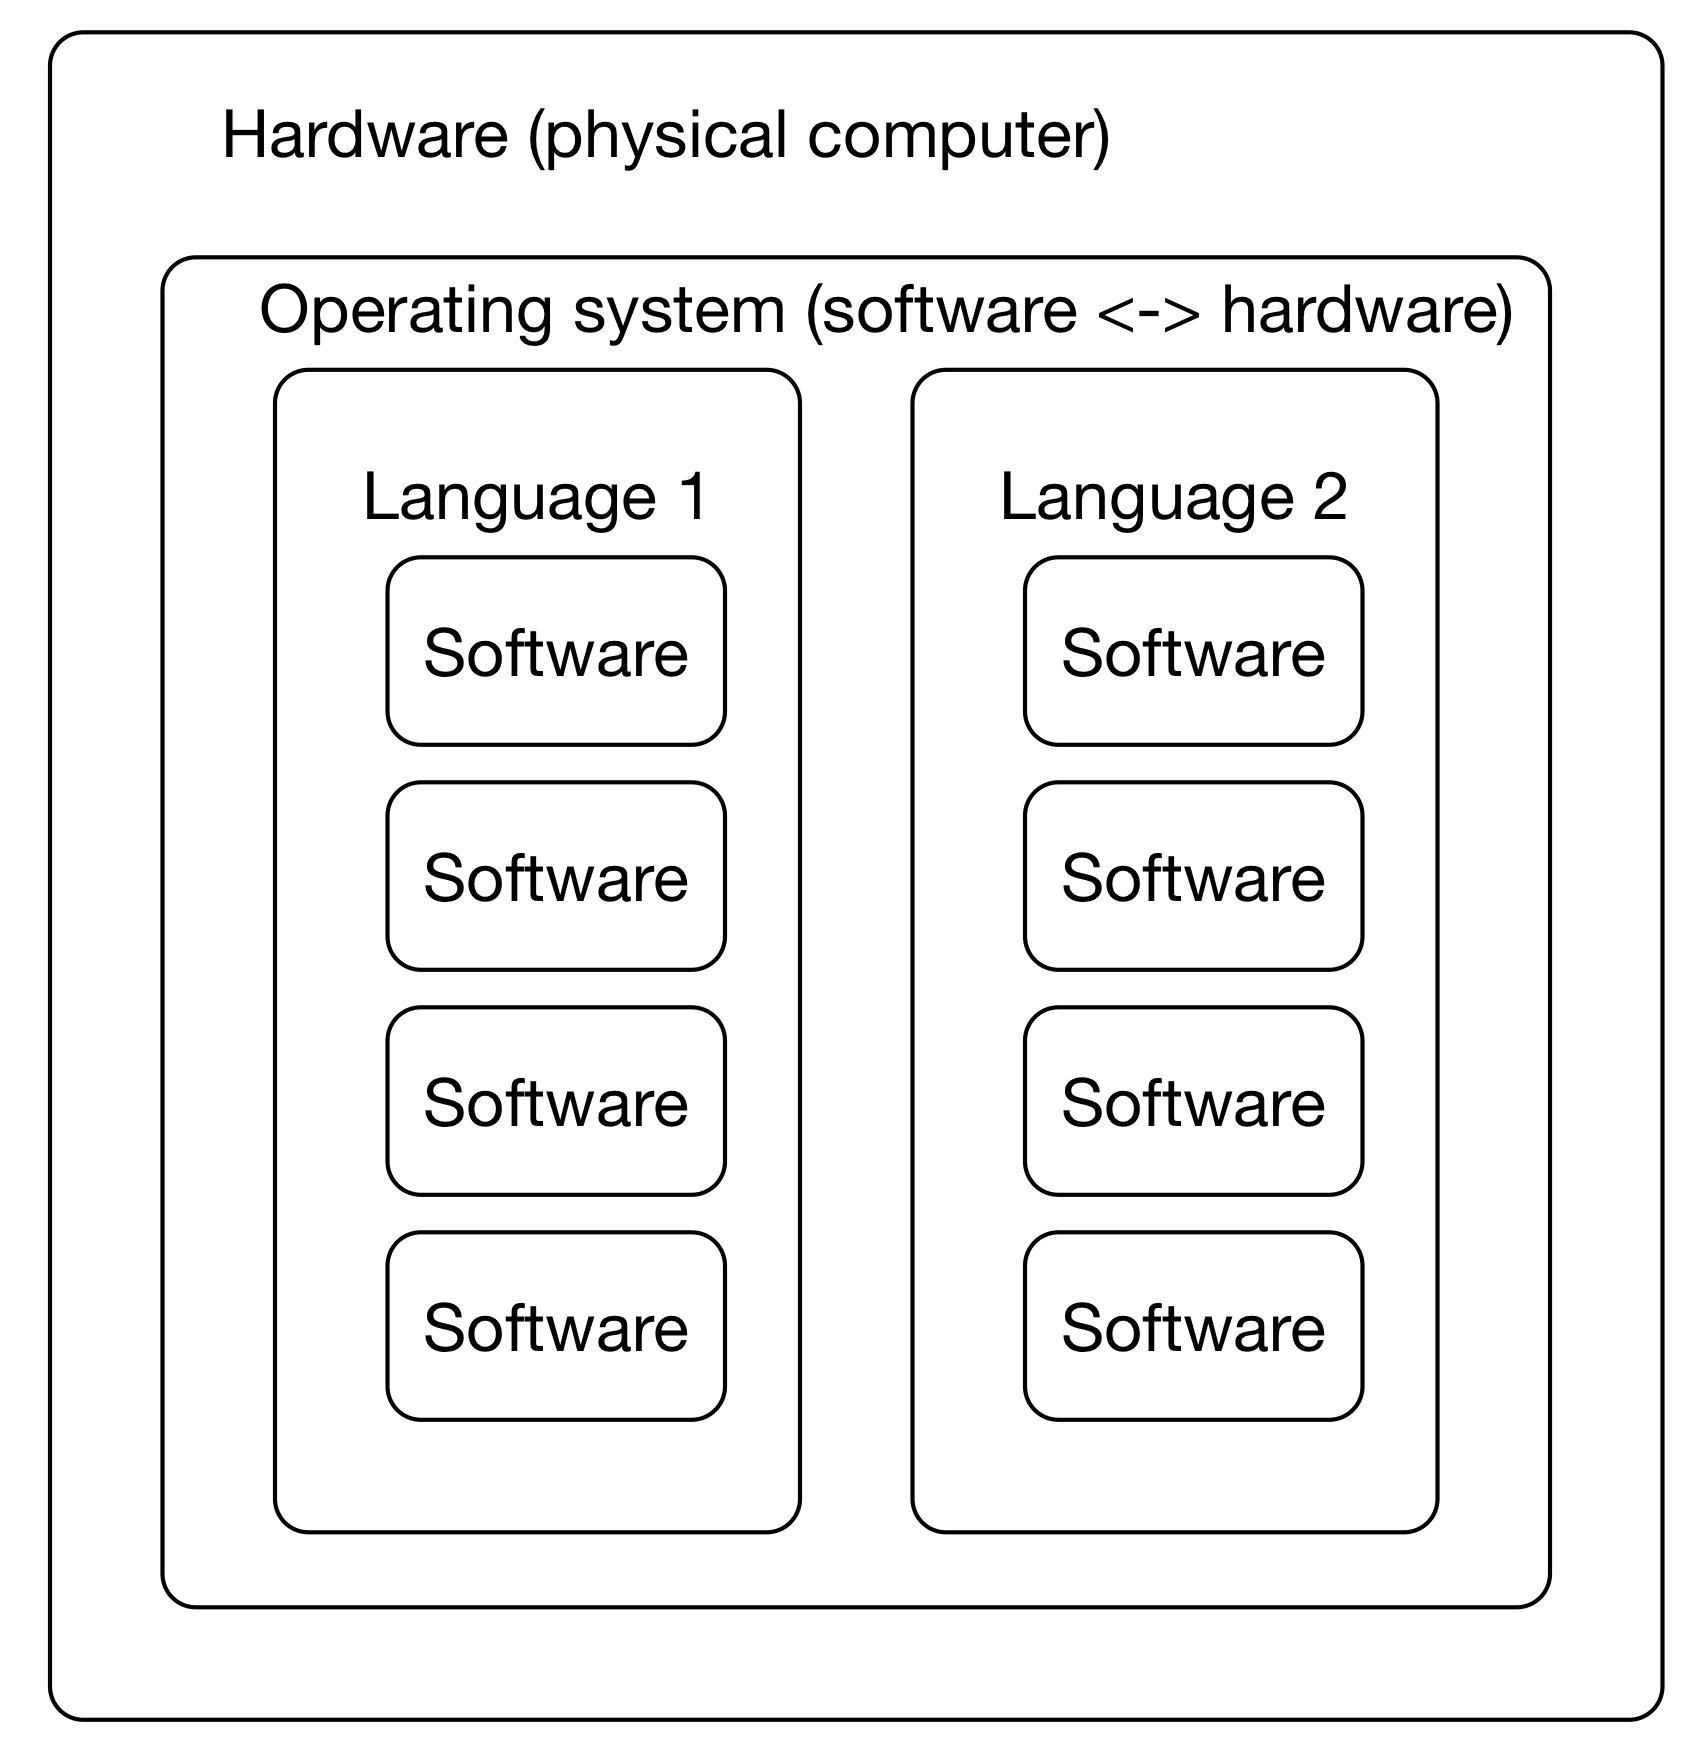
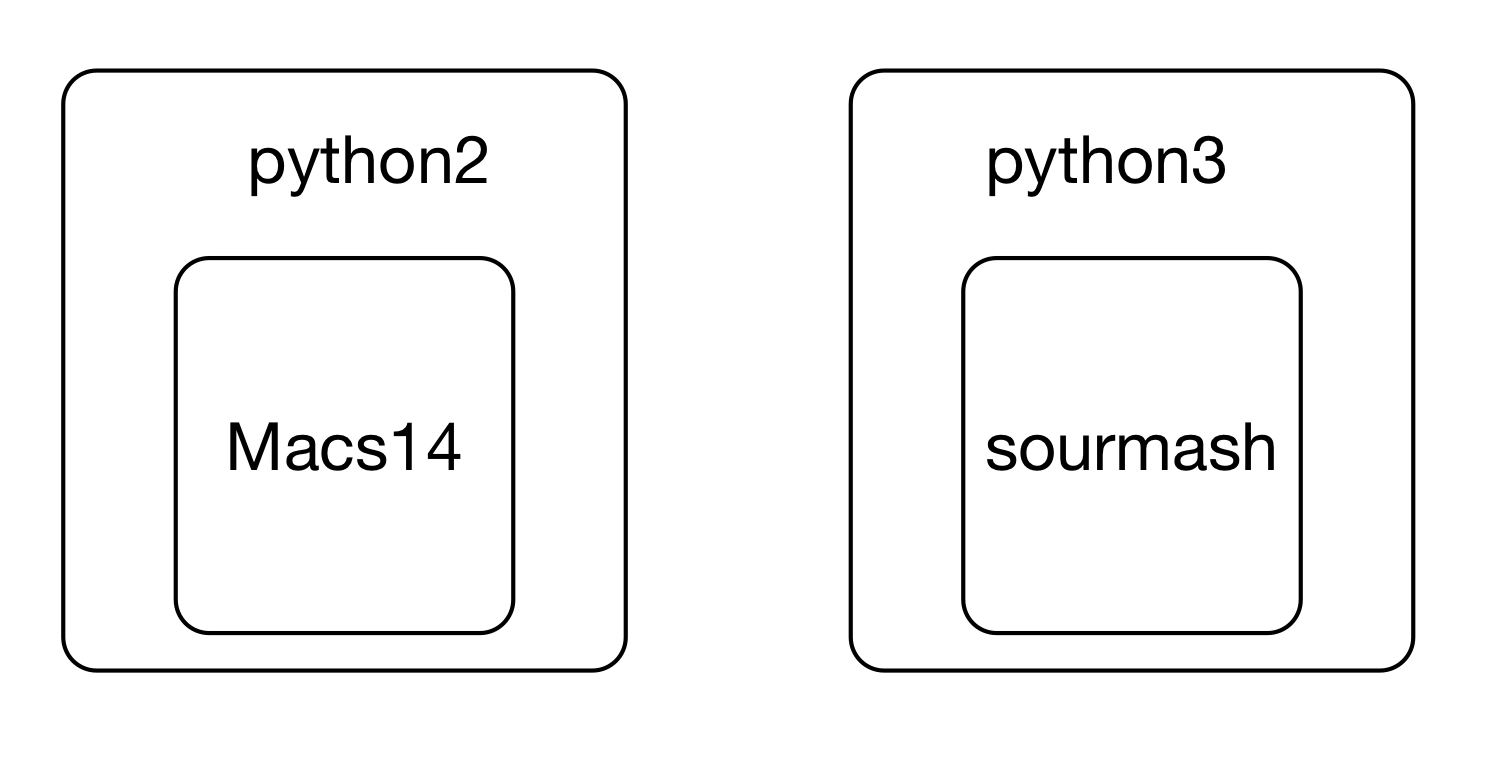
This leads to confusing situations where different versions of underlying software are need to run two different programs -- what if you wanted to run Macs14 and sourmash both, but one wanted 'python' to mean python2 and the other wanted 'python' to mean python3? Or you needed to use two R packages - one that only worked with R 4.0.1, and one that worked only with R 4.1.1?
Decoupling user-focused software from underlying operating systems is a Big Deal - imagine, otherwise you'd have to rebuild software for every OS! (This is kind of what conda does for you, actually - it's just centralized!)
Also, lot of software installation currently requires (or at least is much easier with) sysadmin privileges, which is inherently dangerous on mulituser systems.
**Why do you need isolated software install environments? Some specific reasons:**
* your work relies on a bunch of specific versions (perhaps old versions?)
* working with a collaborator who really likes a particular feature!
* experiment with new packages without messing up current workflow (reproducibility!)
* publication ("here's what I used for software", repeatability!)
* sometimes workflows rely on incompatible software packages! see [my twitter question](https://twitter.com/ctitusbrown/status/1218252506335080449)
Conda tries to solve all of these problems, and (in our experience) largely succeeds. That's what we'll explore today.
Note that conda emerged from the Python world but is much broader and works for many more software types, including R!
## Getting started with conda and mamba
### Open up a terminal on a computer with conda installed
The easiest thing to do would be to do some of the below on your JetStream computer. Open up RStudio and select "Terminal".
Then run:
```
conda install -y -n base mamba
```
to install the mamba command, which you will be using throughout. (See the section below about `mamba`; you can really use either `conda` or `mamba` for this tutorial!)
:::warning
In case you want to
install it on another computer [follow these instructions](https://github.com/conda-forge/miniforge) to install mamba!.
:::
:::info
### conda vs mamba
mamba is a reimplementation of conda that is faster.
You can use either `conda` or `mamba` to manage environments. They are, with almost no exceptions, identical in _behavior_.
Below, we'll be using the `mamba` command because it's always faster than conda.
:::
### Creating your first environment & installing csvtk!
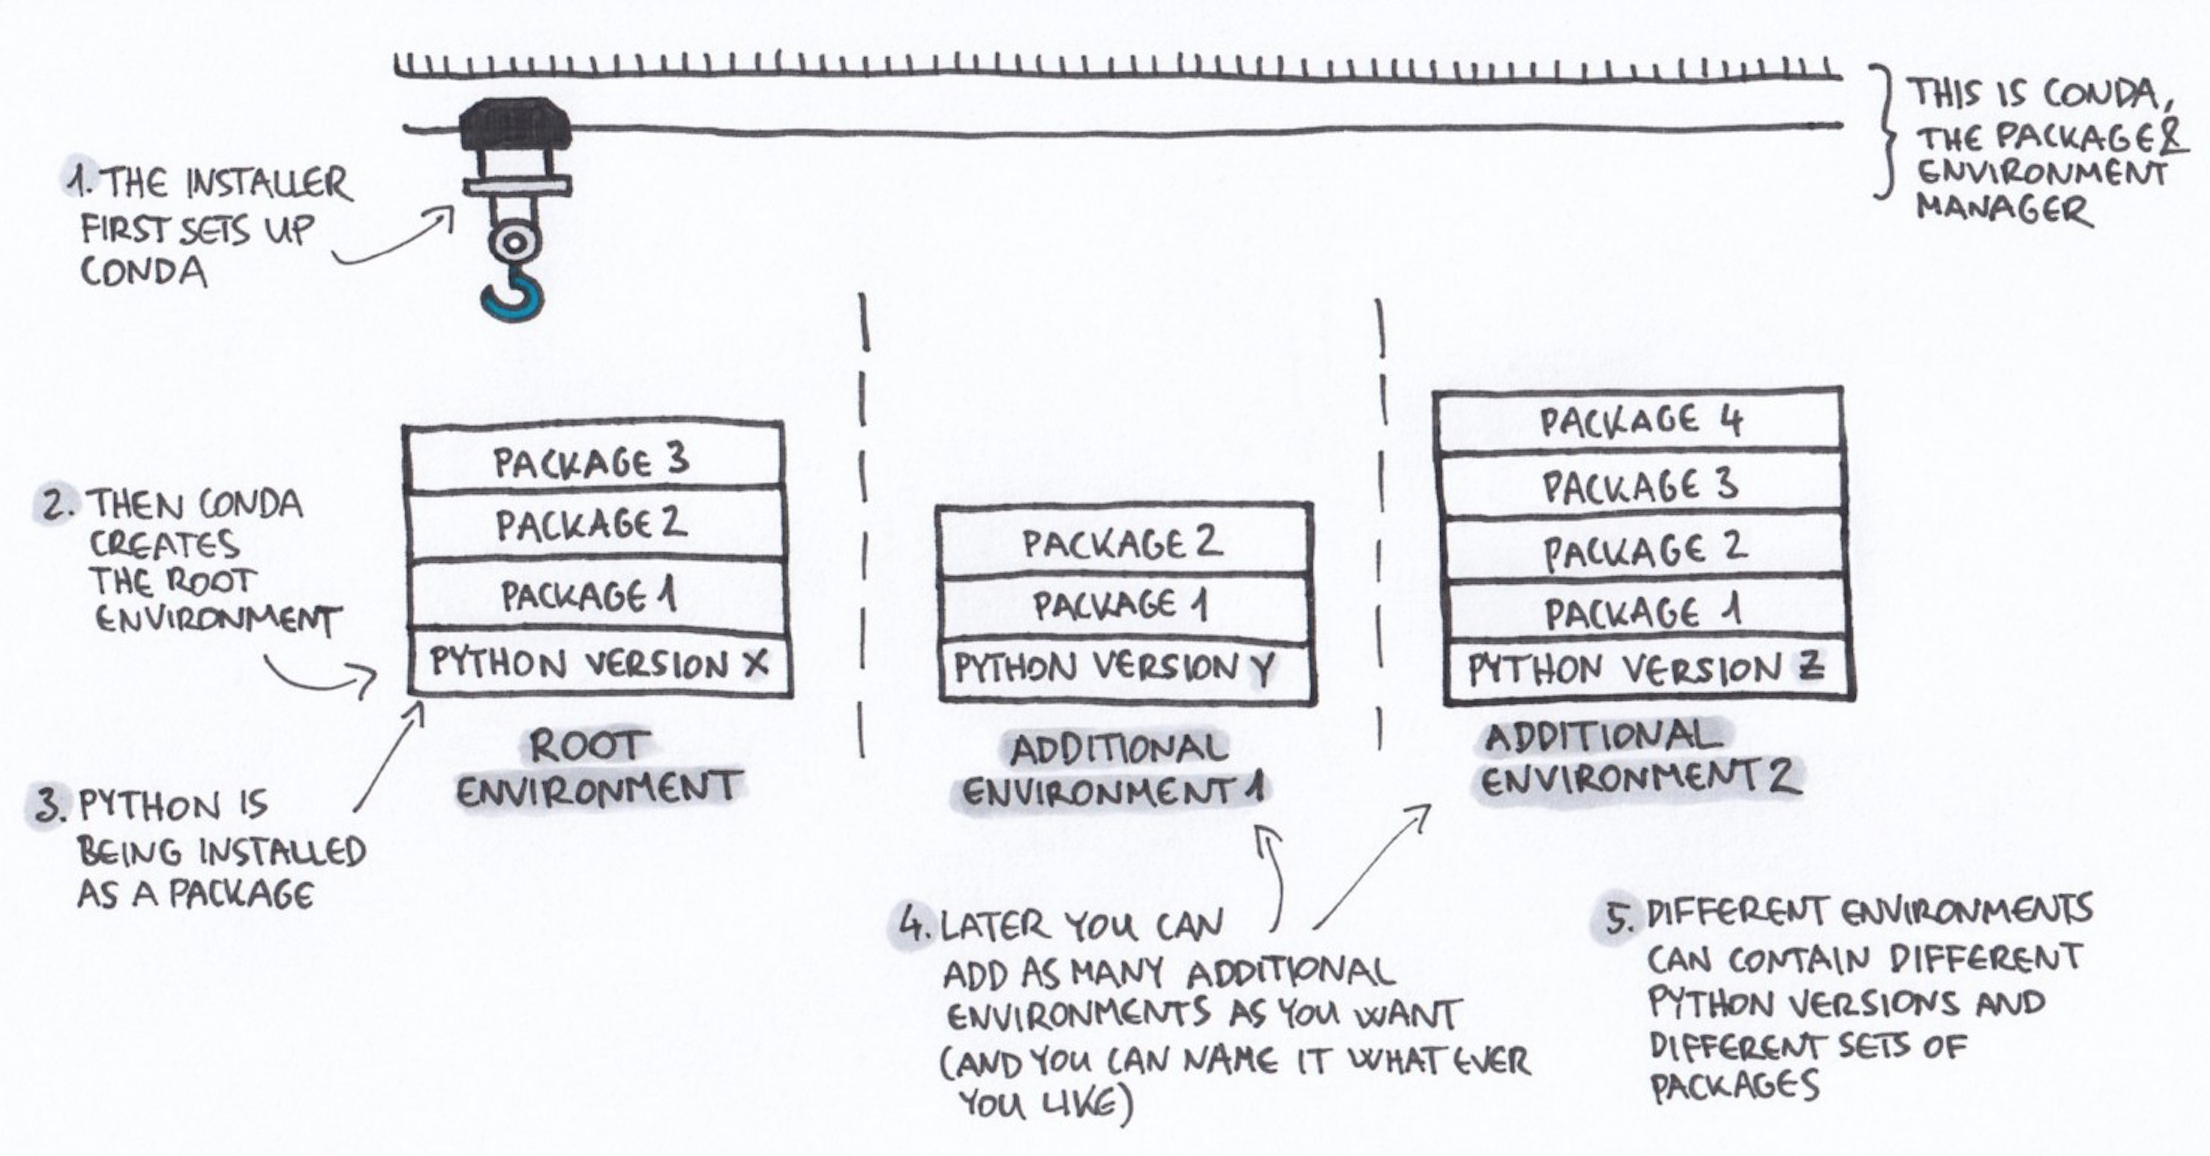
#### What is a conda environment?
A conda environment is a specific collection of packages/tools that
you have installed. For example, you might have a Python 3.11
environment for the latest version of Python, and Python 3.9 environment for an older version that works with certain packages.
Environments are
isolated from each other: if you change one environment, your other
environments are not affected. You can easily `activate` new
environments, which is how you switch between them.
### Installation!
Let's install some software! We'll start with csvtk, a tool to work with text files (see [remote computing workshop 2, working with text files](https://ngs-docs.github.io/2021-august-remote-computing/creating-and-modifying-text-files-on-remote-computers.html#use-csvtk-when-working-with-csv-files-maybe.)).
Here's the command to `create` a new conda environment, named 'csv', with csvtk installed.
```
mamba create --name csv -y csvtk
```
Here, we are installing the csvtk package into an environment named `csv`.
The -y indicates that we don't want conda to ask us for confirmation - it
should just go ahead and create the environment.
Now, activate the new environment:
```
mamba activate csv
```
Your prompt should change to have `(csv)` at the beginning.
Let's run csvtk on some real data now! To download the data, run:
```
cd ~/
git clone https://github.com/ngs-docs/2021-remote-computing-binder/
```
(per [this workshop](https://ngs-docs.github.io/2021-august-remote-computing/running-programs-on-remote-computers-and-retrieving-the-results.html#first-download-some-files)).
Now uncompress one of the downloaded files:
```
cd ~/2021-remote-computing-binder/SouthParkData
gunzip -k All-seasons.csv.gz
ls -l All-seasons.csv
```
You should now be able to run:
```
csvtk cut -f Character All-seasons.csv | grep Computer | sort | uniq -c
```
and you should see:
> ~~~
> 13 Computer
> 3 Computer Voice
> ~~~
### csvtk in a bit more detail
What's going on here?
csvtk is [a cross-platform library for working with CSV and TSV
files](https://bioinf.shenwei.me/csvtk/). It's written and maintained
by Wei Shen, and it's free and open source.
It's relatively new - I found out about it a few years ago - and
while it doesn't do anything I couldn't do with other commands, it packages
a bunch of really nice functionality together into one tool.
For example, I can find the headers in a csv file like so,
```
csvtk headers All-seasons.csv
```
and I can then cut out one particular column and summarize things -- e.g.
```
csvtk cut -f Character All-seasons.csv | sort | uniq -c | sort -n | tail
```
(which tells me that Cartman is by far the most quoted character in this file).
What I'm doing here is using UNIX piping and filtering (see [more information here](https://ngs-docs.github.io/2021-august-remote-computing/creating-and-modifying-text-files-on-remote-computers.html#redirection-appending-and-piping.)) to:
* take the contents of the Character column, produced by csvtk
* sorting the contents (`sort`)
* counting the number of distinct elements (`uniq -c`)
* sorting the counts from least to most by number (`sort -n`)
* and then showing only the last 10 (`tail`)
(It looks complicated, but as you start using these commands more and more,
it will become second nature!)
::::warning
**CHALLENGE:** How would I find the _least_ quoted characters in this file?
::::spoiler
You could use either
```
csvtk cut -f Character All-seasons.csv | sort | uniq -c | sort -rn | tail
```
or
```
csvtk cut -f Character All-seasons.csv | sort | uniq -c | sort -n | head
```
::::
---
The key thing about csvtk for _this_ lesson is that it's new software, and
it's mostly useful for data scientists, so it's not "built into" UNIX
operating systems yet (and may never be).
So when you try running it in the _base_ environment,
```shell
mamba activate base
csvtk
```
you'll get "command not found" because it's not installed.
Let's revisit that:
* csvtk is not something that's installed by default on farm.
* it's not in our default conda environment, either.
* but, if we use mamba to install it in a new environment, and then activate that environment, we can use it!
If you switch back to your csv environment, you'll see that you can run it
again:
```
conda activate csv
csvtk
```
### Where is the software coming from!?
When we run `conda create` to install csvtk, where is conda looking for
and finding the software?
The short answer is "the Internet", and more specifically,
pre-prepared conda software repositories, or "channels". Bioconda is
one such channel, as is conda-forge. We'll talk more about channels
below.
### Digression: there are many ways to install software!
If you're at all familiar with UNIX, you might be saying "wait! but I already
use homebrew! or apt! or yum! or containers! or ...!"
Or you may point your sysadmins at this tutorial and they'll say "well
you should just use the modules system on your HPC."
Yes, there are many ways to install and use software! Why conda?
We like conda, because it's straightforward, flexible, cross-platform,
supports version pinning, and does not require systems administrator
access. In the past 12 years of teaching bioinformatics and data
science, conda has come closest to being the thing that works for
everyone, on every platform. As they say, "your mileage may vary"
(YMMV). But we like conda :).
More specifically,
* conda doesn't require sysadmin privileges to install stuff!
* it is not platform specific - it works on Mac OS, Linux, and Windows.
* it is open source.
* It is supported by a big community.
* Most command-line software is available via it, and that software is often up to date.
## Installing more software in your current environment
Once you're in an environment, you can install new software **into that environment** with `conda install -y <software_name>` like so:
```
mamba activate csv
mamba install -y fastqc
```
and that should work too! You'll be able to run the `fastqc` command now.
What you're doing here is _installing software_ into an _existing_ environment with `mamba install`, instead of _creating_ a _new_ environment with `mamba create`.
:::success
Let's try it out quickly -
```
mkdir ~/298-lab3
cd ~/298-lab3
fastqc ~ctbrown/data/ggg201b/SRR2584403_1.fastq.gz -o ./
```
As per our previous execution of fastqc, this will create two files, `SRR2584403_1_fastqc.html` and `SRR2584403_1_fastqc.zip`, in your `298-lab3/` directory.
:::
Generally you want to avoid installing too many packages in one
environment, as it starts to get slow to figure out whether or not
something can be installed. We'll talk more about this below.
You can list software with `mamba list`:
```
mamba list
```
which is less useful than you might think, given how many packages
we've actually installed... this is because packages like FastQC have many dependencies!
(Why are there so many? Because most software is built on top of
_lots_ of other software... and so you need to install all of that other
software, too!)
### Digression: where does the software get installed!?
Installed software on most operating systems (including Linux, which is what farm runs) is usually installed in a separate place from where you run it.
You _run_ software _in_ a directory where you want to input or output files, e.g. your data files or results files. This directory is known as the current working directory, and it's displayed on the prompt. You can also ask what it is with `pwd`.
You _install_ software into a location (directory) that's on your "path". There are lots of different things there on your path - you can look with:
```
echo $PATH
```
Some of these locations are system installation locations, some of them are module locations, and some of them are conda locations. It gets pretty complicated!
What `conda activate` is actually _doing_ is adjusting your path to point at the software installed in a particular environment. For example, fastqc is installed in a directory `~/.conda/envs/csv/bin/`; you can figure this out by typing:
```
which fastqc
```
These installation directories can get pretty big:
```
du -sh ~/.conda/envs/csv
```
will show you this:
>529M /home/datalab-05/.conda/envs/csv
but it's still smaller than most of your data sets so :shrug:
### Back to running things: finding and specifying versions of software
To see what version of a particular piece of software you have installed, run:
```
mamba list csvtk
```
and look at the second column. (Note that `mamba list` doesn't need an exact match, so e.g. you can find all packages with 'csv' in the name by doing `mamba list csv`).
As of Jan 2024, conda installs csvtk version 0.29.0. You can force conda to install _exactly_ this version in the future like so,
```
mamba install csvtk==0.29.0
```
This can be really important - software versions change all the time, which may change data analysis results. Mamba lets you "pin" your software to a specific version to help control this!
:::info
Unfortunately there's no good way to know if a new version of a
software package is "significant" or not, unless they use [semantic
versioning](https://semver.org/)... Generally if there's a big number
update (1.0 -> 2.0) the software will work quite differently, but
there's no guarantee on that.
For example, our software sourmash 1.0 was very different from 2.0,
while sourmash 3.0 was virtually identical to 2.0 in usage (but not in
implementation). The next version, sourmash 4.0, changed many things.
(The lesson is, it is hard for software projects to communicate changes in any systematic way!)
:::
::::warning
**CHALLENGE:** Use the `mamba create` command to create a new environment (named `smash`)
and install the latest version of sourmash in it. Then activate that
environment and verify that you can run 'sourmash'.
::::spoiler
Try:
```
mamba create --name smash -y sourmash
mamba activate smash
sourmash
```
::::
---
Make sure to switch back to your csv environment when you're all done:
```
conda activate csv
```
### Making and using environment files
What if you want to specify collections of software that you use together?
And/or send collaborators or colleagues the set of software they need,
all in one nice file?
conda has a nice human-readable format for that, called an
**'environment file'**. These are portable
files that you can put on different computers and have them
automatically install the right stuff. You can see the one for the
binder for a remote computing workshops
[here](https://github.com/ngs-docs/2021-remote-computing-binder/blob/latest/binder/environment.yml), and the one for an RNAseq pipeline [here](https://github.com/ngs-docs/2020-ggg-201b-rnaseq/blob/latest/binder/environment.yml),
for example.
(These are [YAML files](https://en.wikipedia.org/wiki/YAML), which are
in a format that's structured for computers to read but not super
difficult for humans to write. You'll see these used occasionally in
configuration files for bioinformatics software, too.)
If you have a complicated environment that you want to save, you can make an environment file from your current environment like so:
```
mamba env export > export.yml
```
To look at the environment files we've just created, do:
```
cat export.yml
```
and you can create a new environment from this file like so:
```
mamba env create -n csv2 -f export.yml
```
This would create a new environment called `csv2` that has all the same things installed in it as `csv` does (because that's where we ran `mamba env export`!)
I should say that I don't actually recommend this, because the environment file is going to contain all of the dependencies too. I tend to just list the specific packages I care about running in the environment file; mamba will happily install all the dependencies as needed.
So, for example, an environment file for csvtk would be simply:
```yaml!
channels:
- conda-forge
- bioconda
- defaults
dependencies:
- csvtk
```
### Updating, removing, etc software
You can update software with `mamba update`, and remove software with
`mamba remove`. Generally there's not too much need for these commands
tho, as we recommend just creating new environments with a pinned
version, OR the latest version. Then, when you want to update your software,
you create a new, clean environment.
### Creating multiple environments
As you can probably infer from the above, you can have multiple
environments with different (potentially incompatible) things
installed in each one.
The default is `base`. Other environments will have their own set of
packages. Environments do not include packages from other environments;
you'll need to install each package in every environment that needs it.
So, for example:
```
mamba activate base
csvtk
```
should return "command not found".
:::info
This may be annoying at first but it helps prevent confusion - you have to be explicit about what you want in each environment!
:::
You can list environments with `mamba env list`:
```
mamba env list
```
It will list all of the available environments as well as denote the environment you are currently in with an \*.
Switch environments with `conda activate <environment_name>`, and remove environments with `mamba env remove -n <environment_name>`.
Note that switching environments **doesn't switch your working directory**, it just switches **the software you're running**.
So, for example, you can have one working directory in which you use two different collections of software just fine; you would just have to switch mamba environments. This is really useful for workflows!
### Challenges with using one big environment
We generally recommend using a task-specific environments for each
task (e.g. one environment for your R work, and another for your
bioinformatics work), because this can dramatically simplify
installation and speed up new conda installs. This is because conda
needs to make sure that any new package (and all of its dependencies)
you would like to install doesn't conflict with all the existing
packages.
### How Titus uses conda
That having been said, my experience is that I rely on a core set of
packages for my daily work, and so I usually have my "daily work"
environment where I have a bunch of stuff installed, and then when I'm
working on data analysis, I don't want to constantly install new
things or switch environments.
So I usually have a default environment that I work in, and when I use
non-standard software (stuff I use infrequently or for specific tasks)
I create software-specific environments to work in.
snakemake (which we'll be talking about in more detail soon)
helps with this by letting you use analysis-specific environments.
### Finding packages within conda
To search for all available versions of a particular package from the
command line, do:
```
mamba search <software>
```
## Using the 'bioconda' and 'conda-forge' channels
[Conda-forge](https://conda-forge.org/) and
[Bioconda](https://bioconda.github.io/) are "software channels" for
conda, that provide collections of conda-packaged software.
In particular, conda-forge contains an awful lot of general community
packages as well as many Python and R libraries, while bioconda is more
focused on biology/bioinformatics tools specifically.
You can install stuff directly from these channels by specifying the
bioconda channel explicitly: `mamba install -c bioconda ...`. Or, you
can add it to your "default" set of channels to search, as it is in your account (because we installed mamba for you using [mambaforge](https://github.com/conda-forge/miniforge#mambaforge)).
(You don't need to run these, but you can:)
```
mamba config --add channels defaults
mamba config --add channels bioconda
mamba config --add channels conda-forge
```
These commands configure things in your .condarc file -- take a look,
```
cat ~/.condarc
```
This will automatically make `mamba install` search for packages in bioconda and conda-forge.
Note: if you get the error
>~~~
>PackagesNotFoundError: The following packages are not available from current channels:
>~~~
but you're pretty sure the package exists, you probably need to configure
your channels properly :)
### Mac OS X and Linux, but not Windows
conda and mamba work on Windows, OS X and Linux!
But unfortunately many conda-forge and bioconda packages are only
available for OS X and Linux, and not Windows :(. This is because
they are built for Linux or a UNIX-like OS.
### How to engage with conda-forge and bioconda
Both conda-forge and bioconda are community-driven libraries of
software. They rely upon people (like you!) to package software; this
involves writing a recipe, like [the sourmash
recipe](https://github.com/bioconda/bioconda-recipes/blob/master/recipes/sourmash/meta.yaml).
Some tips and tricks for using conda-forge and bioconda:
* Both are community maintained, please be respectful and friendly - no one is working _for_ you, and no one is making money doing this.
* Help advocate for your favorite software to be added, and/or do it yourself! (e.g. [gtdbtk](https://github.com/Ecogenomics/GTDBTk/issues/30#issuecomment-431707687)) - we can help!
* File bug reports, but be respectful and helpful. See [a sterling example :)](https://github.com/GATB/bcalm/issues/44).
## Conda and data science: R and Python
Conda emerged from the Python community initially, but it now has some pretty
good support for R as well, through the conda-forge channel.
Why use Conda for R and Python? What does it give you? A few things -
* with conda, you can manage multiple R and Python installations, each containing different (and incompatible!) versions of packages.
* where libraries are available via conda, you can install them without compiling them. This can be (much) faster than using the standard `install.packages` or `pip install` supported by R and Python.
* where libraries are _not_ available via conda, you can still install them, and you don't need to do anything special or tricky - just run the standard installation commands.
### Conda and R
conda-forge now has some pretty good support for R - see [this
environment
file](https://github.com/ngs-docs/2020-ggg-201b-rnaseq/blob/latest/binder/environment.yml)
for RNAseq, for example. It installs both tidyverse packages and
bioconductor packages!
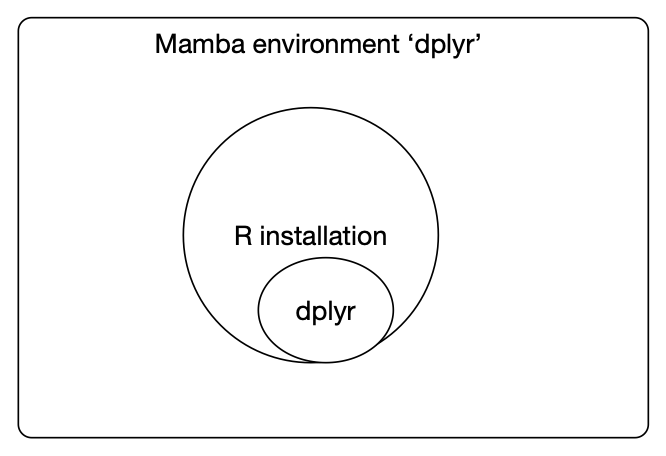
Let's install R with dplyr support.
First, let's figure out what the right package name is. We _could_ go to
[the conda-forge page](https://conda-forge.org/feedstock-outputs/) and search
for rmarkdown, but it turns out that google is often your best bet :).
Google 'install dplyr with conda' and you'll see that the first hit is
`r-dplyr`. Let's try it!
```
mamba create -y -n dplyr r-dplyr
```
This will go ahead and install R itself, as well as all of the packages needed
to compile RMarkdown documents (like this Web site, in fact).
Activate the environment:
```
conda activate r-dplyr
```
Now, try running:
```
type R
```
to see where R is installed - under your own account. Yay!
If you want, you can run `R` and then `library(dplyr)` to verify that
it's installed. (Type 'exit' to get out of R!)
Here's what's going on:
You can also install your own R packages from within R using `install.packages` - and, as long as you're running R from within your conda environment, it will install into that environment.
You can manage R packages either way - with conda, or "manually" using R's internal mechanisms. It's often faster to use conda, especially if there are C extension packages, and I've found that the majority of R packages I use in bioinformatics are readily
available via conda-forge, which is nice. Again, your mileage may vary... regardless, at least now you have options!
### Running RStudio Server using the R from inside a Mamba environment
You know how you enter `module load R` before `module load rstudio-server`? You can replace `module load R` with `mamba activate dplyr`, and then execute `rstudio-launch`, and then you will be using the R installed in the monda environment!
### Conda and Python
Python is heavily used in data science as well, and it is also well supported
by conda. Conveniently, you can install different versions quite easily:
```
mamba create -n py311 -y python==3.11
```
will install Python v3.9.
Then
```
conda activate py311
type python
python -V
```
will show you that Python is v3.9 in this environment.
Conveniently, as with R, you have full installation privileges - so you could
run the python package installer, pip, to install stuff. For example, run:
```
pip install screed
```
to install the screed library in your very own Python environment.
(screed is another library my lab built for reading sequence data files;
here we're just using it as an example of something that you can install
with mamba).
### Supporting interactive packages (RStudio and JupyterLab)
Many (most?) people now use R and Python packages via RStudio and
JupyterLab, and it's totally possible to use conda installs with that.
We'll cover this elsewhere (not today), but hit me up if you're interested in instructions!
## Tricky things to think about with conda
### It can take a long time to install lots of software
This is because conda needs to make sure to resolve version incompatibilities before proceeding, and for large conda environments containing many packages, this can take a while!
This has mostly been resolved by the mamba command, which is much faster than conda.
Solution: use isolated environments to install single packages, instead.
### Explicit package listing
You can grab an explicit list of version pinned software that is OS specific like so -
```
mamba list --explicit > package-files.txt
mamba create --name myenv --file spec-file.txt
mamba install --name myenv --file spec-file.txt
```
this will guarantee _identical_ environments.
See [the conda docs](https://docs.conda.io/projects/conda/en/latest/user-guide/tasks/manage-environments.html#building-identical-conda-environments) for more information.
## Reference list of Conda Commands
| Conda commands | action |
| -------- | -------- |
| `conda install <package_name>` | install a package |
| `conda list` | list installed packages |
| `conda search <package_name>` | search for a package––this can be the full or partial name of a package |
| `conda info` | list of information about the currently active environment |
| `conda list` | list out all the installed packages in the currently active environment |
| `conda remove <package_name>` | remove a conda package |
| `conda config --get channels` | list out the active channels and their priorities |
| `conda update` | update all the installed packages |
| `conda config --remove channels <channel>` | remove unwanted channel |
| `conda env list` | list the different environments you have set up |
| `conda activate <new_environment_name>` | activate the a new conda environment conda (this also works for activating our `base` environment |
| `conda info --envs` | list the locations of conda directories |
## More Reading on Conda
+ Conda [Documentation](https://conda.io/en/latest/)
+ Drawing credit: Gergely Szerovay. Read original article [here](https://www.freecodecamp.org/news/why-you-need-python-environments-and-how-to-manage-them-with-conda-85f155f4353c/)
## Discussion items:
* What happens if something isn't conda installable?
* You can install it as normal, and it will be usable as normal.
* However, it won't be "managed" via conda (or snakemake)
* Disk, vs environment, vs login shell
* especially note that multiple terminals all look at the same disk
## Digression if time: `pixi`
I don't yet use this myself, but I thought it would be fun to try coming at this from a different direction --
Let's use a completely different interface that's built on top of conda, called [pixi](https://github.com/prefix-dev/pixi)! It uses all the same software packages and so on, but uses a different strategy for activating environments.
### Install pixi in your account
first, we need to install pixi:
```
curl -fsSL https://pixi.sh/install.sh | bash
```
and activate it:
```
source ~/.bashrc
```
### Initiate a new project in a new directory
```
cd ~/
mkdir 298-pixi
cd 298-pixi
pixi init .
```
### Configure it to look at bioconda for packages
```
pixi project channel add bioconda
```
### Install `fastqc`
```
pixi add fastqc
```
### Run fastqc!
```
pixi run fastqc ~ctbrown/data/ggg201b/SRR2584857_1.fastq.gz -o .
```
### Thoughts
What's different about pixi?
Are these differences good or bad?
### pixi & mamba
It seems like you can use them both at the same time :shrug: :exploding_head:
## In summary
Mamba/conda is one way you can install software on computers, including most
especially HPC and cloud computers.
Mamba lets you create separate "environments" containing collections of
software that are isolated from other collections.
Mamba supports a pretty normal data science set of tools, and also
provides tools to support computational reproducibility via environment
files and version pinning.
Go mamba!!
 Sign in with Wallet


