:::info
<span class="textc" style="font-weight:bold; font-size:1.2em">課程講師資訊</span>巨匠電腦講師:呂心怡
E-mail:zoego99@gmail.com <span class="urll">[課程練習下載區:連結](https://drive.google.com/file/d/17kXrukRJnxMqQWeZtUz-LHTfRB3IMp0Y/view) </span>
:::
# 一、準備工作,打造高效簡報的第一步
目標:熟悉 PowerPoint 基本操作,提升簡報製作效率與便利性。
## <span class="h2">1. 工具配置【快速存取工具列】</span>
### (1) 設定方式
<details>
<summary>【細項說明】點擊展開/摺疊</summary>
<span class="h4">A. 設定方式</span>
<span class="img50">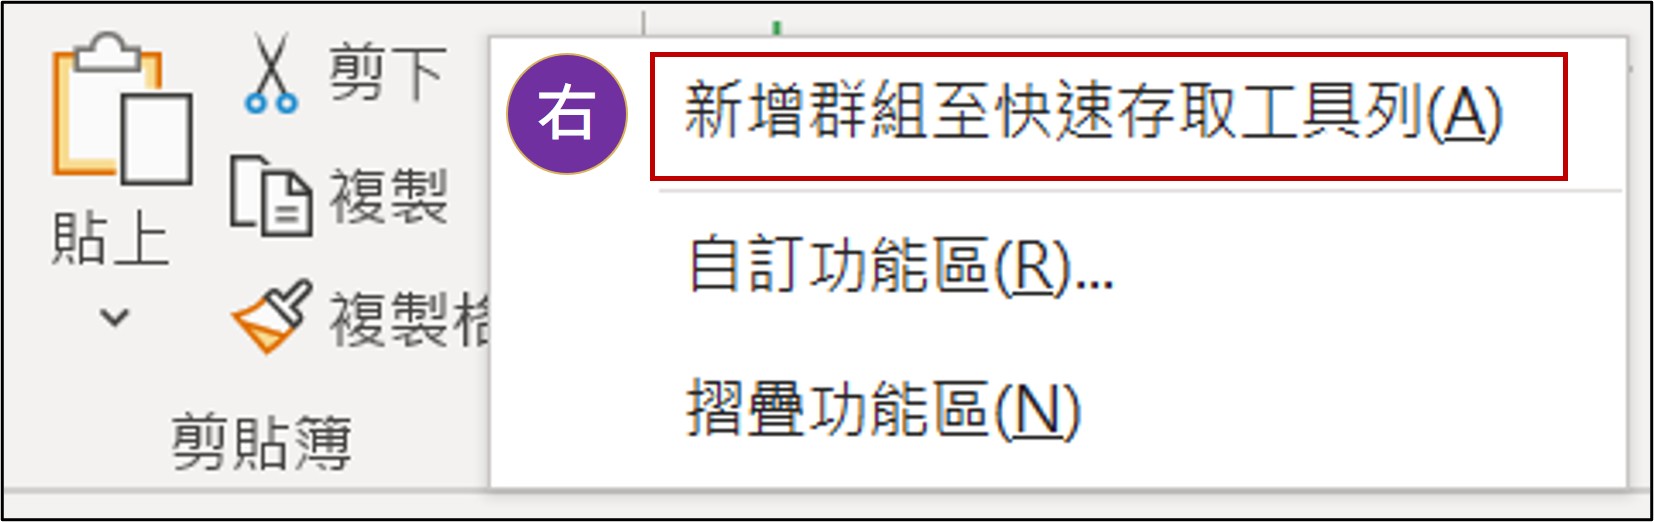</span>
<span class="h4">B. 常用功能設定</span>
快速存取工具列:所有Word、Excel及PPT皆相同建議
<span class="img70">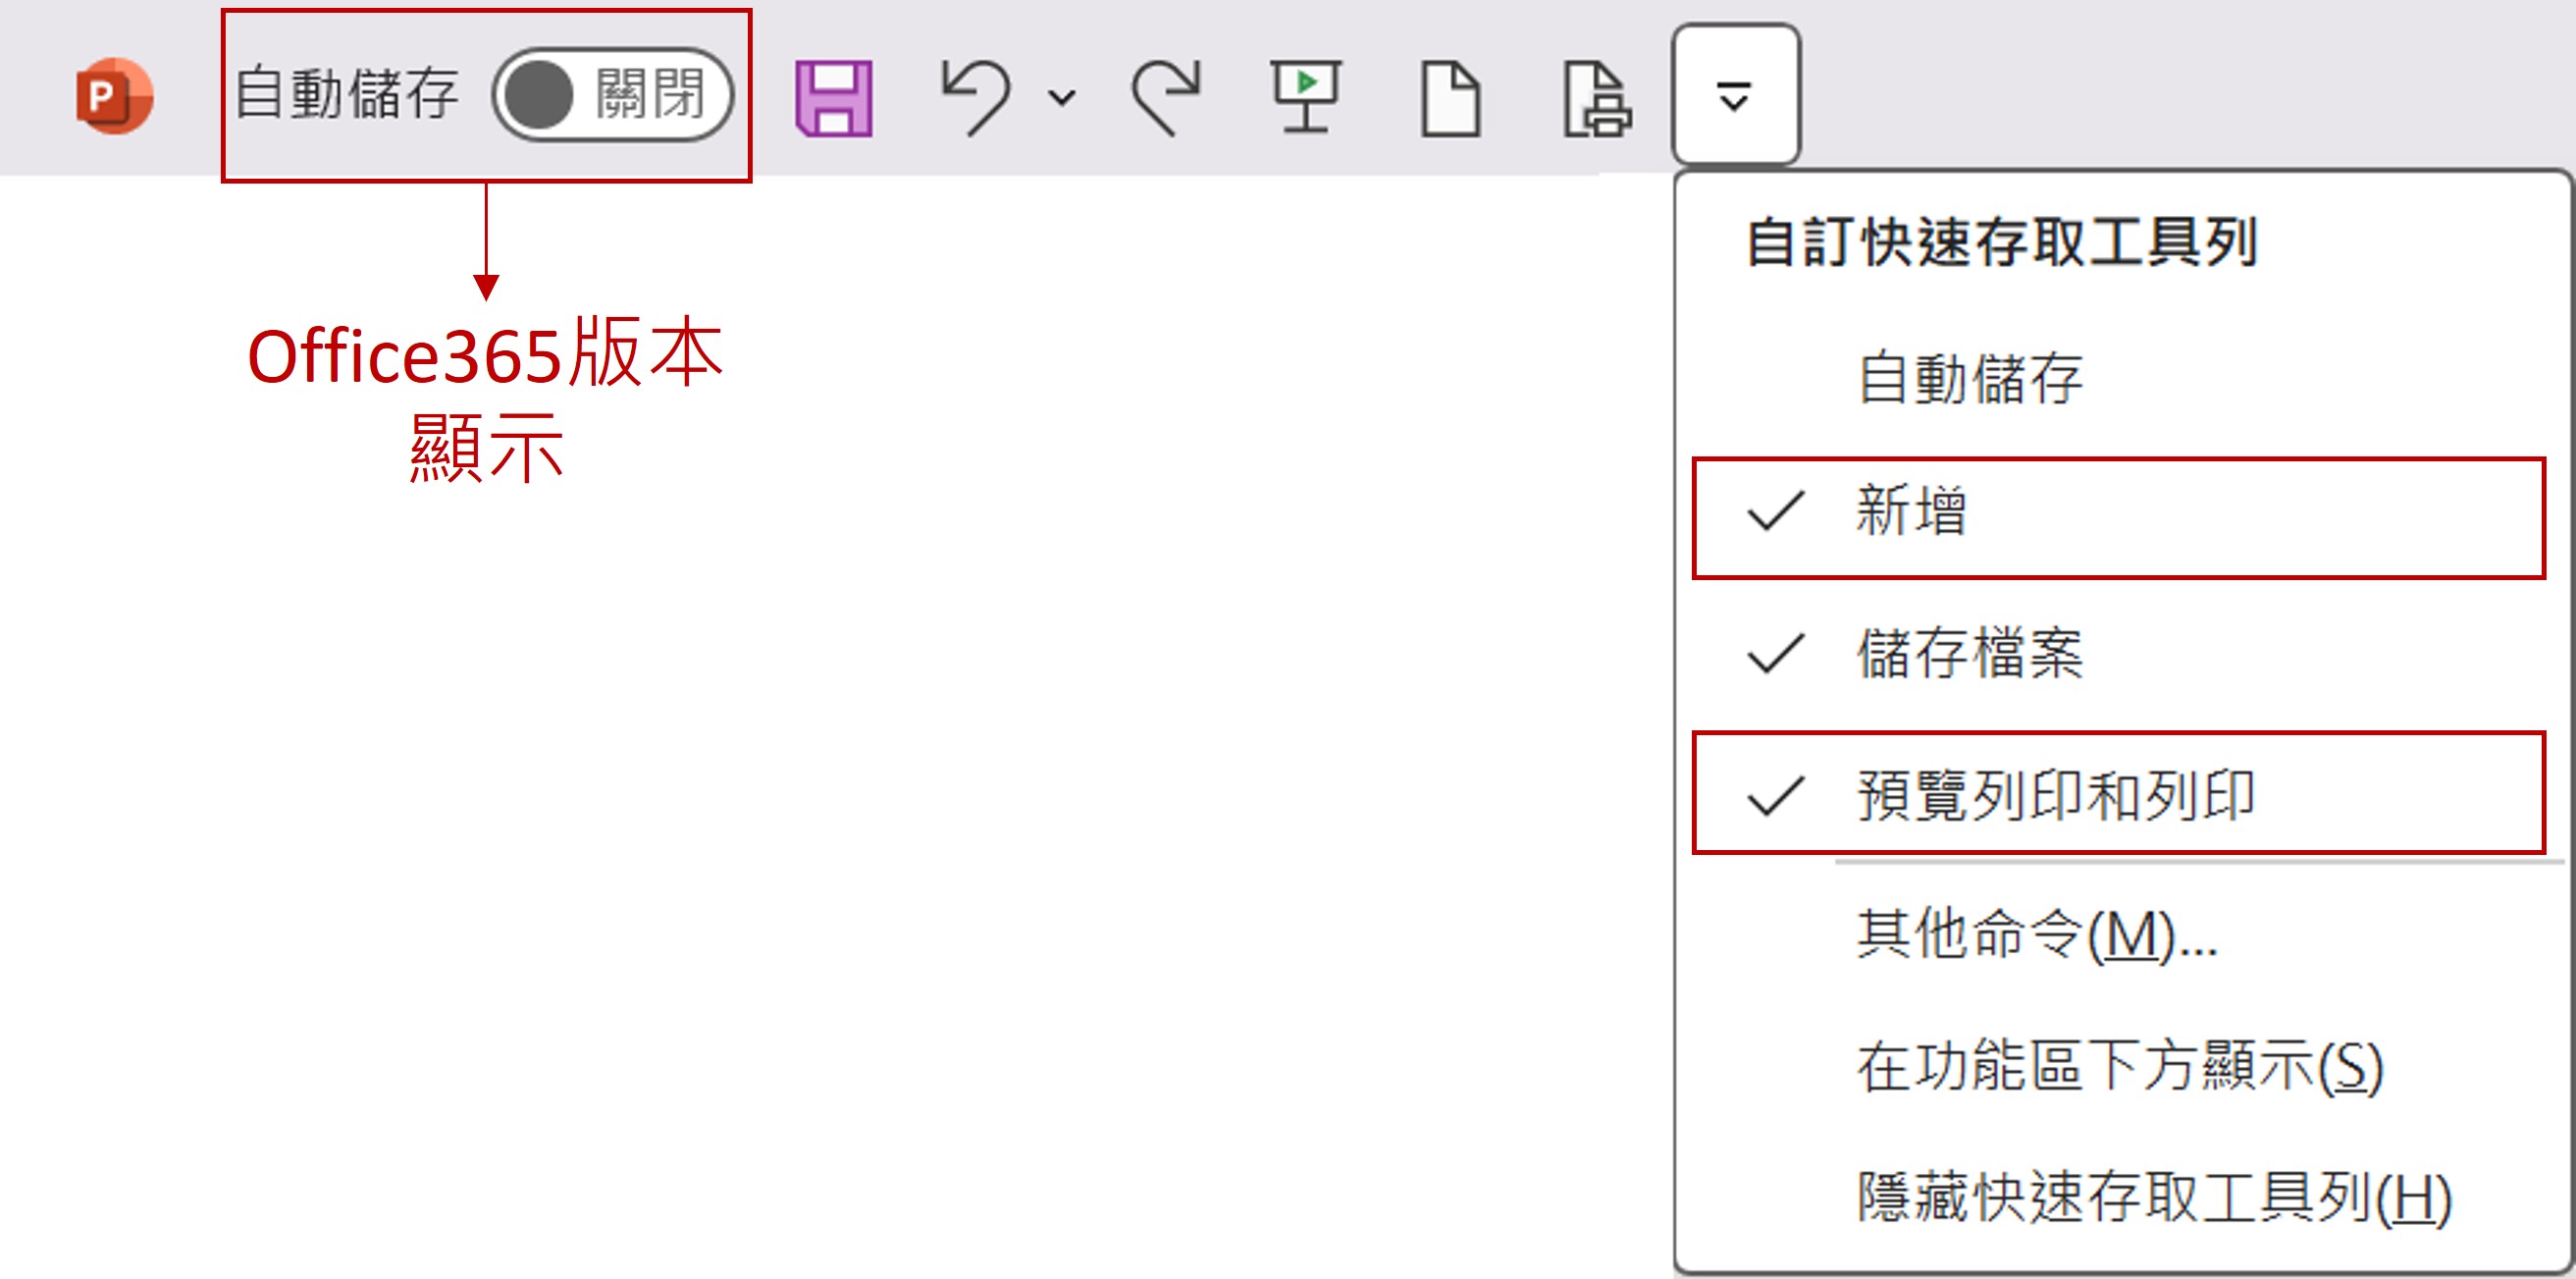</span>
</details>
### (2) 個人建議工具
<details>
<summary>【細項說明】點擊展開/摺疊</summary>
依個人使用PPT時,有些指令重覆使用,故建議置於快速存取工具列
<span class="h4">A. 複製格式</span>
<span class="h4">B. 選取窗格</span>
指令:【常用】>【選取】>【選取窗格】
<span class="img20">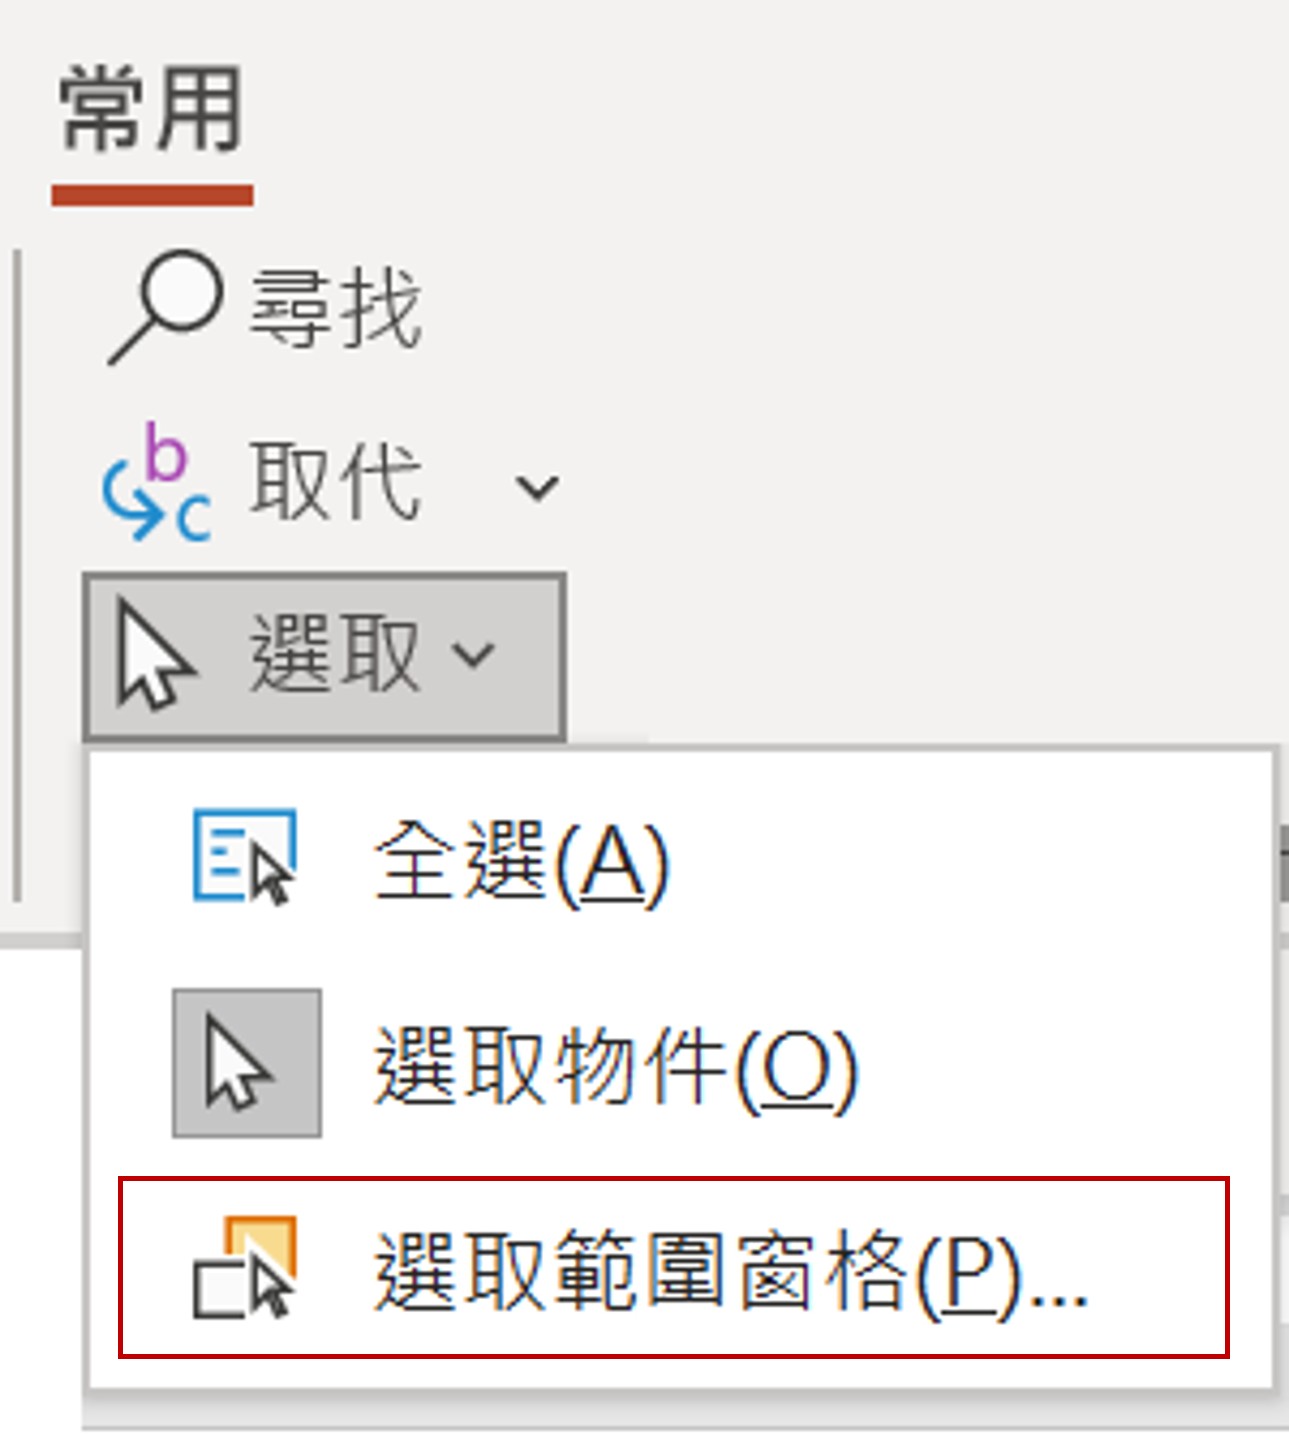</span>
> 與動畫結合時選取物件命名的影響
> * 選取順序影響接續前動畫的順序
> * 群組/取消群組 會影響物件上下層位置
> * 群組物件若設定動畫,則不宜再取消群組
<span class="h4">C. 物件對齊工具</span>
S1.選取任一物件
S2.【對齊】、【組成群組】、【旋轉】
<span class="img40">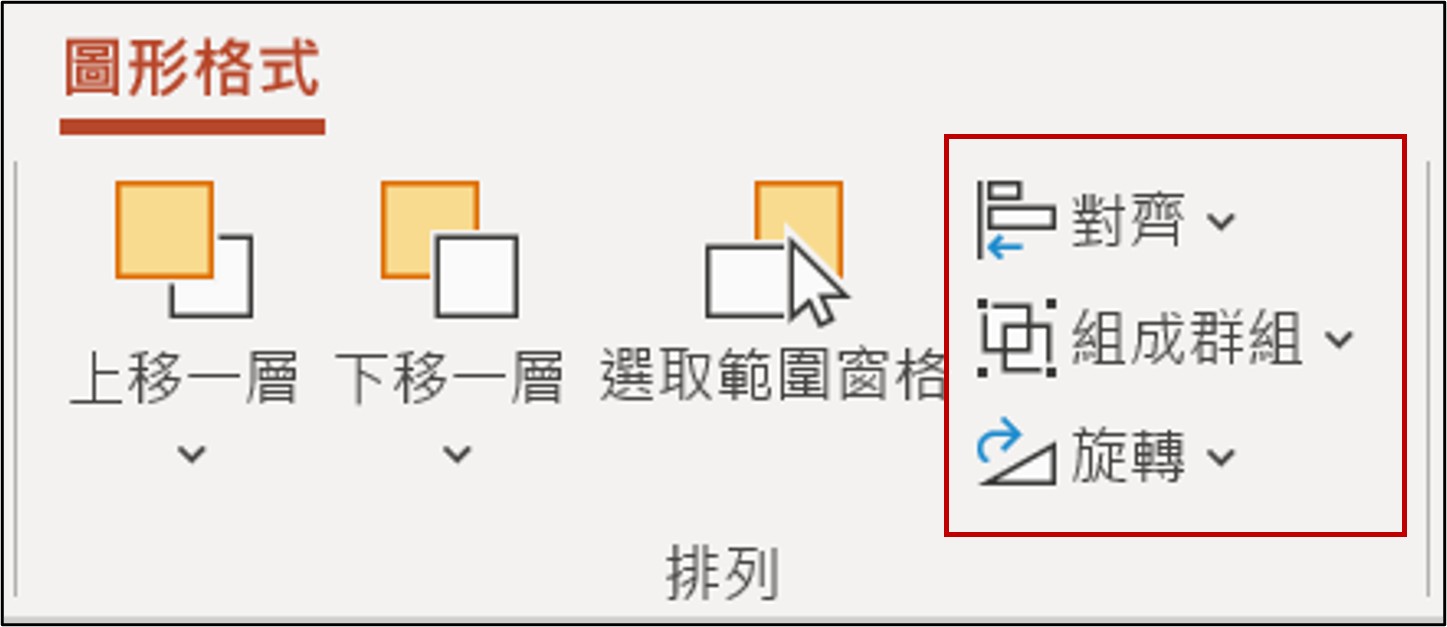</span>
<span class="h4">D. 輔助線,協助物件對齊</span>
指令:【檢視】>勾選【輔助線】
<span class="img20">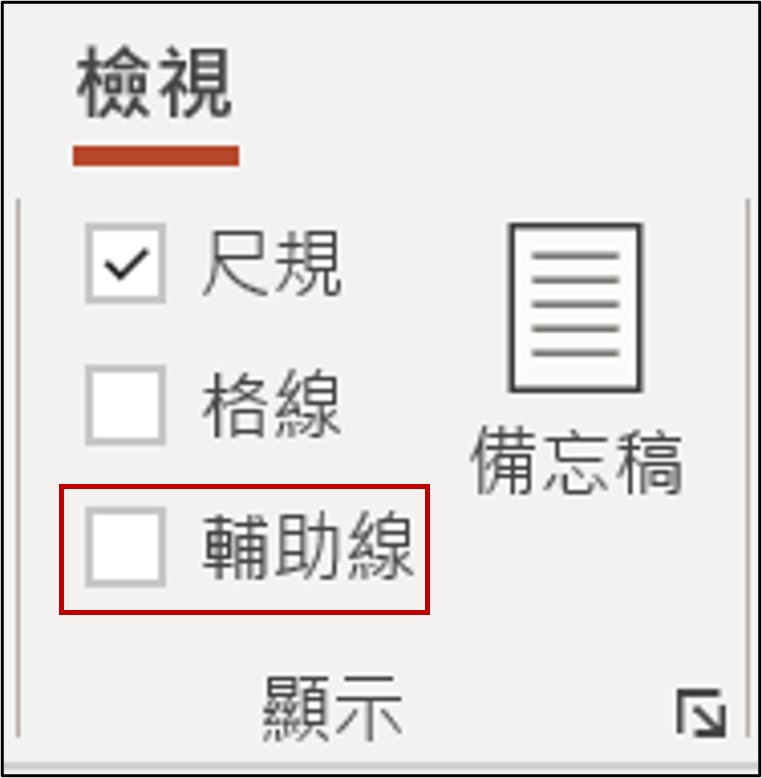</span>
|快速鍵|說明|
|-|-|
||◻ 直接移動輔助線以尺規距離為單位<br>◻ 預設以 0.1 固定單位移動|
|`Ctrl`|新增輔助線,預設以 0.1 固定單位移動|
|`Shift`|自起始位置為基點0,顯示移動位置|
|`Alt`|顯示移動位置,其移動單位小於 0.1 微調|
</details>
## <span class="h2">2. 善用【快速鍵】提升效率</span>
<details>
<summary>【細項說明】點擊展開/摺疊</summary>
在簡報製作中,使用快速鍵讓調整物件上事半功倍,故介紹常被忽略的好用快速鍵。
<span class="img80">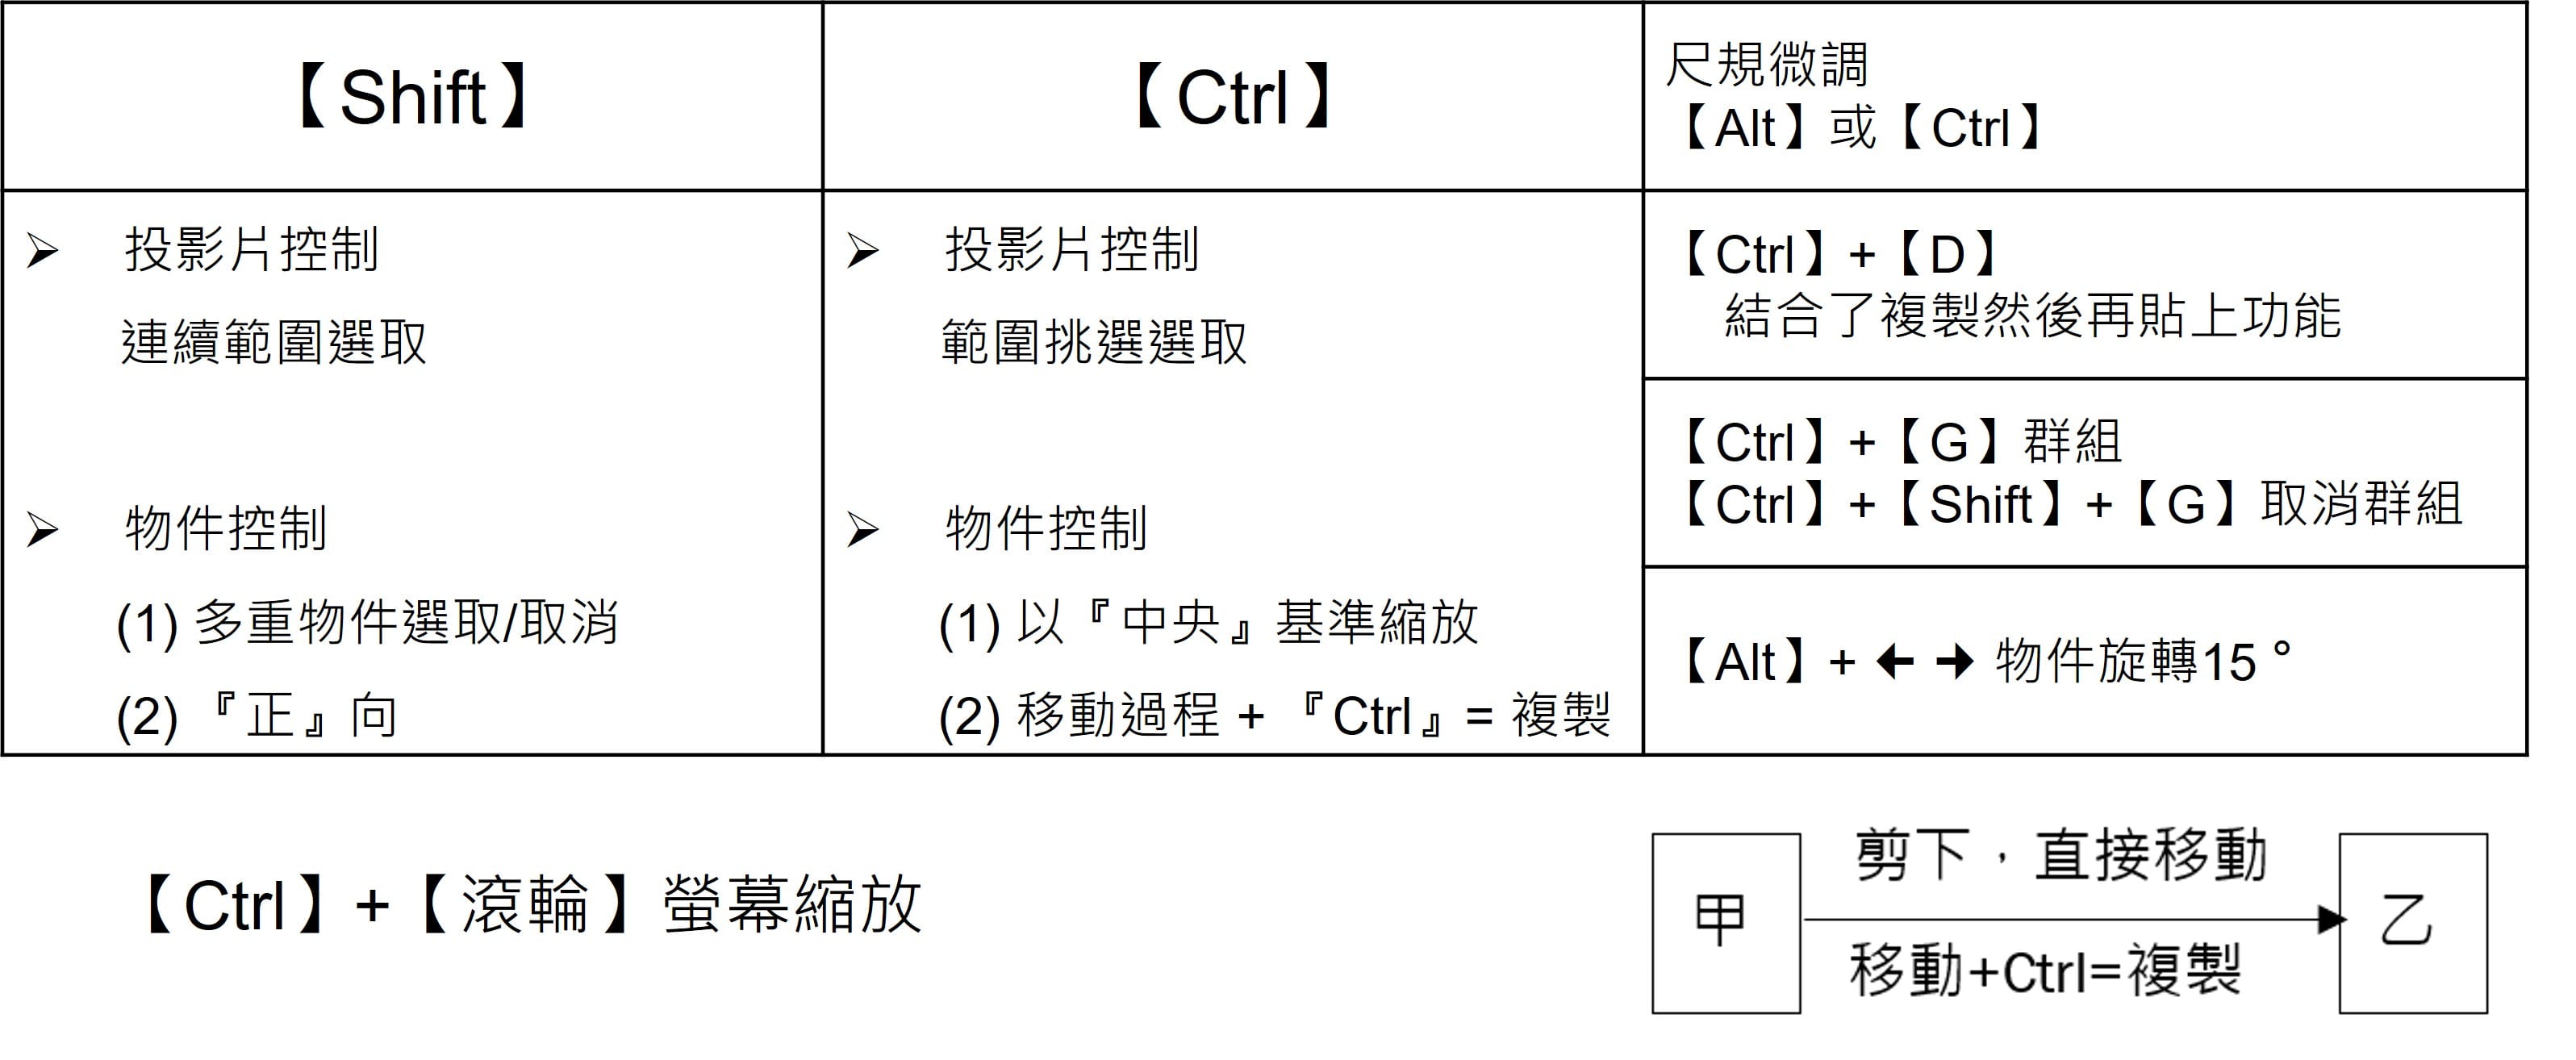</span>
</details>
# 二、打造高質感簡報
目標:運用 PowerPoint 圖像設計工具,提升視覺表現。
## <span class="h2">1. 善用軟體提供的好工具</span>
### (1) 智慧型輔助線
<details>
<summary>【細項說明】點擊展開/摺疊</summary>
<span class="img80">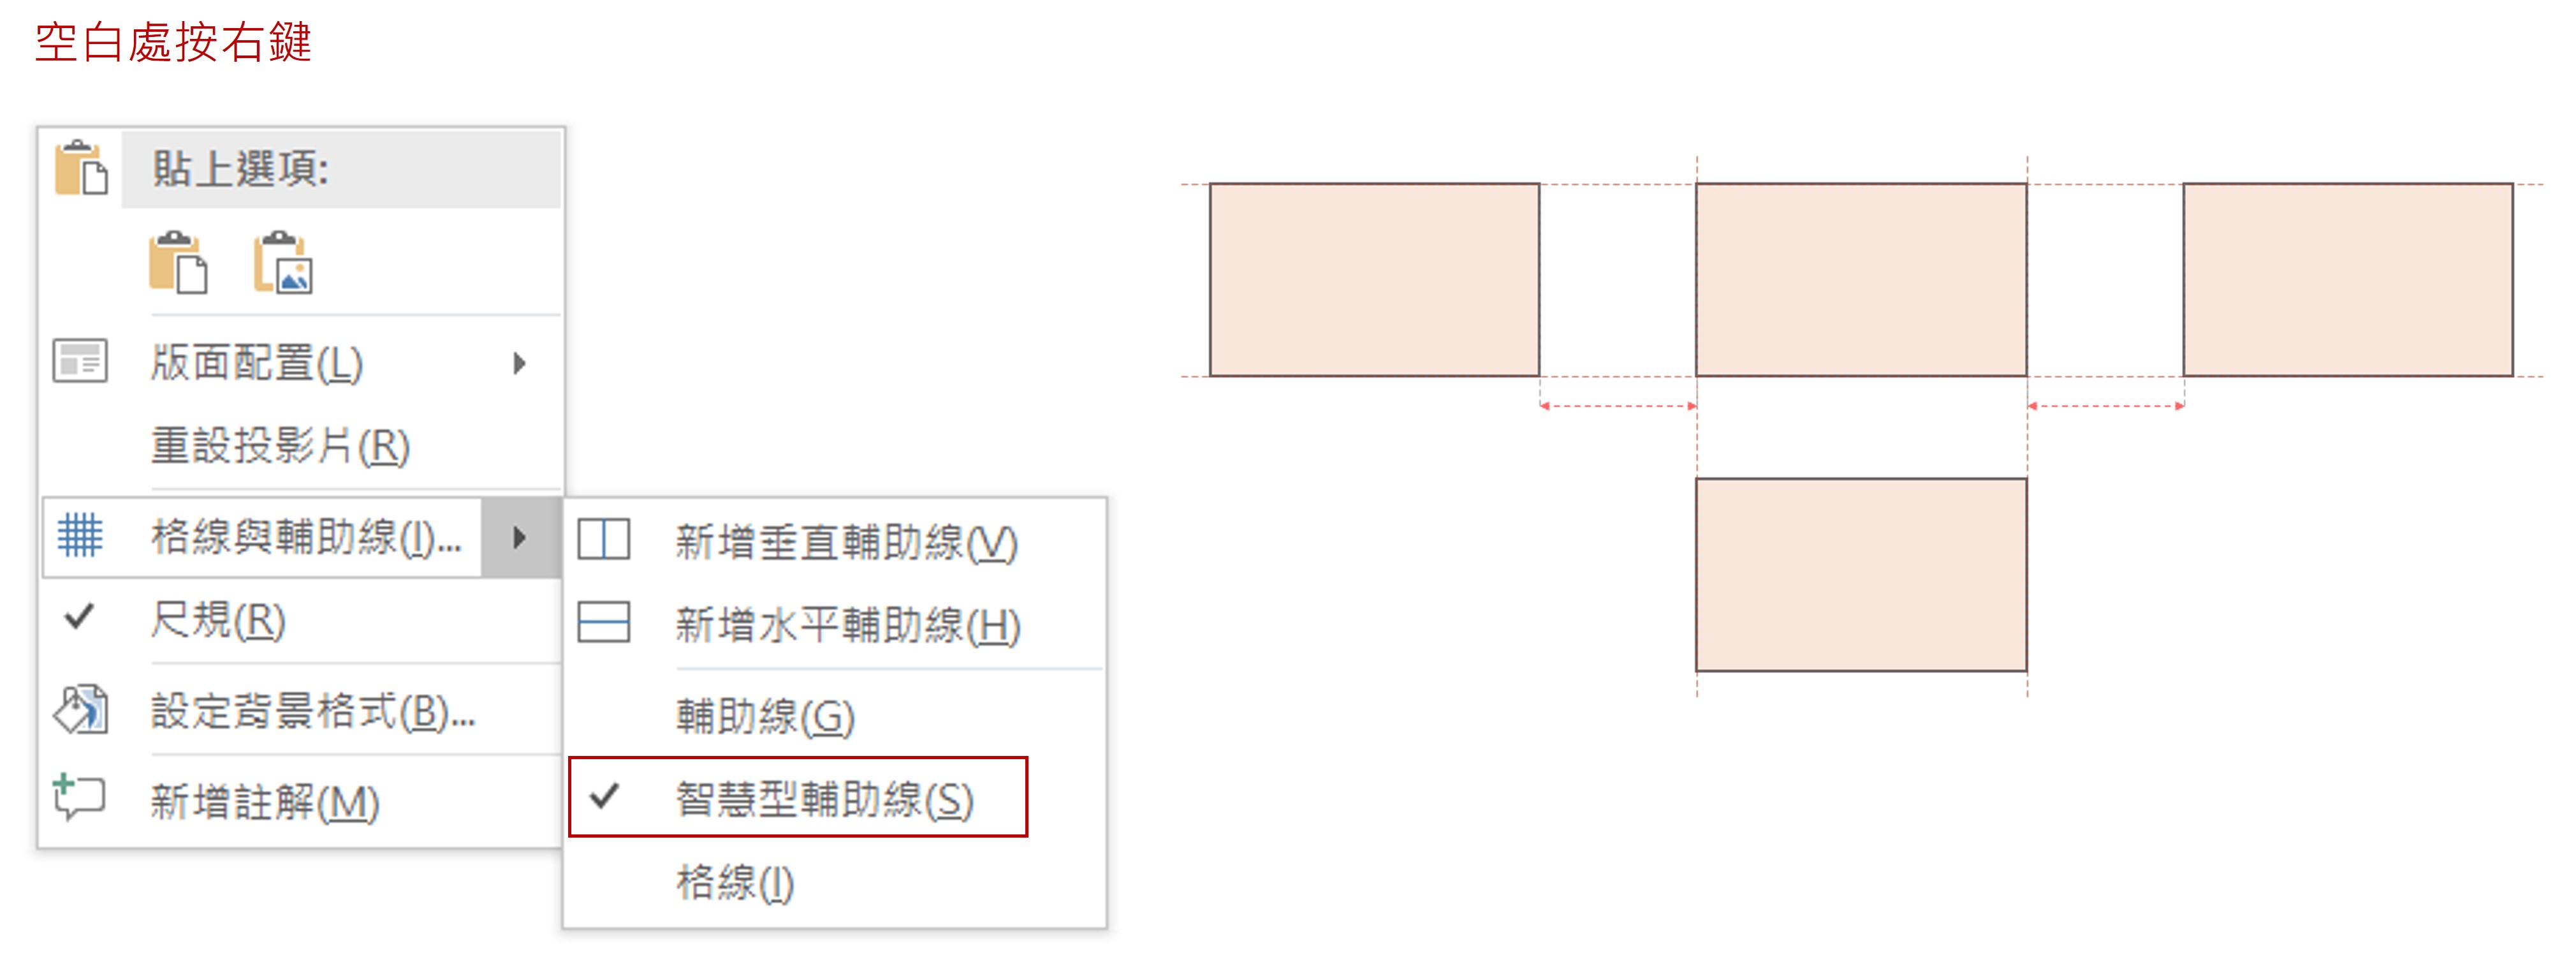</span>
</details>
### (2) 輔助線,協助物件對齊
<details>
<summary>【細項說明】點擊展開/摺疊</summary>
指令:【檢視】>勾選【輔助線】
<span class="img20"></span>
|快速鍵|說明|
|-|-|
||◻ 直接移動輔助線以尺規距離為單位<br>◻ 預設以 0.1 固定單位移動|
|`Ctrl`|新增輔助線,預設以 0.1 固定單位移動|
|`Shift`|自起始位置為基點0,顯示移動位置|
|`Alt`|顯示移動位置,其移動單位小於 0.1 微調|
</details>
### (3) 圖形工具配置
<details>
<summary>【細項說明】點擊展開/摺疊</summary>
<span class="h4">A. 上方常用工具</span>
<span class="img100">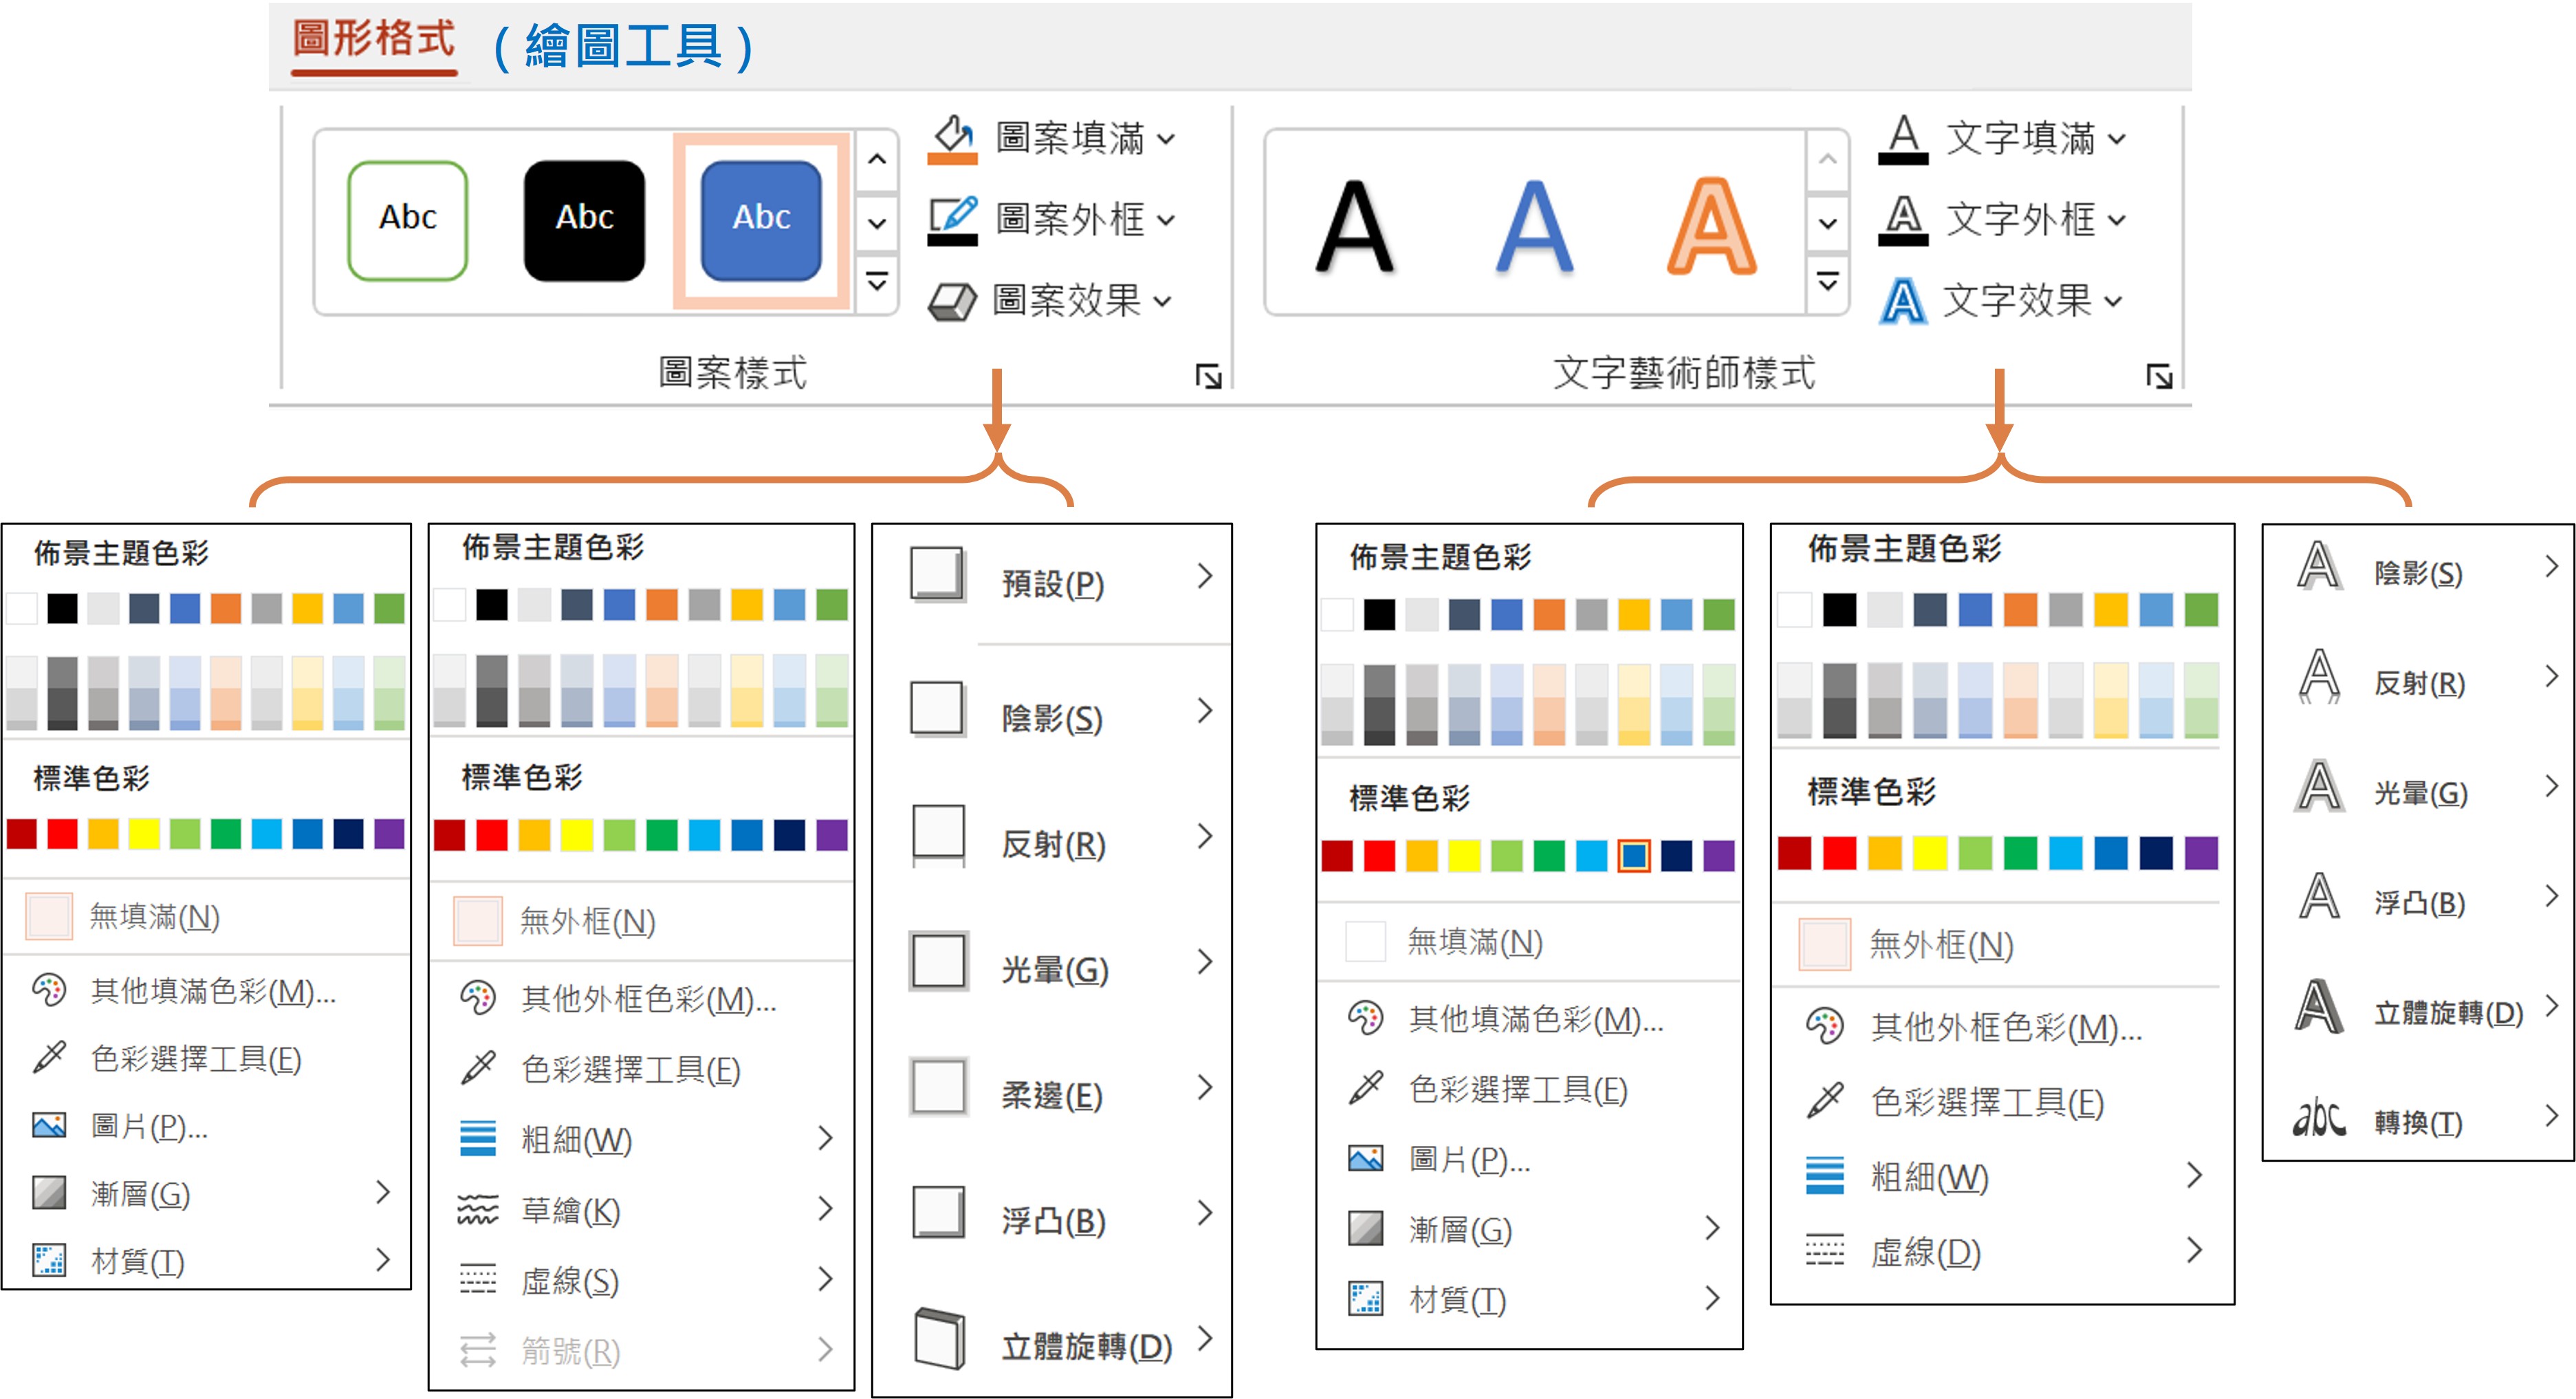</span>
<span class="h4">B. 右側詳細工具</span>
<span class="img100">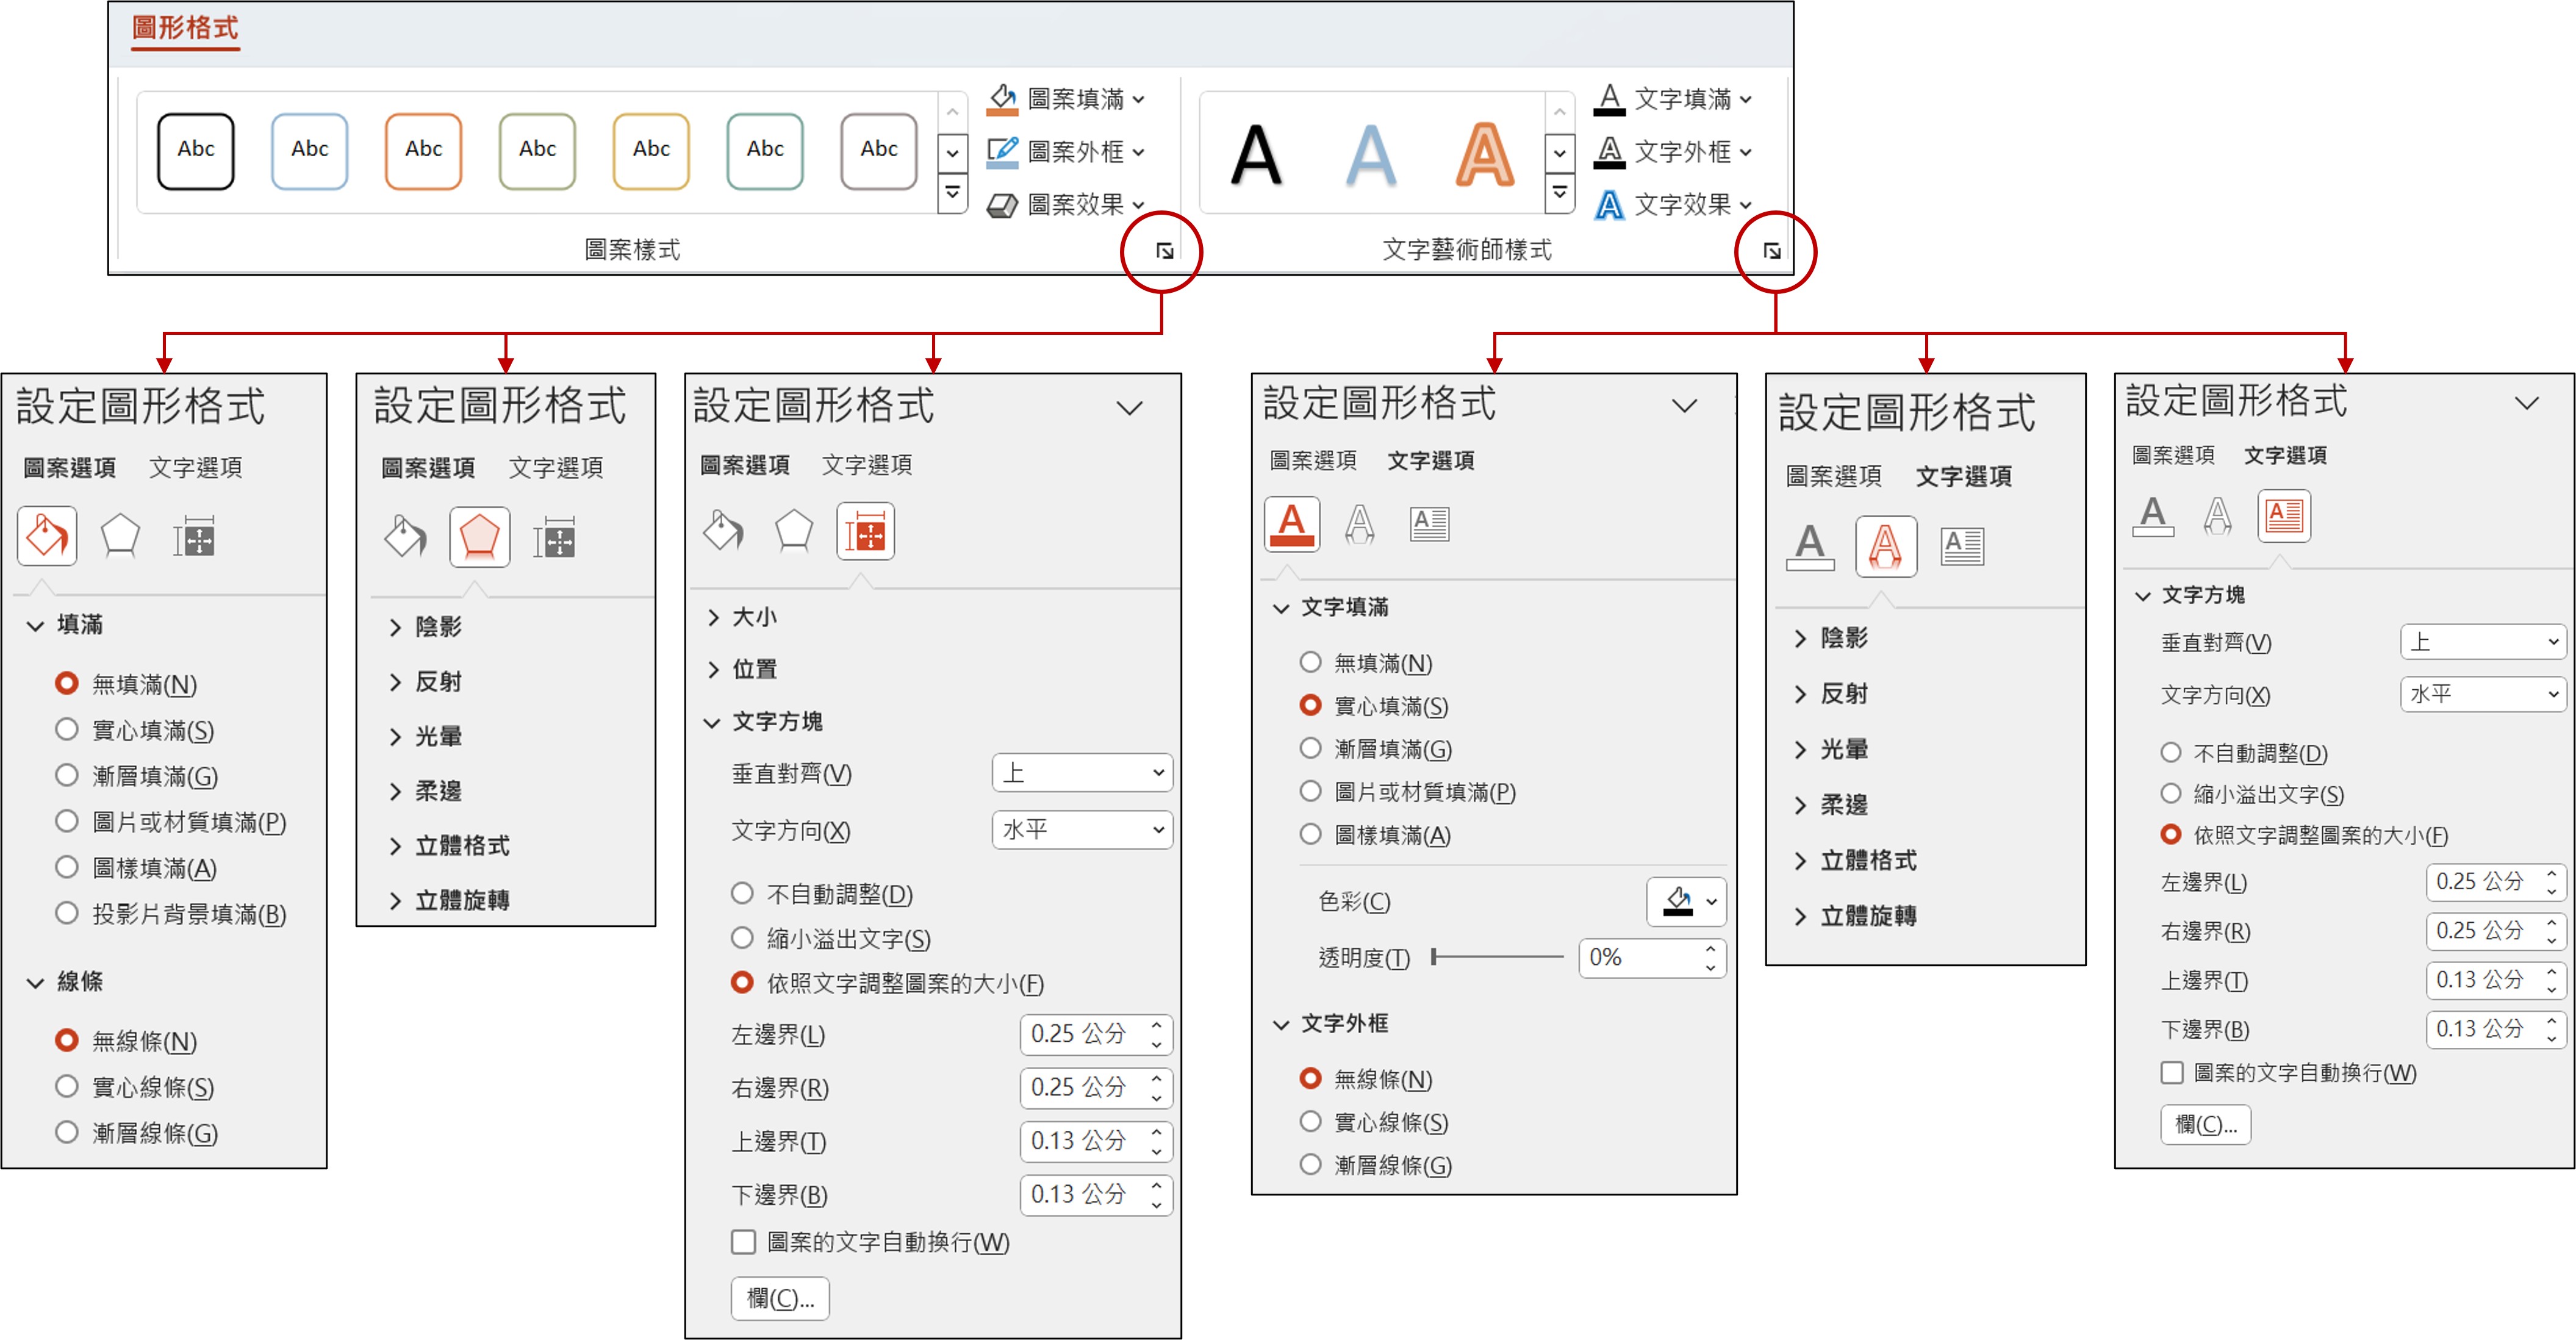</span>
</details>
### (4) 編輯端點 & 合併圖案
<details>
<summary>【細項說明】點擊展開/摺疊</summary>
<span class="img100">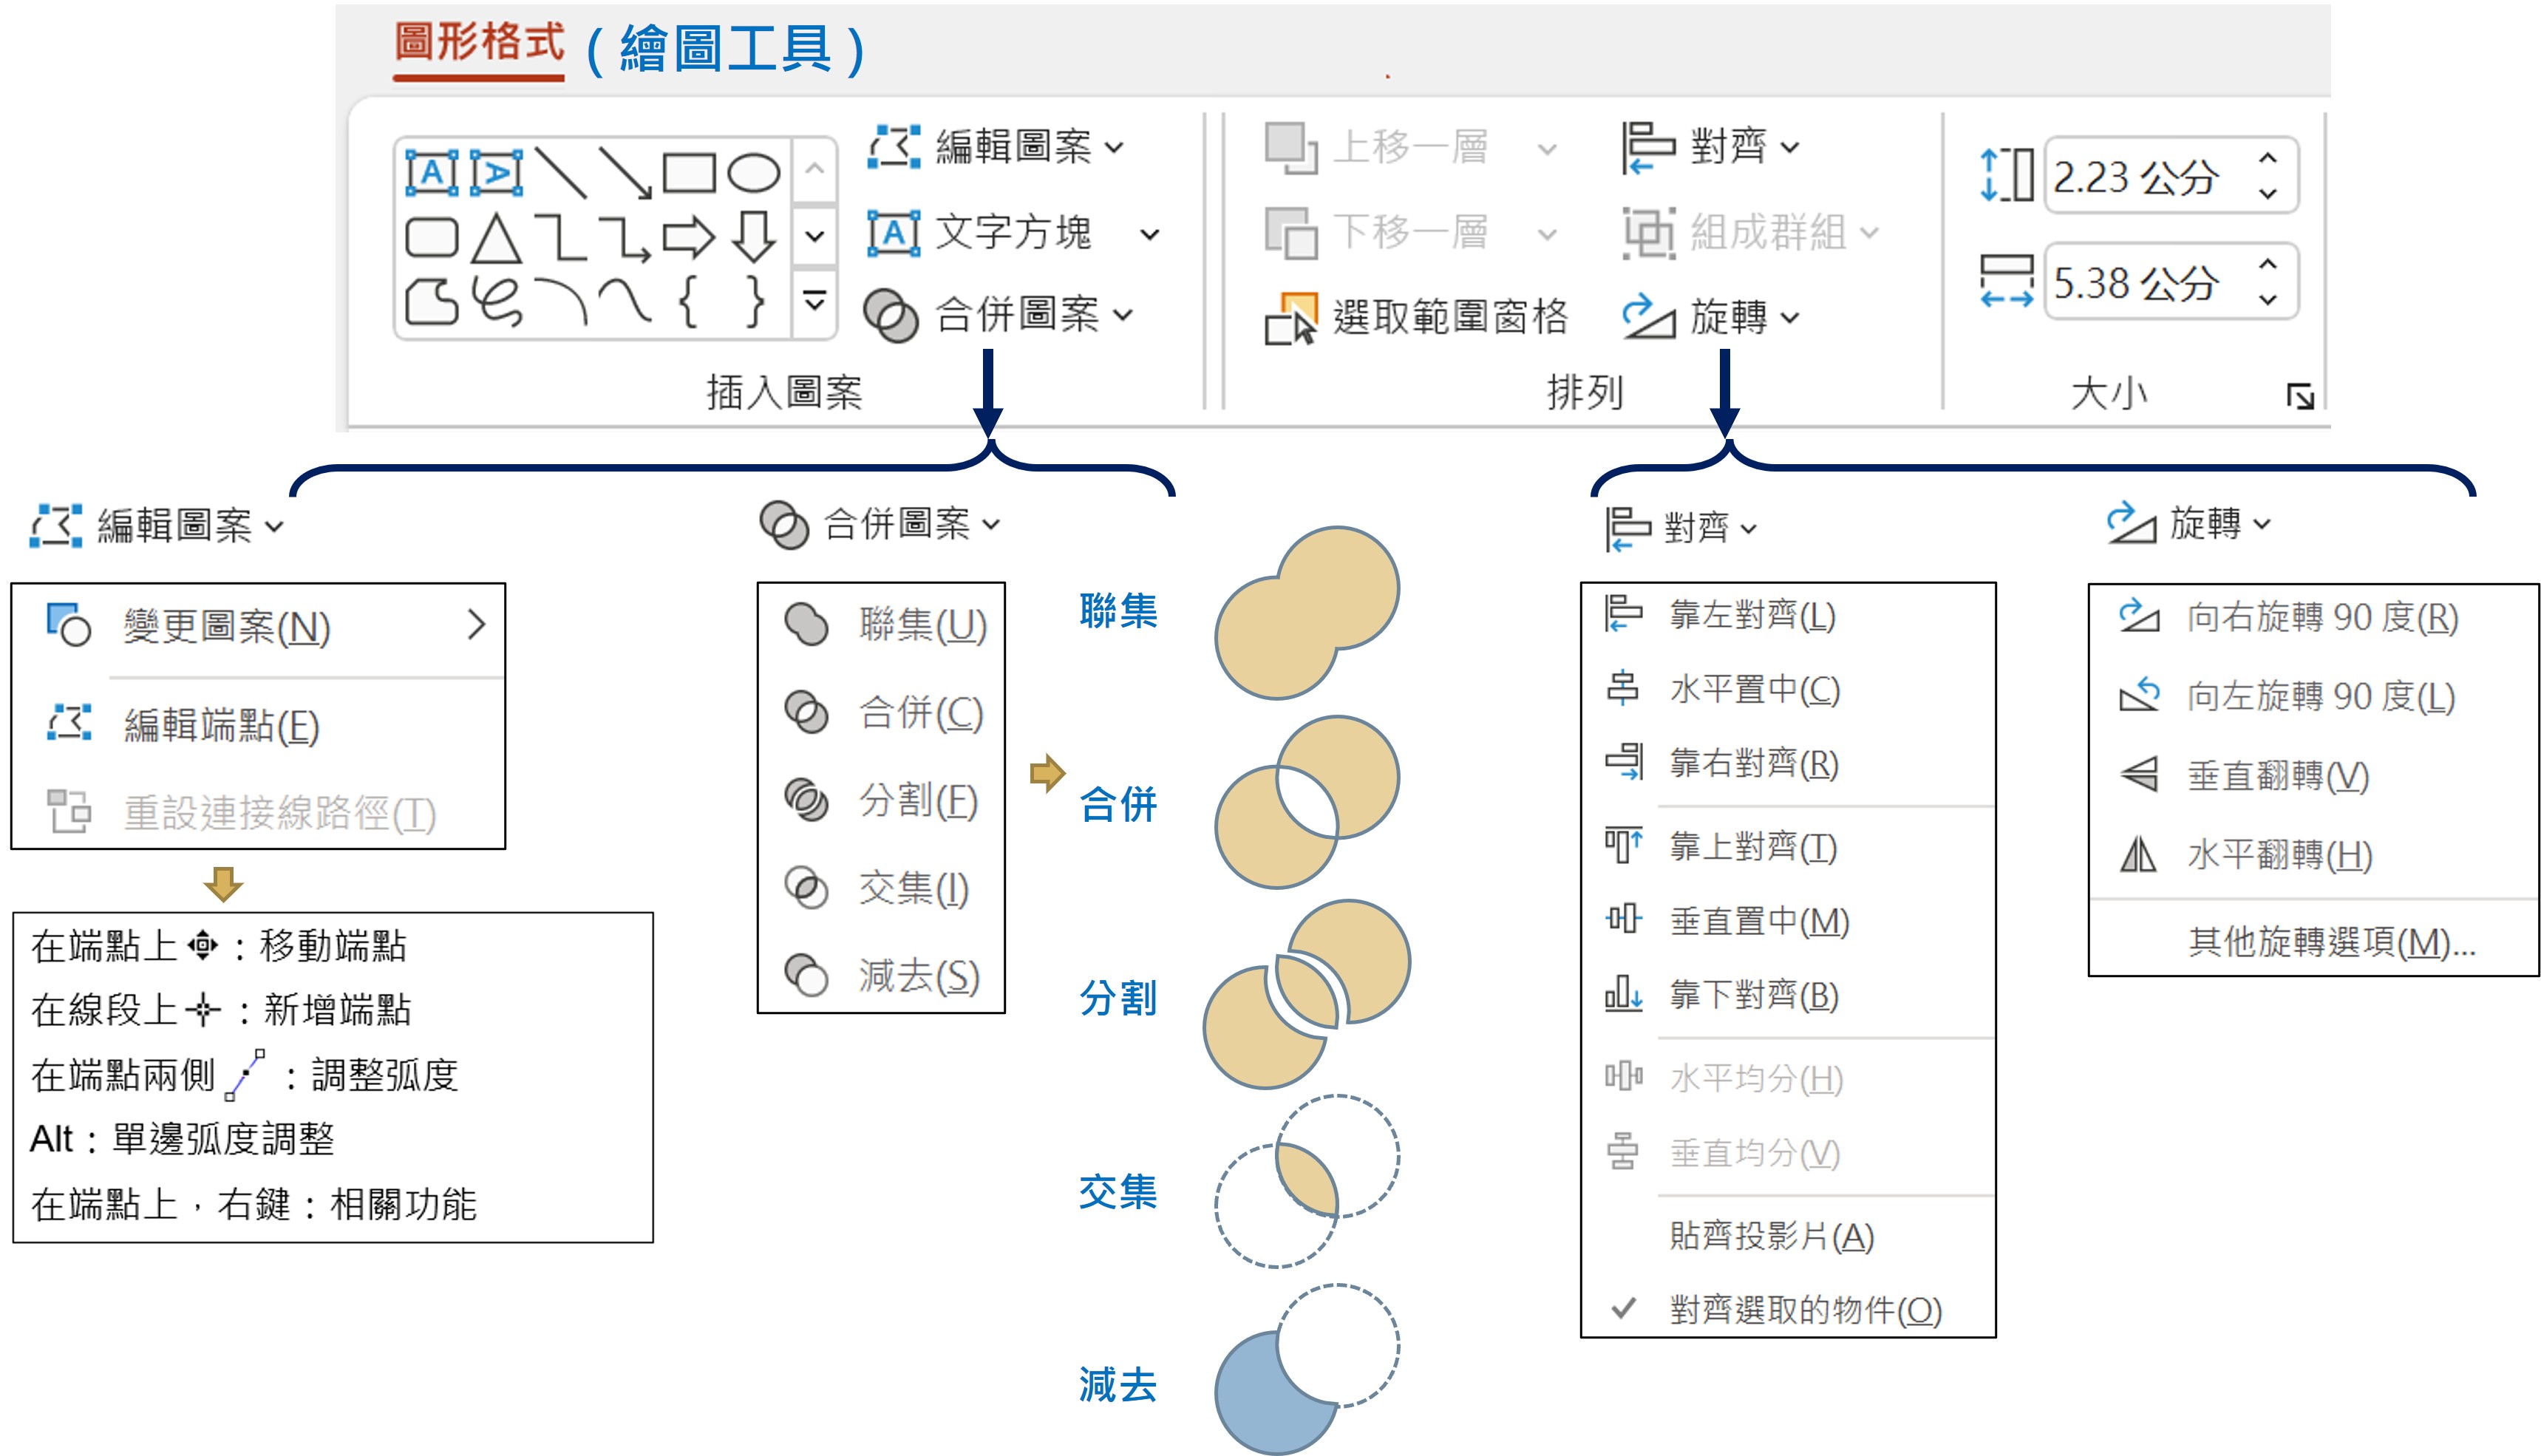</span>
</details>
## <span class="h2">2. 剪裁圖片比例的重要性</span>
<details>
<summary>【細項說明】點擊展開/摺疊</summary>
<span class="img100"></span>
<span class="img100">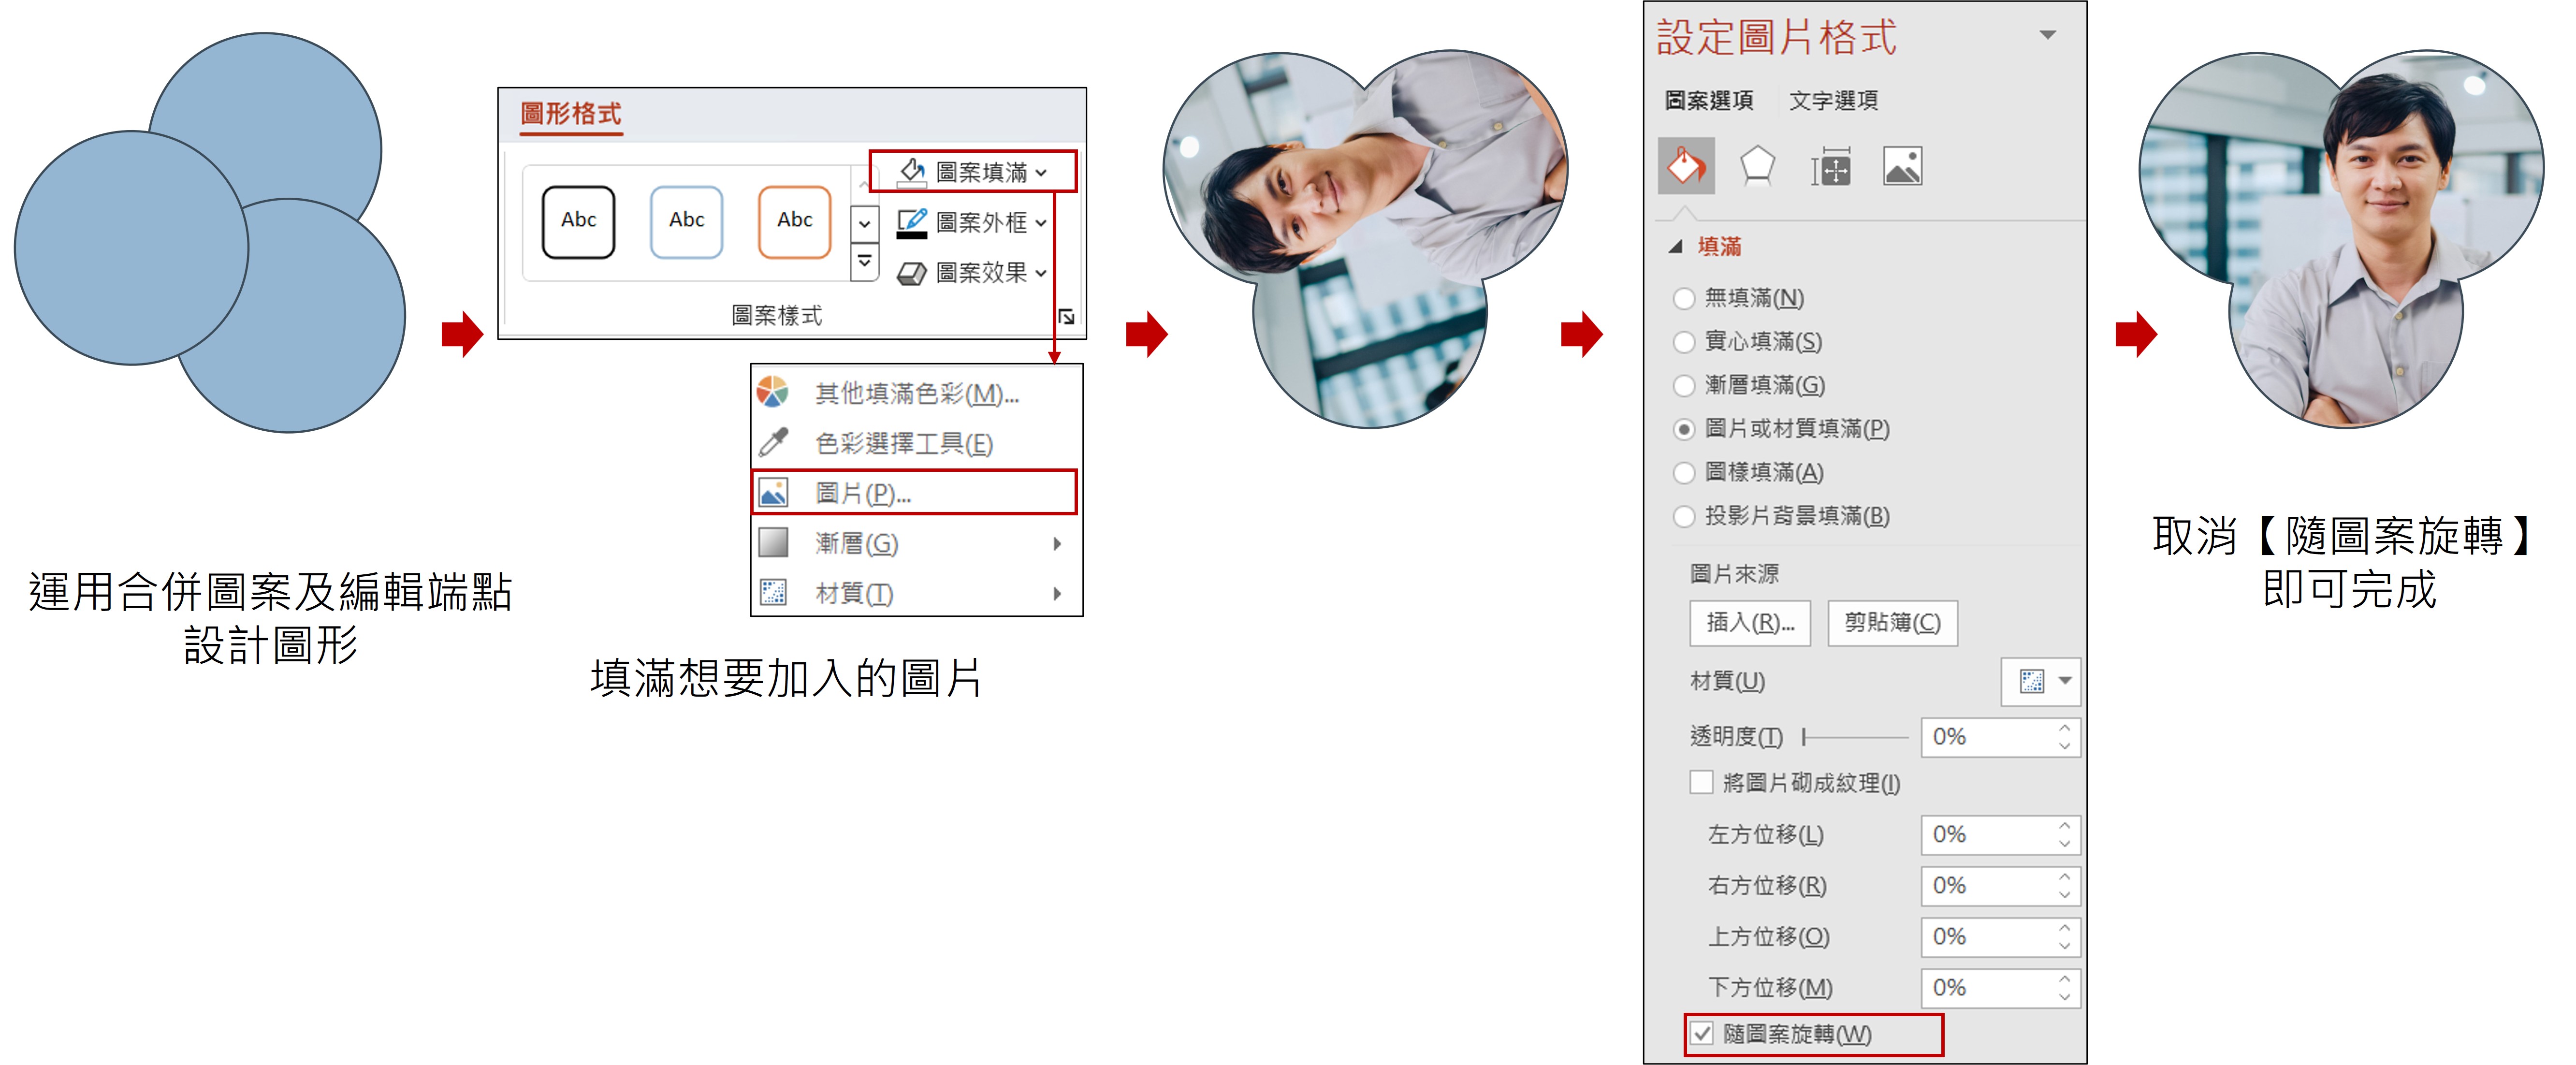</span>
</details>
## <span class="h2">3. 凸顯重要元素</span>
### (1) 遮避不重要的區域
<details>
<summary>【細項說明】點擊展開/摺疊</summary>
透過半透明圖形,遮避不重要的區域,凸顯重要元素,步驟如下圖:
<span class="img90">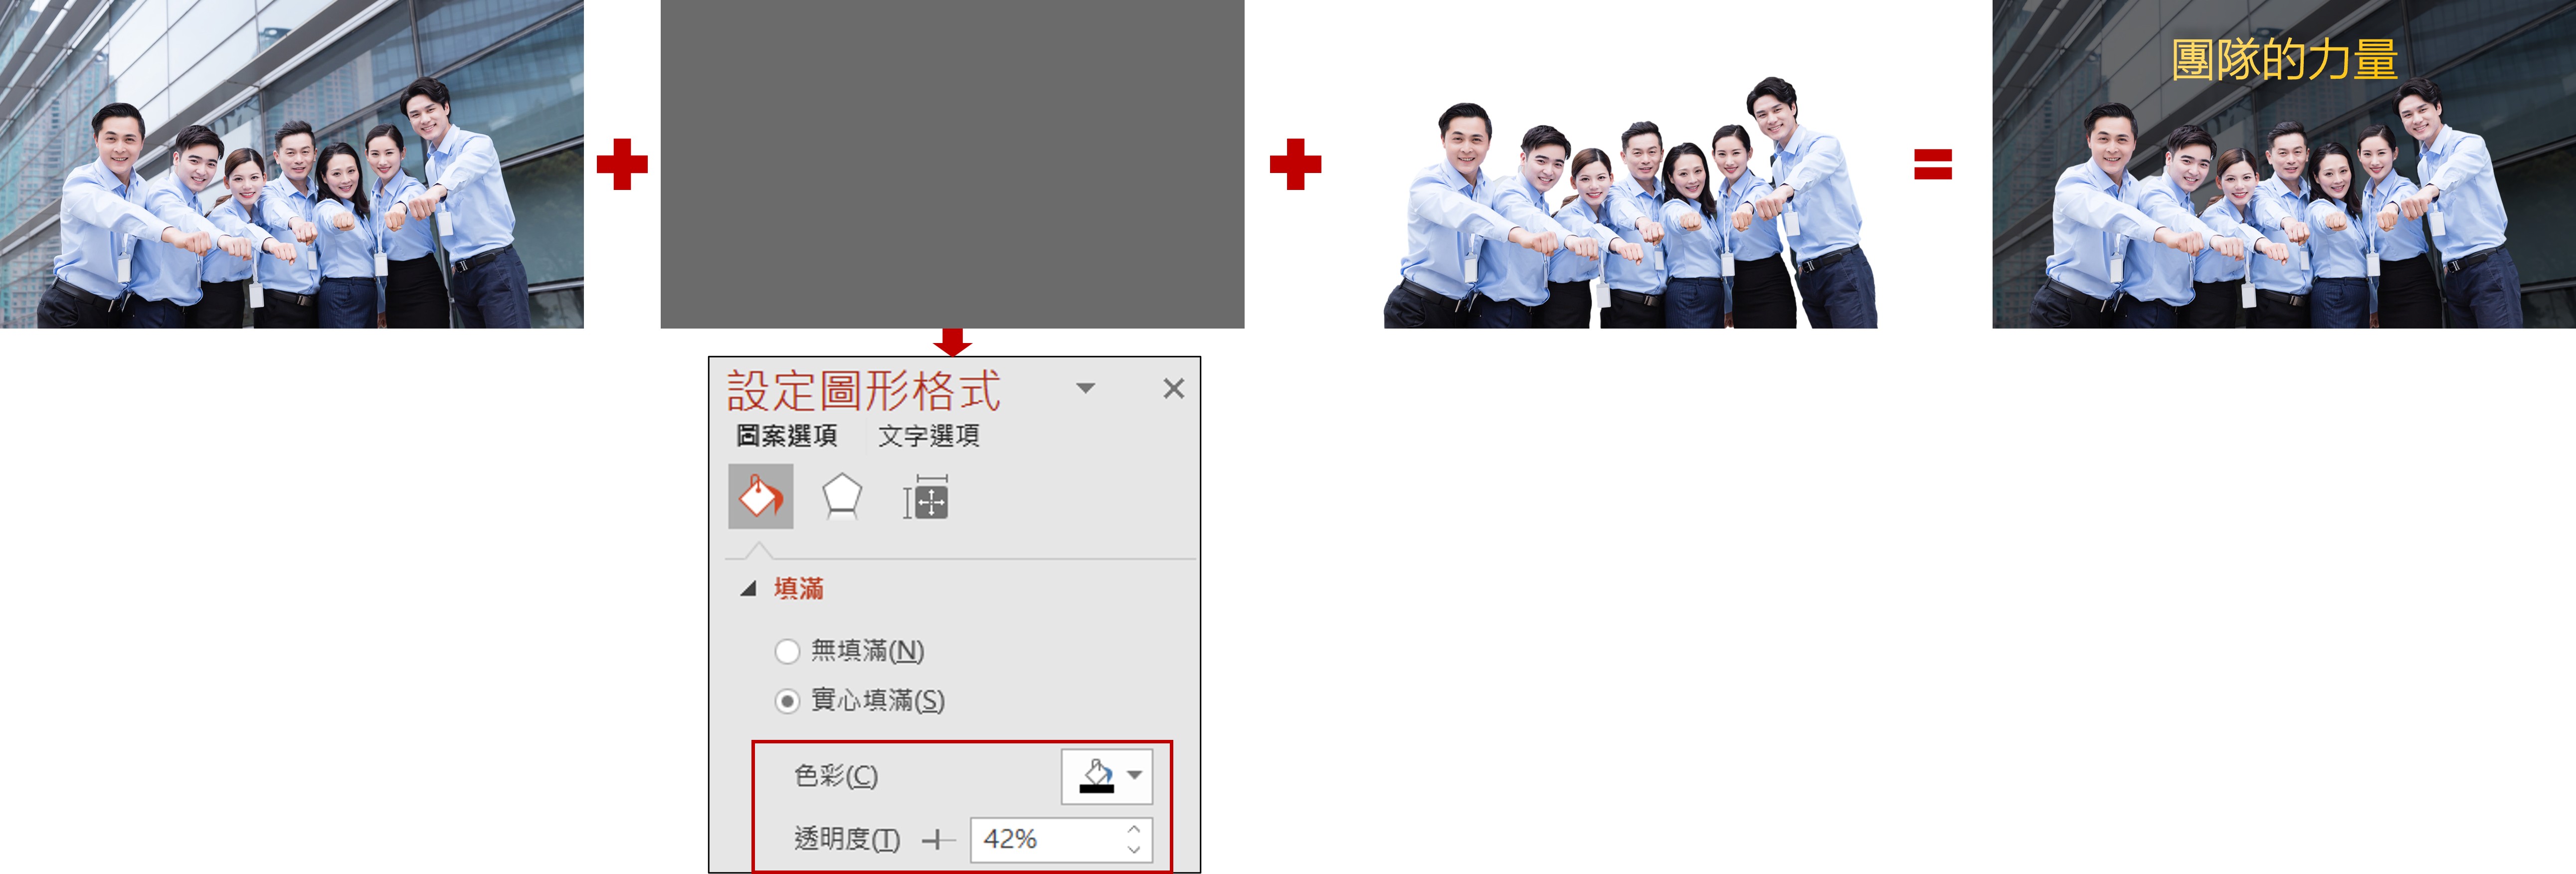</span>
</details>
### (2) 放大想要凸顯重要元素
<details>
<summary>【細項說明】點擊展開/摺疊</summary>
透過圖片剪裁 / 填滿圖片於圖形,並放大想要凸顯重要元素,步驟如下圖:
<span class="img90">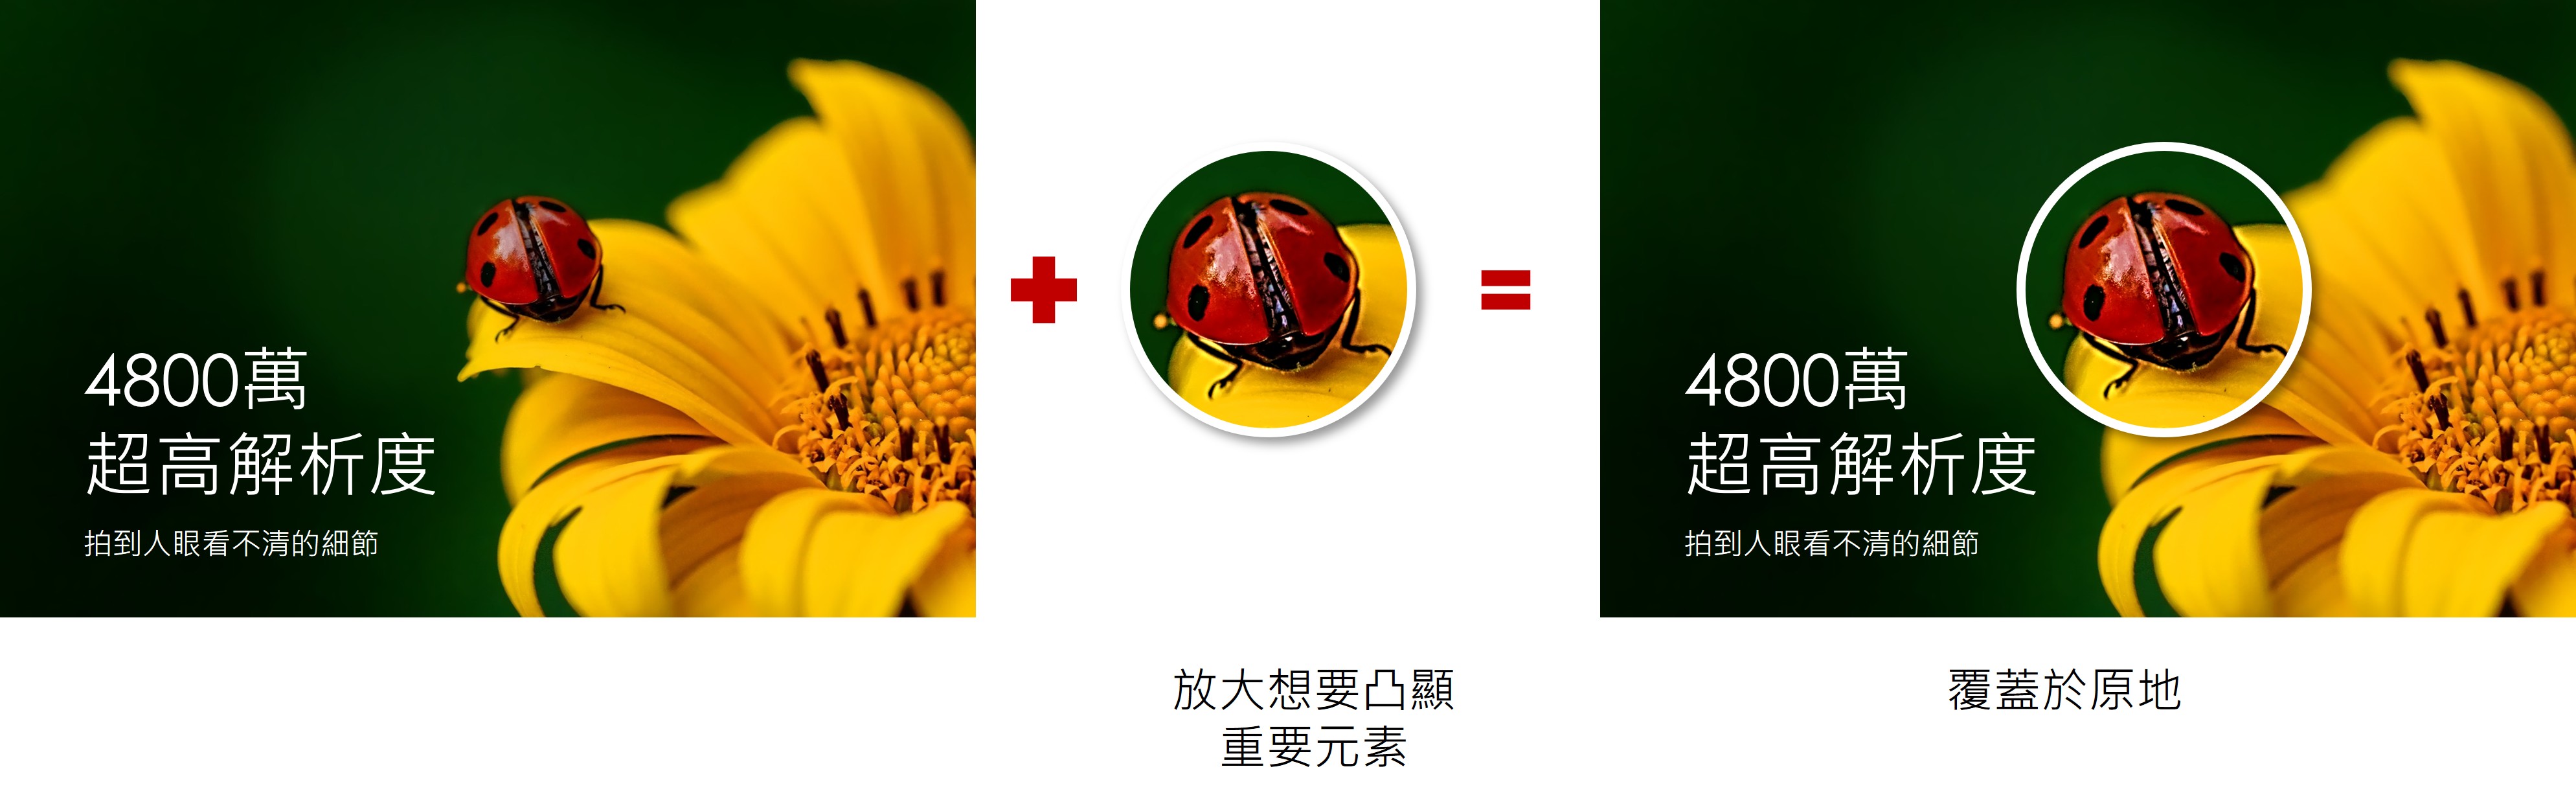</span>
<span class="img70">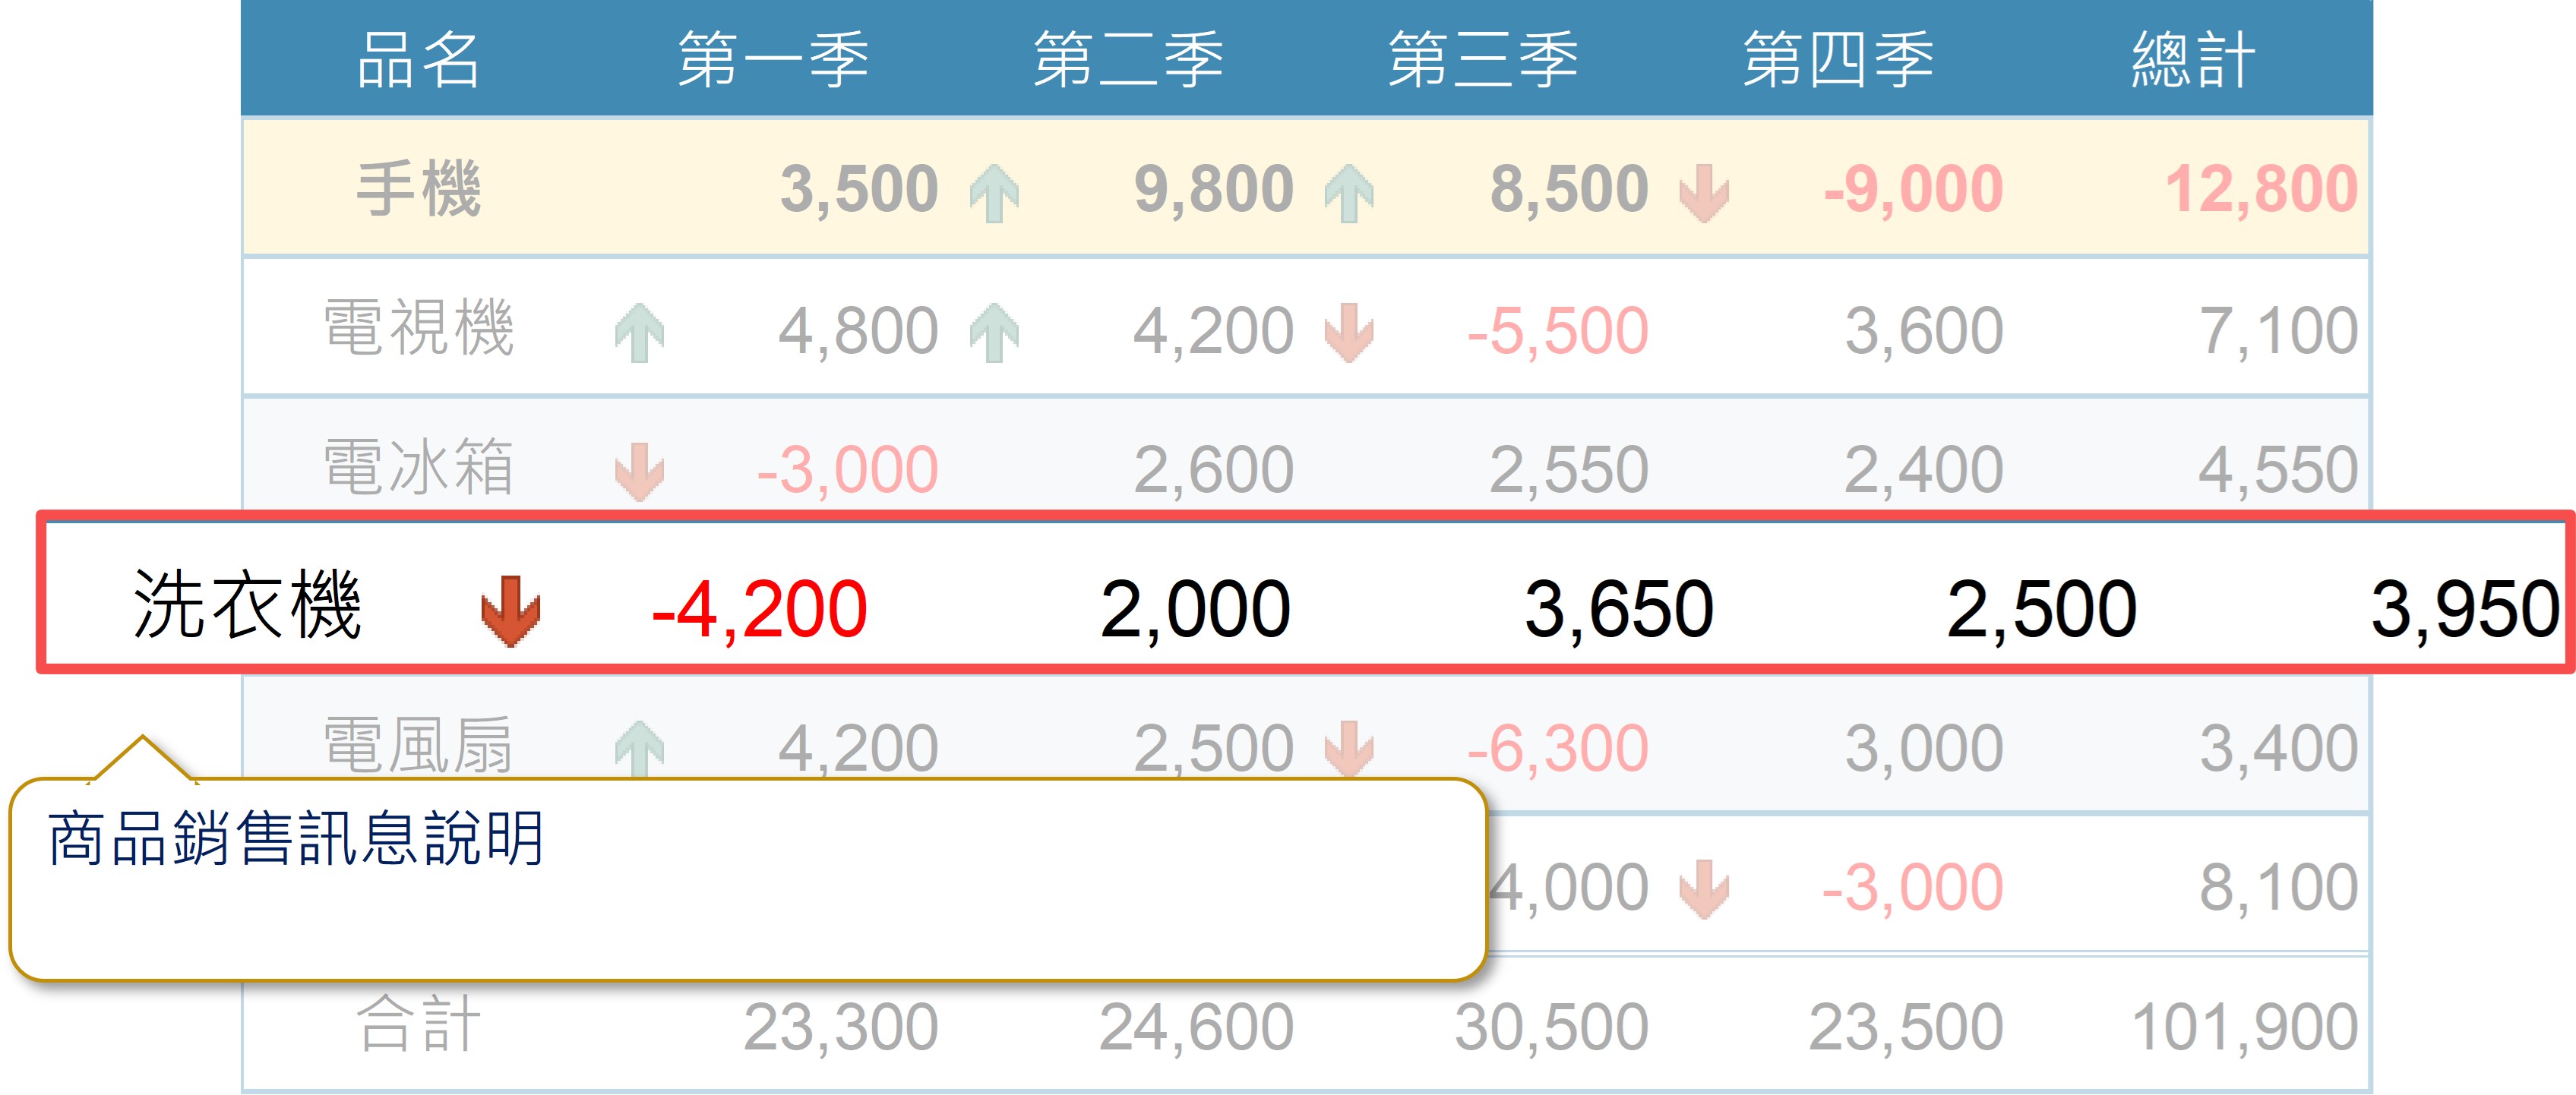</span>
</details>
### (2) 運用技巧設計簡報版型
<details>
<summary>【細項說明】點擊展開/摺疊</summary>
<span class="img90">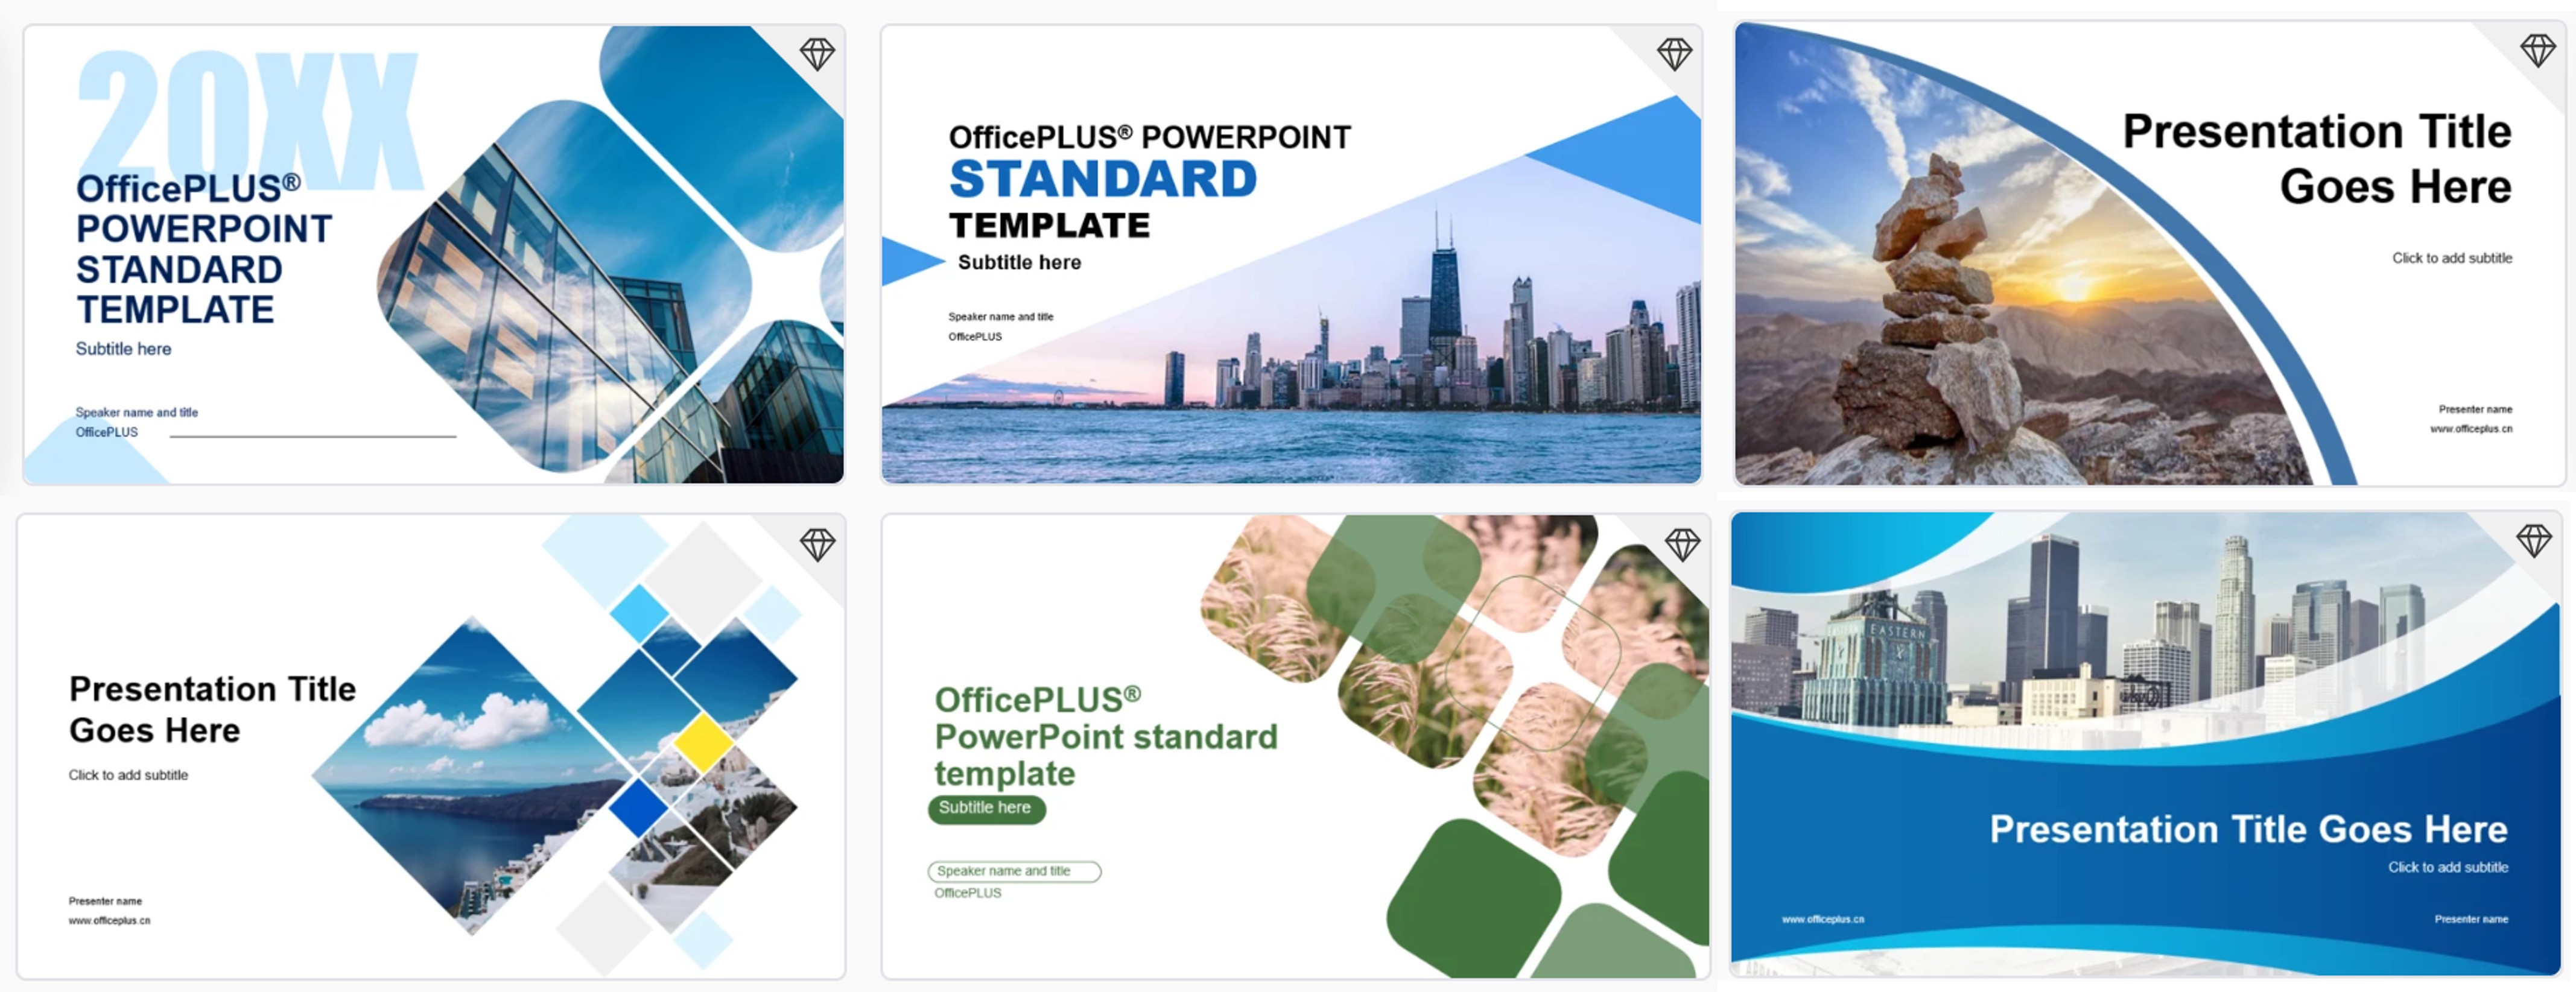</span><span class="img90">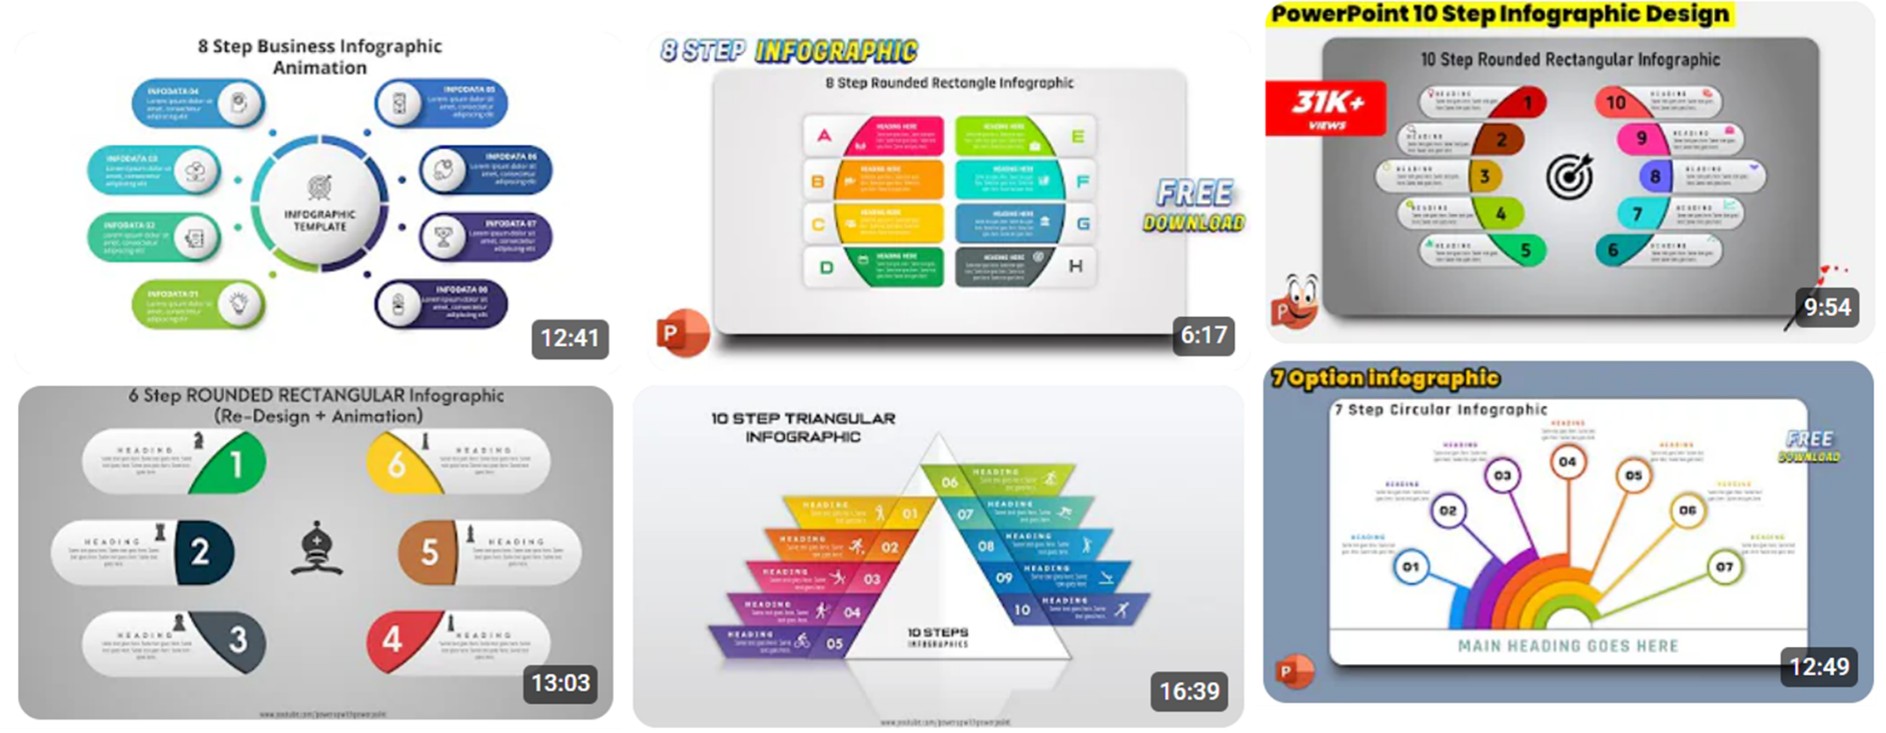</span>
</details>
## <span class="h2">4. 繪製專業感流程圖</span>
範例結果:
<details>
<summary>【細項說明】點擊展開/摺疊</summary>
<span class="img60">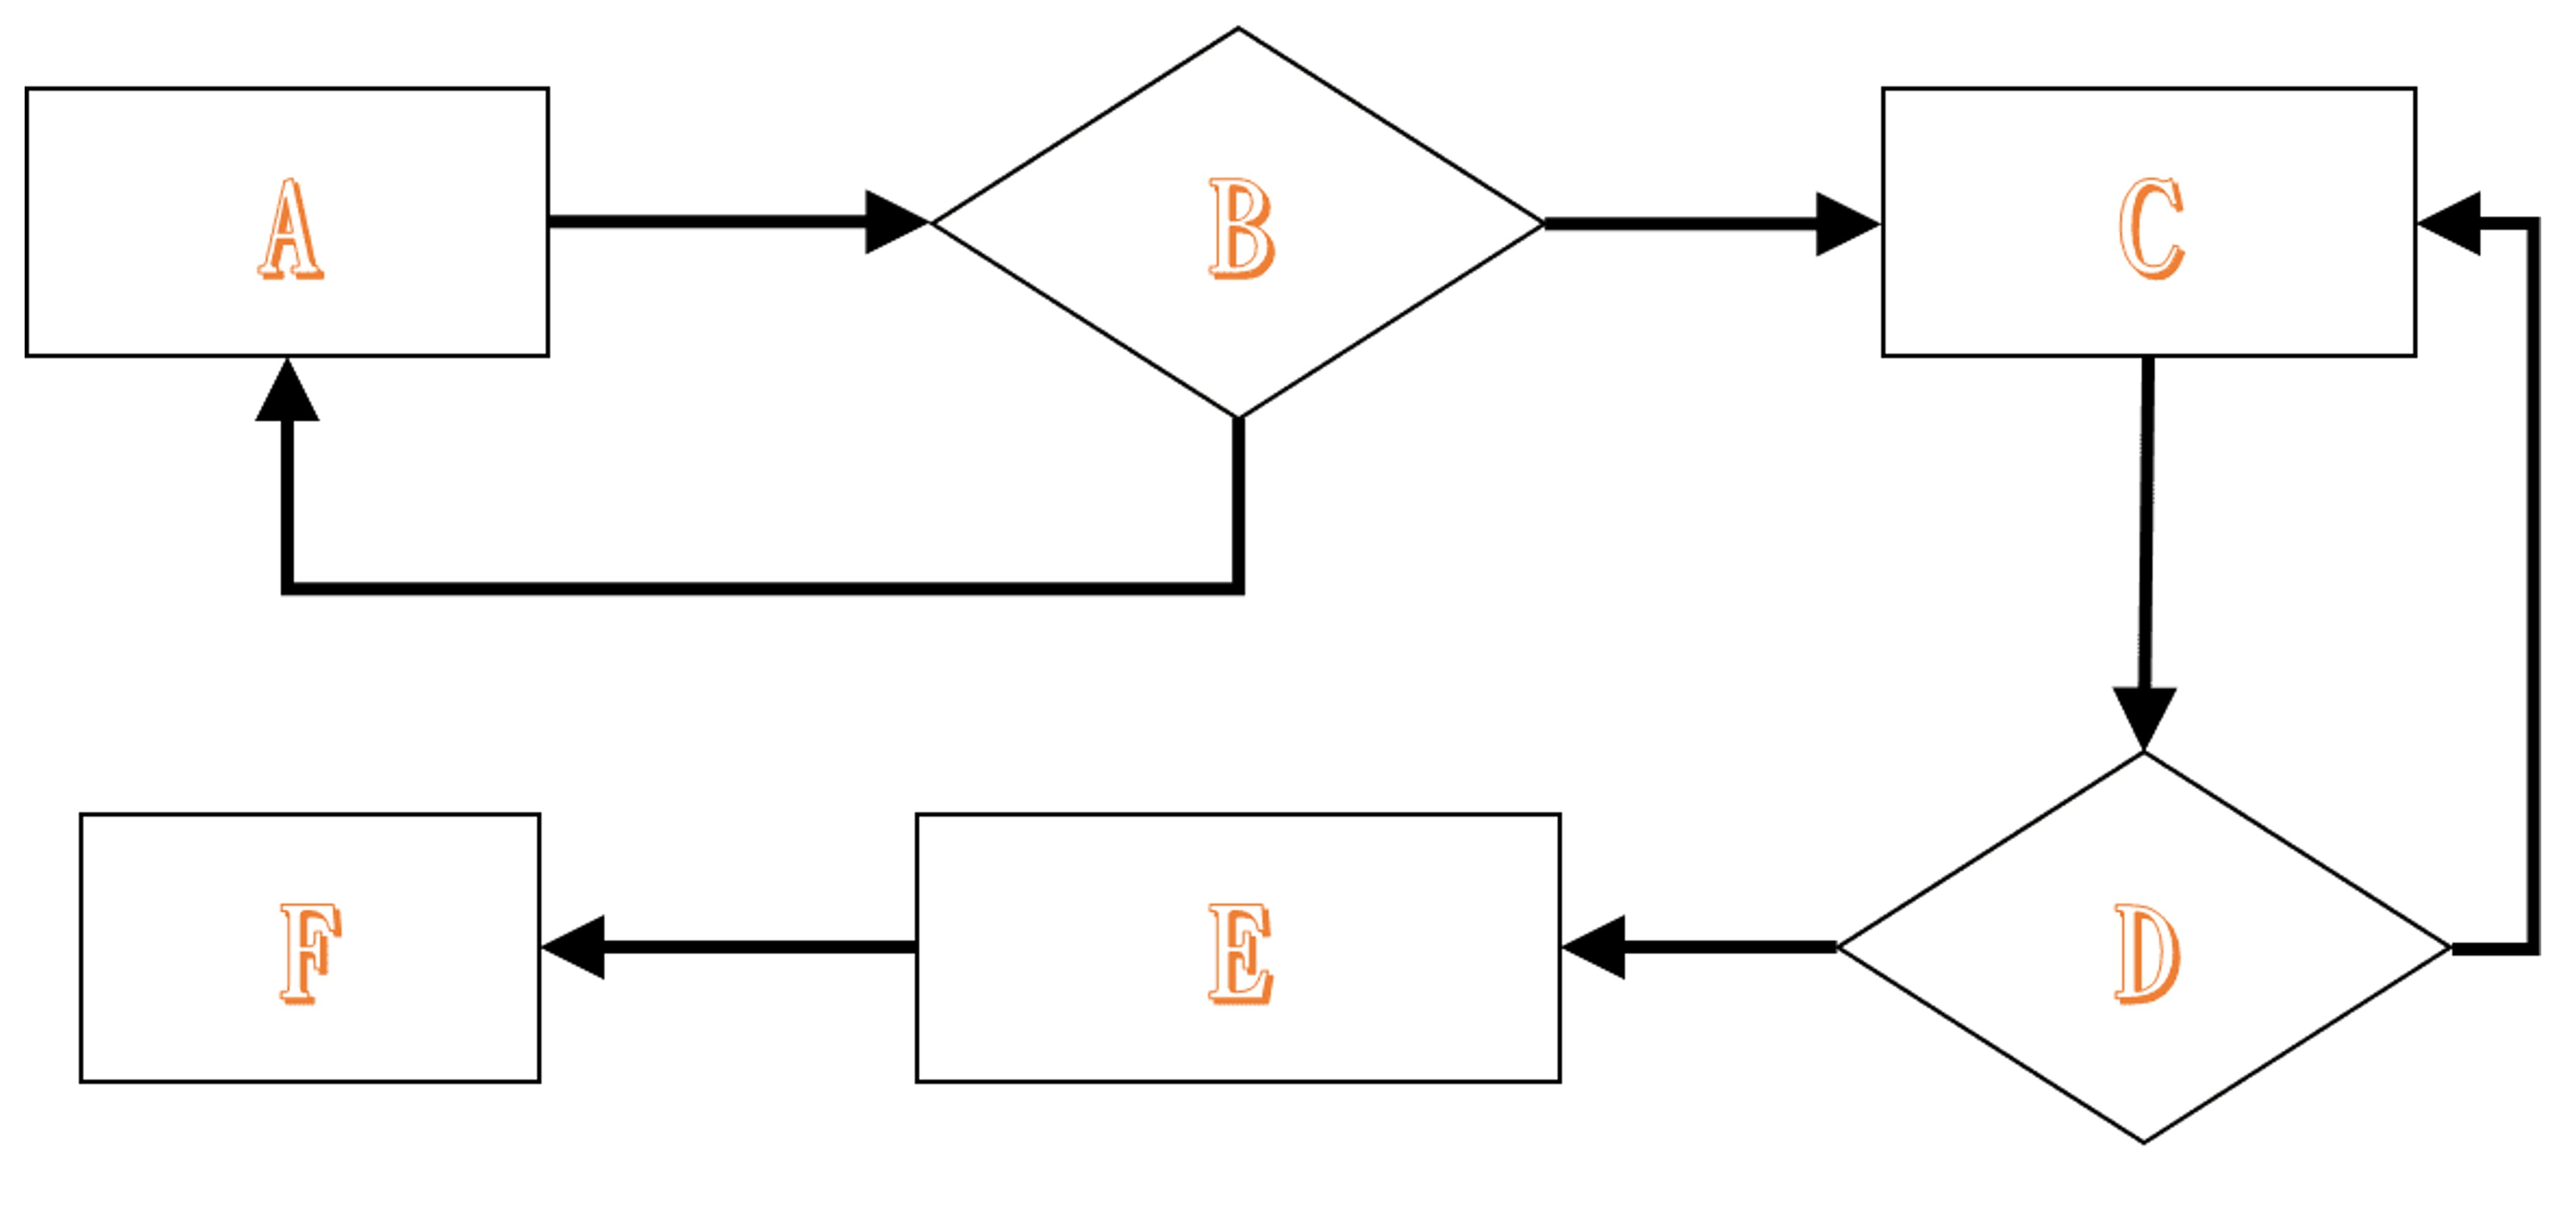</span>
<span class="img80">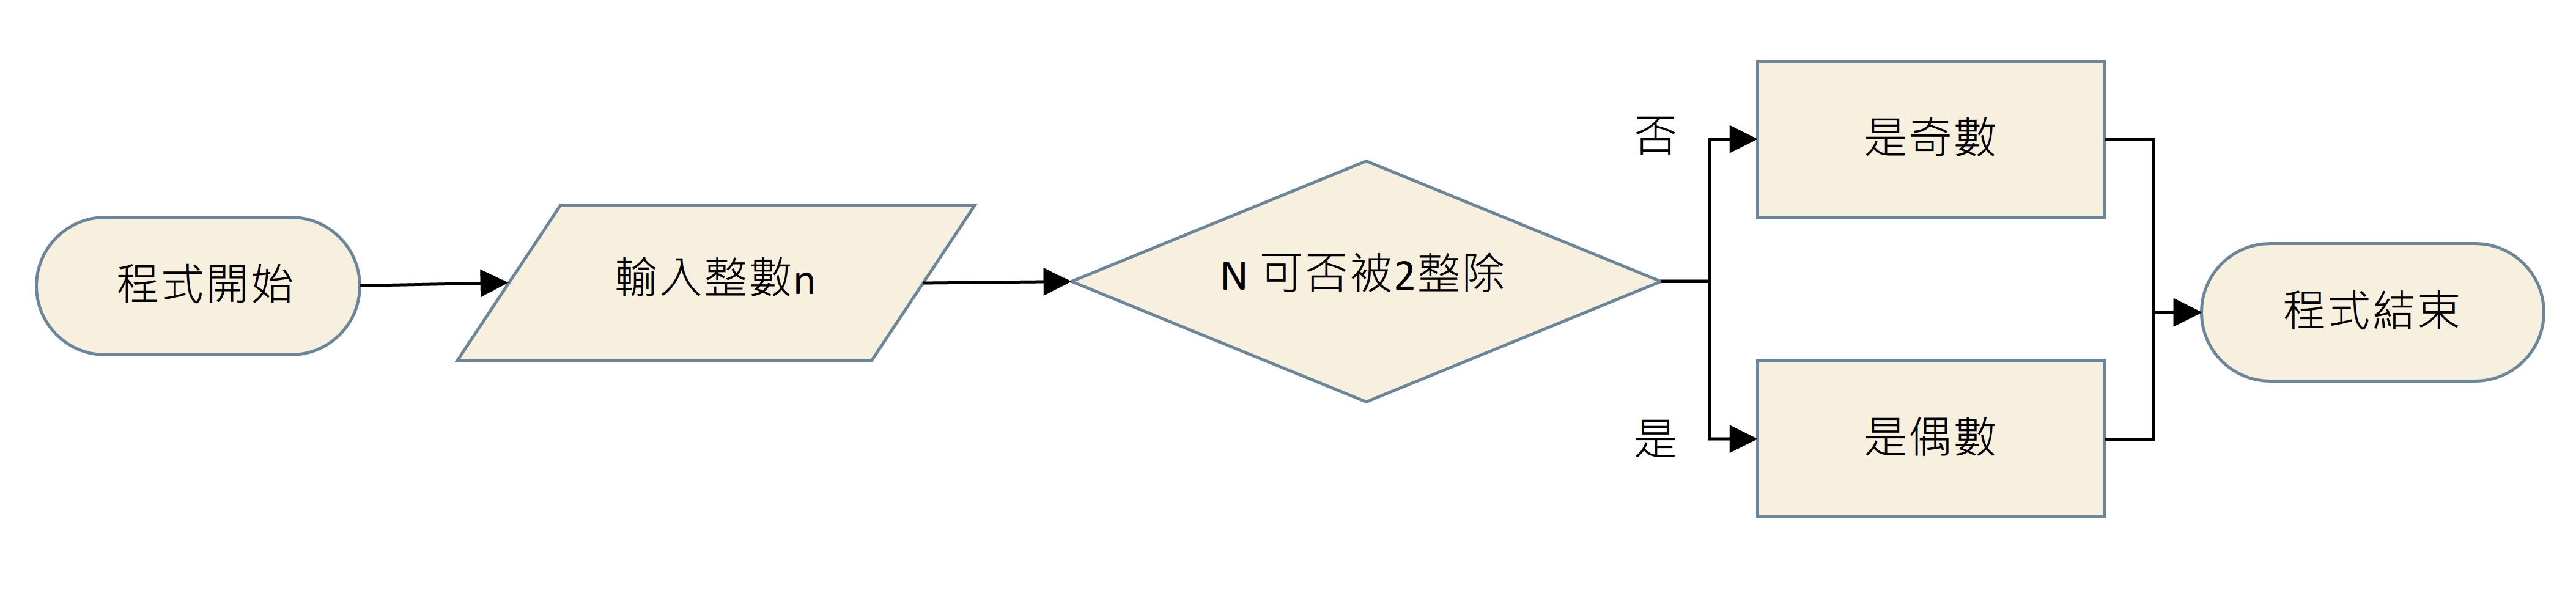</span>
</details>
### (1) 流程圖元素意義
<details>
<summary>【細項說明】點擊展開/摺疊</summary>
<span class="img80">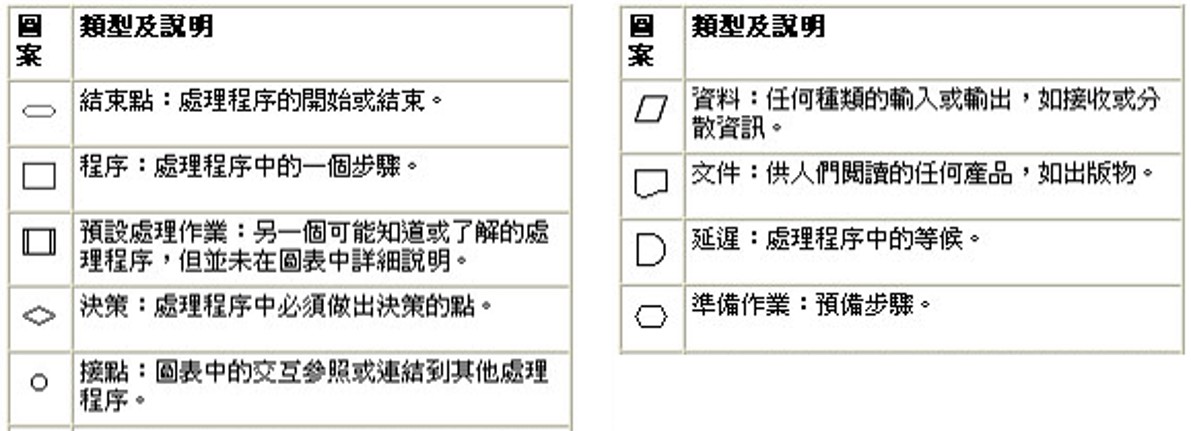</span>
</details>
### (2) 操作技巧
<details>
<summary>【細項說明】點擊展開/摺疊</summary>
<span class="h4">A. 連續圖形繪製</span>
<span class="img100"></span>
<span class="h4">B. 多運用複製格式</span>
<span class="img60">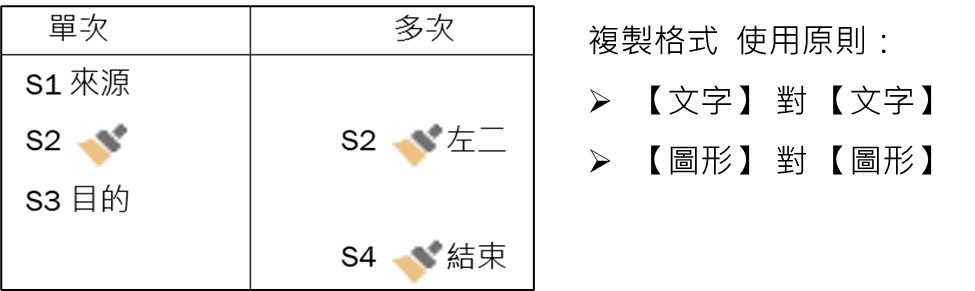</span>
<span class="h4">C. 群組重要性</span>
<span class="img40">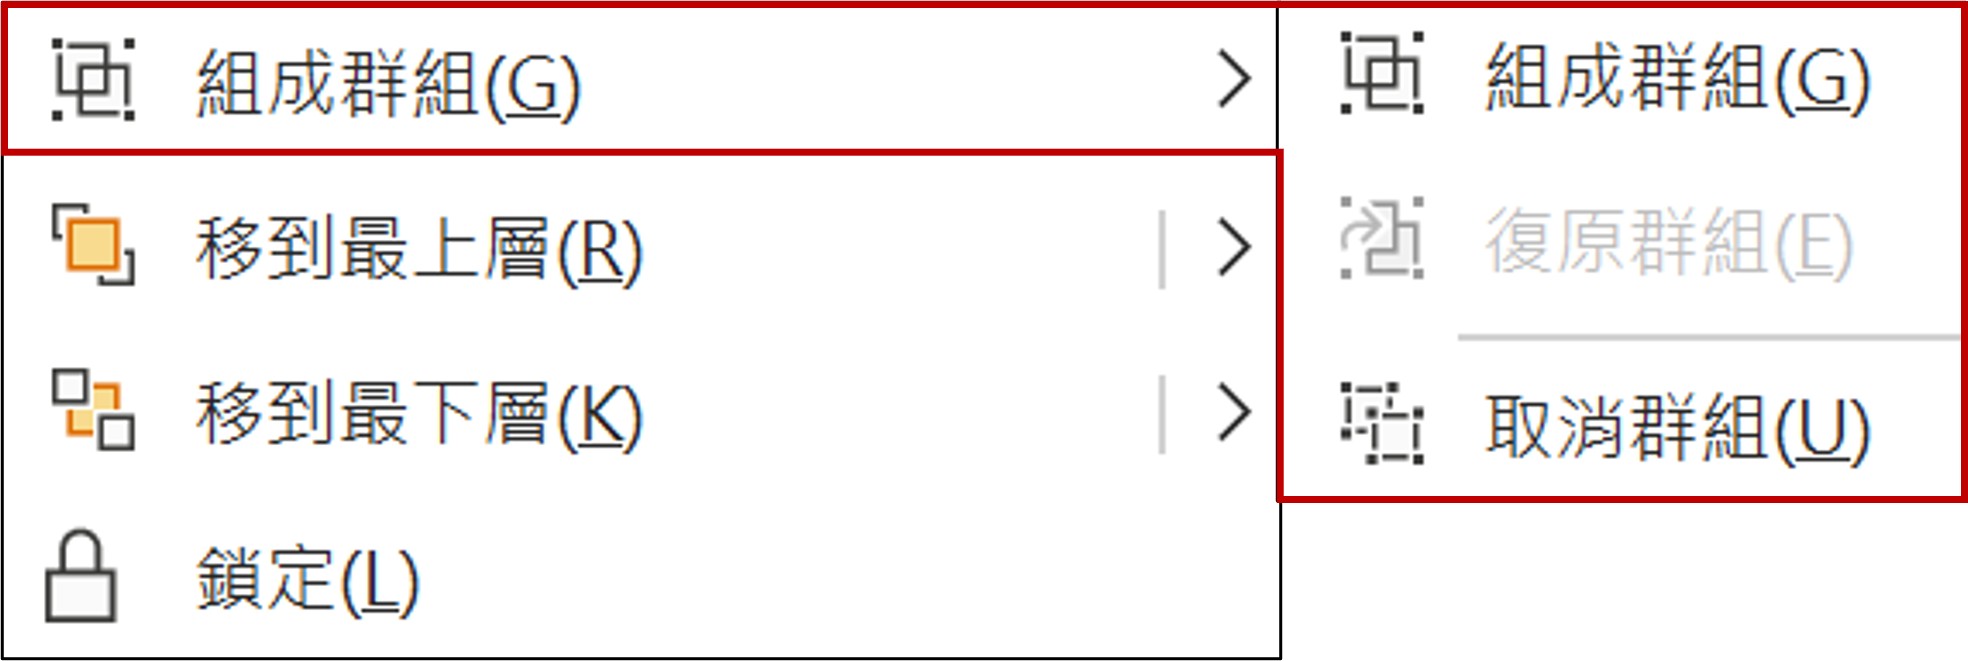</span>
<span class="h4">D. 圖形內的文字的困擾</span>
<span class="img100">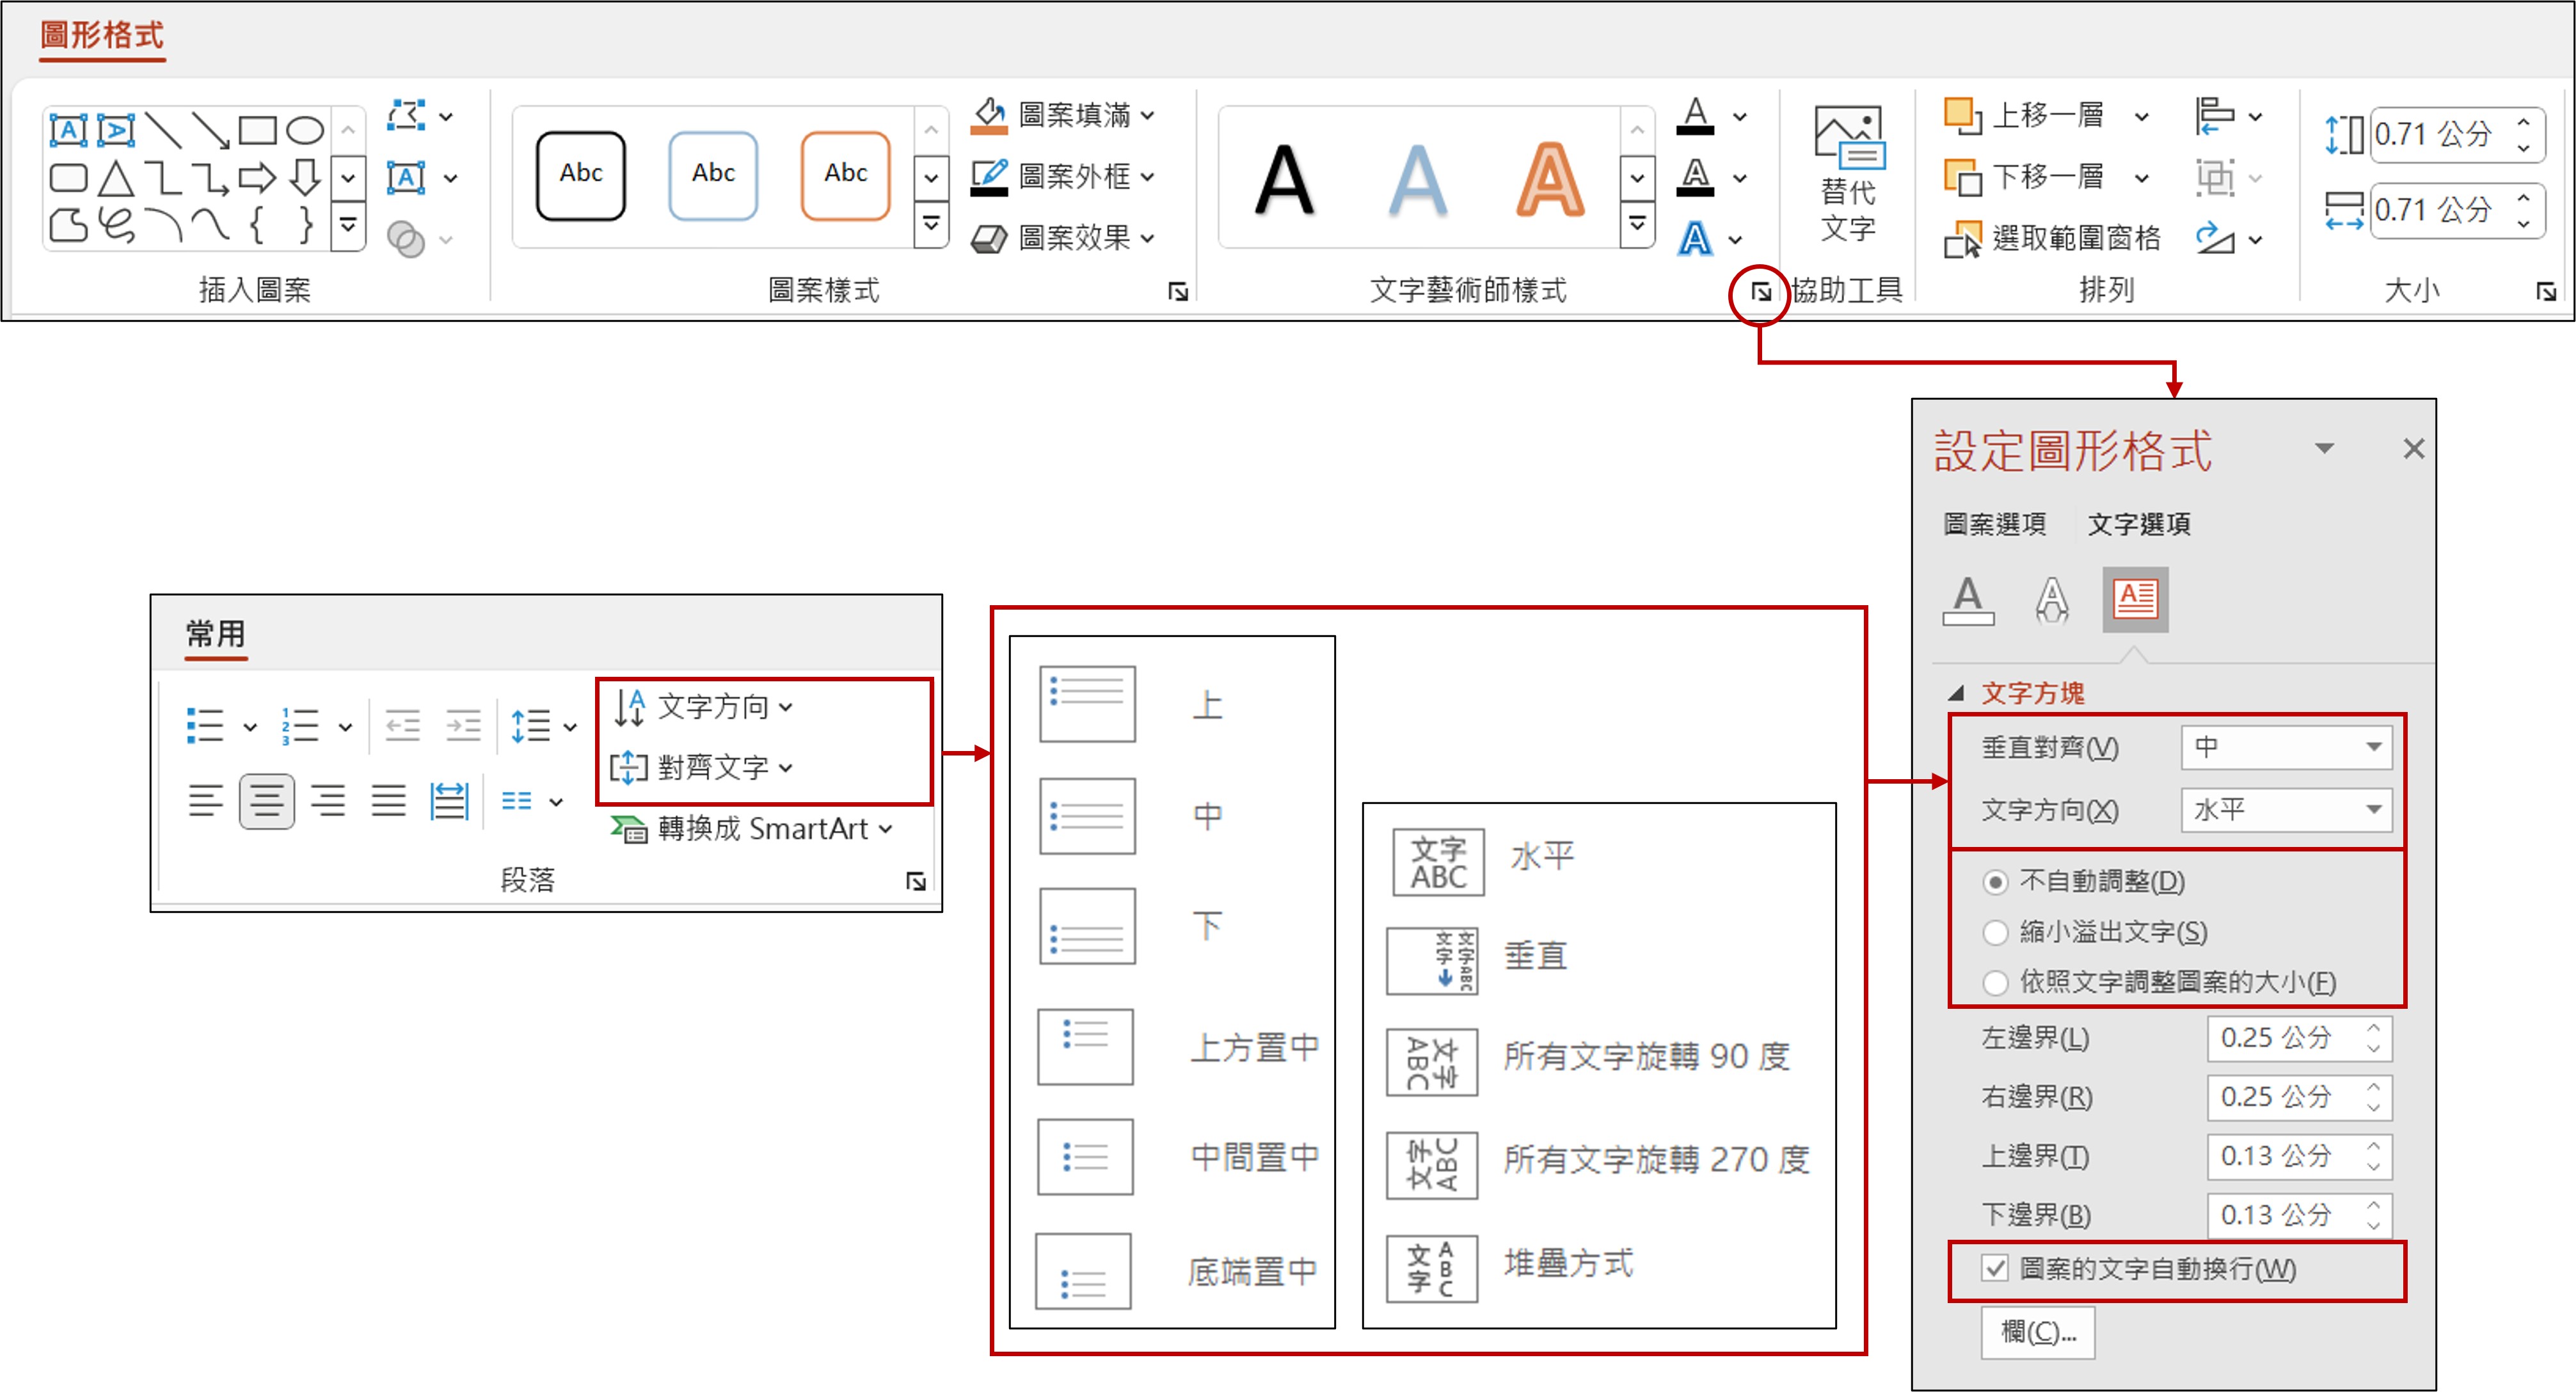</span>
<span class="h4">E. 整體文字大小調整技巧</span>
<span class="img40">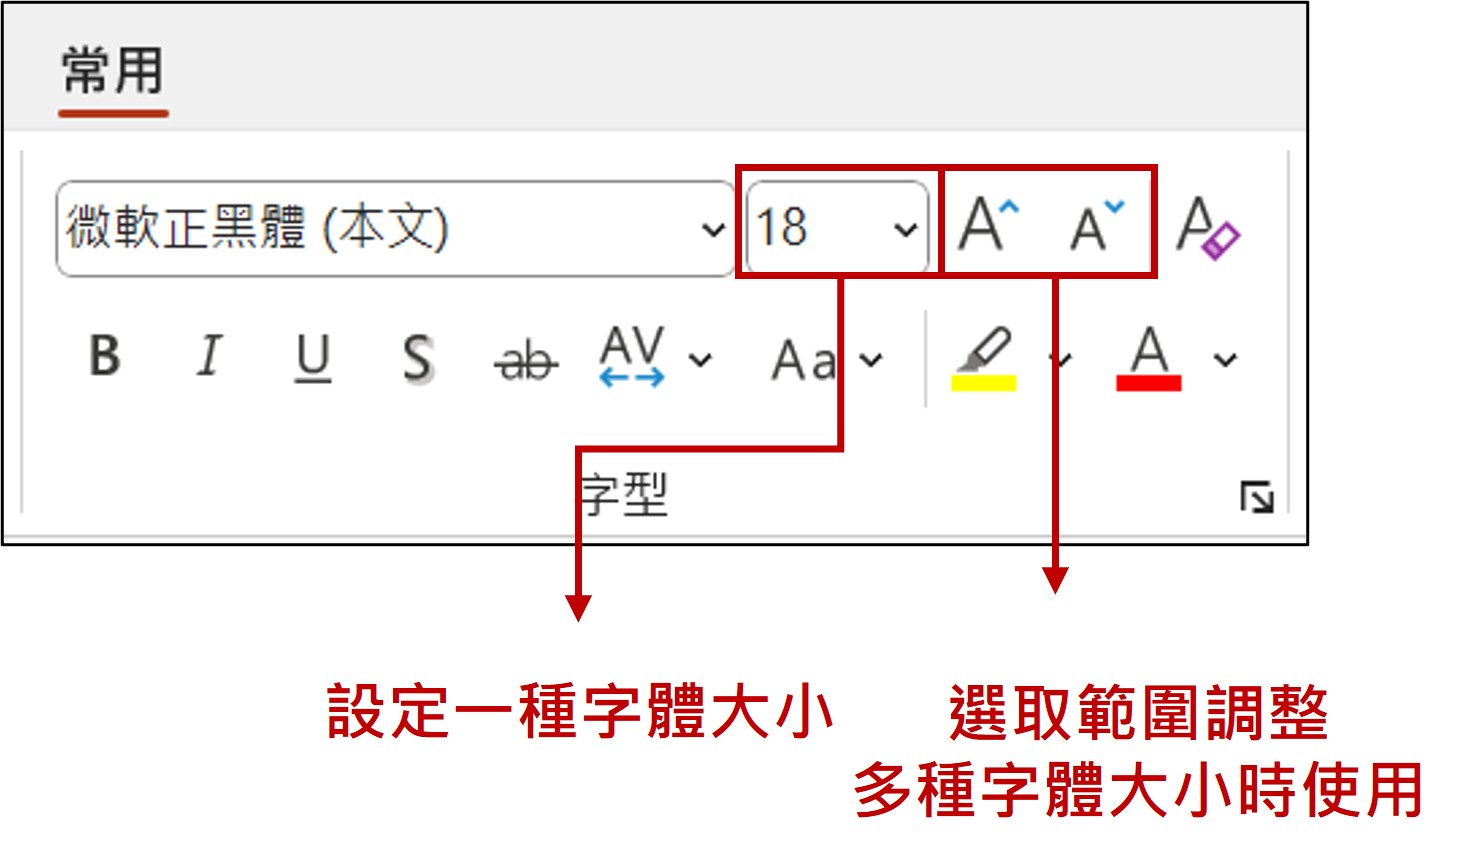</span>
</details>
## <span class="h2">5. SmartArt(SA)運用</span>
<details>
<summary>【細項說明】點擊展開/摺疊</summary>
※ 新增圖案原則:<span class="red bold">重點是【選取主角】產生白點之下元素</span>
<span class="img90">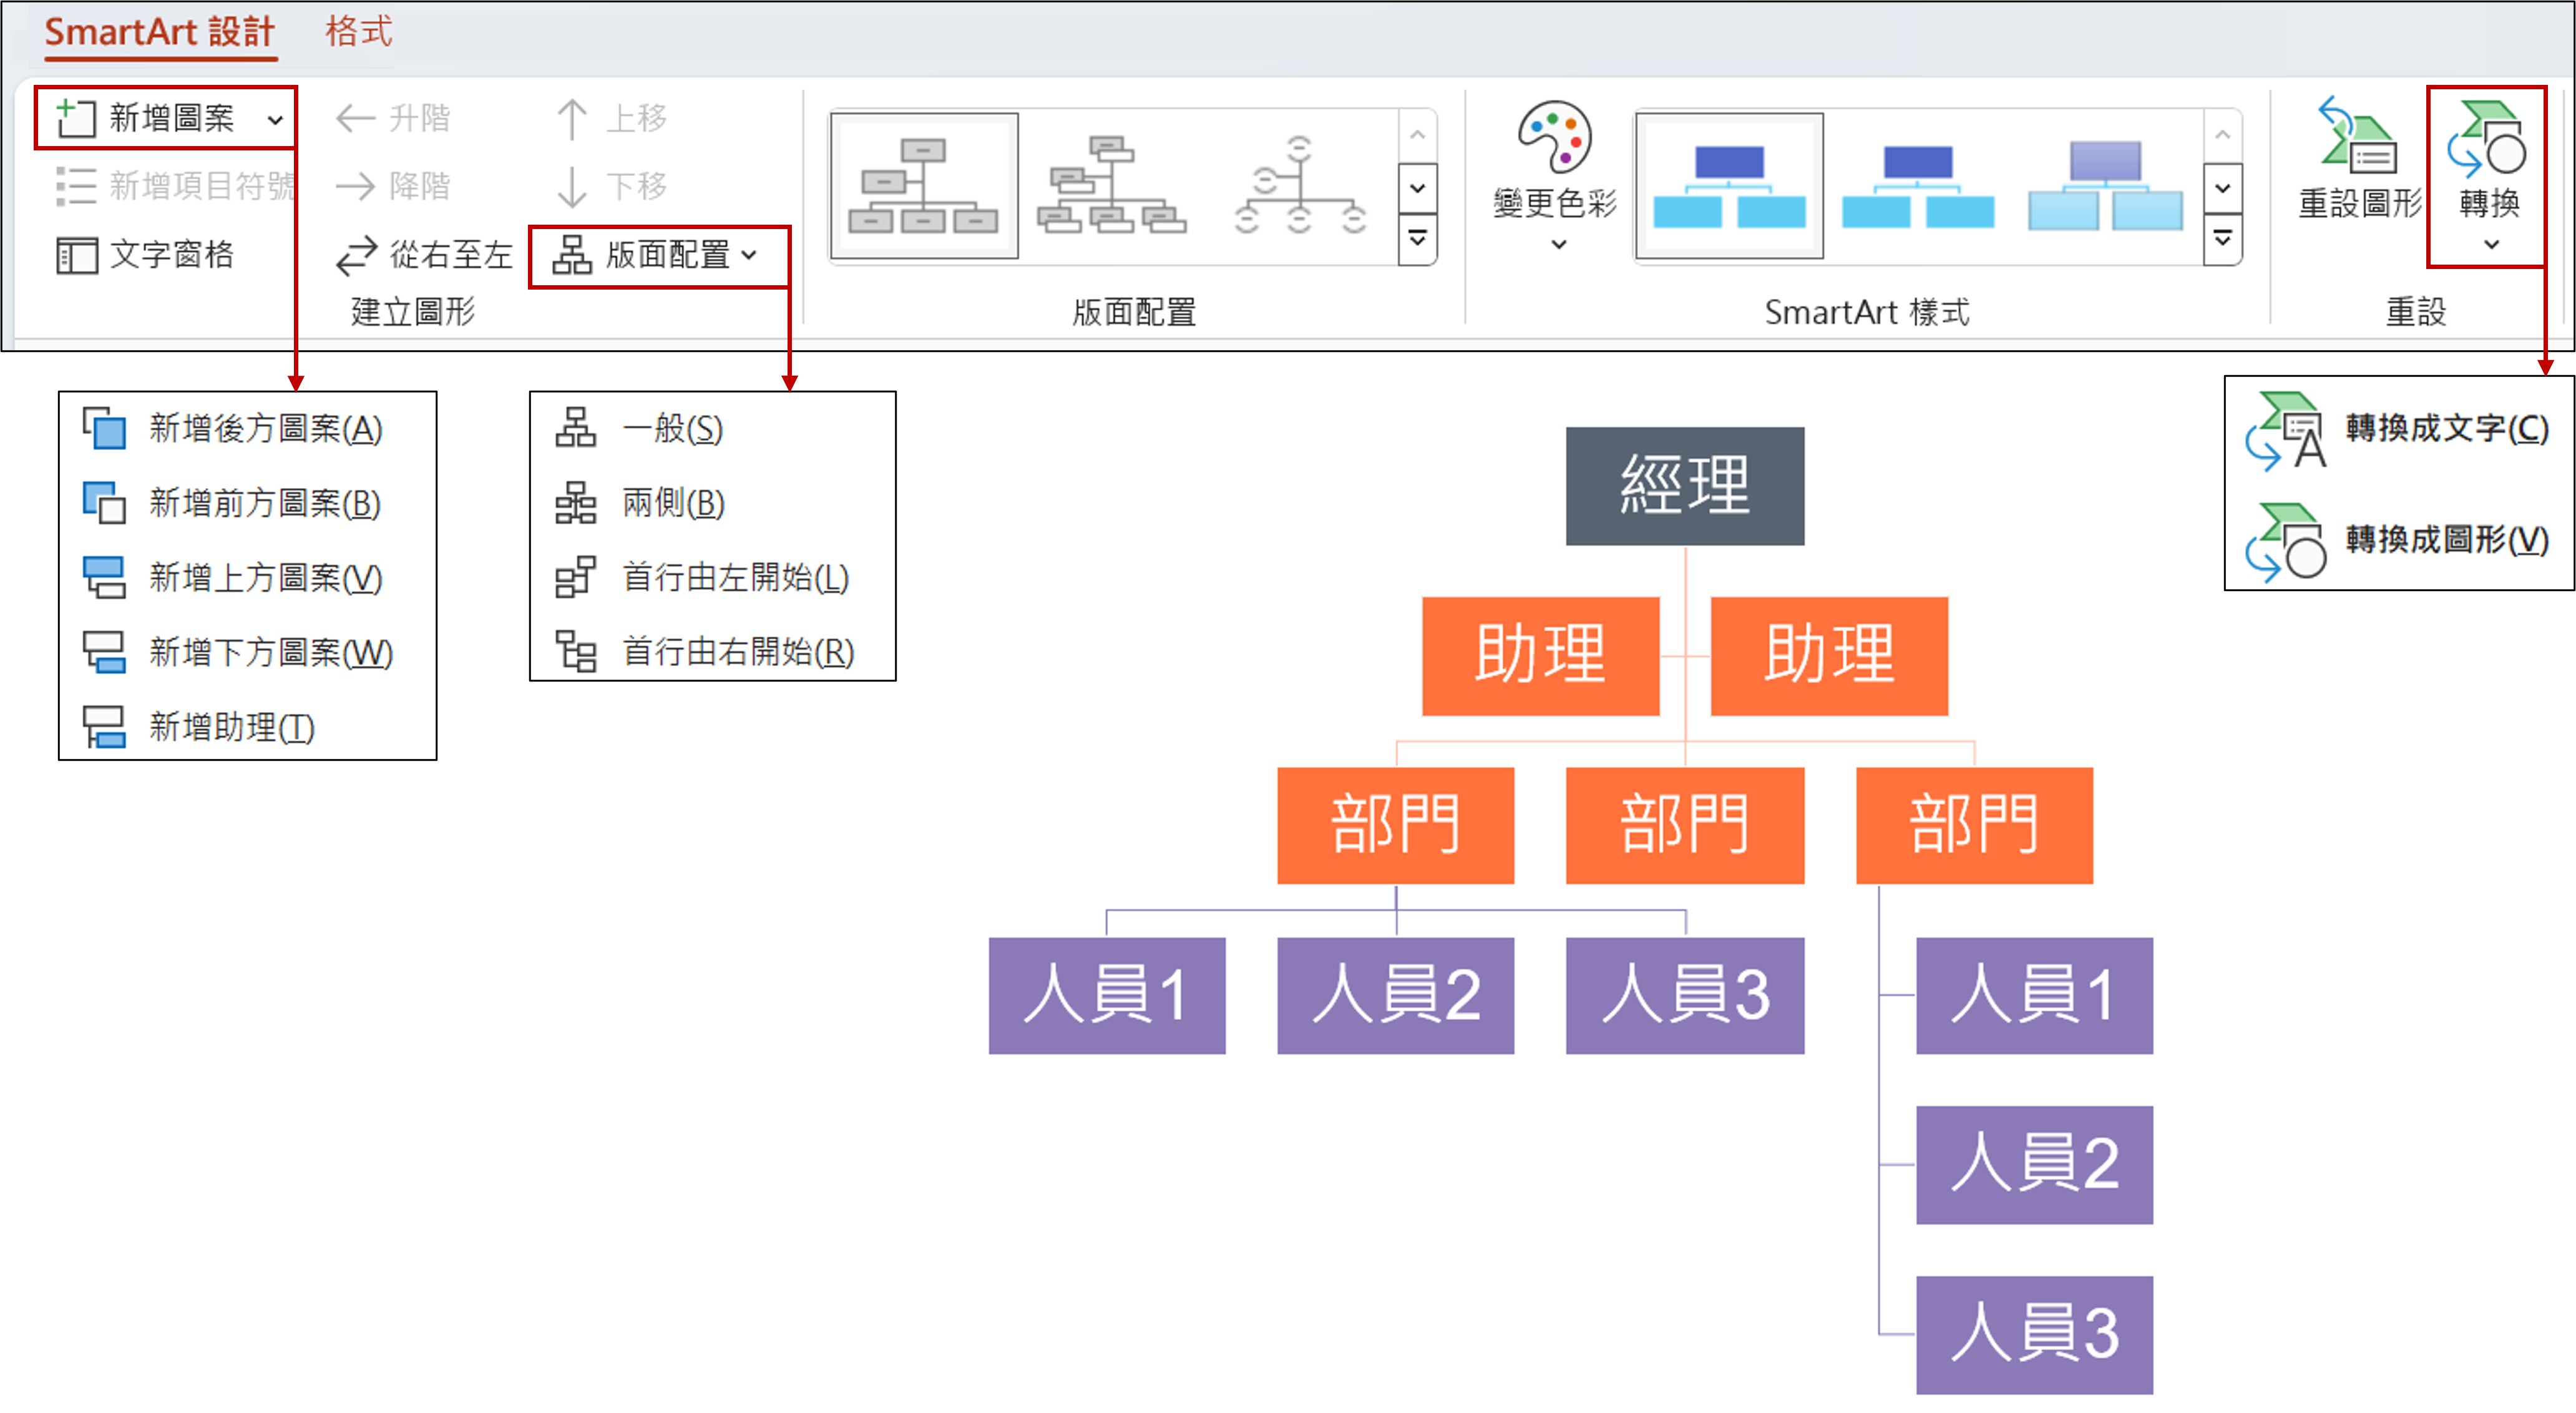</span>
<span class="img70">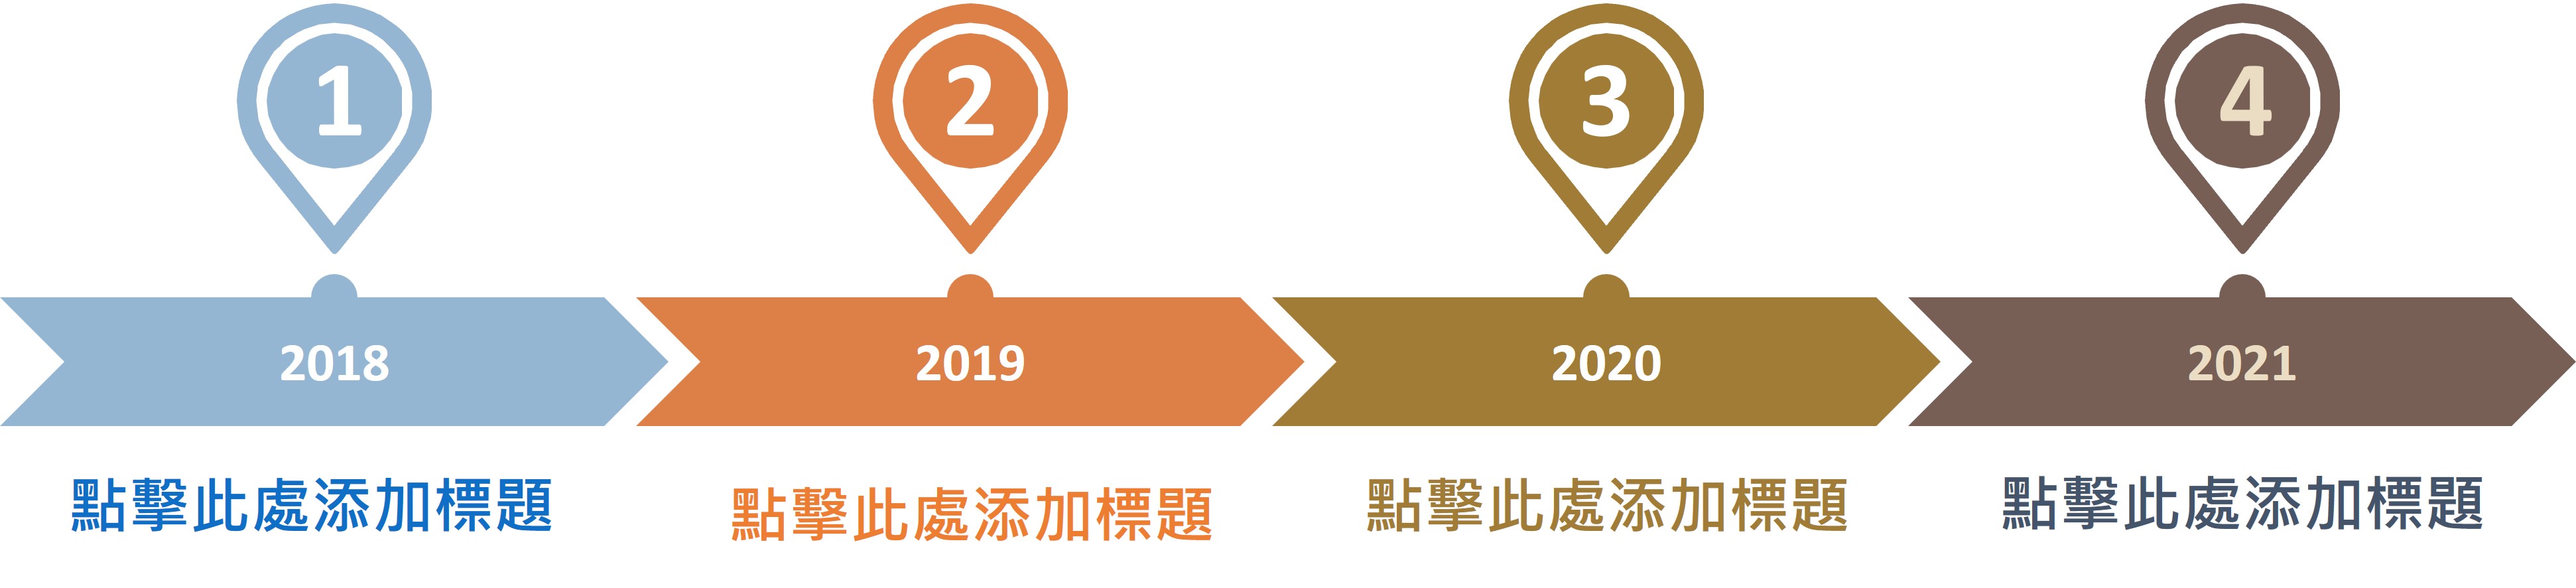</span>
</details>
## <span class="h2">6. 設計專業的數據圖表</span>
### (1) 說明
<details>
<summary>【細項說明】點擊展開/摺疊</summary>
※ 麥肯錫式圖表<span class="img90">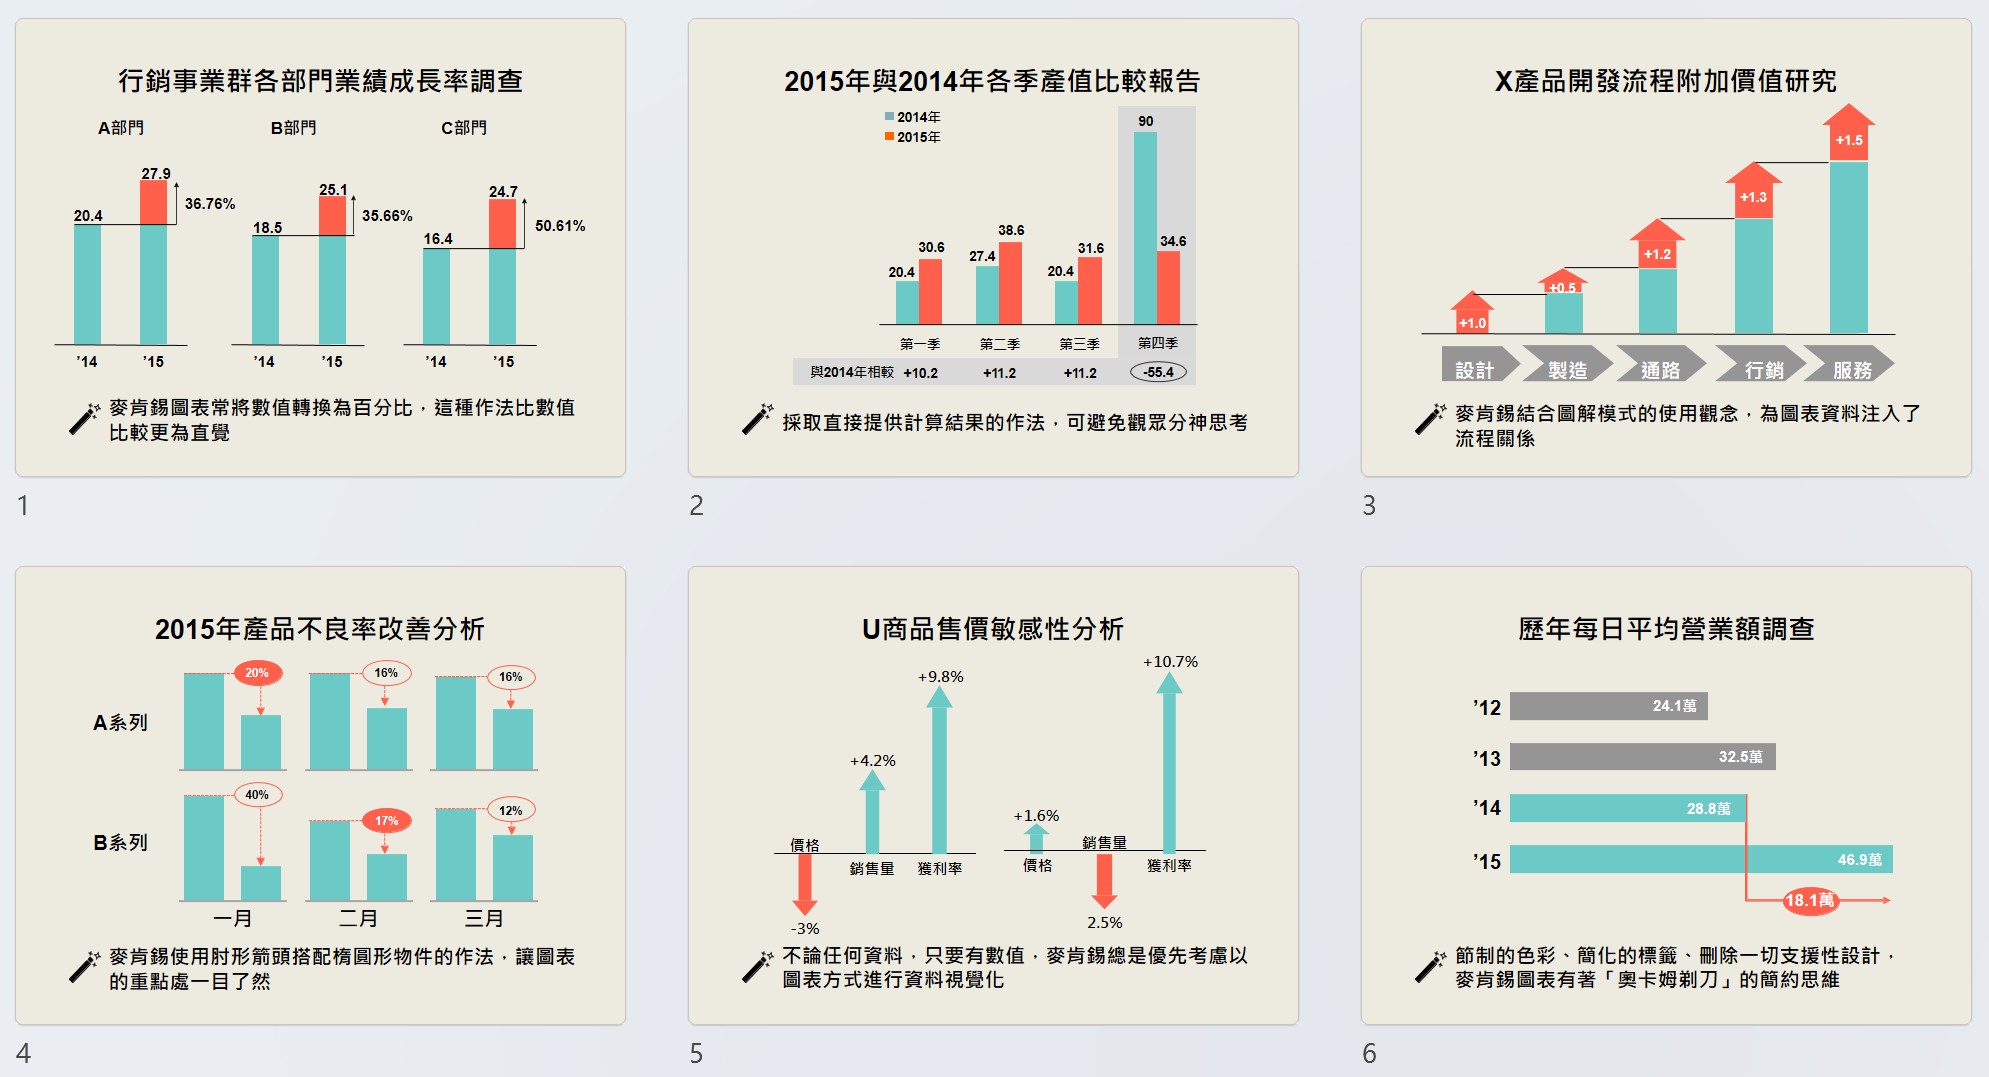</span>
</details>
### (2) 範例練習
<details>
<summary>【細項說明】點擊展開/摺疊</summary>
S1:繪製圖形
<span class="img90">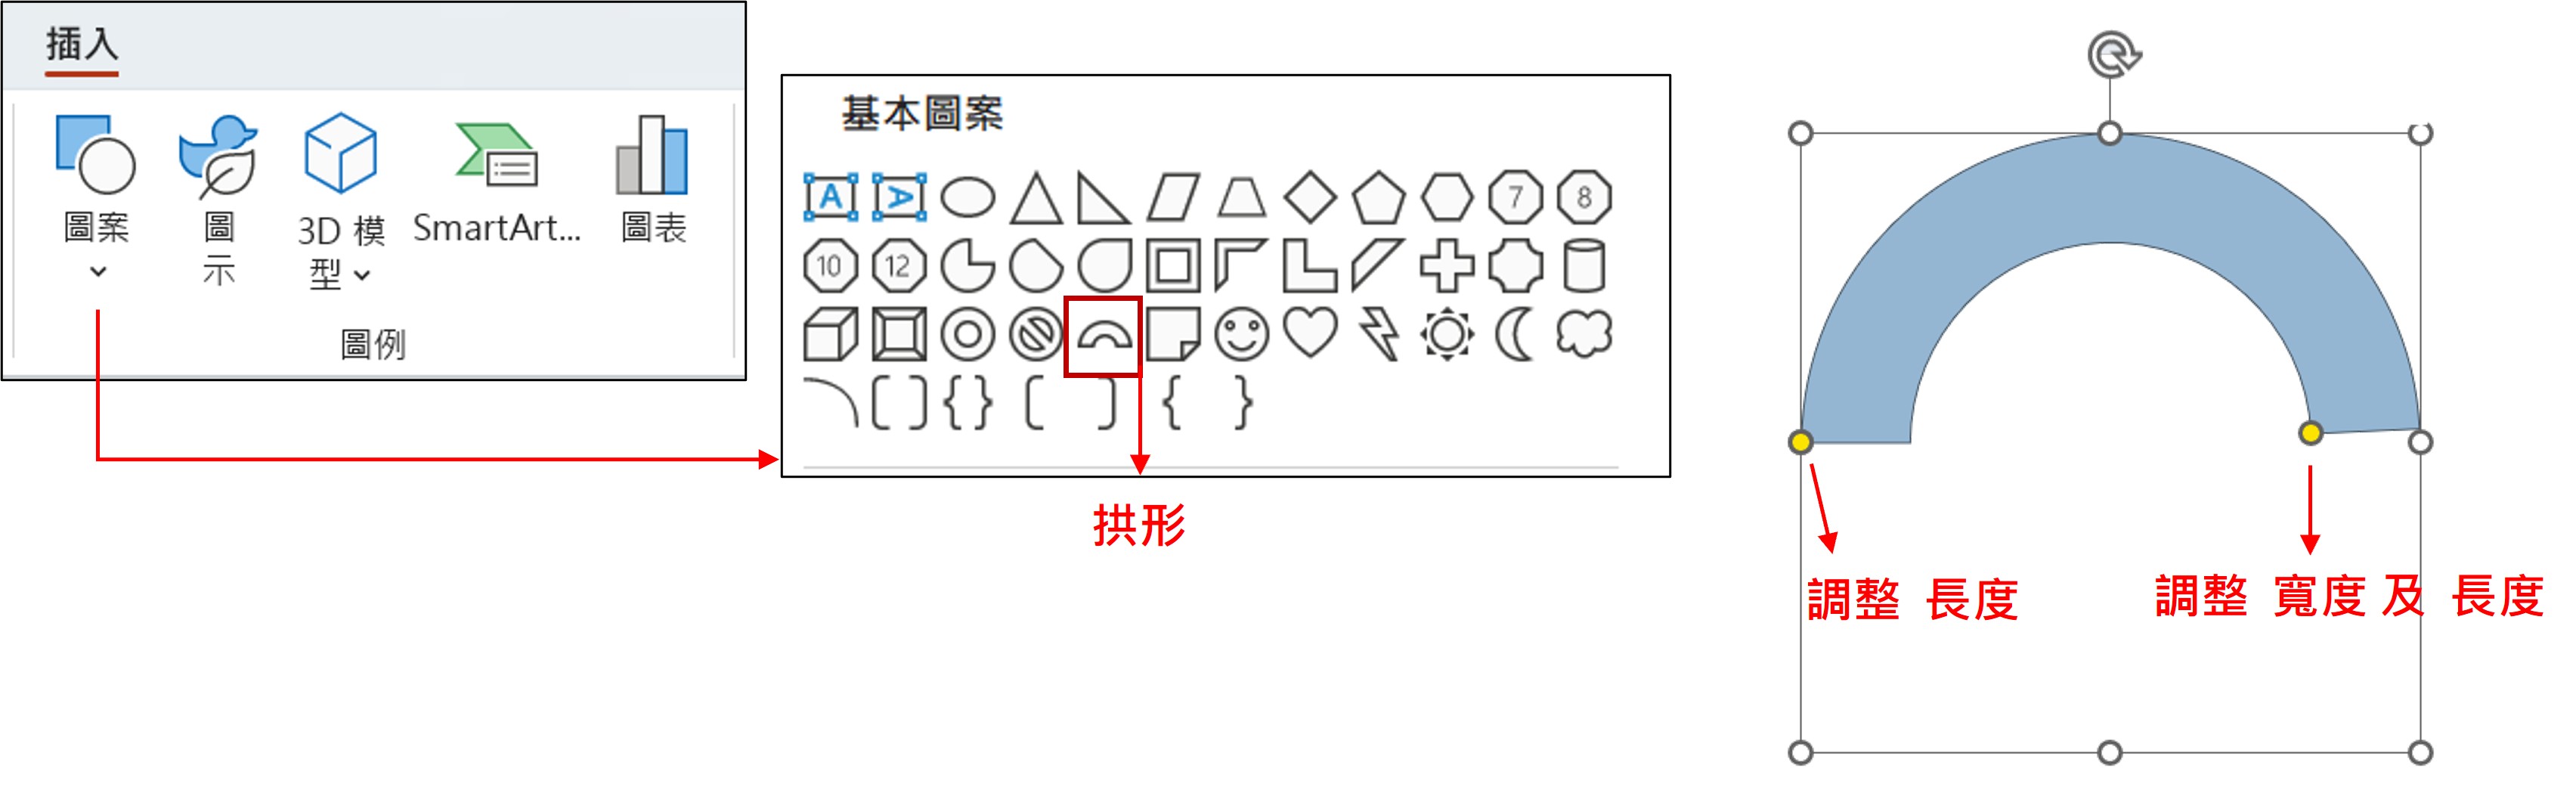</span>
S2:群組圖形
<span class="img70">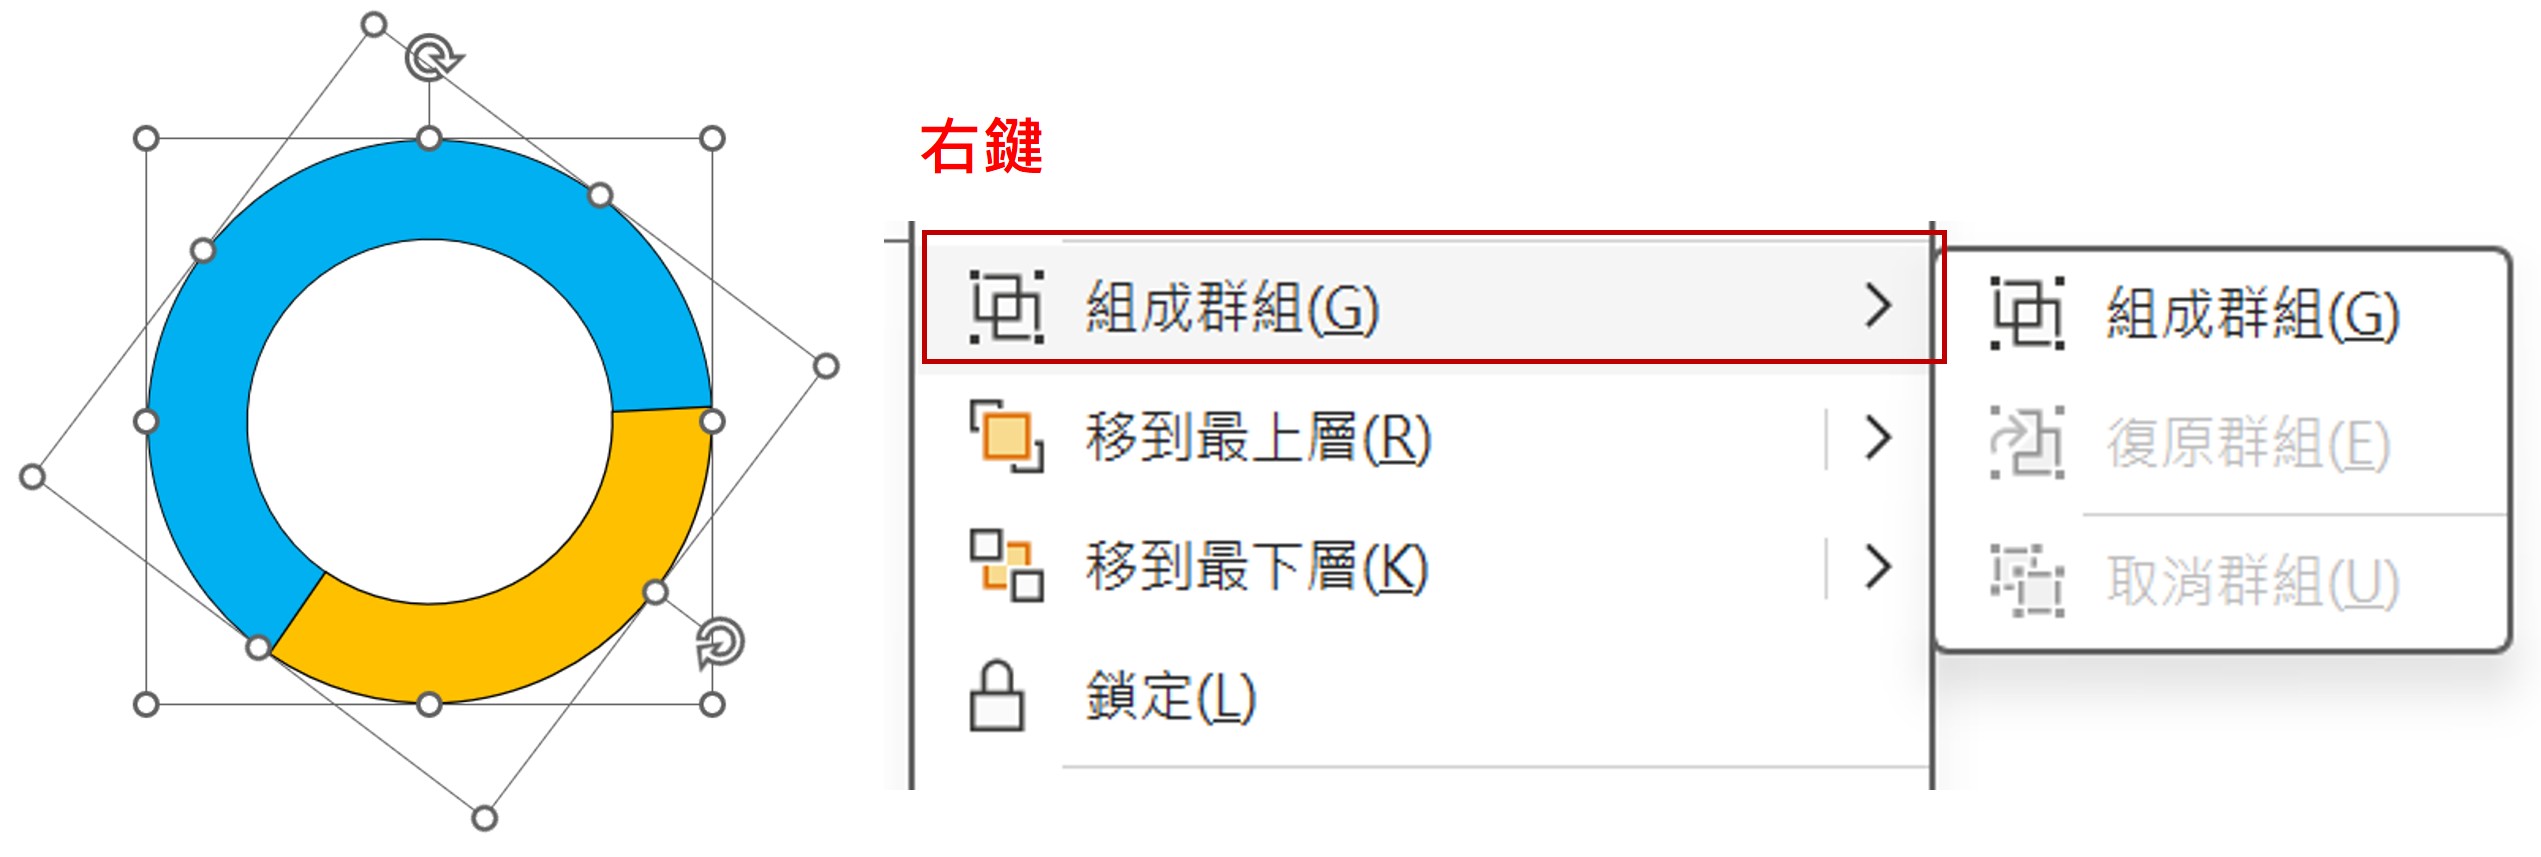</span>
S3:設定為立體圖形
<span class="img90">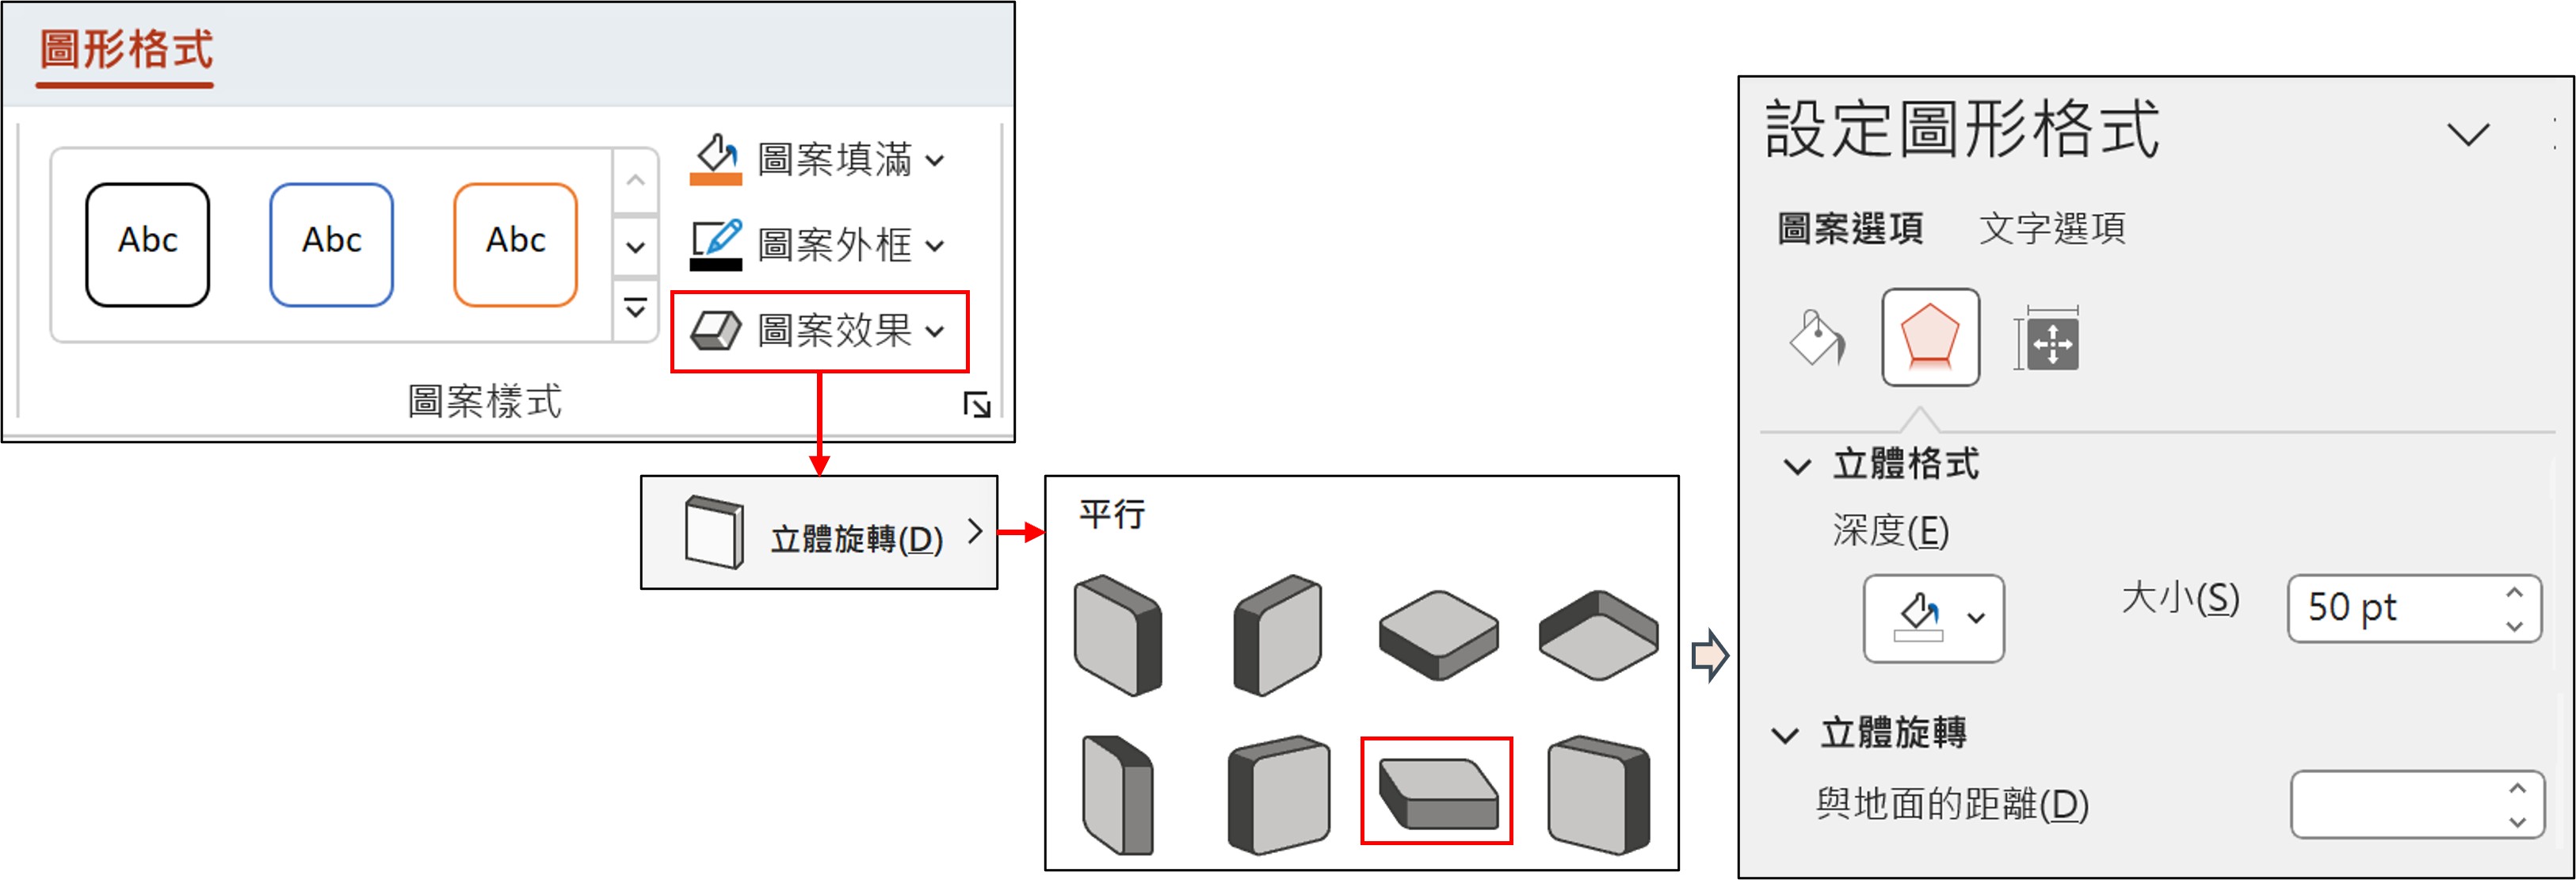</span>
</details>
# 三、打造互動式簡報
目標:利用PowerPoint 的連結功能與瀏覽者產生互動,提高簡報的參與感與互動性。
## <span class="h2">1. 設定位置及方法</span>
<details>
<summary>【細項說明】點擊展開/摺疊</summary>
|設定位置|設定方法|
|-|-|
|◼ 文字<br>◼ 動作按鈕(快取圖案)<br><span style="padding-left:2em">◽ 動作按鈕</span><br><span style="padding-left:2em">◽ 快取圖案</span><br>◼ 圖片|◼ 超連結<br><span style="padding-left:2em">◽ Word、Excel、PPT皆適用</span><br><span style="padding-left:2em">◽ 僅動畫 (按下)</span><br>◼ 動作設定<br><span style="padding-left:2em">◽ 僅PPT</span><br><span style="padding-left:2em">◽ 動畫及聲音 (按下及滑過)</span>|
<span class="img50">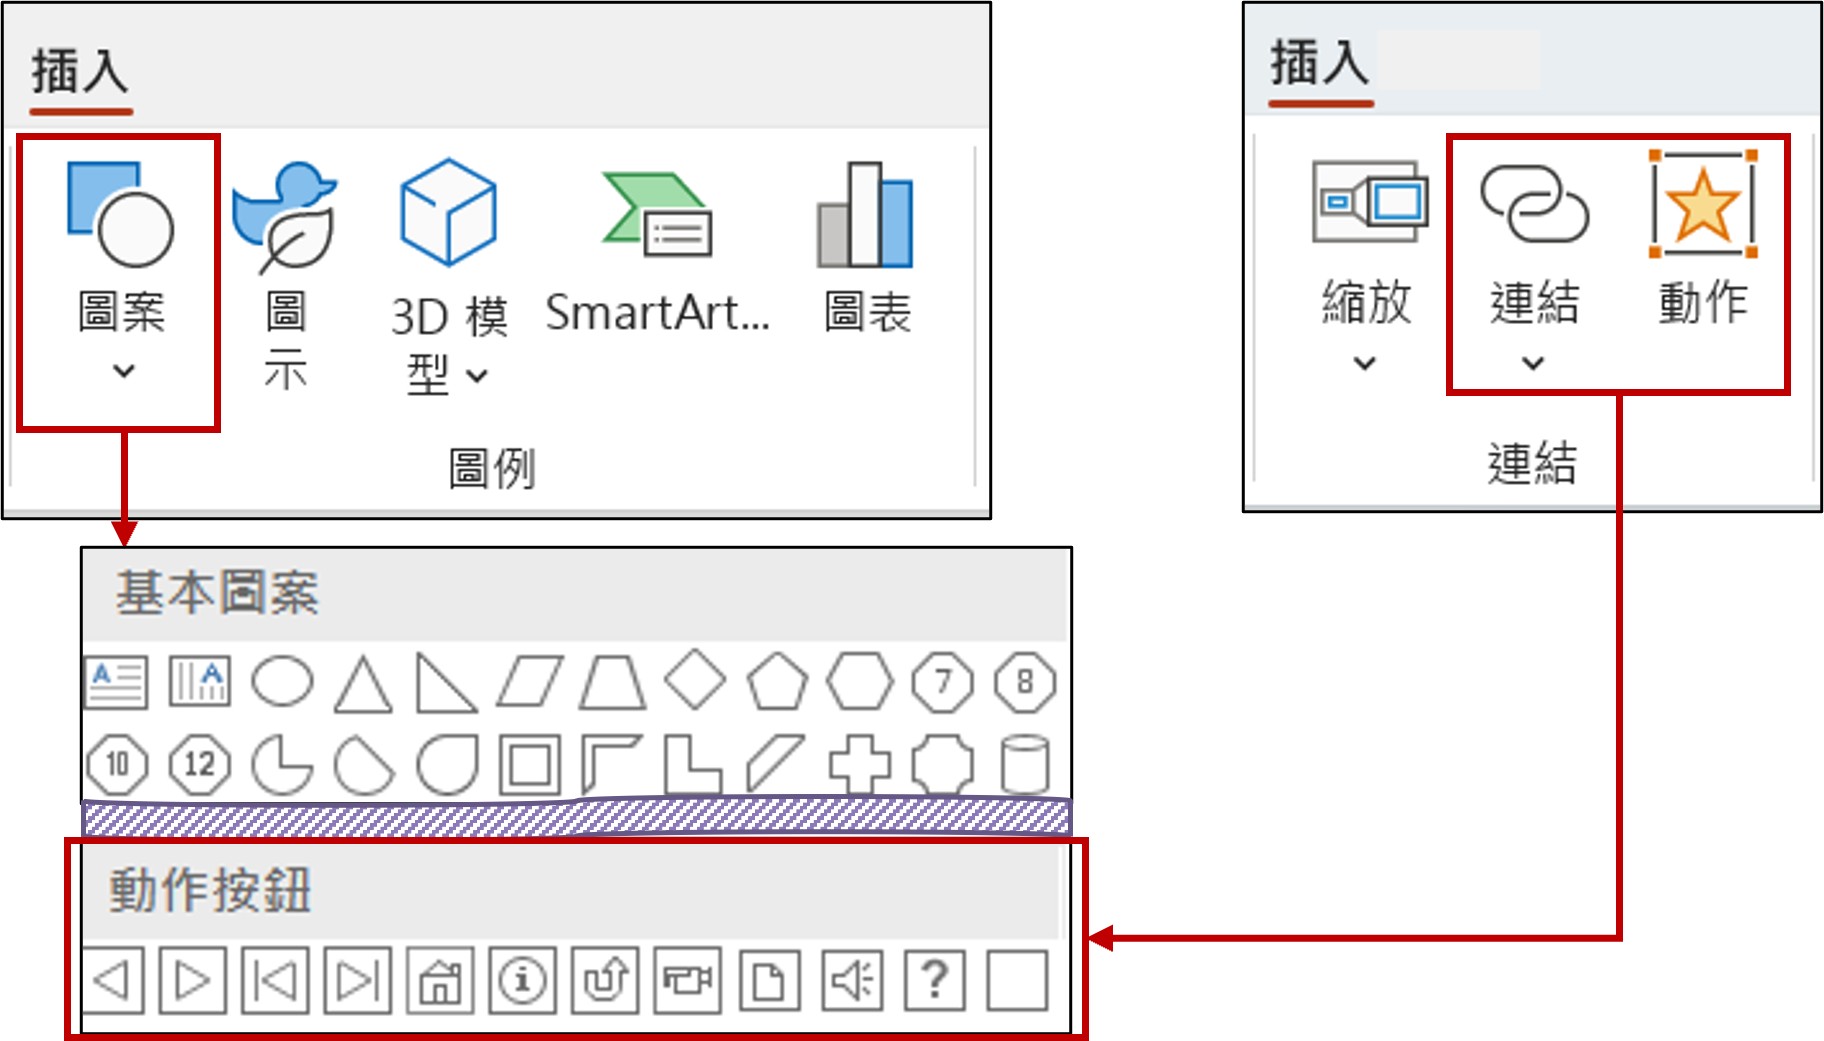</span>
<span class="h5">※ 放映後,投影間切換確認</span>
<span class="img40">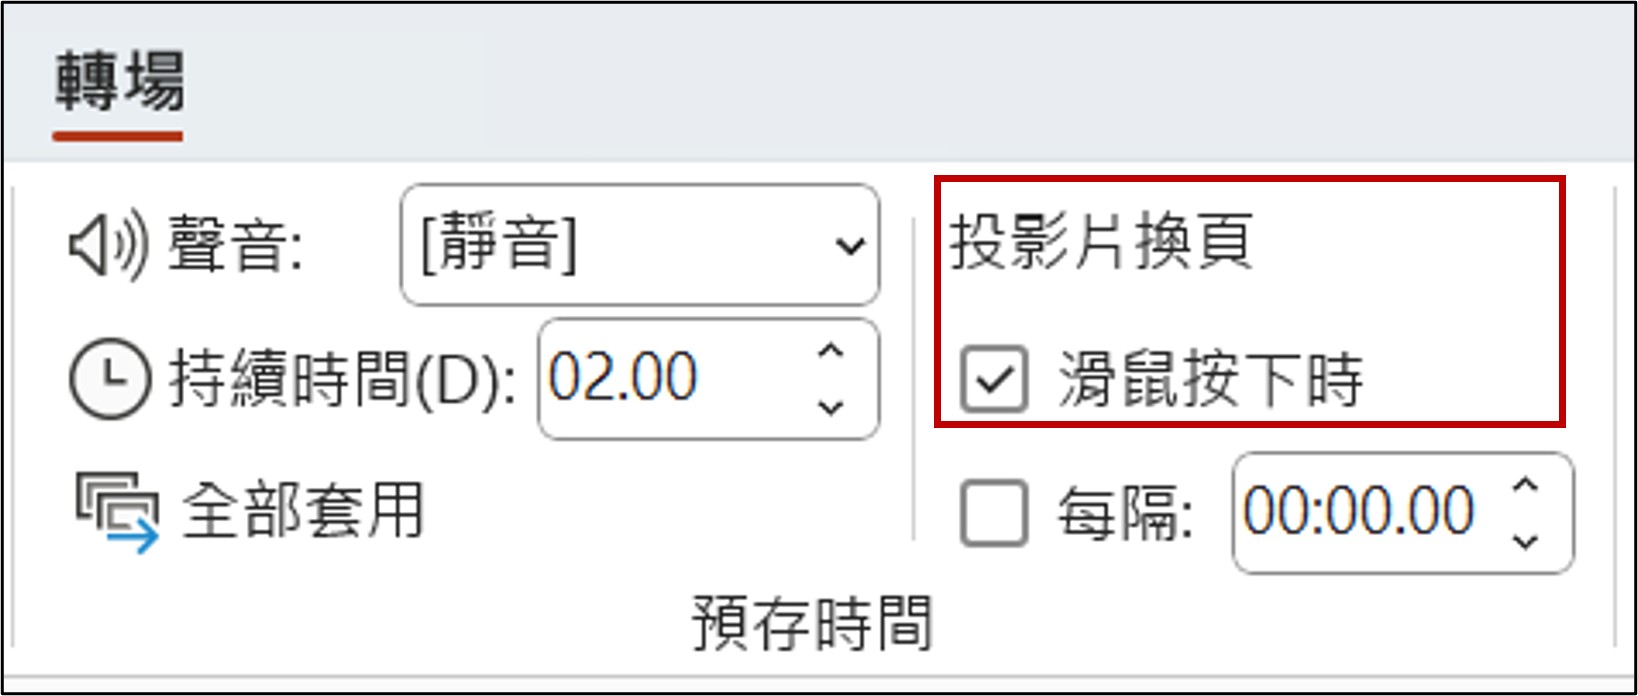</span>
</details>
## <span class="h2">2. 假按鈕設定</span>
<details>
<summary>【細項說明】點擊展開/摺疊</summary>
<span class="img60">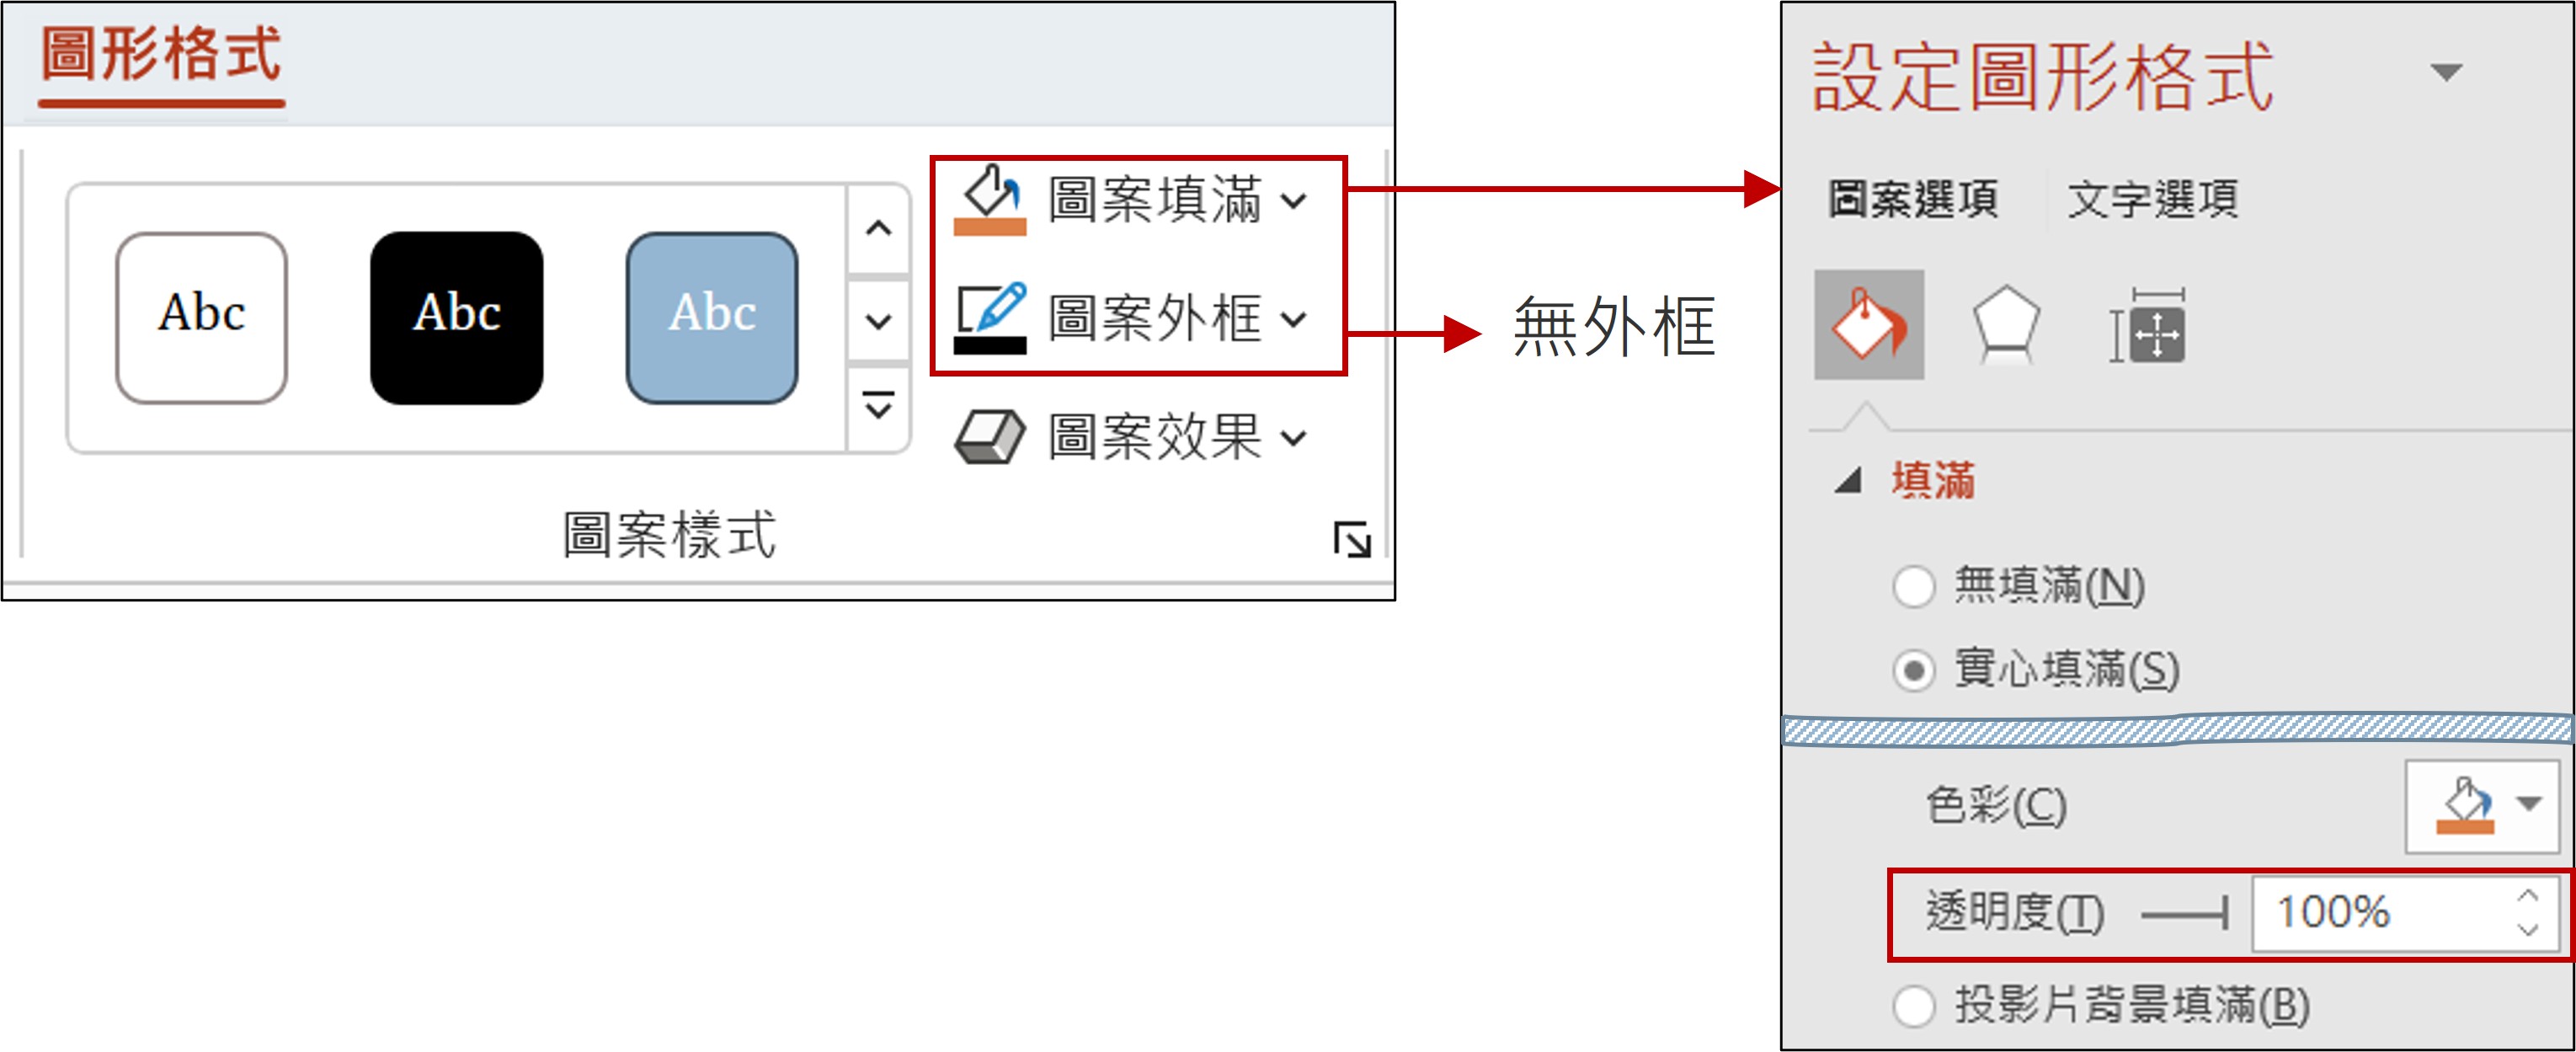</span>
</details>
# 四、動畫製作,讓簡報更生動
目標:運用動畫與影音元素,提升簡報的動態表現力與吸引力。
## <span class="h2">1. 基本動畫介紹</span>
<details>
<summary>【細項說明】點擊展開/摺疊</summary>
<span class="red">S0:啟動場記【動畫窗格】</span>
S1:選取物件
<span class="img90">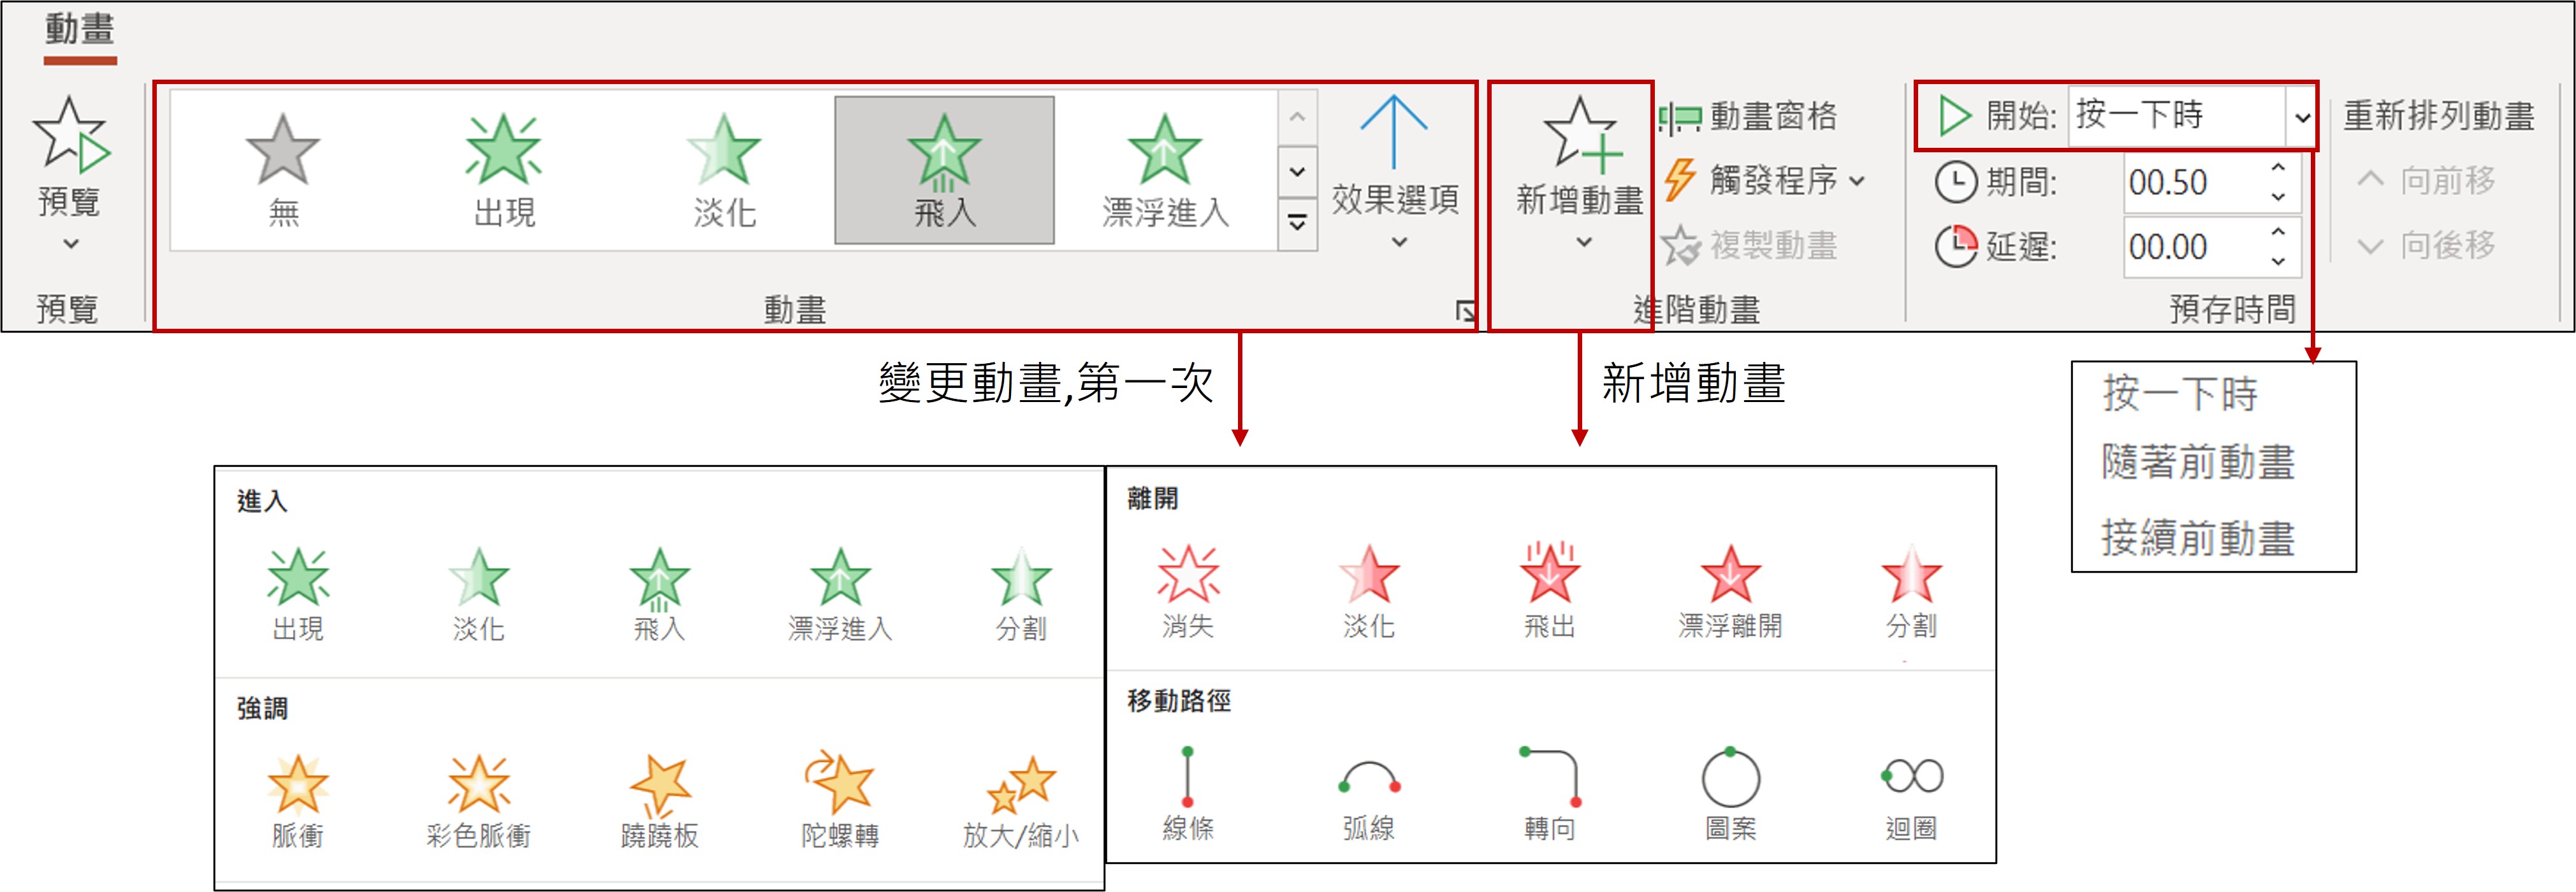</span>
|(A)動畫方式|(B)啟動時機|(C)可動畫物件|
|-|-|-|
|◾ 進入<br>◾ 強調<br>◾ 結束<br>◾ 影片路徑|◾ 按一下<br>◾ 接續前動畫<br>◾ 與前動畫同時<br>◾ 觸發程序(2010強化功能)|◾ 圖片<br>◾ 文字(單行、多行)<br>◾ SmartArt<br>◾ 圖表<br>◾ 表格<br>◾ 多媒體(音訊、影片)|
</details>
## <span class="h2">2. 路徑動畫</span>
<details>
<summary>【細項說明】點擊展開/摺疊</summary>
<span class="img90"></span>
</details>
## <span class="h2">3. 影音與動畫結合</span>
<details>
<summary>【細項說明】點擊展開/摺疊</summary>
### 1、 影片旁白加入
<span class="blue">目的:【書籤】觸發【物件】</span>
<span class="step">S1.針對物件設定動畫</span>
<span class="step">S2.`螢幕右側`動畫窗格,點選物件動畫</span>
<span class="step">S3.【動畫】>【觸發程序】>【由書籤觸發】</span>
### 2、 遙控器使用
<span class="blue">目的:【物件】觸發【書籤】</span>
<span class="step">S1.點選書籤找到【動畫搜尋鈕】</span>
<span class="step">  note:第2次以後搜尋鈕自【進階動畫】工作群組 > 【新增動畫】</span>
<span class="step">S2.`螢幕右側`動畫窗格,點選書籤動畫搜尋鈕</span>
<span class="step">S3.【動畫】>【觸發程序】>【按一下時】</span>
</details>
## <span class="h2">4. 循環動畫技巧</span>
<details>
<summary>【細項說明】點擊展開/摺疊</summary>
S1. 循環動畫的技巧原則,是同一物件二張進行移動替代
<span class="img90">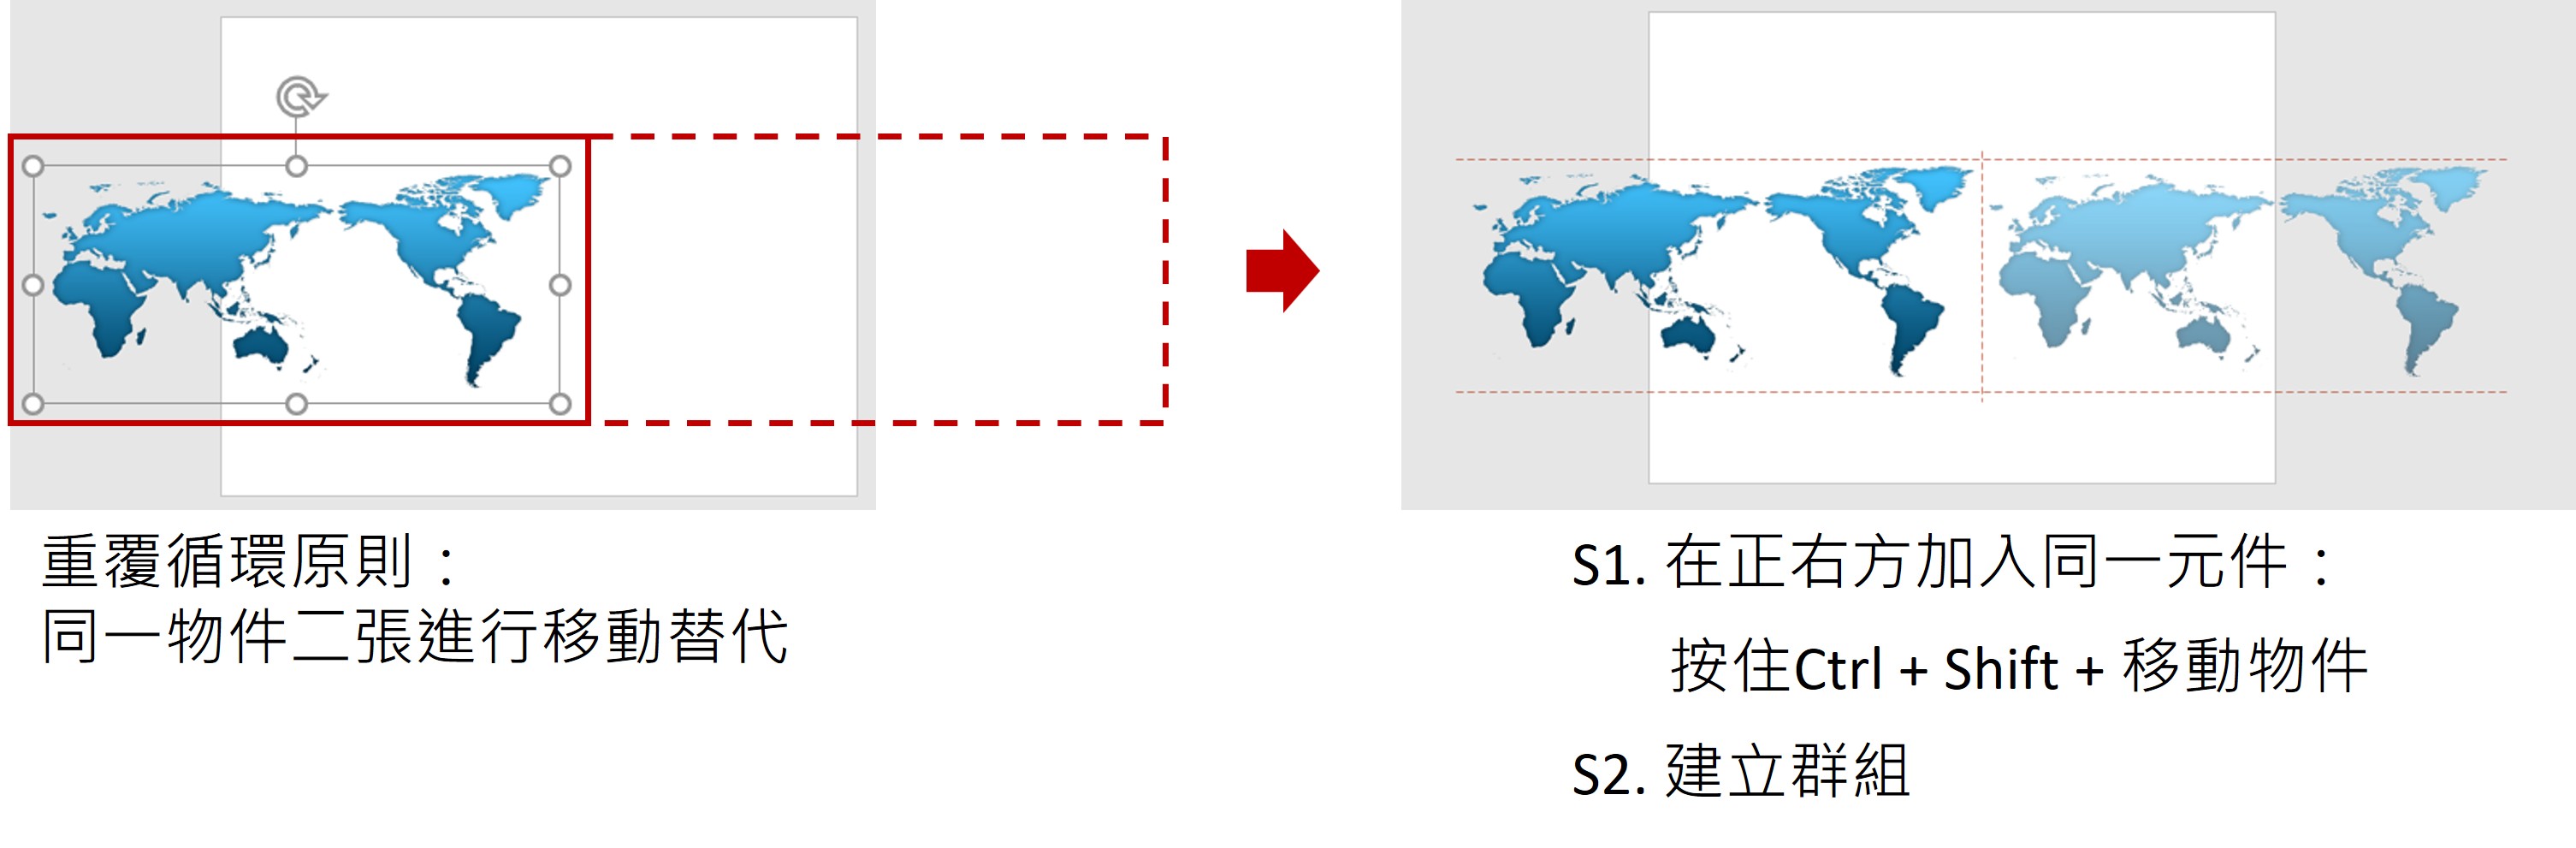</span>
S2. 設定移動路徑:線條(向右),其線條為一張地圖的長度。
<span class="img90"></span>
S3. 依下圖,進行動畫微調。
<span class="img90">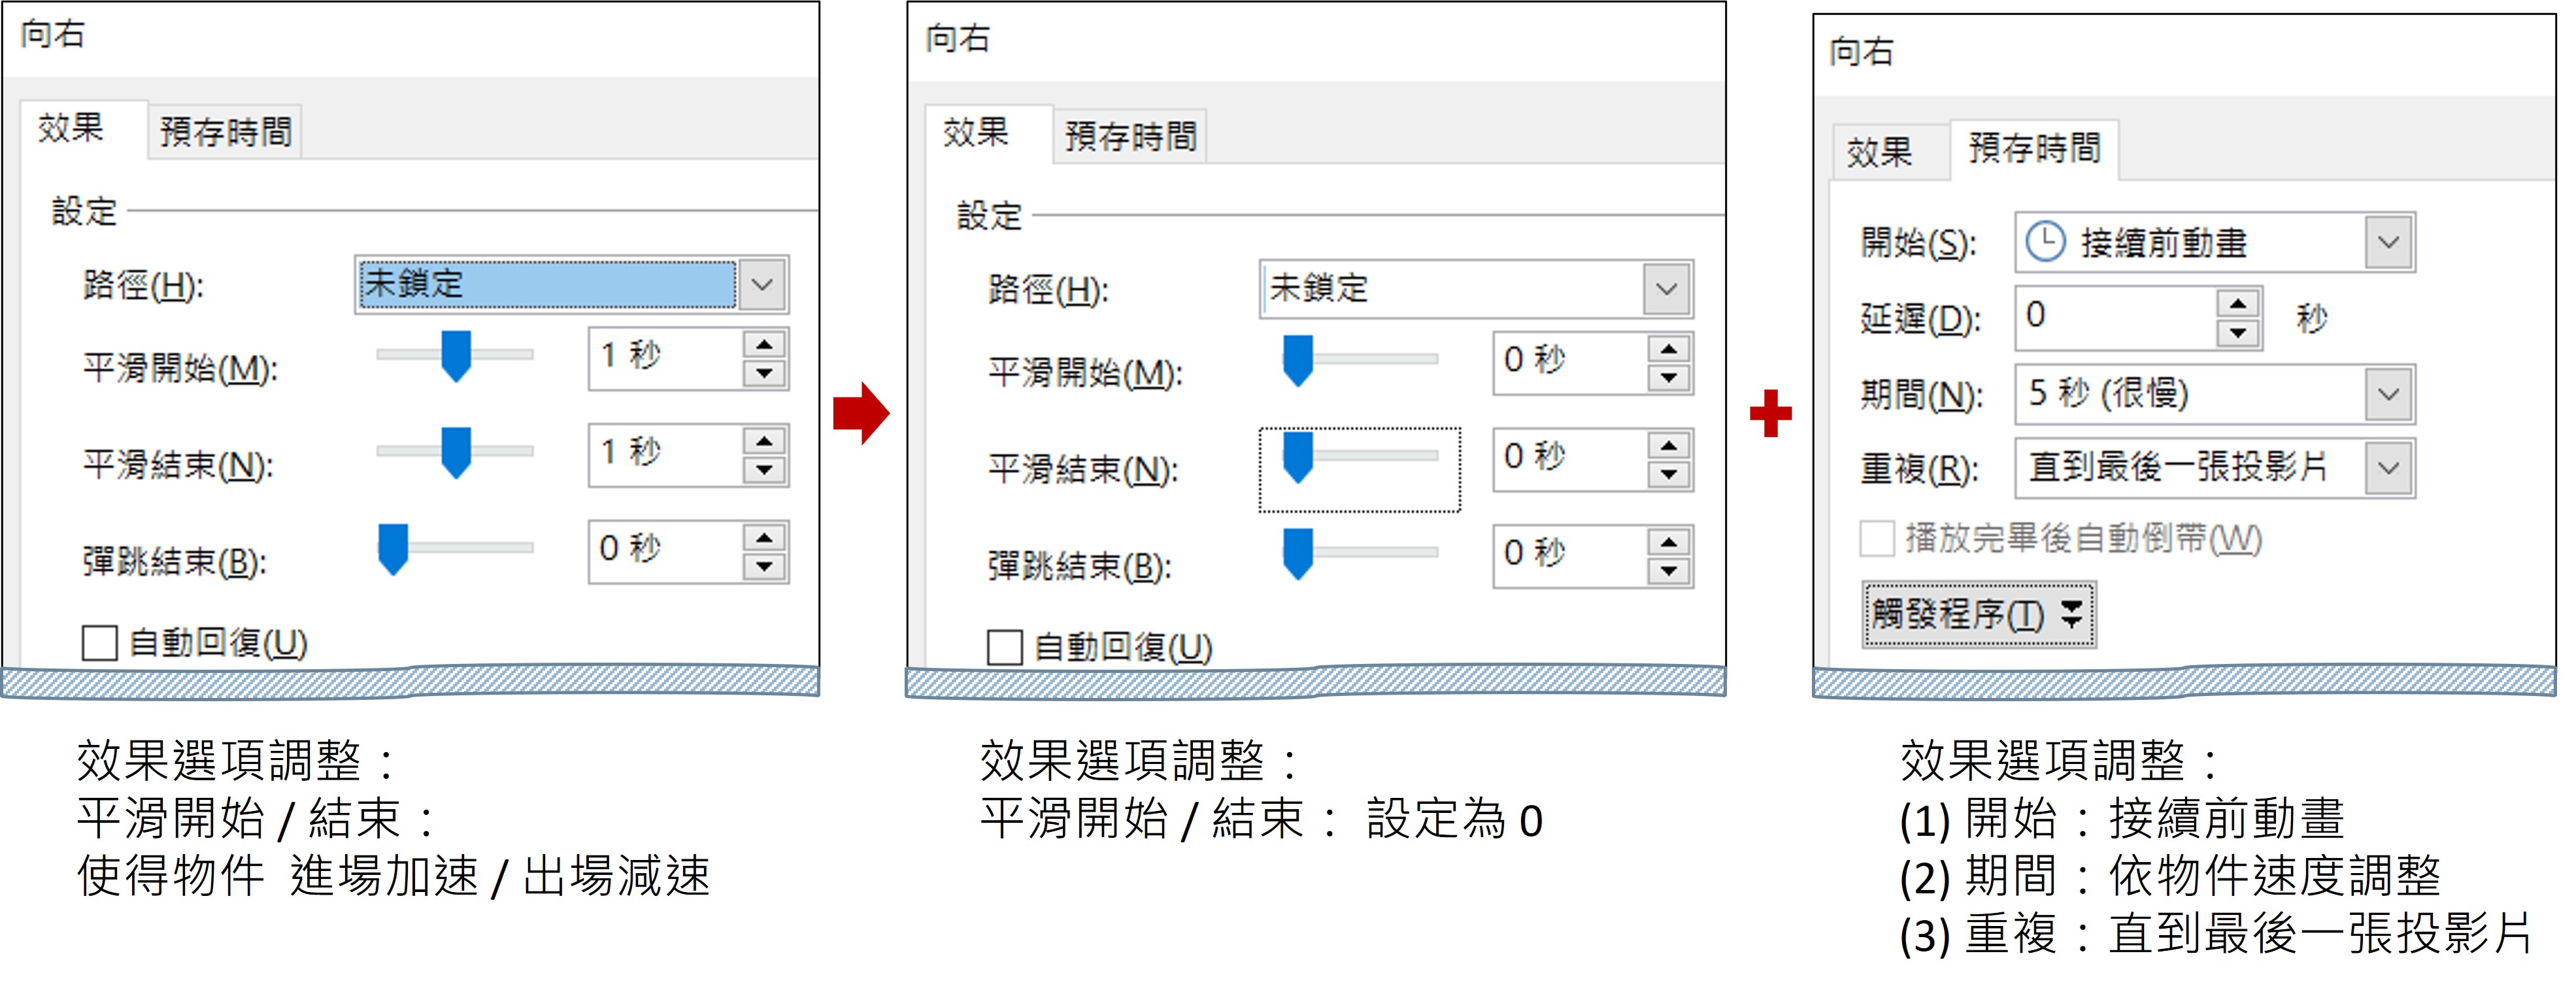</span>
</details>
## <span class="h2">5. 影片加字幕方法</span>
<details>
<summary>【細項說明】點擊展開/摺疊</summary>
<a href="https://filedn.com/lzai0pPTnpfyPiXAjMDqr4V/hackmd/ppt137.png"><span class="img100"></span></a>
S1:利用記事本,寫入字幕內容,其內容如下:
```
WEBVTT
00:01.000 --> 00:08.000
方法1:自動計算差值進行累加
00:09.000 --> 00:16.000
方法2:透過智慧標籤
00:17.000 --> 00:30.000
方法3:拖曳時,加上【Ctrl】變成自動累加序號+1
```
S2:檔案儲存後,其副檔名【* . txt】 改為【 <span class="red">* . vtt</span> 】
S3:將視訊加入PPT後,點選視訊影片,【視訊】>【播放】>【插入輔助字幕】
<a href="https://filedn.com/lzai0pPTnpfyPiXAjMDqr4V/hackmd/ppt138.png"><span class="img100"></span></a>
</details>
# 五、優化簡報結構整體呈現
目標:掌握 PowerPoint 的進階設定,優化簡報結構與整體呈現。
## <span class="h2">1. 啟動簡報者檢視畫面</span>
<details>
<summary>【細項說明】點擊展開/摺疊</summary>
<span class="img100">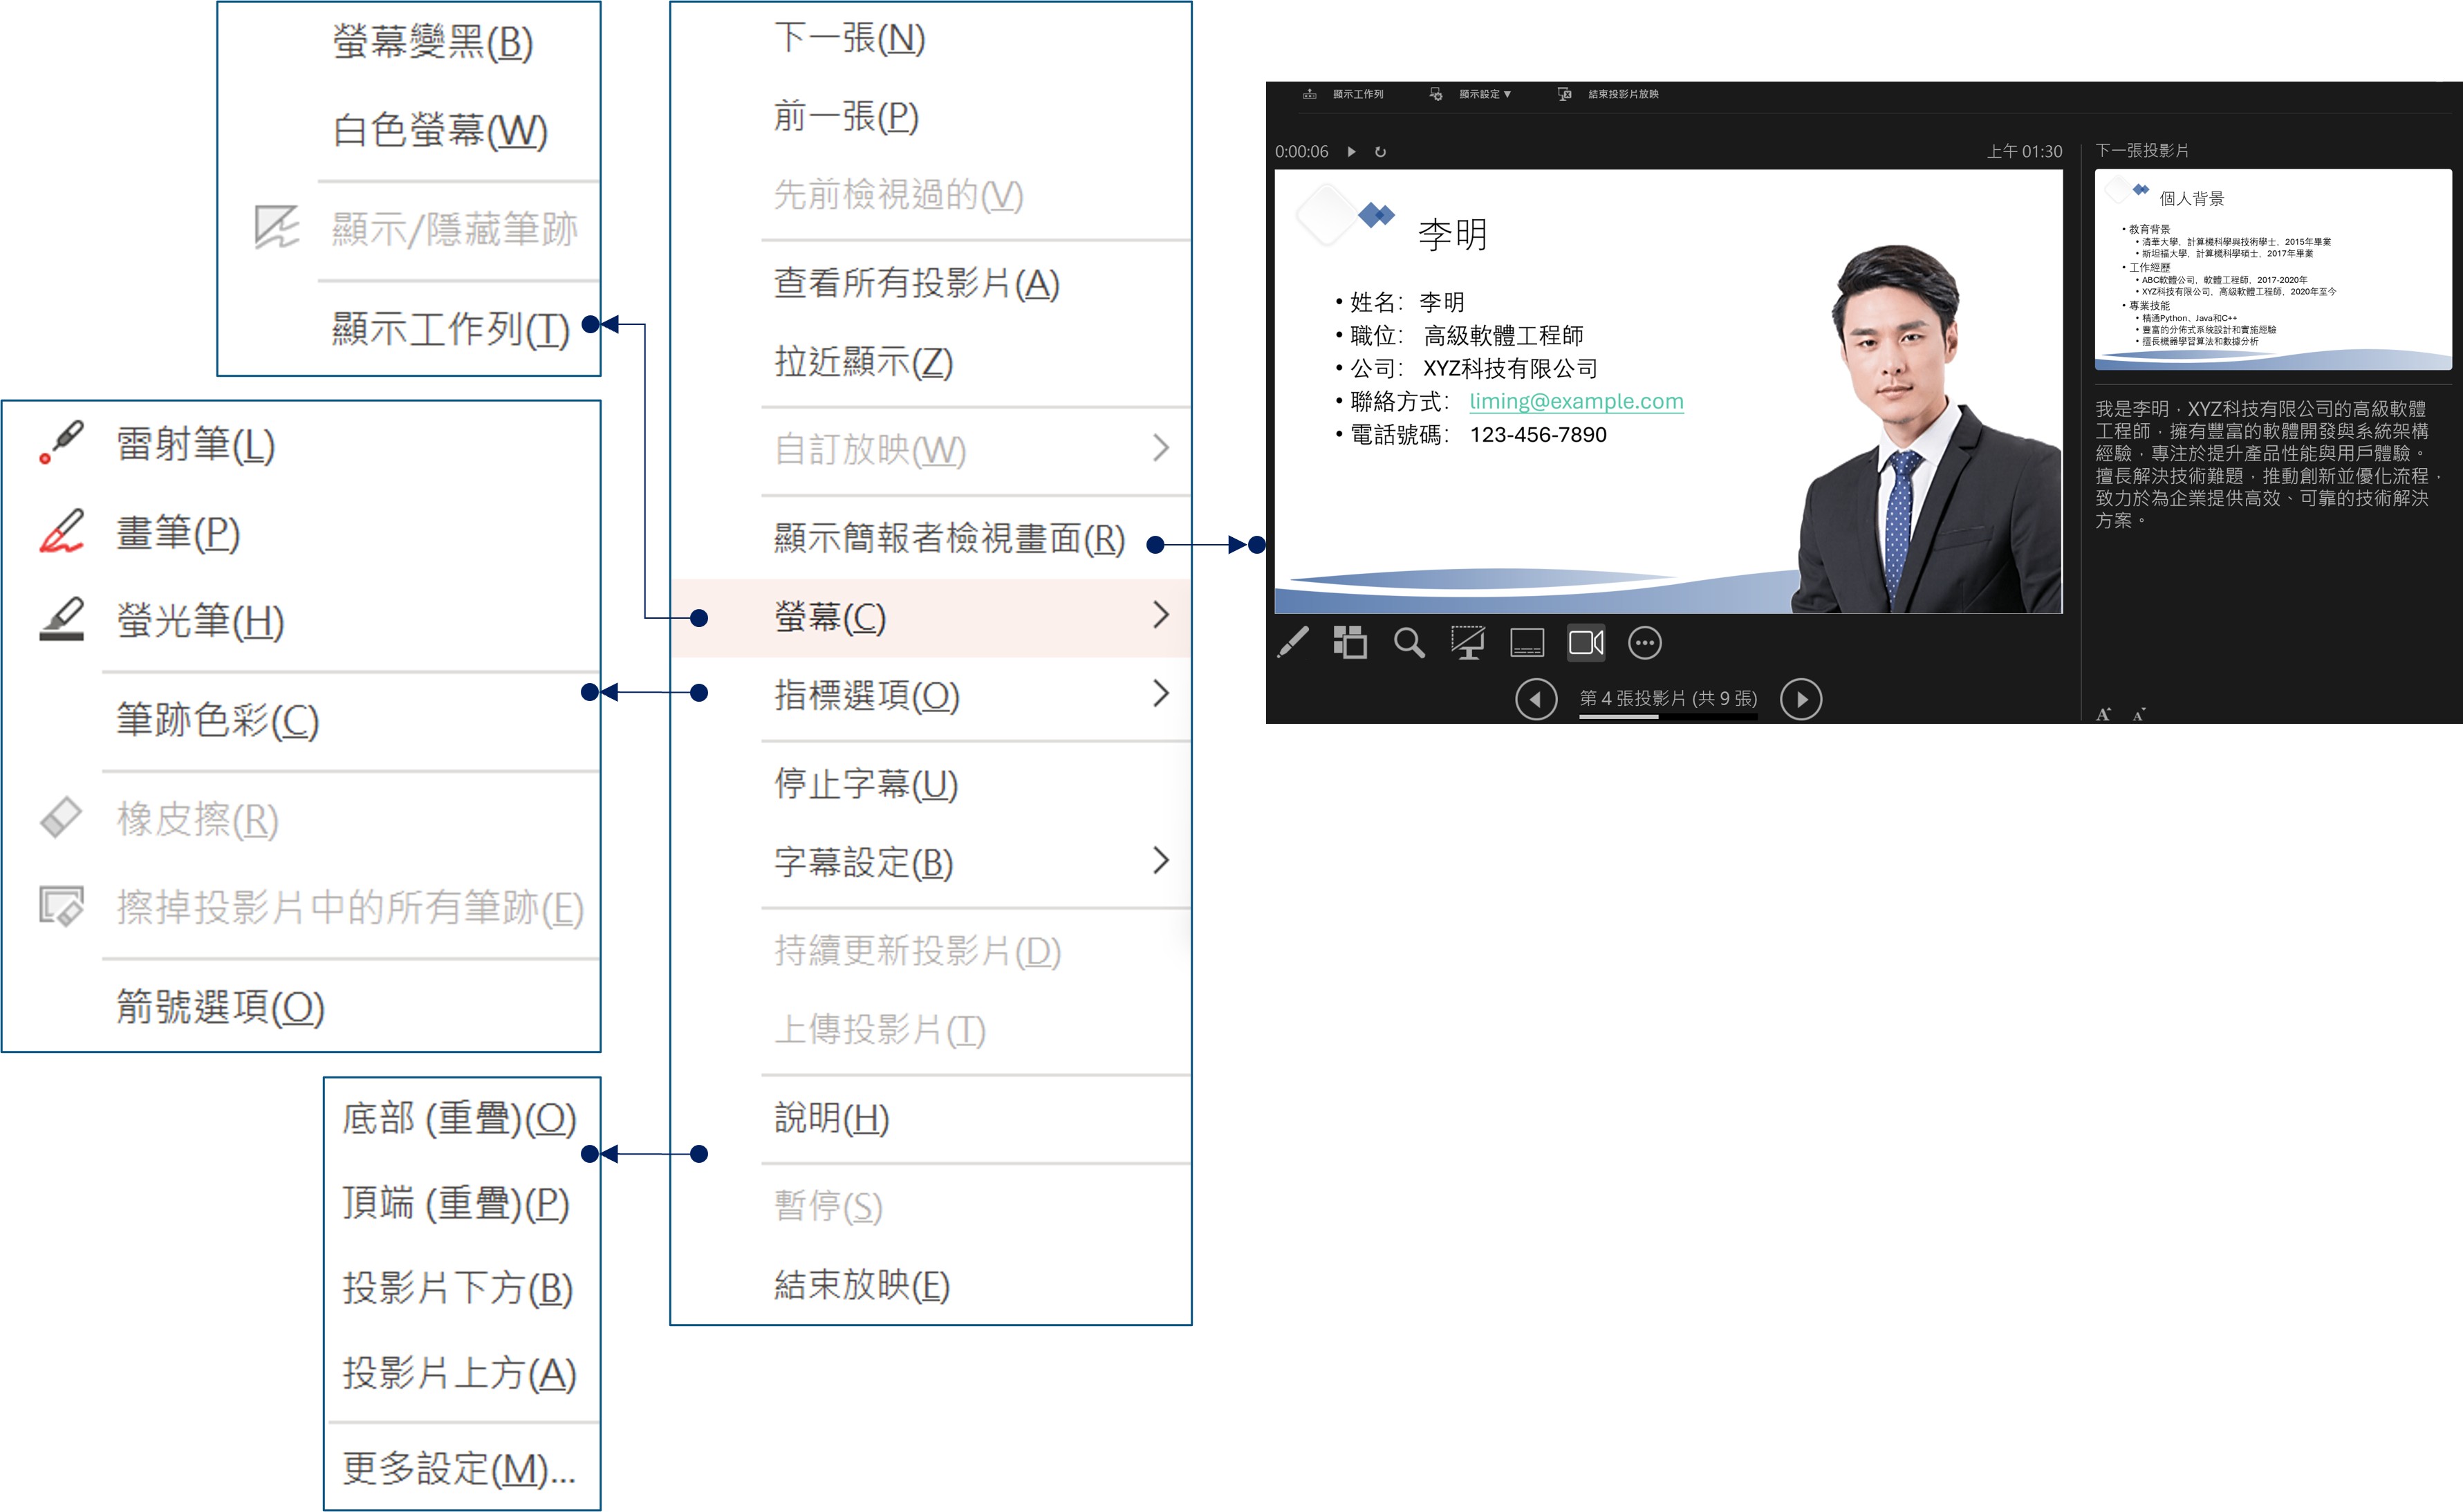</span>
</details>
## <span class="h2">2. 自訂放映,調整簡報播放流程</span>
<details>
<summary>【細項說明】點擊展開/摺疊</summary>
<span class="img100"></span>
</details>
## <span class="h2">3. 【設計】投影片整體美化</span>
<details>
<summary>【細項說明】點擊展開/摺疊</summary>
:::warning
* 何謂【佈景主題】?
* 著手進行建立簡報時,除簡報內容規劃外,當開新檔案後,一開始需考量事項如下:
* 【投影片尺寸】
* 【佈景主題選擇】
* 【頁碼起始編號:簡報封面不顯示頁碼技巧】
* 【亮彩/暗背景投影片背景】
<span class="pp">練習選取:</span>
* <span class="pp">【Shift】連續、【Ctrl】不連續挑選</span>
* <span class="pp">佈景主題應用:其先決條件,應使用佈景主題色彩及字型</span>
:::
<span class="img100">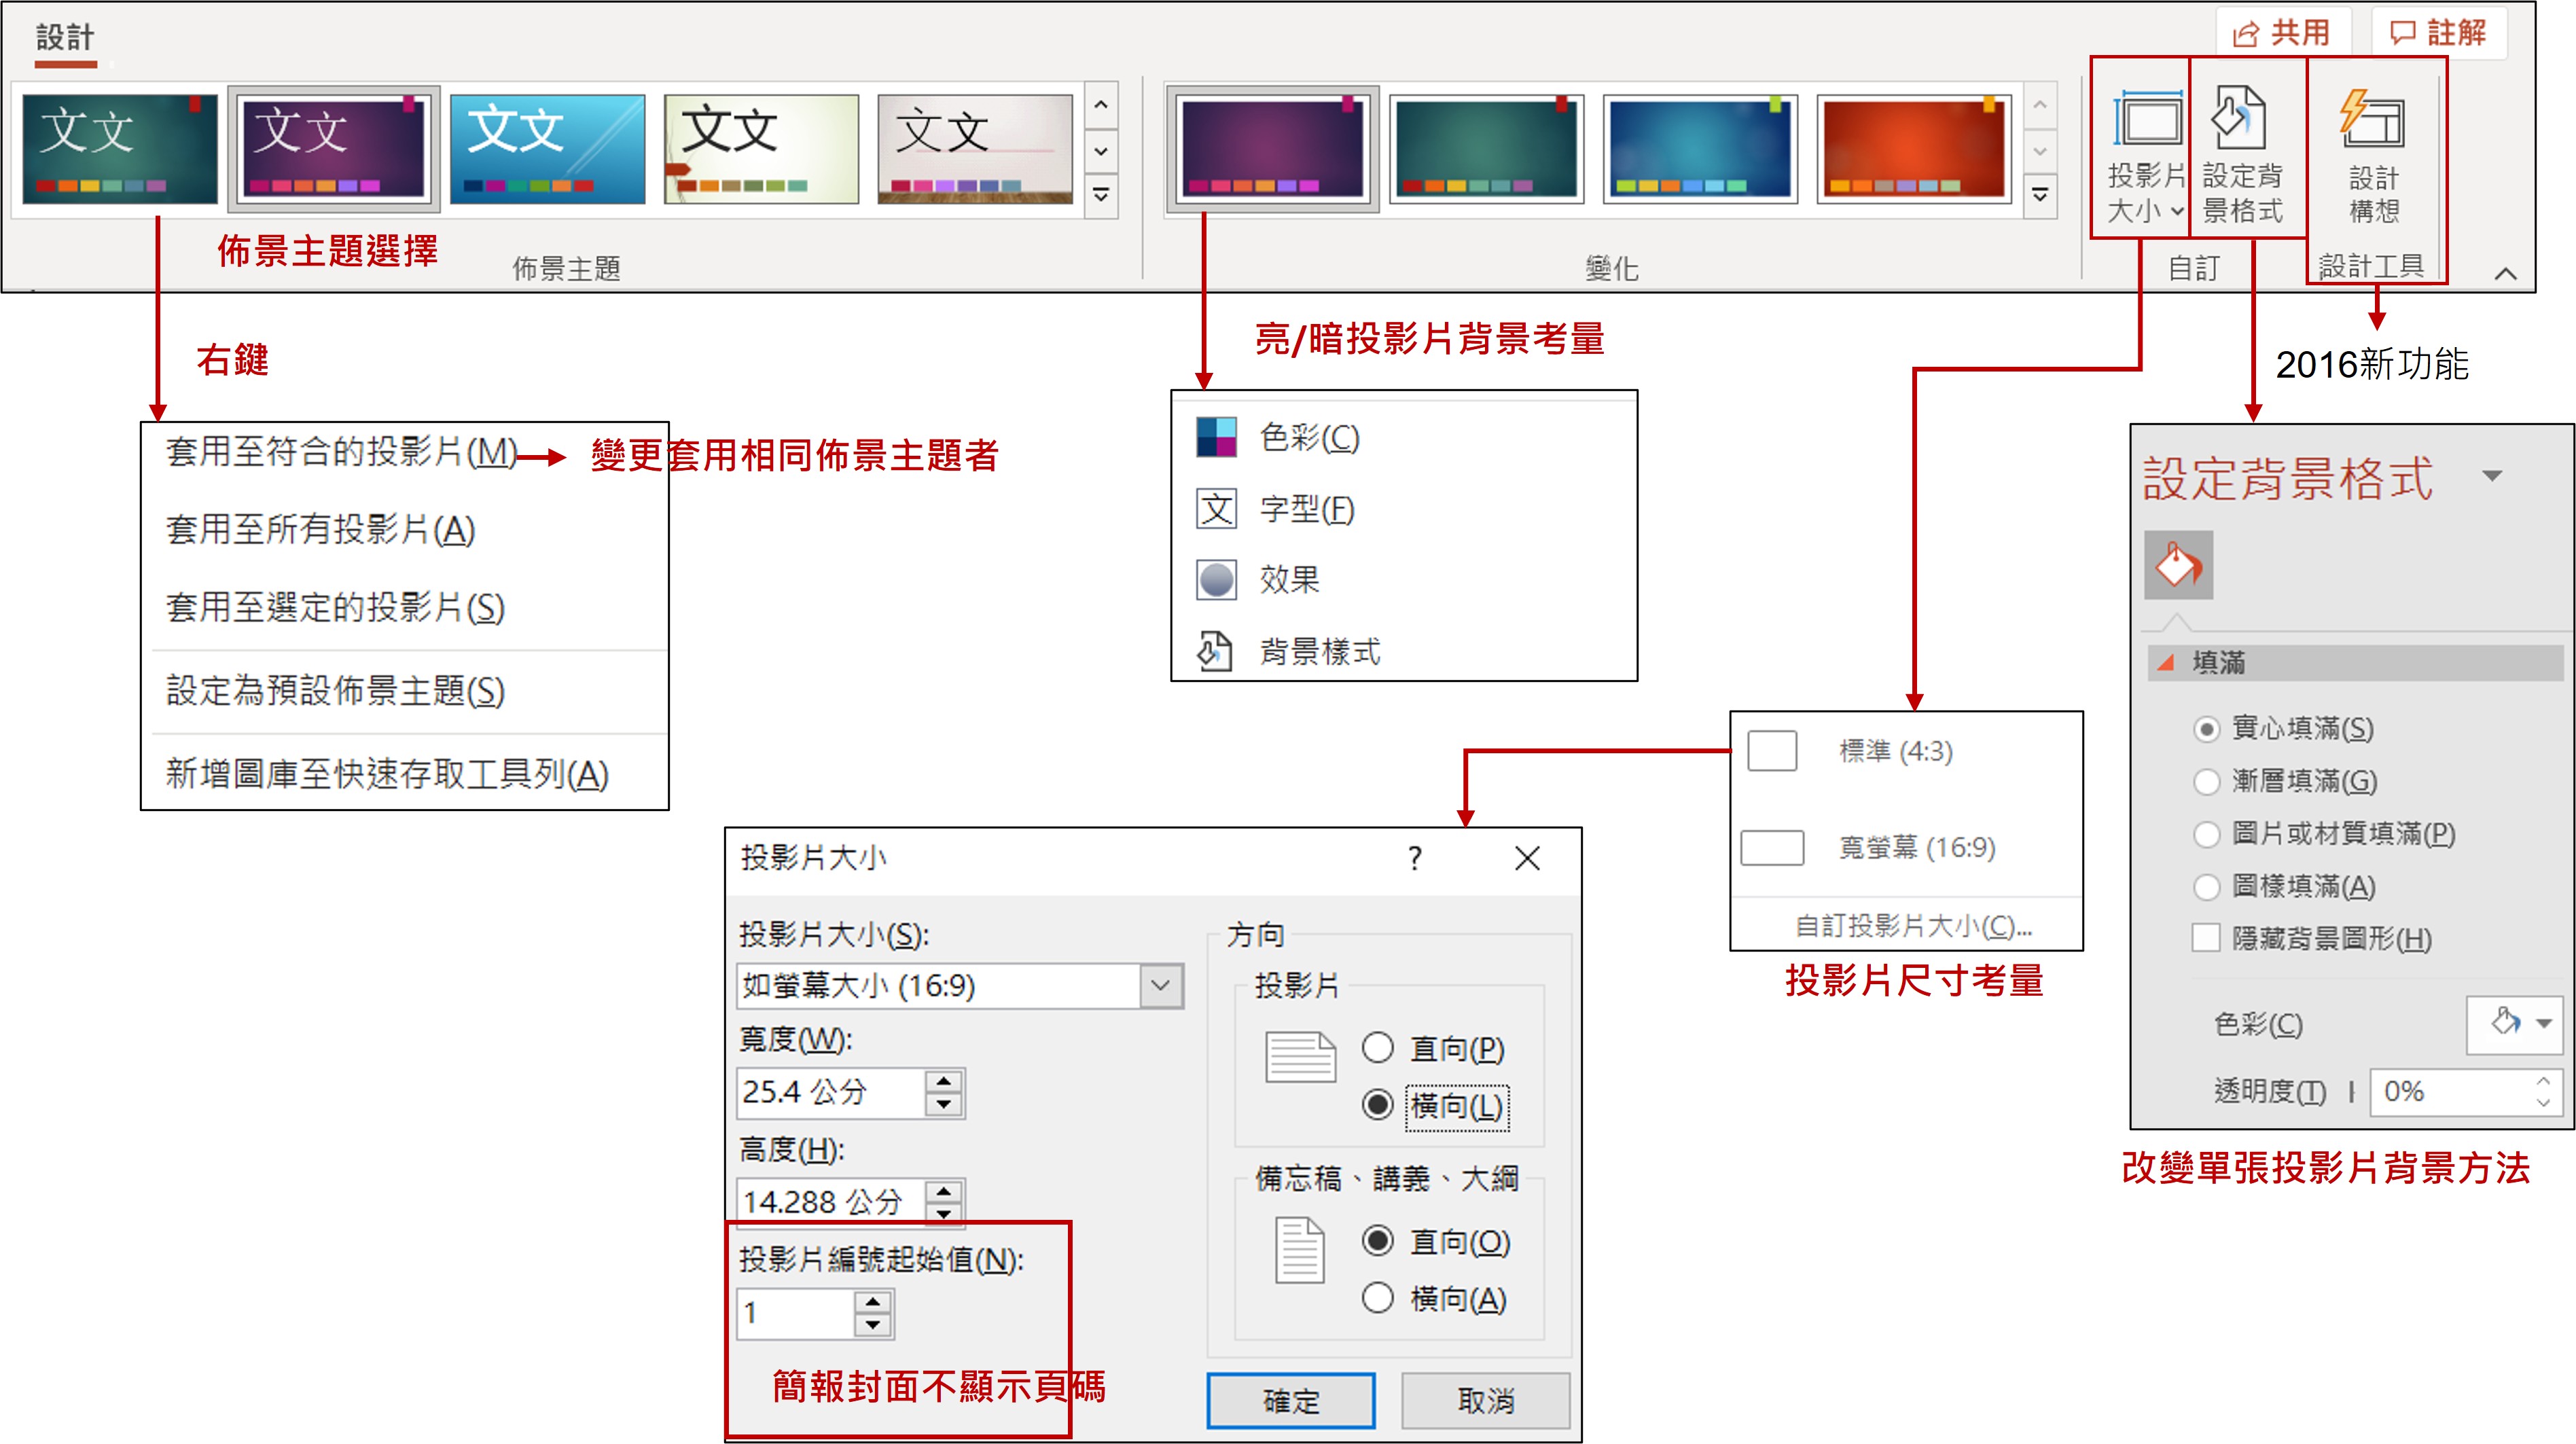</span>
</details>
## <span class="h2">4. 改變投影片開始編號</span>
<details>
<summary>【細項說明】點擊展開/摺疊</summary>
S1.【插入】>【頁首/頁尾】
S2. 變更投影片頁碼編號,【設計】>【投影片大小】
<span class="img80">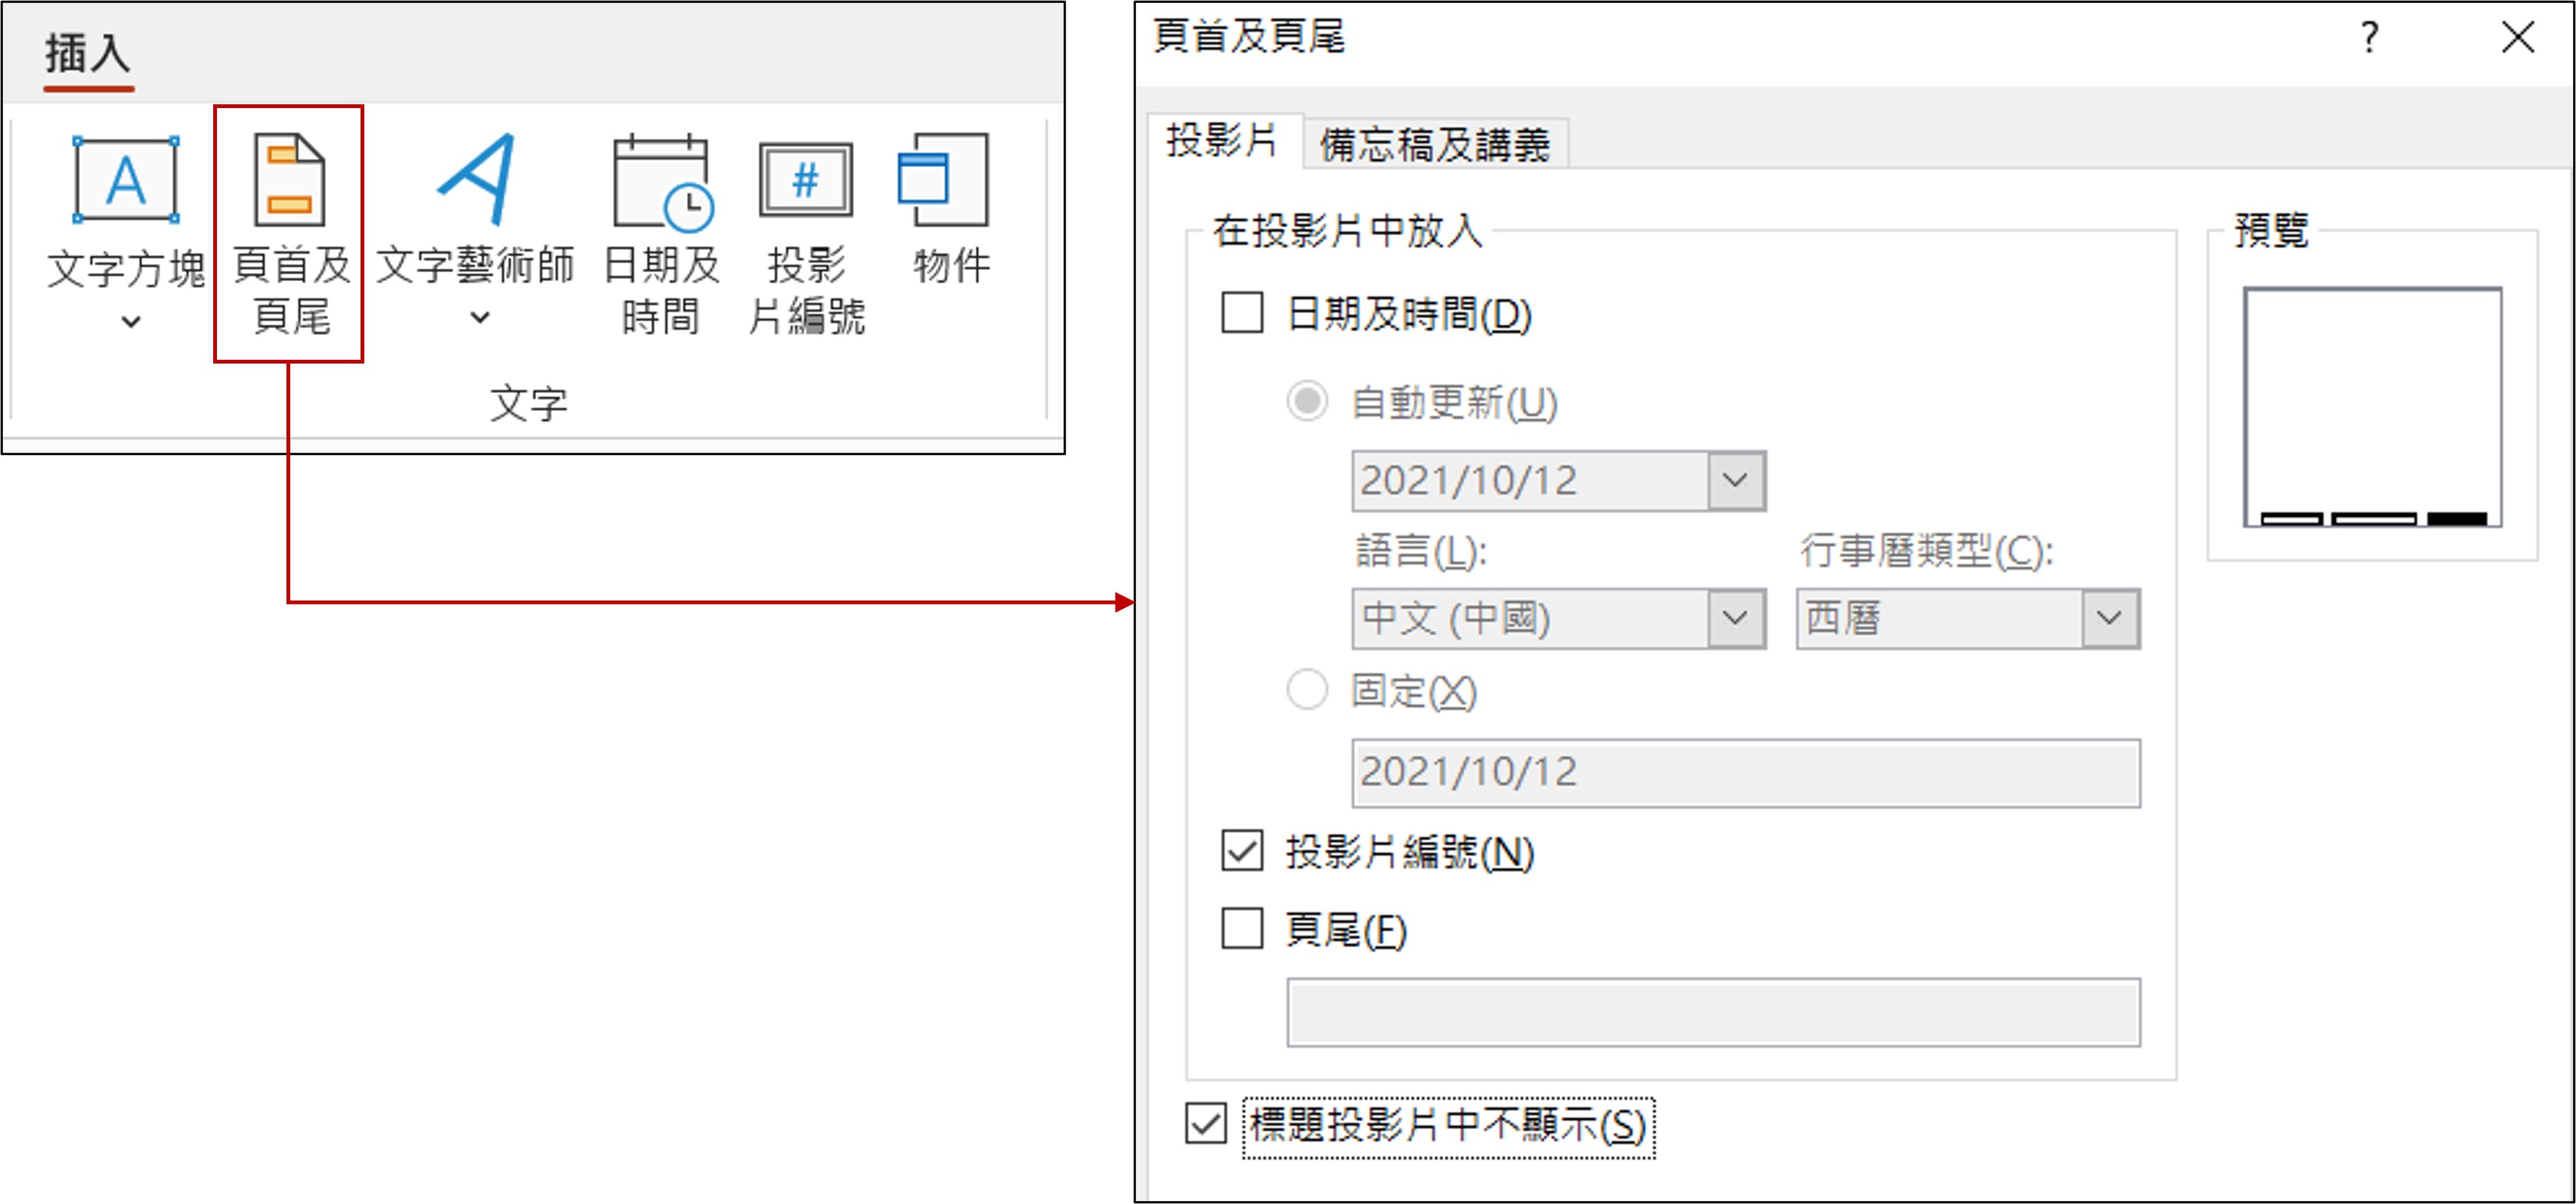</span>
</details>
## <span class="h2">5. 善用母片,統一風格</span>
<details>
<summary>【細項說明】點擊展開/摺疊</summary>
<span class="img100"></span>
</details>
## <span class="h2">6. 【字】的整體調整</span>
<details>
<summary>【細項說明】點擊展開/摺疊</summary>
<span class="h4">(1) 字型批次取代</span>
<span class="img50">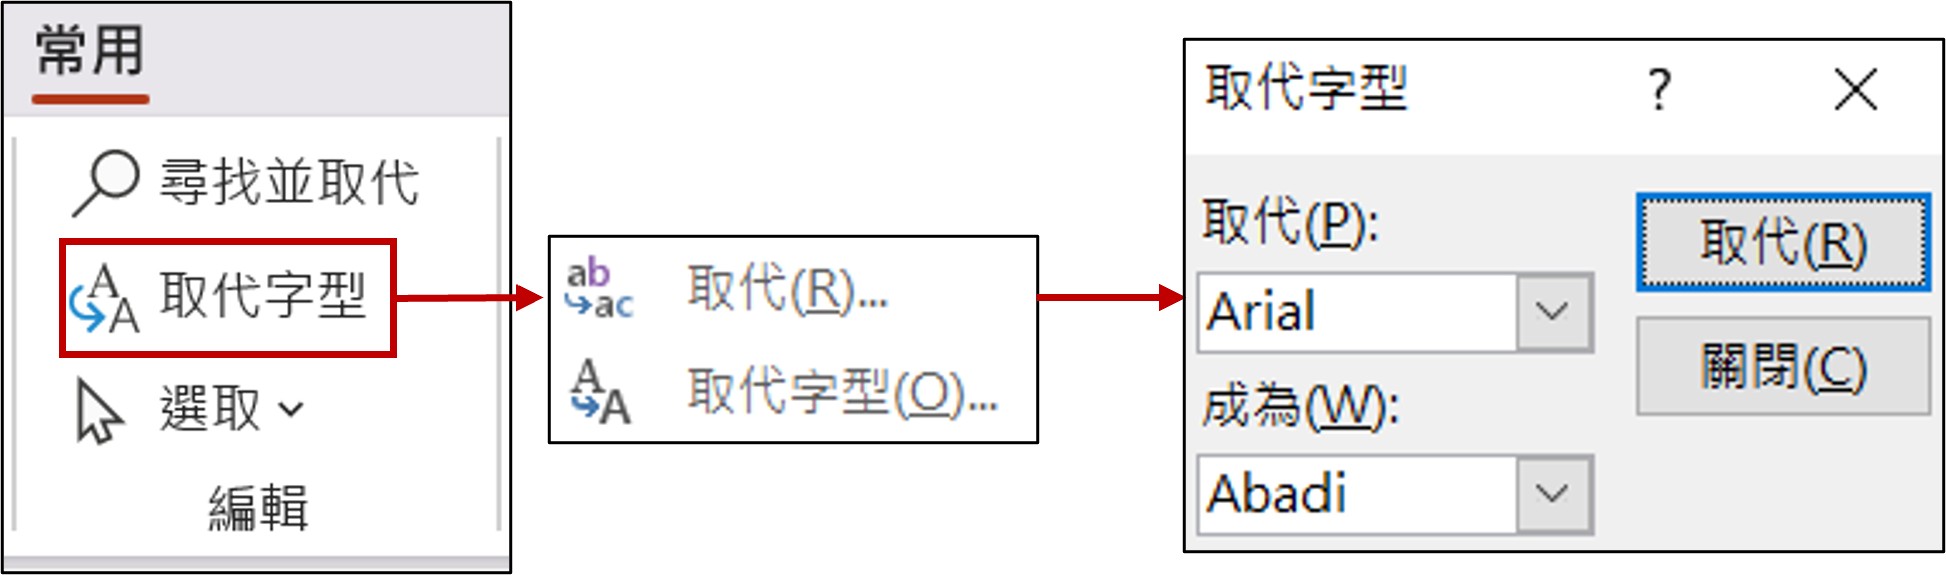</span>
<span class="h4">(2) 整體文字大小調整技巧</span>
<span class="img40"></span>
<span class="h4">(3) 圖形內的文字的困擾</span>
<span class="img100"></span>
<span class="h4">(4) 拼音檢查</span>
<span class="img60">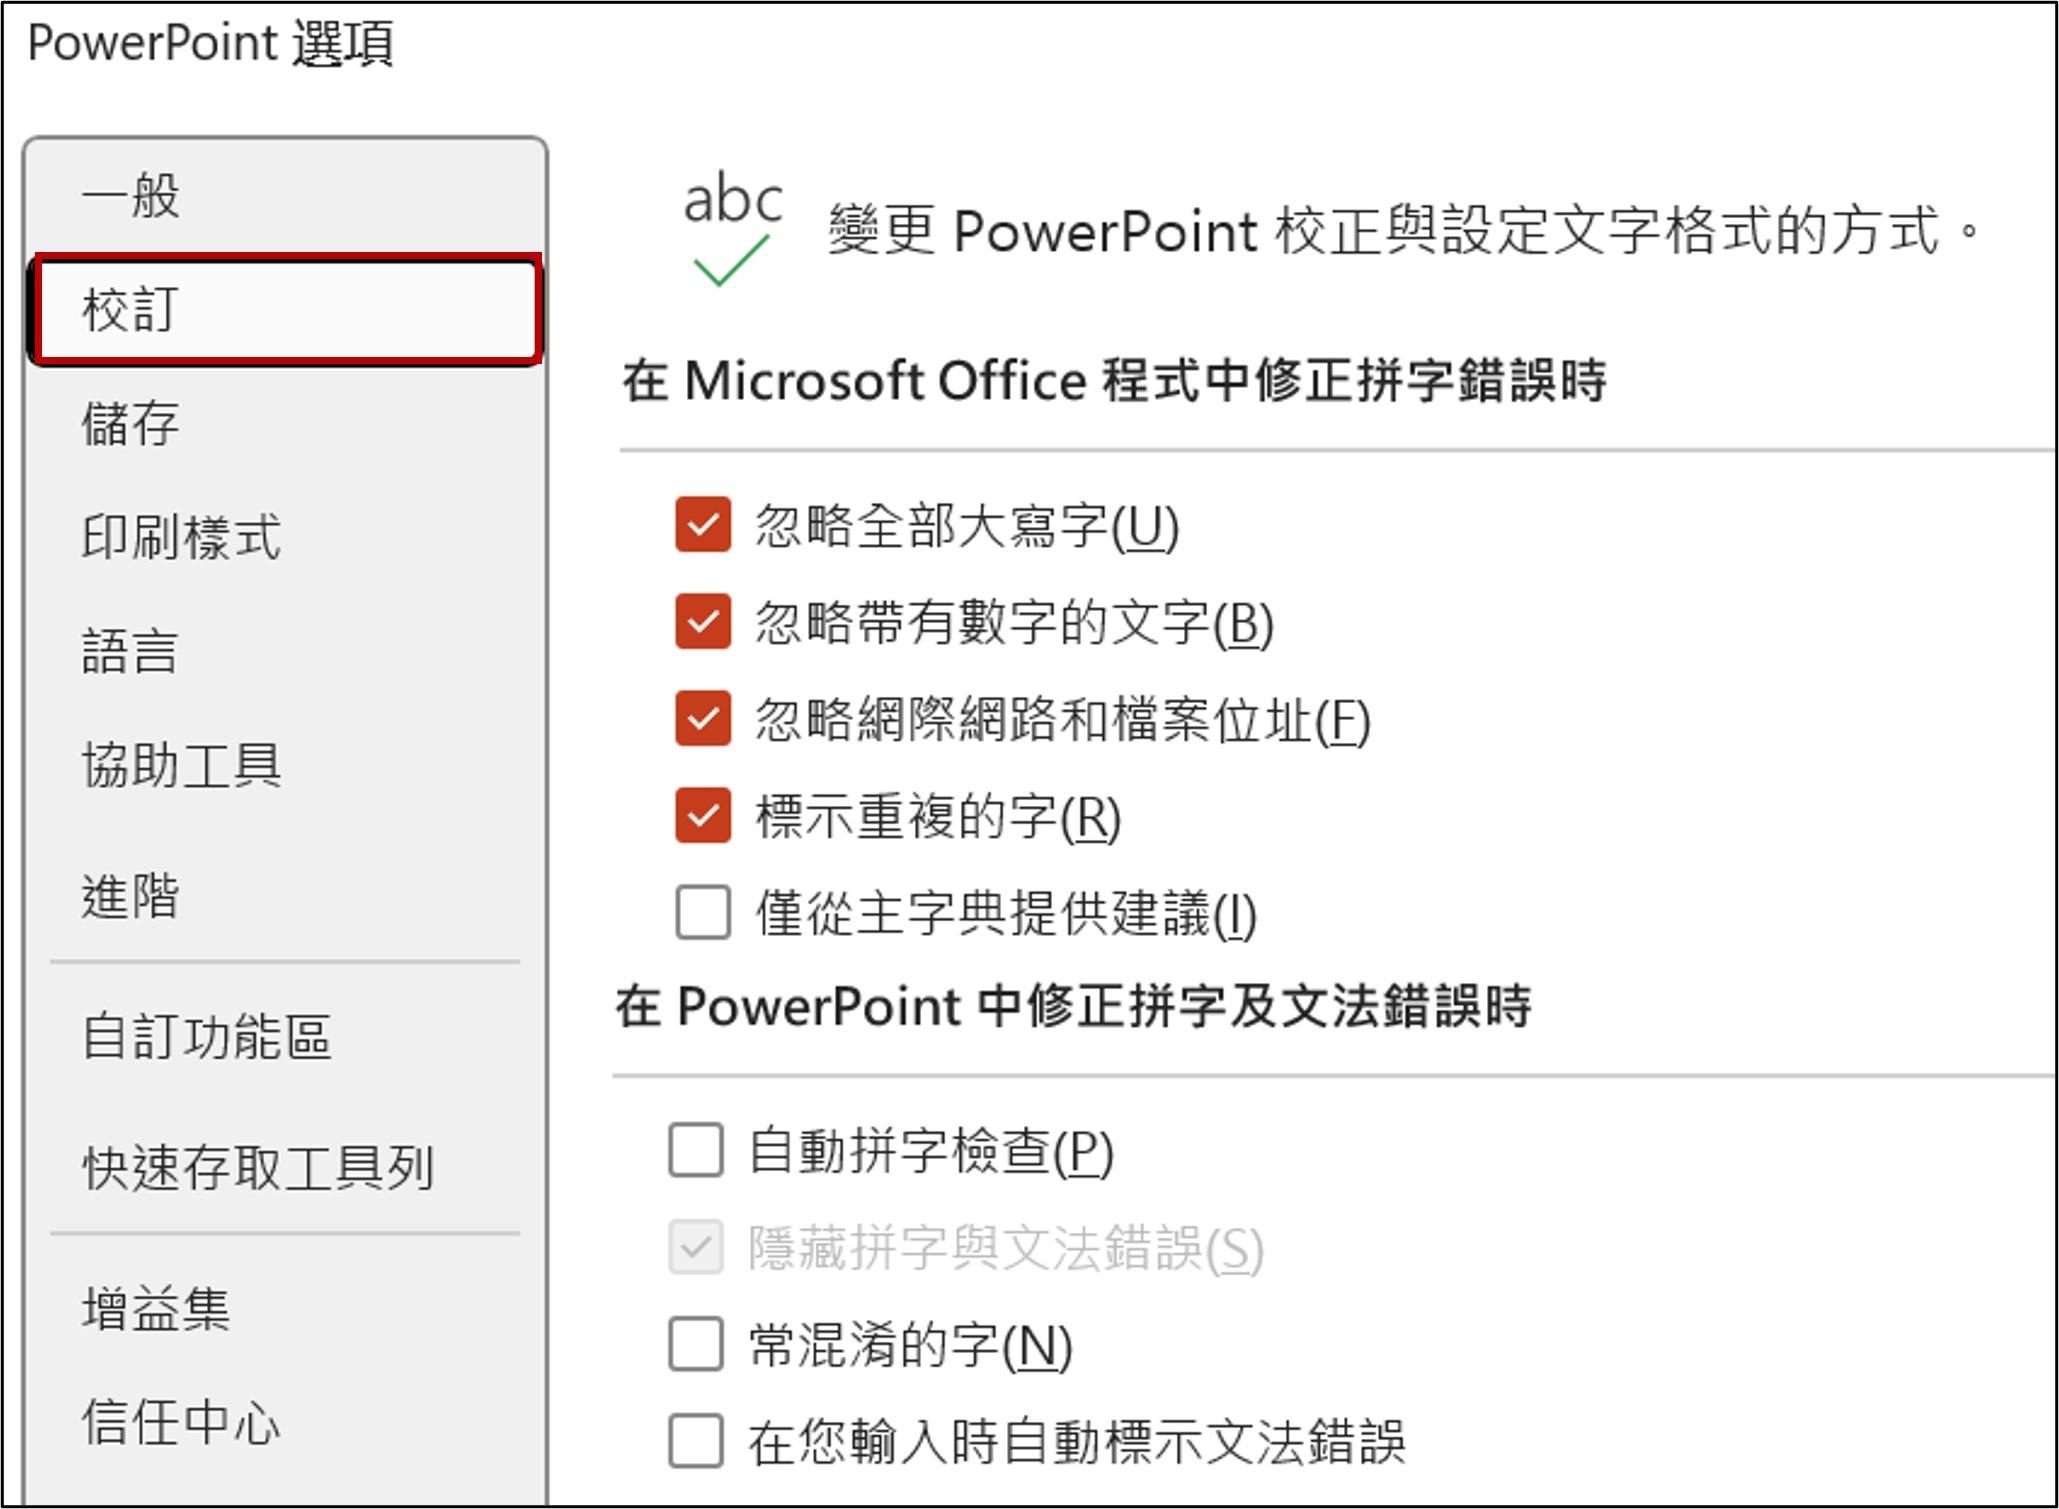</span>
<span class="h4">(5) 字型內嵌</span>
<span class="img80">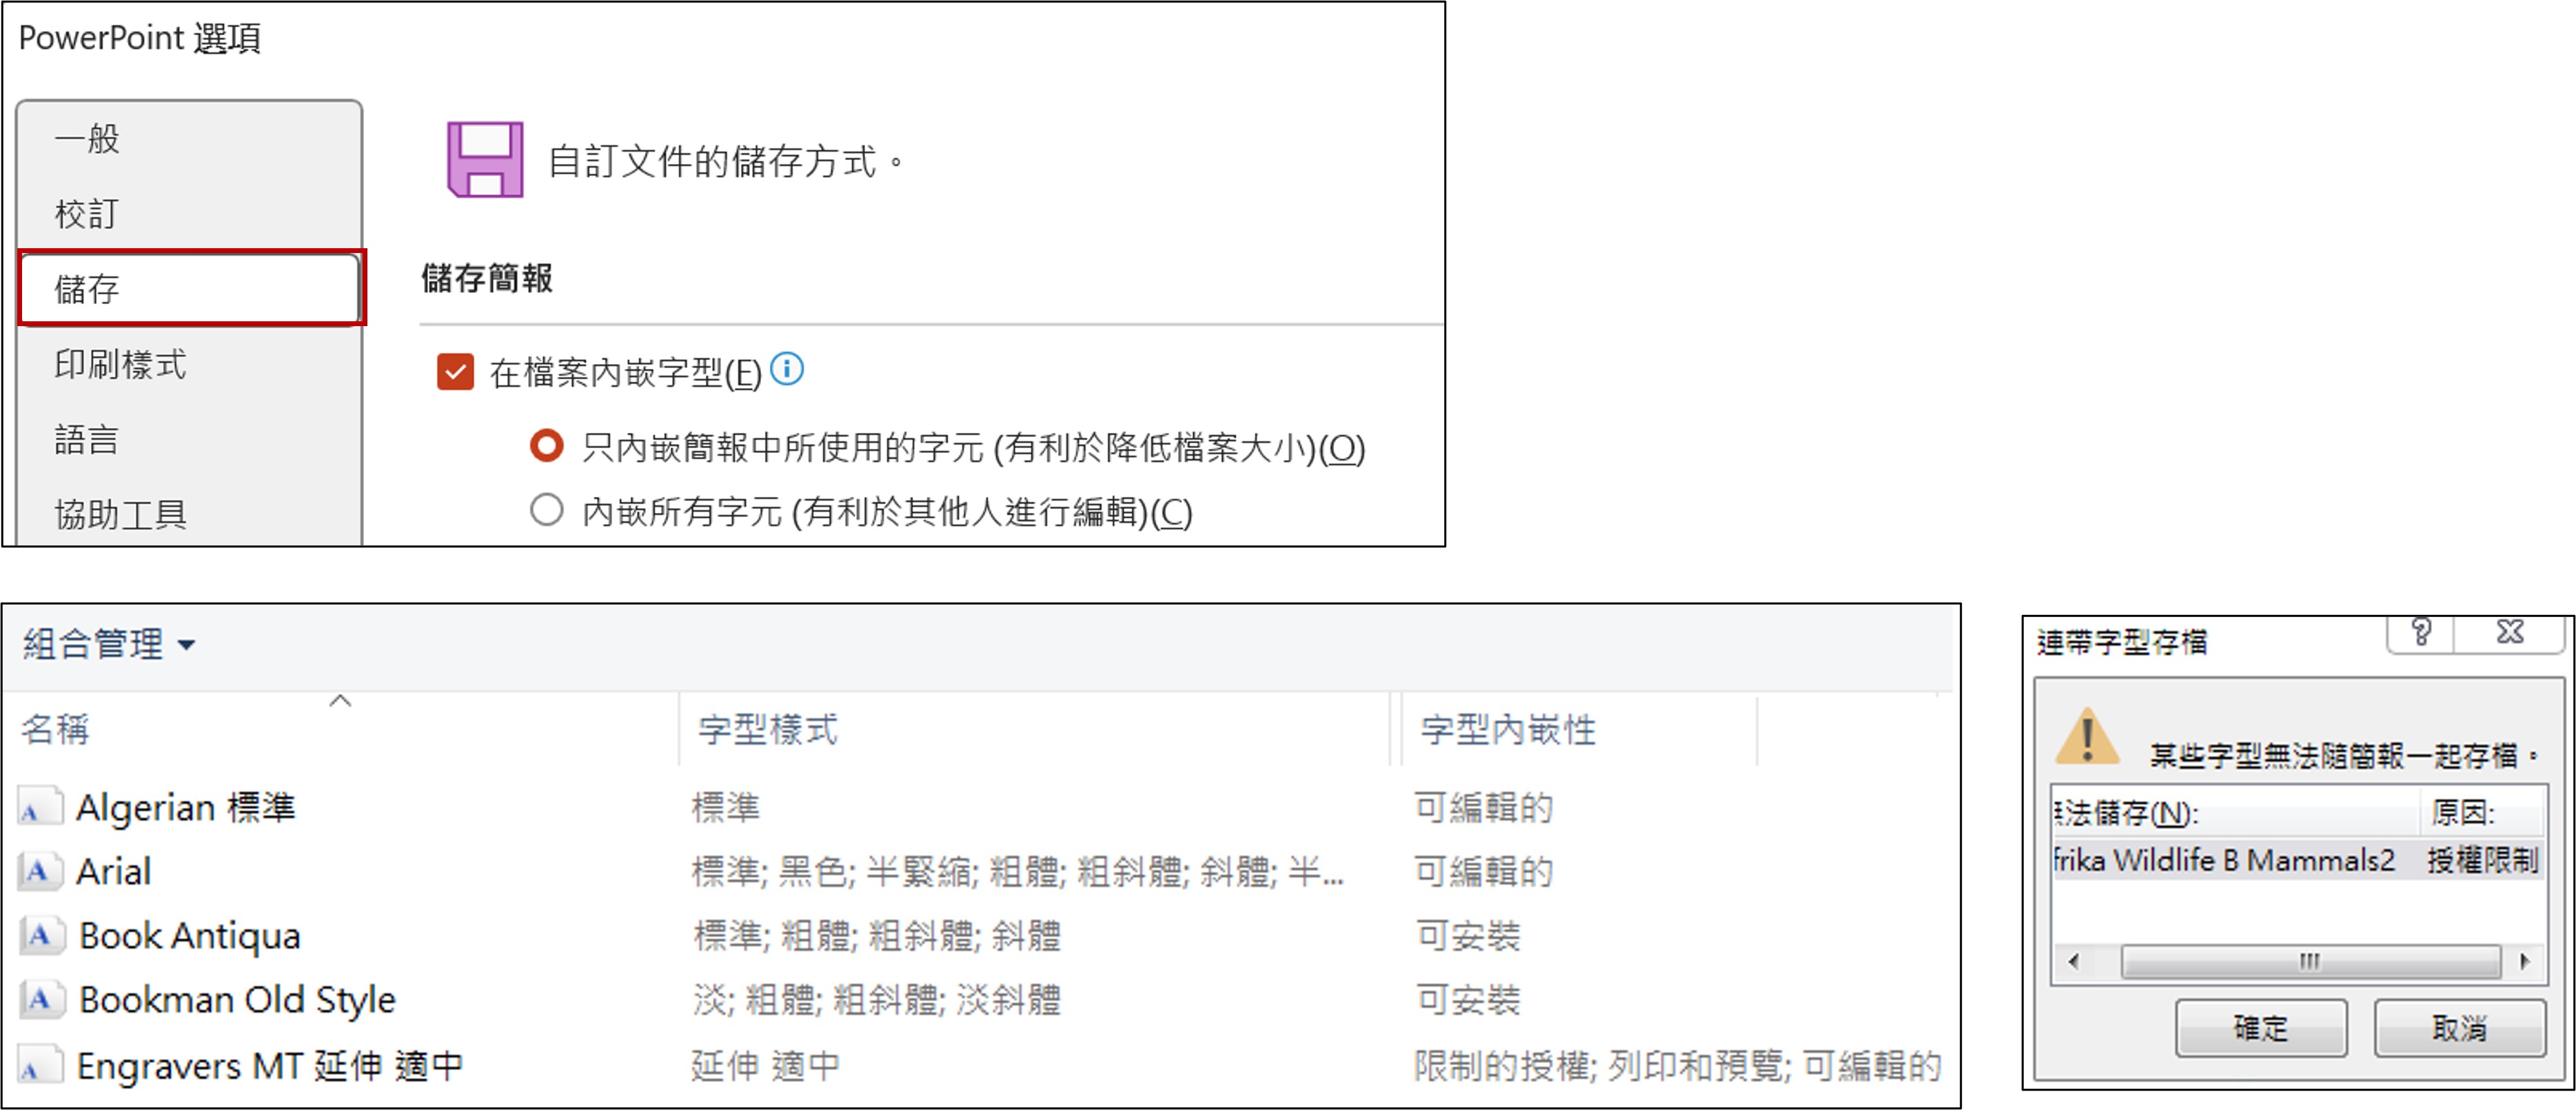</span>
</details>
<br><br><br><br><br><br>
# ------------
# 一、素材取得
## <span class="h2">1. 圖片處理建議</span>
### (1) PPT提供功能
<details>
<summary>【細項說明】點擊展開/摺疊</summary>
<span class="h4">A. 圖片去背工具</span>
<span class="img50">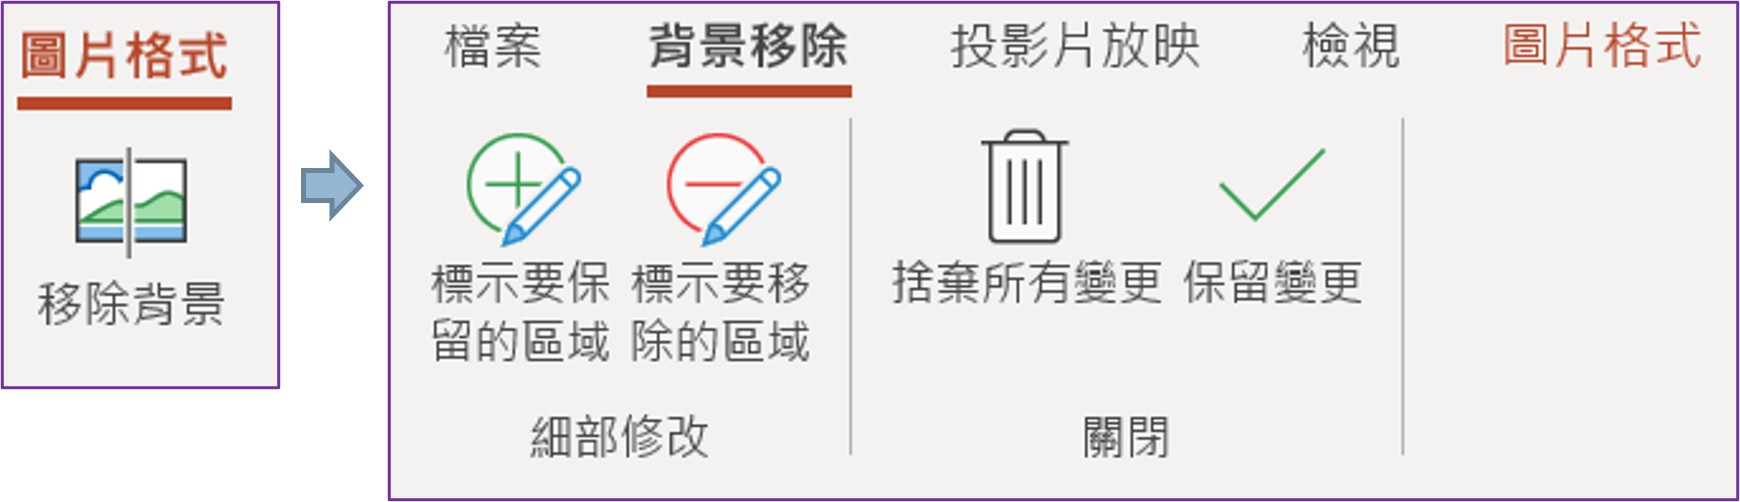</span>
<span class="h4">B. 圖片壓縮</span>
<span class="img80">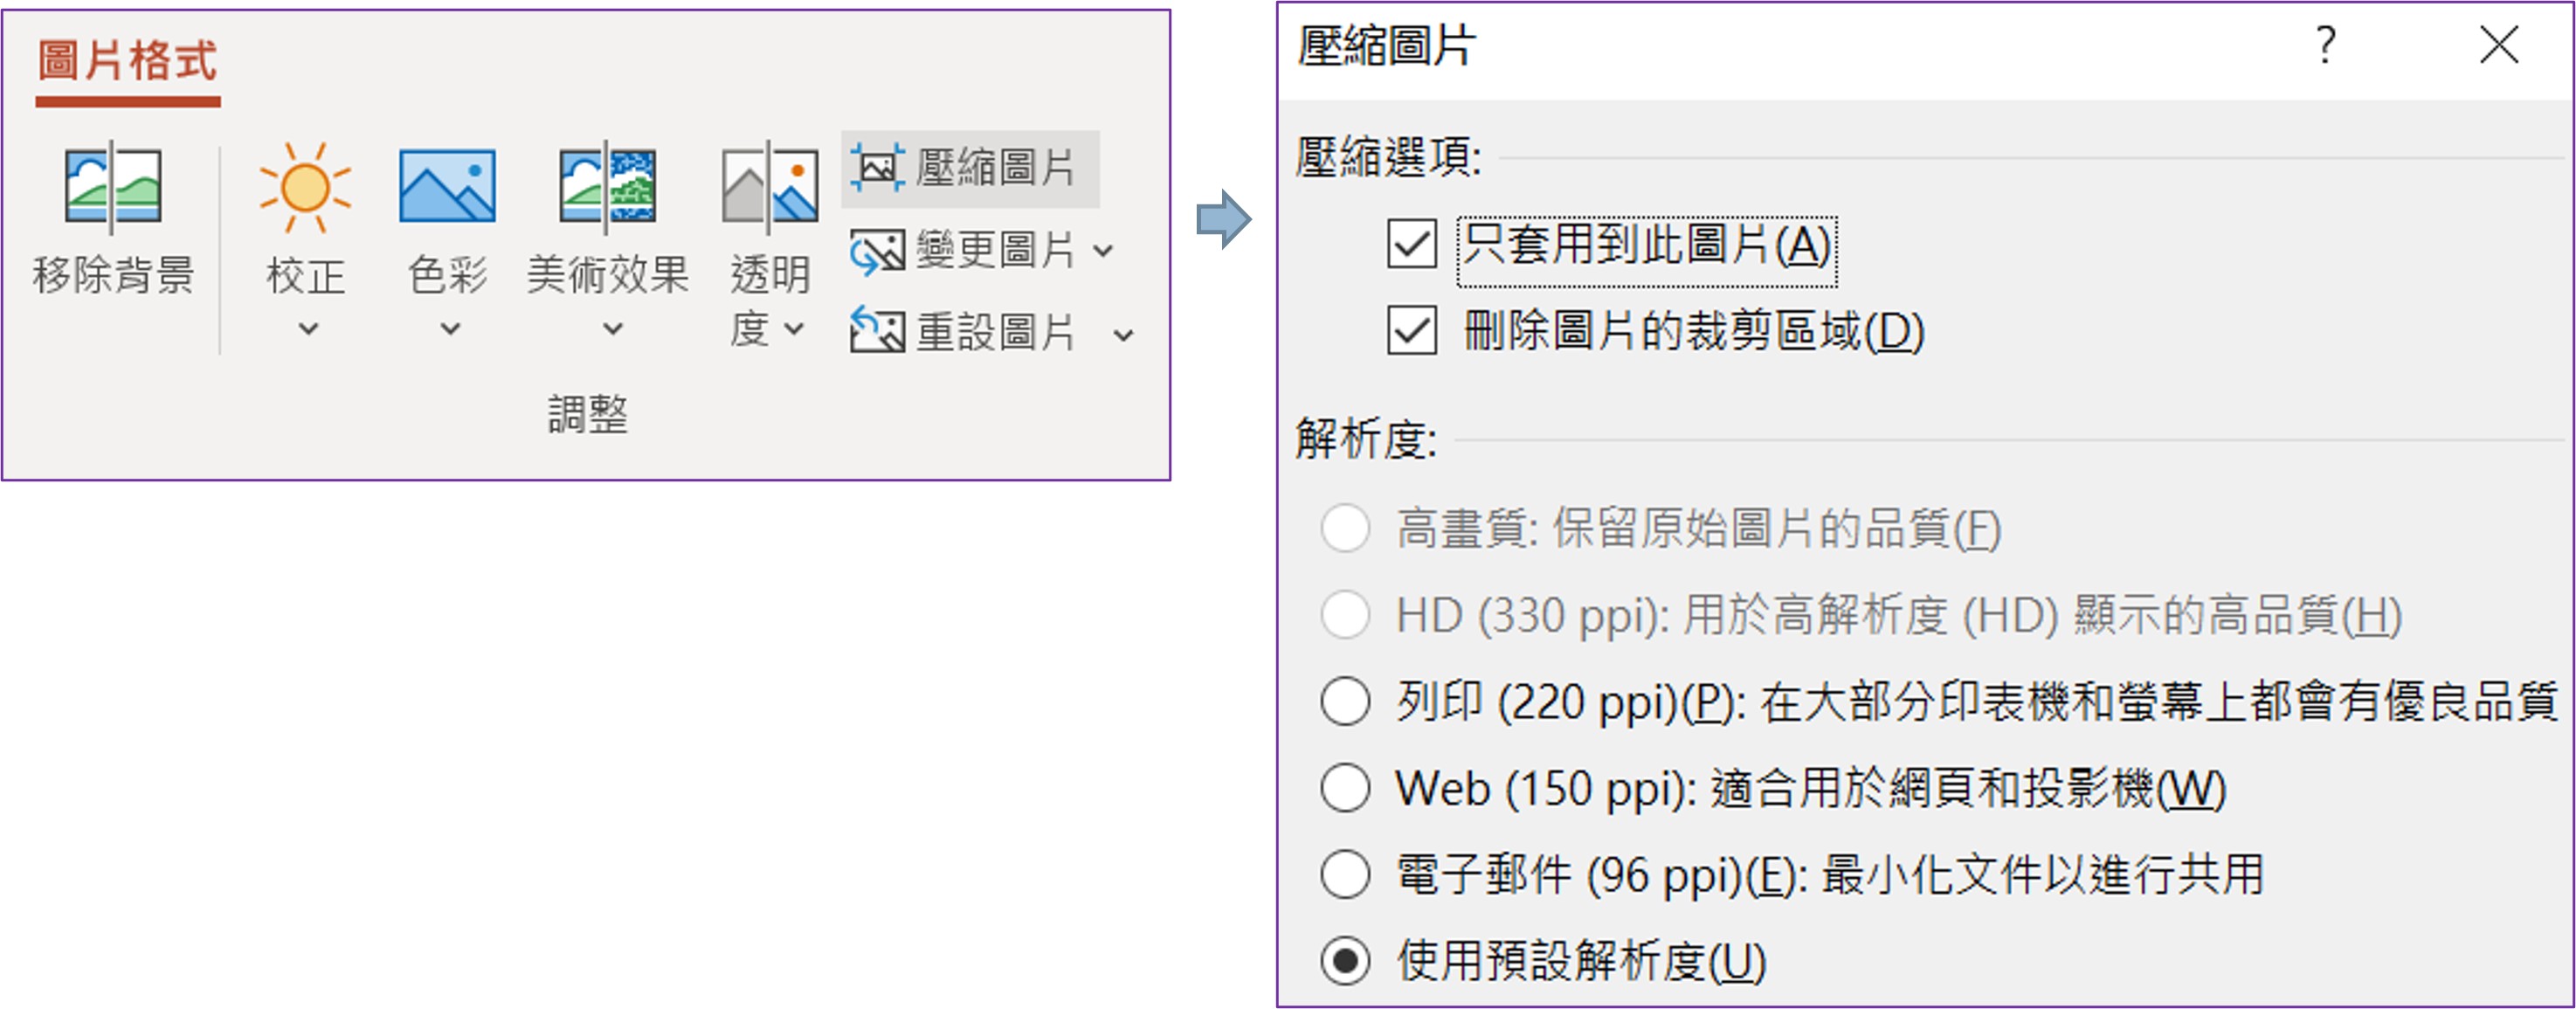</span>
<span class="h4">C. 螢幕擷取畫面</span>
<span class="pp">📌 PPT指令</span>
<span class="img80">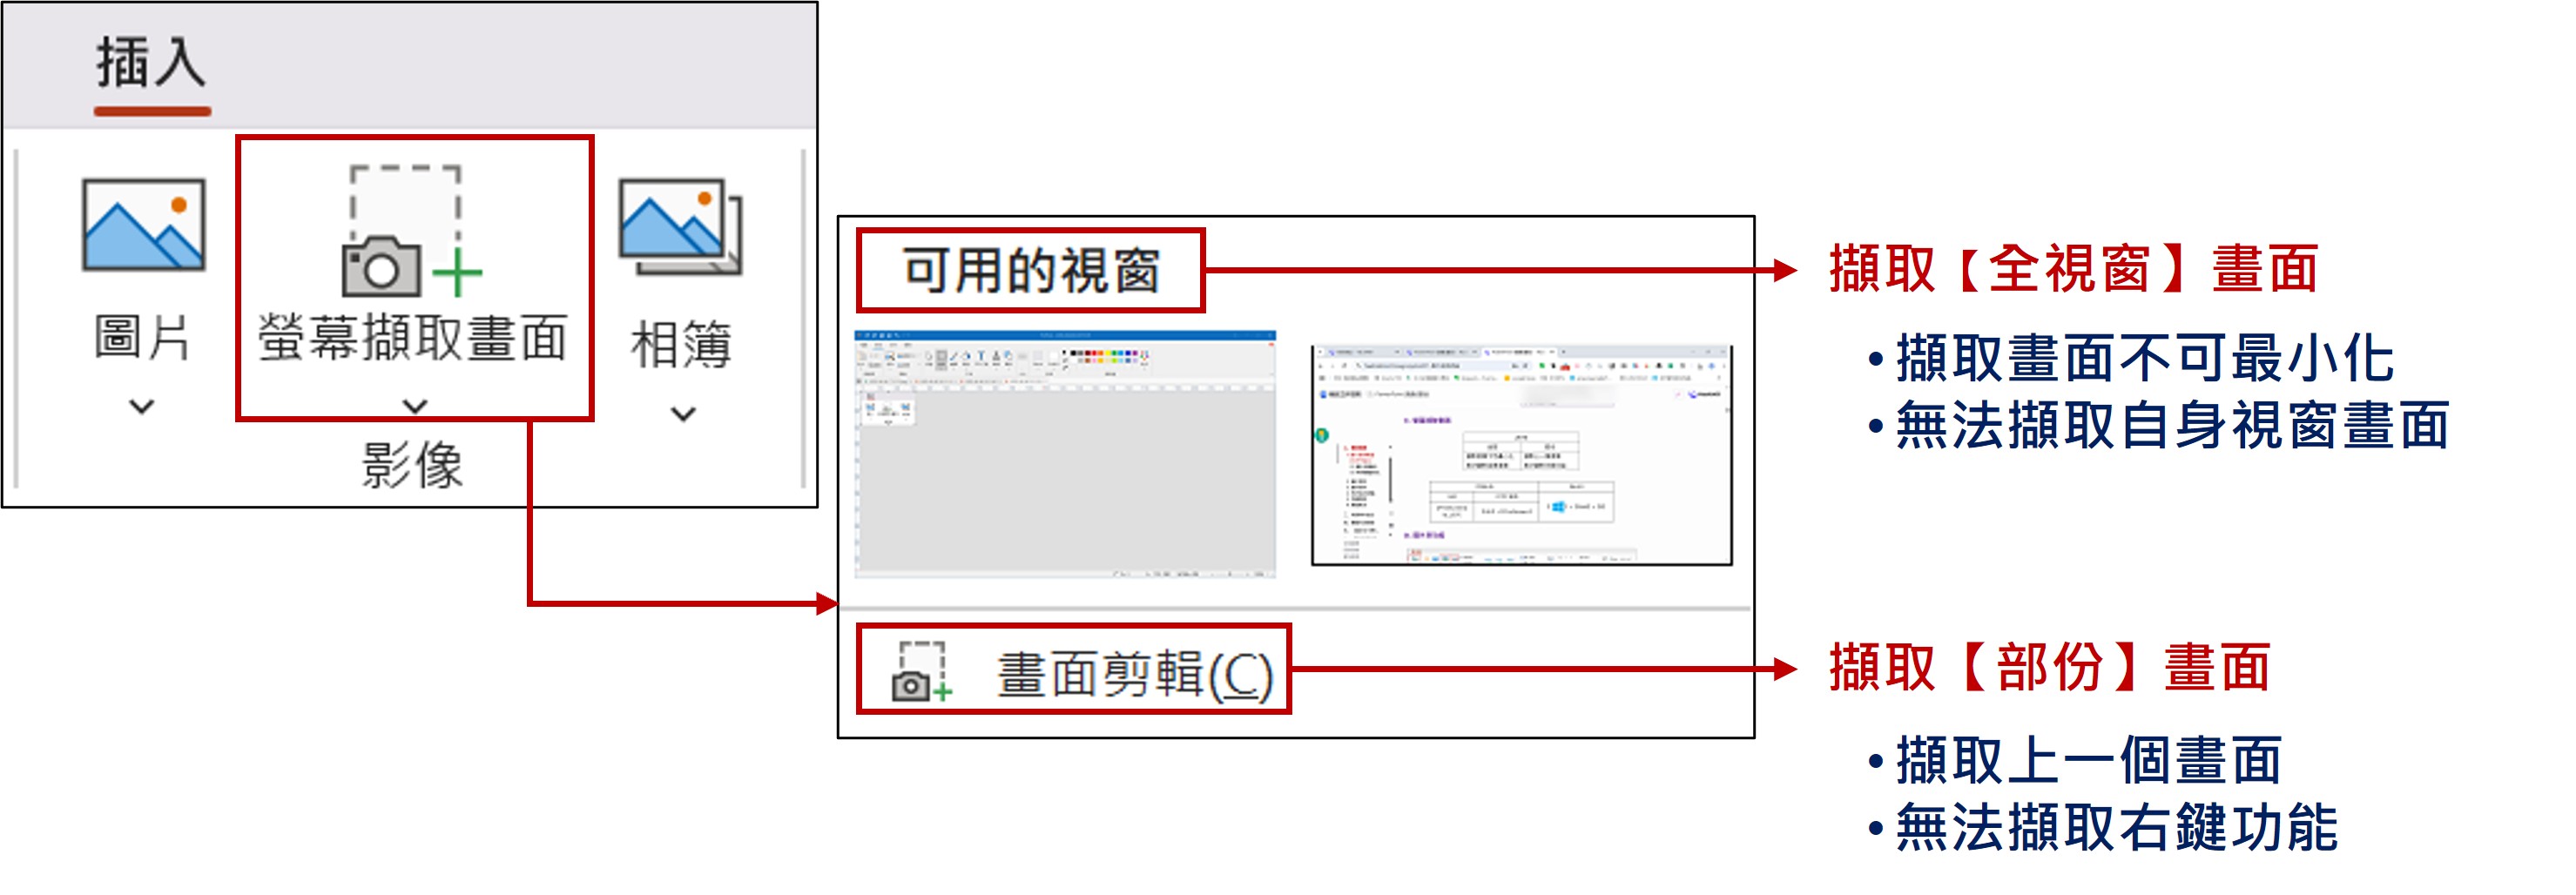</span>
<span class="pp">📌 作業系統快速鍵</span>
* 擷取【全視窗】畫面:`PrintScreen`
* 擷取【部份】畫面:`Alt` + `PrintScreen`
<span class="pp">📌 作業系統【<span class="img5"></span>剪切工具】</span>
<span class="img60">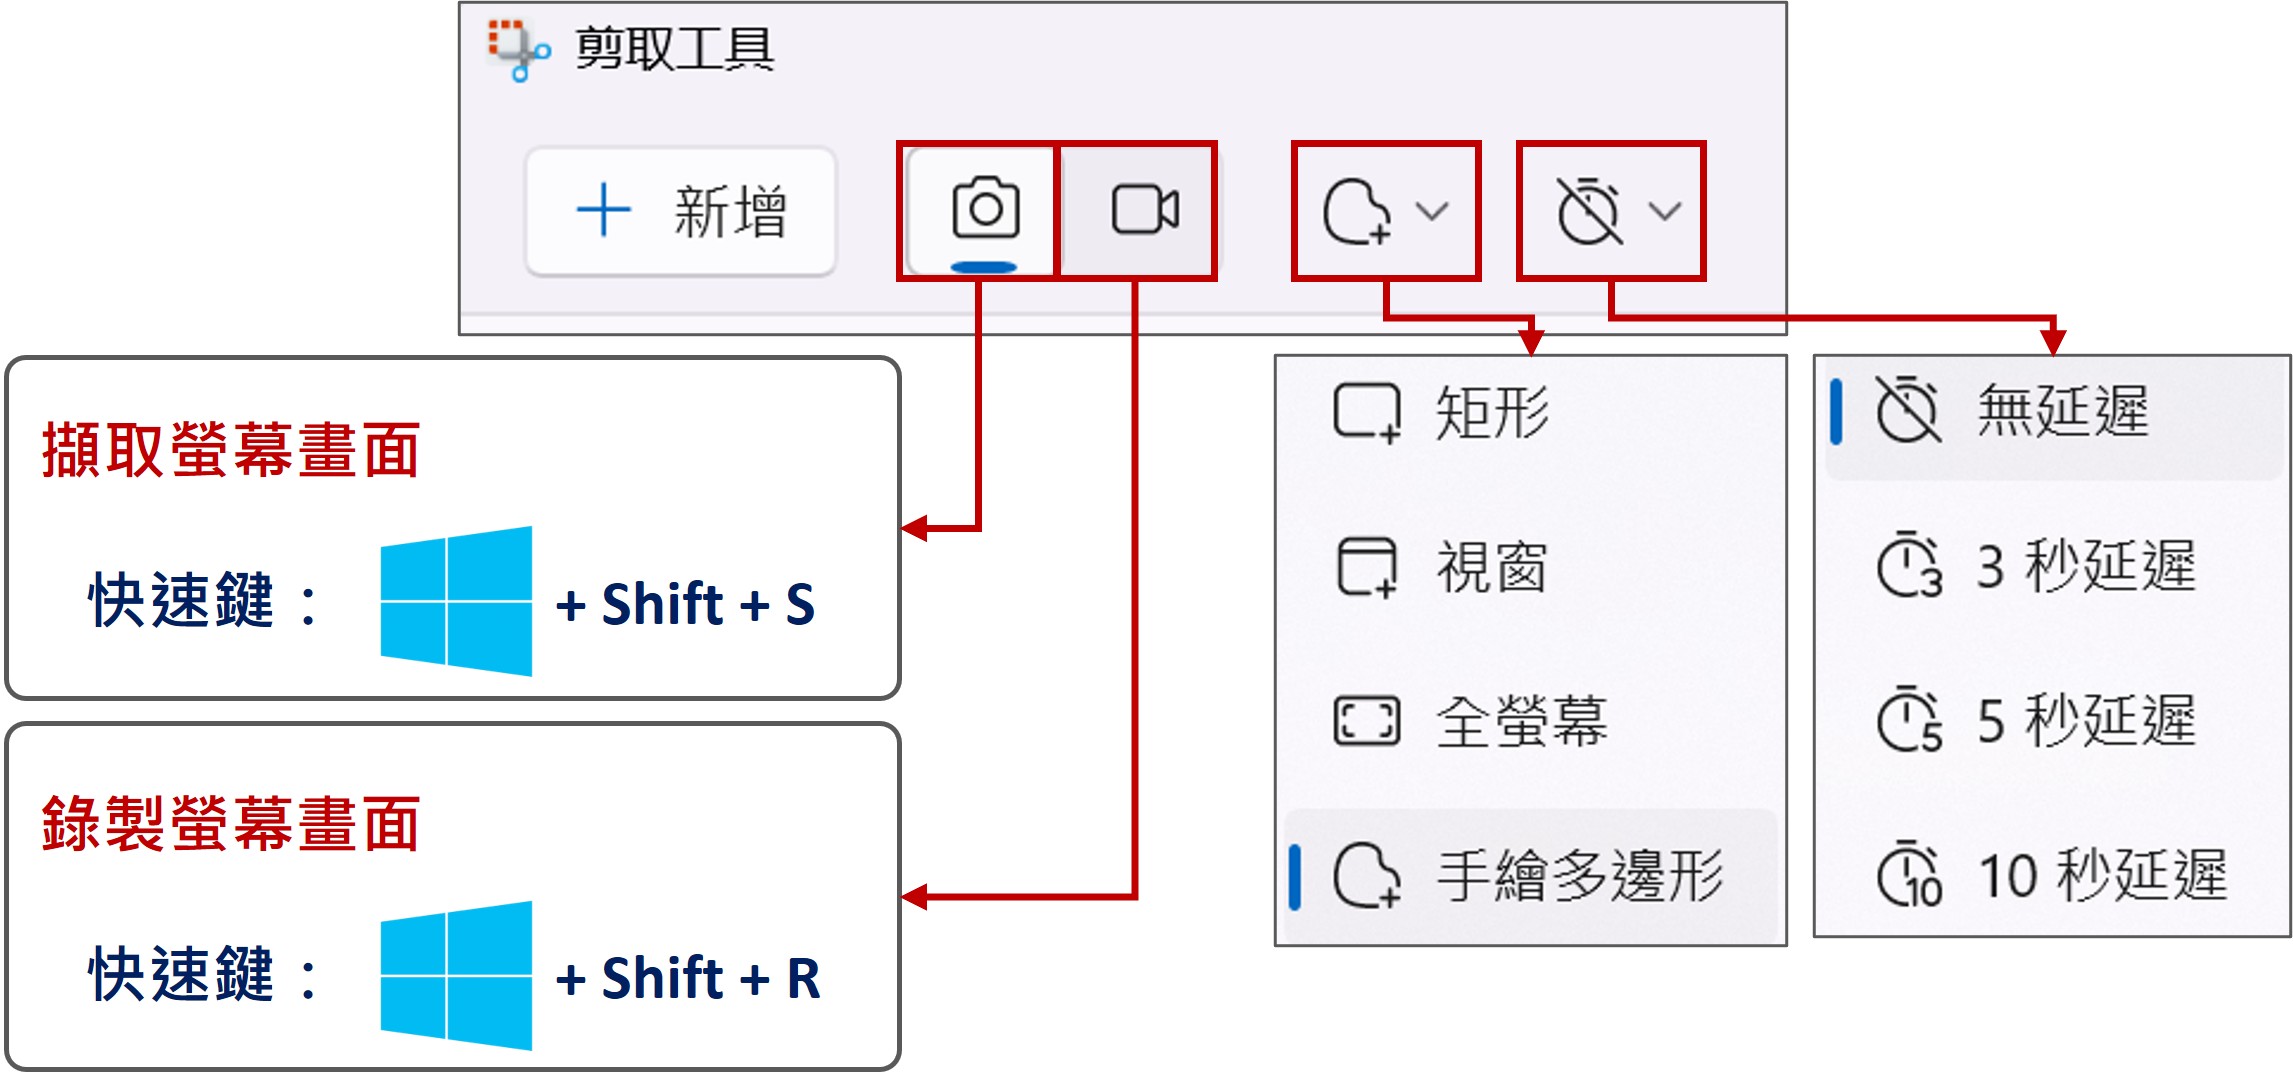</span>
</details>
### (2) 圖片相關處理工具
<details>
<summary>【細項說明】點擊展開/摺疊</summary>
|搜尋KeyWord|<a href="https://www.iloveimg.com">iLoveimg</a>|<a href="https://picwish.com">PicWish</a>|<a href="https://www.remove.bg/">RemoveBg</a>|
|-|-|-|-|
|Logo|<span class="img100" style="margin:0 auto"></span>|<span class="img100" style="margin:0 auto"></span>|<span class="img100" style="margin:0 auto"></span>|
SVG網站參考:<span class="urll" style="display:inline">[【👆中央氣象局(首頁)】](https://www.cwb.gov.tw/V8/C/) </span>
</details>
### (3) 常用圖檔格式
<details>
<summary>【細項說明】點擊展開/摺疊</summary>
<span class="fz12 blue textc bold">🔹點陣圖🔹</span>
|類型|說明|
|-|-|
|<span class="red">Webp</span>|1.WebP是Google新推出影像技術,讓網頁圖檔有效進行壓縮,又不影響圖片實際清晰度,讓網頁下載速度加快<br>2.目前許多軟體不支援,需要藉由工具轉換為常用圖檔格式<br>(1) 方法1:加入 [Chrome 套件](https://chrome.google.com/webstore/detail/save-image-as-type/gabfmnliflodkdafenbcpjdlppllnemd/related)<br>【圖片另存為JPG/PNG/WebP】,加入後針對想下載圖片,按右鍵即可選擇轉換格式<br>(2)方法2:線上轉檔網站,例如:[iLoveIMG](https://www.iloveimg.com/zh-tw/convert-to-jpg/webp-to-jpg)|
|<span class="red">jpg、jpeg</span>|主要儲存照片、支援全彩、不支援透明及動畫、網頁圖片由Webp取代趨勢|
|<span class="red">png</span>|取jpg與gif優點,全彩、透明,但不支援動畫|
|GIF|多張圖片依序顯示,營造動畫效果、圖片色彩少、支援透明及動畫|
|tiff、tif|傳統影像印刷、掃瞄檔|
|BMP|點陣圖、支援全彩、檔案大、早期圖檔格式|
|PSD|PhotoShop檔案,需要專業軟體開啟|
<span class="fz12 blue textc bold">🔹向量圖🔹</span>
|類型|說明|
|-|-|
|<span class="red">SVG</span>|可縮放向量圖形,可由瀏覽器檢視圖檔,現階段流行格式|
|WMF|向量圖檔、任意放大縮小品質不失真、早期圖檔格式,由SVG取代|
|EPS、Ai|需要Adobe illustrator專業軟體開啟|
</details>
## <span class="h2">2. 圖片素材</span>
<details>
<summary>【細項說明】點擊展開/摺疊</summary>
<span class="red">「無著作權(CC0)」高解析度圖片網站,</span>
使用者可以將圖片運用在各種用途,無需支付任何費用、標記原作者名稱。
|<span style="text-align:center; display:block;">連結網址</span>|<span style="text-align:center; display:block;">logo</span>|<span style="text-align:center; display:block;">說明</span>|
|-|-|-|
|https://pixabay.com/zh/|<span class="img50" style="margin:0 auto"></span>|JPG、Video|
|https://unsplash.com/|<span class="img50" style="margin:0 auto"></span>|JPG、Icon|
|https://www.pexels.com/|<span class="img50" style="margin:0 auto"></span>|JPG、Video|
|https://www.foodiesfeed.com/|<span class="img50" style="margin:0 auto"></span>|食物圖片|
</details>
## <span class="h2">3. 圖形素材</span>
<details>
<summary>【細項說明】點擊展開/摺疊</summary>
|搜尋KeyWord|<a href="https://undraw.co/illustrations">undraw</a>|<a href="https://www.svgrepo.com/">SVGrepo</a>|<a href="https://uxwing.com/?utm_source=chatgpt.com">uxwing</a>|
|-|-|-|-|
|Logo|<span class="img80" style="margin:0 auto"></span>|<span class="img100" style="margin:0 auto"></span>|<span class="img80" style="margin:0 auto"></span>|
</details>
## <span class="h2">4. 地圖應用</span>
<details>
<summary>【細項說明】點擊展開/摺疊</summary>
製作商業簡報時,經常需要結合地理資訊呈現出重點內容。例如:說明全球營業據點的分佈概況、展現各地產品的銷售業績。
相較於使用表格或圖表,採取地圖結合資訊與數據的作法,除了可以顯示資料之間的關連性與視覺性之外,亦能大幅提升簡報的說服力。
|網址|地圖形態|
|-|-|
|[維基百科:新北市地理位置圖](https://zh.wikipedia.org/wiki/Template:Location_map_Taiwan_NewTaipei)|<a href="https://filedn.com/lzai0pPTnpfyPiXAjMDqr4V/hackmd/ppt34.png"><span class="img100"></span></a>|
|[維基百科:臺灣地理位置圖模板](https://zh.wikipedia.org/wiki/Category:%E8%87%BA%E7%81%A3%E5%9C%B0%E7%90%86%E4%BD%8D%E7%BD%AE%E5%9C%96%E6%A8%A1%E6%9D%BF)|<a href="https://filedn.com/lzai0pPTnpfyPiXAjMDqr4V/hackmd/ppt35.png"><span class="img100">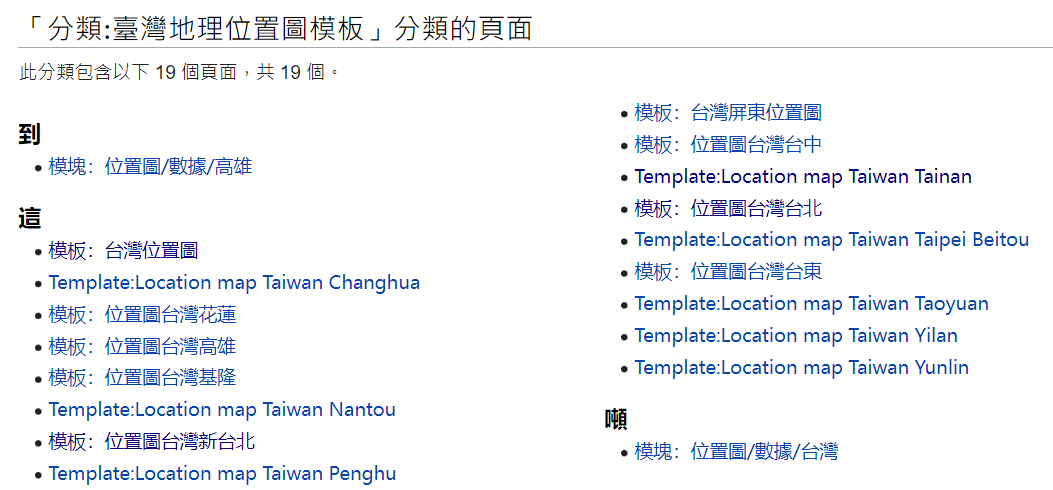</span></a>|
|[維基百科:台北市地理位置圖](https://zh.wikipedia.org/wiki/Template:Location_map_Taiwan_Taipei)|<a href="https://filedn.com/lzai0pPTnpfyPiXAjMDqr4V/hackmd/ppt36.png"><span class="img40">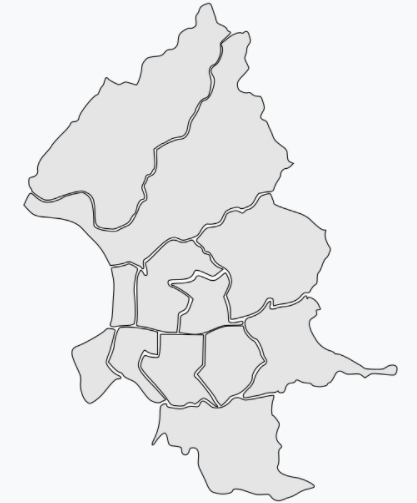</span></a>|
|[文件:台灣中華民國政區地圖.svg](https://zh.wikipedia.org/wiki/File:Taiwan_ROC_political_division_map.svg)|<a href="https://filedn.com/lzai0pPTnpfyPiXAjMDqr4V/hackmd/ppt37.png"><span class="img40">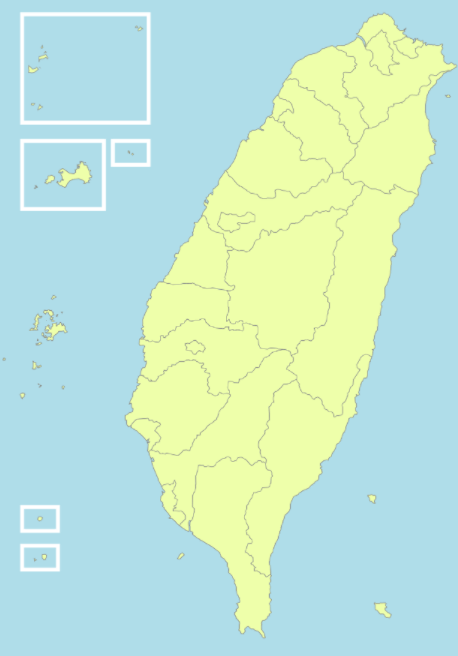</span></a>|
|[臺灣地理位置圖](https://zh.wikipedia.org/wiki/Template:Location_map_Taiwan)|<a href="https://filedn.com/lzai0pPTnpfyPiXAjMDqr4V/hackmd/ppt38.png"><span class="img100">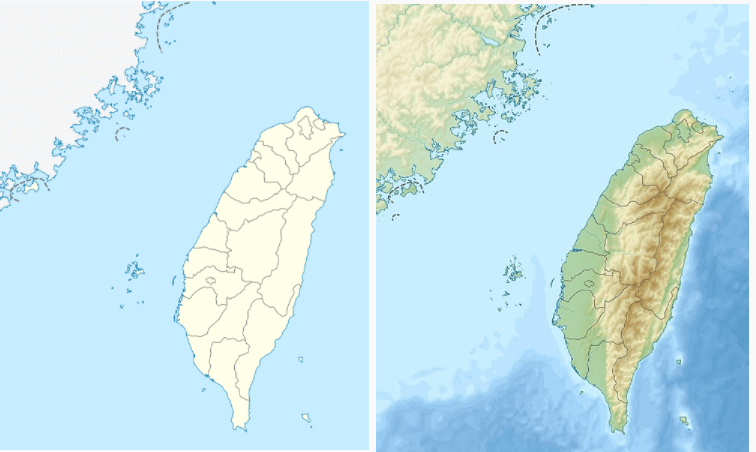</span></a>|
|[plotdb](https://plotdb.com/chart/2200/#/)|<a href="https://filedn.com/lzai0pPTnpfyPiXAjMDqr4V/hackmd/ppt39.png"><span class="img100"></span></a>|
</details>
## <span class="h2">5. 色彩組合建議</span>
### (1) 簡報色彩建議
<details>
<summary>【細項說明】點擊展開/摺疊</summary>
為了保持乾淨的外觀,建議
<span class="pp" style="padding-left:1.5em;">文字類簡報:不使用超過 3 ~ 4 種顏色</span><br><span class="pp" style="padding-left:1.5em;">圖型類簡報:選擇 4 ~ 6 種顏色進行套用</span>
</details>
### (2) 色彩設計基本概念
<details>
<summary>【細項說明】點擊展開/摺疊</summary>
<span class="img100">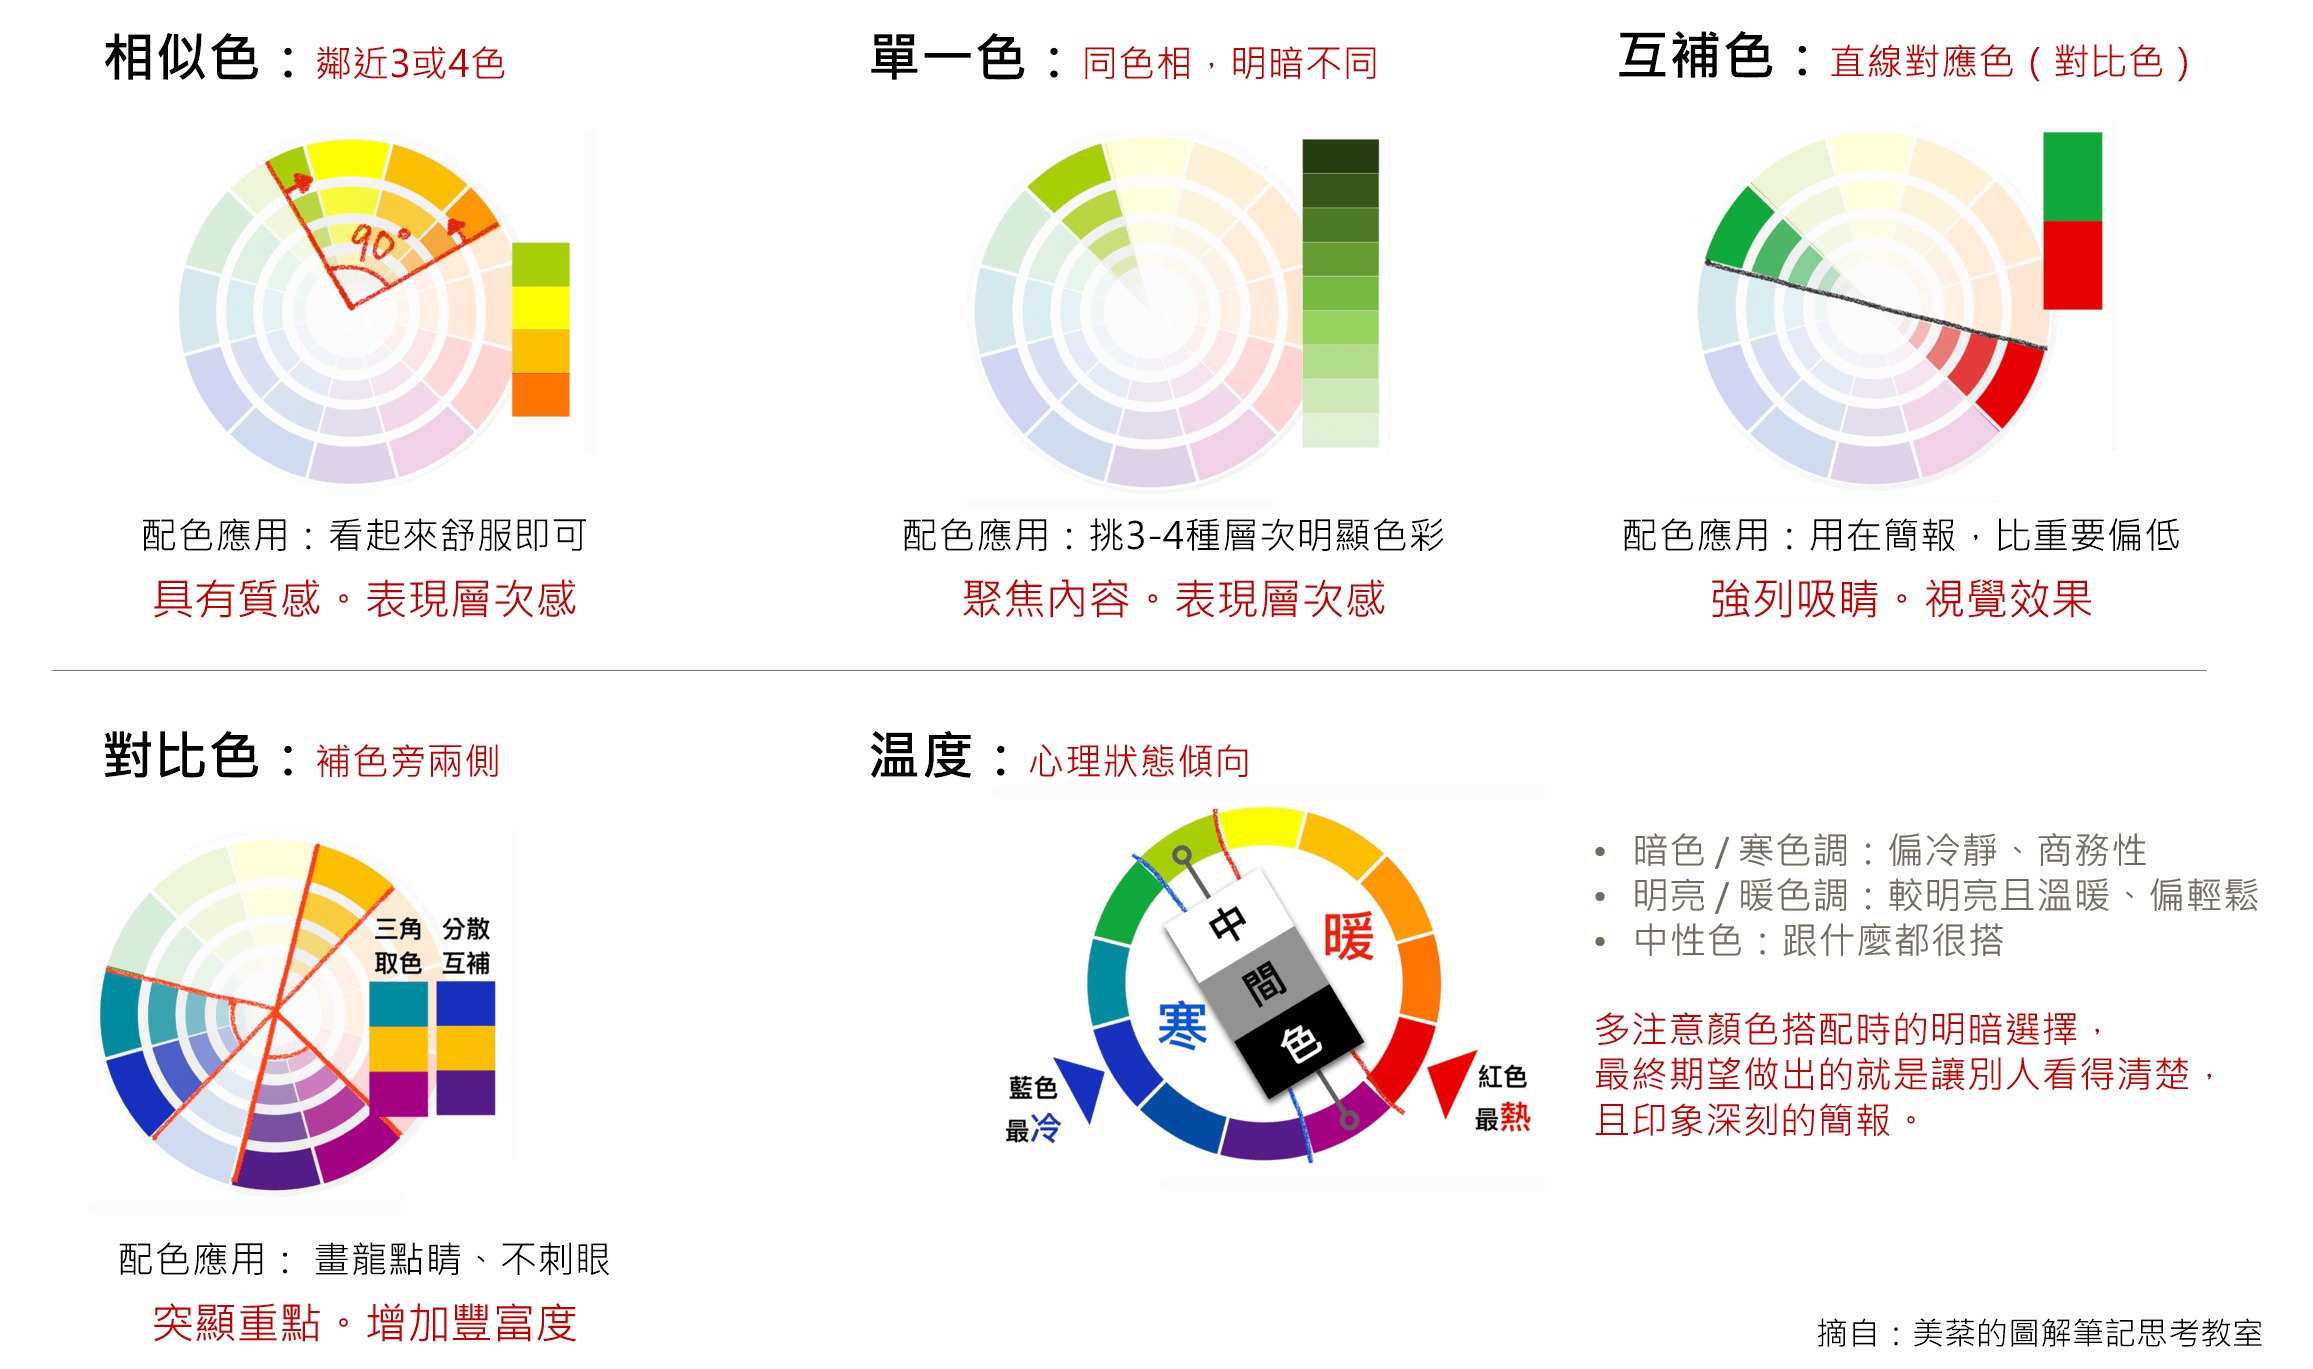</span>
<span class="urll">[摘自:美棻的圖解筆記思考教室](https://nancywei.org/2019/06/04/the-color-we-use-in-ppt/)</span>
</details>
### (3) 用色彩簡單原則
<details>
<summary>【細項說明】點擊展開/摺疊</summary>
參考網站:
https://www.managertoday.com.tw/articles/view/59997
:::info
* 先從色相環中挑選兩種色,貫穿簡報的【基色】
* 基色對面色彩標示為【重點色】
* 基色兩側【相近色】作為輔助色
:::
<span class="img80">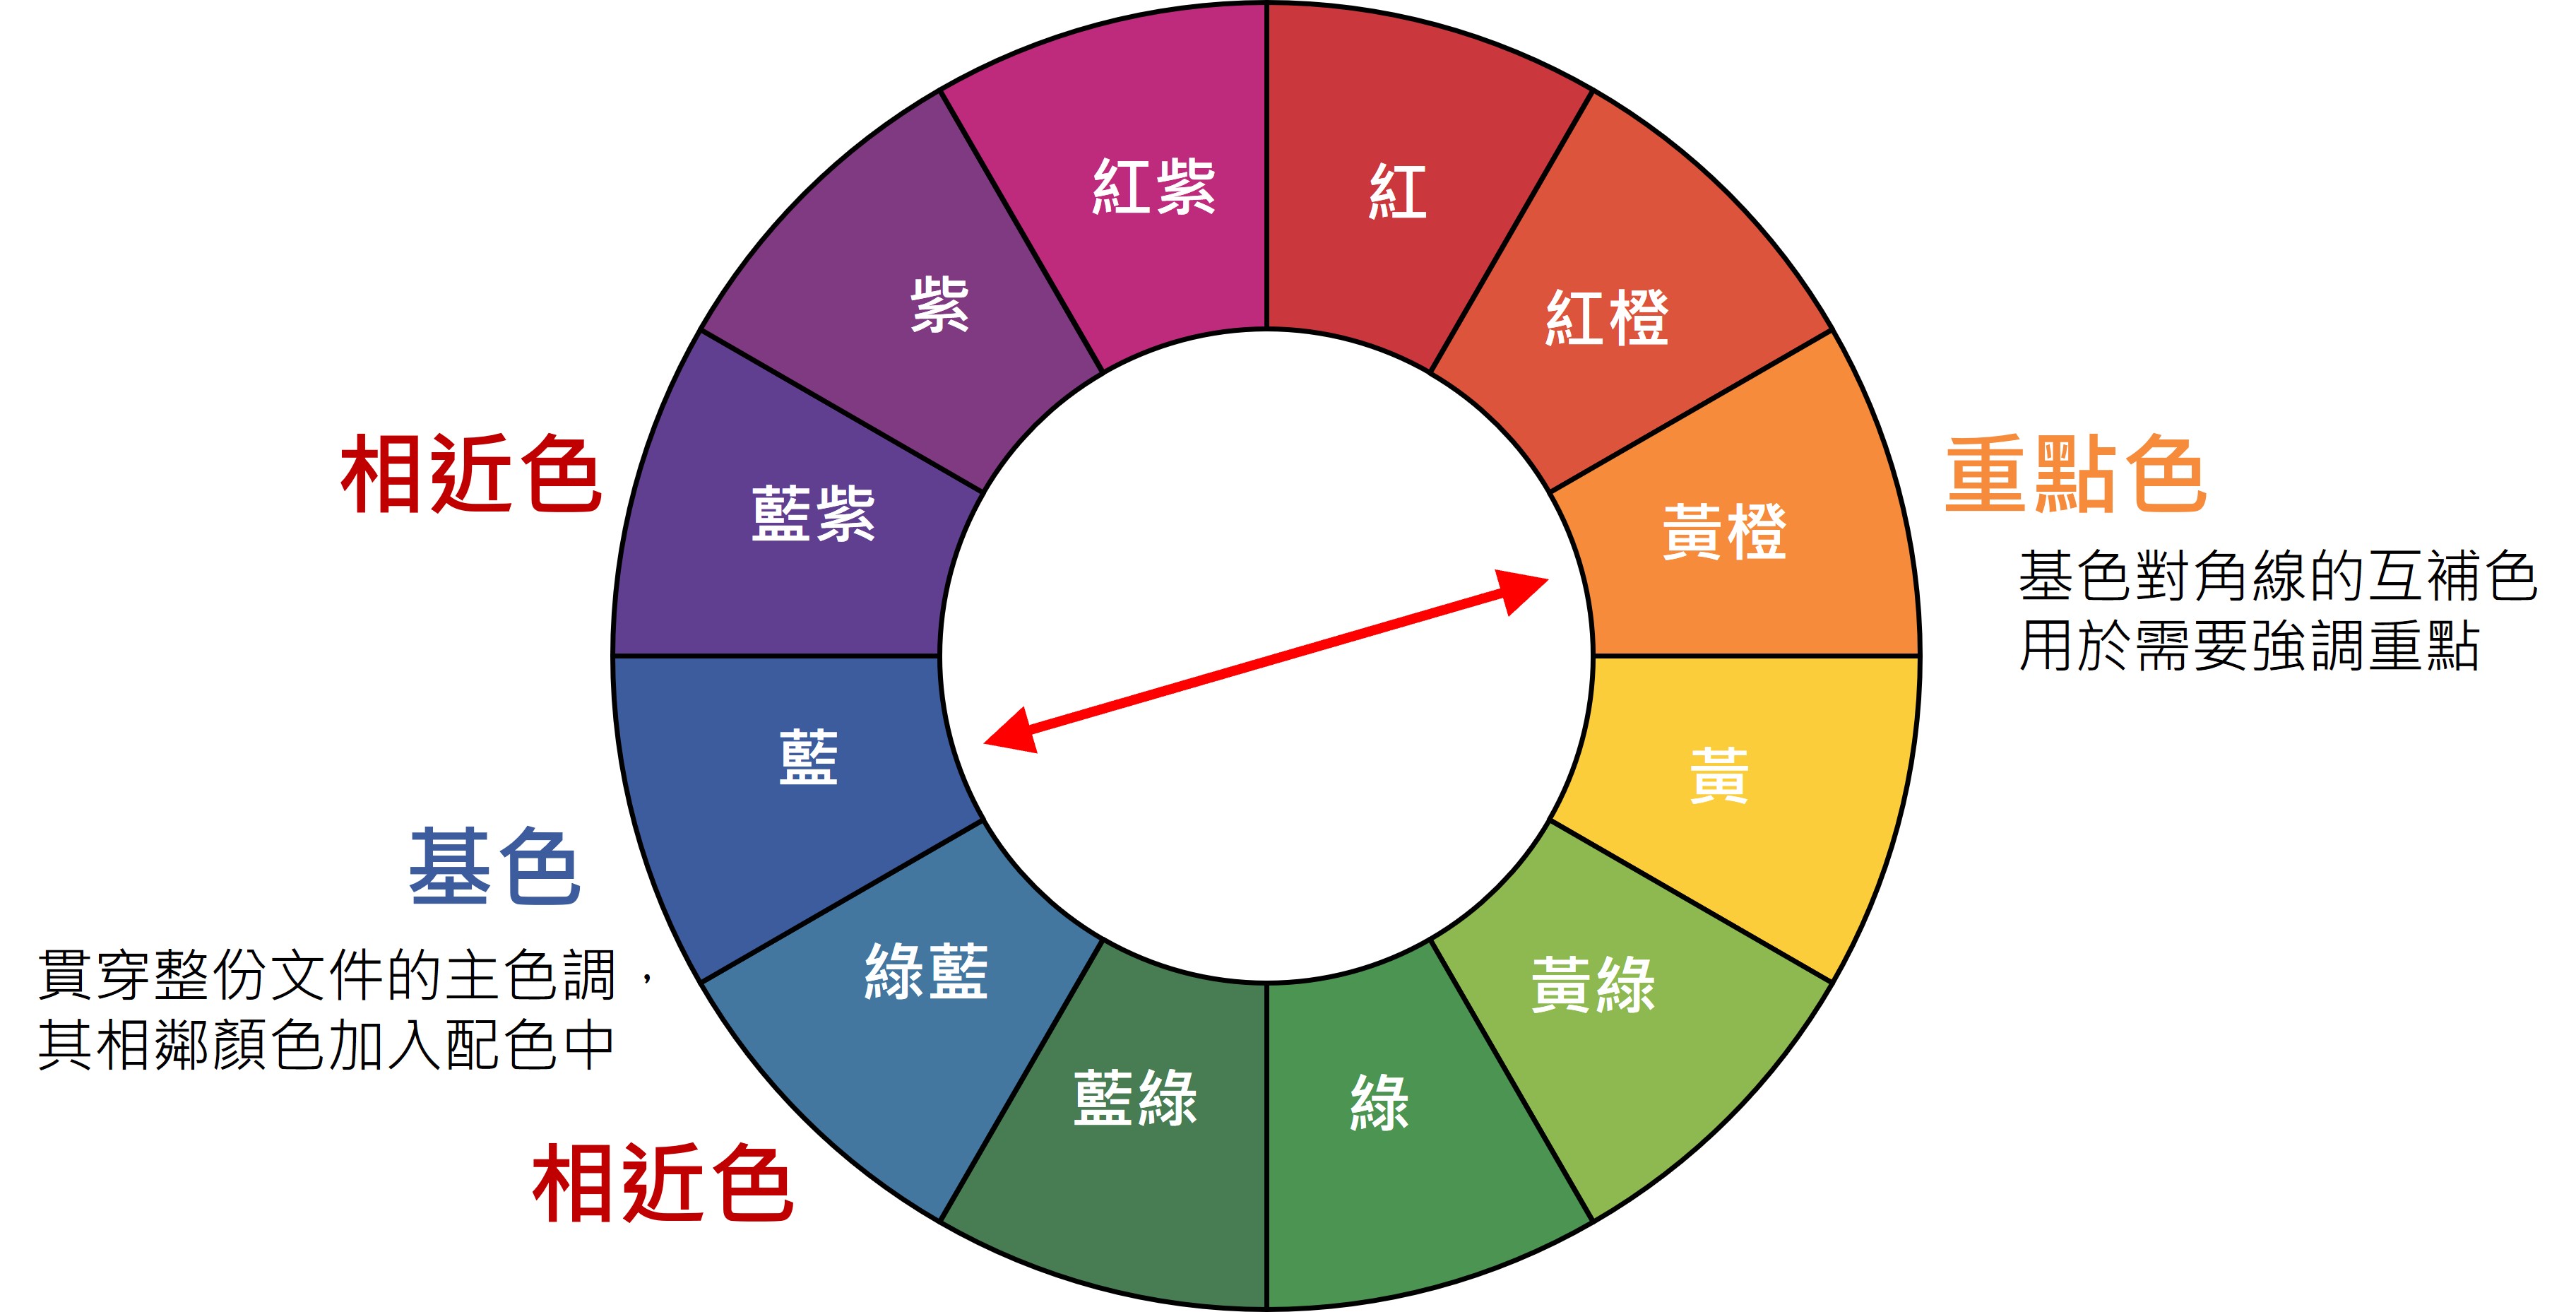</span>
</details>
### (4) 色票組合提供
<details>
<summary>【細項說明】點擊展開/摺疊</summary>
|連結網址|logo|說明|
|-|-|-|
|https://colorhunt.co/|<span class="img50" style="margin:0 auto"></span>|色票組合|
|https://www.schemecolor.com/|<span class="img50" style="margin:0 auto"></span>|色票組合|
|https://color.adobe.com/zh/create/color-wheel|<span class="img50" style="margin:0 auto"></span>|色票組合|
|http://brandcolors.net/<br>收錄世界知名品牌「顏色」色碼,獲取色票資訊|<span class="img50" style="margin:0 auto"></span>|企業色票|
</details>
## <span class="h2">6. 色票組合提供</span>
### (1) 圖解型範本
<details>
<summary>【細項說明】點擊展開/摺疊</summary>
<span class="img100">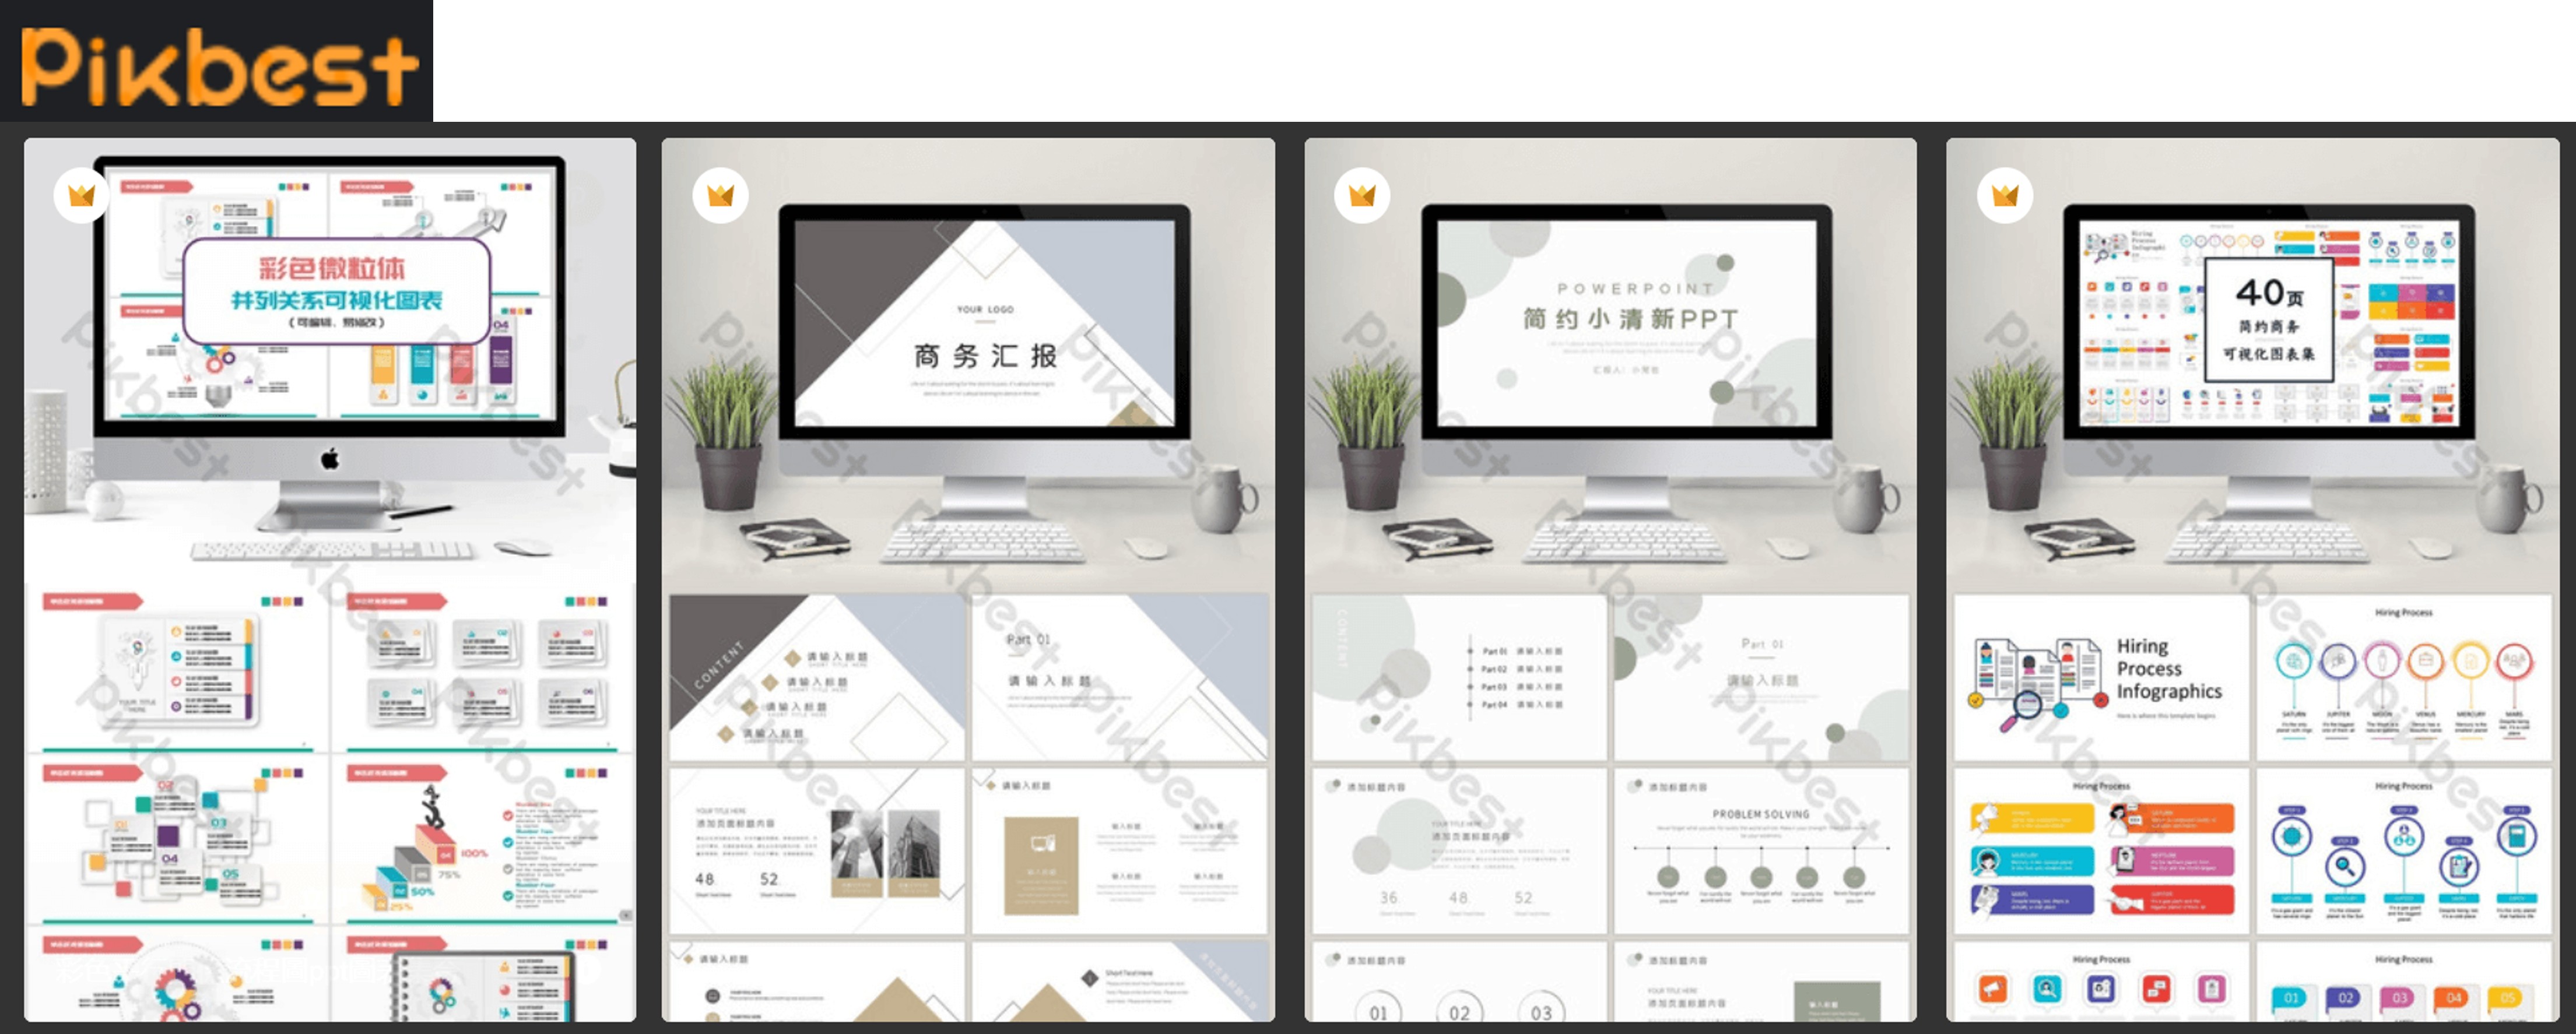</span><a href="https://zh.pikbest.com/powerpoint/" class="linkRight">(參考網站:pikbest)</a>
</details>
### (2) 母片 / 背景型範本
<details>
<summary>【細項說明】點擊展開/摺疊</summary>
<span class="img100"></span><a href="https://www.slidemembers.com/en_US/category/PPT-Templates/6/?scale=20&sort=date" class="linkRight">(參考網站:slidemembers)</a>
</details>
### (3) 依簡報版面分類
<details>
<summary>【細項說明】點擊展開/摺疊</summary>
<span class="img100">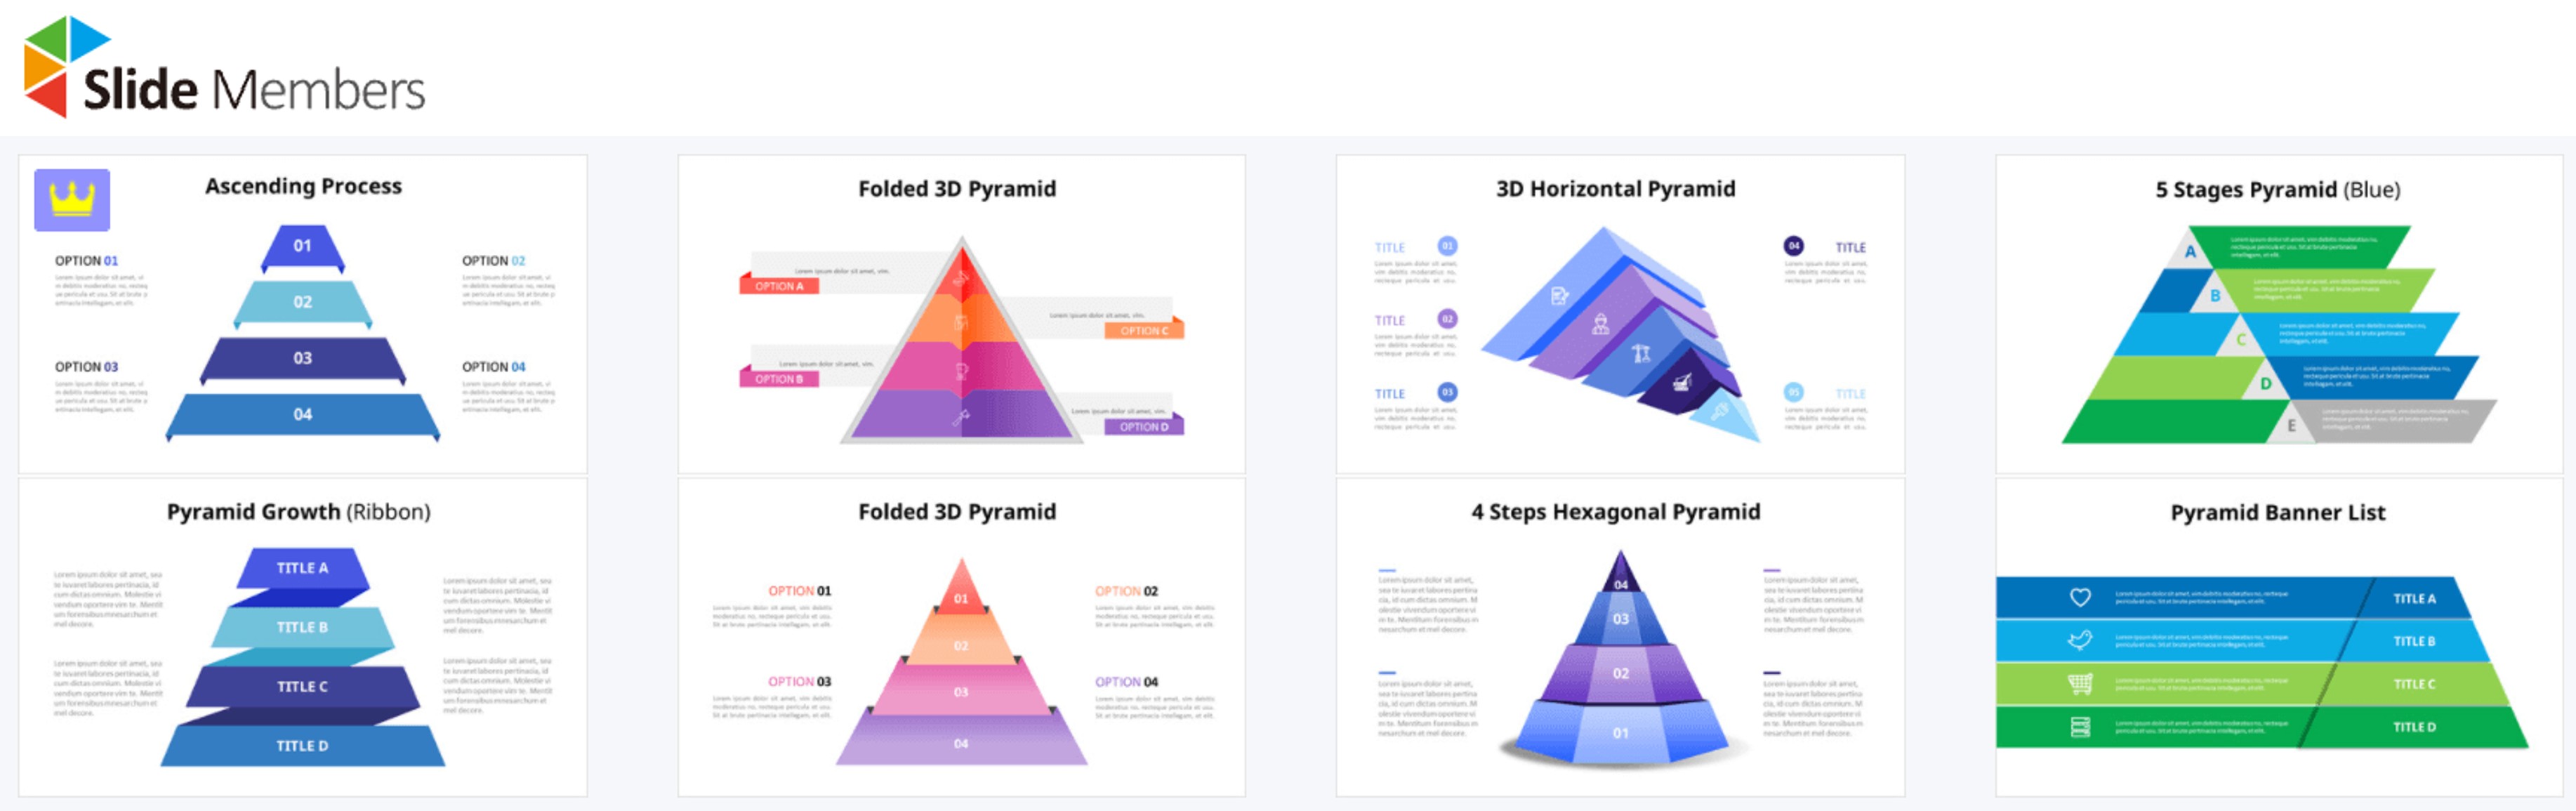</span><a href="https://www.slidemembers.com/en_US/category/Diagram/1/" class="linkRight">(參考網站:slidemembers)</a>
---
<span class="img100"></span><a href="https://infograpia.com/products/timeline-infographics" class="linkRight">(參考網站:infograpia)</a>
---
<span class="img100">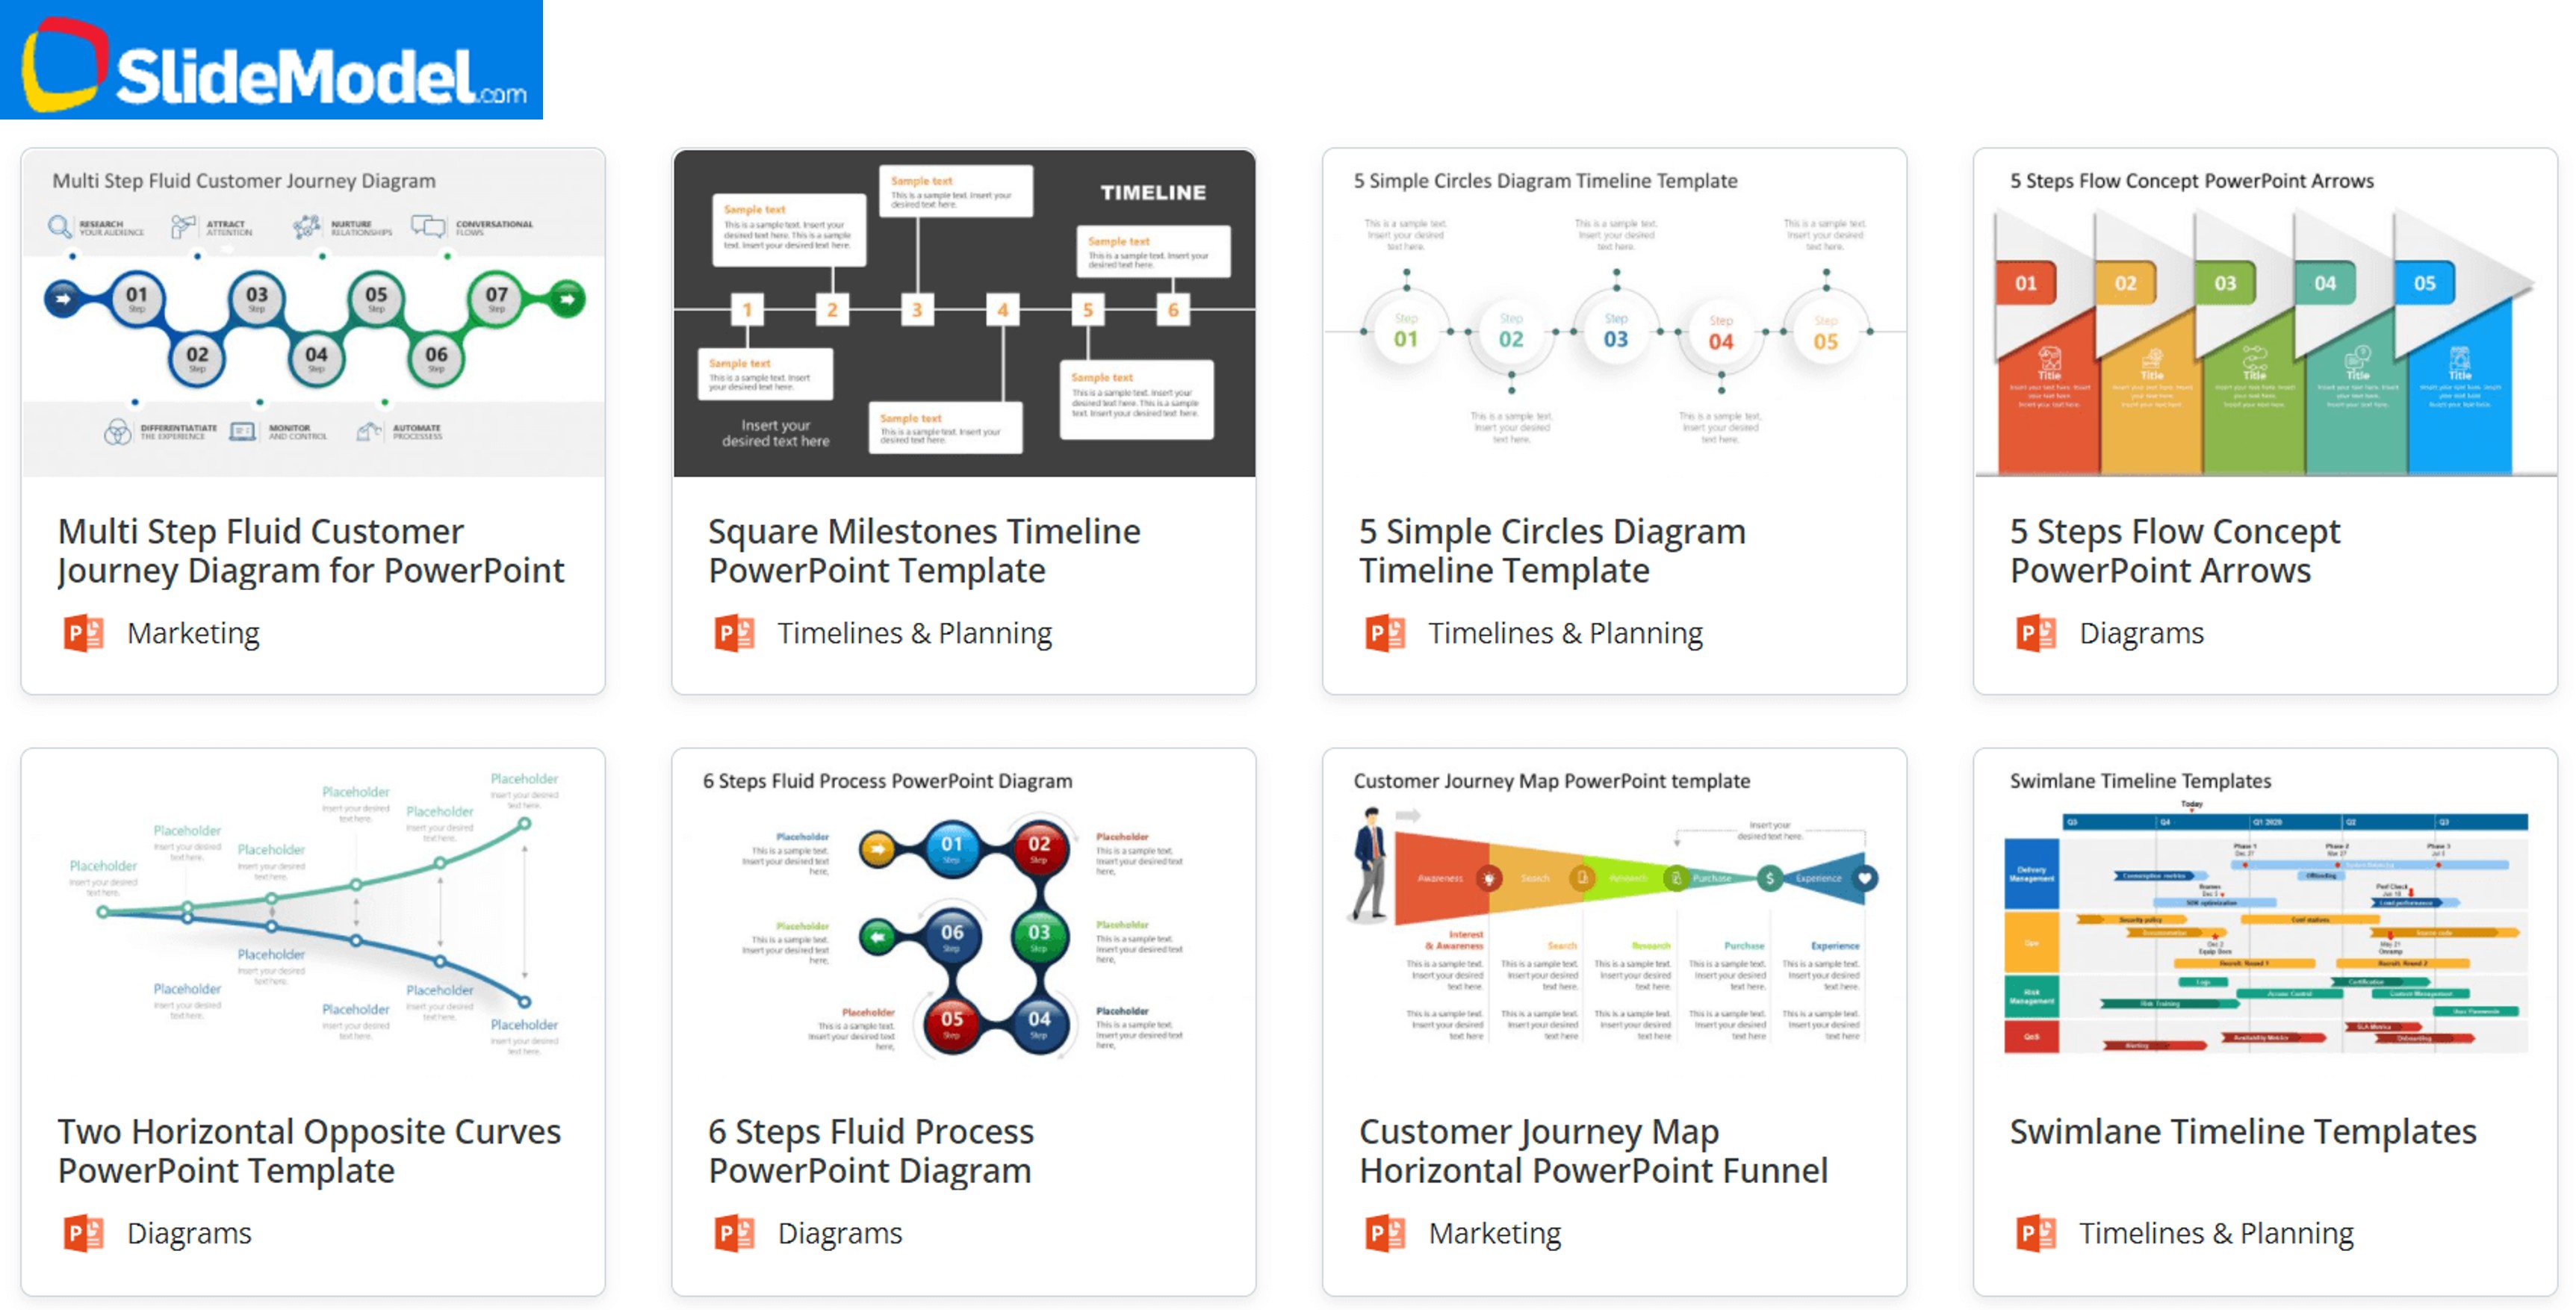</span><a href="https://slidemodel.com/templates/tag/roadmap/" class="linkRight">(參考網站:slidemodel)</a>
</details>
## <span class="h2">7. 批次取得簡報中圖片</span>
<details>
<summary>【細項說明】點擊展開/摺疊</summary>
<span class="img100">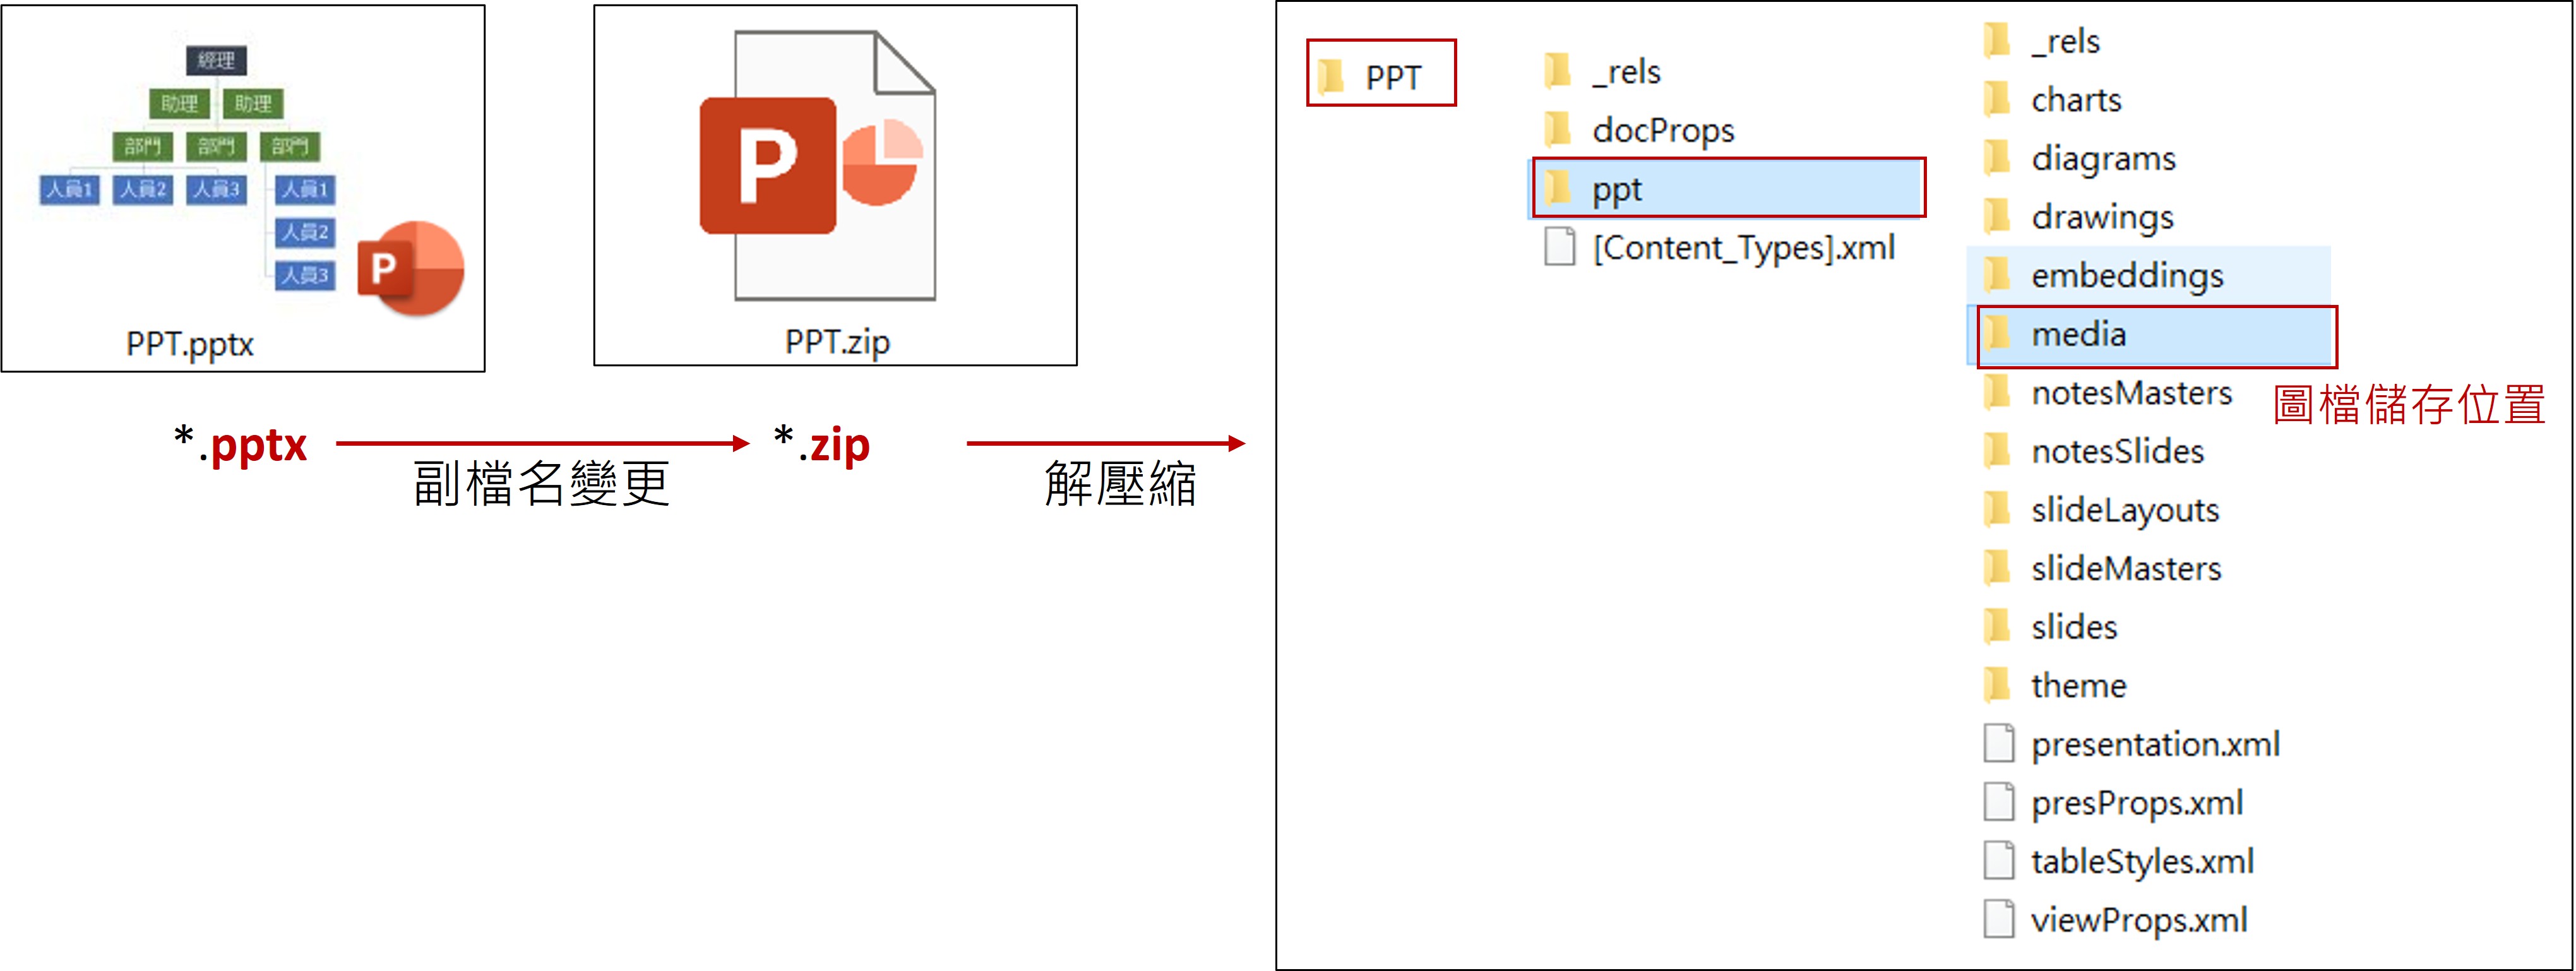</span>
</details>
# 二、AI與PPT結合
<span class="urll">[Gamma簡報下載PPT調整影片:連結](https://youtu.be/lmuObEj4Vec) </span>
## <span class="h2">1. ChatGPT 進行重點彙整</span>
內容無。
## <span class="h2">2. 利用gamma建立簡報</span>
網址:https://gamma.app/
### (1) 申請帳戶
<details>
<summary>【細項說明】點擊展開/摺疊</summary>
<span class="img100"></span>
</details>
### (2) 版本
<details>
<summary>【細項說明】點擊展開/摺疊</summary>
<span class="img100">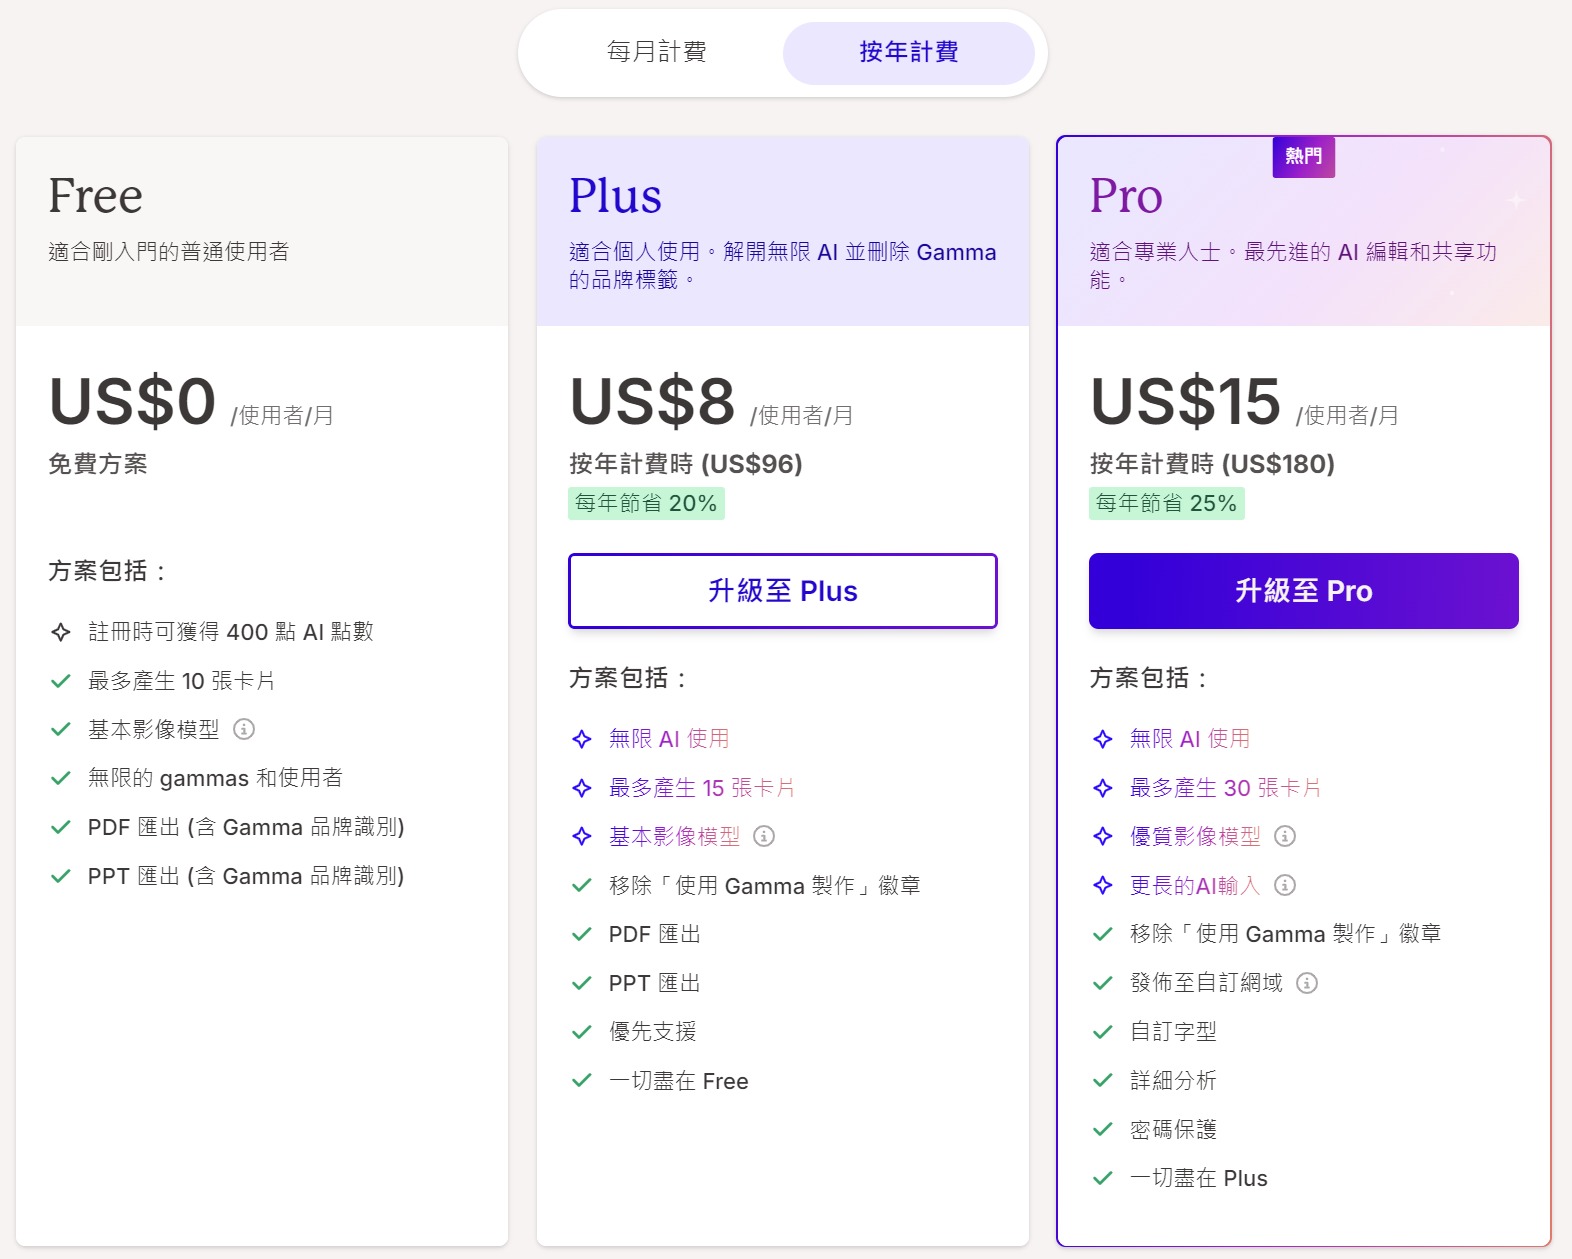</span>
</details>
## <span class="h2">2. 開始畫面</span>
<details>
<summary>【細項說明】點擊展開/摺疊</summary>
<span class="img100"></span>
</details>
## <span class="h2">3. 製作文件</span>
### S1:匯入檔案
<details>
<summary>【細項說明】點擊展開/摺疊</summary>
<span class="img100"></span>
</details>
### S2:文件內容顯示
<details>
<summary>【細項說明】點擊展開/摺疊</summary>
:::danger
總共400點,免費簡報共10張卡片
:::
<span class="img100"></span>
</details>
### S3:排選主題
<details>
<summary>【細項說明】點擊展開/摺疊</summary>
<span class="img100"></span>
</details>
### S4:文件內容編輯
<details>
<summary>【細項說明】點擊展開/摺疊</summary>
<span class="img100">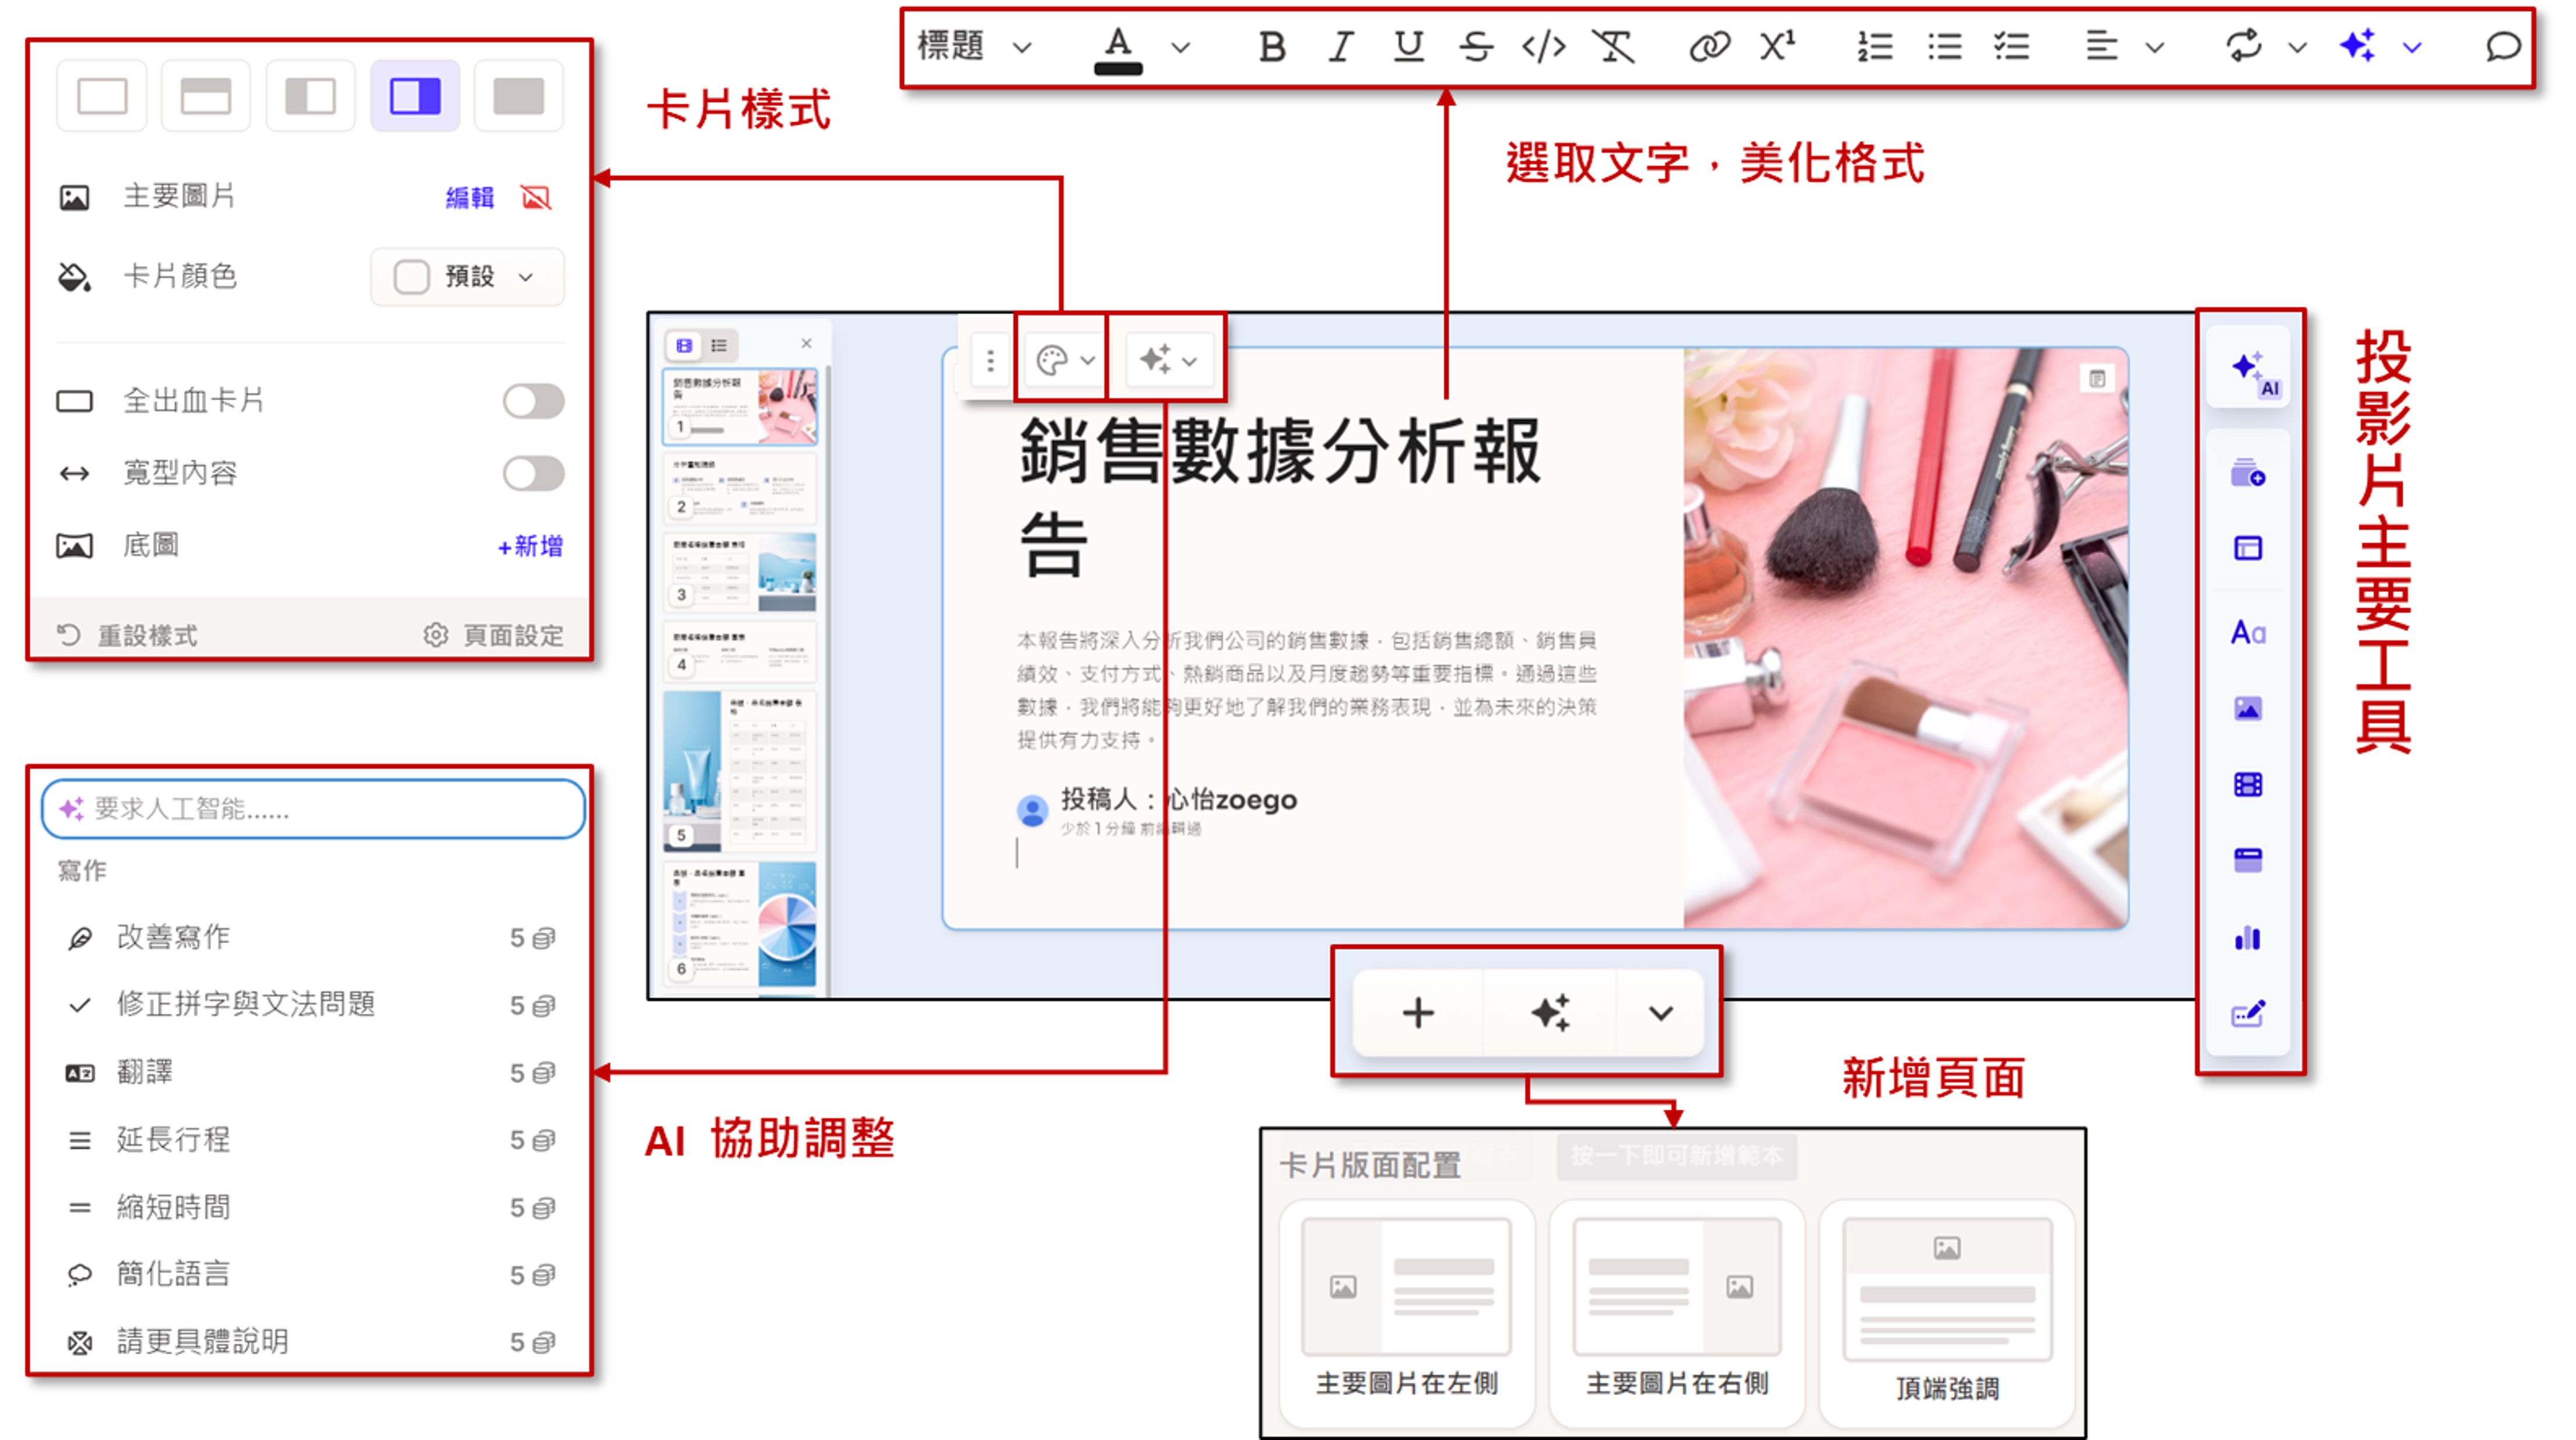</span>
</details>
<br><br><br><br><br><br><br><br><br><br><br><br><br><br><br><br><br><br><br><br><br><br><br><br><br><br><br><br><br><br><br><br><br><br><br><br><br><br><br><br><br><br><br><br><br><br><br><br><br><br><br><br><br><br>
# <!-- style -->
<style>
/* 加入Logo */
/* .toc:{position: relative;}
.toc:before{
content: url(https://zoego.tech/img/logo.svg);
width:200px;
position:fixed; top:0 ; left:0;
} */
/* 調整 左側NAV */
.markdown-body { max-width: 900px !important;}
.markdown-body h1,.markdown-body h2{border-bottom: none;}
.ui-toc-dropdown .nav>li>a{ color: #000;}
.ui-toc-dropdown .nav>.active:focus>a, .ui-toc-dropdown .nav>.active:hover>a, .ui-toc-dropdown .nav>.active>a{ color:#C00000;}
/* h1~H5 修改 */
h1{ color:#4C4C6D; }
.h2{ color:#52006A; background-color:#A2DBFA; line-height:1.8em;font-size:.9em;display:block; padding-left:10px;border-radius:5px;}
h3{ color:#BF1363; }
.h3{ color:#BF1363; font-size:1.4em; font-weight:bold; }
.h4{color:#000099; font-size: 1.1em; line-height: 2.5em;}
.h5{color:#7030A0; font-size:1.0em;}
.fz10{font-size:1.0em;}
.fz11{font-size:1.1em;}
.fz12{font-size:1.2em;}
/* 講師資訊 美化 */
.alert-warning {
border-width: 2px; width: 90%; margin: auto;
color:#795548 !important;
}
.markdown-body blockquote{
border-left-color: #BF360C !important ;
color: #3E2723 !important ;
}
.pleft20{padding-left:20px;}
.mleft20{margin-left:20px;}
/* 指令 縮圖 ICON圖設定 */
.img3{ width:30px; display:inline-block;margin:0 5px;}
.img4{ width:40px; display:inline-block;margin:0 5px;}
.img5{ width:50px; display:inline-block;margin:0 5px;}
.img6{ width:60px; display:inline-block;margin:0 5px;}
/* 圖片尺寸 設定 */
.img10{ width:10%; margin:20px auto; display:block; text-align: center;}
.img20{ width:20%; margin:20px auto; display:block; text-align: center;}
.img30{ width:30%; margin:20px auto; display:block; text-align: center;}
.img40{ width:40%; margin:20px auto; display:block; text-align: center;}
.img50{ width:50%; margin:20px auto; display:block; text-align: center;}
.img60{ width:60%; margin:20px auto; display:block; text-align: center;}
.img70{ width:70%; margin:20px auto; display:block; text-align: center;}
.img80{ width:80%; margin:20px auto; display:block; text-align: center;}
.img90{ width:90%; margin:20px auto; display:block; text-align: center;}
.img100{ width:100%; margin:20px auto; display:block; }
/* 圖片去除圓角 */
.markdown-body img, .markdown-body iframe { border-radius: none !important;}
/* 連結URL 調整 */
.urlr{ text-align:right; line-height:1.5em;display:block;}
.urll{ line-height:1.5em;display:block;}
/* 提供講義標示頁碼 */
/* .page{display:flex; justify-content: right;} */
.page span{
background:#ffdd75;border:1px solid #d1a128;border-radius:5px; padding:2px;margin-left:5px;color:#000; float:right;
}
/* 標示靠右 */
.dright{ display:block; text-align:right }
/* Slider 外掛 美化 */
iframe{ width:850px; height:478px; display:block; margin:auto; border-width: 0;border:2px solid #000;}
/* 設定 pre 及 快速鍵 */
.markdown-body code { border: 1px solid #000; margin:0 5px; }
/* .markdown-body pre>code { font-size: 1.2em; } */
.markdown-body pre { border: 1px solid #ab0505 !important; margin:10px 0; padding:5px 10px;}
.markdown-body details code {
background-color: transparent !important;
}
/* 快速鍵 > 語法於P中 */
.markdown-body p>code { color:#BF1363 !important; border:none; background:none}
/* details 摺疊設定 */
.markdown-body details {
background-color: transparent !important;
}
.markdown-body details summary {
color:#7d7d7d; font-size:1.5rem;
/* padding-bottom: 10px; */
}
/* 表格 設定 */
.markdown-body table {
width: fit-content;
margin: auto;
}
.markdown-body table th, .markdown-body table td {
border: 1px solid #7F7F7F;
}
.tableTitle{text-align:center; display:block;}
.bold{font-weight:bold;}
.red{color:#BF1363;font-weight:bold;}
.blue{color:#265F92;font-weight:bold;}
.pp{color:#5E00BC;} /* 紫色*/
.pp2{color:#311B92;} /* 深紫色*/
.markblue{ color:#fff; background:#232B99; border-radius:5px;padding:5px 10px;line-height:1.8em; } /* 藍色背景 標註*/
.textc{text-align:center; display:block;}
.markdown-body p{ margin-bottom: 0;}
.block{display:block;}
/* .flex{ display:flex; border:2px solid #000; padding:20px; margin:20px; } */
.ex{color:#333399 ; font-size:1em; font-weight:bold;}
.eg{ color:#fff; background:#232B99; border-radius:5px;padding:5px 10px;line-height:3em;}
/* 置中、圓角框、項目 */
.title{ text-align:center; display:block;color:#766161;font-size:1.2em;font-weight:bold; border:1px solid;line-height:2em;border-radius:5px}
.youtube:before{
content:"";
display:block;
position:absolute;
top:5%;
left:5%;
z-index:1;
/* transform:translate(-50%,-50%); */
width:80px;
height:80px;
background:url(https://zoego.tech/img/icon_youtube2.png);
background-size: contain;
border-radius: 10px;
box-shadow: 1px 1px 3px #000;
}
.youtube{
border:1px solid #333;
}
.ub{ font-weight:bold; text-decoration: underline; }
.db{ font-weight:bold; text-decoration: double; text-decoration-style: dotted; }
.linkRight{display:block; text-align:right;}
/* check list */
.markdown-body li>p {margin-top: 0; line-height: 1.3em;}
.task-list-item+.task-list-item {margin-top: 0px}
.markdown-body li+li { padding-top: 0em;}
</style>