# 光蛇體驗版工作坊
- [計劃書](https://drive.google.com/file/d/13KSDLXbrsgEtOL0c76bzKazTeqh5TwXH/view?usp=sharing)
- 贊助單位: 成大工程科學系系學會、成大工程科學系
- [Github](https://github.com/sciyen/ES-Lux/tree/master/Lux-starter)
# Schematic

# PCB
正面

背面

| Name | Specification | Designer |
|-------------------------------------------------------------------------------|------------------------|---------------------------------------------------------------------------------------|
| DC-DC converter | DC-DC converter | *17 |
| Capacitor | 220 uF | C1 |
| Capacitor | 100 nF | C2 |
| Capacitor | 22pF | C3, C4 |
| LED | RGB LED common Cathode | D 1, D 2, D 3, D 4, D 5, D 6, D 7, D 8, D 9, D 10, D 11, D 12, D 13, D 14, D 15, D 16 |
| USB-C | 母座 | J1 |
| Header, 2-Pin | Power In | P1 |
| Header, 5-Pin, UART, for uploading | UART | P2 |
| PNP BJT | C9012 | Q1, Q2, Q3 |
| Resistor | 1K | R1, R3, R4, R6 |
| Resistor | 100 | R2, R5, R7 |
| Switch (Reset) | SW- 2 pin | S1 |
| 8-bit shift registers with 3-state output registers 16-PDIP -40 to 85 | SN74HC595N | U1, U2 |
| AVR AVR® ATmega Microcontroller IC 8-Bit 20MHz 32KB (16K x 16) FLASH 28-PDIP | ATMEGA328-PU | U3 |
| Crystall Oscillator | 16MHZ | Y 1 |
| IC座 | 16pin | |
| IC座 | 28pin | |
| battery | 18650 battery | |
| battery holder | | |
| 電源開關 | | S2 |
# 焊接教學
## 焊接工具
- 烙鐵(注意不要和線靠太近)
- 烙鐵架
- 海綿(一定要濕,最好微積水)
- 吸錫器(把多餘的錫吸掉)
## 焊接參考步驟
- 烙鐵上
- 焊錫上
- 焊錫下
- 烙鐵下
注意
- 焊接時間不可以太久(會氧化)
- 焊錫不可以用太多,大概兩毫米
- 烙鐵不可以燙太久,電子零件會壞掉
## 理想

# 燒錄程式
首先看一下你手上的電路板,在下圖綠色框框的位置可以找到一組排針,並且以白字標記其功能:
| 名稱 | RST | GND | Rx | Tx | Vcc |
| --- | --- | --- | --- | --- | --- |
| 全稱 | Reset | Ground | Receive | Transmit | Voltage Common Collector |
| 功能 | 重置 | 接地 | UART 接收端 | UART 發送端 | 電源 (5V) |

## 使用 USB to TTL 作為燒錄器
在電子材料行你可以買到下面這種 USB to TTL converter ,上面也有類似的 pin

還記得上課時曾經畫過這張圖嗎? (應該忘記了 XD
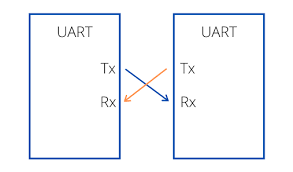
發射端要接到對面的接收端,因此 Rx <-> Tx,Tx <-> Rx,所以
| USB to TTL | ES-LUX |
| -------- | -------- |
| Rst | Rst |
| GND | DND |
| Rx | Tx |
| Tx | Rx |
| Vcc | 5V |
注意 Rx 和 Tx 相反
## 使用 Arduino UNO 作為燒錄器
如果你沒有 USB to TTL converter 也沒關係,這邊教你怎麼用一塊 Arduino UNO 上的 USB to TTL 晶片燒錄。
Arduino UNO 上原本也有一個晶片,用來將 USB 訊號轉為 TTL 訊號,他在這裡 (所以你上傳時或是用 Serail 時這邊的 LED 都會閃爍):

現在,我們不要讓他燒錄到原本 Arduino UNO 上的 Atmega 328 ,而是要改上傳到 ES-LUX ,因此我們需要兩個步驟:
1. 拔掉原本的 Atmega328 晶片
2. 依照下面的方式接線
| USB to TTL | ES-LUX |
| -------- | -------- |
| Rst | Rst |
| GND | DND |
| Rx | Rx (0) |
| Tx | Tx (1) |
| Vcc | 5V |
Arduino UNO 上標示的 Rx 及 Tx 是 原本的 Atmega 的 UART 接口 (也就是 USB to TTL 的通訊對象),ES-LUX 也是 USB to TTL 的通訊對象,因此 Rx 和 Tx 相同
 Sign in with Wallet
Connect another wallet
Sign in with Wallet
Connect another wallet