---
title: 深入 Dojo 合约系统
date: 2023-09-10 10:47:30
tags: [[Dojo],[Cairo]]
---
## 概述
全链游戏突然间再次成为了叙述主流。万幸的是,我所熟悉的 StarkNet 生态系统内存在目前最好的全链游戏引擎之一的 [Dojo](https://www.dojoengine.org/en/)。
此教程可以认为是 Dojo 开发的 `Quick Start`,本文会介绍 dojo 开发环境的搭建与 ECS 系统的基本概念,但是由于笔者不擅长游戏逻辑设计且专精于 cairo 开发,所以本文会包含大量的源代码阅读,帮助读者深入了解 dojo 开发框架。
本文基于 `dojo v0.4.1` 编写。
## 环境配置
我们首先使用以下命令安装 `dojoup`:
```bash
curl -L https://install.dojoengine.org | bash
```
然后使用以下命令安装 `Dojo` 组件:
```bash
dojoup
```
我们可以看到 `dojoup` 安装了以下四部分内容:
```bash
dojoup: installed - katana 0.4.1
dojoup: installed - sozo 0.4.1
dojoup: installed - torii 0.4.1
dojoup: installed - dojo-language-server 0.4.1
dojoup: done!
```
`sozo` 是一个核心组件,主要用于项目初始化、代码测试、项目交互以及最终的项目部署和迁移更新等工作。与 Foundry 系统内的 `forge` 命令类似。
`katana` 是一个快速的 StarkNet 本地节点,允许用户快速启动 StarkNet 本地测试环境。
`torii` 则是一个本地的检索器,用于开始启动对于项目合约数据的链下检索,使用此命令后会启动一个 `graphql` 服务器来响应用户请求。
`dojo-languge-server` 是 dojo 的 LSP ,用于实时显示语法报错。
完成以上安装后,创建一个新的文件夹,并进入此文件夹使用以下命令初始化 dojo 项目:
```bash
sozo init
```
初始化完成后,我们可以获得以下目录结构:
```bash
.
├── LICENSE
├── README.md
├── Scarb.lock
├── Scarb.toml
├── scripts
│ └── default_auth.sh
├── src
│ ├── actions.cairo
│ ├── lib.cairo
│ ├── models.cairo
│ └── utils.cairo
└── target
├── CACHEDIR.TAG
└── dev
├── dojo::base::base.json
├── dojo::executor::executor.json
├── dojo::world::world.json
├── dojo_examples::actions::actions.json
├── dojo_examples::models::moves.json
├── dojo_examples::models::position.json
└── manifest.json
```
在介绍具体的合约代码前,我们首先体验一下这个项目的具体功能。此项目实现了以下功能:
1. 允许用户调用 `spawn` 创建一个可参与游戏的用户,用户的位置会被初始化到 `x = 1000` 和 `y = 1000` 的位置,同时会把用户的 `remaining` 设置为 100。当用户每移动一步,`remaining` 会自减 1 ,直至 `remaining = 0` 为止
2. 完成用户创建后,用户可以调用 `move` 方法实现移动,
我们可以使用以下方法在本地部署此项目:
首先,我们需要在项目文件夹内使用 `sozo build` 编译此项目。
打开一个新的终端输入以下命令:
```bash
katana --disable-fee
```
上述命令将启动本地的 StarkNet 测试节点。
完成测试节点启动后,我们使用以下命令在本地节点部署 dojo 项目:
```bash
sozo migrate --name test
```
我们可以看到如下输出:
```
Migration account: 0x517ececd29116499f4a1b64b094da79ba08dfd54a3edaa316134c41f8160973
World name: test
[1] 🌎 Building World state....
> No remote World found
[2] 🧰 Evaluating Worlds diff....
> Total diffs found: 5
[3] 📦 Preparing for migration....
> Total items to be migrated (5): New 5 Update 0
# Executor
> Contract address: 0x30d87b1462e33becf675f22517d2ff6d6b3b00ace2217a629a7eab770e467bc
# Base Contract
> Class Hash: 0x6c458453d35753703ad25632deec20a29faf8531942ec109e6eb0650316a2bc
# World
> Contract address: 0x249f6226633c7a23abf30eec47dc1e27c5ea9aad5e702076d5f57c0bc12a271
# Models (2)
dojo_examples::models::moves
> Class hash: 0x64495ca6dc1dc328972697b30468cea364bcb7452bbb6e4aaad3e4b3f190147
dojo_examples::models::position
> Class hash: 0x2b233bba9a232a5e891c85eca9f67beedca7a12f9768729ff017bcb62d25c9d
> Registered at: 0x122d8a08c80ddf09d061df645242cfe7ce15401bae9226f873b2ec6d937644c
# Contracts (1)
dojo_examples::actions::actions
> Contract address: 0x6cef16725f6d52fc1c8b30fb1f747ad8be450faa621685026e43d26fb9bfc25
🎉 Successfully migrated World at address 0x249f6226633c7a23abf30eec47dc1e27c5ea9aad5e702076d5f57c0bc12a271
✨ Updating manifest.json...
✨ Done.
```
此处显示了一系列合约,我们会在后文详细介绍每一个合约的具体功能及其代码。
完成以上部署后,为方便后期调用,我们需要在 `Scarb.toml` 内写入以下内容:
```toml
world_address = "0x249f6226633c7a23abf30eec47dc1e27c5ea9aad5e702076d5f57c0bc12a271"
```
我们可以进行交互操作,我们首先调用 `spawn` 方法创建一个可用于移动的用户:
```bash
sozo execute dojo_examples::actions::actions spawn
```
此处,我们填入了 `dojo_examples::actions::actions` 作为执行 `spawn` 操作的合约,此合约即上文部署的 `actions` 合约。在新版本的 dojo 中,我们可以提供直接填写 `dojo_examples::actions::actions` 来代替 `actions` 合约的实际地址。关于此处为什么需要填写合约地址,我们会在后文进一步讨论。
接下来,我们可以使用以下命令查询我们注册用户的位置:
```bash
sozo model get Position 0x517ececd29116499f4a1b64b094da79ba08dfd54a3edaa316134c41f8160973
```
此命令的格式如下:
```bash
sozo model get <NAME> [KEYS]
```
`NAME` 是我们需要检索的组件的名称,我们系统内存在两个组件,代码如下:
```rust
#[derive(Model, Drop, Serde)]
struct Moves {
#[key]
player: ContractAddress,
remaining: u8,
last_direction: Direction
}
#[derive(Copy, Drop, Serde, Introspect)]
struct Vec2 {
x: u32,
y: u32
}
#[derive(Model, Copy, Drop, Serde)]
struct Position {
#[key]
player: ContractAddress,
vec: Vec2,
}
```
我们需要检索 `Position` 组件,而 `[KEYS]` 则是需要检索内容的索引,此处为 `player` 即用户地址。
返回值如下:
```rust
struct Position {
#[key]
player: ContractAddress = 0x517ececd29116499f4a1b64b094da79ba08dfd54a3edaa316134c41f8160973,
vec: Vec2,
}
struct Vec2 {
x: u32 = 10,
y: u32 = 10,
}
```
在此处,我们就可以发现 `Model` 的核心功能就是存储用户数据,`#[key]` 则是用于检索数据的核心参数。
我们也可以尝试检索 `Moves` 组件,命令如下:
```bash
sozo model get Moves 0x517ececd29116499f4a1b64b094da79ba08dfd54a3edaa316134c41f8160973
```
返回值如下:
```rust
struct Moves {
#[key]
player: ContractAddress = 0x517ececd29116499f4a1b64b094da79ba08dfd54a3edaa316134c41f8160973,
remaining: u8 = 99,
last_direction: Direction = Left,
}
enum Direction {
None
Left
Right
Up
Down
}
```
完成上述数据检索任务后,我们尝试移动用户的位置,使用以下命令:
```bash
sozo execute dojo_examples::actions::actions move -c 1
```
此处 `execute` 表示执行某个函数,而 `calldata` 则需要填入具体参数,具体如何填写,我们需要参考 `move` 的具体代码:
```rust
impl DirectionIntoFelt252 of Into<Direction, felt252> {
fn into(self: Direction) -> felt252 {
match self {
Direction::Left(()) => 0,
Direction::Right(()) => 1,
Direction::Up(()) => 2,
Direction::Down(()) => 3,
}
}
}
// Implementation of the move function for the ContractState struct.
fn move(self: @ContractState, direction: Direction) {
// Access the world dispatcher for reading.
let world = self.world_dispatcher.read();
// Get the address of the current caller, possibly the player's address.
let player = get_caller_address();
// Retrieve the player's current position and moves data from the world.
let (mut position, mut moves) = get!(world, player, (Position, Moves));
// Deduct one from the player's remaining moves.
moves.remaining -= 1;
// Update the last direction the player moved in.
moves.last_direction = direction;
// Calculate the player's next position based on the provided direction.
let next = next_position(position, direction);
// Update the world state with the new moves data and position.
set!(world, (moves, next));
// Emit an event to the world to notify about the player's move.
emit!(world, Moved { player, direction });
}
```
我们此处输入了 `1` ,根据 `DirectionIntoFelt252` 提供 `into` 方法,实际上代表向右移动,此时我们调用以下命令重新查询位置参数:
```bash
sozo model get Position 0x517ececd29116499f4a1b64b094da79ba08dfd54a3edaa316134c41f8160973
```
返回值如下:
```
struct Vec2 {
x: u32 = 9,
y: u32 = 10,
}
```
注意到 `x` 的值已经增加了 `1` ,则与我们移动的预期结果是一致的。我们还可以调用以下内容查询用户的 `remaining` 是否发生变化:
```bash
sozo model get Moves 0x517ececd29116499f4a1b64b094da79ba08dfd54a3edaa316134c41f8160973
```
返回值如下:
```bash
struct Moves {
#[key]
player: ContractAddress = 0x517ececd29116499f4a1b64b094da79ba08dfd54a3edaa316134c41f8160973,
remaining: u8 = 99,
last_direction: Direction = Left,
}
enum Direction {
None
Left
Right
Up
Down
}
```
`remaining` 为 99,正好减少了 1 ,也符合我们预期。
最后,我们体验以下 dojo 自带的 `torii` 检索器,在使用检索器前,我们需要创建一个 `sqlite` 文件,请读者切换到 `target` 文件夹内,使用以下命令创建数据库:
```bash
sqlite3 indexer.db
```
在进入 `sqlite3` 的命令后,输入以下内容:
```
.database
.q
```
如下图:

然后输入以下命令启动检索器:
```bash
torii --database sqlite:indexer.db --world 0x249f6226633c7a23abf30eec47dc1e27c5ea9aad5e702076d5f57c0bc12a271
```
此处的 `--world` 后应为上文部署的 world 合约地址。
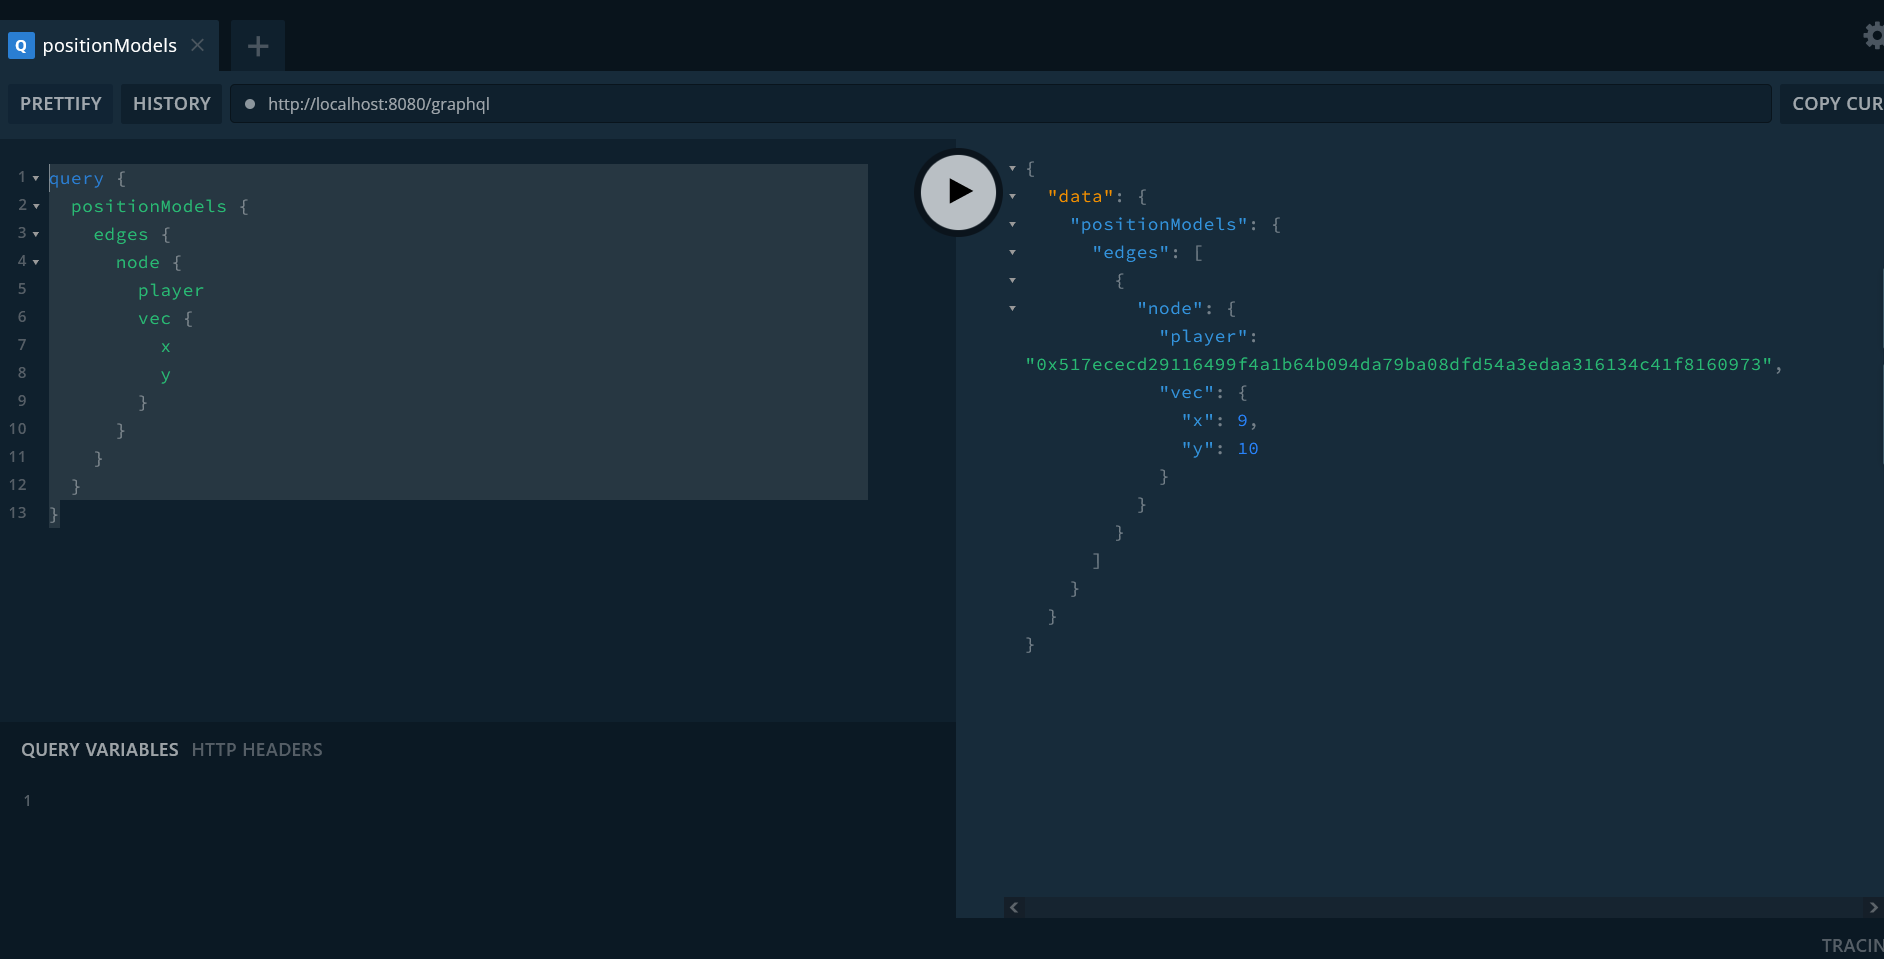
启动成功后,读者可以打开 `http://127.0.0.1:8080/graphql` 进入 `GraphQL` 控制台页面,使用以下查询即可获得用户当前位置:
```graphql
query {
positionModels {
edges {
node {
player
vec {
x
y
}
}
}
}
}
```
结果如下图:
由于本文重点不在于讨论检索器相关内容,所以此处我们不再深入给出 `GraphQL` 的语法知识等,读者可以参考文档或者是我之前编写的 [基于Python与GraphQL的链上数据分析实战](https://blog.wssh.trade/posts/on-chain-data-basement/) 文章。
> 注意目前 `torii` 仍只可使用 `sqlitedb` 作为数据存储后端,但是考虑到 `torii` 使用了 `sqlx` ,支持其他数据库后端应该难度不大
## 代码解析
在体验完整个项目的具体作用,我们开始进入代码解析阶段。我们需要对 ECS 系统有一定简单的了解,`ECS` 的全称为 `Entity Component System` ,其核心为:
- `Component` 组件,正如上文所述,组件的作用是作为数据的载体,用来存储游戏内的各种数据,同时组件具有可组合性,我们可以为用户绑定多个组件
- `Entity` 实体,实际上就是只是一个索引,在上文中的 `player` 就是一个实体,我们可以为实体配置多个组件,目前 sozo 还没有命令可以直接获取实体的所有数据,但我们可以通过 `torii` 实现此功能
- `System` 系统,执行具体的游戏逻辑,系统内往往不存储数据,而是通过 `get!` 方法获取组件内的数据,修改完成后使用 `set!` 将其写回组件,我们使用 `ssozo execute $action move -c 1` 命令其实就是在调用系统内的 `move` 方法
在 dojo 开发系统内,还存在一个较为特殊的存在,其被称为 `World` 世界,简单来说,World 合约是 dojo 系统的核心,所有的 `Component` 都会注册到 World 合约中,可以认为 `World` 合约为 `dojo` 游戏的核心数据库。
在现有的代码中,`Component` 被定义在 `src/models.cairo` 中,该代码内最简单的 `Component` 定义如下:
```rust
#[derive(Model, Copy, Drop, Serde)]
struct Moves {
#[key]
player: ContractAddress,
remaining: u8,
last_direction: Direction
}
```
其中 `Model` 为 `Component` 自动生成了一系列模板代码,而 `Serde` 则用于 `Component` 的序列化。此处的 `#[key]` 定义了该 `Component` 的主键,也可以认为其代表 `Entity` 实体。一般来说,我们会将与数据直接相关的部分 trait 逻辑与组件定义写在一起,如:
```rust
impl DirectionIntoFelt252 of Into<Direction, felt252> {
fn into(self: Direction) -> felt252 {
match self {
Direction::None(()) => 0,
Direction::Left(()) => 1,
Direction::Right(()) => 2,
Direction::Up(()) => 3,
Direction::Down(()) => 4,
}
}
}
```
该 `impl` 实现了 `Direction` 组件的 `into` 函数,实现该函数后,我们可以通过调用 `into` 实现自动类型转换。常见的需要与组件一起定义的 trait 包含以下几个:
- `PrintTrait<T>` 用于自定义类型 `T` 的打印
- `Into<T, E>` 用于 `into` 相关的自动类型转换
- `Add<T>` 等用于运算符重载的 trait,详细类型可参考 [traits.cairo](https://github.com/starkware-libs/cairo/blob/main/corelib/src/traits.cairo)
一个较为复杂的组件定义如下:
```rust
#[derive(Copy, Drop, Serde, Print, Introspect)]
struct Vec2 {
x: u32,
y: u32
}
#[derive(Model, Copy, Drop, Print, Serde)]
struct Position {
#[key]
player: ContractAddress,
vec: Vec2,
}
```
此处的 `Vec2` 带有 `Introspect` ,该 trait 代表该组件只能被嵌入到其他组件内使用,我们可以看到在 `Position` 内使用了 `Vec2`。
而负责游戏逻辑的 `System` 系统被定义在 `src/actions.cairo` 文件内,`System` 的开发与普通的智能合约基本类似,但是我们会使用 `#[dojo::contract]` 定义合约,且我们需要使用 `use dojo_examples::models::{Position, Moves, Direction, Vec2};` 导入需要的组件。
我们可以看一个简单的示例:
```rust
fn spawn(self: @ContractState) {
// Access the world dispatcher for reading.
let world = self.world_dispatcher.read();
// Get the address of the current caller, possibly the player's address.
let player = get_caller_address();
// Retrieve the player's current position from the world.
let position = get!(world, player, (Position));
// Retrieve the player's move data, e.g., how many moves they have left.
let moves = get!(world, player, (Moves));
// Update the world state with the new data.
// 1. Increase the player's remaining moves by 10.
// 2. Move the player's position 10 units in both the x and y direction.
set!(
world,
(
Moves {
player, remaining: moves.remaining + 10, last_direction: Direction::None(())
},
Position {
player, vec: Vec2 { x: position.vec.x + 10, y: position.vec.y + 10 }
},
)
);
}
```
在 `System` 中,我们使用 `get!` 获得数据,使用 `set!` 写入数据。上文给出的 `spawn` 是一个初始化函数。
一个复杂的 `System` 示例如下:
```rust
fn move(self: @ContractState, direction: Direction) {
// Access the world dispatcher for reading.
let world = self.world_dispatcher.read();
// Get the address of the current caller, possibly the player's address.
let player = get_caller_address();
// Retrieve the player's current position and moves data from the world.
let (mut position, mut moves) = get!(world, player, (Position, Moves));
// Deduct one from the player's remaining moves.
moves.remaining -= 1;
// Update the last direction the player moved in.
moves.last_direction = direction;
// Calculate the player's next position based on the provided direction.
let next = next_position(position, direction);
// Update the world state with the new moves data and position.
set!(world, (moves, next));
// Emit an event to the world to notify about the player's move.
emit!(world, Moved { player, direction });
}
```
在此处,我们可以看到此函数使用 `emit!` 释放了事件,简化了 cairo 语言原生的事件释放语法。在此处,我们也可以一个完整读取-修改-写入的流程。具体来说,使用 `get!` 获得了可变 `mut` 变量,然后修改结构体内的数据,然后直接 `set!` 到 `world` 合约。
最后,我们介绍 `System` 的测试,如下:
```rust
#[test]
#[available_gas(30000000)]
fn test_move() {
// caller
let caller = starknet::contract_address_const::<0x0>();
// models
let mut models = array![position::TEST_CLASS_HASH, moves::TEST_CLASS_HASH];
// deploy world with models
let world = spawn_test_world(models);
// deploy systems contract
let contract_address = world
.deploy_contract('salt', actions::TEST_CLASS_HASH.try_into().unwrap());
let actions_system = IActionsDispatcher { contract_address };
// call spawn()
actions_system.spawn();
// call move with direction right
actions_system.move(Direction::Right(()));
// Check world state
let moves = get!(world, caller, Moves);
// casting right direction
let right_dir_felt: felt252 = Direction::Right(()).into();
// check moves
assert(moves.remaining == 9, 'moves is wrong');
// check last direction
assert(moves.last_direction.into() == right_dir_felt, 'last direction is wrong');
// get new_position
let new_position = get!(world, caller, Position);
// check new position x
assert(new_position.vec.x == 11, 'position x is wrong');
// check new position y
assert(new_position.vec.y == 10, 'position y is wrong');
}
```
在测试中,我们一般需要按照以下步骤进行:
第一步是初始化 World 合约,首先需要声明包含所有 `Component` 构成的 `models` 数组,然后使用 `spawn_test_world` 初始化并部署 `world` 合约,最后部署 `System` 合约。
```rust
// models
let mut models = array![position::TEST_CLASS_HASH, moves::TEST_CLASS_HASH];
// deploy world with models
let world = spawn_test_world(models);
// deploy systems contract
let contract_address = world
.deploy_contract('salt', actions::TEST_CLASS_HASH.try_into().unwrap());
let actions_system = IActionsDispatcher { contract_address };
```
第二步就是进行调用和 `assert` 断言判断:
```rust
// call spawn()
actions_system.spawn();
// call move with direction right
actions_system.move(Direction::Right(()));
// Check world state
let moves = get!(world, caller, Moves);
// casting right direction
let right_dir_felt: felt252 = Direction::Right(()).into();
// check moves
assert(moves.remaining == 9, 'moves is wrong');
// check last direction
assert(moves.last_direction.into() == right_dir_felt, 'last direction is wrong');
// get new_position
let new_position = get!(world, caller, Position);
// check new position x
assert(new_position.vec.x == 11, 'position x is wrong');
// check new position y
assert(new_position.vec.y == 10, 'position y is wrong');
```
## 深入部署
从此节开始,我们将深入 dojo 的源代码来探索每一步操作背后的原理。我们首先从一切的开始 world 及其他合约的部署开始聊起。
在上文的测试中,我们给出了合约初始化的 Cairo 代码:
```rust
let mut models = array![position::TEST_CLASS_HASH, moves::TEST_CLASS_HASH];
// deploy world with models
let world = spawn_test_world(models);
// deploy systems contract
let contract_address = world
.deploy_contract('salt', actions::TEST_CLASS_HASH.try_into().unwrap());
let actions_system = IActionsDispatcher { contract_address };
```
此处的 `spawn_test_world` 函数定义如下:
```rust
fn spawn_test_world(models: Array<felt252>) -> IWorldDispatcher {
// deploy executor
let constructor_calldata = array::ArrayTrait::new();
let (executor_address, _) = deploy_syscall(
executor::TEST_CLASS_HASH.try_into().unwrap(), 0, constructor_calldata.span(), false
)
.unwrap();
// deploy world
let (world_address, _) = deploy_syscall(
world::TEST_CLASS_HASH.try_into().unwrap(),
0,
array![executor_address.into(), dojo::base::base::TEST_CLASS_HASH].span(),
false
)
.unwrap();
let world = IWorldDispatcher { contract_address: world_address };
// register models
let mut index = 0;
loop {
if index == models.len() {
break ();
}
world.register_model((*models[index]).try_into().unwrap());
index += 1;
};
world
}
```
我们可以看到此处的部署是分为以下三步的:
1. 部署 `executor` 合约
2. 使用 `executor` 合约地址和 `dojo::base::base` 合约 class 作为参数部署 world 合约
3. 在 world 合约内使用 `model` 合约的 class hash 为参数调用 `register_model` 方法
我们首先给出 `executor` 合约的源代码:
```rust
use starknet::ClassHash;
#[starknet::interface]
trait IExecutor<T> {
fn call(
self: @T, class_hash: ClassHash, entrypoint: felt252, calldata: Span<felt252>
) -> Span<felt252>;
}
#[starknet::contract]
mod executor {
use array::{ArrayTrait, SpanTrait};
use option::OptionTrait;
use starknet::{ClassHash, SyscallResultTrait, SyscallResultTraitImpl};
use super::IExecutor;
const EXECUTE_ENTRYPOINT: felt252 =
0x0240060cdb34fcc260f41eac7474ee1d7c80b7e3607daff9ac67c7ea2ebb1c44;
#[storage]
struct Storage {}
#[external(v0)]
impl Executor of IExecutor<ContractState> {
/// Call the provided `entrypoint` method on the given `class_hash`.
///
/// # Arguments
///
/// * `class_hash` - Class Hash to call.
/// * `entrypoint` - Entrypoint to call.
/// * `calldata` - The calldata to pass.
///
/// # Returns
///
/// The return value of the call.
fn call(
self: @ContractState,
class_hash: ClassHash,
entrypoint: felt252,
calldata: Span<felt252>
) -> Span<felt252> {
starknet::syscalls::library_call_syscall(class_hash, entrypoint, calldata)
.unwrap_syscall()
}
}
}
```
此处的 `EXECUTE_ENTRYPOINT` 是之前版本的遗留阐述,在本文讨论的 3.10 中已经没有用途。我们可以看到 `Executor` 合约只包含 `call` 函数用于进行 `library_call_syscall` 调用并返回调用结果。
在 World 合约中,我们在以下函数中使用了 `Executor` 合约:
```rust
fn class_call(
self: @ContractState, class_hash: ClassHash, entrypoint: felt252, calldata: Span<felt252>
) -> Span<felt252> {
self.executor_dispatcher.read().call(class_hash, entrypoint, calldata)
}
```
而 `class_call` 在 world 合约内只使用了一次:
```rust
let name = *class_call(@self, class_hash, NAME_ENTRYPOINT, calldata.span())[0];
```
读者可能好奇为什么 world 合约要引入 `executor` 进行 class 调用操作?这是为了安全的隔离考虑,某些用户可能恶意构造一些特殊的 class ,当合约调用时会修改调用者的存储。而当我们引入 `executor` 合约后,即使调用了恶意的 class ,也不会导致 world 合约内的数据被修改。
另一个合约 `dojo::base::base` 的源代码如下:
```rust
use dojo::world::IWorldDispatcher;
#[starknet::interface]
trait IBase<T> {
fn world(self: @T) -> IWorldDispatcher;
}
#[starknet::contract]
mod base {
use starknet::{ClassHash, get_caller_address};
use dojo::upgradable::{IUpgradeable, UpgradeableTrait};
use dojo::world::IWorldDispatcher;
#[storage]
struct Storage {
world_dispatcher: IWorldDispatcher,
}
#[constructor]
fn constructor(ref self: ContractState) {
self.world_dispatcher.write(IWorldDispatcher { contract_address: get_caller_address() });
}
#[external(v0)]
fn world(self: @ContractState) -> IWorldDispatcher {
self.world_dispatcher.read()
}
#[external(v0)]
impl Upgradeable of IUpgradeable<ContractState> {
/// Upgrade contract implementation to new_class_hash
///
/// # Arguments
///
/// * `new_class_hash` - The new implementation class hahs.
fn upgrade(ref self: ContractState, new_class_hash: ClassHash) {
UpgradeableTrait::upgrade(new_class_hash);
}
}
}
```
正如其名,此合约是一个最简单的基础合约,仅包含一个 `upgrade` 合约升级函数。该合约在 World 合约内存在以下用法:
```rust
fn deploy_contract(
ref self: ContractState, salt: felt252, class_hash: ClassHash
) -> ContractAddress {
let (contract_address, _) = deploy_syscall(
self.contract_base.read(), salt, array![].span(), false
)
.unwrap_syscall();
let upgradable_dispatcher = IUpgradeableDispatcher { contract_address };
upgradable_dispatcher.upgrade(class_hash);
self.owners.write((contract_address.into(), get_caller_address()), true);
EventEmitter::emit(
ref self, ContractDeployed { salt, class_hash, address: contract_address }
);
contract_address
}
```
此函数用于部署 System 合约,如上文 `action` 合约即通过此函数部署。可能又有读者好奇为什么不直接使用 `deploy_syscall` 部署 System 合约,而是通过需要先部署 base 合约后升级到 System 合约呢? 这实际上是一个特殊的初始化方法。
在 `action` 合约内,我们会使用以下语句:
```rust
fn spawn(self: @ContractState) {
// Access the world dispatcher for reading.
let world = self.world_dispatcher.read();
```
读者应该可以注意到 `action` 合约内根本没有 `world_dispatcher` 定义,此定义实际上是通过预先部署的 base 合约传递的。
部署的最后一步是注册 Component 组件,主要使用了 `register_model` 函数,此函数在 world 合约内定义如下:
```rust
/// Registers a model in the world. If the model is already registered,
/// the implementation will be updated.
///
/// # Arguments
///
/// * `class_hash` - The class hash of the model to be registered.
fn register_model(ref self: ContractState, class_hash: ClassHash) {
let caller = get_caller_address();
let calldata = ArrayTrait::new();
let name = *class_call(@self, class_hash, NAME_ENTRYPOINT, calldata.span())[0];
let mut prev_class_hash = starknet::class_hash::ClassHashZeroable::zero();
// If model is already registered, validate permission to update.
let current_class_hash = self.models.read(name);
if current_class_hash.is_non_zero() {
assert(self.is_owner(caller, name), 'only owner can update');
prev_class_hash = current_class_hash;
} else {
self.owners.write((name, caller), true);
};
self.models.write(name, class_hash);
EventEmitter::emit(ref self, ModelRegistered { name, class_hash, prev_class_hash });
}
```
此函数较为简单,其功能为如果系统内不存在当前 model 则直接将此 model 注册到 `models` 映射内,同时更新 model 的 `owner`;如果存在此 model,则判断调用者是否为 `owner`,如果是则进行更新 `models` 映射。
至此,我们再次阅读以下之前执行 `sozo migrate --name test` 的输出:
```bash
# Executor
> Contract address: 0x59f31686991d7cac25a7d4844225b9647c89e3e1e2d03460dbc61e3fbfafc59
# Base Contract
> Class Hash: 0x5a2c567ed06c8059c8d1199684796a0a0ef614f9a2ab628700e804524816b5c
# World
> Contract address: 0x13dfc87155d415ae384a35ba4333dfe160645ad7c83dc8b5812bd7ade9d69d6
# Models (2)
Moves
> Class hash: 0x2e5174b54aef0b99d4685827ffa51488447e1f5607908293d5c715d6bd22433
Position
> Class hash: 0x6a11b5b3003a3aa0ae7f8f443e48314cc0bc51eaea7c3ed1c19beb909f5dda3
> Registered at: 0x5b9ff0db391a01696e1fb61b2efe38a129eb61f0054ad70e5d9c11bfeeede1e
# Contracts (1)
actions
> Contract address: 0x47c92218dfdaac465ad724f028f0f075b1c05c9ff9555d0e426c025e45c035
```
读者应该可以理解输出的顺序以及为什么某些输出为 `Class Hash` 而另一些为 `Contract address`
> 此处的 `Registered at:` 后为 `Position` 注册的交易 hash
## 深入 Model
在上文中,我们展示了 dojo 中 Model 的定义方法,如下:
```rust
#[derive(Model, Copy, Drop, Serde)]
struct Moves {
#[key]
player: ContractAddress,
remaining: u8,
last_direction: Direction
}
```
但是在上文,我们可以看到这一个结构体实际上被拓展为了合约。此处,我们可以简单讨论一下 dojo 的编译流程。Dojo 的编译实际上建立在 Cairo 编译器的基础上,Dojo 编译器负责将其 Dojo 定义的语法元素(大部分都是宏),如 `Model` 和 `#[key]` 等转化为 Cairo 代码。
此处对于 Model 的转化代码可以在 [dojo-lang/src/model.rs](https://github.com/dojoengine/dojo/blob/main/crates/dojo-lang/src/model.rs) 内找到,完整代码如下:
```rust
impl $type_name$Model of dojo::model::Model<$type_name$> {
#[inline(always)]
fn name(self: @$type_name$) -> felt252 {
'$type_name$'
}
#[inline(always)]
fn keys(self: @$type_name$) -> Span<felt252> {
let mut serialized = ArrayTrait::new();
$serialized_keys$
array::ArrayTrait::span(@serialized)
}
#[inline(always)]
fn values(self: @$type_name$) -> Span<felt252> {
let mut serialized = ArrayTrait::new();
$serialized_values$
array::ArrayTrait::span(@serialized)
}
#[inline(always)]
fn layout(self: @$type_name$) -> Span<u8> {
let mut layout = ArrayTrait::new();
dojo::database::schema::SchemaIntrospection::<$type_name$>::layout(ref layout);
array::ArrayTrait::span(@layout)
}
#[inline(always)]
fn packed_size(self: @$type_name$) -> usize {
let mut layout = self.layout();
dojo::packing::calculate_packed_size(ref layout)
}
}
$schema_introspection$
#[starknet::interface]
trait I$type_name$<T> {
fn name(self: @T) -> felt252;
}
#[starknet::contract]
mod $contract_name$ {
use super::$type_name$;
#[storage]
struct Storage {}
#[external(v0)]
fn name(self: @ContractState) -> felt252 {
'$type_name$'
}
#[external(v0)]
fn unpacked_size(self: @ContractState) -> usize {
dojo::database::schema::SchemaIntrospection::<$type_name$>::size()
}
#[external(v0)]
fn packed_size(self: @ContractState) -> usize {
let mut layout = ArrayTrait::new();
dojo::database::schema::SchemaIntrospection::<$type_name$>::layout(ref layout);
let mut layout_span = layout.span();
dojo::packing::calculate_packed_size(ref layout_span)
}
#[external(v0)]
fn layout(self: @ContractState) -> Span<u8> {
let mut layout = ArrayTrait::new();
dojo::database::schema::SchemaIntrospection::<$type_name$>::layout(ref layout);
array::ArrayTrait::span(@layout)
}
#[external(v0)]
fn schema(self: @ContractState) -> dojo::database::schema::Ty {
dojo::database::schema::SchemaIntrospection::<$type_name$>::ty()
}
}
```
此处的所有使用美元符包裹的字段都会根据用户编写的 Dojo 代码进行重写。代码如下:
```rust
&UnorderedHashMap::from([
("contract_name".to_string(), RewriteNode::Text(name.to_case(Case::Snake))),
(
"type_name".to_string(),
RewriteNode::new_trimmed(struct_ast.name(db).as_syntax_node()),
),
("schema_introspection".to_string(), handle_introspect_struct(db, struct_ast)),
("serialized_keys".to_string(), RewriteNode::new_modified(serialized_keys)),
("serialized_values".to_string(), RewriteNode::new_modified(serialized_values)),
]),
```
此部分代码较长,我们将其分为以下三部分分析:
1. `impl` 部分,此部分为结构体实现了一系列方法
2. `$schema_introspection$` 部分,提供结构体的数据库支持
3. `contract` 部分,此部分提供了大量合约功能
我们首先分析 `impl` 部分,此部分代码如下:
```rust
impl $type_name$Model of dojo::model::Model<$type_name$> {
#[inline(always)]
fn name(self: @$type_name$) -> felt252 {
'$type_name$'
}
#[inline(always)]
fn keys(self: @$type_name$) -> Span<felt252> {
let mut serialized = ArrayTrait::new();
$serialized_keys$
array::ArrayTrait::span(@serialized)
}
#[inline(always)]
fn values(self: @$type_name$) -> Span<felt252> {
let mut serialized = ArrayTrait::new();
$serialized_values$
array::ArrayTrait::span(@serialized)
}
#[inline(always)]
fn layout(self: @$type_name$) -> Span<u8> {
let mut layout = ArrayTrait::new();
dojo::database::schema::SchemaIntrospection::<$type_name$>::layout(ref layout);
array::ArrayTrait::span(@layout)
}
#[inline(always)]
fn packed_size(self: @$type_name$) -> usize {
let mut layout = self.layout();
dojo::packing::calculate_packed_size(ref layout)
}
}
```
此处我们一并给出上文的示例 Dojo 代码:
```rust
#[derive(Model, Copy, Drop, Serde)]
struct Moves {
#[key]
player: ContractAddress,
remaining: u8,
last_direction: Direction
}
```
此处的 `$type_name$` 即我们在 Dojo 系统内声明的 Model 名称,此处为 `Moves`。此部分为我们声明的 Model提供了多个方法,且使用了 `#[inline(always)]` 节约 gas。
> 对于 `#[inline(always)]` 节约 gas 的原理,可以参考 [深入探索 Cairo: Sierra IR 与 Cairo 底层](https://blog.wssh.trade/posts/deep-in-sierra/) 一文
`keys` 函数会返回 Model 的 key 部分,即我们上文使用 `#[key]` 标识的结构体成员,此处为 `player`,而 `values` 则会返回非键的结构体成员,此处为 `remaining` 和 `last_direction`。
根据编译器源代码,我们可以知道 `$serialized_keys$` 和 `$serialized_values$` 都使用了同一个函数实现:
```rust
let serialize_member = |m: &Member, include_key: bool| {
if m.key && !include_key {
return None;
}
if m.ty == "felt252" {
return Some(RewriteNode::Text(format!(
"array::ArrayTrait::append(ref serialized, *self.{});",
m.name
)));
}
Some(RewriteNode::Text(format!(
"serde::Serde::serialize(self.{}, ref serialized);",
m.name
)))
};
let serialized_keys: Vec<_> =
keys.iter().filter_map(|m| serialize_member(m, true)).collect::<_>();
let serialized_values: Vec<_> =
members.iter().filter_map(|m| serialize_member(m, false)).collect::<_>();
```
此处的 `m` 指结构体每一个成员。读者可能无法猜测上述代码内出现 `ty` 的含义,我们在此处给出其 Rust 源代码:
```rust
#[derive(Clone, Debug, Serialize, Deserialize, PartialEq)]
pub struct Member {
/// Name of the member.
pub name: String,
/// Type of the member.
#[serde(rename = "type")]
pub ty: String,
pub key: bool,
}
```
实际上,`ty` 只是此结构体成员的类型名称。简单来说,`serialize_member` 实现了以下功能:
1. 如果结构体成员类型为 `felt252` 则使用 `array::ArrayTrait::append(ref serialized, *self.{});` 将其加入 `serialized`
2. 如果结构体成员类型为其他类型,则使用 `serde::Serde::serialize(self.{}, ref serialized);` 将其加入 `serialized`
接下来,我们介绍复杂的 `layout` 函数,此函数实际上是对 `dojo::database::schema::SchemaIntrospection::<$type_name$>::layout` 的简单包装。而 `dojo::database::schema::SchemaIntrospection::<$type_name$>` 的实现其实是在 `$schema_introspection$` 内实现,而 `packed_size` 函数也与此相关。所以我们首先分析 `$schema_introspection$` ,此部分实现如下:
```rust
fn handle_introspect_internal(
_db: &dyn SyntaxGroup,
name: String,
mut layout: Vec<RewriteNode>,
mut size_precompute: usize,
type_ty: String,
members: Vec<Member>,
) -> RewriteNode {
let mut size = vec![];
let primitive_sizes = primitive_type_introspection();
members.iter().for_each(|m| {
let primitive_intro = primitive_sizes.get(&m.ty);
let mut attrs = vec![];
if let Some(p_ty) = primitive_intro {
// It's a primitive type
if m.key {
attrs.push("'key'");
} else {
size_precompute += p_ty.0;
p_ty.1.iter().for_each(|l| {
layout.push(RewriteNode::Text(format!("layout.append({});\n", l)))
});
}
} else {
// It's a custom type
if m.key {
attrs.push("'key'");
} else {
size.push(format!(
"dojo::database::schema::SchemaIntrospection::<{}>::size()",
m.ty,
));
layout.push(RewriteNode::Text(format!(
"dojo::database::schema::SchemaIntrospection::<{}>::layout(ref layout);\n",
m.ty
)));
}
}
});
if size_precompute > 0 {
size.push(format!("{}", size_precompute));
}
RewriteNode::interpolate_patched(
"
impl $name$SchemaIntrospection of dojo::database::schema::SchemaIntrospection<$name$> {
#[inline(always)]
fn size() -> usize {
$size$
}
#[inline(always)]
fn layout(ref layout: Array<u8>) {
$layout$
}
#[inline(always)]
fn ty() -> dojo::database::schema::Ty {
$ty$
}
}
",
&UnorderedHashMap::from([
("name".to_string(), RewriteNode::Text(name)),
("size".to_string(), RewriteNode::Text(size.join(" + "))),
("layout".to_string(), RewriteNode::new_modified(layout)),
("ty".to_string(), RewriteNode::Text(type_ty)),
]),
)
}
```
 Sign in with Wallet
Connect another wallet
Sign in with Wallet
Connect another wallet