---
title: BEX Build Commands
desc: The Quasar CLI list of commands when developing or building a Browser Extension (BEX).
---
With the [Quasar CLI](/start/quasar-cli), it is incredibly easy to develop and build Browser Extension distributables. Below, we'll explain the two processes in detail.
## Developing
Start developing a Browser Extension with just one command.
```bash
$ quasar dev -m bex
# ..or the longer form:
$ quasar dev --mode bex
```
You may or may not have already had a `src-bex` folder, but you will definitely have one now. You will also have a set of files under `src-bex/www`. These files are the output from the webpack development server. Normally, these files are kept in memory, which is why you wouldn't see them when creating an SPA, but for Browser Extension development, physical files are required in order for the process to work.
::: warning
Do not edit anything under the `src-bex/www` folder, as these changes are overridden via Hot Module Reloading (HMR). This folder is just the built output of your `src` folder, so make the changes there instead.
:::
Now that we've created a development environment, we need to load generated browser extension into your browser.
### Chrome
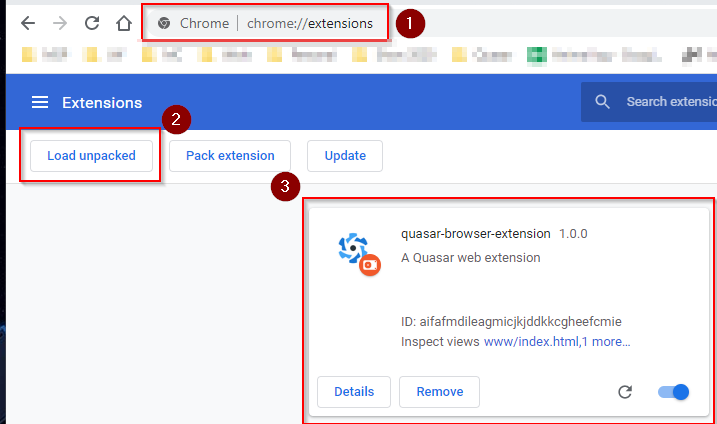
In line with the screenshot above, the following steps must be taken:
1. In Chrome, navigate to `chrome://extensions`
2. Click "Load unpacked". This will present you with the *folder* selection dialog. Navigate to and select your `src-bex` folder.
3. You should now see your BEX mounted in Chrome.
More information about debugging Chrome Browser Extensions can be found in the [official documentation](https://developer.chrome.com/extensions/tut_debugging).
### Firefox
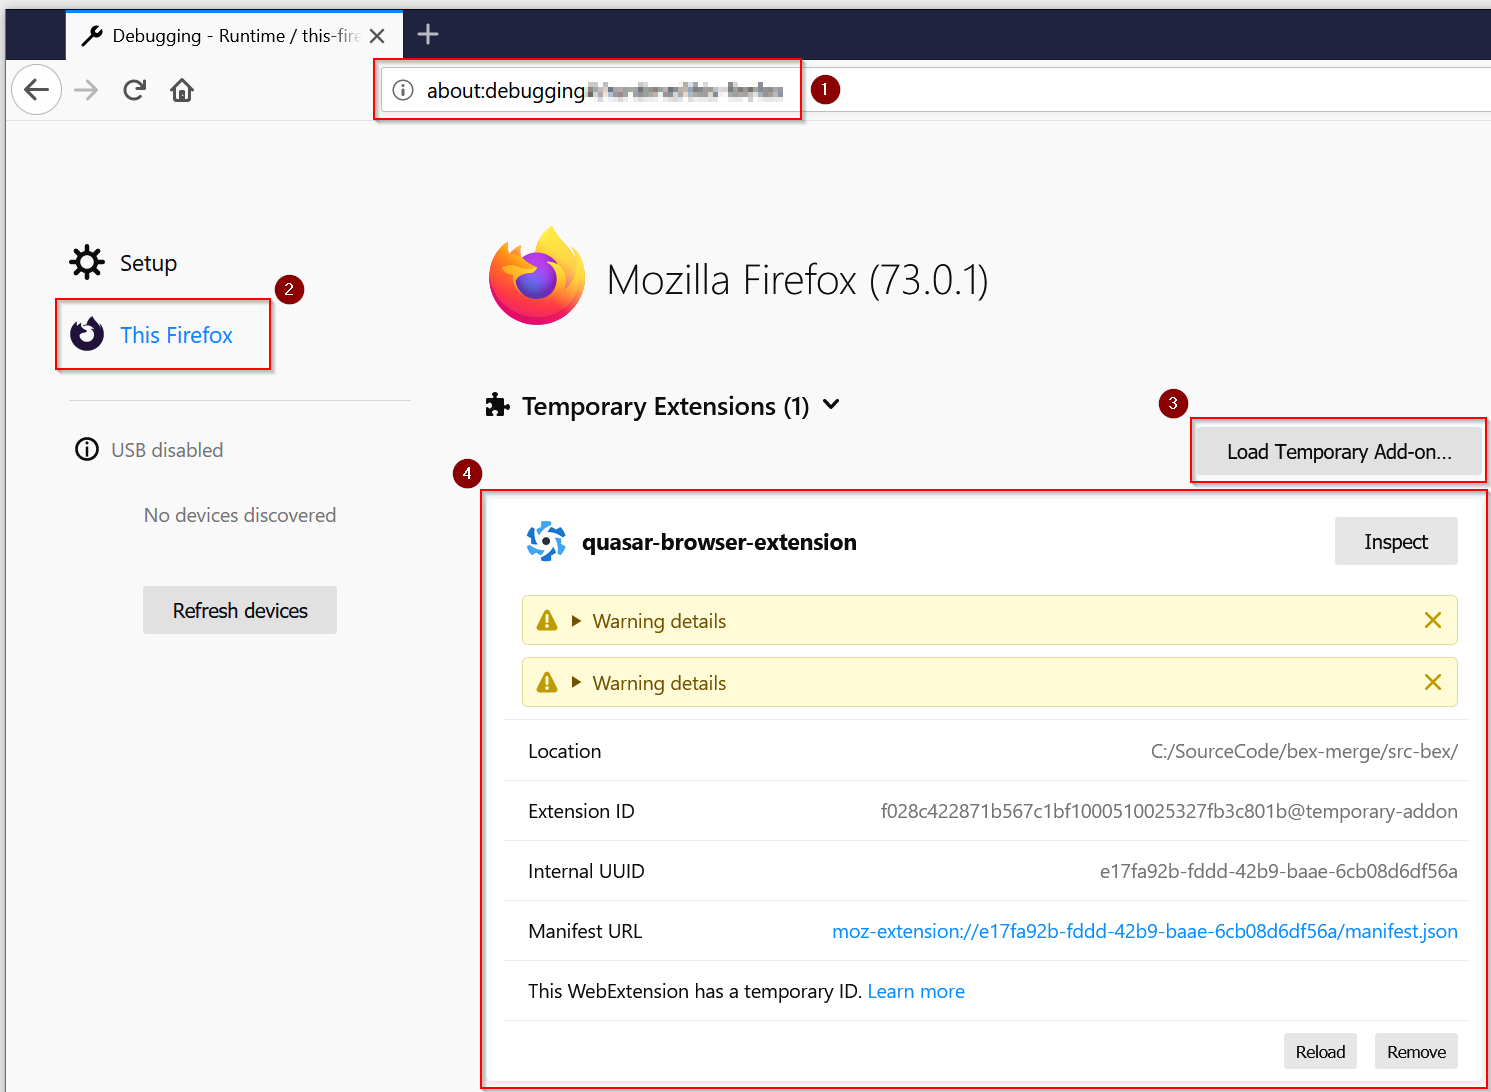
In line with the screenshot above, the following steps must be taken:
1. In Firefox, navigate to `about:debugging`
2. Click on "This Firefox"
3. Click "Load Temporary Add-on...". This will present you with the *file* selection dialog. Navigate to and select your `src-bex/manifest.json` file. **Note:** Firefox requires the manifest file, not the `src-bex` folder like Chrome.
4. You should now see your BEX mounted in Firefox.
More information about debugging Firefox temporary addons can be found in the [Firefox Extension Workshop](https://extensionworkshop.com/documentation/develop/temporary-installation-in-firefox/).
### Hot Module Reloading (HMR)
HMR works with Browser Extension development but does work slightly differently depending on which browser you're developing on. In both cases, the Quasar application being built will reload when changes are made. The quasar application in this instance would refer to changes made to everything under the `src` folder.
::: tip
**Chrome vs Firefox Nuances** - When developing your Browser Extension, you will often need to make changes to the files under the `src-bex` folder as well. This will be done when configuring hooks, setting up popups etc. Firefox will see these changes and automatically re-load the Browser Extension. Chrome on the other hand will not. When you have made these changes in Chrome, you will need to navigate to your Extension (see the Chrome section above) and click on the refresh icon in your Development Browser Extension.
:::
## Building for Production
```bash
$ quasar build -m bex
# ..or the longer form:
$ quasar build --mode bex
```
When building for production, multiple directories are generated:
The new folder has the following structure:
```bash
.
└── dist/
├── UnPackaged/ # Built code ready for testing in your development environment
├── Packaged/
| ├── Chrome
| | └── your-project-name.zip # A zip file ready for submission to the Chrome Browser Extension Store
| ├── Firefox
└── └── └── your-project-name.zip # A zip file ready for submission to the Firefox Extension Store
```
::: tip
If you want to test out the `your-project-name.zip` file, you can do this by dragging the file into the same place you load the Extension in development mode; for Chrome `chrome://extensions` and Firefox `about:debugging`. See the development screenshots above for more information.
:::
### A Note on Minification
Part of the review process for Browser Extensions in both Chrome and Firefox must allow the relative teams to examine the code being deployed as a live extension. With this in mind, minified code is not allowed. So, to allow for the review process, Quasar will not obfuscate and minify the built code for Browser Extensions.
Given any extension will be ran directly on the user's computer, upload speed isn't a factor to worry about here, so minifying the code isn't necessary.
## Publishing to the Stores
Since Quasar removes the burden of building and packaging your Browser Extension, once you are finished developing your extension, it is ready to be published. The publishing process differs between browsers, but the official documentation will guide you through the process.
**Chrome** - [Publishing a Chrome Browser Extension](https://developer.chrome.com/webstore/publish)
**Firefox** - [Publishing a Firefox Add On (Browser Extension)](https://extensionworkshop.com/documentation/publish/)
 Sign in with Wallet
Connect another wallet
Sign in with Wallet
Connect another wallet