---
tags: salle, PMMA, raspberry, done
---
# Raspberry Pi práctica
[TOC]
## El proyecto Raspberry Pi
> The Raspberry Pi project originally leaned towards the promotion of teaching basic computer science in schools and in developing countries. The original model became more popular than anticipated, selling outside its target market for uses such as robotics. It is widely used in many areas, such as for weather monitoring, because of its low cost, modularity, and open design.
 
### Hardware y modelos de Pi's
A lo largo de los años la fundación Raspberry Pi ha liberado diferentes modelos de placas:
| | Generación | Modelos | Año | RAM |
|---|---|---|---|---|
|  | Raspberry Pi | A, B, A+, B+ | 2012 | 256-512 MB |
|  | Raspberry Pi 2 | B | 2014 | 1 GB
|  | Raspberry Pi 3 | B, A+, B+ | 2016 | 512 MB-1 GB |
|  | Raspberry Pi 4 | B, 400 | 2019 | 1-8 GB |
|  | Raspberry Pi Zero | Zero, W, WH, 2W | 2014 | 512 MB |
|  | Raspberry Pi 5 | | 2023 | 1-8GB |
## Linux

> Your Raspberry Pi needs an operating system to work. This is it. Raspberry Pi OS (previously called Raspbian) is our official supported operating system.
### Software libre
> Free software or libre software, infrequently known as freedom-respecting software, is computer software distributed under terms that allow users to run the software for any purpose as well as to study, change, and distribute it and any adapted versions.
* The freedom to **run the program as you wish**, for any purpose (freedom 0).
* The freedom to **study how the program works, and change it** so it does your computing as you wish (freedom 1). **Access to the source code** is a precondition for this.
* The freedom to **redistribute copies** so you can help your neighbor (freedom 2).
* The freedom to distribute copies of your **modified versions** to others (freedom 3). By doing this you can give the whole community a chance to benefit from your changes. Access to the source code is a precondition for this.
> Free as in freedom, not free as in free beer.
## Distribuciones y arquitecturas
Las Raspberry Pi, además del sistema operativo oficial (Raspberry Pi OS), pueden ejecutar diferentes distribuciones de linux, además de algunos otros sistemas operativo alternativos.
## Instalación del sistema
[Instrucciones](https://www.raspberrypi.com/software/) de cómo instalar el sistema operativo en tu Raspberry.
### Copiar la imagen en una sdcard.
Para esto se pueden usar diferentes herramientas, la herramienta oficial se llama **Raspberry Pi imager** y está disponible para Linux, OSX y Windows. La puedes descargar [aquí](https://www.raspberrypi.com/software/)

**1. Seleccionar el modelo** de Raspberry Pi que vamos a usar.

**2. Seleccionar el sistema operativo** que queremos instalar, si no vamos a utilizar nuestra raspberry como ordenador de escritorio se recomienda utilizar la versión **Lite** que omite muchos programas que no necesitaremos. Esta dentro de la opción **Raspberry Pi OS (other)**


**3. Seleccionar la sd-card** donde vamos a grabar nuestra sistema.

**4. Modificar la configuración inicial** de nuestro sistema.

En la pestaña **GENERAL**
* **Hostname** - Nombre de nuestro ordenador
* **Username and password** - Crear un usuario y darle un password
* **Wireless LAN** - Configurar el WiFi
* **Locale settings** - Configurar el uso horario y la distribución de nuestro teclado.

En la pestaña **SERVICES**
* **SSH** - Habilitarlo para poder tener acceso remoto.

Y finalmente en la pestaña **OPTIONS**
* Deshabilitar la opción **telemetry**

**4. Por último hay que copiar el sistema en la sdcard...**

## SSH
> The Secure Shell Protocol (SSH) is a cryptographic network protocol for operating network services securely over an unsecured network. Its most notable applications are remote login and command-line execution.
Para poder conectarnos a nuestra Raspberry desde nuestro ordenador necesitamos utilizar SSH, con esto tendremos una terminal remota con la cual interactuar con la Raspi. Si nuestro ordenador es Linux, MacOS o Windows 10-11 no necesitamos instalar ningún programa adicional, sin embargo en versiones anteriores de Windows hace falta instalar una utilería llamada [PuTTY](https://www.putty.org/).
Lo primero que necesitamos saber es la dirección IP de nuestra Raspi, para ello tenemos varias alternativas:
* Conectar una pantalla a la Raspi.
* Revisar nuestro Router WIFi y ver la lista de dispositivos conectados.
* Si nuestro ordenador soporta mDNS podemos buscar el nombre _raspberry.local_ o el nombre que le asignamos a nuestra Raspi en el campo hostname seguido por .local: ej. _PMMA.local_
* El comando nmap o algún escáner de red.
:::info
[Documentación](https://www.raspberrypi.com/documentation/computers/remote-access.html#introduction-to-remote-access) para acceso remoto a la Raspi.
:::
## Shell
> A Unix shell is a command-line interpreter or shell that provides a command line user interface for Unix-like operating systems. The shell is both an interactive command language and a scripting language, and is used by the operating system to control the execution of the system using shell scripts.
Una vez estemos conectados con nuestra raspi via ssh tendremos acceso a un shell que por defecto será [bash](https://en.wikipedia.org/wiki/Bash_(Unix_shell)). Hay varios shells diferentes, como zsh, dash o fish.
:::info
Para enviar un mensaje a otro usuario podemos utilizar el comando _write_
~~~
write username (pi)
~~~
Ahora todo lo que escribamos será enviado al usuario que elegimos cada vez< que piquemos enter. Para salir picamos Ctrl+D.
:::
### cd y ls
El comando _cd_ nos sirve para cambiar de directorio y el comando _ls_ para listar los contenidos del directorio en el que estamos.
:::info
El directorio en el que nos encontramos se representa con un punto _._ y el directorio arriba de nosotros con dos .. Así que si queremos subir un directorio usamoe el comando _cd .._
:::
### man
El comando **_man_** es uno de los más importantes a recordar, nos sirve para tener acceso al manual de los diferentes comandos que podemos usar en nuestro shell.

Sólo tenemos que teclear **_man comando_** (tienes que reemplazar la palabra "comando" con el nombre del comando que quieres aprender) y nos aparecerá la descripción y las opciones del comando que pedimos. Prueba a teclear **_man ls_**.
Para salir del manual podemos usar la letra _**q**_, para buscar algo en especial tecleamos _**/**_ seguido del texto que queremos buscar.
### sudo
Los comandos que necesitemos ejecutar como _root_ (administrador para los que vienen del mundo windows) los precedemos con _sudo_, por ejemplo _sudo apt update_ para hacer update de nuestro sistema.
### apt
_**apt**_ es el administrador de paquetes que utiliza la Raspberry Pi, con el podemos instalar, desinstalar y hacer upgrades de el software que tenemos instalado.
:::info
Para hacer upgrade de nuestro sistema (obviamente necesitamos una conexión a internet) ejecutamos los comandos:
~~~
sudo apt update
sudo apt upgrade
~~~
:::
### raspi-config
[**raspi-config**](https://www.raspberrypi.com/documentation/computers/configuration.html) es un comando específico de la Raspberry Pi (si usamos el sistema operativo oficial Raspberry Pi OS) que nos sirve para configurar todo tipo de cosas, al ejecutarlo nos aparecerá un menú con las diferentes opciones y submenus.

Con este menú podemos configurar el Wi-Fi de nuestra Raspberry!
Sí necesitamos configurar más de una red wifi, lo podemos hacer [editando el archivo](https://www.raspberrypi.com/documentation/computers/configuration.html#adding-the-network-details-to-your-raspberry-pi) `/etc/wpa_supplicant/wpa_supplicant.conf`.
## MQTT
MQTT was developed by Andy Stanford-Clark (IBM) and Arlen Nipper (Eurotech; now Cirrus Link) in 1999 for the monitoring of an oil pipeline through the desert.
The goals were to have a protocol, which is bandwidth-efficient and uses little battery power, because the devices were connected via satellite link and this was extremely expensive at that time.
The protocol uses a publish/subscribe architecture wich is event-driven and enables messages to be pushed to clients. The central communication point is the MQTT broker, it is in charge of dispatching all messages between the senders and the rightful receivers. Each client that publishes a message to the broker, includes a topic into the message.
The topic is the routing information for the broker. Each client that wants to receive messages subscribes to a certain topic and the broker delivers all messages with the matching topic to the client. Therefore the clients don’t have to know each other, they only communicate over the topic.
This architecture enables highly scalable solutions without dependencies between the data producers and the data consumers.
[source](https://www.hivemq.com/blog/how-to-get-started-with-mqtt)

A topic is a simple string defined by the user that can have more hierarchy levels, which are separated by a slash.
```
pma/input/team1/temperature
pma/ouput/team2/motor
```
Wilcards can also be used in sigle leves ej. `pma/input/+/temperature` will return **temperatures of all teams**.
Or in multilevels: `pma/output/#` will return **all** outputs from **all teams**.
### Mosquitto
#### Instalación
Mosquitto es un software que nos permite conectarnos a un broker MQTT o correr nuestro propio broker. Para instalarlo debes ejecutar:
~~~bash
sudo apt install mosquitto mosquitto-clients
~~~
#### Configuración
Para permitir que cualquiera pueda publicar y recibir mensajes hay que editar el archivo `/etc/mosquitto/mosquitto.conf`:
~~~bash
sudo nano /etc/mosquitto/mosquitto.conf
~~~
Y agregar al final las siguientes dos lineas:
~~~
listener 1883
allow_anonymous true
~~~
Luego reiniciar el servicio con
~~~bash
sudo systemctl restart mosquitto
~~~
#### Publicar
Para publicar un mensaje necesitas saber el nombre o dirección del broker en el cuál quieres publicar y el nombre del topico. Todos los clientes que estén suscritos al tópico donde publiques recibirán tu mensaje.
~~~bash
mosquitto_pub -h broker_hostname -t topic_name -m "este es mi mensaje"
~~~
#### Suscribirse
Para suscribirte a un tópico debes usar el comando:
~~~bash
mosquitto_sub -h broker_hostname -t topic_name
~~~
Para probarlo puedes suscribirte a un tópico (puedes usar cualquir nombre) y en otra terminal publicar algo en ese mismo tópico.
### MQTT en python
Para usar el protocolo MQTT desde el lenguaje python, podemos usar la librería [paho](https://www.eclipse.org/paho/index.php?page=clients/python/index.php)
Para instalarla en la raspberry Pi:
~~~
sudo apt install python3-paho-mqtt
~~~
[Aquí](https://www.emqx.com/en/blog/how-to-use-mqtt-in-python) hay un tutorial para aprender a usarlo. Y [aqui](https://www.eclipse.org/paho/index.php?page=clients/python/docs/index.php) está la documentación oficial.
## Node-red
> Node-RED is a flow-based development tool for visual programming developed originally by IBM for wiring together hardware devices, APIs and online services as part of the Internet of Things.
https://nodered.org/
{%youtube ksGeUD26Mw0%}
:::info
Node-Red essential [**video list**](https://www.youtube.com/watch?v=ksGeUD26Mw0&list=PLyNBB9VCLmo1hyO-4fIZ08gqFcXBkHy-6): lista de reproducción con videos en inglés para aprender a usar node-red.
:::
### Instalación en la Raspberry
Para instalar Node-Red en la raspberry pi, podemos usar la siguiente instrucción (se recomienda decir que sí a la instalación de los nodos específicos para la raspberry):
```bash
bash <(curl -sL https://raw.githubusercontent.com/node-red/linux-installers/master/deb/update-nodejs-and-nodered)
```

Una vez terminada la instalación, para iniciar el servidor node-red podemos ejecutar:
~~~
sudo systemctl start nodered.service
~~~
Y para que se inicie siempre al arrancar nuestra raspberry ejecutamos:
~~~
sudo systemctl enable nodered.service
~~~
Si necesitas más detalles, [aquí](https://nodered.org/docs/getting-started/raspberrypi) puedes encontrar las instrucciones oficiales.
### Flows
Para aislar el area de trabajo se pueden utilizar los _flows_, en el menu de arriba a la derecha se agrega un _flow_ y haciendo doble click sobre su nombre lo podemos renombrar.

### Trabajando con nodos
Para insertar un nodo simplemente se arrastra desde el menú de nodos hacia la ventana central.

Para editar las características del no al darle doble clic se abrir una ventana que nos permite cambiarlas.
[Aquí](https://nodered.org/docs/tutorials/first-flow) hay un tutorial paso a paso para crear tu primer flow.
### Consola de mensajes
La consola de mensajes nos sirve para comprobar el output de nuestros nodos.

### Conectarse a un broker
Para conectarse un broker hay que agregar un nodo de MQTT y editarlo, creando una nueva instancia de dicho broker, para esto sólo hay que seleccionar el host dónde está corriendo el broker, ponerle un nombre para reconocerlo después, y seleccionar el tópico en el cual queremos publicar o suscribirnos según sea el caso.

Para probar nuestro setup podemos utilizar nodo de inyección de texto conectado al nodo _MQTT out_ que publicará el mensaje en determinado tópico al cual nos subscribimos con el nodo _MQTT in_, que a su vez conectamos al nodo de debug. De esta manera podremos ver los mensajes en tiempo real apareciendo en la consola.
### Subscribirse a un tópico.
[tutorial](https://cookbook.nodered.org/mqtt/subscribe-to-topic)
### Publicar en un tópico

[tutorial](https://cookbook.nodered.org/mqtt/publish-to-topic)
### Raspberry GPIO desde Node-Red
Al conectar un botón entre el pin de ground y el pin 12 o GPIO 18 podemos leer el estado del botón desde el interior de node-red.

Usando el nodo de _rpi GPIO out_ podemos controlar un actuador, como por ejemplo un led. Además de de tener una salida digital (1/0) podemos escribir un valor [PWM](https://en.wikipedia.org/wiki/Pulse-width_modulation) entre 0 y 100, con lo cual podemos hacer un fade o controlar un servo motor, por ejemplo.
[Aquí](https://flows.nodered.org/node/node-red-node-pi-gpio) puedes encontrar la documentación oficial de los nodos GPIO para la raspberry pi. Recuerda que si seguiste el proceso de instalación documentado arriba no necesitas volverlos a instalar.
### Dashboard
En node-red podemos crear un dashboard que nos permite visualizar los outputs de nuestros nodos y mediante diferentes controles generar inputs.

Primero que nada debes instalar los nodos correspondientes:

Primero debes agregar algun nodo, crear un nuevo dashboard y agregarle un nuevo tab:

Para poder ver el estado de tu botón, sólo tienes que configurar los valores que recibirá el switch, así cada vez que presiones el botón el switch se actualizará automáticamente.

Después de crear tu dashboard y agregar algún widget la puedes acceder en la dirección de tu servidor node-red agregando _ui_ al final (por ejemplo http://localhost:1880/ui)
[Aquí](https://flows.nodered.org/node/node-red-dashboard) puedes encontrar la documentación oficial.
## Sistema de archivos
## Audio
> All Raspberry Pi models with HDMI, micro HDMI, or mini HDMI support audio output over HDMI. All Raspberry Pi models support audio over USB. All Raspberry Pi models equipped with Bluetooth support Bluetooth audio. All variants of the Raspberry Pi 1, 2, 3, and 4 include a 3.5mm auxiliary TRRS jack which may require amplification for sufficient output volume.
De la [página oficial](https://www.raspberrypi.com/documentation/computers/getting-started.html#audio) de Rraspberry Pi. En este [documento](https://hackmd.io/-1uCEUE2QXmmiCY-c0wRPg) puedes encontrar más información sobre como utilizar la salida de audio digital I2S presente en los GPIO's de la Pi.
## GPIO
Los pines que encontramos en la placa de nuestra Raspberry Pi nos sriven para conectar todo tipo de Inputs y Outputs, podemos conectar un led, un sensor, una pantalla, etc.

En la [documentación oficial](https://www.raspberrypi.com/documentation/computers/os.html#gpio-and-the-40-pin-header) podemos encontrar mucha más información sobre este tema. En [pinout.xyz](https://pinout.xyz/) hay un _pinout interactivo_ con todo lo que necesitas saber para utilizar los GPIO's de la raspberry.
### Input
Como ejemplo de input podemos utilizar un simple botón conectado directamente a los pines de nuestra raspberry pi
{%youtube AlcF1_rs9e0%}
[Aquí](https://www.raspberrypi.com/documentation/computers/raspberry-pi.html#button) podemos encontrar un ejemplo de cómo leer el botón con un script en python.
~~~python
from gpiozero import Button
from time import sleep
button = Button(2)
while True:
if button.is_pressed:
print("Pressed")
else:
print("Released")
sleep(1)
~~~
## Cámara
En la [documentación oficial](https://www.raspberrypi.com/documentation/computers/camera_software.html#introducing-the-raspberry-pi-cameras) hay mucha información sobre los diferentes modelos de cámaras y como utilizarlos.

En este [documento](https://hackmd.io/i0c2Qh-6So6hsxe9VBjkQw) puedes encontrar instrucciones para convertir tu raspberry Pi en un servidor para capturar videos e imágenes.
## Addressable Leds
> The WS2812 Integrated Light Source — or NeoPixel in Adafruit parlance — is the latest advance in the quest for a simple, scalable and affordable full-color LED. **Red, green and blue LEDs are integrated alongside a driver chip into a tiny surface-mount package controlled through a single wire**. They can be used individually, chained into longer strings or assembled into still more interesting form-factors.
> NeoPixels don’t just light up on their own; **they require a microcontroller (such as Arduino) and some programming.**
desde [adafruit](https://learn.adafruit.com/adafruit-neopixel-uberguide)

La manera más fácil de controlar leds direccionables desde la raspberry pi es utilizando python y una librería como: [Adafruit CircuitPython NeoPixel](https://github.com/adafruit/Adafruit_CircuitPython_NeoPixel). En esta [guía](https://learn.adafruit.com/adafruit-neopixel-uberguide/python-circuitpython) encontrarás información muy detallada sobre como utilizar este tipo de leds.
### Energía (WIP)
https://www.temposlighting.com/guides/power-any-ws2812b-setup
:::info
Para evitar daños a los leds, cuando los conectes a una fuente de energía o microcontrolador encendidos, **siempre conecta primero la tierra (GND)**. Y al desconectar siempre desconecta la tierra al final.
:::
https://quinled.info/addressable-digital-leds/
### Conexiones
Los leds direccionables normalmente tienen tres conexiones: voltaje, tierra y señal de control. Algunos modelos (WS2813) tienen cuatro cables, la conexión extra se debe conectar a tierra como se muestra en [esta](https://hackmd.io/_uploads/r1Izi3nGC.png) imagen, [aquí](https://www.seeedstudio.com/blog/2019/02/14/ws2812b-vs-ws2813-addressable-rgb-led-strips-how-are-they-different/) puedes encontrar una comparación.

En la Raspberry Pi, para que la línea de control funcione correctamente se debe conectar a el **GPIO10, GPIO12, GPIO18 o GPIO21**
#### Dirección de los datos
Un error muy común es conectar los leds al revés, los microcontroladores que manejan cada led tienen una entrada de datos llamada _DI_ y una salida _DO_ **nuestra señal de control emitida por la reaspberry pi debe estar conectada a la entrada _DI_ del primer led,** el cuál pasará la señal al siguiente y así sucesivamente.

### Control (WIP)
En sistemas linux como el que utilizamos en la raspberry, la librería que necesitamos se puede instalar utilizando el manejador de librerías de python [pip](https://github.com/pypa/pip) con el siguiente comando:
~~~bash
pip3 install adafruit-circuitpython-neopixel
~~~
## Python
## DMX desde la Raspberry Pi
> DMX512 is a standard for digital communication networks that are commonly used to control lighting and effects.
from [wikipedia](https://en.wikipedia.org/wiki/DMX512)
### Señal diferencial
> Signals like this are interpreted by reading the difference between one wire with the data (D+), and another wire with the inverse of the data (D-). Since we are reading the difference, we call this a differential signal. Differential signals like RS485 pick up noise almost equally along the two signal lines, this keeps the difference between the two signals the same. Since we read the difference between the two signals, it's easy to communicate over long distances (The DMX standard recommends a maximum run of a thousand feet, although RS-485 is rated for 4,000 feet).
### Definiciones básicas
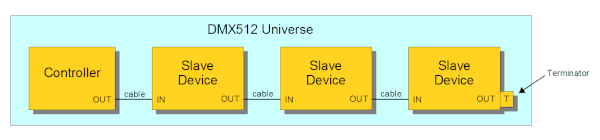
* **Fixture/Slave:** Any object that takes DMX input. Receives a full DMX packet, picks out and listens data relevant to itself (intelligent lights, gobos, lasers, and fog machines). Most Fixtures have an output channel that is simply a copy of the input.
* **Universe:** A Universe consists of a set of fixtures all strung together reading the same data. A Universe contains 512 bytes of information, so the amount of fixtures in a universe will depend on how many bytes of data are needed to address each fixture.
* **Controller:** Creates and sends DMX data to one or more Universes. Usually, this a large board with many knobs and sliders, however, a simple PC can be used as a DMX controller.
from [sparkfun](https://learn.sparkfun.com/tutorials/introduction-to-dmx)
### Conectores
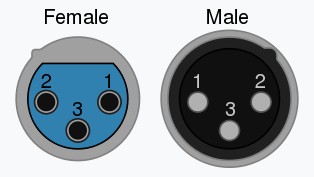
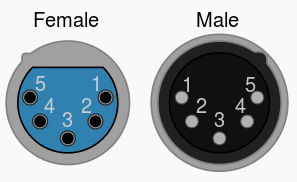
> DMX data is typically transferred over an XLR-5 cable, although occasionally, DMX capable XLR-3 cables are also used. RS-485 only requires 3 lines, ground, Data+, and Data-; and in many applications, this is all that was used. However, an additional pair of data lines was added to allow for future growth, requiring the XLR-5 cable. These connectors and their pinouts are shown below.

### Instalar el hardware _DMX interface for Raspberry pi_
Esta placa nos permite comunicarnos con dispositivos DMS directamente desde la raspberry Pi, se instala como un _hat_ conectándose directamente al header GPIO's. Dependiendo del tipo de Raspberry que tengamos hace falta utilizar un adaptador para que la placa quede bien posicionada en la raspberry pi.

Para utilizar esta placa se requiere instalar el software [Open Lighting Project's OLA](https://www.openlighting.org/) el cual nos permitirá enviar mensajes a través del hardware DMX desde diversas interfaces como son Node-Red o python entre otras.
Antes de poder utilizar esta placa tenemos que confugrar varias cosas en nuestra Raspberry Pi.
#### Liberar el puerto Serial /dev/ttyAMA0
Normalmente la Raspberry Pi da acceso a una terminal de mantenimiento a través del puerto serial en el header de pines, sin embargo nosotros queremos utilizar esa mismo puerto serial para comunicarnos con los dispositivos DMX, por esto tenemos que deshabilitar la terminal.
Ejecutando la herramienta `sudo raspi-config` y seleccionando el menu _Interface Options_ → _Serial Port_ primero deshabilitamos el Shell y habilitamos el puerto serial:

También hay que agregar las siguientes líneas al final del archivo `/boot/config.txt` para deshabilitar el Serial bluetooth y configurar el reloj del puerto Serial.
~~~
dtoverlay=disable-bt
init_uart_clock=16000000
~~~
Por último hay que deshabilitar el login por terminal Serial.
~~~
sudo systemctl disable serial-getty@ttyAMA0.service
~~~
#### GPIO 18 enabled as output
Necesitamos habilitar el pin 18 del header como un output para comunicarnos con la placa DMX. Esto hay que hacerlo cada vez que inicie la raspberry pi, podemos poner el siguiente contenido en el archivo `/etc/rc.local` que se ejecuta automáticamente cada vez que la Pi bootea.
~~~
#!/bin/sh
# set_dmx_mode
pin=18
gpio=/sys/class/gpio/gpio$pin
echo $pin > /sys/class/gpio/export
echo out > $gpio/direction
echo 1 > $gpio/value
~~~
#### Instalar OLA
La instalación es muy sencilla basta con el comando
~~~
sudo apt install ola ola-python
~~~
:::info
**En caso de que algo no funcione correctamente** se recomienda la instalación manual desde el [repositorio](https://github.com/OpenLightingProject/ola) en github.
Para lo cual hay que instalar primero todas las dependencias necesarias para compilar el software:
~~~
sudo apt-get install libcppunit-dev libcppunit-1.15-0 uuid-dev pkg-config libncurses5-dev libtool autoconf automake g++ libmicrohttpd-dev libmicrohttpd12 protobuf-compiler libprotobuf-lite23 python3-protobuf libprotobuf-dev libprotoc-dev zlib1g-dev bison flex make libftdi-dev libftdi1 libusb-1.0-0-dev liblo-dev libavahi-client-dev python3-numpy git
~~~
Luego obtener el software con git
~~~
git clone https://github.com/OpenLightingProject/ola.git ola
~~~
Configurarlo, compilarlo e instalarlo.
~~~
cd ola
autoreconf -i
./configure --enable-python-libs --prefix=/usr --enable-rdm-tests
make
sudo make install
sudo ldconfig
~~~
:::
Si instalamos Ola manualmente lo podemos iniciar usando el comando:
~~~
olad --log-level 4 --http-data-dir /usr/share/olad/www
~~~
pero si lo hicimos mediante _apt install_ debemos usar el comando:
~~~
sudo systemctl start olad
~~~
Después de la primera ejecución ola creará una carpeta con los archivos de configuración en la carpeta _home_ del usuario en caso de instalación manual o en la carpeta _/etc_ en caso de instalación general (_apt install_). Para poder comunicarnos por el puerto Serial con la placa DMX hay que modificar el archivo `ola-uartdmx.conf`, su contenido debe quedar así:
~~~
enabled = true
device = /dev/ttyAMA0
/dev/ttyAMA0-break = 100
/dev/ttyAMA0-malf = 24000
~~~
Por último para iniciar OLAD automáticamente después del boot en caso de instalación manual podemos aggregar la siguiente linea al archivo `/etc/rc.local`
~~~
sudo -u pi olad --log-level 4 --http-data-dir /usr/share/olad/www
~~~
y en caso de instalación por _apt install_:
~~~
sudo systemctl enable olad
~~~
Una vez hecho esto podemos acceder a una interface web de control en el puerto 9090 de nuestra raspberry pi (http://nuestra-raspberry.local:9090)

A través de esta interface podemos crear Universos, asignarles puertos y guardarlos.

Esto también se puede hacer a través de la línea de commando, en esta [página](https://www.openlighting.org/ola/getting-started/using-ola/) hay más información al respecto.
### OLA desde node-red
En node-red podemos instalas un node de salida para controlar dispositivos DMX através de OLA, esto lo podemos hacer a través del menú de instalación en _Manage Palette_ en la pestaña de _Install_ buscando el nodo llamado [node-red-contrib-ola](https://flows.nodered.org/node/node-red-contrib-ola).
Una vez instalado podemos utilizarlo para controlar cualquier canal en el universo que seleccionemos, el formato es muy sencillo:
~~~json
msg.payload={
"channel": 1,
"value": 255
}
return msg;
~~~
Si queremos modificar más de un canal al mismo tiempo podemos usar algo como:
~~~json
msg.payload={
"channels": [
{
"channel": 1,
"value": 255
},
{
"channel": 2,
"value": 255
},
{
"channel": 3,
"value": 255
}
]
}
return msg;
~~~
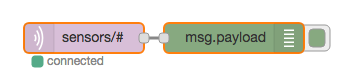
Para controlar una lámpara RGB (con un canal por color) sede MQTT podemos usar un setup muy sencillo como este:

También podemos fácilmente agregar control en un dashboard a través de sliders en combinación con el control por MQTT:


### OLA desde Python
Primero tenemos que estar seguros de que las librerías de ola para python se instalaron correctamente, esto lo podemos verificar ejecutando el intérprete de python e intentando importar la librería:

Si no vemos ningún error quiere decir que las librerias de ola están listas para usarse.
Una vez que las librerías están instaladas correctamente podemos empezar revisando la página de [Python API](https://www.openlighting.org/ola/developer-documentation/python-api/) en el sitio web de OLA, también podemos encontrar muchos ejemplos en su [repositorio de github](https://github.com/OpenLightingProject/ola/tree/master/python/examples).
Aquí un ejemplo sencillo para enviar valores a 3 canales dmx:
~~~python
import array
from ola.ClientWrapper import ClientWrapper
def DmxSent(state):
wrapper.Stop()
universe = 1
data = array.array('B')
data.append(10)
data.append(50)
data.append(255)
wrapper = ClientWrapper()
client = wrapper.Client()
client.SendDmx(universe, data, DmxSent)
wrapper.Run()
~~~
:::info
**Recursos DMX**
[DMX512](https://en.wikipedia.org/wiki/DMX512)
[Sparkfun Introduction to DMX](https://learn.sparkfun.com/tutorials/introduction-to-dmx)
[The DMX Wiki](https://www.thedmxwiki.com/Welcome)
[OLA](https://www.openlighting.org/ola/) Open Lighting Architecture en Linux
An example [repository](https://github.com/rydercalmdown/dmx_lights) of a server for controlling DMX lights with a Raspberry Pi using OLA python bindings.
[Using Artnet DMX and the ESP32 to Drive Pixels](https://learn.sparkfun.com/tutorials/using-artnet-dmx-and-the-esp32-to-drive-pixels)
:::
---
:::info
**Referencias Raspberry Pi**
- [Página](https://en.wikipedia.org/wiki/Raspberry_Pi) de la wikipedia
- [Página](https://www.raspberrypi.org/) principal de la fundación Raspberry Pi
- Raspberry Pi [hardware](https://www.raspberrypi.com/products/)
- El [Manifiesto GNU](https://www.gnu.org/gnu/manifesto.en.html)
- [Instrucciones](https://hackmd.io/vpZiueeBQ-Szk_C0-xLSTA) para instalar [Arch Linux](https://archlinux.org/) en tu Raspberry
- [Lista](https://hackmd.io/xAjS5n_ASTOmX9EhacRRhw) de sensores y actuadores.
:::