---
tags: concurrency
---
# [並行程式設計](https://hackmd.io/@sysprog/concurrency): Lock-Free Programming
## Lock-Free 和 Lock-Less 的分野
在許多文件、程式碼和技術討論中,不難見到 lock-free 和 lockless 字眼,例如 [DPDK Programmer's Guide](https://www.intel.com/content/dam/www/public/us/en/documents/guides/dpdk-programmers-guide.pdf) 就在一份文件中存在這二個術語,其差異是
- lock-free: 強調以系統的觀點來看,只要執行足夠長的時間,至少會有一個執行緒會有進展 (progress)
- lockless: 避免使用 lock 而能安全無誤地操作共用資料
二者有所重疊,但著重的議題不同:lockless 著重在實作層面,即在不使用 lock 的前提之下,該如何確保共用資料的正確性?但不使用 lock 的程式碼未必能達到 lock-free。舉例來說,下方 [compare-and-swap](https://en.wikipedia.org/wiki/Compare-and-swap) 中搭配迴圈進行等待的程式碼,屬於 lockless,但不屬於 lock-free:
```c
#include <limits.h>
#include <stdatomic.h>
atomic_int UpperBound = ATOMIC_VAR_INIT(INT_MIN);
/* Atomically attempt UpperBound = max(UpperBound, y) */
void RecordMax(int y)
{
do {
int snapshot = atomic_load_explicit(&UpperBound, memory_order_relaxed);
/* Abort if the current value is already large enough. */
if (snapshot >= y)
return;
/* If UpperBound happens to equal y, it is lowered to snapshot. */
} while (atomic_compare_exchange_weak_explicit(
&UpperBound, &(int) {y}, /* [1] expected */
snapshot, /* [2] desired */
memory_order_relaxed, memory_order_relaxed));
}
```
> `[1]`: `y` 作為「期望值」
> `[2]`: `snapshot` 作為「目標值」
上方 `RecordMax` 函式確保 `UpperBound` 始終保持所有輸入 `y` 中的最大值,即 `UpperBound = max(UpperBound, y)`。之所以無法滿足 lock-free 的要求,原因在於 `atomic_compare_exchange_weak_explicit` (CAS,以下採此簡稱) 的誤用:
1. 參數次序顛倒導致邏輯錯誤: CAS 會嘗試檢查 `*obj` 的目前值是否等於 `*expected`,若相等,則將 `*obj` 更新為 `desired` 並返回 `true` (成功);否則,將 `*expected` 更新為 `*obj` 的目前值並返回 `false` (失敗)。然而,程式碼中的寫法是 `CAS(&UpperBound, &(int){y}, snapshot, ...)`,這意味著:
* 它期望 `UpperBound` 的目前值等於 `y` (傳入的目標最大值)
* 若相等,它會將 `UpperBound` 更新為 `snapshot` (舊的 `UpperBound` 值)
* 這與想要達到的「若 `UpperBound` 等於 `snapshot`,就將 `UpperBound` 更新為 `y`」完全相反
:::spoiler 結果範例
* 假設 `UpperBound` 目前為 5,`y` 為 10
* `int snapshot = atomic_load_explicit(&UpperBound, memory_order_relaxed);` 得到 `snapshot = 5`
* `if (5 >= 10)` 不成立
* 執行 `CAS(&UpperBound, &(int){10}, 5, ...)`。該操作詢問:「`UpperBound` (目前是 5) 現在是 10 嗎?」由於不相等,CAS 操作失敗,返回 `false`。同時,傳入的 `expected` 參數 (`&(int){10}` 指向的臨時變數) 會被更新為 `UpperBound` 的目前值 `5`
* 由於 CAS 返回 `false`,迴圈條件 `!false` 為 `true`,迴圈繼續
* 下一輪迴圈開始: `snapshot = atomic_load_explicit(&UpperBound, memory_order_relaxed);` `snapshot` 仍為 5。`if (5 >= 10)` 依然不成立。執行 `CAS(&UpperBound, &(int){5}, 5, ...)`。(此時 `&(int){y}` 指向的臨時變數值已是 5),該操作詢問:「`UpperBound` (目前是 5) 現在是 5 嗎?」由於相等,CAS 操作成功,返回 `true`。`UpperBound` 被更新為 `5` (實際上是原地更新)
* 由於 CAS 返回 `true`,迴圈條件 `!true` 為 `false`,迴圈結束
* 最終,`UpperBound` 的數值仍為 `5`,未能更新到 `10`。這個根本的邏輯錯誤導致 `UpperBound` 永遠無法正確地更新到傳入的 `y`數值
:::
2. 迴圈錯誤終止: 由於參數次序顛倒,CAS 要不因數值不匹配而失敗,要不在 `&(int){y}` 指向的臨時變數被 `UpperBound` 的目前數值覆寫後,在下一輪迴圈中因 `UpperBound` 等於 `&(int){y}` (即 `UpperBound` 等於自身) 而成功,導致迴圈終止。這種終止方式並非肇因於達到 `max(UpperBound, y)` 的目標,而是 CAS 操作以錯誤的邏輯「成功」,導致 `UpperBound` 的數值沒有正確更新
為何不符合 `lock-free` 的定義?
* 無法確保任何執行緒取得進展: `lock-free` 要求至少有一個執行緒能向著操作目標取得「進展」。在上述錯誤程式碼中,由於 CAS 操作的邏輯錯誤,無論多少執行緒呼叫 `RecordMax`,並且無論它們執行多久,它們都無法成功地將 `UpperBound` 更新為真正的最大值。沒有任何執行緒能有效地推進 `UpperBound = max(UpperBound, y)` 這個操作的完成。
* 違反 `lock-free` 保證: 即使所有 CPU 核都在努力執行這個函式,共用變數 `UpperBound` 也永遠不會更新到其應有的最大值,亦即違反 `lock-free` 關於系統進展的保證
以下是針對 `RecordMax` 函式的修正:
```c
void RecordMax(int y)
{
int snapshot = atomic_load_explicit(&UpperBound, memory_order_relaxed);
/* Retry until y is no longer larger, or the CAS succeeds. */
while (snapshot < y && !atomic_compare_exchange_weak_explicit(
&UpperBound, &snapshot, /* [1] expected */
y, /* [2] desired */
memory_order_relaxed, memory_order_relaxed))
/* [3] On failure, snapshot is overwritten with current UpperBound. */
;
}
```
> `[1]`: 期望 UpperBound 是該數值
> `[2]`: 若期望值匹配,我們想設定 `UpperBound` 為該數值
> `[3]`: 當 CAS 失敗時,`snapshot` 會被自動更新為 UpperBound 的最新值,這樣下一輪迴圈就可用新的 `snapshot` 值來嘗試 CAS
修正後的程式碼滿足 `lock-free` 要求:
* 在任何時刻,若有多個執行緒同時嘗試更新 `UpperBound`,總會有一個執行緒能成功執行其 CAS 操作。因為 CAS 是 atomic 操作,且在硬體層面保證競爭條件下的單一成功
* 一旦一個執行緒成功更新 `UpperBound`,它就推進整個系統向著 `UpperBound = max(UpperBound, y)` 這個目標邁進。即使其他執行緒暫時失敗需要重試,但由於總有一個會成功,因此「至少一個執行緒有進展」的條件得到滿足。
儘管修正後符合 lock-free 的定義,但並非 wait-free。在高度競爭情況下,一個特定的執行緒可能會反覆地無法贏得 CAS 競爭,導致它在完成自身操作前需要進行多次重試,可能導致該執行緒的「飢餓」(starvation)。wait-free 會保證每個執行緒都能在有限且預定的步驟內完成其操作,而 lock-free 僅保證系統整體有進展。
## Lock-Free Programming
> 導讀 [An Introduction to Lock-Free Programming](http://preshing.com/20120612/an-introduction-to-lock-free-programming/) 與 [Lock-Free Programming](https://www.cs.cmu.edu/~410-s05/lectures/L31_LockFree.pdf)
解說影片:
* [Lock-Free Programming (or, Juggling Razor Blades), Part I](https://youtu.be/c1gO9aB9nbs)
* [Lock-Free Programming (or, Juggling Razor Blades), Part II](https://youtu.be/CmxkPChOcvw)
[transaction](https://dictionary.cambridge.org/dictionary/english/transaction) 若翻譯為「交易」,可能會受限於漢語字面上的意思而阻礙我們的理解,於是我們可將 "transaction" 聯想為「轉帳」,亦即將程式對資料的連串操作視為一次轉帳過程。例如匯款 10,000 元到某人的帳戶時,若過程中某人剛好查詢帳號中的存款,則該用戶只該看到二種結果:
1. 轉帳前的餘額
2. 轉帳後的餘額
除了轉帳之前和之後的二個數值,==該用戶不該看到其他數值==,即使程式正在處理帳戶金額,使得資料處於某種未完成的中間狀態,該使用者也不應該看到任何資料的中間狀態。
只有在完成資料變更之後,才透過 atomic write 寫入改變後的結果。這樣一來,該用戶及其他觀察者就只會看到資料變更前後的狀態。
Atomic write 則隱含著這樣的意義:原本對資料的修改過程,外界是不可見的(或者說不應該看見),只能看到修改前的狀態。而 atomic write 的作用是「讓所有觀察者都能看到你所做的完整改變」(即將轉帳後的最終餘額顯示出來)。
Atomic operation 若翻譯為「原子操作」,同樣可能因為其字面意義而限制我們的理解。因此,可以將其理解為「最小操作」,亦即某個動作在執行過程中,無法被分割成更小的步驟或被中斷。
其中一種機制是 Compare-and-Swap (CAS)。從概念上來說,CAS 確保以下操作是「不可分割地」(全有或全無,中途不會被打斷) 完成:
```c
int CAS(int *a, int old_val, int new_val)
{
if (*a == old_val) {
*a = new_val;
return old_val;
}
return *a;
}
```
用淺顯的方式來說是:
> 「你能把冰箱裡的大象換成長頸鹿嗎?」
> 「什麼?!你跟我說冰箱裡面放的不是大象?那冰箱裡面到底放什麼?」
「裡面放的東西一樣」不等同於「從檢查到現在都沒有人動過裡面的東西」,二者是不同的概念。例如 [ABA 問題](https://en.wikipedia.org/wiki/ABA_problem)中的情境,參照下圖

執行緒角色以顏色區分: Thread~A~ 穿綠色上衣,Thread~B~ 穿橘色上衣
1. Thread~A~ 檢查冰箱,看見大象 A,將此值視為 expected
2. Thread~B~ 把大象換成小熊 B,資料變成 B
3. Thread~B~ 再把小熊換回大象 A,冰箱看似恢復原狀,但其間發生變動
4. Thread~A~ 執行 CAS:比對時仍見 A,條件成立,於是進行一氣呵成的更新,把大象換成長頸鹿 C。A 不知道冰箱剛歷經 A $\to$ B $\to$ A 的循環,這正是 [ABA 問題](https://en.wikipedia.org/wiki/ABA_problem):數值又回到 A,但不表示期間未被改動
通常會回傳數值來表示寫入操作是否成功,但可能存在不同的回傳慣例(例如回傳 `bool` 值或 `*ptr` 的原始值)。因此,上述程式碼僅為虛擬碼。例如 GCC 中,對應的 [atomic 函式](https://gcc.gnu.org/wiki/Atomic)宣告如下:
```c
bool __atomic_compare_exchange_n(type *ptr, type *expected, type desired, bool weak, int success_memorder, int failure_memorder);
```
> 此函式會嘗試比較 `*ptr` 與 `*expected` 的值。若二者相等,則將 `*ptr` 更新為 `desired` 並回傳 `true` (表示成功)。否則,會將 `*ptr` 的目前值寫回 `*expected` 並回傳 `false` (表示失敗)。
> `weak` 參數決定是否允許 spurious failure。
另一個對應函式的宣告:
```c
type __atomic_exchange_n(type *ptr, type val, int memorder);
```
> 此函式會將 `*ptr` 的值替換為 `val`,並回傳 `*ptr` 在替換之前的舊值。
但無論如何,事後都有辦法得知那個當下是否成功寫入。
一般使用 CAS 的方式,大致如下:
```c
int old_val;
int desired_val = NEW_VALUE;
do {
old_val = *p; /* Load current value */
/* Attempt to swap *p with desired_val if *p is still old_val.
* On failure, old_val will be updated with the current *p.
*/
} while (!__atomic_compare_exchange_n(p, &old_val, desired_val, false, __ATOMIC_RELAXED, __ATOMIC_RELAXED));
```
CAS 條件所包住的迴圈可視為 critical section,當執行到 CAS 指令時,CAS 會去檢查 `*p` 的值和 `old` 是否一樣,若是,表示在執行期間沒有其他執行緒變更過 `*p`,於是就可安心將 `*p` 更新成 `new` 的數值。反之,若 `*p` 的數值和 `old` 不同,表示此期間已有執行緒更動過 `*p`,於是這次迴圈結果作罷,再重新跑一次迴圈,並希望這次不會受到別的執行緒干擾。
延伸閱讀:
* [ARM and Lock-Free Programming](https://randomascii.wordpress.com/2020/11/29/arm-and-lock-free-programming/)
* video: [Introduction to Lock-free Programming](https://youtu.be/RWCadBJ6wTk)
* 檢驗認知: 用 C11 atomics 改寫演說中示範的程式碼
* 何謂 ABA?如何避免 ABA?
* Mike Acton 的 [Recent sketches on concurrency, data design and performance](https://cellperformance.beyond3d.com/articles/2009/08/roundup-recent-sketches-on-concurrency-data-design-and-performance.html)
為了解決傳統同步機制 (如 semaphore 和 mutex) 可能導致的問題 (例如 deadlock, livelock, priority inversion),可採用 lock-free (或 lockless) 程式設計的技巧來提升系統的效能與正確性。
lock-free 並非指完全不使用 mutex lock,而是指整個系統的執行,不會因為單一執行緒被 mutex 鎖住而停滯不前。考慮以下程式碼:
```c
while (x == 0) {
x = 1 - x;
}
```
若二個執行緒同時執行這段程式碼(其中 `x` 為共用變數),是否可能出現二者都無法跳出迴圈的情況?
| x | Thread~1~ | Thread~2~ |
|---|:---------------|:---------------|
| 0 | while (x == 0) | |
| 0 | | while (x == 0) |
| 1 | x = 1 - x | |
| 0 | | x = 1 - x |
| 0 | while (x == 0) | |
| 0 | | while (x == 0) |
| | ... | ... |
> 此案例造成 [livelock](https://en.wikipedia.org/wiki/Deadlock#Livelock)
對應的 [promela](https://spinroot.com/spin/Man/promela.html) 表示方式:
```c
active [2] proctype livelock() {
byte x = 0;
do
:: x == 0 ->
x = 1 - x;
:: else ->
break
od;
}
```
狀態機示意:
```graphviz
digraph p_livelock {
size="8,10";
GT [shape=box,style=dotted,label="livelock"];
GT -> S5;
S5 -> S5 [color=black,style=solid,label=" x == 0 (執行 x=1-x)"];
S5 -> S8 [color=black,style=solid,label=" else (x==1)"];
S8 -> S0 [color=black,style=solid,label=" -end-"];
S8 [color=blue,style=bold,shape=box];
}
```
上圖展示單一執行緒在迴圈中的狀態移轉。然而,在多執行緒環境中,當二個執行緒(如 Thread~1~ 和 Thread~2~)同時執行這段程式碼時,變數 `x` 的值會在 `0` 和 `1` 之間持續震盪。該狀況致使 [livelock](https://en.wikipedia.org/wiki/Deadlock#Livelock):儘管執行緒之間頻繁交互執行,且每個執行緒都在不斷改變 `x` 的值,但它們卻無法取得任何有意義的整體進展,導致系統陷入無限循環。此時,從每個執行緒的視角來看,它們都困在猶如 S5 的循環狀態中。
### lock-free vs. wait-free
> 參考: [Non-blocking algorithm](https://en.wikipedia.org/wiki/Non-blocking_algorithm#Wait-freedom)
想像以下情境:當使用 mutex 時,若持有 lock 的執行緒在釋放 lock 之前被系統搶佔 (preempt),則所有等待相同資源的其他執行緒將無法繼續執行,直到該執行緒恢復並釋放 lock 為止。
* blocking:若持有資源的執行緒被終止 (kill),可能導致整個程式永久停滯。這意味著:當特定執行緒被阻塞 (block) 時,會阻礙其他執行緒取得進展 (progress)。
與此相對的是 non-blocking 演算法,其分類如下:
* **wait-free** 是 non-blocking 中最強的保證。它保證任何執行緒在有限且可預知的步驟數內一定能完成其操作 (即所有執行緒都能在一定時間內取得進展)
* **lock-free** 相較於 wait-free 強度稍弱。它不保證每個執行緒都能在有限步驟內完成,但保證只要系統持續執行足夠長的時間,至少會有一個執行緒能夠完成其操作並取得進展。即使某些執行緒被暫停或反覆重試,系統整體仍能持續推進
* **obstruction-free** 是 non-blocking 中最弱的保證。它僅保證在沒有其他執行緒競爭的情況下,一個執行緒能夠在有限步驟內完成其操作。一旦發生競爭,obstruction-free 不提供任何進展保證,因此可能導致 [livelock](https://en.wikipedia.org/wiki/Deadlock#Livelock)
根據上述定義,所有 wait-free 的演算法都屬於 lock-free,而 obstruction-free 的演算法則不一定屬於 lock-free。
因此,不使用 mutex lock(例如採用 busy waiting)不等同於達到 lock-free。例如,稍早提及的 `while (x == 0) { x = 1 - x; }` 這段程式碼(當 `x` 為共用變數),其同步強度僅達到 obstruction-free。
要求整個程式系統都達到 lock-free 是極為困難的。通常,lock-free 會用於對特定資料結構的操作,例如為 lock-free queue 實作對應的 `push`, `pop` 和 `is_empty` 等。
### lock-free 涉及的議題
- [ ] 1. Atomic Operation: Read-Modify-Write (RMW)
此類操作(RMW)雖然在邏輯上包含讀取、修改、寫入等複數個步驟,但已藉由硬體的設計確保這些操作是一個不可分割的原子單元,即在執行期間無法被其他指令中斷。
> 延伸閱讀: [Read-modify-write](https://en.wikipedia.org/wiki/Read-modify-write)
常見的 atomic RMW 操作包括:[Test-and-set](https://en.wikipedia.org/wiki/Test-and-set) (TAS), [Fetch-and-add](https://en.wikipedia.org/wiki/Fetch-and-add) (FAA), 和 [Compare-and-swap](https://en.wikipedia.org/wiki/Compare-and-swap) (CAS)。
**test-and-set**
```c
bool test_and_set(bool *target) // atomic
{
/* These operations are performed atomically and are non-interruptible. */
bool b = *target;
*target = true;
return b;
}
```
```c
/* Assuming 'lock_var' is initialized to false (e.g., bool lock_var = false;)
* Pseudo-code for a loop using test_and_set for a spinlock
*/
while (true) {
while (test_and_set(&lock_var)) // Pass address of lock_var
/* busy-wait or yield */ ;
/* critical section */
lock_var = false; /* Release the lock */
break; // Exit the loop after critical section
}
```
**fetch-and-add**
各平台提供的 API
* Win32: `_InterlockedIncrement` (僅允許遞增 1)
* iOS: `OSAtomicAdd32`
* GCC (舊版): `__sync_fetch_and_add`
* GCC: `__atomic_fetch_add`
* C11: `atomic_fetch_add{_explicit}`
* C++11: `std::atomic<int>::fetch_add`
值得一提的是,C(+\+)11 的 atomic operation 並不保證是 lock-free 的,必須透過 C 的`ATOMIC_INT_LOCK_FREE` 或 C+\+ 的 `std::atomic<>::is_lock_free` 來確認
- [ ] 2. Compare-And-Swap Loops
在 RMW 中最常見的應用就是將 CAS 搭配迴圈使用
各平台提供的 API
* Win32: `_InterlockedCompareExchange`
* iOS: `OSAtomicCompareAndSwap32`
* GCC/Intel: `__sync_{bool,val}_compare_and_swap`
* GCC: `__atomic_compare_exchange{_n}`
* C11: `atomic_compare_exchange_{weak,strong}{_explicit}`
* C++11: `std::atomic<int>::compare_exchange_{weak,strong}`
```c
void LockFreeQueue::push(Node* newHead)
{
for (;;) {
// Copy a shared variable (m_Head) to a local.
Node* oldHead = m_Head;
// Do some speculative work, not yet visible to other threads.
newHead->next = oldHead;
// Next, attempt to publish our changes to the shared variable.
// If the shared variable hasn't changed, the CAS succeeds and we return.
// Otherwise, repeat.
if (_InterlockedCompareExchange(&m_Head, newHead, oldHead) == oldHead)
return;
}
}
```
上例為何可稱為 lock-free?因為若其中一個執行緒的迴圈無法通過 `_InterlockedCompareExchange`,代表有其他的執行緒成功,程式整體有進展。
在處理 CAS 和迴圈時要特別小心 [ABA Problem](https://en.wikipedia.org/wiki/ABA_problem):
若兩個執行緒同時對一個記憶體內容進行操作,但優先執行完畢的執行緒把原值 A 改爲 B 又改回 A,這樣較後執行的執行緒將會讀取到錯誤的資料

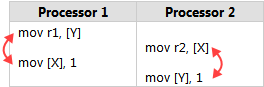
- [ ] 3. Sequential Consistency
所有的執行緒都依循順序執行程式,簡單來說,就是前面的指令一定比後面的指令先執行
```shell
$ gcc -S main.c
$ cat main.s
...
store x, 1
load r1, y
...
```
* sequential consistency 保證不會出現
```c
// in CPU
load r1, y
store x, 1
```
的情況
- [ ] 4. Memory Ordering
參考: [淺談 Memory Reordering](http://dreamrunner.org/blog/2014/06/28/qian-tan-memory-reordering/)
當一個 **lock-free** 程式在**多核**系統執行,且執行環境**不保證 sequential consistency** 時,就要小心 memory reordering

memory reordering 代表程式的執行順序不一定,可能會造成錯誤結果
* 實例: [Memory Reordering Caught in the Act](http://preshing.com/20120515/memory-reordering-caught-in-the-act/)
注意發生的條件
* 若已確保 sequential consistency,那就不用擔心會出錯
* 若在**單核**系統執行,那只要關閉 compiler optimization 就可以確保 sequential consistency
* 若程式**並非 lock-free**,那 critical section 的指令會因為有 lock 而被 block 住,也可以確保執行的正確性
reordering 可以分成二種:
* compiler reordering
實例: [Memory Ordering at Compile Time](http://preshing.com/20120625/memory-ordering-at-compile-time/)
* processor reordering
這二種之間,其實就是在 compile-time 跟 run-time 這二個不同的時間點,進行最佳化而重新排序指令的關係
## 案例分析
### Lock-free Thread Pool
[ [source](http://blog.csdn.net/xhjcehust/article/details/45844901) ]
大多數 thread pool 實作都離不開 lock 的使用,如 `pthread_mutex` 結合 (condition variable) `pthread_cond`。一般來說,lock 的使用對於程式效能影響較大,雖然現有的 `pthread_mutex` 的取得 (acquire) 與釋放 lock 的操作,在 Linux 核心和對應函式庫上已有一定的效能提昇,但我們仍然希望有不仰賴 lock 的 thread pool 的實作。
#### 常見的 thread pool 實作原理
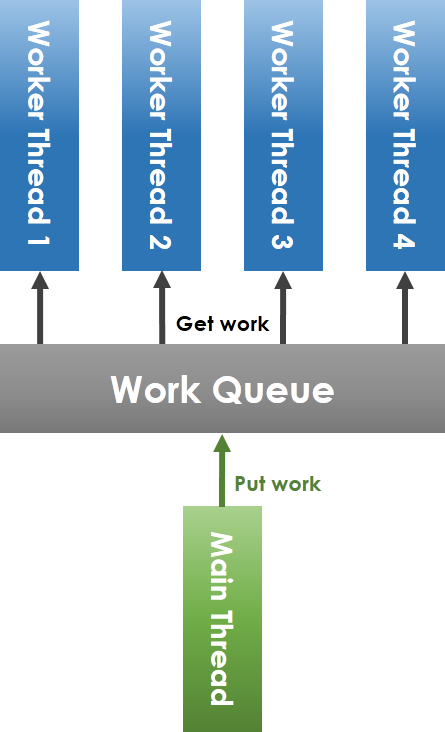
如上圖所示,workqueue (工作佇列) 由 main thread (主執行緒) 和 worker thread 共享,main thread 將任務放進 workqueue,worker thread 從 workqueue 中取出任務執行。要注意到,共享 workqueue 的操作必須在 mutex 的保護下安全進行,main thread 將任務放進 workqueue 時,若偵測到目前待執行的工作數目小於 worker thread 總數,則要透過 condition variable 喚醒可能處於等待狀態的 worker thread。
#### lock-free 化的 thread pool 實作原理

為解決 lock-free 所會面臨的議題,我們一定要避免共享資源的競爭 (contention),因此將原本的共享 workqueue 拆分變成每 worker thread 對應一個 workqueue 的方式,如上圖。對於 main thread 放入工作和 worker thread 取出任務的競爭問題,可以採用 ring-buffer 來避免。在解決 lock 機制後,就只剩下 condition variable 的問題,condition variable 的提出原本就是為了解決執行緒之間的通訊議題,不然為了追蹤特定變數,如之前提到的 "count" 變數,還得額外建立執行緒來追蹤。而 semaphore 是另一種可以替代的通訊方式,其大致實作方式為:
```c
sigemptyset(&zeromask);
sigemptyset(&newmask);
sigaddset(&newmask, SIGXX);
sigprocmask(SIG_BLOCK, &newmask, &oldmask);
while (!CONDITION)
sigsuspend(&zeromask);
sigprocmask(SIG_SETMASK, &oldmask, NULL)
```
#### lock-free thread pool 實作說明
> 程式碼: [LFTPool](https://github.com/xhjcehust/LFTPool)
在 lock-free thread pool 的實作中,有別於常見 thread pool 之處,在於 semaphore 與 condition variable、排程演算法、增加或減少執行緒數目後的 task migration,另一點則是引入 [ring-buffer](https://en.wikipedia.org/wiki/Circular_buffer),後者參考 Linux 核心中的 kfifo 而實作。
(1) **semaphore 與 condition variable**
semaphore 與 condition variable 的區別,主要在於 condition variable 的喚醒 (signal),對於接收端執行緒而言可以忽略,而在未設定 semaphore 處理函式的情況下,接收到 semaphore 會導致接收的執行緒,甚至是整個程式的終止。因此,需要在 thread pool 產生執行緒前,事先指定 semaphore 處理函式,如此一來,新建立的執行緒會繼承這個 semaphore 處理函式。在 LFTPool 中,用 `SIGUSR1` 這個 POSIX signal 來等待「有工作分發給我」這個事件。「等待事件發生」是 semaphore 的一種常見但不是唯一的用法。例:把 semaphore 初始化成 0,則可用來等待事件;把 semaphore 初始化成 1,則可用作 mutex。
> 注意:POSIX 另有名為 semaphore 的機制(`sem_{wait,post}` 等),在觀念上把此機制也稱為 semaphore 的話,很容易造成混淆。
[LFTPool](https://github.com/xhjcehust/LFTPool) 的作者刻意使用 POSIX signal 來突顯其程式已達到 "lockfree":「在解决了锁机制之后,就只剩下条件变量的问题了,条件变量本身即解决条件满足时的线程通信问题,而信号作为一种通信方式,可以代替之」(語出:[高效執行緒池之無鎖化實作 (Linux C)](https://blog.csdn.net/xhjcehust/article/details/45844901)),但 POSIX signal 的傳送在 Linux 核心中當然不是 lock-free 的。觀念上,只要程式在等待事件時需要把 CPU 釋放出來並進入排程器,那個部份的 lock-free 與否就變得意義不大,因為 context switch 比 lock acquire/release 的開銷更大。
(2) **任務排程演算法**
常見的以 thread pool 實作的任務排程,主要藉由作業系統核心的 (原生) 執行緒排程器來達成。若考慮 load-balancing,main thread 在分配任務時應採取合適的任務排程演算法,將任務放入對應的 worker thread 隊列,本程式目前已實作 Round-Robin 和 Least-Load 演算法。Round-Robin 即輪詢式地分配工作,Least-Load 即選擇目前具有最少工作的 worker thread 放入。
(3) **task migration**
在執行緒活動的增減過程中,若同樣考慮 load-balancing,會涉及現有 task 的遷移 (migration) 問題。load-balancing 演算法基於均分工作量的想法,統計目前時刻的總任務數目,均分至每一個執行緒,求出每個工作者執行緒應該增加或減少的工作數目,然後從頭至尾逐一存取,需要移出工作的執行緒與需要移入工作的執行緒之間透過執行 task migration 相互抵銷。最後若還有多出來的工作,再依次分配。
工作的遷入 (migrate IN) 不存在競爭條件 (race condition),因為工作的遷入始終由 main thread 完成,而工作的遷出 (migrate OUT) 則存在競爭條件,因為在遷出工作的同時,worker thread 可能正在執行任務。所以需要採用 atomic operation 加以修正,其主要技巧就是預先擷取 (prefetch) ,大致實作程式碼如下:
```c
do {
work = NULL;
if (thread_queue_len(thread) <= 0) // thread_queue_len() 必須是 atomic
break;
tmp = thread ->out;
// prefetch work
work = &thread->work_queue[queue_offset(tmp)];
} while (!__sync_bool_compare_and_swap(&thread->out,
tmp, tmp + 1));
if (work) do_something();
```
* test-and-set instruction: [](https://en.wikipedia.org/wiki/Test-and-set)[https://en.wikipedia.org/wiki/Test-and-set](https://en.wikipedia.org/wiki/Test-and-set)
* `__sync_bool_compare_and_swap` 是 GCC atomic builtin function 之一: [](https://gcc.gnu.org/onlinedocs/gcc-5.3.0/gcc/_005f_005fsync-Builtins.html#_005f_005fsync-Builtins)[https://gcc.gnu.org/onlinedocs/gcc-5.3.0/gcc/_005f_005fsync-Builtins.html#_005f_005fsync-Builtins](https://gcc.gnu.org/onlinedocs/gcc-5.3.0/gcc/_005f_005fsync-Builtins.html#_005f_005fsync-Builtins)
* C11 標準正式將 atomic operation 納入,請見: [](http://en.cppreference.com/w/c/atomic)[http://en.cppreference.com/w/c/atomic](http://en.cppreference.com/w/c/atomic)
Atomic 是種同步機制,不須透過 explicit lock (如 mutex),也能確保變數之間的同步。Linux 核心提供對應的型態 `atomic_t`。而 gcc 也提供對應的內建函式 (built-in functions),專門處理 atomics,如下:
```c
type __sync_fetch_and_add (type *ptr, type value, ...)
type __sync_fetch_and_sub (type *ptr, type value, ...)
```
上面的 "type" 可以是 int8 .. int64。
最常用到的就是「加」和「減」的操作,使用方式如下:
```c
int val = 0;
__sync_fetch_and_add(&val, 1);
```
這是種輕量級的同步機制,若只是對一個變數做同步,實在不需要透過 mutex。在真實硬體環境中,atomics 的效能會比 `pthread_mutex_t` 好。
atomics 通常會伴隨著 memory barrier 的議題,這是因為編譯器往往會在進行最佳化時調整指令的順序,但在特定的狀況下會造成不良反應,對此 gcc 也提供以下內建函式來設立 memory barrier:
```c
__sync_synchronize()
```
執行緒的活動減少之後,原先執行緒上未能執行完的任務,只需要由 main thread 再次根據任務排程演算法重新分配至其他存活的 worker thread 隊列中即可,不存在上述問題,當然,此時可以同時執行 load-balancing 演算法加以最佳化。
(4) ring-buffer

ring-buffer 的實作以 Linux 核心中的 kfifo 為主要的參考,如下圖所示:
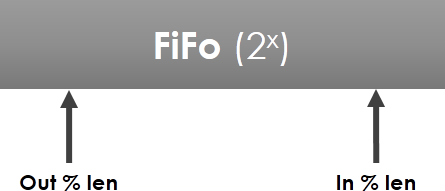
環狀佇列長度為 2 的冪,out 和 in 索引遞增至越界時歸零繼續遞增,其類型為 `unsigned int`,即 out 指標一直追趕 in 指標,out 和 in 映射至 FiFo 的對應索引處,其間的元素即為隊列元素。
## 案例分析
### Concurrent Linked List
從 [Bubble sort](https://en.wikipedia.org/wiki/Bubble_sort) 談起,如何有效率地操作不連續記憶體
* [Linked List Bubble Sort](http://faculty.salina.k-state.edu/tim/CMST302/study_guide/topic7/bubble.html) (*)
* [A Comparative Study of Linked List Sorting Algorithms](https://www.cs.mtu.edu/~shene/PUBLICATIONS/1996/3Conline.pdf), Ching-Kuang Shene [[冼鏡光](https://zh.wikipedia.org/zh-tw/%E5%86%BC%E9%8F%A1%E5%85%89)] (1996)
[concurrent-ll](https://github.com/jserv/concurrent-ll) 程式碼,分析 lock 和 lock-free 版本。在 4 core 處理器上的測試:


十字叉叉代表 scalability(可擴縮性),線條代表 throughput (資料吞吐量),綠色線條為 lock-free,紅色線條為 lock-based。可以很清楚地看到 lock-based 的效能不管有多少 thread 都不太會提升,而 lock-free 的效能就會隨著 thread 變多而提升。
* Throughput (吞吐量)
* Throughput is a measure of how many units of information a system can process in a given amount of time.
> 在單位時間內可以處理多少的資料量
* Scalability (可擴縮性)
* Scalability is the capability of a system, network, or process to handle a growing amount of work, or its potential to be enlarged in order to accommodate that growth.
> 可以處理越來越多的資料,或者說是工作時的能力或潛力
[concurrent-ll](https://github.com/jserv/concurrent-ll) 實作的基礎是〈[A Pragmatic Implementation of Non-Blocking Linked Lists](https://www.cl.cam.ac.uk/research/srg/netos/papers/2001-caslists.pdf)〉,論文作者是 Timothy L. Harris,發表於 2001 年。
文中首先提到 linked list 的「天真版」的插入(insert)與刪除(delete)操作,就算直接用 compare-and-swap 這個最小操作改寫,也沒有辦法確保結果正確。在只有 insert 的狀況下可行,但加上 delete 的話,若 insert 跟 delete 發生時機很接近,有可能會發生以下的狀況:

這個狀況是:準備插入 `20`, 並且刪除 `10`。也就是做到一半的狀況。
* delete 的操作:
```c
CAS(&(H->next), head_next, head->next->next)
```
* insert 的操作:
```c
CAS(&(node_10->next), node_10_next, node_20)
```
但是兩個 CAS 動作的發生先後是無法確定的。若 insert 先發生,那結果符合預期。但若 delete 先發生,則會變成下面這樣:

結果顯然不對,因為本來沒有要刪除 `10` 那個節點。那該怎麼辦呢?〈[A Pragmatic Implementation of Non-Blocking Linked Lists](https://www.cl.cam.ac.uk/research/srg/netos/papers/2001-caslists.pdf)〉提及一個作法:刪除時先不要真的刪除,而是掛一個牌子說「此路段即將刪除」(即 "mark"),但仍過得去,像這樣:

然後等到真的要拆它時 (例如需要插入之際),再予以拆除,這也是 CAS:

因此,需要有個方法標示「不需要的節點」,然後再配合 atomic operation 來刪除。
#### 標示不用的節點
為什麼 [lockfree/list.c](https://github.com/jserv/concurrent-ll/blob/master/src/lockfree/list.c) 只用位元運算就能在「邏輯上」刪除節點?
C99 的規格中 6.7.2.1 提到:
* 12
> Each non-bit-field member of a structure or union object is aligned in an implementation- defined manner appropriate to its type.
* 13
> Within a structure object, the non-bit-field members and the units in which bit-fields reside have addresses that increase in the order in which they are declared. A pointer to a structure object, suitably converted, points to its initial member (or if that member is a bit-field, then to the unit in which it resides), and vice versa. There may be unnamed padding within a structure object, but not at its beginning.
由於 alignment 涉及與作業系統實作相關的議題,對照來看 [gcc 的文件](https://gcc.gnu.org/onlinedocs/gcc/Structures-unions-enumerations-and-bit-fields-implementation.html) 怎麼說:
> The alignment of non-bit-field members of structures (C90 6.5.2.1, C99 and C11 6.7.2.1).
> Determined by ABI.
先回去翻 C99 的規格,裡面提到關於 `intptr_t` 這個資料型態:
7.18.1.4 Integer types capable of holding object pointers
> The following type designates a signed integer type with the property that any valid pointer to void can be converted to this type, then converted back to pointer to void, and the result will compare equal to the original pointer:
> * `intptr_t`
所以 `intptr_t` 是個 integral type,裝得下 pointer
`/usr/include/stdint.h` 的部分內容:
```c
/* Types for `void *' pointers. */
#if __WORDSIZE == 64
# ifndef __intptr_t_defined
typedef long int intptr_t;
# define __intptr_t_defined
# endif
typedef unsigned long int uintptr_t;
#else
# ifndef __intptr_t_defined
typedef int intptr_t;
# define __intptr_t_defined
# endif
typedef unsigned int uintptr_t;
#endif
```
繼續翻找 [System V Application Binary Interface: AMD64 Architecture Processor Supplement](https://www.uclibc.org/docs/psABI-x86_64.pdf),其中一個附表如下:
<table>
<thead>
<tr>
<th>Type</th>
<th>C</th>
<th><code>sizeof</code></th>
<th>Alignment <br/> (bytes)</th>
<th>AMD64 architecture</th>
</tr>
</thead>
<tbody>
<tr>
<td rowspan=12>Integral</td>
</tr>
<tr>
<td><code>_Bool</code></td>
<td>1</td>
<td>1</td>
<td>boolean</td>
</tr>
<tr>
<td><code>char</code> <br/> <code>signed char</code></td>
<td>1</td>
<td>1</td>
<td>signed byte</td>
</tr>
<tr>
<td><code>unsigned char</code></td>
<td>1</td>
<td>1</td>
<td>unsigned byte</td>
</tr>
<tr>
<td><code>short</code> <br/> <code>signed short</code></td>
<td>2</td>
<td>2</td>
<td>signed twobyte</td>
</tr>
<tr>
<td><code>unsigned short</code></td>
<td>2</td>
<td>2</td>
<td>unsigned twobyte</td>
</tr>
<tr>
<td><code>int</code> <br/> <code>signed int</code> <br/> <code>enum</code></td>
<td>4</td>
<td>4</td>
<td>signed fourbyte</td>
</tr>
<tr>
<td><code>unsigned int</code></td>
<td>4</td>
<td>4</td>
<td>unsigned fourbyte</td>
</tr>
<tr>
<td><code>long</code> <br/> <code>signed long</code> <br/> <code>long long</code> <br/> <code>signed long long</code></td>
<td>8</td>
<td>8</td>
<td>signed eightbyte</td>
</tr>
<tr>
<td><code>unsigned long</code> <br/> <code>unsigned long long</code></td>
<td>8</td>
<td>8</td>
<td>unsigned eightbyte</td>
</tr>
<tr>
<td><code>__int128</code> <br/> <code>signed __int128</code></td>
<td>16</td>
<td>16</td>
<td>signed sixteenbyte</td>
</tr>
<tr>
<td><code>unsigned __int128</code></td>
<td>16</td>
<td>16</td>
<td>unsigned sixteenbyte</td>
</tr>
</tbody>
<tbody>
<tr>
<td>Pointer</td>
<td><code><em>any-type</em> *</code><br/> <code><em>any-type</em> (*)()</code></td>
<td>8</td>
<td>8</td>
<td>unsigned eightbyte</td>
</tr>
</tbody>
<tbody>
<tr>
<td rowspan=4>Floating-<br/>point</td>
<td><code>float</code></td>
<td >4</td>
<td>4</td>
<td>single (IEEE-754)</td>
</tr>
<tr>
<td><code>double</code></td>
<td>8</td>
<td >8</td>
<td>double (IEEE-754)</td>
</tr>
<tr>
<td><code>long double</code></td>
<td>16</td>
<td>16</td>
<td>80-bit extended (IEEE-754)</td>
</tr>
<tr>
<td><code>__float128</code></td>
<td>16</td>
<td>16</td>
<td>128-bit extended (IEEE-754)</td>
</tr>
</tbody>
<tbody>
<tr>
<td rowspan=3>Decimal-<br/>floating-<br/>point</td>
<td><code>_Decimal32</code></td>
<td >4</td>
<td>4</td>
<td>32bit BID (IEEE-754R)</td>
</tr>
<tr>
<td><code>_Decimal64</code></td>
<td>8</td>
<td >8</td>
<td>64bit BID (IEEE-754R)</td>
</tr>
<tr>
<td><code>_Decimal128</code></td>
<td>16</td>
<td >16</td>
<td>128bit BID (IEEE-754R)</td>
</tr>
</tbody>
<tbody>
<tr>
<td rowspan=3>Packed</td>
<td><code>__m64</code></td>
<td>8</td>
<td>8</td>
<td><em>MMX</em> and 3DNow!</td>
</tr>
<tr>
<td><code>__m128</code></td>
<td>16</td>
<td>16</td>
<td>SSE and SSE-2</td>
</tr>
<tr>
<td><code>__m256</code></td>
<td>32</td>
<td>32</td>
<td>AVX</td>
</tr>
</tbody>
</table>
然後又提到:
> **Aggregates and Unions**
> Structures and unions assume the alignment of their most strictly aligned component. Each member is assigned to the lowest available offset with the appropriate alignment. The size of any object is always a multiple of the object‘s alignment.
> An array uses the same alignment as its elements, except that a local or global array variable of length at least 16 bytes or a C99 variable-length array variable always has alignment of at least 16 bytes.
> Structure and union objects can require padding to meet size and alignment constraints. The contents of any padding is undefined.
可推論出該結構:
```c
typedef intptr_t val_t;
typedef struct node {
val_t data;
struct node *next;
} node_t;
```
的合理定址當中,不會發生位址的最後一個 bit 被使用到的狀況 (因為都是 4 的倍數 + 必須對齊)。所以就能把最後一個 bit 設成 1 來當作已刪掉這個節點的 mark,或設成 0 來表示恢復原狀。
#### atomic operation
[include/atomics.h](https://github.com/sysprog21/concurrent-ll/blob/master/include/atomics.h) 定義 atomic operations。注意到 `_sync` 系列的 atomics builtins 已經標註為 legacy: [Legacy _\_sync Built-in Functions for Atomic Memory Access](https://gcc.gnu.org/onlinedocs/gcc/_005f_005fsync-Builtins.html),因此已改寫為使用 `__atomic` 系列。
#### insert
> 註:後面引用的程式碼來自 [A Pragmatic Implementation of Non-Blocking Linked Lists](https://www.cl.cam.ac.uk/research/srg/netos/papers/2001-caslists.pdf),但跟 `concurrent-ll` 中的原始程式碼相近。
linked list 的插入操作都是插在兩個節點中間,左邊的就叫 `left_node`,右邊的就叫 `right_node`。
概念是:到寫入位址的前一刻,若這兩個節點仍然是相鄰的,就寫入新値;若發現不一樣,就重新來過。
```c
public boolean List::insert (KeyType key) {
Node *new_node = new Node(key);
Node *right_node, *left_node;
do {
/* 尋找插入位置的左右相鄰的節點 */
right_node = search (key, &left_node);
/* 找到跟欲插入節點一樣的值,就不插入 */
if ((right_node != tail) && (right_node.key == key)) /*T1*/
return false;
/* 準備插入時,確定剛剛找的左右是否相鄰,也就是驗證 left_node.next 在這時是否仍然等於 right_node */
/* 若是,就 compare-and-swap */
/* 若不是,就重新搜尋適當的插入位置,並重新來過 */
new_node.next = right_node;
if (CAS (&(left_node.next), right_node, new_node)) /*C2*/
return true;
} while (true); /*B3*/
}
```
到這裡會發現:需要知道怎麼實作 `search`,使得它可以找到真的相鄰的兩個節點,而且中間沒有「被標記刪除」的節點。就算中間碰到其他人插入節點,也要能夠發現並且做出相應的操作。
#### search
`search()` 的功能大致如下:
1. 找到「插入位置前後」的兩個節點。既然是準備插入,所以一邊會比較大,一邊會比較小。小的那邊的節點叫 `left_node` ,大的那邊的節點叫 `right_node`。
> 由於只能回傳一個值,這裡的設計是函式回傳 `right_node`,並且提供一個 pointer to pointer 參數讓函式可以寫入 `left_node`。
2. 若節點已經存在的話,就把「大小相等」的那個節點當作本來應該「比較大」的那個節點回傳。
這裡要注意 `search` 必須「找到真的相鄰的節點」。
之所以這樣說,是因若有很多執行緒一邊插入,一邊刪除,那麼在這一刻還相鄰的節點,下一刻可能就會:
* 中間被插入其他點;
* 或是中間其中一個節點被刪除
這些都是在單一執行緒之下不會發生的事。所以若找到的兩個節點中間有被標記為刪除的節點,這時候 `search` 必須刪除那些節點後再回傳。
然後因為這一刻已確認的事實,若稍微不留神,下一刻可能就會被其他執行緒改變,所以需要一直反覆檢查。
對應的程式碼如下:
```c
private Node *List::search (KeyType search_key, Node **left_node) {
Node *left_node_next, *right_node;
search_again:
do {
Node *t = head;
Node *t_next = head.next;
do {
/* 因為 while 的條件,若找到沒被標記的點,它只有可能是值比較小的 */
/* 這時候就把他們存起來 */
if (!is_marked_reference(t_next)) {
(*left_node) = t;
left_node_next = t_next;
}
/* 這裡就是單純的走訪,可看作 t = t->next */
/* 但若碰到被標記刪除的點,要記得接下來要走的是沒被標記的版本 */
t = get_unmarked_reference(t_next);
if (t == tail) break;
t_next = t.next;
} while (is_marked_reference(t_next) || (t.key<search_key));
right_node = t;
/* 若中間沒有被標記刪除的點,做最後檢查後回傳 */
if (left_node_next == right_node){
if ((right_node != tail) && is_marked_reference(right_node.next))
goto search_again; /*G1*/
else
return right_node; /*R1*/
}
/* 若中間有被標記刪除的點,就把他們刪掉 */
if (CAS (&(left_node.next), left_node_next, right_node)){ /*C1*/
if ((right_node != tail) && is_marked_reference(right_node.next))
goto search_again; /*G2*/
else
return right_node; /*R2*/
}
} while (true); /*B2*/
}
```
於是我們可理解為:
> 走訪所有的節點。目前的節點叫 `t`,目前節點的下個位置叫 `t_next`
也就是:
```c
do {
if (!is_marked_reference(t_next)) {
(*left_node) = t;
left_node_next = t_next;
}
t = get_unmarked_reference(t_next);
if (t == tail) break;
t_next = t.next;
} while (is_marked_reference(t_next) || (t.key<search_key)); /*B1*/
right_node = t;
```
注意 `while` 迴圈裡面的驗證順序:先驗證 `t` 是不是已標記為被刪除,若不是,則接著驗證 `t` 的值是否大於等於要搜尋的值
1. 若 `t` 是將被刪掉的節點,那麼就要一直往下跑,直到遇到第一個不是將被刪掉的點。這個節點有可能比要搜尋的值小或大:
* 比較小:下一次回到迴圈頭時,就會把它設成左端點。
* 比較大或一樣大:跳出迴圈(因為不是將被刪的點 + 值大於等於),並且把它設為右端點
2. 若 `t` 不是將被刪掉的點,也就是 `is_marked_reference(t_next)` 為假,但是裡面的值比要搜尋的還小,那就表示 `t` 是可能的左端點,下次回到迴圈頭時,就把它設成左端點。並繼續搜尋右端點。
3. 因為要求回傳的點相鄰,所以找到左右節點之後,就要立即檢查是否相鄰:
```c
if (left_node_next == right_node)
if ((right_node != tail) && is_marked_reference(right_node.next))
goto search_again; /*這是全部重做的意思*/
else
return right_node; /*R1*/
```
若相鄰,皆大歡喜。準備回傳時再檢查確認不是將被刪掉的點之後,就把東西回傳。
若不相鄰,表示中間有一些已標記被刪除的點。這時候就要先把中間那些節點全部刪掉,再回傳左右節點:
```c
/* 3: Remove one or more marked nodes */
if (CAS (&(left_node.next), left_node_next, right_node)) /*C1*/
if ((right_node != tail) && is_marked_reference(right_node.next))
goto search_again; /*G2*/
else
return right_node; /*R2*/
```
這裡就一口氣把它 CAS 成剛剛找到的右邊節點。
> 可以發現這裡沒有 `free` 他。所以在 `concurrent-ll` 當中的註解有說要等人做垃圾回收
這裡在很多情況下都需要全部重來。例如沒通過 CAS 的比較檢查,或是好不容易找到的右端點被莫名其妙冒出來的 `delete` 刪掉、左右端點間突然被插入奇怪的點等等。
#### delete
已有上述的 `search` 後,就可更簡潔地實作。`delete` 的程式碼如下:
```c
public boolean List::delete (KeyType search_key)
{
Node *right_node, *right_node_next, *left_node;
do {
/* 找相鄰節點。要刪的那個會被存在 right_node */
right_node = search (search_key, &left_node);
/* 若沒找到的話 */
if ((right_node == tail) || (right_node.key != search_key)) /*T1*/
return false;
right_node_next = right_node.next;
/* 若 right_node 剛剛到現在沒被標記為刪除的話 */
if (!is_marked_reference(right_node_next))
if (CAS (&(right_node.next), right_node_next, get_marked_reference (right_node_next)))
break;
} while (true);
/* 試著刪除剛剛標記的點。 */
/* 不過只要呼叫 search() 都會順便執行刪除。就算這次沒成功也無妨*/
if (!CAS (&(left_node.next), right_node, right_node_next)) /*C4*/
right_node = search(right_node.key, &left_node);
return true;
}
```
這裡的理念就相對單純:
1. 找到要刪的點(由 `search` 回傳),然後檢查是不是要找的那個點。
2. 若確定找到,再確認剛剛檢查的這段時間中,這兩個點中間有沒有被插進奇怪的東西。
#### 關於正確性
證明的想法:
> We will take a fairly direct approach to outlining the linearizability of the operations by identifying particular instants during their execution at which the complete operation appears to occur atomically
籍由使用 atomic function 實作特定的操作,來證明執行效能可線性化
- [ ] A. Conditions Maintained by Search
* 在 `search` 中的迴圈頭尾保持以下條件以確保 key 維持升序狀態:
* `search_key <= right_node.key`
* `left_node.key < search.key`
* `search` 函式的回傳路徑依情況分成 2 條,來確保節點左右相鄰
* `/*R1*/`,若確認完左右還是相鄰
* `/*R2*/`,原本的左右不相鄰就用 CAS 的 `compare_and_swap` 值蓋掉
* 右節點的標記狀態,因為前 3 個回傳條件都是 true,且 2 個回傳路徑都要確認右節點未被標記,而右節點從未變成 unmarked,所以我們推斷右節點起初沒有標記。
* CAS 指令 C1 成功後,從 list 中 unlink 被標記的節點
- [ ] B. Linearization points
* 這段說明 ${\rm op}_{i,m}$ 和操作次數 ($m$) 及 processor 數 ($i$) 有關,也就是:在 $i$ 個 processor 下,執行 $m$ 次的效能
* 而 ${\rm d}_{i,m}$ 則是 `search` 在執行時後置條件被滿足時的 final real-time
* 我們總是希望多執行緒的排序,thread 愈多時在理論上愈快

* 若能成功算得 ${\rm d}_{i,m}$,就表示取得的右節點未被 mark 且包含 `search_key`
* 若利用 ${\rm Find}(k)$ 來搜尋,可驗證在 `search_key` 右半部的 nodes 的 key 嚴格遞減,在左半部的 nodes 的 key 嚴格遞增,從而可證其正確性。
- [ ] C. Progress
* We will show that the concurrent implementation is non-blocking.
* 每次成功的插入都會產生一個更新
* 每次成功的刪除產生最多兩次更新
#### 結果
[A Pragmatic Implementation of Non-Blocking Linked Lists](https://www.cl.cam.ac.uk/research/srg/netos/papers/2001-caslists.pdf) 所做的比較,lock-free 實作的 CPU time (user + system) 比 lock-based 的少。

後續討論: [Harris's Linked List](https://concurrencyfreaks.blogspot.com/2014/03/harriss-linked-list.html)
### Hungry Birds
* 展示典型的 producer-consumer problem 在多執行緒、多核心環境之下的運作
* [hungry-birds](https://github.com/jserv/hungry-birds) implements unbounded lockless single consumer multiple producer FIFO queue.
* 延伸閱讀: [C11 atomic variables and the kernel](https://lwn.net/Articles/586838/)
## 參考資料
* [Linux 核心設計: RCU 同步機制](https://hackmd.io/@sysprog/linux-rcu)
* [Userspace RCU Library: What Linear Multiprocessor Scalability Means for Your Application](https://blog.linuxplumbersconf.org/2009/slides/Mathieu-Desnoyers-talk-lpc2009.pdf)
* [Improve Linux User-Space Core Libraries with Restartable Sequences](https://events19.linuxfoundation.org/wp-content/uploads/2017/12/Improve-Linux-User-Space-Core-Libraries-with-Restartable-Sequences-Mathieu-Desnoyers-EfficiOS.pdf)
* [A more Pragmatic Implementation of the Lock-free, Ordered, Linked List](https://github.com/parlab-tuwien/lockfree-linked-list)