# Linux 核心專題: TLSF 實作
> 執行人: a1091150
#### 專題錄影與 GitHub 連結
- [專題解說錄影](https://youtu.be/O4YbqJFl1wk)
- [GitHub: xvmalloc](https://github.com/a1091150/xvmalloc)
:::success
:question: 提問清單
* ?
:::
## 任務簡述
重做[第 6 週測驗題](https://hackmd.io/@sysprog/linux2023-quiz6)的測驗四,搭配第 5 週教材提及的 [tlsf-bsd](https://github.com/jserv/tlsf-bsd),探討何以 $O(1)$ 時間複雜度可落實於記憶體配置器
## TODO: 研讀教材並紀錄認知及問題
至少要涵蓋:
* [TLSF: a new dynamic memory allocator for real-time systems](http://www.gii.upv.es/tlsf/files/ecrts04_tlsf.pdf)
* [Benchmarking Malloc with Doom 3](https://www.forrestthewoods.com/blog/benchmarking-malloc-with-doom3/)
* TLSF: [Part 1: Background](https://brnz.org/hbr/?p=1735), [Part 2: The floating point](https://brnz.org/hbr/?p=1744)
### 研讀教材
#### 研讀論文 TLSF
在即時系統例如 RTOS (Real-Time Operating Systems) 下,每項操作或同種操作都需要在一定時間內回應。動態記憶體配置 (DSA; Dynamic storage allocation) 相關方法,在多數情況下有良好的回應時間,但是在 worst case 上可能超出時間。因此,在記憶體配置與釋放的操作上,TLSF 限定在 $\theta(1)$ 時間複雜度。
在論文中假設的應用場景:一定時間內回應、低程度的記憶體碎片、在有限或固定的記憶體配置上操作
##### TLSF 核心機制
在論文中主要介紹:
- 使用兩層去紀錄 free block
- `mapping` 機制將要求的記憶體大小轉換到指定的層
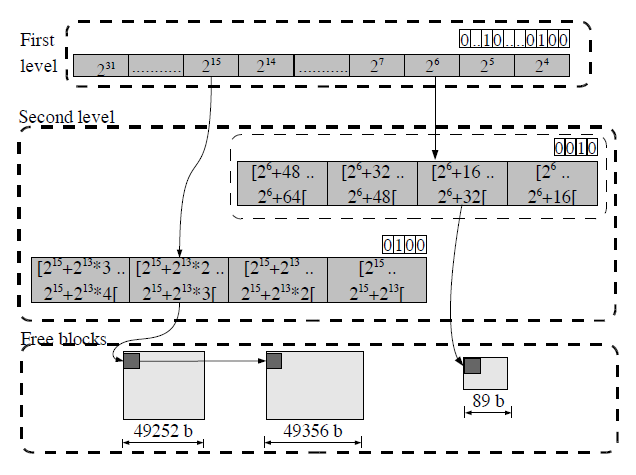
TLSF 使用兩層位元,紀錄擁有的 free block
- 第一層(First level):將 free block 以 2 的冪分類,使用對應位置的位元表示是否有 free block
- 第二層(Second level):再將 free block 分成 4 個區間,分別用位元紀錄,透過串列去串接每個區間內的 free block
當程式要求記憶體 `size` 時,透過 `size` 計算分別對應第一層的位元與第二層位元,即可查詢是否有 free block。若在該位元沒有 free block,也可透過位元操作查詢鄰近的 free block。整個操作皆在 $\theta(1)$ 時間複雜度內。
在論文中,使用`mapping` 機制轉換 `size` 成為指定第一層與第二層位元,以 `size = 460` 為例:
$$
size = 460_{10} = 0000 \space 000\overbrace{1}^{fl=8} \space \underbrace{1100}_{sl=12} \space 1100_2
$$
- 第一層的位元透過 find least set(fls) 計算取得
- 第二層的位元取第一層的位元之後 4 個位元
#### 研讀教材 Part 1: Background and Part 2: The floating point
參考 Part 1: Background 文中的`mapping_insert` 程式碼,該程式碼引用自 [GitHub - mattconte/tlsf](https://github.com/mattconte/tlsf/blob/master/tlsf.c#L513)
```c
void mapping_insert(size_t size, int* fli, int* sli)
{
int fl, sl;
if (size < 256)
{
fl = 0;
sl = (int)size / 8;
}
else
{
fl = fls(size);
sl = (int)(size >> (fl - 5)) ^ 0x20;
fl -= 7;
}
*fli = fl;
*sli = sl;
}
```
- 計算第一層 `fl` 數值上,取 fls 數值
- 計算第二層 `sl` 數值上,與前述取得第一層位元的後 4 個位元相同,透過 `^ 0x20` 移除第一層的位元。
這裡有個特別的 `fl -= 7` 的程式碼,根據 Part 2: The floating point 文中敘述,可以將此 `mapping_insert` 當作把整數轉換程浮點數中 exponent 減去 bias 的過程,唯此轉換前後一定是正數。
#### 研讀 [tlsf-bsd](https://github.com/jserv/tlsf-bsd)
tlsf-bsd 依照 TLSF 論文實作 `mapping` 機制,這裡來查看記憶體是如何被操作。
##### 了解 `struct tlsf_block` 結構體
查看結構體 `struct tlsf_block`
```c
/* Block status bits are stored in the least significant bits (LSB) of the
* size field.
*/
#define BLOCK_BIT_FREE ((size_t) 1)
#define BLOCK_BIT_PREV_FREE ((size_t) 2)
typedef struct tlsf_block {
/* Points to the previous block.
* This field is only valid if the previous block is free and is actually
* stored at the end of the previous block.
*/
struct tlsf_block *prev;
/* Size and block bits */
size_t header;
/* Next and previous free blocks.
* These fields are only valid if the corresponding block is free.
*/
struct tlsf_block *next_free, *prev_free;
} tlsf_block_t;
```
- `size_t header;`:
- 表示此 free block 的大小
- 透過記憶體對齊的特性,最低位元用來此 block 表示為 in-use block or free block,以 `BLOCK_BIT_FREE` 設定
- 透過記憶體對齊的特性,最低第二位元用來表示前一個 block 為 in-use block or free block,以 `BLOCK_BIT_PREV_FREE` 設定
- `struct tlsf_block *next_free, *prev_free;`:透過串列串接擁有相近大小的 free block
- `struct tlsf_block *prev;`:除了串列串接相近大小的 free block 外,每個 free block 的最後一個元素被指派此 free block 的起始位址,讓下個 free block 可以透過此元素直接取得 free block 以合併。
當兩個 free block 合併前,參考下圖,`block2->prev` 指向 `block` 的最後一個元素,該元素有 `block1` 的記憶體位址。若把 `block1 size` 當作 `block1` 的一部分,可以認為這兩個 block 重疊。
```
+--------+ <--- block1
| |
+--------+ <--- block1->header
| |
+- +--------+ <--- block1->next_free
| | |
| | |
size --+ | |
| | |
| +--------+ <--- block2->prev
+- +--------+ <--- block2->header
| |
+--------+
```
當 free block 轉為 in-use block 時,`struct block_t` 經由 `*block_payload()` 計算 payload,回傳指定位址,以圖片區分 in-use block 與 free block 使用差異:
```
in-use block free block
block ───► ┌───────┐ ┌───────┐ ◄─── block
│ │ │ │
block->header ───► ├───────┤ ├───────┤ ◄─── block->header
│ │ │ │
payload ───► ├───────┤ ├───────┤ ◄─── block->next_free
│ │ │ │
│ │ ├───────┤ ◄─── block->prev_free
│ space │ │ space │
│ │ │ │
└───────┘ └───────┘
```
##### 透過 `tlsf_malloc` 了解 `struct tlsf_block` 結構體位址計算
參考 Makefile 檔案,分別在 `test.c` 與 `bench.c` 以 `tlsf_resize()` 函式,向系統取得固定的記憶體空間。這裡解說 `gcc test.c tlsf.c` 編譯後的程式。
透過修改 `test.c` 的 `main()` 函式,觀察其行為
```c
// test.c
int main(void)
{
PAGE = (size_t) sysconf(_SC_PAGESIZE); // 4096
MAX_PAGES = 20 * TLSF_MAX_SIZE / PAGE;
tlsf_t t = TLSF_INIT;
const size_t page_size = PAGE;
void *p1 = tlsf_malloc(&t, (1 << 10) + 1);
void *p2 = tlsf_malloc(&t, page_size - 1);
tlsf_free(&t, p1);
tlsf_free(&t, p2);
}
// tlsf.c
void *tlsf_malloc(tlsf_t *t, size_t size)
{
size = adjust_size(size, ALIGN_SIZE);
if (UNLIKELY(size > TLSF_MAX_SIZE))
return NULL;
tlsf_block_t *block = block_find_free(t, size);
if (UNLIKELY(!block))
return NULL;
return block_use(t, block, size);
}
```
要求記憶體時 `void *p1 = tlsf_malloc(&t, (1 << 10) + 1);`,會經由
- `tlsf_malloc(size)`:取得記憶體位址,將 `size` 透過 `adjust_size(size)` 進位到鄰近的 `ALIGN_SIZE = 1 << 3` 的倍數
- `block_find_free()`: 取得 free block 記憶體位址,但沒有找到 free block
- `arena_grow()`:申請的記憶體空間,並作為 free block 加入到 tlsf level 中
- `tlsf_resize()`:透過 `mmap` 申請固定大小記憶體空間
- 再度透過 `block_find_free()` 取得 free block
觀察 `arena_grow` 中 `block` 的記憶體位址計算,來了解 `struct tlsf_block` 的每個成員作用:
```c
INLINE tlsf_block_t *to_block(void *ptr)
{
tlsf_block_t *block = (tlsf_block_t *) ptr;
return block;
}
#define BLOCK_OVERHEAD (sizeof(size_t))
static bool arena_grow(tlsf_t *t, size_t size)
{
size_t req_size =
(t->size ? t->size + BLOCK_OVERHEAD : 2 * BLOCK_OVERHEAD) + size;
void *addr = tlsf_resize(t, req_size);
if (!addr)
return false;
tlsf_block_t *block =
to_block(t->size ? (char *) addr + t->size - 2 * BLOCK_OVERHEAD
: (char *) addr - BLOCK_OVERHEAD);
if (!t->size)
block->header = 0;
check_sentinel(block);
block->header |= size | BLOCK_BIT_FREE;
block = block_merge_prev(t, block);
block_insert(t, block);
tlsf_block_t *sentinel = block_link_next(block);
sentinel->header = BLOCK_BIT_PREV_FREE;
t->size = req_size;
check_sentinel(sentinel);
return true;
}
```
第一次要求記憶體配置 `tlsf_malloc(&t, (1 << 10) + 1)`:
- `req_size = 2 * BLOCK_OVERHEAD + size`
- `block->header |= size | BLOCK_BIT_FREE;`,並加入到 tlsf level 中
- `block_link_next()` 連結下一個的 block,相當於指派 `sentinel->prev = block`
- `sentinel` 表示記憶體中最後一個 block
在 `to_block()` 轉換成 free block 的位址計算,最後以圖表列出 `block` 與 `sentinel` 分別指向的位址
```
+--------+ <--- block
| |
mmap of addr ---> +--------+ <--- block->header
| 1088 |
+- +--------+ <--- block->next_free
| | |
| | |
size --+ | |
| | |
| +--------+ <--- sentinel->prev
+- +--------+ <--- sentinel->header
sizeof(size_t)| | |
End of address ---> +- +--------+
```
`block` 指向不可寫入的記憶位址,但是可以指派 `block->header`; `sentinel` 記錄最高位址,以重疊的區塊 `sentinel->prev` 紀錄 block 位址。
最終透過 `block_find_free()` 與 `block_use()` 回傳 payload 記憶體位址。
## TODO: 解讀和改進程式碼
重做[第 6 週測驗題](https://hackmd.io/@sysprog/linux2023-quiz6)的測驗四,搭配上述來解釋何以 $O(1)$ 時間複雜度可落實於記憶體配置器,又如何改進實作。
此 heap allocator 與 tlsf-bsd 實作不同之處在於
- Level 設計差異:
- TLSF 採取 first level 與 second level,first level 以位元位置跟 2 的冪區分、再以 second level 分成 4 個區間
- heap allocator 以一維陣列表示,對應成員 `headsbits` 陣列,陣列中的每個位元位置對應一種 base size。在此程式碼實作與命名中,每 15 個位元視為同個 level。
- Metadata 儲存方式差異:
- TLSF 使用 `tlsf_block` 儲存該記憶體空間的 metadata,並以記憶體位址做減法以回推 `tlsf_block`
- heap allocator 將 metadata 分離儲存,不能藉由記憶體做減法回推 metadata:
- 利用 Linux 提供的 `posix_memalign` 使得記憶體對齊,將記憶體位址計算求出對應的 `headsbits` 與 `bitfield`
- 成員 `bitfield` 用於紀錄鄰近記憶體空間的狀態,可視為二維陣列,若取其中的一維陣列的元素,可表示同個 level 下,該鄰近空間的使用情況。
### 解讀程式碼
透過修改程式碼,並搭配 GDB 檢查變數數值、部分函式寫成 Python 程式碼,藉此觀察 `struct heap` 每個成員的作用。
```c
#define BASE_SIZE_MIN (0x00000010U)
#define BASE_SIZE_MAX (0xF0000000U)
#define BASE_SIZES_COUNT (105)
#define MAIN_BASE_SIZE_COUNT (7U)
#define HEADS_BITS_SIZE (((BASE_SIZES_COUNT + 31) >> 5))
struct heap {
uint32_t headsbits[HEADS_BITS_SIZE]; // 4
uint32_t *bitfield[MAIN_BASE_SIZE_COUNT]; // 7
uint8_t *hdata;
uint32_t hsize;
uint32_t hdcnt;
uint32_t bscnt;
chunk_t *heads[0];
};
```
- `uint32_t headsbits[HEADS_BITS_SIZE];`:某個位元對應的 base size 是否有 free block
- `uint32_t *bitfield[MAIN_BASE_SIZE_COUNT]`:用於記錄該多個記憶體區塊的使用情況
- `uint8_t *hdata;`:傳入記憶體起始位址
- `uint32_t hdcnt;`:`bitfield` 陣列元素數量
- `chunk_t *heads[0];`:用於串接 free block。 free block 的記憶體空間會被用於串接每個 `chunk_t` 資料
#### `main()` 函式
將 `SIZE` 修改成較小的 `SIZE`,藉由引入與修改巨集數值 `#define BC 5` 來測試 `headsbits` 陣列數值。
每個位元代表不同的 base size
```c
#define BC 5
int main(int argc, char *argv[])
{
const uint32_t SIZE = (1 << 4) << BC;
void *data = memalign(SIZE, SIZE);
/* ... */
return 0;
}
```
`void *data = memalign(SIZE, SIZE);` 使用 `posix_memalign()`,取得的記憶體位址與 `SIZE` 對齊。 可參考 `man posix_memalign` 說明
> `int posix_memalign(void **memptr, size_t alignment, size_t size);`
> The address of the allocated memory will be a multiple of alignment, which **must be a power of two and a multiple of sizeof(void *)**.
因此 `SIZE` 具有以下特性:
- 與 `void *` 對齊
- 只有一個位元被設定且為最高位
- 是 base size
#### 解讀 `headsbits[HEADS_BITS_SIZE]` 成員
`H1->headbits` 是用來表示此 heap 以被設定的位元,此位元對應一種 base size,來表示擁有的 free block
##### 解讀方法
初始化 `headsbits` 使用到 `closest_base_size(SIZE)`, `base_size_to_index(used_size)` 與 `base_size_from_index(index)` 函式
- `closest_base_size(SIZE)` 函式將 `SIZE` 轉換成大於等於 `SIZE` 的 base size,由於 `SIZE` 對齊的特性,轉換前後數值相同
- `base_size_to_index(SIZE)` 函式將 `SIZE` 轉換為 base size 的索引值
- `base_size_from_index(index)` 函式為 `base_size_to_index(SIZE)` 的反函式
觀察函式 `base_size_from_index` 的輸出:
| index | 0 | 1 | 2 | 3 | 4 | 5 | 6 | 7 | 8 | 9 | 10 | 11 | 12 | 13 | 14 | 15 | 16 | 17 | 18 | 19 | 20 | 21 | 22 | 23 | 24 | 25 | 26 | 27 | 28 | 29 | 30 | 31 |
|:--------------:| --- | --- | --- | --- | --- | --- | --- | --- | --- | --- | --- | --- | --- | --- | --- | --- | --- | --- | ---- | ---- | ---- | ---- | ---- | ---- | ---- | ---- | ---- | ---- | ---- | ---- | ---- | ---- |
| 對應 base size | 16 | 32 | 48 | 64 | 80 | 96 | 112 | 128 | 144 | 160 | 176 | 192 | 208 | 224 | 240 | 256 | 512 | 768 | 1024 | 1280 | 1536 | 1792 | 2048 | 2304 | 2560 | 2816 | 3072 | 3328 | 3584 | 3840 | 4096 | 8192 |
從以上可以推得一個規律,每 15 位元視為同個 level,一共 7 個 level:
- 第 00 ~ 14 位元:鄰近位元對應的 base size 之間相差一個 $16^1$
- 第 15 ~ 29 位元:鄰近位元對應的 base size 之間相差一個 $16^2$,第 15 位元為第 14 位元的 2 倍
- 第 30 ~ 44 位元:鄰近位元對應的 base size 之間相差一個 $16^3$,第 30 位元為第 29 位元的 2 倍
在 `heap_create()` 函式中,透過 `populate_heads()` 函式設定指定的位元。
```c
heap_t *heap_create(uint8_t *const address, uint32_t const size)
{
/* ... */
new_heap->headsbits[0] = 0;
new_heap->headsbits[1] = 0;
new_heap->headsbits[2] = 0;
new_heap->headsbits[3] = 0x007FFFFFU;
populate_heads(new_heap, address, size);
/* ... */
}
static void populate_heads(heap_t *const h,
void const *const data,
uint32_t const size)
{
/* ... */
uint32_t used_size = closest_base_size(size);
uint32_t i = base_size_to_index(used_size);
h->headsbits[i >> 5] |= 0x80000000U >> (i & 31);
}
```
`h->headsbits[i >> 5] |= 0x80000000U >> (i & 31);` 將設定指定的位元,來表示 heap 中擁有的 free block。
#### 解讀 `bitfield[MAIN_BASE_SIZE_COUNT]` 成員
用來記錄每個 free block 使用的情形,利用 `chunk_status_t` ,以兩個位元表示對應的記憶體位置的區塊使用情況
```c
typedef enum {
STATUS_FREE = 0x02U,
STATUS_ALLOC = 0x00U,
STATUS_ALLOC_HEAD = 0x01U,
STATUS_SPLIT = 0x03U,
} chunk_status_t;
```
其中可以利用或修改以下函式,來查看對應的 `bitfield` 數值,或使用經由 `heap_alloc` 取得的記憶體位址,檢查該對應的 `chunk_status_t` 數值
```c
static chunk_status_t chunk_get_status(uint32_t const *const bf, uint32_t const idx);
static uint32_t heap_get_address_status_priv(...)
chunk_status_t heap_get_address_status(heap_t const *const h, void const *const a)
```
##### 解讀方法
觀察 `heap_create()` 函式中藉由 `total_bitfield_count` 取得所有 `bitfield` 需要的記憶體空間,利用 `needed_bitfield_count` 計算分配給每個區域需要多少空間,`set_bf_ptr()` 初始化每個 `bitfield` 的數值。
```c
heap_t *heap_create(uint8_t *const address, uint32_t const size)
{
/* ... */
uint32_t const tot_bf_count = total_bitfield_count(size);
void *const mem_bf = malloc(tot_bf_count * sizeof(uint32_t));
/* ... */
for (uint32_t i = 0, start = 0; i < MAIN_BASE_SIZE_COUNT; ++i) {
uint32_t const nbc = needed_bitfield_count(size, i);
set_bf_ptr(i, nbc, new_heap, start, mem_bf, size);
start += nbc;
}
/* ... */
}
```
仿照 `needed_bitfield_count()` 函式撰寫成 Python 程式碼觀察其數量
```python
def needed_bitfield_count(size: int, index: int):
count = size >> ((index + 1) << 2)
return (count + 15) // 16
def show_need_bitfield_each_alloc(i: int):
size = 1 << i
xx = [needed_bitfield_count(size, x) for x in range(7)]
return xx
```
輸入參數`SIZE = 1 << i` 來表示原本 `SIZE = 1 << 4 << BC` 的輸入,輸出指標陣列中 `bitfield[MAIN_BASE_SIZE_COUNT]` 每個陣列的元素數量。
```python
In [3]: show_need_bitfield_each_alloc(4) # SIZE = 1 << 4
Out[3]: [1, 0, 0, 0, 0, 0, 0]
In [4]: show_need_bitfield_each_alloc(5) # SIZE = 1 << 5
Out[4]: [1, 0, 0, 0, 0, 0, 0]
In [5]: show_need_bitfield_each_alloc(6) # SIZE = 1 << 6
Out[5]: [1, 0, 0, 0, 0, 0, 0]
In [6]: show_need_bitfield_each_alloc(7) # SIZE = 1 << 7
Out[6]: [1, 0, 0, 0, 0, 0, 0]
In [7]: show_need_bitfield_each_alloc(8)
Out[7]: [1, 1, 0, 0, 0, 0, 0]
In [8]: show_need_bitfield_each_alloc(9)
Out[8]: [2, 1, 0, 0, 0, 0, 0]
In [10]: show_need_bitfield_each_alloc(10)
Out[10]: [4, 1, 0, 0, 0, 0, 0]
In [11]: show_need_bitfield_each_alloc(11)
Out[11]: [8, 1, 0, 0, 0, 0, 0]
In [12]: show_need_bitfield_each_alloc(12)
Out[12]: [16, 1, 1, 0, 0, 0, 0]
In [13]: show_need_bitfield_each_alloc(13)
Out[13]: [32, 2, 1, 0, 0, 0, 0]
```
`**bitfield` 型態為 `uint32_t`,以兩個位元表示 `chunk_status_t` 狀態,因此一個 `**bitfield` 元素可以表示 16 個記憶體區塊的狀態。
以 `SIZE = 1024 = 1 << 10 = 1 << 4 << 6` 為例,一次最小配置的記憶體是 16 位元組:
- 若全部皆以 `heap_alloc(H1, 16)` 取得記憶體位址,則需要 $2^{6}$ 個 `chunk_status_t` 去記錄狀態,可用 $2^6 / 16 = 2^2 = 4$ 個 `uint32_t`,符合 Python 程式輸出
- 若全部皆以 `heap_alloc(H1, 256)` 取得記憶體位址,則需要 $2^{2}$ 個 `chunk_status_t` 去記錄狀態,可用 $\lceil 2^2 / 16 \rceil = 1 = 1$ 個 `uint32_t`,符合 Python 程式輸出
###### 觀察 `bitfield` 數值狀態
透過修改 `chunk_get_status()` 函式中,新增 `printf("%u %x\n", idx >> 4, bf[idx >> 4]);` 觀察 `bitfield` 數值變化。
```c
static chunk_status_t chunk_get_status(uint32_t const *const bf,
uint32_t const idx)
{
uint32_t const sub = ~idx & 15u;
printf("%u %x\n", idx >> 4, bf[idx >> 4]);
return (bf[idx >> 4] >> (sub << 1)) & 0x03U;
}
/* ... */
#define BC 4
int main(int argc, char *argv[])
{
const uint32_t SIZE = (1 << 4) << BC;
/* ... */
void *foo[(1 << BC)];
for (int i = 0; i < (1 << BC); i++) {
foo[i] = heap_alloc(H1, 16);
printf("%02d ", i);
chunk_status_t cs = heap_get_address_status(H1, foo[i]);
}
return 0;
}
```
每行 `heap_alloc` 函式依序輸出 `foo` 索引值、`bitfield` 索引值、該 `bitfield` 數值, 單一行`heap_free` 函式輸出`bitfield` 索引值、該 `bitfield` 數值
```
00 0 aaaaaaa9
01 0 aaaaaaa5
02 0 aaaaaa95
03 0 aaaaaa55
04 0 aaaaa955
05 0 aaaaa555
06 0 aaaa9555
07 0 aaaa5555
08 0 aaa95555
09 0 aaa55555
10 0 aa955555
11 0 aa555555
12 0 a9555555
13 0 a5555555
14 0 95555555
15 0 55555555
```
觀察 `heap_alloc()` 函式輸出情況,以第一行 `00 0 aaaaaaa9` 為例,最低十六進制的數值為 $9_{10} = 1001_2$,取最低兩個位元,得到 `chunk_status_t` 狀態為 `STATUS_ALLOC_HEAD = 0x01U`
#### 解讀 `chunk_t *heads[0];` 成員
`*heads[0];` 可參考 [GNU Zero Length](https://gcc.gnu.org/onlinedocs/gcc/Zero-Length.html) 說明,GNU Extension 支援
在前述 `headsbits` 的位元用來表示是否有 free block, `chunk_t *heads[0];` 則用來串接每個 free block 的記憶體位址。
```c
typedef struct chunk {
struct chunk *prev, *next;
} chunk_t;
```
##### 解讀方法
觀察 `heap_create()` 初始化的方式與使用 `heap_alloc` 時候其使用的 `chunk_t` 的方式
```c
heap_t *heap_create(uint8_t *const address, uint32_t const size)
{
/* ... */
uint32_t const cs = CLZ(size) & 0x1CU;
uint32_t const hd_cnt = ((24 - cs) >> 2) * 15 + ((size >> (28 - cs)) & 0x0FU);
heap_t *new_heap = malloc(sizeof(*new_heap) + (hd_cnt * sizeof(chunk_t *)));
populate_heads(new_heap, address, size);
}
static void populate_heads(heap_t *const h,
void const *const data,
uint32_t const size)
{
uint32_t used_size = closest_base_size(size);
uint32_t i = base_size_to_index(used_size);
h->heads[i] = (chunk_t *) data;
h->heads[i]->prev = NULL;
h->heads[i]->next = NULL;
/* ... */
}
```
在 `heap_create()` 中,`hd_cnt` 的實際數值剛好是 `base_size_to_index(size) + 1`。例如 `SIZE = 1 << 28`, `hd_cnt = 91` 且 `base_size_to_index(SIZE) = 90`,在 `populate_heads` 函式中,剛好是指定 `h->heads[90]` 陣列中擁有 free block
經過多個 `heap_alloc()` 與 `heap_free()` 交錯執行後,該 free block 的記憶體空間會被轉換成並用於 `chunk_t`
#### 解讀 `heap_alloc()` 函式
經過前述 `heap_t` 結構體成員的每個作用,多少可以推得 O(1) 如何的運作模式。
來解讀 `heap_alloc(heap_t *const h, uint32_t const sz)` 函式實作,主要有以下步驟:
- 經由 `next_available_head_index()` 函式取得,尋找符合 `needed_sz` 的 free block。
- 在符合的 free block 中,取得符合 `needed_sz` 的 free block,並將剩餘 free block 切割並加入至對應大小的 `h->heads` 中
以 `SIZE = 1 << 16 = 65536` 為例,查看其中一種程式碼行為:
```c=1
#define BC 12
int main(int argc, char *argv[])
{
const uint32_t SIZE = (1 << 4) << BC;
void *data = memalign(SIZE, SIZE);
heap_t *H1 = heap_create(data, SIZE);
void *foo = heap_alloc(H1, 16);
/* ... */
return 0;
}
void *heap_alloc(heap_t *const h, uint32_t const sz)
{
/* ... */
uint32_t const index = next_available_head_index(h, needed_sz);
chunk_t *c = h->heads[index];
uint32_t const extra_sz = found_sz - needed_sz;
/* the combined number of iterations for both 'for' loops in this
* function is 7 max, hence the 0(1) complexity */
for (;; --bs_level, shift -= 4) {
uint32_t const lvl_remain_sz = (extra_sz >> shift) & 0x0FU;
if (0 != lvl_remain_sz) {
uint32_t const head =
(bs_level << 4) - bs_level + lvl_remain_sz - 1;
chunk_t *const hd = h->heads[head];
update_next(h, c, hd);
update_prev(h, c, NULL);
update_head(h, head, c);
if (hd) {
update_prev(h, hd, c);
}
c = (chunk_t *) ((uint8_t *) c + (lvl_remain_sz << shift));
}
lvl_needed_sz = needed_sz >> shift;
if (0 != lvl_needed_sz)
break;
uint32_t const split = ((uint32_t) c - base) >> shift;
bf_set_split(h->bitfield[bs_level], split);
}
/* ... */
}
```
當 `heap_alloc(H1, 16)` 時
- `chunk_t *c` 變數為回傳的記憶體位址
- `next_available_head_index` 取得 `index = 45` 對應原本 `SIZE = 65536` 的 free block
- `65536 - 16 = 65520`,可以預期將 `65520` 分割成不同的 base size:`65520 = 61440 + 3840 + 240`
- `61440` 對應 base size index 為 44
- `3840` 對應 base size index 為 29
- `240` 對應 base size index 為 14
- 在第 20 行程式碼,先將剩餘的 free block 將入到 base size 對應的 `h->heads[head]` 之中,再計算 `c` 的記憶體位址
根據註釋
```
/* the combined number of iterations for both 'for' loops in this
* function is 7 max, hence the 0(1) complexity */
```
可以設想最多的執行次數的 worst case,例如 `SIZE = 1 << 31` 並且 `heap_alloc(H1, 16)` 取最小單位的空間,最終在所有 7 個 level 中,都放置一個 free block
```c
#define BC 27
int main(int argc, char *argv[])
{
const uint32_t SIZE = (1 << 4) << BC;
void *data = memalign(SIZE, SIZE);
heap_t *H1 = heap_create(data, SIZE);
void *foo = heap_alloc(H1, 16);
/* ... */
return 0;
}
```
## TODO: 研究 Linux 核心的 xvmalloc 和 zsmalloc
Linux 核心一度具備同為 $O(1)$ 時間複雜度的 [xvmalloc](https://github.com/torvalds/linux/commit/644bf7b5983cf2540b57a5b25b775cb3c1e8e943),不過隨後就被 [zsmalloc](https://www.kernel.org/doc/html/v5.0/vm/zsmalloc.html) 取代,請依據 git log 和 LWN 等第一手材料,探討核心開發者的考量因素。
在討論時,避免「舉燭」,應至少將 [xvmalloc](https://github.com/torvalds/linux/commit/644bf7b5983cf2540b57a5b25b775cb3c1e8e943) 移植到 userspace,搭配 [tlsf-bsd](https://github.com/jserv/tlsf-bsd) 的測試和效能評比框架,分析其效益。
參考資訊:
* [yvt/rlsf](https://github.com/yvt/rlsf)
* [xvMalloc](https://code.google.com/archive/p/compcache/wikis/xvMalloc.wiki)
* [AllocatorsComparison](https://code.google.com/archive/p/compcache/wikis/AllocatorsComparison.wiki)
* [War of allocators: TLSF in action](http://webkit.sed.hu/blog/20100324/war-allocators-tlsf-action)
#### xvmalloc: 探討核心開發者的考量的因素
在 git log 中未有標注原因,在 LWN.net 搜尋 xvmalloc,有以下描述:
節錄自 [LWN.net: In-kernel memory compression](https://lwn.net/Articles/545244/#:~:text=To%20improve%20density,through%20Linux%203.8.), [The zsmalloc allocator](https://lwn.net/Articles/477067/#:~:text=The%20%22zsmalloc%22%20allocator,within%20a%20page.)
> To improve density, the xvmalloc allocator was written, based on the two-level sequential fit (TLSF) algorithm.
> Xvmalloc provided high density for some workloads and was the initial default allocator for zram and for the frontswap-driven portion of the initial zcache.
> It was found, however, **that the high density led to poor fragmentation characteristics, especially for zsize distributions that skewed fat.**
> Xvmalloc has since been discarded (though remnants of it survive through Linux 3.8.)
>
> The "zsmalloc" allocator, proposed by Seth Jennings, is aimed at a specific use case.
> The slab allocators work by packing multiple objects into each page of memory; that works well when the objects are small, but can be problematic as they get larger.
> In the worst case, if a kernel subsystem routinely needs allocations that are **just larger than PAGE_SIZE/2, only one object will fit within a page.**
>
> [staging: zsmalloc: memory allocator for compressed pages](https://lwn.net/Articles/474880/)
> This patchset introduces a new memory allocation library named
> zsmalloc. zsmalloc was designed to fulfill the needs
> of users where:
> 1) Memory is constrained, preventing contiguous page allocations
> larger than order 0(single page) and
> 2) Allocations are all/commonly greater than half a page.
在 xvmalloc 實作中,如果絕大多數的要求記憶體空間,接近並大於 `PAGE_SIZE / 2`,則該 page 只會有一個物件,形成嚴重的記憶體浪費。 zsmalloc 主要解決此使用情境。
:::warning
:warning: 應闡述什麼場景特別重視上述的記憶體運用方式。
:notes: jserv
:::
#### 移植 xvmalloc
> [Github: xvmalloc](https://github.com/a1091150/xvmalloc)
xvmalloc 與前面 TLSF-bsd 實作上不同:
- 記憶體配置 `xv_malloc(... size)` 只能要求小於一個 page size(Linux 上 page size = 4096)
- `size` 會進位成 8 的倍數,包含本身 4 位元組的 block 開銷,最大配置大小為 4088 位元組(4096 - 8)
在移植 xvmalloc 的時候,考量以上特性,把 tlsf-bsd 中的測試流程修改成 xvmalloc 的應用情境
##### 解說移植後程式碼
目前的程式碼可以在 macOS 與 Ubuntu Linux 22.04 上運作。
在移植的方式上,盡量不更動 xvmalloc 程式碼,透過撰寫缺少的函式、結構體。
- `xv_malloc.c`, `xv_malloc.h` 與 `xv_malloc_int.h`:移植後的程式碼主體
- `types.h`:移植必要的巨集
- `test_page.h`:移植 linux module header 的函式的標頭檔
- `test.c`:主要撰寫 `main()` 函式與 benchmark
在原本的 xvmalloc 中,每次空間不足時,透過 `alloc_page()` 向系統申請一個 page,使用 `xv_malloc()` 會取得 page 結構體與 offset,以此取得記憶體位址。
來查看真如 LWN 敘述的記憶體浪費的情形。在 `test.c` 透過配置兩組指定記憶體大小,大於 `page size / 2` 與 `4`,並限制總體 page 數量,即可發現記憶體配置失敗,符合 LWN 敘述的記憶體浪費:
```c
int main(int argc, char **argv)
{
MAX_PAGES = 1; // Only one page can be required
/* ... */
test_alloc();
/* ... */
}
void test_alloc()
{
struct xv_pool *pool = xv_create_pool();
struct page *page;
u32 offset;
const u32 size = XV_MAX_ALLOC_SIZE / 2 + 1;
int x1 = xv_malloc(pool, size, &page, &offset);
int x2 = xv_malloc(pool, 4, &page2, &offset2); // Fail to acquire memory
/* ... */
}
```
### benchmark
使用測量環境
```
5.19.0-43-generic
Architecture: x86_64
CPU op-mode(s): 32-bit, 64-bit
Address sizes: 39 bits physical, 48 bits virtual
Byte Order: Little Endian
CPU(s): 4
On-line CPU(s) list: 0-3
Vendor ID: GenuineIntel
Model name: Intel(R) Core(TM) i5-4250U CPU @ 1.30GHz
gcc (Ubuntu 11.3.0-1ubuntu1~22.04.1) 11.3.0
```
依照 tlsf-bsd 中的測試方式:
- 若已取得記憶體,低機率 `realloc()` 或高機率 `tlsf_free()`
- 若無記憶體空間,要求記憶體 `tlsf_malloc()`
```c
static void run_alloc_benchmark()
{
while (loops--) {
size_t next_idx = (size_t) rand() % num_blks;
size_t blk_size = get_random_block_size(blk_min, blk_max);
if (blk_array[next_idx]) {
if (rand() % 10 == 0) {
blk_array[next_idx] =
tlsf_realloc(&t, blk_array[next_idx], blk_size);
} else {
tlsf_free(&t, blk_array[next_idx]);
blk_array[next_idx] = tlsf_malloc(&t, blk_size);
}
} else {
blk_array[next_idx] = tlsf_malloc(&t, blk_size);
}
if (clear)
memset(blk_array[next_idx], 0, blk_size);
}
/* Free up all allocated blocks. */
for (size_t i = 0; i < num_blks; i++) {
if (blk_array[i])
tlsf_free(&t, blk_array[i]);
}
}
```
在 xvmalloc 中沒有 `realloc` 函式,直接移除 `realloc` 函式,限制記憶體配置範圍 32 ~ 4088。
```c
static void run_alloc_benchmark()
{
struct xv_pool *pool = xv_create_pool();
assert(pool);
while (loops--) {
size_t next_idx = (size_t) rand() % num_blks;
size_t blk_size = get_random_block_size(blk_min, blk_max);
if (blk_array[next_idx]) {
struct page *page = blk_array[next_idx];
u32 offset = blk_offset_array[next_idx];
xv_free(pool, page, offset);
blk_array[next_idx] = NULL;
blk_offset_array[next_idx] = 0;
} else {
struct page *page;
u32 offset;
int r = xv_malloc(pool, blk_size, &page, &offset);
if (!r) {
blk_array[next_idx] = page;
blk_offset_array[next_idx] = offset;
}
}
if (clear && blk_array[next_idx]) {
char *addr = blk_array[next_idx];
u32 offset = blk_offset_array[next_idx];
memset(addr + offset, 0, blk_size);
}
}
/* ... */
}
```
獲得輸出:
```shell
$ gcc xvmalloc.c test.c
$ ./a.out
blk_min=512 to blk_max=512
512:512:10000000:0:87900160:0.703468: took 0.703468 s for 10000000 malloc/free
benchmark loops of 512-512 bytes. ~0.070 us per loop
./a.out -s 32:4088
blk_min=32 to blk_max=4088
32:4088:10000000:0:96399360:1.237614: took 1.237614 s for 10000000 malloc/free
benchmark loops of 32-4088 bytes. ~0.124 us per loop
./a.out -s 32:4088 -c
blk_min=32 to blk_max=4088
32:4088:10000000:1:96399360:1.592345: took 1.592345 s for 10000000 malloc/free
benchmark loops of 32-4088 bytes. ~0.159 us per loop
```
與 tlsf-bsd 對比
```shell
$ ./build/bench
blk_min=512 to blk_max=512
512:512:10000000:0:6025216:0.480467: took 0.480467 s for 10000000 malloc/free
benchmark loops of 512-512 bytes. ~0.048 us per loop
$ ./build/bench -s 32
blk_min=32 to blk_max=512
32:512:10000000:0:3923968:0.611649: took 0.611649 s for 10000000 malloc/free
benchmark loops of 32-512 bytes. ~0.061 us per loop
$ ./build/bench -s 10:12345
blk_min=10 to blk_max=12345
10:12345:10000000:0:68145152:1.400485: took 1.400485 s for 10000000 malloc/free
benchmark loops of 10-12345 bytes. ~0.140 us per loop
```
用 `perf stat --repeat 100 ./a.out -s 32:4088` 去測量
```
Performance counter stats for './a.out -s 32:4088' (100 runs):
2,666.90 msec task-clock # 1.000 CPUs utilized ( +- 0.18% )
22 context-switches # 8.333 /sec ( +- 5.54% )
2 cpu-migrations # 0.758 /sec ( +- 25.99% )
23,383 page-faults # 8.857 K/sec ( +- 0.00% )
6,884,795,731 cycles # 2.608 GHz ( +- 0.10% )
7,809,646,003 instructions # 1.15 insn per cycle ( +- 0.00% )
1,003,886,833 branches # 380.259 M/sec ( +- 0.00% )
24,409,076 branch-misses # 2.43% of all branches ( +- 0.02% )
2.66722 +- 0.00591 seconds time elapsed ( +- 0.22% )
```
用 `perf stat --repeat 100 ./a.out -s 32:4088 -c` 測量,`-c` 參數會將取得的記憶體空間指派 0。
```
Performance counter stats for './a.out -s 32:4088 -c' (100 runs):
3,740.16 msec task-clock # 1.014 CPUs utilized ( +- 0.18% )
26 context-switches # 7.100 /sec ( +- 4.53% )
0 cpu-migrations # 0.000 /sec
23,384 page-faults # 6.385 K/sec ( +- 0.00% )
9,560,078,934 cycles # 2.610 GHz ( +- 0.15% )
8,235,466,240 instructions # 0.87 insn per cycle ( +- 0.00% )
1,068,148,108 branches # 291.669 M/sec ( +- 0.00% )
28,288,702 branch-misses # 2.65% of all branches ( +- 0.09% )
3.68915 +- 0.00996 seconds time elapsed ( +- 0.27% )
```
使用
```shell
$ perf record -g --call-graph dwarf ./a.out -s 32:4088 -c
$ perf report --stdio -g graph,0.5,caller > foo.txt
```
得到以下結果
:::spoiler Perf Graph
```
main
|
|--93.41%--bench_main
| |
| --93.33%--run_alloc_benchmark
| |
| |--29.72%--xv_free
| | |
| | |--5.65%--test_flag
| | |
| | |--4.58%--insert_block
| | | |
| | | --1.27%--__set_bit
| | |
| | |--2.52%--remove_block
| | | |
| | | --0.66%--get_ptr_atomic
| | |
| | |--1.15%--set_flag
| | |
| | |--0.93%--get_ptr_atomic
| | |
| | --0.75%--BLOCK_NEXT
| |
| |--28.92%--xv_malloc
| | |
| | |--5.59%--remove_block_head
| | | |
| | | --0.70%--__clear_bit
| | |
| | |--5.01%--find_block
| | | |
| | | |--0.75%--get_index
| | | |
| | | --0.56%--test_bit
| | |
| | |--3.54%--set_flag
| | |
| | |--3.52%--grow_pool
| | | |
| | | |--1.77%--alloc_page
| | | | |
| | | | --1.33%--find_page_unused
| | | |
| | | --0.55%--set_flag
| | |
| | |--2.50%--insert_block
| | | |
| | | --0.68%--__set_bit
| | |
| | |--0.84%--get_ptr_atomic
| | |
| | |--0.80%--clear_flag
| | |
| | |--0.69%--set_blockprev
| | |
| | --0.51%--put_ptr_atomic
| |
| |--11.96%--rand
| | |
| | --11.87%--__random
| | |
| | --1.26%--__random_r
| |
| |--7.33%--__memset_avx2_unaligned_erms
| |
| |--6.78%--get_random_block_size
| | |
| | --4.55%--rand
| | __random
| | |
| | --2.68%--__random_r
| |
| --1.59%--0x55b65b21a214
```
:::
## 附錄 RLSF
- 可參考官方文件 [Rust Doc RLSF](https://docs.rs/rlsf/latest/rlsf/#structs)
- [GitHub RLSF](https://github.com/yvt/rlsf)
:::warning
我剛開始學習 Rust,因此可能部分環節有誤。
:::
在有之前 TLSF 的認識之後,來了解如何使用 Rust 去實作,參考 RLSF 範例。
```rust
fn main() {
let mut pool = [MaybeUninit::uninit(); 65536];
let mut tlsf: Tlsf<'_, u16, u16, 12, 16> = Tlsf::new();
tlsf.insert_free_block(&mut pool);
}
```
先來了解 Rust 語法跟其作用:
> MaybeUninit,可參考 [Rust Doc: MaybeUninit](https://doc.rust-lang.org/stable/core/mem/union.MaybeUninit.html)
> A wrapper type to construct uninitialized instances of T
> 建立一變數,Rust 會初始化該數值,例如 `let x: i32` 會自動初始化為 0。
> 透過 `MaybeUninit` 取得未初始化的記憶體空間。
>
> [type; length] 語法糖:建立一組陣列 [Rust Vec](https://doc.rust-lang.org/stable/std/vec/index.html)
> A contiguous growable array type with heap-allocated contents, written Vec
> 在記憶體空間上為連續。
`pool` 變數取得的連續記憶體空間,相當於 C 語言的 `void *pool = malloc(65536)` ,作為 block 加入至 tlsf allocator 中。
```rust
pub struct Tlsf<'pool, FLBitmap, SLBitmap, const FLLEN: usize, const SLLEN: usize> {
fl_bitmap: FLBitmap,
/// `sl_bitmap[fl].get_bit(sl)` is set iff `first_free[fl][sl].is_some()`
sl_bitmap: [SLBitmap; FLLEN],
first_free: [[Option<NonNull<FreeBlockHdr>>; SLLEN]; FLLEN],
_phantom: PhantomData<&'pool ()>,
}
```
依據 [Rust Doc: Generic Type](https://doc.rust-lang.org/book/ch10-01-syntax.html) 特性,可在編譯時期決定該型態:
- `FLBitmap` 成員:First level 的位元對應的 Rust 整數型態
- `SLBitmap` 成員:Second level 的位元對應的 Rust 整數型態
- `FLLEN` 成員:First level 用到的位元數量
- `SLLEN` 成員:Second level 用到的位元數量
- `_phantom` 成員:根據 [Rust Doc: PhantomData](https://doc.rust-lang.org/std/marker/struct.PhantomData.html): Zero-sized type used to mark things that “act like” they own that data type. Rust 強調所有權(Ownership),這裡假裝擁有資料的所有權。
`'pool` 語法可參考 [Rust by Example: Explicit annotation](https://doc.rust-lang.org/rust-by-example/scope/lifetime/explicit.html),表示在 TLSF 結構體執行時間,`pool` 的生命週期夠長(活得夠久)
根據註釋,此實作版本的 RLSF 最低配置 16 位元組
```svgbob
First level
"FLLEN = 8"
╭─────┬─────┬─────┬─────┬─────┬─────┬─────┬─────╮
"fl_bitmap: FLBitmap ="│ 0 │ 0 │ 0 │ 1 │ 0 │ 0 │ 0 │ 0 │
├─────┼─────┼─────┼─────┼─────┼─────┼─────┼─────┤
"min size"│ 2¹¹ │ 2¹⁰ │ 2⁹ │ 2⁸ │ 2⁷ │ 2⁶ │ 2⁵ │ 2⁴ │
╰─────┴─────┴─────┴──┬──┴─────┴─────┴─────┴─────╯
```
將 `pool` 當作 free block 加入到 `TLSF` 中
```rust
pub fn insert_free_block(&mut self, block: &'pool mut [MaybeUninit<u8>]) -> impl Send + Sync {
// Safety: `block` is a mutable reference, which guarantees the absence
// of aliasing references. Being `'pool` means it will outlive `self`.
unsafe { self.insert_free_block_ptr(NonNull::new(block as *mut [_] as _).unwrap()) };
}
```
參考 [The Rust Programming Guide: unsafe](https://doc.rust-lang.org/book/ch19-01-unsafe-rust.html),使用 `unsafe` 去操作與 C 語言實作中相同的記憶體位址計算:
> To switch to `unsafe` Rust, use the unsafe keyword and then start a new block that holds the unsafe code.
> You can take five actions in unsafe Rust that you can’t in safe Rust, which we call unsafe superpowers.
> Those superpowers include the ability to:
> - Dereference a raw pointer
> - Call an unsafe function or method
> - Access or modify a mutable static variable
> - Implement an unsafe trait
> - Access fields of unions
透過 [Rust raw pointer](https://doc.rust-lang.org/reference/types/pointer.html#mutable-references-mut),將該 block 的記憶體位址取出。
:::info
透過文件查詢,可以使用內建的函式 [`core::ptr::addr_of`](https://doc.rust-lang.org/core/ptr/macro.addr_of.html) 取得記憶體位址。
在 Rust Playground 實驗下,可獲得一樣的輸出
```rust
fn main() {
let a = 42;
let memory_location = &a as *const i32 as usize;
let mf = core::ptr::addr_of!(a) as usize;
println!("{}", memory_location); // 140723548430676
println!("{}", mf); // // 140723548430676
}
```
:::
`NonNull` 可當作是支援 raw pointer 的結構體,參考 [Rust Doc: NonNull](https://doc.rust-lang.org/stable/core/ptr/struct.NonNull.html)
> This is often the correct thing to use when building data structures using raw pointers, but is ultimately more dangerous to use because of its additional properties.
> If you’re not sure if you should use NonNull\<T\>, just use *mut T!