---
title: "一文了解 Nebula Graph 上的 Spark 项目"
date: 2022-06-06T10:19:11+08:00
draft: false
tags: ["Nebula Graph", "Spark", "PySpark"]
categories: ["Nebula Graph"]
description: "Nebula Graph 生态中有哪些 Spark 项目? 本文为大家介绍 Spark-connector(包括 PySpark), Nebula Algorithm 和 Nebula Exchange。"
featuredImage: "featured-image.webp"
featuredImagePreview: "featured-image.webp"
---
> Nebula Graph 生态中有哪些 Spark 项目? 本文为大家介绍 Spark-connector(包括 PySpark), Nebula Algorithm 和 Nebula Exchange。
<!--more-->
最近我试着搭建了方便大家一键试玩的 Nebula Graph 中的 [Spark](https://spark.apache.org/) 相关的项目,今天就把它们整理成文分享给大家。而且,我趟出来了 PySpark 下的 Nebula Spark Connector 的使用方式,后边也会一并贡献到文档里。
## Nebula Graph 的三个 Spark 子项目
我曾经围绕 Nebula Graph 的所有数据导入方法画过一个[草图](https://www.siwei.io/sketches/nebula-data-import-options/),其中已经包含了 Spark Connector,Nebula Exchange 的简单介绍。在这篇文章中我将它们和另外的 Nebula Algorithm 进行稍微深入的探讨。
> 注:(这篇文档)[https://docs.nebula-graph.com.cn/3.1.0/20.appendix/write-tools/]也很清楚为我们列举了不同导入工具的选择。
TL;DR
- Nebula Spark Connector 是一个 Spark Lib,它能让 Spark 应用程序能够以 `dataframe` 的形式从 Nebula Graph 中读取和写入图数据。
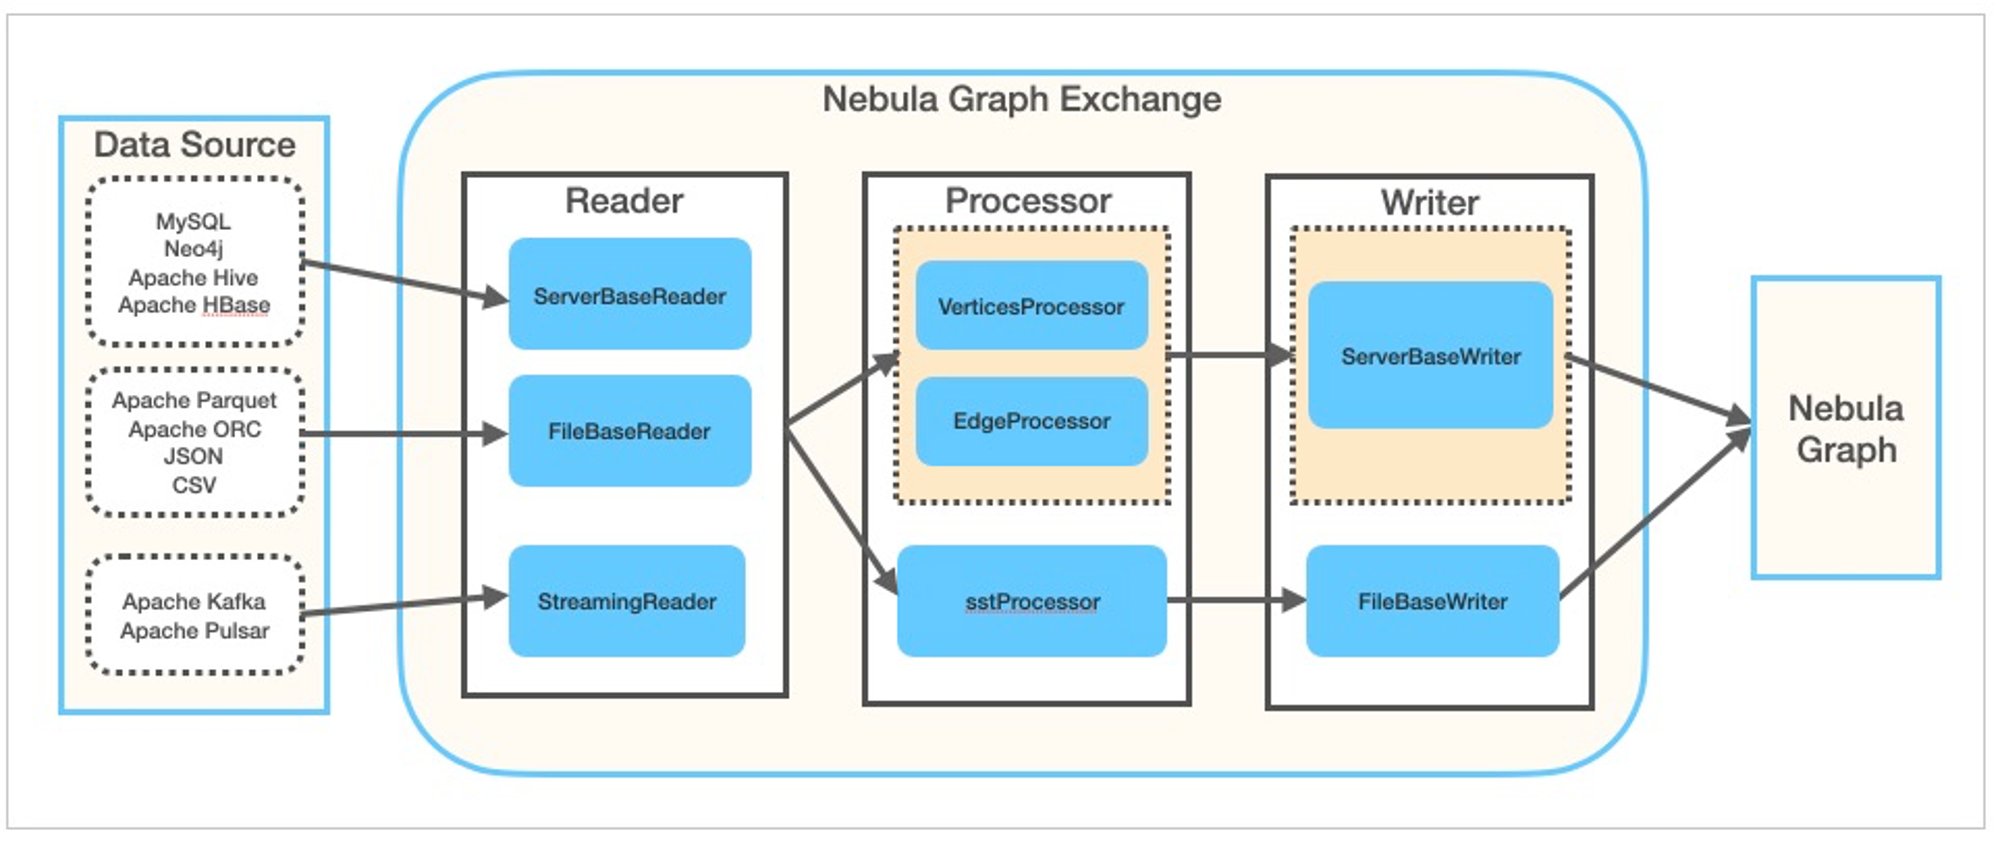
- Nebula Exchange 建立在 Nebula Spark Connector 之上,作为一个 Spark Lib 同时可以直接被 Spark 提交 JAR 包执行的应用程序,它的设计目标是和 Nebula Graph 交换不同的数据源(对于开源版本,它是单向的:写入,而对于企业版本,它是双向的)。Nebula Exchange 支持的很多不同类型的数据源如:[MySQL](https://www.mysql.com/cn/)、[Neo4j](https://neo4j.com/)、[PostgreSQL](https://www.postgresql.org/)、[ClickHouse](https://clickhouse.com/)、[Hive](https://hive.apache.org/) 等。除了直接写入 Nebula Graph,它还可以选择生成 SST 文件,并将其注入 Nebula Graph,以便使用 Nebula Graph 集群之外算力帮助排序底层。
- Nebula Algorithm,建立在 Nebula Spark Connector 和 GraphX 之上,也是一个Spark Lib 和 Spark 上的应用程序,它用来在 Nebula Graph 的图上运行常用的图算法(pagerank,LPA等)。
## Nebula Spark Connector
- 代码:https://github.com/vesoft-inc/nebula-spark-connector
- 文档:https://docs.nebula-graph.io/3.1.0/nebula-spark-connector/
- JAR 包:https://repo1.maven.org/maven2/com/vesoft/nebula-spark-connector/
- 代码例子:[example](https://github.com/vesoft-inc/nebula-spark-connector/tree/master/example)
### Nebula Graph Spark Reader
为了从 Nebula Graph 中读取数据,比如读 vertex,Nebula Spark Connector 将扫描所有带有给定 TAG 的 Nebula StorageD,比如这样表示扫描 `player` 这个 TAG :`withLabel("player")`,我们还可以指定 vertex 的属性:`withReturnCols(List("name", "age"))`。
指定好所有的读 TAG 相关的配置之后,调用 `spark.read.nebula.loadVerticesToDF` 返回得到的就是扫描 Nebula Graph 之后转换为 Dataframe 的图数据,像这样:
```scala
def readVertex(spark: SparkSession): Unit = {
LOG.info("start to read nebula vertices")
val config =
NebulaConnectionConfig
.builder()
.withMetaAddress("metad0:9559,metad1:9559,metad2:9559")
.withConenctionRetry(2)
.build()
val nebulaReadVertexConfig: ReadNebulaConfig = ReadNebulaConfig
.builder()
.withSpace("basketballplayer")
.withLabel("player")
.withNoColumn(false)
.withReturnCols(List("name", "age"))
.withLimit(10)
.withPartitionNum(10)
.build()
val vertex = spark.read.nebula(config, nebulaReadVertexConfig).loadVerticesToDF()
vertex.printSchema()
vertex.show(20)
println("vertex count: " + vertex.count())
}
```
写入的例子我这里不列出,不过,前边给出的代码示例的链接里是有更详细的例子,这里值得一提的是,**Spark Connector 读数据为了满足图分析、图计算的大量数据场景**,和大部分其他客户端非常不同,它直接绕过了 GraphD,通过扫描 MetaD 和 StorageD 获得数据,但是写入的情况则是通过 GraphD 发起 nGQL DML 语句写入的。
接下来我们来做一个上手练习吧。
### 上手 Nebula Spark Connector
先决条件:假设下面的程序是在一台有互联网连接的 Linux 机器上运行的,最好是预装了 Docker 和 Docker-Compose。
#### 拉起环境
首先,让我们用 [Nebula-Up](https://github.com/wey-gu/nebula-up/) 部署基于容器的 Nebula Graph Core v3、Nebula Studio、Nebula Console 和 Spark、Hadoop 环境,如果还没安装好它也会尝试为我们安装 Docker 和 Docker-Compose。
```bash
# Install Core with Spark Connector, Nebula Algorithm, Nebula Exchange
curl -fsSL nebula-up.siwei.io/all-in-one.sh | bash -s -- v3 spark
```
> 你知道吗 [Nebula-UP](https://github.com/wey-gu/nebula-up/) 可以一键装更多东西,如果你的环境配置大一点(比如 8 GB RAM)`curl -fsSL nebula-up.siwei.io/all-in-one.sh | bash` 可以装更多东西,但是请注意 [Nebula-UP](https://github.com/wey-gu/nebula-up/) 不是为生产环境准备的。
上述边脚本执行后,让我们用 [Nebula-Console](https://docs.nebula-graph.com.cn/3.1.0/nebula-console/)(Nebula Graph 的命令行客户端)来连接它。
```bash
# Connect to nebula with console
~/.nebula-up/console.sh
# Execute any queryies like
~/.nebula-up/console.sh -e "SHOW HOSTS"
```
加载一份数据进去,并执行一个图查询:
```bash
# Load the sample dataset
~/.nebula-up/load-basketballplayer-dataset.sh
# 等一分钟左右
# Make a Graph Query the sample dataset
~/.nebula-up/console.sh -e 'USE basketballplayer; FIND ALL PATH FROM "player100" TO "team204" OVER * WHERE follow.degree is EMPTY or follow.degree >=0 YIELD path AS p;'
```
#### 进入 Spark 环境
执行下面这一行,我们就可以进入到 Spark 环境:
```bash
docker exec -it spark_master_1 bash
```
如果我们想执行编译,可以在里边安装 `mvn`:
```bash
docker exec -it spark_master_1 bash
# in the container shell
export MAVEN_VERSION=3.5.4
export MAVEN_HOME=/usr/lib/mvn
export PATH=$MAVEN_HOME/bin:$PATH
wget http://archive.apache.org/dist/maven/maven-3/$MAVEN_VERSION/binaries/apache-maven-$MAVEN_VERSION-bin.tar.gz && \
tar -zxvf apache-maven-$MAVEN_VERSION-bin.tar.gz && \
rm apache-maven-$MAVEN_VERSION-bin.tar.gz && \
mv apache-maven-$MAVEN_VERSION /usr/lib/mvn
```
#### 跑 Spark Connector 的例子
##### 选项 1(推荐):通过 PySpark
- 进入 PySpark Shell
```bash
~/.nebula-up/nebula-pyspark.sh
```
- 调用 Nebula Spark Reader
```python
# call Nebula Spark Connector Reader
df = spark.read.format(
"com.vesoft.nebula.connector.NebulaDataSource").option(
"type", "vertex").option(
"spaceName", "basketballplayer").option(
"label", "player").option(
"returnCols", "name,age").option(
"metaAddress", "metad0:9559").option(
"partitionNumber", 1).load()
# show the dataframe with limit of 2
df.show(n=2)
```
- 返回结果例子
```python
____ __
/ __/__ ___ _____/ /__
_\ \/ _ \/ _ `/ __/ '_/
/__ / .__/\_,_/_/ /_/\_\ version 2.4.5
/_/
Using Python version 2.7.16 (default, Jan 14 2020 07:22:06)
SparkSession available as 'spark'.
>>> df = spark.read.format(
... "com.vesoft.nebula.connector.NebulaDataSource").option(
... "type", "vertex").option(
... "spaceName", "basketballplayer").option(
... "label", "player").option(
... "returnCols", "name,age").option(
... "metaAddress", "metad0:9559").option(
... "partitionNumber", 1).load()
>>> df.show(n=2)
+---------+--------------+---+
|_vertexId| name|age|
+---------+--------------+---+
|player105| Danny Green| 31|
|player109|Tiago Splitter| 34|
+---------+--------------+---+
only showing top 2 rows
```
##### 选项 2:编译、提交示例 JAR 包
- 先克隆 Spark Connector 和它示例代码的代码仓库,然后编译:
> 注意,我们使用了 master 分支,因为当下 master 分支是兼容 3.x 的,一定要保证 spark connector 和数据库内核版本是匹配的,版本对应关系参考代码仓库的 `README.md` 。
```bash
cd ~/.nebula-up/nebula-up/spark
git clone https://github.com/vesoft-inc/nebula-spark-connector.git
docker exec -it spark_master_1 bash
cd /root/nebula-spark-connector
```
- 替换示例项目的代码
```bash
echo > example/src/main/scala/com/vesoft/nebula/examples/connector/NebulaSparkReaderExample.scala
vi example/src/main/scala/com/vesoft/nebula/examples/connector/NebulaSparkReaderExample.scala
```
- 把如下的代码粘贴进去,这里边我们对前边加载的图: `basketballplayer` 上做了顶点和边的读操作:分别调用 `readVertex` 和 `readEdges`。
```scala
package com.vesoft.nebula.examples.connector
import com.facebook.thrift.protocol.TCompactProtocol
import com.vesoft.nebula.connector.connector.NebulaDataFrameReader
import com.vesoft.nebula.connector.{NebulaConnectionConfig, ReadNebulaConfig}
import org.apache.spark.SparkConf
import org.apache.spark.sql.SparkSession
import org.slf4j.LoggerFactory
object NebulaSparkReaderExample {
private val LOG = LoggerFactory.getLogger(this.getClass)
def main(args: Array[String]): Unit = {
val sparkConf = new SparkConf
sparkConf
.set("spark.serializer", "org.apache.spark.serializer.KryoSerializer")
.registerKryoClasses(Array[Class[_]](classOf[TCompactProtocol]))
val spark = SparkSession
.builder()
.master("local")
.config(sparkConf)
.getOrCreate()
readVertex(spark)
readEdges(spark)
spark.close()
sys.exit()
}
def readVertex(spark: SparkSession): Unit = {
LOG.info("start to read nebula vertices")
val config =
NebulaConnectionConfig
.builder()
.withMetaAddress("metad0:9559,metad1:9559,metad2:9559")
.withConenctionRetry(2)
.build()
val nebulaReadVertexConfig: ReadNebulaConfig = ReadNebulaConfig
.builder()
.withSpace("basketballplayer")
.withLabel("player")
.withNoColumn(false)
.withReturnCols(List("name", "age"))
.withLimit(10)
.withPartitionNum(10)
.build()
val vertex = spark.read.nebula(config, nebulaReadVertexConfig).loadVerticesToDF()
vertex.printSchema()
vertex.show(20)
println("vertex count: " + vertex.count())
}
def readEdges(spark: SparkSession): Unit = {
LOG.info("start to read nebula edges")
val config =
NebulaConnectionConfig
.builder()
.withMetaAddress("metad0:9559,metad1:9559,metad2:9559")
.withTimeout(6000)
.withConenctionRetry(2)
.build()
val nebulaReadEdgeConfig: ReadNebulaConfig = ReadNebulaConfig
.builder()
.withSpace("basketballplayer")
.withLabel("follow")
.withNoColumn(false)
.withReturnCols(List("degree"))
.withLimit(10)
.withPartitionNum(10)
.build()
val edge = spark.read.nebula(config, nebulaReadEdgeConfig).loadEdgesToDF()
edge.printSchema()
edge.show(20)
println("edge count: " + edge.count())
}
}
```
- 然后打包成 JAR 包
```bash
/usr/lib/mvn/bin/mvn install -Dgpg.skip -Dmaven.javadoc.skip=true -Dmaven.test.skip=true
```
- 最后,把它提交到 Spark 里执行:
```bash
cd example
/spark/bin/spark-submit --master "local" \
--class com.vesoft.nebula.examples.connector.NebulaSparkReaderExample \
--driver-memory 4g target/example-3.0-SNAPSHOT.jar
# 退出 spark 容器
exit
```
- 成功之后,我们会得到返回结果:
```
22/04/19 07:29:34 INFO DAGScheduler: Job 1 finished: show at NebulaSparkReaderExample.scala:57, took 0.199310 s
+---------+------------------+---+
|_vertexId| name|age|
+---------+------------------+---+
|player105| Danny Green| 31|
|player109| Tiago Splitter| 34|
|player111| David West| 38|
|player118| Russell Westbrook| 30|
|player143|Kristaps Porzingis| 23|
|player114| Tracy McGrady| 39|
|player150| Luka Doncic| 20|
|player103| Rudy Gay| 32|
|player113| Dejounte Murray| 29|
|player121| Chris Paul| 33|
|player128| Carmelo Anthony| 34|
|player130| Joel Embiid| 25|
|player136| Steve Nash| 45|
|player108| Boris Diaw| 36|
|player122| DeAndre Jordan| 30|
|player123| Ricky Rubio| 28|
|player139| Marc Gasol| 34|
|player142| Klay Thompson| 29|
|player145| JaVale McGee| 31|
|player102| LaMarcus Aldridge| 33|
+---------+------------------+---+
only showing top 20 rows
22/04/19 07:29:36 INFO DAGScheduler: Job 4 finished: show at NebulaSparkReaderExample.scala:82, took 0.135543 s
+---------+---------+-----+------+
| _srcId| _dstId|_rank|degree|
+---------+---------+-----+------+
|player105|player100| 0| 70|
|player105|player104| 0| 83|
|player105|player116| 0| 80|
|player109|player100| 0| 80|
|player109|player125| 0| 90|
|player118|player120| 0| 90|
|player118|player131| 0| 90|
|player143|player150| 0| 90|
|player114|player103| 0| 90|
|player114|player115| 0| 90|
|player114|player140| 0| 90|
|player150|player120| 0| 80|
|player150|player137| 0| 90|
|player150|player143| 0| 90|
|player103|player102| 0| 70|
|player113|player100| 0| 99|
|player113|player101| 0| 99|
|player113|player104| 0| 99|
|player113|player105| 0| 99|
|player113|player106| 0| 99|
+---------+---------+-----+------+
only showing top 20 rows
```
事实上,在这个代码仓库下还有更多的例子,特别是 [GraphX](https://spark.apache.org/docs/latest/graphx-programming-guide.html) 的例子,你可以尝试自己去探索这部分。
> 请注意,在 GraphX 假定顶点 ID 是数字类型的,因此对于字符串类型的顶点 ID 情况,需要进行实时转换,请参考 [Nebula Algorithom 中的例子](https://github.com/vesoft-inc/nebula-algorithm/blob/a82d7092d928a2f3abc45a727c24afb888ff8e4f/example/src/main/scala/com/vesoft/nebula/algorithm/PageRankExample.scala#L31),了解如何绕过这一问题。
## Nebula Exchange
- 代码:https://github.com/vesoft-inc/nebula-exchange/
- 文档:https://docs.nebula-graph.com.cn/3.1.0/nebula-exchange/about-exchange/ex-ug-what-is-exchange/
- JAR 包:https://github.com/vesoft-inc/nebula-exchange/releases
- 配置例子: [exchange-common/src/test/resources/application.conf](https://github.com/vesoft-inc/nebula-exchange/blob/master/exchange-common/src/test/resources/application.conf)
Nebula Exchange 是一个 Spark Lib,也是一个可以直接提交执行的 Spark 应用,它被用来从多个数据源读取数据写入 Nebula Graph 或者输出 [Nebula Graph SST 文件](https://docs.nebula-graph.com.cn/3.1.0/nebula-exchange/use-exchange/ex-ug-import-from-sst/#step_5_import_the_sst_file)。
通过 spark-submit 的方式使用 Nebula Exchange 的方法很直接:
- 首先创建配置文件,让 Exchange 知道应该如何获取和写入数据
- 然后用指定的配置文件调用 Exchange 包
现在,让我们用上一章中创建的相同环境做一个实际测试。
### 一键试玩 Exchange
#### 先跑起来看看吧
> 请参考前边[拉起环境](#拉起环境)这一章节,先一键装好环境。
一键执行:
```
~/.nebula-up/nebula-exchange-example.sh
```
恭喜你,已经第一次执行成功一个 Exchange 的数据导入任务啦!
#### 再看看一些细节
这个例子里,我们实际上是用 Exchange 从 CSV 文件这一其中支持的数据源中读取数据写入 Nebula Graph 集群的。这个 CSV 文件中第一列是顶点 ID,第二和第三列是 "姓名 "和 "年龄 "的属性:
```bash
player800,"Foo Bar",23
player801,"Another Name",21
```
- 咱们可以进到 Spark 环境里看看
```bash
docker exec -it spark_master_1 bash
cd /root
```
- 可以看到我们提交 Exchange 任务时候指定的配置文件 `exchange.conf` 它是一个 `HOCON` 格式的文件:
- 在 `.nebula` 中描述了 Nebula Graph 集群的相关信息
- 在 `.tags` 中描述了如何将必填字段对应到我们的数据源(这里是 CSV 文件)等有关 Vertecies 的信息。
```HOCON
{
# Spark relation config
spark: {
app: {
name: Nebula Exchange
}
master:local
driver: {
cores: 1
maxResultSize: 1G
}
executor: {
memory: 1G
}
cores:{
max: 16
}
}
# Nebula Graph relation config
nebula: {
address:{
graph:["graphd:9669"]
meta:["metad0:9559", "metad1:9559", "metad2:9559"]
}
user: root
pswd: nebula
space: basketballplayer
# parameters for SST import, not required
path:{
local:"/tmp"
remote:"/sst"
hdfs.namenode: "hdfs://localhost:9000"
}
# nebula client connection parameters
connection {
# socket connect & execute timeout, unit: millisecond
timeout: 30000
}
error: {
# max number of failures, if the number of failures is bigger than max, then exit the application.
max: 32
# failed import job will be recorded in output path
output: /tmp/errors
}
# use google's RateLimiter to limit the requests send to NebulaGraph
rate: {
# the stable throughput of RateLimiter
limit: 1024
# Acquires a permit from RateLimiter, unit: MILLISECONDS
# if it can't be obtained within the specified timeout, then give up the request.
timeout: 1000
}
}
# Processing tags
# There are tag config examples for different dataSources.
tags: [
# HDFS csv
# Import mode is client, just change type.sink to sst if you want to use client import mode.
{
name: player
type: {
source: csv
sink: client
}
path: "file:///root/player.csv"
# if your csv file has no header, then use _c0,_c1,_c2,.. to indicate fields
fields: [_c1, _c2]
nebula.fields: [name, age]
vertex: {
field:_c0
}
separator: ","
header: false
batch: 256
partition: 32
}
]
}
```
- 我们应该能看到那个 CSV 数据源和这个配置文件都在同一个目录下了:
```bash
bash-5.0# ls -l
total 24
drwxrwxr-x 2 1000 1000 4096 Jun 1 04:26 download
-rw-rw-r-- 1 1000 1000 1908 Jun 1 04:23 exchange.conf
-rw-rw-r-- 1 1000 1000 2593 Jun 1 04:23 hadoop.env
drwxrwxr-x 7 1000 1000 4096 Jun 6 03:27 nebula-spark-connector
-rw-rw-r-- 1 1000 1000 51 Jun 1 04:23 player.csv
```
- 然后,实际上我们可以手动再次提交一下这个 Exchange 任务
```bash
/spark/bin/spark-submit --master local \
--class com.vesoft.nebula.exchange.Exchange download/nebula-exchange.jar \
-c exchange.conf
```
- 部分返回结果
```log
22/06/06 03:56:26 INFO Exchange$: Processing Tag player
22/06/06 03:56:26 INFO Exchange$: field keys: _c1, _c2
22/06/06 03:56:26 INFO Exchange$: nebula keys: name, age
22/06/06 03:56:26 INFO Exchange$: Loading CSV files from file:///root/player.csv
...
22/06/06 03:56:41 INFO Exchange$: import for tag player cost time: 3.35 s
22/06/06 03:56:41 INFO Exchange$: Client-Import: batchSuccess.player: 2
22/06/06 03:56:41 INFO Exchange$: Client-Import: batchFailure.player: 0
...
```
更多的数据源,请参考文档和配置的例子。
> 关于 Exchange 输出 SST 文件的实践,你可以参考文档和我的旧文 [Nebula Exchange SST 2.x实践指南](https://www.siwei.io/nebula-exchange-sst-2.x/)。
## Nebula Algorithm
- 代码仓库: https://github.com/vesoft-inc/nebula-algorithm
- 文档:https://docs.nebula-graph.com.cn/3.1.0/nebula-algorithm/
- JAR 包:https://repo1.maven.org/maven2/com/vesoft/nebula-algorithm/
- 示例代码:[example/src/main/scala/com/vesoft/nebula/algorithm](example/src/main/scala/com/vesoft/nebula/algorithm)
### 通过 spark-submit 提交任务
> 我在[这个代码仓库](https://github.com/wey-gu/nebula-livejournal)里给出了例子,今天我们借助 Nebula-UP 可以更方便体验它。
>
> 参考前边[拉起环境](#拉起环境)这一章节,先一键装好环境。
在如上通过 Nebula-UP 的 Spark 模式部署了需要的依赖之后
- 加载 [LiveJournal](https://snap.stanford.edu/data/soc-LiveJournal1.html) 数据集
```bash
~/.nebula-up/load-LiveJournal-dataset.sh
```
- 在 LiveJournal 数据集上执行一个 PageRank 算法,结果输出到 CSV 文件中
```bash
~/.nebula-up/nebula-algo-pagerank-example.sh
```
- 检查输出结果:
```bash
docker exec -it spark_master_1 bash
head /output/part*000.csv
_id,pagerank
637100,0.9268620883822242
108150,1.1855749056722755
957460,0.923720299211093
257320,0.9967932799358413
```
#### 配置文件解读
完整文件在[这里](https://github.com/wey-gu/nebula-livejournal/blob/main/nebula-algorithm/algo-pagerank.conf),这里,我们介绍一下主要的字段:
- `.data` 指定了源是 Nebula,表示从集群获取图数据,输出`sink`是 `csv`,表示写到本地文件里。
```hocon
data: {
# data source. optional of nebula,csv,json
source: nebula
# data sink, means the algorithm result will be write into this sink. optional of nebula,csv,text
sink: csv
# if your algorithm needs weight
hasWeight: false
}
```
- `.nebula.read` 规定了读 Nebula Graph 集群的对应关系,这里是读取所有 edge type: `follow` 的边数据为一整张图
```hocon
nebula: {
# algo's data source from Nebula. If data.source is nebula, then this nebula.read config can be valid.
read: {
# Nebula metad server address, multiple addresses are split by English comma
metaAddress: "metad0:9559"
# Nebula space
space: livejournal
# Nebula edge types, multiple labels means that data from multiple edges will union together
labels: ["follow"]
# Nebula edge property name for each edge type, this property will be as weight col for algorithm.
# Make sure the weightCols are corresponding to labels.
weightCols: []
}
```
- `.algorithm` 里配置了我们要调用的算法,和算法的配置
```hocon
algorithm: {
executeAlgo: pagerank
# PageRank parameter
pagerank: {
maxIter: 10
resetProb: 0.15 # default 0.15
}
```
### 作为一个库在 Spark 中调用 Nebula Algoritm
请注意另一方面,我们可以将 Nebula Algoritm 作为一个库调用,它的好处在于:
- 对算法的输出格式有更多的控制/定制功能
- 可以对非数字 ID 的情况进行转换,见[这里](https://github.com/vesoft-inc/nebula-algorithm/blob/a82d7092d928a2f3abc45a727c24afb888ff8e4f/example/src/main/scala/com/vesoft/nebula/algorithm/PageRankExample.scala#L48)
这里我先不给出例子了,如果大家感兴趣可以给 Nebula-UP 提需求,我也会增加相应的例子。
 Sign in with Wallet


