# 오픈마켓
### 질문 리스트
# PR
# 오픈마켓2 [STEP 1] Zhilly, Dragon
안녕하세요, 하비(@havilog)🙇🙇♀️!
[zhilly🔥](https://github.com/zhilly11), [Dragon🐉](https://github.com/FlameYG)입니다!
이번 스텝에서는 새로운 개념도 많고 디테일적으로 수정해줘야하는 부분들도 많아서 시간이 오래 걸렸네요...
처음 꾸며보는 기능들이 많아서 코드가 조금 뒤죽박죽 같은 느낌도 있어서 코드를 보기 어려우실 수 있지만! 리뷰 잘부탁드리겠습니다😁
마구마구 코멘트 달아주세요 📚
# 📍고민했던 부분
## NetworkManager의 기능 분리를 어떻게 할지 고민했었습니다.
: 메서드에서 NetworkManger를 사용할 때마다 한 번만 할당해주기 때문에 사용 용도에 따라 프로토콜로 기능분리를 해주었습니다.

## View 재활용 고민 BaseProductView를 부모 클래스로 구현
: STEP-1 문서를 봤을때 상품 수정화면과 등록화면이 거의 같은 화면처럼 보였습니다.
하지만 요소들이 같아보여도 다르게 동작하도록 구현을 해야했어서, 공통되는 뷰를 `BaseProductView`로 만들어 부모 뷰 클래스로 구현하고
등록하는 화면, 수정하는 화면에서 `BaseProductView`에서 파생된 자식 뷰로 화면을 구성해서 View의 재사용성을 높여봤습니다.
## 키보드가 올라올 때 어떻게 처리할지
: 키보드가 올라올 때 키보드가 올라오는 높이만큼 뷰의 일정부분을 줄여 상품정보가 더 많이 보이게 구현해줘야 했습니다.
그래서 전체뷰에서 키보드가 올라올 때 키보드의 높이을 빼주고 뷰를 구성하도록 구현하였습니다.
그 과정에서 줄일 수 있는 부분이 상품 이미지뿐이라고 생각하여, 상품이미지가 살짝 줄어들고 상품설명을 적는 텍스트뷰를 조금 더 확보할 수 있었습니다.
추가로, 키보드 타입에 따라 높이가 다른 부분도 해결하기 위해 아래와 같이 코드를 작성하여 해결하였습니다.
```swift
private var keyHeight: CGFloat = 0
private func checkKeyboard() {
NotificationCenter.default.addObserver(self,
selector: #selector(keyboardWillShow(_:)),
name: UIResponder.keyboardWillShowNotification,
object: nil)
NotificationCenter.default.addObserver(self,
selector: #selector(keyboardWillHide(_:)),
name: UIResponder.keyboardWillHideNotification,
object: nil)
}
@objc
private func keyboardWillShow(_ sender: Notification) {
guard let senderUserInfo = sender.userInfo else { return }
let userInfo: NSDictionary = senderUserInfo as NSDictionary
if let keyboardFrame: NSValue = userInfo.value(forKey: UIResponder.keyboardFrameEndUserInfoKey) as? NSValue {
let keyboardRectangle = keyboardFrame.cgRectValue
var keyboardHeight = keyboardRectangle.height
if keyHeight == 0 {
keyHeight = keyboardHeight
view.frame.size.height -= keyboardHeight
} else if keyHeight > keyboardHeight {
keyboardHeight = keyboardHeight - keyHeight
keyHeight = keyHeight + keyboardHeight
view.frame.size.height -= keyboardHeight
}
}
}
@objc
private func keyboardWillHide(_ sender: Notification) {
view.frame.size.height += keyHeight
keyHeight = 0
}
```
## 뷰컨에 따로만든 뷰 파일을 추가하는방법
: UIView는 따로 xcode에서 자동으로 xib파일을 만들어주지 않아 해멨었습니다..
FIle's Owner와 identifier를 활용하는 방법으로 Viewcontroller에 추가할 수 있었습니다..!
## 상품등록 화면에서 사진을 컬렉션뷰를 사용할지 스크롤뷰를 사용할지 고민하였습니다.
: 스크롤뷰와는 다르게 콜렉션뷰에서는 아이템을 보다 편리하게 관리할 수 있다는 이점이 있다고 생각하여 콜렉션뷰를 사용하여 사진을 추가하는 방향으로 구현하였습니다.
# 📍조언을 얻고 싶은 부분
## ProductEditViewController과 ProductRegisterViewController에서 중복되는 기능을 어떻게 처리해야 좋을지 조언 부탁드립니다...
: 두개의 VC에서 기능이 많이 중복되어 코드도 많이 겹치는 부분이 많습니다.
이 부분을 어떻게 해결해야할지 고민 해보다가 중복되는 기능을 Protocol+Extension으로 빼줘야하나 했지만... 이것도 좋은 접근은 아니라고 판단되어
일단 하비에게 조언받아 한번 더 고민해보고 코드 리팩토링에 들어가고자 하여 조언을 구하게 되었습니다!
## 이미지 리사이징
: ImagePicker에서 이미지를 가져와 화면에 올릴 때 원본 이미지로 그대로 UIImageView에 올리게 되면 앱이 많은 메모리를 쓴다는 것을 확인했습니다. 이미지를 많이 쓰게 되면 종료될 수도 있다고 생각해 `UIGraphicsImageRenderer`를 활용해 이미지를 리사이징해서 메모리 사용을 줄여보았습니다! 일단은 이미지 피커에서 사용하는 이미지의 크기만 resize방식을 통해서 줄여봤는데 괜찮은 방법일지 궁금합니다!
(이미지 피커를 활용할 때 이미지를 리사이징하기 때문에 업로드를 위한 준비과정을 생략할 수 있었습니다!)
(이미지를 크게 보여줘야할 때에는 리사이징을 잘 조절해야할 것 같지만 실제로 작은 이미지로 보여주기 때문에 작은 사이즈로 리사이징 했습니다.)
(찾아보던 와중에 화면 해상도에 맞게 x1, x2, x3으로 조절하는 방법도 찾았지만 몰라서 적용은 하지 못했습니다..)
## 이미지 용량을 제한하는 방법
: 요구사항 중 이미지 용량을 300KB로 제한해야한다고 하여, 두가지 방법을 생각해보았습니다.
1. Quality를 0.9로 낮추는 반복문을 실행시켜 300KB가 되었을 때 탈출하고 반환된 이미지를 사용하는 방법
2. ImageSize를 일정하게 낮게 잡아줌으로써 300KB 사이즈가 되도록 하는 방법
반복문을 사용하는 것보다 한번에 용량를 맞춰줄 수 있도록 하는 것이 좋은 접근이라고 생각하여 2번 방법으로 용량을 맞춰주었습니다.
이렇게 용량을 제한을 해도 되는지 의문점이 생겨서 조언 여쭤보게 되었습니다~!
## Network-Request할 때 아래 첨부문구처럼 발생하는 `timeStamp`에러
: MainVC에서 스크롤해줄때 아래 스크린샷과 같은 에러가 콘솔에 찍힙니다... 혹시 해결방법 아실까해서 여쭤봅니다!

# 🏬 오픈마켓 🏬
## 🗒︎ 목차
1. [소개](#-소개)
2. [개발환경 및 라이브러리](#-개발환경-및-라이브러리)
3. [팀원](#-팀원)
4. [타임라인](#-타임라인)
5. [파일구조](#-파일구조)
6. [UML](#-UML)
7. [실행화면](#-실행-화면)
8. [트러블 슈팅 및 고민](#-트러블-슈팅-및-고민)
9. [참고링크](#-참고-링크)
<br>
## 👋 소개
**서버와 통신이 가능한 오픈마켓 서비스 프로젝트 입니다**
- 프로젝트 기간 : 22.11.14 ~ 22.12.09 (4주)
**[다뤄본 기술]**
- URLSession (Get, Post, Patch, Delete)
- multipart/form-data의 구조 파악
- URLSession을 활용한 multipart/form-data 요청 전송
- UICollectionView 구현 및 FlowLayout으로 셀의 크기 다루기
- JSON(Decode, Encode) 활용
- UIImagePicker를 이용하여 사진 가져오는 방법 구현
- ActivityIndicator을 활용하여 로딩 중인 상태 표시
- Keyboard 타입 변경 및 높이에 따른 뷰 크기 조절
- Segment Control를 통해 CollectionViewCell의 2가지 레이아웃을 구현
- TextView & TextField의 PlaceHolder와 글자수 제한 기능을 구현
- CustomCell을 Xib 활용하여 관리
- 상속 혹은 프로토콜 기본구현을 통해 (수정/등록 과정의) 공통기능 구현
- Image를 서버에 업로드 하기전에 용량을 제한하는 기능 구현
- UI요소의 CellIdentifier을 간단히 가져오는 기능을 Extention으로 기능 추가
- Mock을 통해 URLSessionTest를 구현
<br>
## 💻 개발환경 및 라이브러리
[]()
[]()
<br>
## 🧑 팀원
|Zhilly|Dragon|
|:---:|:---:|
|<img src=https://user-images.githubusercontent.com/99257965/190572502-b7a41ed7-3c1b-44af-8b03-77d7e49d4705.png width=200>|<img src = "https://i.imgur.com/LI25l3O.png" width=200 height=200>|
<br>
## 🕖 타임라인
### STEP 1 - [기간:11.14 ~ 11.18]
- STEP 1-1
- 2022.11.14
- JSON파일을 디코딩하여 저장할 모델 타입들 구현
- JSONDecode Unit Test 작성
- 폴더 구조화 및 리팩터링
- STEP 1-2
- 2022.11.15
- 서버와 통신을 하는 NetworkManager 타입 구현
- NetworkError 타입 구현
- 서버에서 보내는 Response에 따라 다르게 동작하는 로직 구현
- 테스트 모델과 서버에서 받은 모델이 다른 이유로 모델 타입 수정
- STEP 1-3
- 2022.11.16
- NetworkManager타입이 외부요인과 관계없이 테스트 할 수 있도록 Mock 타입구현
- Mock 타입을 이용해 NetworkManager Unit Test 작성
- 전반적인 코드 리팩토링 및 그룹화, 은닉화 작업
### STEP 2 - [기간: 11.21 ~ 11.25]
- STEP 2-1
- 2022.11.22
- CollectionView, ListCollectionViewCell 구현
- MainViewController에서 CollectionView 관련 기능 구현
- UIImageView에 이미지를 비동기적으로 로딩할 수 있는 기능 구현.
- String에 attribute를 커스텀하게 설정하는 기능 구현
- STEP 2-2
- 2022.11.24
- GridCollectionViewCell, SegmentedControll 구현
- STEP 2-3
- 2022.11.24
- ListCollectionViewCell, GridCollectionViewCell 오토레이아웃 적용
- Cell 디자인 요소 추가 (border line, bottom line)
- NumberFormatter 적용
- 전반적인 코드 리팩터링
### STEP 3 - [기간: 11.28 ~ 12.09]
- STEP 3-1
- 2022.12.01
- NetworkManager Post &. Patch 구현
- 2022.12.02
- NetworkManager Delete 구현
- STEP 3-2
- 2022.12.02
- BaseProductView 구현
- ProdudctRegisterViewController(상품 등록 화면) 구현
- 2022.12.05
- ImagePicker 구현
- 키보드 관련 추가기능 구현
- 2022.12.07
- 상품 등록 화면 추가 구현 및 리팩터링
- ProdudctEditViewController(상품 수정 화면) 구현
- 전반적인 코드 리팩터링
<br>
## 💾 파일구조
### tree
```bash
.
├── OpenMarket
│ ├── OpenMarket
│ │ ├── Info.plist
│ │ ├── Resources
│ │ │ └── Assets.xcassets
│ │ └── Sources
│ │ ├── App
│ │ │ ├── AppDelegate.swift
│ │ │ └── SceneDelegate.swift
│ │ ├── Controller
│ │ │ ├── MainViewController.swift
│ │ │ ├── ProductEditViewController.swift
│ │ │ └── ProductRegisterViewController.swift
│ │ ├── Enum
│ │ │ └── NameSpace.swift
│ │ ├── Error
│ │ │ ├── JSONDecodeError.swift
│ │ │ ├── NetworkError.swift
│ │ │ └── ProductPostRequirementError.swift
│ │ ├── Extension
│ │ │ ├── Array+Extension.swift
│ │ │ ├── CellIdentifierInfo+Extension.swift
│ │ │ ├── Data+Extension.swift
│ │ │ ├── Double+Extension.swift
│ │ │ ├── JSONDecode+Extension.swift
│ │ │ ├── String+Extension.swift
│ │ │ └── UIImage(View)+Extension.swift
│ │ ├── Model
│ │ │ └── Product
│ │ │ ├── Currency.swift
│ │ │ ├── Image.swift
│ │ │ ├── ParamsProduct.swift
│ │ │ ├── Product.swift
│ │ │ ├── ProductList.swift
│ │ │ └── Vendor.swift
│ │ ├── Network
│ │ │ ├── HttpMethod.swift
│ │ │ ├── NetworkDeletable.swift
│ │ │ ├── NetworkManager.swift
│ │ │ ├── NetworkPatchable.swift
│ │ │ ├── NetworkPostable.swift
│ │ │ ├── NetworkRequestable.swift
│ │ │ └── URL
│ │ │ ├── URLManager.swift
│ │ │ ├── URLSession+Extension.swift
│ │ │ └── URLSessionProtocol.swift
│ │ ├── Protocol
│ │ │ └── CellIdentifierInfo.swift
│ │ └── View
│ │ ├── Base.lproj
│ │ │ └── Main.storyboard
│ │ ├── BaseProductView.swift
│ │ ├── BaseProductView.xib
│ │ ├── GridCollectionViewCell.swift
│ │ ├── GridCollectionViewCell.xib
│ │ ├── ImageCollectionViewCell.swift
│ │ ├── ImageCollectionViewCell.xib
│ │ ├── ListCollectionViewCell.swift
│ │ ├── ListCollectionViewCell.xib
│ │ ├── ProductEditView.swift
│ │ └── ProductRegisterView.swift
│ ├── OpenMarket.xcodeproj
│ ├── JSONDecodeTests
│ │ └── JSONDecodeTests.swift
│ └── MockURLSessionTests
│ ├── Mock
│ │ ├── MockData.swift
│ │ ├── MockURLSession.swift
│ │ └── MockURLSessionDataTask.swift
│ └── MockURLSessionTests.swift
└── README.md
```
<br>
## 📊 UML
<br>
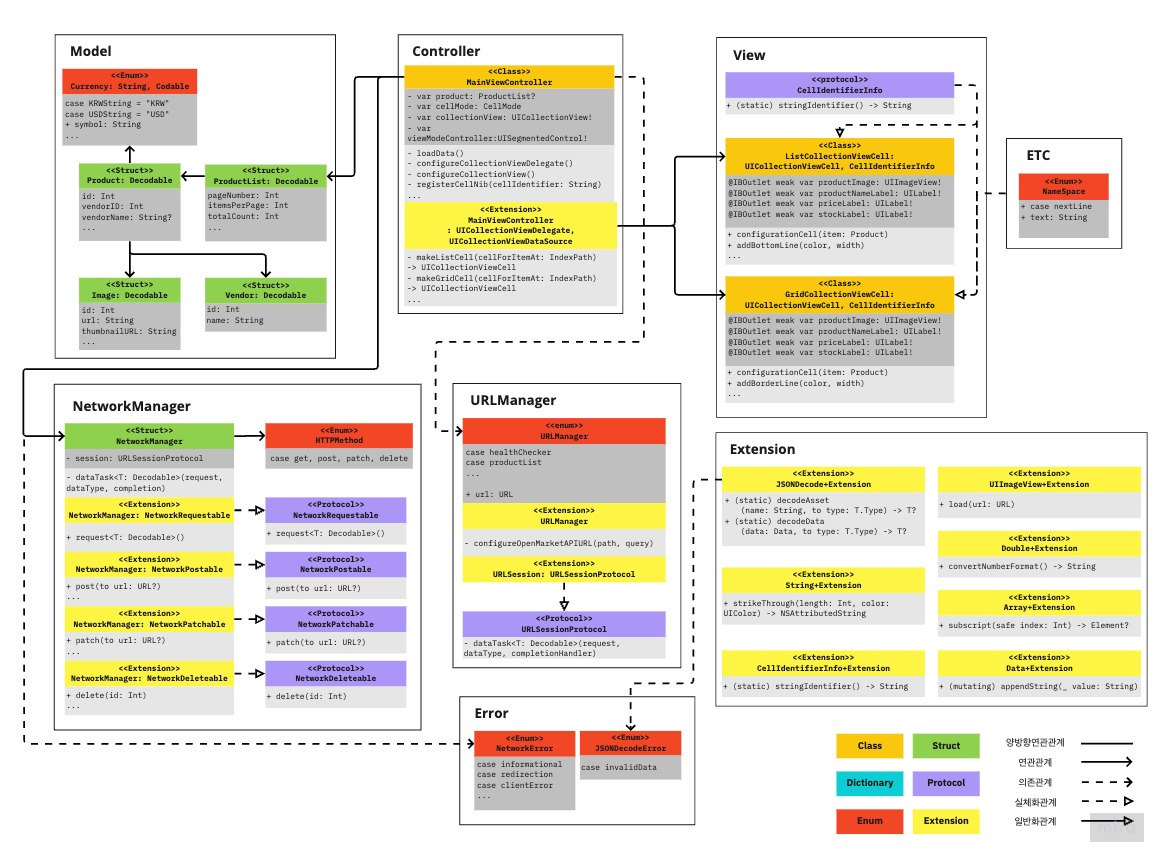
## 💻 실행 화면
- 상품 목록 화면
|ListType|GridType|
|:-:|:-:|
| 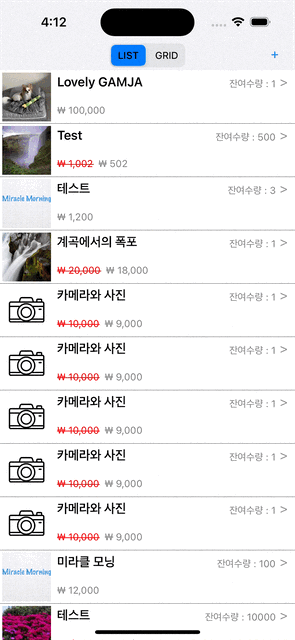 |  |
- 상품 등록화면
|정상적인 등록|요구사항을 만족하지 못했을 때 알림표시|
|:-:|:-:|
| | |
- 상품 수정화면
|상품 수정하기||
|:-:|:-:|
| | |
<br>
## 🎯 트러블 슈팅 및 고민
> **서버 데이터타입과 `products.json`파일의 데이터타입이 다름**
<details>
<summary>자세히보기</summary>
서버 데이터 타입으로 `Testproducts.json`파일을 만들어 하나의 데이터타입으로 UnitTest를 수행했습니다
</details><br>
> **브랜치 전략**
<details>
<summary>자세히보기</summary>
STEP-1이 3단계로 나눠져 있어서 브랜치를 어떻게 만들지 고민했었습니다. main에서 각각의 브랜치를 따로따로 만들어 주는 것보다, STEP-1브랜치를 생성하고 여기서 브랜치를 새로 만들어 주는 방식으로 진행했습니다. 만약 STEP-1-1이 끝난다면 STEP-1으로 Merge 시키는 방식으로 브랜치 전략을 세웠습니다.
</details><br>
> **파일구조 정리**
<details>
<summary>자세히보기</summary>
프로젝트를 진행하며 코드를 작성하고 정리하는 과정에서 어떻게 파일을 폴더로 정리할지는 아직 고민되는 부분이였습니다.
일단 MVC안에 최대한 구분지어서 넣었었는데 MVC는 presentation layer단에서의 패턴이기에, 네트워크나 비즈니스로직, extension등이 Model이 들어있는건 어색하게 느껴질 수 있어서 MVC외의 폴더로 구성을 해주는게 좋은 접근이라고 생각했습니다.
</details><br>
> **네트워크매니저의 역할**
<details>
<summary>자세히보기</summary>
URL주소까지 NetworkManager에서 관리할 경우 100개의 API가 있을 때, 100개의 함수가 생길 수 있기에, URLManager를 생성하여 URL관리하도록 변경하였습니다
또한, 일반적으로 URL에서 가져온 데이터를 Decode까지 해주기에 코드를 추가하였습니다
아직 네트워크를 어떻게 설계할지 몰라서 어떤 API 통신을 하던 재사용과 확장에 용이할 수 있도록 해야할지 그려지는 그림이 없기 때문에, 잘 설계되어있는 NetworkManager를 보는 시간이 필요할 것 같습니다
</details><br>
> **Struct VS Class**
<details>
<summary>자세히보기</summary>
이 내용은 자주 고민하는 부분인데도 이번 프로젝트에서 아직 깊이가 많이 부족한 개념으로 확인했습니다
class를 사용하면 프로토콜을 준수함으로써 해당 객체가 어떤 역할을 하는지 명시해주는 장점이 있기에 테스터블한 코드의 작성도 가능합니다.
재사용성과 성능상의 이점에 대한 측면들을 알아보니 Struct가 빠르고, final Class가 그 다음, 마지막으로 Class가 가장 느린 속도를 가지고 있다는 것을 알 수 있었습니다.
그외, struct를 사용하면 왜 상속받을것이 없는지 고민해봐야하는데 아직은 명확한 개념이 없고, 추가로 가지고 있는 property들이 자주 바뀔 여지가 있는지, 그에 의해 data race등이 발생할 수 있는지 등 면접에서 자주 물어보는 단골질문이기에 추가 스터디 필요할 것 같습니다....
</details><br>
> **Currency Symbol**
<details>
<summary>자세히보기</summary>
화폐기호를 작성할때 일일이 찾아보는 것이 아닌 애플에서 제공해주는 기능을 활요하는 법을 알았습니다.
이번 오픈마켓 STEP-1에서 사용하였고 아래 코드와 같이 작성하였습니다.
```swift
import UIKit
enum Currency: String, Codable {
case KRWString = "KRW"
case USDString = "USD"
case JPYString = "JPY"
case HKDString = "HKD"
var symbol: String {
let locale = NSLocale(localeIdentifier: self.rawValue)
if let symbol = locale.displayName(forKey: .currencySymbol, value: self.rawValue) {
return symbol
}
return String()
}
}
```
</details><br>
> **오토레이아웃 코드vs스토리보드**
<details>
<summary>자세히보기</summary>
- 전반적인 UI구성을 어떻게 할지 고민하다가 CollectionViewCell에서 코드가 아닌 xib파일을 활용할 수 있다는 것을 알게되어, 처음 접해보는 CollectionView에서 아직 낯선 코드보단 스토리보드를 통해서 작성해보고자 했습니다.
- UI를 스토리보드로 작성했을 때 장점은 UI구성을 한눈에 확인할 수 있고 View요소에 어떤 속성값을 설정했는지 확인하기 쉬운 장점도 있습니다.
단점은 협업시 스토리보드의 충돌 혹은 이슈가 있다고 합니다만 장점이 더 크다고 생각되어 애플리케이션 내에 뷰가 많지 않아서 스토리보드로 작성했습니다.
</details><br>
> **Protocol 활용에 관한 고민**
<details>
<summary>자세히보기</summary>
Protocol을 사용하면 객체가 하는 역할을 명시해주는 역할을 해준다고 생각했습니다.
코드에서 보면 `NetworkManager`가 `NetworkRequestable`을 채택해서 네트워크의 request 역할을 한다는 것을 코드로 작성해 줬습니다. 또한 이렇게 코드를 작성하면 Unit Test 등에서도 이점을 가져올 수 있습니다.
</details><br>
> **AttributedText 구현 및 초기화**
<details>
<summary>자세히보기</summary>
- String타입에 확장으로 `strikeThrough(length: Int, color: UIColor)` 메서드를 구현했습니다. 처음엔 취소선 구현해주는 메서드, text의 색상을 변경해주는 메서드 따로 구현을 하려고 했습니다만, 따로 해줄 경우에 `attribute`를 두 번 덮어 씌우는 형식이라 하나의 메서드로 한 곳에서 추가를 해주는 방식으로 구현했습니다.
- `CollectionViewCell`에 넣어준 `Label.Text`에 `String-Extension`으로 `AttributedText`를 적용해주어 `Cell`이 `Dequeue`되는 과정에서 초기화가 필요했습니다
그 후 초기화를 위해 `prepareForReuse()`메서드에서 text값과 `AttributedText`를 초기화하는 과정에서 text를 먼저 초기화해준 후 `AttributedText`를 초기화를 해주니, 초기화가 정상적으로 되지않는 문제가 발생하였고, 확인결과 `AttributedText`를 초기화 해준 뒤 Text를 초기화해주어야 원하는 동작을 구현할 수 있었습니다.
</details><br>
> **ViewController에서 API통신 비동기 처리**
<details>
<summary>자세히보기</summary>
- ViewController에서 URL에 접근해서 가져온 데이터를 어떻게 받아올지 고민했습니다.
STEP1에서 구현한 `NetworkManager-request`가 **비동기적으로 작업을 진행**하기에 UI에 Data 넣어주는 과정에서 문제가 발생하였습니다.
이를 해결하기 위해 request함수에서 데이터를 모두 가져왔을 때 collectionViewCell에 데이터를 넣어줄 수 있도록 `request함수`를 처리해주는 메서스를 만들어준 뒤 `completion: @escaping`을 적용하여 데이터를 모두 가져왔을 때, UI에 Data를 넣어주는 식으로 진행했었으나, `CollectionView.reloadData()`라는 메서드를 알게되어 main.async하게 작성해줘서 동작하도록 재구현 했습니다.
```swift
// 처음 구현한 방법
override func viewDidLoad() {
super.viewDidLoad()
configureCollectionView()
DispatchQueue.global().async {
self.loadData { data in
DispatchQueue.main.sync {
self.configureCollectionView()
}
}
}
}
func loadData(complete: @escaping(ProductList) -> ()) {
networkManager.request(from: URLManager.productList(pageNumber: 1, itemsPerPage: 200).url, httpMethod: HttpMethod.get, dataType: ProductList.self) { result in
switch result {
case .success(let data):
self.product = data
complete(data)
case .failure(_):
break
}
}
}
// reloadData()를 활용한 방법
override func viewDidLoad() {
super.viewDidLoad()
configureCollectionView()
loadData()
}
func loadData() {
networkManager.request(from: URLManager.productList(pageNumber: 1, itemsPerPage: 200).url,
httpMethod: HttpMethod.get,
dataType: ProductList.self) { result in
switch result {
case .success(let data):
self.product = data
DispatchQueue.main.async {
self.collectionView.reloadData()
}
case .failure(_):
break
}
}
}
```
</details><br>
> **셀 테두리라인 전체 및 부분적으로 그리기**
<details>
<summary>자세히보기</summary>
- 테두리라인을 주기 위해 처음에 생각한 방법은 UIView에 테두리를 적용하고자 하였으나, 원하는대로 적용이 안되었습니다.
그래서 다른 방법을 알아보니 CollectionViewCell에 Code를 적용하여 테두리라인을 추가할 수 있었고, 조사한 방법을 통해 구현을 시켜보니 GridCell에서는 정상적으로 동작하였으나, ListCell에서는 셀간의 간격이 있는 문제로 인해 셀간의 1개의 라인이 아닌 2개의 라인이 그려지는 문제점이 발생하였습니다. 이를 해결하기 위해 cell의 바텀라인에만 구분선을 추가해주면 된다고 생각하여 바텀라인에만 라인을 그리는 방법을 확인하여 적용하여 해결하였습니다.
```swift
// 전체 테두리 그리는 방법
func addBorderLine(color: UIColor, width: CGFloat) {
self.layer.cornerRadius = 10
self.layer.borderWidth = width
self.layer.borderColor = color.cgColor
}
// 부분적으로 테두리 그리는 방법
func addBottomLine(color: UIColor, width: CGFloat) {
let bottomLine: CALayer = CALayer()
bottomLine.frame = CGRectMake(0, self.frame.height - width, self.frame.width, width)
bottomLine.backgroundColor = color.cgColor
self.layer.addSublayer(bottomLine)
}
```
- 리스트 셀에 처음 바텀라인에 줄을 주기위해 Cell.layer를 기준으로 했었더니 아래의 cell과 공간이 비어있게 보였습니다. 그래서 frame을 기준으로 잡고 진행했습니다!
</details><br>
> **세그먼트 컨트롤을 통해 셀을 변경할 경우 Reload 처리**
<details>
<summary>자세히보기</summary>
- 세그먼트 컨트롤을 통해 셀을 변경할 때, 레이아웃을 다시 잡고 데이터를 넣어줘야한다고 생각하고 구현하였습니다.
그런데, 처음에 보이는 Cell들의 이미지가 잘못 들어오는 경우가 종종 보이는 문제가 확인되었습니다.
왜 이런 현상이 발생하는지 고민해보니, 레이아웃을 다시 잡는 과정에서 이전 데이터로 레이아웃을 잡고 다시 데이터를 넣어주는 과정에서 문제가 발생한 것으로 예상되어, 어떻게 해결해야할지 고민하다가 데이터를 넣고, 레이아웃을 다시 잡아주니 문제를 해결할 수 있었습니다.
</details><br>
> **비동기 안에서 activityIndicator Stop 처리**
<details>
<summary>자세히보기</summary>
- 현재 URL에 접근하여 데이터를 가져오는 로딩시간동안 activityIndicator를 표시하도록 구현하였습니다.
그 후 데이터를 모두 가져온 뒤 activityIndicator를 삭제하는 작업이 UI 작업이기에 `Dispatch.main`을 사용하여 정상적으로 구현했습니다.
</details><br>
> **ViewController에 있는 UIView를 CustomView로 가져오는 방법**
<details>
<summary>자세히보기</summary>
- 메인스토리보드에 UIView 추가
- 연결하고 싶은 View&Xib 생성 (View는 자동으로 Xib파일 생성안되어 따로 생성해주어야함!)
- 메인스토리보드에 추가해준 UIView-Class를 생성한 View로 연결
- Xib파일에서 File's Owner에서 Class를 생성한 View로 연결
</details><br>
> **Boundary에 사용할 UUID는 한번만 생성하여 전체 multipart/form-data을 작성해줘야함**
<details>
<summary>자세히보기</summary>
- multipart/form-data을 작성할 때, Boundary의 UUID를 2개 이상 생성해주면, UUID가 다르게 생성되어 오류발생...!
</details><br>
> **키보드 타입 지정 & 키보드 높이에 따른 UIView높이를 줄이는 방법**
<details>
<summary>자세히보기</summary>
- 키보드가 올라올 때 키보드가 올라오는 높이만큼 뷰의 일정부분을 줄여 상품정보가 더 많이 보이게 구현해줘야 했습니다.
그래서 전체뷰에서 키보드가 올라올 때 키보드의 높이을 빼주고 뷰를 구성하도록 구현하였습니다.
그 과정에서 줄일 수 있는 부분이 상품 이미지뿐이라고 생각하여, 상품이미지가 살짝 줄어들고 상품설명을 적는 텍스트뷰를 조금 더 확보할 수 있었습니다.
추가로, 키보드 타입에 따라 높이가 다른 부분도 해결하기 위해 아래와 같이 코드를 작성하여 해결하였습니다.
```swift
private var keyHeight: CGFloat = 0
private func checkKeyboard() {
NotificationCenter.default.addObserver(self,
selector: #selector(keyboardWillShow(_:)),
name: UIResponder.keyboardWillShowNotification,
object: nil)
NotificationCenter.default.addObserver(self,
selector: #selector(keyboardWillHide(_:)),
name: UIResponder.keyboardWillHideNotification,
object: nil)
}
@objc
private func keyboardWillShow(_ sender: Notification) {
guard let senderUserInfo = sender.userInfo else { return }
let userInfo: NSDictionary = senderUserInfo as NSDictionary
if let keyboardFrame: NSValue = userInfo.value(forKey: UIResponder.keyboardFrameEndUserInfoKey) as? NSValue {
let keyboardRectangle = keyboardFrame.cgRectValue
var keyboardHeight = keyboardRectangle.height
if keyHeight == 0 {
keyHeight = keyboardHeight
view.frame.size.height -= keyboardHeight
} else if keyHeight > keyboardHeight {
keyboardHeight = keyboardHeight - keyHeight
keyHeight = keyHeight + keyboardHeight
view.frame.size.height -= keyboardHeight
}
}
}
@objc
private func keyboardWillHide(_ sender: Notification) {
view.frame.size.height += keyHeight
keyHeight = 0
}
```
- 리스트 셀에 처음 바텀라인에 줄을 주기위해 Cell.layer를 기준으로 했었더니 아래의 cell과 공간이 비어있게 보였습니다. 그래서 frame을 기준으로 잡고 진행했습니다!
</details><br>
**NetworkManager의 기능 분리를 어떻게 할지 고민했었습니다**
<details>
<summary>자세히보기</summary>
- 메서드에서 NetworkManger를 사용할 때마다 한 번만 할당해주기 때문에 사용 용도에 따라 프로토콜로 기능분리를 해주었습니다.

</details><br>
**[미흡했던 부분]**
- ProductEditViewController과 ProductRegisterViewController에서 중복되는 코드가 많아서 어떻게 해결해야할지 고민해봐야할듯!
- NetworkManager의 설계가 완성도가 많이 떨어지는듯하여 잘 설계된 코드를 한번 봐야할듯!
<br>
## 📚 참고 링크
- [URLSession](https://developer.apple.com/documentation/foundation/urlsession) <br>
- [Fetching Website Data into Memory](https://developer.apple.com/documentation/foundation/url_loading_system/fetching_website_data_into_memory) <br>
- [UICollectionView](https://developer.apple.com/documentation/uikit/uicollectionview) <br>
- [Modern cell configuration](https://developer.apple.com/videos/play/wwdc2020/10027/) <br>
- [Lists in UICollectionView](https://developer.apple.com/videos/play/wwdc2020/10026) <br>
- [Implementing Modern Collection Views](https://developer.apple.com/documentation/uikit/views_and_controls/collection_views/implementing_modern_collection_views) <br>
## STEP-2 리팩토링
- 객체지향 프로그래밍관점에서 뷰 하나에서는 하나의 화면만을 보여줘야한다라고 생각해야함
- 왜냐하면, TableView <-> CollectionView간 변경이 필요할 경우 구현 가능 (유지보수도 유리)
- 현재 우리가 구현한 오픈마켓은 하나의 뷰에서 2개의 셀을 교체하는 방식이기에 유지보수적으로 좋은 설계는 아님
- 서버로부터 가져와야 되는 데이터의 양을 어떻게 조절할지 고민해보아야함
- 이번 프로젝트에서 구현한 코드는 초기에 모든 데이터를 가져오는 방식
- 하지만, 데이터의 양이 방대하다면?
- 데이터 로딩시간으로 앱이 멈추는 시간이 발생할 것으로 예상됨
- 이를 해결하는 방안으로는 스크롤을 내릴때마다 서버로부터 일정 갯수의 데이터만을 가져오는 방식으로 구현해야한다는 것을 알게 됨!
## STEP-3
boundary는 한곳에서 만들어주자 왜? 값이 계속 달라짐.
- UIView를 가져오는 방법?
- 메인스토리보드에 UIView 추가
- 연결하고 싶은 View&Xib 생성
- 메인스토리보드에 추가해준 UIView-Class를 생성한 View로 연결
- Xib파일에서 File's Owner에서 Class를 생성한 View로 연결
- 화면전환시 Delegate방식을 사용할 경우
- delegate = self 추가해줘야함!!!
 Sign in with Wallet


