# Raspberry pi tutor
## Club application
### Introduction
My name is Richard and I am a student here at Hsinchu International School. I am passionate about Information Technology (IT) and I would like to propose the creation of an IT club for students to share my enthusiasm. The purpose of this club is to provide a platform where students can learn more about IT, develop their skills, and have fun while doing so.
### Background
As a Minecraft gamer and a YouTuber, I have realized the potential of using games to learn while having fun. Furthermore, through my experiences, I have come across the dangers of hacking and how easily a person can be hack and how easily a mechanism can be compromised. Therefore, I am passionate about sharing my knowledge and learning alongside enthusiastic individuals. After completing a project on a slapping alarm which slaps my face to wake me up in the morning, I learned operating system linux, coding language python and basic electronic circuit. I became interested in development board such as Raspberry Pi and Arduino and realized the potential of these development boards. I believe that the creation of an IT club would provide opportunities for students with similar interests to come together and explore the vast world of IT.
### Club Activities
The IT club will organize various activities to cater to the diverse interests of its members. Some of the activities we plan to organize include:
- Coding workshops: We will hold workshops on different programming languages such as Python, Java, and C++. These workshops will cover the basics of coding and allow members to develop their coding skills.
- Cybersecurity workshops: We will hold workshops on cybersecurity, covering topics such as web security, network security, and privacy. Members can learn how to protect themself on the network.
- Minecraft gaming sessions: Minecraft is a popular game that can be used to improve IT skills. We will organize gaming sessions where members can share their knowledge and skills in the game.
- Raspberry Pi and Arduino projects: We will encourage members to work on fun and innovative gadgets using Raspberry Pi and Arduino boards. This will provide an opportunity for members to develop their knowledge of circuits, sensors, and programming.
- Network workshops: We will hold workshops on computer networks, covering topics such as network architecture, protocols, and troubleshooting.
- IT-related discussions and presentations: We will also have discussions and presentations on the latest trends and innovations in IT. These sessions will provide members with the opportunity to learn from each other and invited experts for exploring new ideas.
### Emphasis on Problem-Solving Skills
The IT club will place a strong emphasis on developing problem-solving skills. All the activities and workshops organized by the club will involve solving problems, whether it's coding a program, troubleshooting a network issue, or building a gadget. Members will learn divide and conquer: how to approach a problem, break it down into smaller parts, and come up with a solution. These problem-solving skills will be transferable to other areas of their lives and will be invaluable for their future careers.
### Club Structure
The IT club will have the following organizational structure:
- Club officers: The club will have a President, Vice President, Secretary, and Treasurer. The President will oversee the overall functioning of the club, the Vice President will assist the President, the Secretary will take care of the club's communication, and the Treasurer will manage the club's finances.
- Meeting schedule and location: The club will meet once a week after school. The location of the meetings will be any available classroom.
- Membership criteria and requirements: Membership is open to all students who are interested in IT. Members will be required to attend at least 50% of the meetings and participate actively in club activities.
- Funding and resources: The IT club will require access to a room with tables, chairs, and a projector for workshops and meetings. Funding is not necessary as students can bring their own personal computers or laptops to participate in the workshops.
### Benefits to Members and the School
The IT club will provide the following benefits to its members:
- Enhancing IT knowledge and skills: Members will have the opportunity to learn new IT skills and develop their existing ones.
- Networking and making new friends: Members will be able to interact with like-minded students and build their social network.
- Building leadership and organizational skills: Members will have the opportunity to take up leadership roles and develop their organizational skills.
- Developing problem-solving skills: Members will learn how to approach problems, break them down into smaller parts, and come up with solutions.
- Encouraging student engagement: The IT club provides students with opportunities to engage in extracurricular activities that are intellectually stimulating and relevant to their interests.
- Preparing students for future careers: The IT club will equip students with the necessary IT skills and problem-solving abilities that are useful in their future careers.
### Conclusion
The IT club is a great opportunity for students who are interested in Information Technology to develop their skills, learn new things, and meet peers with similar interests.
## Code backup
:::spoiler matrix keypad
```python
import RPi.GPIO as GPIO
import time
import sys
import tm1637
from datetime import datetime
tm = tm1637.TM1637(clk=3, dio=2, brightness=2)
tm.show("", True)
GPIO.setwarnings(False)
GPIO.cleanup()
GPIO.setmode(GPIO.BCM)
MODE_SHOW_CURRENT_TIME = 1
MODE_SETTING_ALARM = 2
mode = MODE_SHOW_CURRENT_TIME
STR_NO_ALARM = '-- --'
KEY_SHOW_ALARM = 'A' # Press to show alarm time
KEY_CHANGE_ALARM = 'B' # Click and type in alarm time, click again to set
KEY_CLEAR_ALARM = 'C' # Clear 1 digit when setting alarm
ROW = [25, 8, 7, 1]
COL = [12, 16, 20, 21]
# MAP = [["1","2","3","A"],
# ["4","5","6","B"],
# ["7","8","9","C"],
# ["*","0","#","D"]]
MAP = [["D","#","0","*"],
["C","9","8","7"],
["B","6","5","4"],
["A","3","2","1"]]
for pin in ROW:
GPIO.setup(pin, GPIO.OUT)
GPIO.output(pin, GPIO.LOW)
for pin in COL:
GPIO.setup(pin, GPIO.IN, pull_up_down=GPIO.PUD_DOWN)
def scan():
for r in range(0, len(ROW), 1):
GPIO.output(ROW[r], GPIO.HIGH)
for c in range(0, len(COL), 1):
if GPIO.input(COL[c]) == GPIO.HIGH:
while(GPIO.input(COL[c]) == GPIO.HIGH):
time.sleep(0.1)
pass
GPIO.output(ROW[r], GPIO.LOW)
return MAP[r][c]
sys.stdout.flush()
break
GPIO.output(ROW[r], GPIO.LOW)
return None
alarm = list("----")
alarm_index = 0
display_str = ""
try:
while True:
key = scan() # key = None if there is no key pressed
# If any key pressed
if key != None:
print(" Entered: " + key)
# Go to setting alarm mode
if mode == MODE_SHOW_CURRENT_TIME:
if key == KEY_CHANGE_ALARM:
mode = MODE_SETTING_ALARM
elif mode == MODE_SETTING_ALARM:
# number keys 0~9, add to alarm[]
if '0' <= key and key <= '9':
if alarm_index < 4:
alarm[alarm_index] = key
alarm_index = alarm_index + 1
# Clear 1 number on alarm setting
elif key == KEY_CLEAR_ALARM:
if alarm_index > 0: alarm_index = alarm_index - 1
alarm[alarm_index] = "-"
# Set alarm and back to show current time mode
elif key == KEY_CHANGE_ALARM:
print("alarm set to " + f"{alarm[0]}{alarm[1]}:{alarm[2]}{alarm[3]}")
mode = MODE_SHOW_CURRENT_TIME
current_time = list(datetime.now().strftime("%H%M"))
dot = ":"
if int(datetime.now().strftime("%S")) % 2 == 0:
dot = " "
if mode == MODE_SHOW_CURRENT_TIME:
# Check if alarm should be triggered
if current_time == alarm:
print(" Alarm triggered!")
# Prepare display string
display_str = ''.join([current_time[0], current_time[1], dot, current_time[2], current_time[3]])
elif mode == MODE_SETTING_ALARM:
display_str = f"{alarm[0]}{alarm[1]}:{alarm[2]}{alarm[3]} setting alarm mode"
print(f'\r{display_str}', end='')
time.sleep(0.1)
except KeyboardInterrupt:
print("Bye bye")
GPIO.cleanup()
```
:::
## 230325
- Show the log of the service
```
sudo journatctl -u slapping_alarm.service
```
## 230318
- Case install

- Pin socket install

- Linux service: systemd
`/etc/systemd/system/slapping_alarm.service`
```
[Unit]
Description=Slapping Alarm
[Service]
WorkingDirectory=/path/to/py_srcipt_folder
ExecStart=/path/to/python /path/to/py_srcipt_folder/py_script
Restart=always
# Restart service after 10 seconds if this service crashes:
RestartSec=10
KillSignal=SIGINT
User=root
[Install]
WantedBy=multi-user.target
```
```
# Start the service
sudo systemctl start slapping_alarm.service
# Stop the service
sudo systemctl stop slapping_alarm.service
# Enable the service so the service can start on every boot
sudo systemctl enable slapping_alarm.service
# Show status
sudo systemctl status slapping_alarm.service
```
## 230310
- trigger motor
- trigger beeper
- Determine beeper or speaker
- Play sound `pip3 install pydub`
## 230305
- Python: continue in while
- limit 4 digits
- limit proper time range
- trigger alarm once
## 230218
- Local var, global var
- Function return type
- Blink time colon every second or milli second (by modulo)
- Alarm display mode: finished
- Show alarm mode: finished
- Alarm setting mode: on the way,
- Solve blinking problem, by only clear display when mode switching
- Implement "D" key to delete a character and handle edge cases
- [x] Limit alarmset to 4 digits
- [x] Limit proper time range
## 230211
- Check assignments
- Nested for loop and list with keyboard scanning
- Motor, generator
- Function of each key (A,B,C,D)
## 230204
### Check on assignment: Concatenate clicked key and print
- Assignment1: Print previous clicked keys(history) and current clicked key.
For example,
1. press "0" and prints "0"
2. press "8", and prints "08"
3. press "A", and prints "08A"
:::info
Finished, checked on 230211
:::
- Assignment2: Pick a key, let's say "C", as backspace. When "C" is pressed, remove last key from history and print it.
For example,
1. press "0" and prints "0"
2. press "8", and prints "08"
3. press "C", and prints "0"
4. press "C", and prints ""
5. press "C", and prints ""
:::info
Finished, checked on 230211
:::
### Set alarm
Implement 2 modes, a show current time mode that displays current time and blink the colon; an alarm setting mode that user can set alarm.
After initialization, it should be in show current time mode. You can press "B" to enter alarm setting mode. It should displays current alarm setting without blinking the colon. And pressing number keys 0~9 can type the digits. Pressing "B" again sets the alarm and goes back to show current time mode.
:::success
TODO: Implement clear key "C" and set alarm key "B".
:::
### Triger the alarm
After the alarm is set and back to show current time mode, you should print "Alarm triggered!" when current time matches the alarm time.
:::success
TODO: The program should prints "Alarm triggered!" when current time matches alarm.
:::
:::success
TODO: When the alarm is triggered, activate the [servo](#221127).
:::
:::success
TODO: When current time matches alarm time right after alarm is set, the alarm should not be triggered.
:::
## 230107
### Connect raspberri pi with laptop hotspot
When using raspberry pi without home wifi, you can create a wifi hotspot from PC or cellphone.
Note that if you are using cellphone hotspot, you have to connect your PC and pi to the same hotspot.
1. Config hotspot on PC or cellphone with the SSID and the password that raspberry pi remembers
2. Turn hotspot
3. Turn on raspberry pi
4. Go to the hotspot settings, it usually shows the connected devices
5. Wait for raspberry pi to appear and get its private IP address
On some cellphones, only the connected device count is shown. In such case, you have to remember the host name of your raspberry pi. You can do that by the command `hostname`
```bash
username@raspberrypi:~$ hostname
raspberrypi
```
Then try to ping `hostname` or `hostname.local` on PC and see if either one replies:
```
ping raspberrypi
ping raspberrypi.local
```
6. You can now ssh to your raspberry pi with private address or hostname.
Note that if only `hostname.local` replies on ping, you should connect it through `hostname.local`:
```
ssh username@raspberrypi.local
```
### Python: string
```python=
String1 = "GeeksForGeeks"
print("Initial String: ")
print(String1)
# Printing First character
print("\nFirst character of String is: ")
print(String1[0])
# Printing Last character
print("\nLast character of String is: ")
print(String1[-1])
# Slicing
# Printing 3rd to 12th character
print("\nSlicing characters from 3-12: ")
String1_sliced = String1[3:12]
print(String1_sliced)
# Printing characters between
# 3rd and 2nd last character
print("\nSlicing characters between " +
"3rd and 2nd last character: ")
print(String1[3:-2])
# Modify string with list
# You cannot modify string elements directly
# Convert to list first
str_list = list(String1)
str_list[3:10] = ['k'] * 7 # 3,4,5,6,7,8,9 modified
new_str_from_list = ''.join(str_list)
print(str_list)
print(new_str_from_list)
# Modify string with directly assignment and +
new_str_assigned = String1
new_str_assigned = new_str_assigned[0:-1] + new_str_assigned[0]
```
### Function and return value
Function declared with function name `func_1`. And `param1` and `param2` are parameters of `func_1`. They are going to be used in`func_1`. A function can also be declared without any parameter, e.g., printing current time.
```python
# function declaration
def func_1(param1, param2):
# some computations / opertations using parameters
# ...
print("The value is: ", end="")
print(param1 + param1 * param2)
```
Function is also known as subroutine, and you can invoke a subroutine instead of write multiples lines.
```python
# function declaration
def fahrenheit_to_celsius(f):
c = (f - 32) / 1.8
return c
print("fahrenheit: ", end='')
f = input()
f = int(f) # convert f from string to int
c = fahrenheit_to_celsius(f)
print("celsius: ", end='')
print(c)
```
### Concatenate clicked key and print
- Assignment1: Print previous clicked keys(history) and current clicked key.
For example,
1. press "0" and prints "0"
2. press "8", and prints "08"
3. press "A", and prints "08A"
- Assignment2: Pick a key, let's say "C", as backspace. When "C" is pressed, remove last key from history and print it.
For example,
1. press "0" and prints "0"
2. press "8", and prints "08"
3. press "C", and prints "0"
4. press "C", and prints ""
5. press "C", and prints ""
## 221218
Go through previous lectures
## 221211
### 7 segment display module (TM1637)
Reference: [raspberrypi-tm1637](https://github.com/depklyon/raspberrypi-tm1637)

```
A
---
F | | B *
-G- H (on 2nd segment)
E | | C *
---
D
HGFEDCBA
0b01101101 = 0x6D = 109 = show "5"
```
### Matrix keypad
[Reference](https://www.digikey.com/en/maker/blogs/2021/how-to-connect-a-keypad-to-a-raspberry-pi)


```python=
# import required libraries
import RPi.GPIO as GPIO
import time
# Initialize the GPIO pins
GPIO.setwarnings(False)
GPIO.cleanup()
GPIO.setmode(GPIO.BCM)
# these GPIO pins are connected to the keypad
# change these according to your connections!
L1 = 25
L2 = 8
L3 = 7
L4 = 1
C1 = 12
C2 = 16
C3 = 20
C4 = 21
GPIO.setup(L1, GPIO.OUT)
GPIO.setup(L2, GPIO.OUT)
GPIO.setup(L3, GPIO.OUT)
GPIO.setup(L4, GPIO.OUT)
# Make sure to configure the input pins to use the internal pull-down resistors
GPIO.setup(C1, GPIO.IN, pull_up_down=GPIO.PUD_DOWN)
GPIO.setup(C2, GPIO.IN, pull_up_down=GPIO.PUD_DOWN)
GPIO.setup(C3, GPIO.IN, pull_up_down=GPIO.PUD_DOWN)
GPIO.setup(C4, GPIO.IN, pull_up_down=GPIO.PUD_DOWN)
# The readLine function implements the procedure discussed in the article
# It sends out a single pulse to one of the rows of the keypad
# and then checks each column for changes
# If it detects a change, the user pressed the button that connects the given line
# to the detected column
def readLine(line, characters):
GPIO.output(line, GPIO.HIGH)
if(GPIO.input(C1) == 1):
print(characters[0])
if(GPIO.input(C2) == 1):
print(characters[1])
GPIO.output(line, GPIO.LOW)
try:
while True:
# call the readLine function for each row of the keypad
readLine(L1, ["1","2","3","A"])
readLine(L2, ["4","5","6","B"])
time.sleep(0.1)
except KeyboardInterrupt:
print("\nApplication stopped!")
GPIO.cleanup()
```
## 221127
### Servo
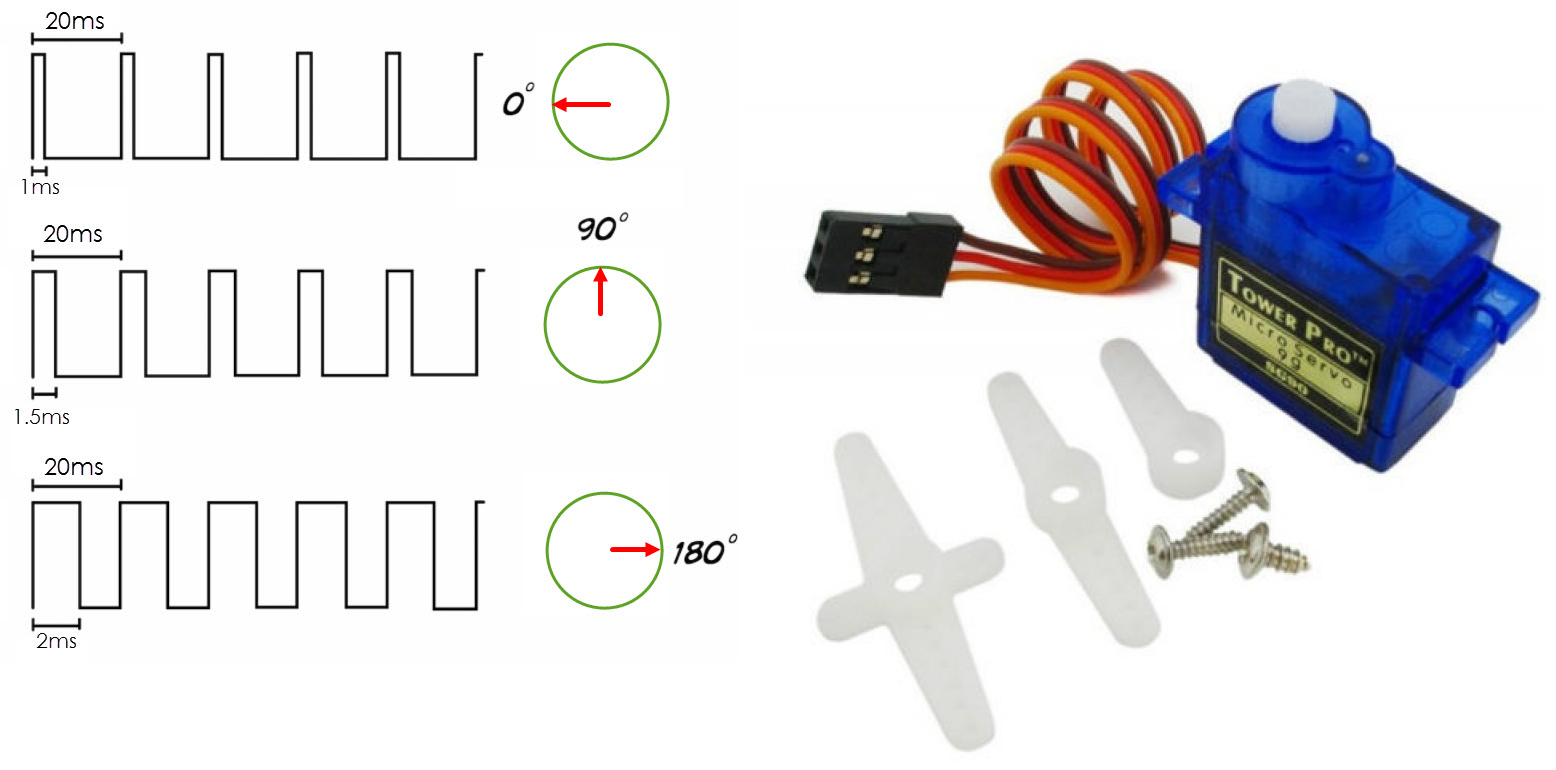
:::success
TODO: Evaluate the function of angle f() that outputs duty cycle.
Hint: duty cycle = high duration / (high+low duration)
f(0) = 1/20
f(90) = 1.5/20
f(180) = 2/20
:::

```python=
import RPi.GPIO as GPIO
import time
PWM_FREQ = 50
def angle_to_duty_cycle(angle=0):
# TODO
duty = (0.05 * PWM_FREQ) + (0.19 * PWM_FREQ * angle / 180)
return duty
SERVO_PIN = 18
GPIO.setwarnings(False) # disable warnings
GPIO.setmode(GPIO.BCM) # set pin numbering mode
GPIO.setup(SERVO_PIN, GPIO.OUT) # set pin to output mode
GPIO.output(SERVO_PIN, GPIO.LOW) # turn pin to low
GPIO.setup(SERVO_PIN, GPIO.OUT)
pi_pwm = GPIO.PWM(SERVO_PIN, PWM_FREQ) # create PWM instance with frequency=50Hz
pi_pwm.start(0) # start PWM of required Duty Cycle
try:
while True:
# pi_pwm.ChangeDutyCycle(angle_to_duty_cycle(float(input())))
for angle in range(0,180,1):
pi_pwm.ChangeDutyCycle(angle_to_duty_cycle(angle))
time.sleep(0.1)
for angle in range(180,0,-1):
pi_pwm.ChangeDutyCycle(angle_to_duty_cycle(angle))
time.sleep(0.1)
time.sleep(1)
except KeyboardInterrupt:
print("Bye bye")
GPIO.cleanup()
```
### Something else
- Web sercurity (how to peek password)
- Current go through body
- CTF: cybersercurity contest
## 221118 basic python, Button and Control LED from web
### python v.s java
- Variables:
```python
# python
x, y = 12, 10
isTrue = True
greeting = "Welcome!"
```
```java
// java
int x = 12, y = 10;
boolean isTrue = true;
String greeting = "Welcome!";
```
- List and array:
```python
# python
countries = [
"Portugal",
"England",
"Brazil",
"New Zealand",
"Spain"
]
numbers = [12, 14, 9, 10, 9]
countries.sort()
for i in range(0, 5, 1): # range(a, b, c) --> for (i=a; i<b; i=i+c)
print(countries[i])
```
```java
// java
import java.util.Arrays;
public class Main {
public static void main(String[] args) {
// Working with Arrays
String[] countries = {
"Portugal",
"England",
"Brazil",
"New Zealand",
"Spain"
};
int[] numbers = {12, 14, 9, 10, 9};
Arrays.sort(countries);
// Looping through an Array
for (int i=0; i<5; i++) {
System.out.println(countries[i]);
}
}
}
```
- if / else if / else
```python
# python
a = 111
b = 3
c = 300
if (a % b) == 0:
print(f"{a} is dividable by {k}")
elif a > c:
print(f"{a} is greater than {c}")
else:
print(f"{a} is dividable by {k} nor greater than {c}")
print(f"This is also a line a else")
print(f"This is the line not in if, else if nor else.")
```
```java
// java
int a = 111;
int b = 3;
int c = 300;
if((a % b) == 0){
System.out.printf("%d is dividabble by %d\n", a, b);
}
else if(a > c){
System.out.printf("%d is greater than %d\n", a, c);
}
else {
System.out.printf("%d is dividable by %d nor greater than %d\n", a, k, c);
System.out.printf("This is also a line a else.\n");
}
System.out.printf("This is the line not in if, else if nor else.\n");
```
- for
```python
# python
for i in range(0, 5, 1):
print(f"This is #{i} iteration")
print(f"print something else in the iteration")
print(f"print after for, not in for, printed once")
```
```java
// java
for(int i=0; i<5; i = i+1){
System.out.printf("This is #%d iteration\n", i);
System.out.printf("print something else in the iteration\n");
}
System.out.printf("print after for, not in for, printed once");
```
- while
```python
# python
num = int( input() )
print(f"You entered {num}")
while num > 0:
print(f"num is now {num}")
num = num - 1
```
```java
// java
Scanner scanner = new Scanner(System.in);
int num = scanner.nextInt();
while(num > 0){
System.out.printf("num is now %d\n", num);
num--;
}
```
- function
```python
# python
def myMethod():
print("I just got executed!")
def power(base: int, index: int) -> int:
ans = 1
for i in range(0, index, 1):
ans = ans * base
return ans
myMethod()
print("base:", endl='') # endl='' means no newline
base = int(input())
print("index:", endl='')
index = int(input())
result = power(base, index)
print(f"{base} to the power of {index} is {result}")
```
```java
// java
public class Main {
static void myMethod() {
System.out.println("I just got executed!");
}
static int power(int base, int index){
int ans = 1;
for(int i=0; i<index; i++){
ans = ans * base;
}
return ans;
}
public static void main(String[] args) {
int base = 0;
int index = 0;
int result = 0;
Scanner scanner = new Scanner(System.in);
myMethod();
System.out.print("base:");
base = scanner.nextInt();
System.out.print("index:");
index = scanner.nextInt();
result = power(base, index);
System.out.printf("%d to the power of %d is %d\n", base, index, result);
}
}
```
### Button: Digital Input
[Ref](https://raspberrypihq.com/use-a-push-button-with-raspberry-pi-gpio/)
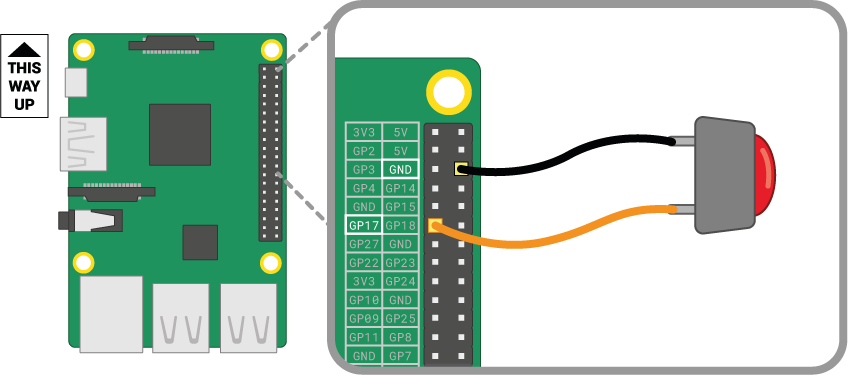
Pick an available pin without removing the wires of LED bar.
```python=
import RPi.GPIO as GPIO # Import Raspberry Pi GPIO library
import time
GPIO.setwarnings(False) # Ignore warning for now
GPIO.cleanup()
GPIO.setmode(GPIO.BCM)
BTN_PIN = 17 # Pick what's available
GPIO.setup(BTN_PIN, GPIO.IN, pull_up_down=GPIO.PUD_UP)
count = 0
try:
while True: # Run forever
if GPIO.input(BTN_PIN) == True:
print(f"Button was pushed!, count={count}")
count = count + 1
except KeyboardInterrupt:
GPIO.cleanup()
```
:::success
TODO: Make each press increase count by 1. Hint: time.sleep()
:::
:::success
TODO: Make long press also increase count by 1. Hint: while
:::
:::success
TODO: Each time a button is pressed, turn on 1 more LED
All off --> 1 LED on --> 2 LEDs on .... -> 10 LEDs on --> All off --> 1 LED on ...
Hint:
(1) Try to print how many LED should be turned on every time a button is pushed
(2) Try to advance led count by 1 each time a button is pressed instead of advancing quickly
(3) Turn on LED bar with coressponding led count you print
:::
### Control LED through your phone
Install python server libray:
```
pip3 install flask
```
The simplest flask example:
```python=
from flask import Flask
# __name__: current module
app = Flask(__name__)
@app.route('/')
def hello():
return 'Hello, World!\n'
@app.route('/my_girlfriend')
def my_girlfriend():
return 'Oops, not found\n'
app.run(host='0.0.0.0',port=5000)
```
Connect your laptop or phone to the same Wi-Fi as raspberry pi connected to.
Create file `index.html`:
```htmlmixed=
<!DOCTYPE html>
<html>
<body><center>
<h1>Richard LED contorl</h1><br>
Ciclk to turn <a href="led_on">LED ON</a><br>
Ciclk to turn <a href="led_off">LED OFF</a><br>
</center></body>
</html>
```
```python=
from flask import request, render_template
import flask
# __name__: current module
app = flask.Flask(__name__, template_folder='.')
def led(state):
return
@app.route('/')
def hello():
return 'Hello, World!\n'
@app.route('/main', methods=['GET', 'POST'])
def main_page():
if request.method == 'POST':
print(request.values['data'])
return render_template('./index.html')
@app.route('/led_on')
def web_call_led_on():
print("Led on")
# TODO: Turn on LED
return render_template('./index.html')
@app.route('/led_off')
def web_call_led_off():
print("Led off")
# TODO: Turn off LED
return render_template('./index.html')
# TODO: Init GPIO (setwarnings, cleanup, setmode, setup)
app.debug = True
app.run(host='0.0.0.0',port=5000)
```
:::success
TODO: Turn LED on and off using browser.
:::
### Project discussion
| | Possible features | Pros | Cons | Difficulty |
|---|---|---|---|---|
| Slapping alarm | Remote wake up<br>Webcam<br>Super loud speaker<br>Big vibrator | Easy<br>Fun<br>Eye-catching<br>Still learn a lot like other projects | Looks less professional<br>No good idea for branding | 2 |
| Robotics | Caterpillar tracks/wheels/biomimetic<br>Grab stuff w/ arm<br>Object tracking | Good for demonstration<br>Easy branding: disaster relief, enviormental protection...<br>Ready-made kits/module<br>Eye cataching | Takes more time<br>Time on coding, circuits and mechanis<br>Costly | 5 |
| Sercurity gate | Facial recognition<br>Finger print<br>Webcam<br>Remote access | A glance at AI/deep learning<br>Practical | Mechanics<br>Facial recognition takes more time to implement<br>Less eye catching | 4 |
| Emergence response system | Earthquake detection<br>Fire/gas leakage detection<br>On-site/remote alarm<br>Automatic emergency call<br>Automatic door open | Easy<br>Branding idea clear<br>Materials are inexpensive | Tedius<br>Hard open a life size door | 2 |
| Wether station | Temperature/humidity<br>PM2.5/rain/wind/visibility<br>Measurement/forecast | Easy<br>The only practical one<br>Materials are inexpensive | Less eye catching<br>Products like this already in the market | 1 |
## 221112 LED bar with python list
### Python list practice
Let's say we want to print a user defined sequence [1, 3, 6, 12, 80, 77, -56]
Without list:
```python=
print(1)
print(3)
print(6)
print(12)
print(80)
print(77)
print(-56)
```
With list:
```python=
seq = [1, 3, 6, 12, 80, 77, -56] # seq[index], index starts from 0
print("list length = " + len(seq))
for i in range(len(seq)): # range(K) --> i = 0~K-1
print(seq[i])
```
Or you can also print like this:
```python=5
for num in seq:
print(num)
```
### LED bar, resistor array


::: success
TODO: Wire the LED bar with pi and light them up
Hint: Slide down for code from last week
:::
```python=
# Paste your code here
```
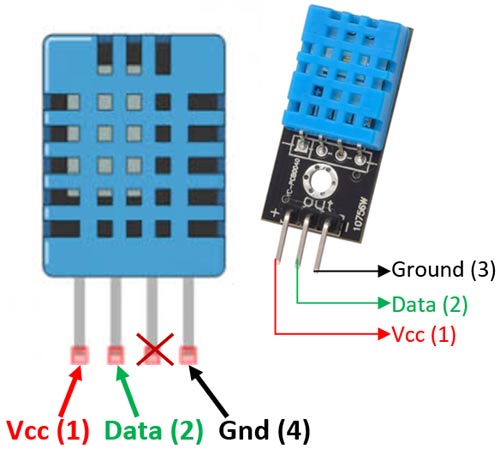
### DHT11: temperature and humidity sensor
[Ref1](https://www.thegeekpub.com/236867/using-the-dht11-temperature-sensor-with-the-raspberry-pi/), [Ref2](https://learn.adafruit.com/dht-humidity-sensing-on-raspberry-pi-with-gdocs-logging/python-setup)
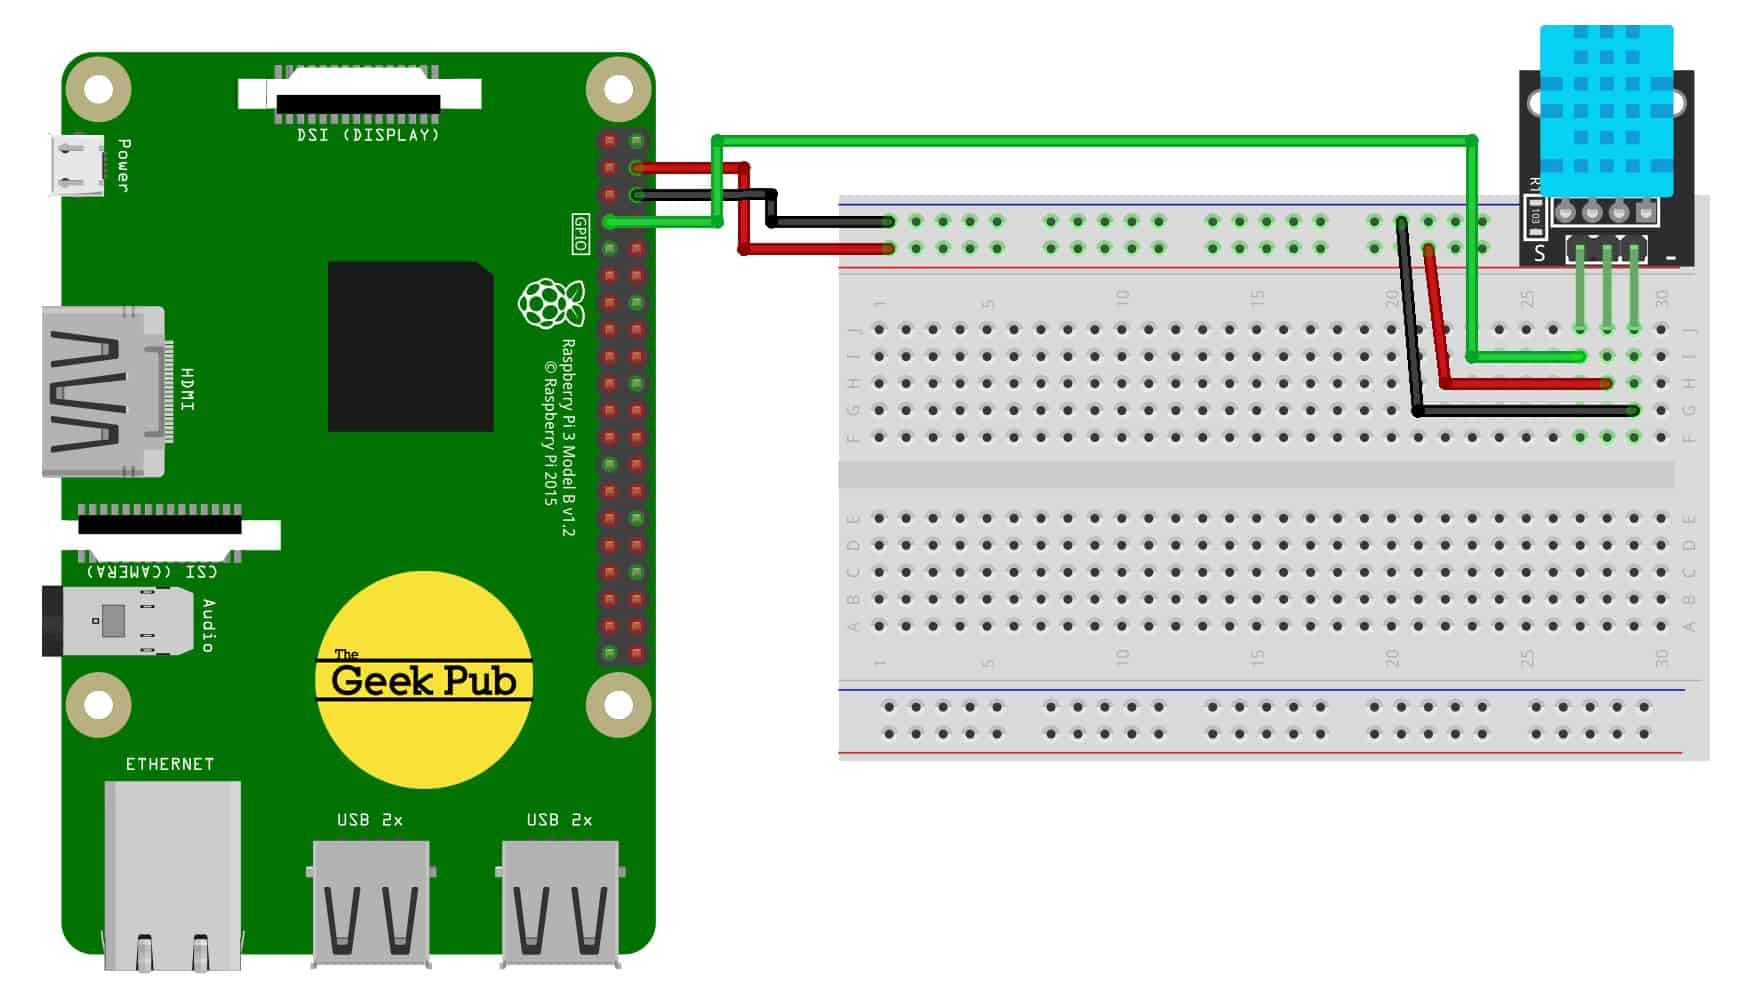
Install DHT11 library:
```bash
sudo pip3 install Adafruit_DHT
```
```python=
import Adafruit_DHT
import time
DHT_SENSOR = Adafruit_DHT.DHT11
DHT_PIN = 4
while True:
humidity, temperature = Adafruit_DHT.read(DHT_SENSOR, DHT_PIN)
if humidity is not None and temperature is not None:
print("Temp={0:0.1f}C Humidity={1:0.1f}%".format(temperature, humidity))
else:
print("Sensor failure. Check wiring.");
time.sleep(3);
```
:::success
TODO: Map the temperatuer to LED bar
(1) Map a range of temperature (low, high), e.g. (20, 30), that maps to (1, 10) leds
(2) Limit the led count if temperature is below/over low/high
:::
```python=
# Paste your code here
```
## 221105 OS setup, basic LED, HCSR-04
::: spoiler {state="open"}
### self intro
- education, hobbies, specialties, [hexapod](https://youtu.be/gW-sJxXskOU?t=130)


### Install OS and setup:
- Install debian on a SD card, [official pi imager](https://www.raspberrypi.com/software/), [Ref](https://www.tomshardware.com/how-to/set-up-raspberry-pi)
:::warning
Becareful when you insert/remove SD card on pi, make sure it's been turned off and unplugged.
Also, try not to touch the components on the board. Static charges are strong sometimes.
:::
- Connect to wifi
- Install anydesk on pi and your PC, [Ref](https://raspberrytips.com/install-anydesk-on-raspberry-pi/)
- Basic cmds: `ls`, `pwd`, `cd`, `mkdir`, `mv`, `cp`, `rm`, ..., [Ref](https://www.digitalocean.com/community/tutorials/linux-commands)
``` bash
ls # List the files under `pwd`
pwd # Show present working directory
cd <DIR> # Change present working directory to `<DIR>`, which can be relative or absolute address
touch <file_name> # If `<file_name>` does not exist, create an empty file named `<file_name>`
nano <file_name> # Edit a text file named <file_name>
rm <file_name> # Remove <file_name> (delete the file directly without going to trash can)
```
:::info
Important concept: present working directory, it's like where you are with the windows Media Explorer opened.
:::
:::success
TODO: Create a text file and remove it with commands.
:::
- SSH
- VS code
### python with basic GPIO:
- Connection:
(LED: the longer leg or the smaller piece is usually the positive side)
(Resistor: no polarity)
(Breadboard)

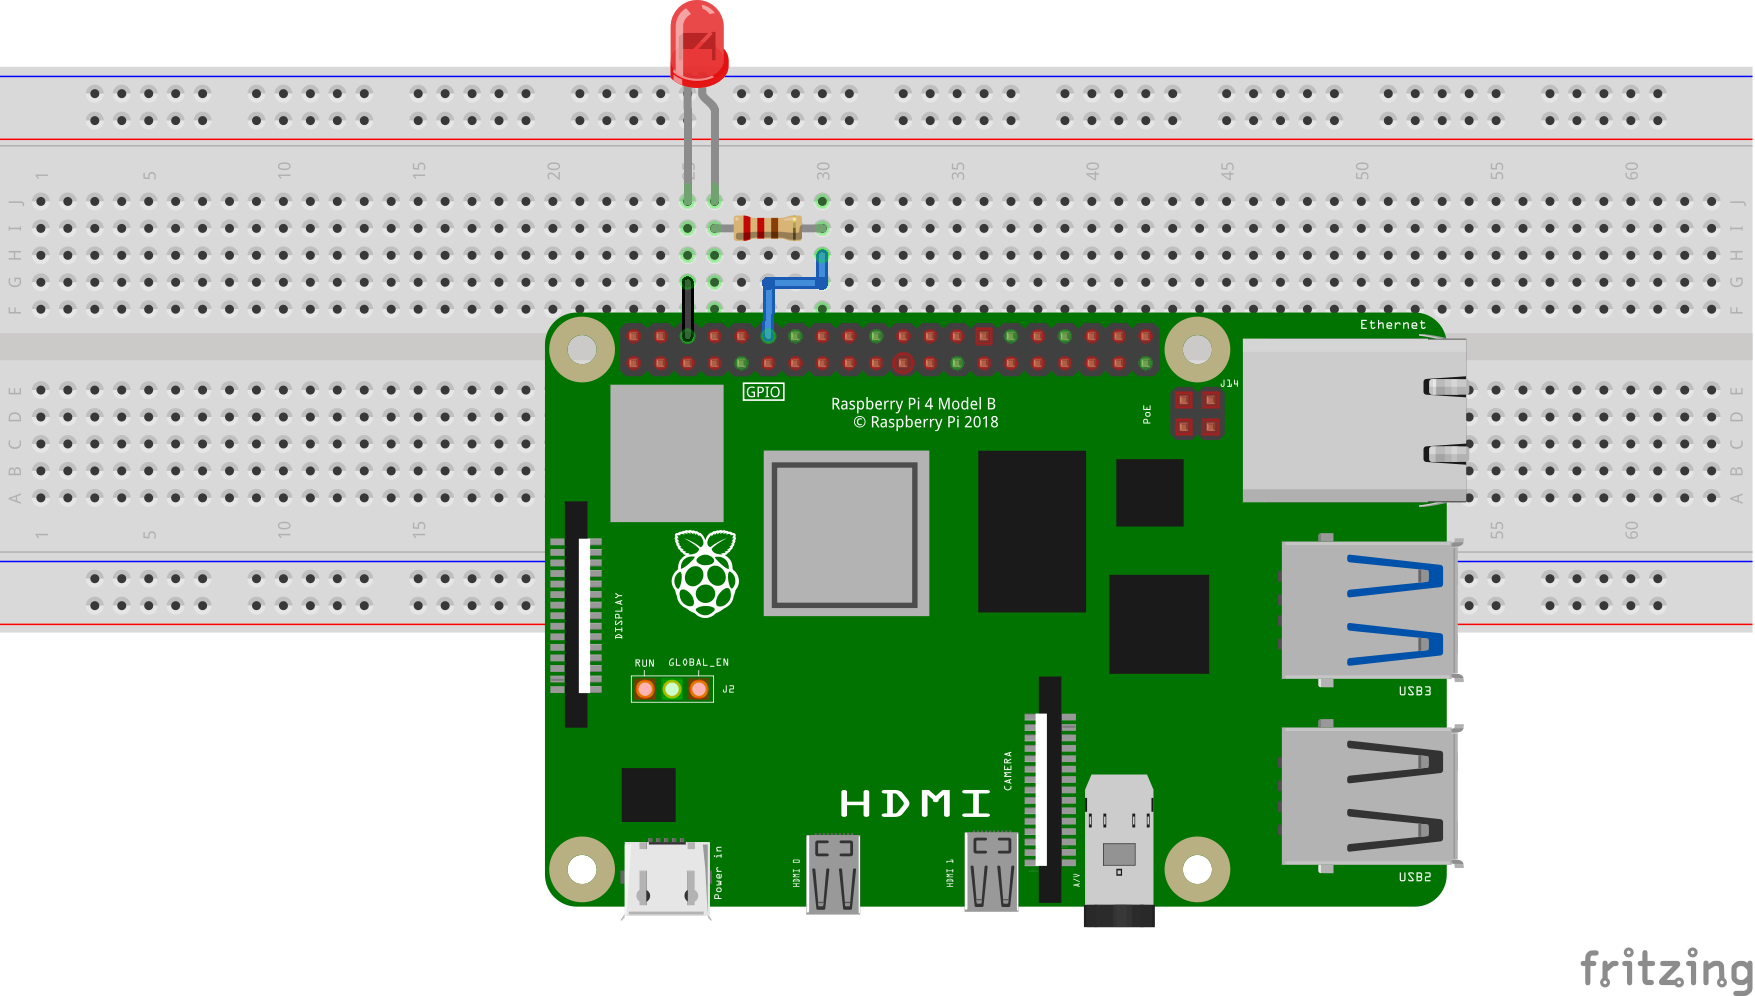
- LED on/off, [Ref](https://roboticsbackend.com/raspberry-pi-control-led-python-3/)
```python=
import RPi.GPIO as GPIO
import time
LED_PIN = 18
GPIO.setmode(GPIO.BCM) # set pin numbering mode
GPIO.setup(LED_PIN, GPIO.OUT)
for i in range(0, 5):
GPIO.output(LED_PIN, GPIO.HIGH)
time.sleep(1)
GPIO.output(LED_PIN, GPIO.LOW)
time.sleep(1)
GPIO.cleanup()
```
:::success
TODO: Blink the led for 20 times with a faster rate. (duration between on and off ~= 500)
:::
- LED PWM, [Ref](https://www.electronicwings.com/raspberry-pi/raspberry-pi-pwm-generation-using-python-and-c)
We can change the brightness by changing the output voltage. However, raspberry pi has only digital output, i.e., only on and off state. We toggle on and off quickly so that that human eyes cannot see and control the brightness by adjusting the ratio of time of on and off.

```python=
import RPi.GPIO as GPIO
import time
LED_PIN = 18
GPIO.setmode(GPIO.BCM) # set pin numbering mode
GPIO.setup(LED_PIN, GPIO.OUT) # set pin to output mode
GPIO.output(LED_PIN, GPIO.LOW) # turn pin to low
GPIO.setwarnings(False) # disable warnings
GPIO.setup(LED_PIN, GPIO.OUT)
pi_pwm = GPIO.PWM(LED_PIN, 1000) # create PWM instance with frequency
pi_pwm.start(0) # start PWM of required Duty Cycle
try:
while True:
for duty in range(0,101,1): # range(from, to+1, step), i.e., duty=0, 1, 2, 3..., 100
pi_pwm.ChangeDutyCycle(duty) # provide duty cycle in the range 0-100
time.sleep(0.05) # wait 0.05 second each time brightness is changed
time.sleep(1) # Wait 1 second after the loop
except KeyboardInterrupt:
print("Bye bye")
GPIO.cleanup()
```
:::success
TODO: Make it repeats: brighter --> dimmer --> brighter --> dimmer....
:::
- HC-SR04, distance sensor, [Ref](https://tutorials-raspberrypi.com/raspberry-pi-ultrasonic-sensor-hc-sr04/)
```python=
import RPi.GPIO as GPIO
import time
#GPIO Mode (BOARD / BCM)
GPIO.setmode(GPIO.BCM)
#set GPIO Pins
GPIO_TRIGGER = 18
GPIO_ECHO = 24
#set GPIO direction (IN / OUT)
GPIO.setup(GPIO_TRIGGER, GPIO.OUT)
GPIO.setup(GPIO_ECHO, GPIO.IN)
def distance():
# set Trigger to HIGH
GPIO.output(GPIO_TRIGGER, True)
# set Trigger after 0.01ms to LOW
time.sleep(0.00001)
GPIO.output(GPIO_TRIGGER, False)
StartTime = time.time()
StopTime = time.time()
# save StartTime
while GPIO.input(GPIO_ECHO) == 0:
StartTime = time.time()
# save time of arrival
while GPIO.input(GPIO_ECHO) == 1:
StopTime = time.time()
# time difference between start and arrival
TimeElapsed = StopTime - StartTime
# multiply with the sonic speed (34300 cm/s)
# and divide by 2, because there and back
distance = (TimeElapsed * 34300) / 2
return distance
# ----- main
try:
while True:
dist = distance()
print ("Measured Distance = %.1f cm" % dist)
time.sleep(1)
# Exit by pressing CTRL + C
except KeyboardInterrupt:
print("Measurement stopped by User")
GPIO.cleanup()
```
```python=
import RPi.GPIO as GPIO
import time
#GPIO Mode (BOARD / BCM)
GPIO.setmode(GPIO.BCM)
#set GPIO Pins
GPIO_TRIGGER = 18
GPIO_ECHO = 24
LED_PIN = 12
#set GPIO direction (IN / OUT)
GPIO.setup(GPIO_TRIGGER, GPIO.OUT)
GPIO.setup(GPIO_ECHO, GPIO.IN)
GPIO.setmode(GPIO.BCM) # set pin numbering mode
GPIO.setup(LED_PIN, GPIO.OUT) # set pin to output mode
GPIO.output(LED_PIN, GPIO.LOW) # turn pin to low
GPIO.setwarnings(False) # disable warnings
GPIO.setup(LED_PIN, GPIO.OUT)
def distance():
# set Trigger to HIGH
GPIO.output(GPIO_TRIGGER, True)
# set Trigger after 0.01ms to LOW
time.sleep(0.00001)
GPIO.output(GPIO_TRIGGER, False)
StartTime = time.time()
StopTime = time.time()
# save StartTime
while GPIO.input(GPIO_ECHO) == 0:
StartTime = time.time()
# save time of arrival
while GPIO.input(GPIO_ECHO) == 1:
StopTime = time.time()
# time difference between start and arrival
TimeElapsed = StopTime - StartTime
# multiply with the sonic speed (34300 cm/s)
# and divide by 2, because there and back
distance = (TimeElapsed * 34300) / 2
return distance
# ----- main
pi_pwm = GPIO.PWM(LED_PIN, 1000) # create PWM instance with frequency
pi_pwm.start(0) # start PWM of required Duty Cycle
try:
while True:
dist = distance()
print ("Measured Distance = %.1f cm" % dist)
duty = dist * 2
if dist > 100:
duty = 100
pi_pwm.ChangeDutyCycle(duty)
time.sleep(1)
# Exit by pressing CTRL + C
except KeyboardInterrupt:
print("Measurement stopped by User")
GPIO.cleanup()
```
:::success
TODO: When your hand gets closer to the sensor, make LED go brighter. vise versa.
:::
### Projects brainstorming
### Comments
:::
 Sign in with Wallet
Connect another wallet
Sign in with Wallet
Connect another wallet