###### tags: `hybpiper_wiki`
# Home - HybPiper Wiki
Welcome to the HybPiper wiki! These documents will cover more in depth installation instructions and tutorials for different ways to use HybPiper.
[Installation](Installation)
[Tutorial with Test Data](Tutorial)
[Dealing with Paralogs](Paralogs)
[Recovering Introns](Introns)
[Troubleshooting: Common Issues](Issues)
[Running HybPiper On a Cluster](HPC)
## 1.0 Preparing your files
***FixMe:*** _update figure below to remove (or update) references to intronerate.py, cleanup.py, and get_seq_lengths.py._ **MJ:** Made an image, although we still will want to have `hybpiper stats` incorporate `hybpiper get_seq_lengths`? (yes)
### 1.1 Read Files
HybPiper expects "clean" sequencing reads in FASTQ format. What "clean" means is up to the user, but we recommend [Trimmomatic](http://www.usadellab.org/cms/?page=trimmomatic) or [fastp](https://github.com/OpenGene/fastp), which can remove poor quality reads, trim poor quality base calls, and remove adapter sequences. If you have sequencing reads from Illumina NextSeq or Illumina NovaSeq, `fastp` is preferred, to remove homodimers from the ends of reads. If you are interested in calculating coverage depth exactly, you may also want to remove PCR duplicates, but this is not necessary for gene recovery.
HybPiper can accept either single-end or paired-end data. As of version 1.2, you may also include a file containing unpaired reads with the `--unpaired` flag.
It is a good idea to rename your read-files so that they contain a unique identifier for each sample. This will be useful for running HybPiper automatically on many samples. For an example, see the test dataset in the [Tutorial](Tutorial).
### 1.2 Target file
[**TODO add description of custom target files and low-complexity**]
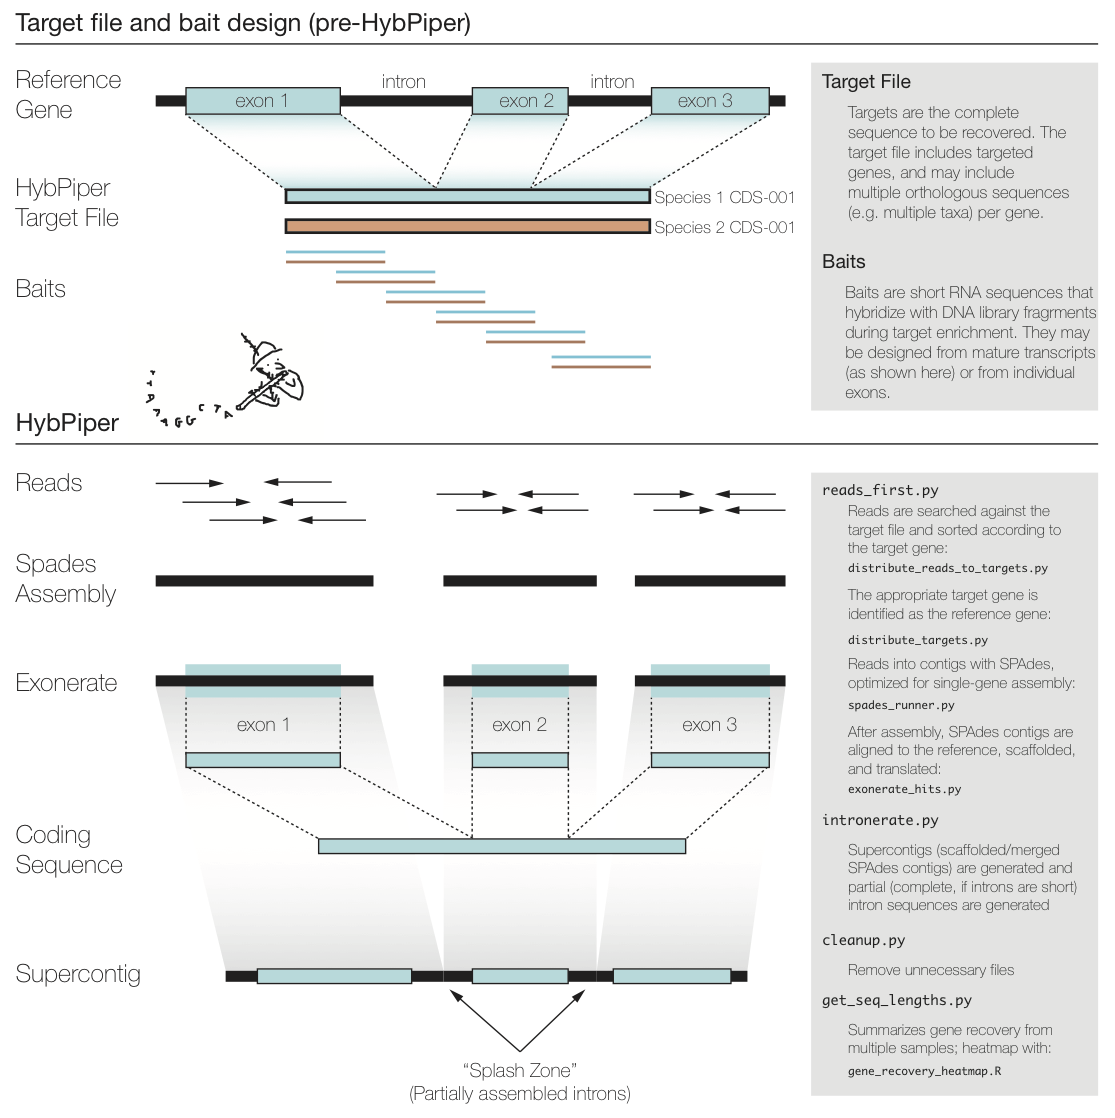
The figure above summarizes a typical exon enrichment setup that targets coding regions of genes for phylogenetics. The baits (short lines) are tiled across the exons. HybPiper uses the coding sequence portion of a gene for both mapping sequencing reads and for alignment of contigs. When generating a "target file" for HybPiper (see below), exon sequences should be concatenated for each gene. Another way to think of the target sequence is as the mature RNA sequence produced from this gene.
The reason HybPiper treats coding sequences this way is to more accurately detect the exon/intron boundary when aligning the assembled contigs against the reference sequence. HybPiper will align assembled contigs to the full gene sequence and will separate exon sequences from intron sequences.
HybPiper uses target sequences to first sort the reads and then extract exon sequences from assembled contigs, for each gene separately. In order to run HybPiper, you will need to prepare a "target file", which is a FASTA file that contains one or more homologous sequences for each gene.
If you are using HybPiper on data generated using HybSeq, the target file should contain the full-length reference sequences for each gene, *NOT* the probe sequences.
**IMPORTANT: If you are using BLAST or DIAMOND to map reads to targets, you need a PROTEIN target file. If you are using BWA, you need a NUCLEOTIDE target file.**
Construct a "target file" of protein sequences in FASTA format. It is ok to have more than one "source sequence" per target (e.g. orthologs from different species).
The ID for each sequence should include the target source and the protein ID, separated by a hyphen. For example:
```
>Amborella-atpH
MNPLISAASVIAAGLAVGLASIGPGVGQGTAAGQAVEGIARQPEAEGKIRGTLLLSLAFM
>Aneura-atpH
MNPLIPAASVIAAGLAVGLASIGPGIGQGTAAGQAVEGIARQPEAEGKIRGTLLSSPASM
>Amborella-rbcL
MSPKTETKASAGFKAGVKDYRLTYYTPDYETLATDILAAFRVTPQPGVPPEEAGAAVAAE
>Aneura-rbcL
MSPQTETKAGVGFKAGVKDYRLTYYTPEYETKETDILAAFRMTPQPGVPPEEAGAAVAAE
```
The construction of the target file can have a big impact on gene recovery. For a larger discussion of constructing target files, see the [FAQ]
## 2.0 Running the pipeline
### 2.1 Command overview table
If you previously used HybPiper 1.3 or earlier, use the table below to see how the older script names correspond to the new subcommands in Hybpiper 2.0 and newer.
| Command description | HybPiper 2.0 command | Old HybPiper 1.3 command/script |
| -------- | -------- | -------- |
| Assemble contigs and extract sequences | `hybpiper assemble` | `reads_first.py` |
| Extract intron and/or supercontig sequences | `hybpiper assemble --run_intronerate` | `intronerate.py`
| Get run statistics | `hybpiper stats` | `get_seq_lengths.py`, `hybpiper_stats.py`
| Clean up intermediate files | Not needed, now run automatically. If desired SPAdes assembly folders can be retained via `hybpiper assemble --keep_intermediate_files` | `cleanup.py`
| Recover gene (nucleotide or amino-acid), intron or supercontig sequences | `hybpiper retrieve_sequences` | `retrieve_sequences.py`
| Get gene recovery heatmap | `hybpiper recovery_heatmap` | `gene_recovery_heatmap.R`, `gene_recovery_heatmap_ggplot.R`
| Recover paralog sequences | `hybpiper paralog_retriever` | `paralog_retriever.py`
For full details on **parameters** available for each command, please see [Full Pipeline Parameters](FullPipelineParameters)
### 2.2 Command overview descriptions
### 2.2.1 Main sequence assembly and extraction pipeline
### `hybpiper assemble`
For a full tutorial using a test dataset, check out the [Tutorial](Tutorial) wiki.
HybPiper is run separately for each sample (single or paired-end sequence reads). When HybPiper generates sequence files from the reads, it does so in a standardized directory hierarchy. Many of the post-processing scripts rely on this directory hierarchy, so do not modify it after running the initial pipeline. It is a good idea to run the pipeline for each sample from the same directory. You will end up with one directory per run of HybPiper, and some of the later commands take advantage of this predictable directory structure.
To execute the entire pipeline, create a directory containing the paired-end (in this example) read files. The command `hybpiper assemble` will create a directory based on the fastq filenames (or use the name provided via the `--prefix` flag):
`Anomodon-rostratus_L0001_R1.fastq` ---> `Anomodon-rostratus/`
The following command will execute the entire pipeline on a pair of Illumina read files, using the targets in the file `targets.fasta`:
```
hybpiper assemble -r MySpecies_R1.fastq MySpecies_R2.fastq -t targets.fasta
```
The BLASTx version of the pipeline (default) will map the reads to amino-acid target sequences. Although it is slower than the BWA version, it may have higher specificity. Reads may not align to divergent nucleotide target sequences, which are required for the BWA version.
If you find the recovery efficiency is poor with BWA, you may want to try again with BLASTx or DIAMOND. See [FAQs link].
### 2.2.2 Post assembly and extraction pipeline
Optional commands after running the pipeline for multiple assemblies. **NOTE**: for these commands to work, the files must be in the same directory hierarchy created by the pipeline. (i.e. `SampleName/GeneName/SampleName/sequences/FAA/` and `SampleName/GeneName/SampleName/sequences/FNA/`).
### `hybpiper stats`
This command will summarize the recovery of genes from multiple samples. If you have all of these separate runs of `hybpiper assemble` in the same directory, create a `namelist.txt` file that contains a list of all the HybPiper directories for each sample (one per line), e.g.:
```
Sample1
Sample2
Sample3
```
Specify the location of the target file and whether it is amino acid or nucleotide on the command line. Specify the `namelist.txt` file and the type of sequence you want to recover statistics for (`gene` or `supercontig`):
**Example Command Line:**
```
hybpiper stats targets.fasta dna namelist.txt gene
```
The command will write a table in `*.tsv` format (default file name is `seq_lengths.tsv`, but this can be changed using the `--seq_lengths_filename` parameter). The first line is a header containing the gene names. The second line contains the length of the reference for each gene. If there are multiple reference sequences for each gene, an average value is reported. Note: even if a target file containing amino-acid sequences was used, the values will correspond to length in nucleotides. The remaining lines are the lengths recovered by `hybpiper assemble` for each sample, with one sample per line (one column per gene). If the gene is missing, a 0 is present.
If `gene` sequences are requested, a warning will print to `stderr` if any sequences are longer than 1.5x the average reference length for that gene. This warning will not be printed in `supercontig` sequences are requested, as these are expected to be substantially longer than the refernce length in some cases, due to introns.
**Example output:**
| Species | rbcL | trnL |
| -------- | -------- | -------- |
| MeanLength | 3252.0 | 1821.6 |
| funaria | 3660 | 1758 |
| timmia | 3057 | 1821 |
The `hybpiper stats` command will then summarize target enrichment and gene recovery efficiency for a set of samples. The output is a table in `*.tsv` format (default file name is `hybpiper_stats.tsv`, but this can be changed using the `--stats_filename` parameter) with one sample per line and the following statistics:
| ColumnName | Description |
| -------- | -------- |
| Name | Sample name corresponding to the parameter `--prefix` or generated from read files. |
| NumReads | Total number of input reads in the `*.fastq` files provided. |
| ReadsMapped | Total number of input reads that mapped to sequences in the target file. |
| PctOnTarget | Percentage of reads in the input `*.fastq` files that mapped to sequences in the target file. |
| GenesMapped | Number of genes in the target file that had reads mapped to their representative sequence(s). |
| GenesWithContigs | From genes with mapped reads, the number of genes for which SPAdes assembled contigs. |
| GenesWithSeqs | From genes with SPAdes contigs, the number of genes that had coding sequences extracted after Exonerate searches of contigs vs the target file reference sequence. |
| GenesAt25pct | Number of genes with sequences > 25% of the mean target length. |
| GenesAt50pct | Number of genes with sequences > 50% of the mean target length. |
| GenesAt75pct | Number of genes with sequences > 75% of the mean target length. |
| GenesAt150pct | Number of genes with sequences > 150% of the mean target length.|
| ParalogWarningsLong | Number of genes that had more than one coding sequence extracted from different contigs by Exonerate searches, each covering more than 75% (default) the length of the selected target file reference sequence. |
| ParalogWarningsDepth | Number of genes where the coverage depth of coding sequences extracted by Exonerate was >1 for 75% (default) the length of the selected target file reference sequence. Coding sequences can be of any length. |
| GenesWithoutStitchedContigs | Number of genes with sequence derived from a single SPAdes contig. |
| GenesWithStitchedContigs | Number of genes with sequence derived from multiple SPAdes contigs. |
| GenesWithStitchedContigsSkipped | Number of genes for which stitched contig creation was skipped (i.e. if the flag `--no_stitched_contig` was provided to the command `hybpiper assemble`). |
For further details, see [Wiki link to add]
### `hybpiper recovery_heatmap`
This command takes the sequence length table output of `hybpiper stats` and creates a figure to visualize the recovery efficiency.
**Example command line:**
```
hybpiper recovery_heatmap seq_lengths.tsv
```
By default, the command saves the figure as a `*.png` file at 300 DPI. This can be changed via the parameters `--heatmap_filetype` and `--heatmap_dpi`, respectively. For full command options, use `hybpiper recovery_heatmap -h`.
The output will look something like this:

Each row shows a sample, and each column is a gene. The amount of shading in each box corresponds to the length of the gene recovered for that sample, relative to the length of the reference (target coding sequence), or mean reference length if there is more than one reference for a given gene.
***FixMe:*** _Matt - the description below isn't accurate (i.e. there are no white columns)?_
In this case, there are a few samples for which few or no genes were recovered (white boxes in rows) and a few genes that had poor recovery across samples (white and light gray).
### `hybpiper retrieve_sequences`
This command fetches either:
1) The sequences recovered from the same gene for all samples; generates an unaligned multi-FASTA file for each gene.
2) The sequences recovered from each gene for a single sample; generates a single multi-FASTA file.
This script will get the sequences generated from multiple runs of the command `hybpiper assemble`. Make sure you have all of the runs in the same directory. Gene names will be retrieved from the target file used in the run of the pipeline.
**Example Command Line (all samples):**
```
hybpiper retrieve_sequences targets.fasta dna --sample_names namelist.txt
```
You must specify whether you want the protein (aa) or nucleotide (dna) sequences.
If you ran `intronerate` on these samples via supplying the flag `--run_intronerate` to the command `hybpiper assebmble`, you can also specify "supercontig" or "intron" to recover those sequences instead.
By default, `hybpiper retrieve_sequences` will output unaligned fasta files (one per gene) to the current directory. Alternatively, an output directory can be specified using the `--fasta_dir` parameter, e.g. `--fasta_dir 01_dna_seqs`
**Example Command Line (single sample):**
```
hybpiper retrieve_sequences.py targets.fasta dna --single_sample_name sample_name
```
As for above, you can retrieve protein (`aa`) or nucleotide (`dna`) sequences, as well as `intron` and `supercontig` sequences if Intronerate was run.
### `hybpiper paralog_retriever`
In many HybSeq target capture designs, care is taken to avoid enrichment for genes with paralogous sequences in the target genomes. However, gene duplication and paleopolyploidy (especially in plants) makes it difficult to completely avoid paralogs. Given enough read depth, it may be possible to identify paralogous sequences with HybPiper.
If the SPAdes assembler generates multiple contigs that contain coding sequences representing 75% (default value) of the length of the reference protein, HybPiper will print a warning for that gene. It will also write the names of the contigs in `<prefix>/<gene_name>/<prefix>/paralog_warning_long.txt`, and will write a collated list of all genes with paralog warnings to `<prefix>/<prefix>_genes_with_long_paralog_warnings.txt`.
If many of your genes have paralogs, one approach could be to add the paralog coding sequence to your target file as a separate gene, and re-run HybPiper. Reads that have a better mapping to the paralog will be sorted accordingly.
For more in-depth discussion about paralogs, see the examples in [the paralog tutorial.](https://github.com/mossmatters/HybPiper/wiki/Paralogs)
-----
## 3.0 Summary
The major steps of the pipeline include:
1. Blast, DIAMOND, or BWA search of the reads against the target sequences.
2. Distribution of reads into separate directories (one per gene).
3. Assembly of reads for each gene into contigs using SPAdes.
4. Conduct an Exonerate search using the protein sequence of the 'best' target reference as the query, and the SPAdes nucleotide contigs as targets. If multiple contigs match the same protein (correcting for overlapping or fully-nested contigs), stitch the hits together into a "stitched contig".
5. In a subdirectory, generate separate FASTA files containing either the nucleotide (FNA) or amino acid (FAA) sequence for each protein.
6. In a subdirectory, generate a FASTA file containing any 'long' paralog sequence present for a given gene/sample.
7. If the flag `--run_intronerate` was provided to the `hybpiper assemble` command, generate separate FASTA files containing the intron or supercontig (exons and introns) sequences for each protein (if present for a given gene/sample).
-----
# Sections to add (here or on different wiki pages?)
## General FAQ
- BLAST vs DIAMOND vs BWA.
- Effect of BLAST evalue.
- Effect of target file sequences (repeats, low complexity areas, etc.).
## Extended options section
- Use of unpaired reads
## Links to other helpful software, e.g. NewTargets?
- Also the variantcall script we used to call variants on supercontigs
 Sign in with Wallet


