最近開始Study FreeRTOS,買了一塊STM32F103開發板。參考 [FreeRTOS on STM32F103C8T6](https://www.hackster.io/Sparky/freertos-on-stm32f103c8t6-1a2413) (Many thanks to Aurelian Ioan) 的步驟在STM32F103C8T6開發板上把FreeRTOS跑起來。這裡做個筆記紀綠下來。
[toc]
## 1. 需要的軟硬體
* STM32F103C8T6 開發板Blue Pill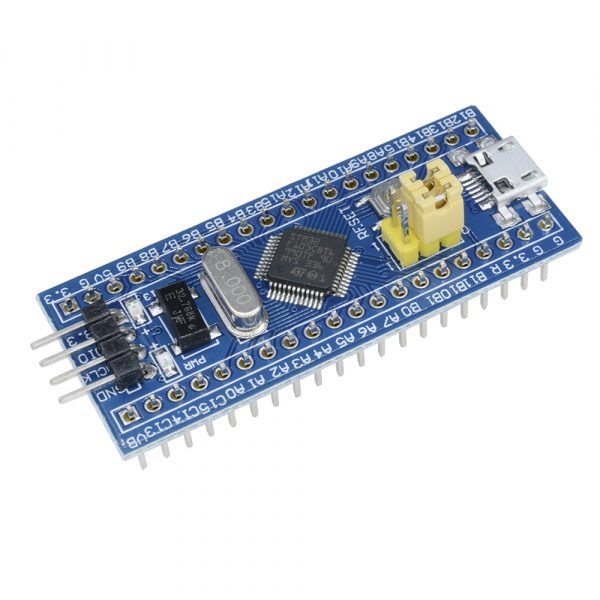
[電路圖](https://www.google.com/url?sa=t&source=web&rct=j&url=https://stm32-base.org/assets/pdf/boards/original-schematic-STM32F103C8T6-Blue_Pill.pdf&ved=2ahUKEwjdkpTNkNn_AhUUVN4KHSBoDSAQFnoECBQQAQ&usg=AOvVaw2szMOREhHWFmID6KVGrzDt)
* USB to USART converter (eg. FTDI或PL2303)

我手上的是PL2303。
[PL2303HXA PHASED OUT SINCE 2012, PLEASE CONTACT YOUR SUPPLIER問題解決辦法](https://mintrabbitplus.com/2021/12/20/%E8%A7%A3%E6%B1%BAwindows-10-%E4%B8%AD%EF%BC%8C%E3%80%8Cpl2303hxa-%E8%87%AA2012-%E5%B7%B2%E5%81%9C%E7%94%A2%EF%BC%8C%E8%AB%8B%E8%81%AF%E7%B9%AB%E6%82%A8%E7%9A%84%E8%B3%BC%E8%B2%B7%E5%BB%A0%E5%95%86/)
* ST-Link V2 for STM8 & STM32

[驅動與安裝](https://blog.csdn.net/liuyi1591537136/article/details/127260436)
[使用說明](https://datasheet.lcsc.com/szlcsc/Chengdu-Ashining-Tech-ST-LINK-V2-STM8-STM32_C186718.pdf)
* [ARM Keil MDK uVision software](https://developer.arm.com/documentation/101407/0538/User-Interface/uVision-GUI)
我安裝的版本是v5.38

## 2. Keil MDK需要先裝Pack
* 點選Pack Installer Icon

* Search **STM32F103C8**

然後把下面這些Pack裝起來
* Keil::STM32F1xx_DFP
* ARM::CMSIS
* ARM::CMSIS-Driver
* ARM::CMSIS-FreeRTOS
* Keil::ARM_Compiler
## 3. Create MDK Project
* Create a new project click on the **Project** -> **"New uVision Project**".

* 指定好Project Name之後 Search **stm32f103c**8 點選後按下OK

* 選取 **CMSIS** -> **CORE**

* 選取 **CMSIS Driver** -> **USART(API)** -> **USART** ,如果出現黃色的方塊的話,按下面的 **Resolve** Button

* 選取 **Compiler** -> **I/O** -> **STDOUT選取User**以及 **Device** -> **DMA, GPIO及Startup**

* **RTOS** 選取設定 **Config 選取[FreeRTOS]**, **Heap**, **Timers**

* Project Create完成後,如下圖所示。基本上project已經create完成。

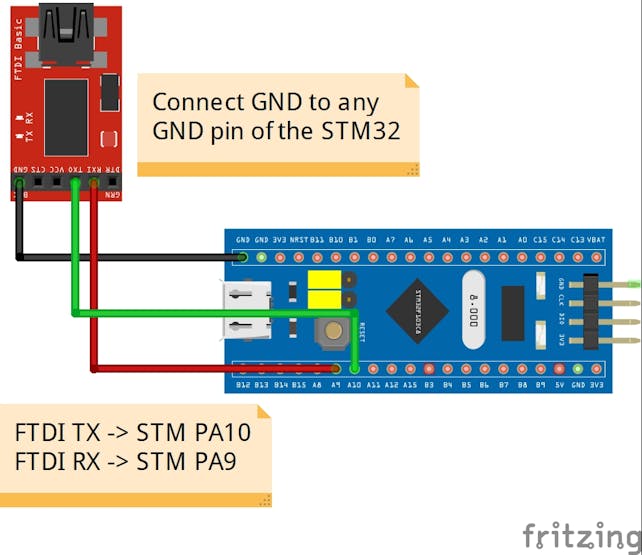
## 4. Enable USART1 並指定Tx/Rx Pin
* 點選**Target 1** --> **Device** --> **RTE_Device.h**

* 修改下面的#define,Enabe USART1, 指定Tx pin到PA9, Rx pin到PA10
```c
// <e> USART1 (Universal synchronous asynchronous receiver transmitter)
// <i> Configuration settings for Driver_USART1 in component ::CMSIS Driver:USART
#define RTE_USART1 1
// <o> USART1_TX Pin <0=>Not Used <1=>PA9
#define RTE_USART1_TX_PORT_ID_DEF 1
// <o> USART1_RX Pin <0=>Not Used <1=>PA10
#define RTE_USART1_RX_PORT_ID_DEF 1
```
## 5. 把printf輸出導向到USART
* Target 1右鍵 **Add New Item to Group..**

* **User Code Template** --> **Compier** --> **STDOUT via USART** 按**Add**

* 修改**stdout_USART.c** 把 **USART_DRV_NUM** 改成 1, **USART_BAUDRATE** 改成 115200
```c
// <o>Connect to hardware via Driver_USART# <0-255>
// <i>Select driver control block for USART interface
#define USART_DRV_NUM 1
// <o>Baudrate
#define USART_BAUDRATE 115200
```
## 6. 加入main.c 測試code
```c
/* Include files */
#include <stdio.h>
#include <stdlib.h>
#include "FreeRTOS.h"
#include "task.h"
#include "semphr.h"
/* The task functions prototype*/
void vTask1( void *pvParameters );
void vTask2( void *pvParameters );
/* Task parameter to be sent to the task function */
const char *pvTask1 = "Task1 is running.";
const char *pvTask2 = "Task2 is running.";
/* Extern functions */
extern void SystemInit(void);
extern void SystemCoreClockUpdate(void);
extern int stdout_init (void);
/*-----------------------------------------------------------*/
/* Global semaphore variable */
SemaphoreHandle_t xSemaphore = NULL;
int main( void )
{
/* Board initializations */
SystemInit();
/* This function initializes the MCU clock, PLL will be used to generate Main MCU clock */
SystemCoreClockUpdate();
/* Initialize the serial I/O(console ), making standard output to be send to USART1 */
stdout_init();
printf("Initialization is done.\r\n");
/* Create one of the two tasks. */
xTaskCreate(vTask1, /* Pointer to the function that implements the task. */
"Task 1", /* Text name for the task. This is to facilitate debugging only. */
configMINIMAL_STACK_SIZE, /* Stack depth in words. */
(void*)pvTask1, /* We are not using the task parameter. */
1, /* This task will run at priority 1. */
NULL ); /* We are not using the task handle. */
/* Create the other task in exactly the same way. */
xTaskCreate( vTask2, "Task 2", configMINIMAL_STACK_SIZE, (void*)pvTask2, 1, NULL );
/* Create a binary semaphore */
xSemaphore = xSemaphoreCreateBinary();
/* make the semaphore token available for the first time */
xSemaphoreGive( xSemaphore);
/* Start the scheduler so our tasks start executing. */
vTaskStartScheduler();
/* If all is well we will never reach here as the scheduler will now be
running. If we do reach here then it is likely that there was insufficient
heap available for the idle task to be created. */
for( ;; );
}
/*-----------------------------------------------------------*/
void vTask1( void *pvParameters )
{
char *pcTaskName = (char *) pvParameters;
/* Task is implemented in an infinite loop. */
for( ;; )
{
/* Take semaphore */
xSemaphoreTake(xSemaphore,(TickType_t) portMAX_DELAY);
/* Print out the name of this task. */
printf( "%s\r\n",pcTaskName );
/* Give semaphore */
xSemaphoreGive(xSemaphore);
/* Delay for a period. */
vTaskDelay( 2000 / portTICK_PERIOD_MS );
}
}
/*-----------------------------------------------------------*/
void vTask2( void *pvParameters )
{
char *pcTaskName = (char *) pvParameters;
/* Task is implemented in an infinite loop. */
for( ;; )
{
/* Take semaphore */
xSemaphoreTake(xSemaphore,(TickType_t) portMAX_DELAY);
/* Print out the name of this task. */
printf( "%s\r\n",pcTaskName );
/* Give semaphore */
xSemaphoreGive(xSemaphore);
/* Delay for a period. */
vTaskDelay( 2000 / portTICK_PERIOD_MS );
}
}
```
main.c主要執行如下:
* MCU使用 SystemInit() 初始化,Clock使用 SystemCoreClockUpdate() 和 stdout_init() 初始化 USART1 設置。
* 創建了 2 個Task和一個Binary Semaphore
* FreeRTOS Task Scheduler 啟動
* 這兩個Task將以相同的優先級運行,因此它們將具有相同的執行時間。 Semaphore用於防止兩個Task同時競爭輸出相應的字符串。
* 當Task 1 處於“運行”狀態時,它將獲取Semaphore,使用 printf() 並將Semaphore返回給另一個Task使用。 如果Task 2 在Task 1 使用Semaphore時嘗試獲取Semaphore,它將進入“阻塞”狀態並等待Semaphore可用。
## 7. 編譯問題解決
* **Project** --> **Build Target (F7)** 可進行編譯
* 出現下列的Build Error

* 解決方法
* **Option for Target (Alt+ F7)**
選**C/C++(AC6)** Page把**Language C**改成**c99**

* **Target 1** --> **RTOS** --> **FreeRTOSConfig.h** 修改 **configUSE_TIMERS** 為 1
```c
#define configUSE_TIMERS 1
```
## 8. 接線
* [STM32F103C8開發板與ST-Link V2的連接](https://blog.csdn.net/weixin_49815165/article/details/120056630)

* STM32F103C8開發板USART1與USB_UART的連接
## 9. 燒錄image
* 設定ST-Link V2 Debugger
* **Option for Target (Alt+ F7)**
選**Debug** Page把**Use**改成**ST Link Debugger**然後按下**Settings**

* 把Clock改成2 MHz

* 燒錄image
Flash --> Download (F8)即可燒錄image
## 11. Task問題解決
* 燒錄完image後,按下板子的reset key,發現只有 **Initialization is done.** 的打印。
Task1, Task2的打印沒有出來。

* 使用 **Debug-> Start/Stop Debug Session (Ctrl+F5)** 用Download的方式定位問題

* 問題#1 : Assert在 **task.c vTaskStartScheduler()** 2066行。

解決方式:
**Target 1** --> **RTOS** --> **FreeRTOSConfig.h** 修改 **configMINIMAL_STACK_SIZE** 為 128
```c
#define configMINIMAL_STACK_SIZE ((uint16_t)128)
```
* 問題#2 : Assert在 **port.c xPortStartScheduler()** 320行。

解決方式:
**Target 1** --> **RTOS** --> **FreeRTOSConfig.h** 修改 **configPRIO_BITS** 為 4
```c
#define configPRIO_BITS 4
```
## 12. 輸出結果
解決問題後,就可以看到輸出結果的打印了。

Project commit to github
https://github.com/lucas0514/freertos-stm32f103c8t6