---
title: 4/29 機器學習課程
tags: 機器學習
description: View the slide with "Slide Mode".
---
## 我是寶可夢訓練師!
<!-- 放課程 ppt link-->
課前準備:https://hackmd.io/s/HkF3yLbsN
---
<!-- .slide: data-background="https://i.imgur.com/cTqiyhS.jpg"-->
<!--  -->
Note:
---
## 陽春版神奇寶貝圖鑑
----
<!-- .slide: data-background="https://i.imgur.com/shASwmi.jpg" -->
<span style="color:black; float:right">**皮卡丘**<!-- .element: class="fragment" data-fragment-index="1" --></span>
----
<!-- .slide: data-background="https://i.imgur.com/R58qbRG.jpg" -->
<span style="color:black; float:right">**妙蛙種子**<!-- .element: class="fragment" data-fragment-index="1" --></span>
---
## DEMO
---
## PYTHON
打開 Jupyter 新增一個 python 檔~
----
## 註解
```python
# 這是註解!
# 用一個井字號
# 在這裡講話電腦不會知道
# 通常用來提醒自己程式在幹麻~
```
----
## 函式 function
* 各式各樣的機器
* 自己做
* 用別人做好的!
* Python 是個厲害的工廠 :)
```python
# [函式格式] 機器名稱(放入機器的東西)
# print 是一台印表機
print("hello world!")
```
----
## 變數 variable
* 裝各種東西的杯子
* 裝的方式:**等於**
```python
name = "PIKA" # 字串(話)要加" "
age = 20 # 數字 不用加" "
# 印出來試試看
print(name)
print(age)
print(age+1)
```
----
## 陣列 array
我想記錄每個同學的名字!
```python
student1 = "pikachu"
student2 = "hebe"
student3 = "IU"
student4 = "I am so tired...."
```
----
## 陣列 array
* 橫排櫃子,有很多格可以裝東西!
```python
students = ["pikachu", "hebe", "IU", "Mr. happy"]
# 櫃子從零號開始算
print(students[0])
print(students[3])
```
----
## 陣列 array
```python
students.append("Mrs. new")
print(students)
```
----
## 自己做函式 function
* *參數*:放入機器的東西
* *回傳*:機器做完的東西
```python
# [定義函式格式] def 函式名稱(函式參數):
def my_add(a, b):
# 用 tab 代表函式裡面的程式
# [回傳格式] return 回傳的東西
return a+b
# 這裡是機器外面了,呼叫函式!
my_add(32, 3)
```
----
## 迴圈
有禮貌地**說十次**你好!
```python
print("你好")
print("你好")
print("你好")
print("你好")
```
<span>... 手寫好累<!-- .element: class="fragment" data-fragment-index="1" --></span>
----
## 迴圈
重複執行!
```python
# 重複做 10 次
for i in range(10):
#tab 代表下面的內容在迴圈裡面
print("你好")
```
----
## 迴圈
叫出每一個同學的名字!
```python
# 每次找一個 students 裡面的每個名字 name
# 印出 name
for name in students:
print(name)
```
---
## 流程
* <span style="color:#FEB2AD">資料</span>
* <span style="color:#FFE684">機器學習</span>
* <span style="color:#BAF2E8">預測</span>
---
## <span style="color:#FEB2AD">資料</span>
* 讀取資料
* 處理照片
* 紀錄標籤
* 切割資料
---
## <span style="color:#FEB2AD">>_ </span>讀取資料
----
* data
* train
* bulbasaur(妙蛙)
* charmander(小火龍)
* pikachu(皮卡丘)
* squirtle(傑尼龜)
* test
* 創一個新的 python 檔!(和 data 同一層)

Note:
提醒接下來會寫一連串的程式,告一段落會停下來讓大家完成,中間就盡量跟~
----
## Import
拾人牙慧 :)
```python
# import 套件名字
import keras
import os
# import 套件名字 as 幫他取個綽號
import numpy as np
import matplotlib.pyplot as plt
# from 套件名稱 import 套件裡的特定函式
from PIL import Image
from random import shuffle
```
<span style="color:red">**Run!**</span>
----
定義一個函式,準備讀圖片!
```python
def load_data(dir_path):
data = [] #紀錄資料,一開始沒有圖片
return data #回傳資料陣列
train_data = load_data("./data/train")
print(train_data)
```
<!-- <span style="color:red">**!!**</span> 函示裡的 data 只能在函式用,外面的 data 和函示裡的不同~ -->
Note:
注意 for 裡面的變數
----
找到 data 資料夾底下的所有資料夾
```python
def load_data(dir_path):
data = []
# 對 data 資料夾裡的所有資料夾做事
for pokemon_name in os.listdir(dir_path):
print(pokemon_name)
# 把 pokemon_name 加到照片路徑的後面,變成新路徑
pokemon_path = os.path.join(dir_path, pokemon_name)
print(pokemon_path)
return data
# 呼叫函式
train_data = load_data("./data/train")
```
----
找到寶可夢資料夾底下的所有檔案
```python
def load_data(dir_path):
data = []
for pokemon_name in os.listdir(dir_path):
pokemon_path = os.path.join(dir_path, pokemon_name)
# 對每一個寶可夢資料夾裡面的東西做事
for img_file in os.listdir(pokemon_path):
path = os.path.join(pokemon_path, img_file)
print(path)
return data
train_data = load_data("./data/train")
```
---
<!-- ## <span style="color:#FEB2AD">>_ </span>處理照片 -->
---
## <span style="color:#FEB2AD">>_ </span>處理照片
----
## 圖片格式
----
## 圖片也是陣列!

----
```python
def load_data(dir_path):
data = []
for pokemon_name in os.listdir(dir_path):
# ... 省略
for img_file in os.listdir(pokemon_path):
path = os.path.join(pokemon_path, img_file)
# 把圖片存起來
img = Image.open(path)
data.append(np.array(img))
return data
```
----
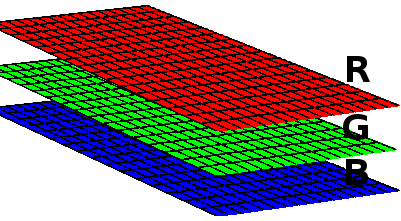
## 想像一下 data
* 圖書館(陣列)
* 樓層(圖片數量)
* 三個櫃子(圖片)
* 每個櫃子(R/G/B)
* 櫃子裡的一格 (Pixel)
----
印出圖片看看
```python
# 把照片 show 出來!
train_data = load_data("./data/train")
plt.imshow(train_data[0]) #第一張照片
```
----
把圖片縮小!
```python
IMG_SIZE = 96
def load_data(dir_path):
data = []
for pokemon_name in os.listdir(dir_path):
# ... 省略
for img_file in os.listdir(pokemon_path):
path = os.path.join(pokemon_path, img_file)
img = Image.open(path)
# 把圖片縮小
img = img.resize((IMG_SIZE, IMG_SIZE),
Image.ANTIALIAS)
# 除以 255!
data.append(np.array(img)/255.)
#shuffle!
shuffle(data)
return data
```
<span style="color:red">**再印出圖片**</span>
Note:
Wait
---
<!--
## <span style="color:#FEB2AD">>_ </span>紀錄標籤 -->
---
## <span style="color:#FEB2AD">>_ </span>紀錄標籤
---
## 標籤是什麼?
----

----
<!-- .slide: data-background="https://i.imgur.com/HV3iXrf.jpg" -->
Note:

----
皮卡丘 妙蛙種子
<div>[ 0 , <span style="color:green">1</span> ]
</div>
<div>
[ <span style="color:yellow">1</span> , 0 ]<!-- .element: class="fragment" data-fragment-index="1" -->
</div>
<div>
<span style="color:gray">可能預測結果</span>
[ <span style="color:yellow">0.7</span> , <span style="color:green">0.3</span> ]<!-- .element: class="fragment" data-fragment-index="2" -->
</div>
----
皮卡丘 妙蛙種子 小火龍
<div>[ 0 , <span style="color:green">1</span> , 0 ]
</div>
<div>[ <span style="color:yellow">1</span> , 0 , 0 ]<!-- .element: class="fragment" data-fragment-index="1" -->
</div>
<div>[ 0 , 0 , <span style="color:red">1</span> ]<!-- .element: class="fragment" data-fragment-index="2" -->
</div>
<div>
<span style="color:gray">可能預測結果</span>
[ <span style="color:yellow">0.1</span> , <span style="color:green">0.3</span> , <span style="color:red">0.6</span> ]<!-- .element: class="fragment" data-fragment-index="3" -->
</div>
----
定義一個新的函式分標籤!
```python
# 宣告有哪些寶可夢
POKEMONS = ["pikachu", "bulbasaur", "charmander", "squirtle"];
def label_img(pokemon_name):
arr = np.zeros(len(POKEMONS))
ind = POKEMONS.index(pokemon_name)
arr[ind] = 1
return arr
label_img("pikachu")
```
----
## data 格式
```python
def load_data(dir_path):
data = []
```
* 圖書館(陣列)
* 樓層(圖片數量)
* 三個櫃子(圖片)
* 每個櫃子(R/G/B)
* 櫃子裡的一格 (Pixel)
----
## data 格式
* 圖書館(陣列)
* 樓層(圖片數量)
* 三個櫃子(圖片)
* 每個櫃子(R/G/B)
* 櫃子裡的一格 (Pixel)
* 小櫃子(標籤)
----
```python
IMG_SIZE = 96
def load_data(dir_path):
data = []
for pokemon_name in os.listdir(dir_path):
# 查找標籤
label = label_img(pokemon_name)
# ... 省略
for img_file in os.listdir(pokemon_path):
# ... 省略
# 把標籤也加入 data
data.append([np.array(img)/255., label])
shuffle(data)
return data
```
----
印出圖片+標籤
```python
# 把照片 show 出來!
train_data = load_data("./data/train")
plt.imshow(train_data[0][0])
print(train_data[0][1])
```
試試看 test 資料夾裡的
``` python
test_data = load_data("./data/test")
```
---
<!-- ## <span style="color:#FEB2AD">>_ </span>切割資料 -->
---
## <span style="color:#FEB2AD">>_ </span>切割資料
----

----
## 訓練資料 Train data

* 讓機器學習的資料
* 課本!
----
## 驗證資料 Validation data

* 讓機器檢視自己的學習狀況、進一步改善
* 參考書 / 小考!
* 可以一寫再寫 > ^ <
----
## 測試資料 Test

* 測試機器學得好不好
* 學測
* 考差就重來 QQ
----
把圖書館分成:**圖片**圖書館、**標籤**圖書館
``` python
train_image = np.array([i[0] for i in train_data])
train_label = np.array([i[1] for i in train_data])
test_image = np.array([i[0] for i in test_data])
test_label = np.array([i[1] for i in test_data])
```
---
## <span style="color:#FFE684">機器學習</span>
* CNN model
* Train
---
## <span style="color:#FFE684">>_ </span>CNN

----
## convolution layer

----
## kernel
* NxN視窗
`0x0 + 0x0 + 0x1+ 0x1 + 1x0 + 0x0 + 0x0 + 0x1 + 0x1 = 0`

----

----
## 抽出特徵

----
## Activation

Note:
補充 Neuron?
EX: 圖片特徵邊界不夠明顯?
What it does is, it calculates the ‘weighted sum’ and adds direction and decides whether to ‘fire’ a particular neuron or not
----
## pooling layer

Note:
Max Pooling:抗雜訊功能。
----
## Fully Connected Layer

----
## Fully Connected Layer

----
## Overview
* 圖片 ==-convolution layer->== 特徵圖片
* 特徵圖片 ==-maxpooling layer->== 小圖片
* 小圖片 ==-fully connected layer->== 結果!
----
## Import
```python
from keras.models import Sequential
from keras.layers import Conv2D, MaxPooling2D
from keras.layers import Flatten,Dense
from keras.layers import BatchNormalization
from keras.layers import Dropout, Activation
```
----
## Sequential
* 一層一層加入!
```python
model = Sequential()
#model.add()
```
----
## Conv2D
* filter size(32):幾種filter
* kernel_size:幾乘幾的視窗
* activation:activation function 名稱
* input_shape:第一次須定義,一張圖片的大小
```python
# 每張圖的大小
INPUT_SHAPE = (IMG_SIZE, IMG_SIZE, 3)
model = Sequential()
# 新增一層 convolution layer
model.add(Conv2D(32, kernel_size = (3, 3),
activation = 'relu', input_shape = INPUT_SHAPE))
```
----
## MaxPooling
* pool_size:在幾乘幾裡找最大值
```python
# 新增一層 maxpooling
model.add(MaxPooling2D(pool_size = (2,2)))
```
----
## Normalize
* 把 output 的數值標準化(平均:0,變異數:1)
* 加速收斂速度
```python
# 新增一層做 normalize
model.add(BatchNormalization())
```
----
## Fully connected layer
* softmax: 將K维向量**壓縮**到另一個K維向量,使所有元素的和為1。
```python
# 把圖片拉平,轉成一維陣列
model.add(Flatten())
# 新增一層 128 個 node 的 hidden layer
model.add(Dense(128, activation='relu'))
# 新增一層 4 個 node 的 output layer
model.add(Dense(len(POKEMONS), activation = 'softmax'))
```
----
## Compile
* 確定目標及求解方法!
```python
model.compile(loss='categorical_crossentropy',
optimizer='adam', metrics = ['accuracy'])
```
----
## loss
* 計算**預測值**離**正確答案**的距離
* 簡答題部分扣分
* 不同 function 算法不一樣
* 不同老師改的方式不同
* loss function
* mean_squared_error
* binary_crossentropy:用在兩類分類
* categorical_crossentropy:用在多種分類
```python
model.compile(loss='categorical_crossentropy',
optimizer='adam', metrics = ['accuracy'])
```
----
## optimizer
* 優化參數
* 找到 loss 最少的方法
* function
* SGD:最單純的 gradient decent 方法
* Adam:常用!
```python
model.compile(loss='categorical_crossentropy',
optimizer='adam', metrics = ['accuracy'])
```
----
## metric
* 評估的標準
* 和 loss 像,但結果不會用在訓練過程中
```python
model.compile(loss='categorical_crossentropy',
optimizer='adam', metrics = ['accuracy'])
```
----
## fit
* 開始訓練!
* batch_size:把 data 切成好幾份,每次訓練用一個 batch
* validation_split:把訓練資料分一些給驗證資料
* epoch:看完所有訓練資料幾次
```python
history = model.fit(train_image, train_label,
batch_size = 50, validation_split = 0.2,
epochs = 20, verbose = 1)
```
---
<!-- ## <span style="color:#BAF2E8">預測</span> -->
---
## <span style="color:#BAF2E8">預測</span>
* 畫出學習曲線
* 驗證學習 model 的正確率
* 預測圖片~
----
## <span style="color:#BAF2E8">>_</span>畫出學習曲線
印印看!
```python
print(history.history['acc'])
print(history.history['val_acc'])
```
----
## <span style="color:#BAF2E8">>_</span>畫出學習曲線
```python
def show_train_history(train_acc, validation_acc):
plt.plot(history.history[train_acc])
plt.plot(history.history[validation_acc])
plt.title('Train History')
plt.ylabel('Accuracy')
plt.xlabel('Epoch')
plt.legend(['train', 'validation'], loc='upper left')
plt.show()
show_train_history('acc', 'val_acc')
```
----
## <span style="color:#BAF2E8">>_</span>驗證學習 model 的正確率
* loss:簡答題,部分扣分
* acc:選擇題,總共答對多少
```python
loss, acc = model.evaluate(test_image, test_label, verbose = 1)
print(acc * 100)
```
----

----

----
## <span style="color:#BAF2E8">>_</span>預測圖片
```python
# 測試第0張照片!
result = model.predict(np.array(test_image[0]).reshape(-1,
IMG_SIZE, IMG_SIZE, 3))
plt.imshow(test_image[0])
print(result)
```
----
## <span style="color:#BAF2E8">>_</span>預測圖片
```python
result = model.predict(np.array(test_image[0]).reshape(-1, IMG_SIZE, IMG_SIZE, 3))
# 找到陣列裡最大的位置
predict_ind = np.argmax(result[0])
# 印出預測寶可夢、預測的準確度
print(POKEMONS[predict_ind], result[0][predict_ind] * 100)
# 印出照片
plt.imshow(test_image[0])
```
----
## <span style="color:#BAF2E8">>_</span>預測圖片
傳新照片!
```python
#讀照片~
img = Image.open("my_pika.jpg")
img = img.resize((IMG_SIZE, IMG_SIZE), Image.ANTIALIAS)
result = model.predict(np.array(img).reshape(-1, IMG_SIZE, IMG_SIZE, 3))
# 找到陣列裡最大的位置
predict_ind = np.argmax(result[0])
# 印出預測寶可夢、預測的準確度
print(POKEMONS[predict_ind], result[0][predict_ind] * 100)
# 印出照片
plt.imshow(img)
```
---
```python
# 試試看多加幾層layer!
model.add(Conv2D(64, kernel_size=(3,3),
activation='relu'))
model.add(MaxPooling2D(pool_size=(2,2)))
model.add(BatchNormalization())
# 把一些 node 去掉
model.add(Dropout(0.2))
```
----
---
## 儲存 model
```python
from keras.models import load_model
model.save('pokemon_model.h5')
```
---
### load model
```python
from keras.models import load_model
model = load_model('pokemon_model.h5')
```

 Sign in with Wallet


