# Part 3: LoRaWAN on The Things Stack (TTS)
###### tags: `TA Stuff ESP32` `PyCom` `Heltec` `ESP32`
## LoRaWAN
In this tutorial, we'll be focusing on connecting your device to **LoRa** (**Lo**ng **Ra**nge). You can find out if your location has coverage LoRaWAN connection on the The Things Stack [here](#Coverage-maps) in your area.
Down below are tutorials for the LoRaWAN to TTS connection.
---
:::danger
**⚠️ Important ⚠️ Make sure the LoRa antenna is connected properly before running any LoRa code on your device. Not doing so might break your device.** You can find how to properly connect the antenna [here](#Connect-the-antenna).
:::
---
## Table of Contents
[TOC]
## Getting started
[//]: <> (AP: Mohammad)
### Coverage maps
Please make sure you have coverage the first thing you do. Here are the maps to TTS coverage:
* [TTN (The Things Network)](https://www.thethingsnetwork.org/map)
[//]: <> (insert länkar till täckningskartor)
### Connect the antenna
---
If using **The LoPy4**:
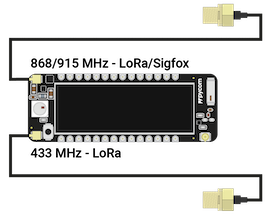
Or if you got **The FiPy**:

Or if you got **The Heltec**:

In general to avoid confusion always use the **868/915 MHz** antenna port on the **Lopy/Fipy** since this one works for **LoRa** and is the same on FiPy or LoPy 4. You still have to configure the correct frequency (Check the examples under LoRa in the next steps).
#### More details:
For **LoRa** if you live in **North America or Australia** you should use the **915 MHz** band and connect the antenna accordingly. If you live in **Europe** you can choose either **433 MHz** band or the **868 Mhz** band. Altough both are license-free, we recommend going with the **868 MHz** since it has less interference.
**❗ Remember, you can always ask a TA if you are not sure**.
### LoRa
---
#### LoRa OTAA
LoRa has 2 main methods of authentication. One is **ABP** and the other is **OTAA**. We will mostly be going through the **OTAA** method of connecting to LoRaWAN since it is the easier and the simpler of the two.
You can find more info about working with LoRa OTAA with pycom devices on: [LoRaWAN with OTAA](https://docs.pycom.io/tutorials/networks/lora/lorawan-otaa/)
In the link you can see that there are code examples for connecting to- and using lora. In the examples you will also see 3 different types of keys/identifiers that you need to provide: **app_eui**, **app_key** and **dev_eui**
The **APP_EUI** is what identifies the application you will be creating on whichever platform you choose in the next step.
The **APP_KEY** is the encryption key that will be used to encrypt all the data you will be sending to the gateway. This is a private key that should be kept secure. Otherwise others will be able to send data to your application.
Lastly the **DEV_EUI** is a unique key that identifies your end device (a LOPY or a similar device). Usually the MAC of the LOPY is used if nothing is provided by the network you are using.
###### tags: `Part 3` `TA Stuff`
## The Things Stack (TTS)
:::danger
**⚠️ Important ⚠️ Make sure the LoRa antenna is connected properly before running any LoRa or Sigfox code on your device. Not doing so might break your device.** You can find how to properly connect the antenna [here](#Connect-the-antenna).
:::
### 1. Register
---
Before you can start using TTS, you need to [create a TTS account](https://account.thethingsnetwork.org/register). Once you have done that, go ahead and navigate to Console.

Then select Europe 1 (eu1) and choose the `Login with The Things ID` option to log in.

### 2. Create an application
Once you've logged in, you'll be redirected to the your homepage. There, you navigate to `Create an application`.
Give the application an appropriate ID, name and description.

When the application is created, you'll be redirected to the application page.

### 3. Add the device to the application
---
Once there, navigate to `Add end device` in the bottom-right corner to add your device to the application.
The next step is to enter your device information. The `DevEUI` can be retrieved from your pycom device by running the following code-snippet in your interpreter, either in Atom or VSCode.
:::danger
**⚠️ Important ⚠️ Make sure the LoRa antenna is connected properly before running any LoRa code on your device. Not doing so might break your device.** You can find how to properly connect the antenna [here](#Connect-the-antenna).
:::
#### Using Pycom Devices
```python=
from network import LoRa
import binascii
lora = LoRa(mode=LoRa.LORAWAN, region=LoRa.EU868)
print(binascii.hexlify(lora.mac()).upper().decode('utf-8'))
```
The output should look something like:
```python=
70B3D54997C25011
```
#### Using Heltec Devices
```python=
import ubinascii
import machine
print(" " + ubinascii.hexlify(bytes(reversed(machine.unique_id()))).upper().decode('utf-8'))
```
The output should look something like:
```python=
5C04FF7EB994
```
This is your `DevEUI` and is a unique identifier for your node/device. Copy that and paste it in the `DevEUI` field, as shown in the image below (This id can also be generated by pressing the `Generate` button, as long as the same value is specified on both the website and your device code it should work fine.):

Set the frequency plan to `Europe 863-870 MHz (SF9 for RX2 - recommended)`, the LoRaWAN version to `LoRaWAN Specification 1.0.2`, and the regional parameters version to `RP001 Regional Parameters 1.0.2`.
Give your end device an appropriate device ID and fill the `AppEUI` with zeros by pressing on the `Fill with zeros` to the right of the `AppEUI` field, then lastly generate your `AppKey`. End device name and description are optional, but recommended if you add multiple end devices to your application. Once this is all done and filled in as the image above, press `Register end device` and continue.
Once you've added your end device to your application, you should be redirected to your device page. The landing page should look like:

### 4. Connect to TTS using your device
---
Now, you connect to TTS using the `AppKey` you generated earlier.
:::danger
**⚠️ Important ⚠️ Make sure the LoRa antenna is connected properly before running any LoRa code on your device. Not doing so might break your device.** You can find how to properly connect the antenna [here](#Connect-the-antenna).
:::
First, add the snippet below at the begining of your `boot.py` that you have in your project folder in Atom or VSCode.
```python=
from network import LoRa
import time
import binascii
lora = LoRa(mode=LoRa.LORAWAN, region=LoRa.EU868)
dev_eui = binascii.unhexlify('0000000000000000')
app_eui = binascii.unhexlify('0000000000000000')
app_key = binascii.unhexlify('00000000000000000000000000000000')
lora.join(activation=LoRa.OTAA, auth=(dev_eui, app_eui, app_key), timeout=0)
# wait until the module has joined the network
while not lora.has_joined():
time.sleep(2.5)
print('Not joined yet...')
print('Network joined!')
# Your old code from main.py should be here
```
:::info
Remove duplicate imports if you have any after adding the snippet above.
:::
Now, replace the zeros in row 8 with your `AppKey`, & `DevEUI`. In our case, the generated `AppKey` was `FD54B5B5B3C752E34385E39C19FB9555`, & the generated `DevEUI` was `70B3D57ED00523E3`. Note that only row 7, & 9 is changed.
```python=
from network import LoRa
import time
import binascii
lora = LoRa(mode=LoRa.LORAWAN, region=LoRa.EU868)
dev_eui = binascii.unhexlify('70B3D57ED00523E3')# Add your own dev_eui here
app_eui = binascii.unhexlify('0000000000000000')
app_key = binascii.unhexlify('FD54B5B5B3C752E34385E39C19FB9555')# Add your own app_key here
lora.join(activation=LoRa.OTAA, auth=(dev_eui, app_eui, app_key), timeout=0)
# wait until the module has joined the network
while not lora.has_joined():
time.sleep(2.5)
print('Not joined yet...')
print('Network joined!')
# Your old code from main.py should be here
```
Try to run `boot.py` and now in the console, you should see something like:

Congratulations, you have now successfully connected to TTS and are ready to start sending messages!
:::warning
If your device tries to join for more than a few minutes, then it is an indication of poor coverage in your area. Perhaps you should consider other networks, like [Helium](https://hackmd.io/K02KYubCTaaDmjqKqdUB8Q).
:::
### 5. Send messages with TTS
---
In order to send messages with TTS, you need to import one additional library in your `main.py` file, the `socket` library. Then, you create a socket and configure it and finally use it to send a message with TTS. Below, you can see how your `main.py` file should look like.
```python=
import socket
import time
s = socket.socket(socket.AF_LORA, socket.SOCK_RAW)
s.setsockopt(socket.SOL_LORA, socket.SO_DR, 5)
s.setblocking(False)
# Your old code from main.py should be here
# EXAMPLE: Create a DHT object, collect data in the loop and send it
while True:
temperature = 23 # Mock value
humidity = 40 # Mock value
s.send(bytes([temperature, humidity]))
print('sent temperature:', temperature)
print('sent humidity:', humidity)
time.sleep(900) # wait 900 seconds (15 minutes) before sending again
```
By running the code-snippet above (in Atom or VSCode), you should get an output similar to the one below.

And in the end device page in your TTS console, you should see something like:

The interesting part is the first line, where you can see the type of the data and preview. The MAC-payload in this message matches your bytes-array you sent using the socket you created.
```python=
s.send(bytes([temperature, humidity]))
```
matches

Note that the MAC payload is in hex (base 16).
:::warning
On The Things Network's public community network a Fair Use Policy applies which limits the uplink airtime to 30 seconds per day (24 hours) per node and the downlink messages to 10 messages per day (24 hours) per node. More about that [here](https://www.thethingsnetwork.org/forum/t/fair-use-policy-explained/1300).
:::