# mimalloc
contributed by < `hankluo6` >
## 環境
```
macOS Monterey 12.2
Apple M1
Linux lima-default 5.15.0-25-generi
```
## Per-CPU Tcmalloc & Per-thread Tcmalloc
* 安裝 Bazel
從[官網](https://docs.bazel.build/versions/main/install-ubuntu.html)直接下載執行檔運行
:::info
[Bazel 安裝教學](https://bazel.build/install/ubuntu#binary-installer)的方法好像都不支援 Arm 處理器
1. Bazel 沒有提供 Aarch64 版本到 apt repository
2. 也沒有提供針對 Aarch64 的 installer
:::
* 執行 Tcmalloc
* 以 per-thread mode 編譯
編輯 Bazel 的 [BUILD](https://bazel.build/concepts/build-files),改變 per-thread 的 visibility
```diff
tcmalloc/tcmalloc/BUILD
cc_library(
name = "tcmalloc_deprecated_perthread",
srcs = [
"libc_override.h",
"libc_override_gcc_and_weak.h",
"libc_override_glibc.h",
"libc_override_redefine.h",
"tcmalloc.cc",
"tcmalloc.h",
],
copts = ["-DTCMALLOC_DEPRECATED_PERTHREAD"] + TCMALLOC_DEFAULT_COPTS,
linkstatic = 1,
- visibility = [
- "//tcmalloc/internal:__pkg__",
- "//tcmalloc/testing:__pkg__",
- ],
+ visibility = ["//visibility:public"],
deps = tcmalloc_deps + [
":common_deprecated_perthread",
],
alwayslink = 1,
)
```
在建置時將 `cc_binary` 內的 malloc 選項設定為 `malloc = "@com_google_tcmalloc//tcmalloc:tcmalloc_deprecated_perthread`
* 錯誤處理
* ```ERROR: BUILD:5:11: no such package '@fuzzing_py_deps//pypi__enum34': BUILD file not found in directory 'pypi__enum34' of external repository ...```
解決方法: [rules_fuzzing](https://github.com/bazelbuild/rules_fuzzing) 需要 Clang compiler,在虛擬機內安裝 Clang 即可
* ```external/com_google_tcmalloc/tcmalloc/internal/percpu_tcmalloc.h:869:3: error: unknown 'asm' flag output '=@ccbe'```
看註解 `@ccbe` 貌似是儲存 underflow 的資料的暫存器,但網路上找不到相關資料,改用 clang 編譯便能解決
* `
error: 'asm goto' cannot have output constraints
: [end_ptr] "=&r"(end_ptr), [cpu_id] "=&r"(cpu_id)
`
clang 版本 10 以後支援才支援 `asm goto` 內含有 output constraints,故使用版本 10 以上即可
* 效能比較
1. [mstress](https://github.com/daanx/mimalloc-bench/blob/master/bench/mstress/mstress.c)
在具有 4 個 logical CPU 的 Arm64 架構,且 lima 環境中測試:

可以看到當 thread 數量小時,效率差別不大,但當 thread 數量變多時,per-thread 的效能反而比 per-cpu 的好。
在 Marvell/Cavium ThunderX2 (具有 224 個 logical CPU 的 Arm64 架構) 重新測試:

可以看到這次 per-cpu 的速度確實比 per-thread 的還快,也符合 tcmalloc 聲稱 per-cpu 使用 RSEQ 能提升效能。
推測差異可能與 CPU cores 的數量有關,因為 rseq 分為 preparatory stages 以及 commit stages,而在 commit stages 前出現搶佔時,會捨棄先前的內容並重新準備。故可能在 CPU cores 數量少時,這種情況發生的頻率會比較高,造成效能降低。
2. [cache-scratch](https://github.com/emeryberger/Hoard/tree/master/benchmarks/cache-scratch)
測試分配的空間對 per-cpu 及 per-thread 的影響,發現這兩者與空間並無關聯:

探討 thread 數量對兩者的影響,在 4 個 logical CPU 的 Arm64 環境中測試:

在 Marvell/Cavium ThunderX2 的環境中測試:

可以發現與 `mstress` 有類似的情況,在多個 CPU 的情況下,per-cpu 的效能比較好。但在超過 1000 個 threads 之後,per-thread 的速度皆比 per-cpu 的還要快。
cache-scratch 是針對 heap's cache locality 做測試,per-cpu 及 per-thread 對 cache 的影響差別並不大。
3. [mpsc](https://github.com/sysprog21/concurrent-programs/blob/master/mpsc/mpsc.c)
測試不同 threads 釋放不同 threads 間的空間是否有效能差異:
| | 4 CPU | 224 CPU |
|:----------:|:---------:|:---------:|
| per-thread | 19.759476 | 94.803452 |
| per-cpu | 21.173311 | 88.699684 |
一樣有 CPU 越多,per-cpu 效率越好的情況,但兩者的運行時間卻差距相當大。
## Tcmalloc vs. Mimialloc
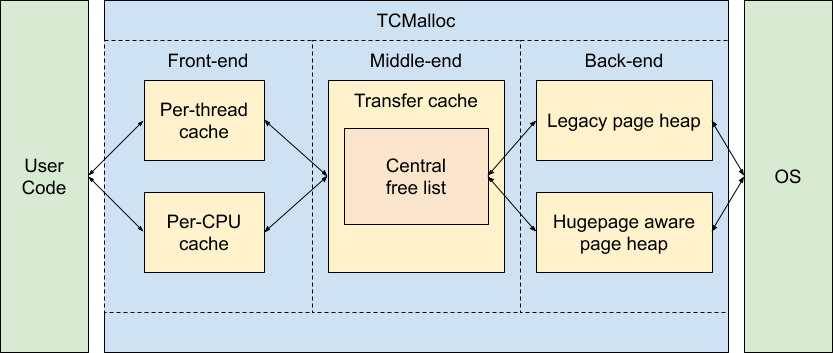
在 Tcmalloc 中,除了 Front-end 的部分可分為 Per-thread 或 Per-CPU 外,Middle-end 及 Back-end 皆是全部執行緒共享,所以需要 atomic operation 或是 lock。所以 rseq 實作的部分都集中在 Front-end 的 push 及 pop 之中。
在 Mimalloc 中,所有的 object (segments, heaps, pages) 都是在同個執行緒當中,故 atomic operation 主要在 segments 上。
## Mimalloc with per-CPU mode
```graphviz
graph ""
{
n000 [label="central memory"] ;
n001 [label="transfer cache"] ;
n018 ;
n018 [label="CPU0"] ;
n018 -- n034 ;
n034 -- n019 ;
n034 -- n036 ;
n036 -- n037 ;
n036 -- n038 ;
n019 [label="segment"] ;
n018 -- n035 ;
n035 -- n022 ;
n022 [label="segment"] ;
n019 -- n020 ;
n020 [label="page"] ;
n019 -- n021 ;
n021 [label="page"] ;
n028 [label="page"] ;
n029 [label="page"] ;
n022 -- n028
n022 -- n029
n034 [label="Thread0"] ;
n035 [label="Thread1"] ;
n032 [label="Thread2"] ;
n033 [label="Thread3"] ;
n036 [label="segment"] ;
n037 [label="page"] ;
n038 [label="page"] ;
n023 ;
n023 [label="CPU1"] ;
n023 -- n032;
n032 -- n024;
n024 [label="segment"] ;
n023 -- n033 ;
n033 -- n027 ;
n027 [label="segment"] ;
n024 -- n025 ;
n025 [label="page"] ;
n024 -- n026 ;
n026 [label="page"] ;
n030 [label="page"] ;
n031 [label="page"] ;
n027 -- n031
n027 -- n030
n000 -- n018 [style=invis];
n000 -- n023 [style=invis];
}
```
當 segment 空間不足時,從 central memory 中分配一個新的 segment。
## Rseq
* [[基本原理]](https://www.efficios.com/blog/2019/02/08/linux-restartable-sequences/)
`rseq_syscall` 會為當前的 task `current` 註冊 rseq,並透過 `rseq_set_notify_resume` 設置 `_TIF_NOTIFY_RESUME` 標誌,在每次 task 返回 userspace 的時候會觸發 `resume_user_mode_work`,接著呼叫 rseq 內的 `__rseq_handle_notify_resume`。
所以每次發生搶占或 CPU 遷移等事件時,都會呼叫 `__rseq_handle_notify_resume->rseq_ip_fixup` 檢查之前是否運行到 critical section 當中,如果在 critical section 當中,則 `rseq_ip_fixup` 會將 instruction pointer 指向 abort 區段。
```c
static int rseq_ip_fixup(struct pt_regs *regs)
{
unsigned long ip = instruction_pointer(regs);
struct task_struct *t = current;
struct rseq_cs rseq_cs;
int ret;
ret = rseq_get_rseq_cs(t, &rseq_cs);
if (ret)
return ret;
/*
* Handle potentially not being within a critical section.
* If not nested over a rseq critical section, restart is useless.
* Clear the rseq_cs pointer and return.
*/
if (!in_rseq_cs(ip, &rseq_cs))
return clear_rseq_cs(t);
ret = rseq_need_restart(t, rseq_cs.flags);
if (ret <= 0)
return ret;
ret = clear_rseq_cs(t);
if (ret)
return ret;
trace_rseq_ip_fixup(ip, rseq_cs.start_ip, rseq_cs.post_commit_offset,
rseq_cs.abort_ip);
instruction_pointer_set(regs, (unsigned long)rseq_cs.abort_ip);
return 0;
}
```
而在文章中有提到,**commit step is a single CPU instruction**,所以能確保不同的 thread 不會同時運行到 critical section,且每個 CPU 的 commit 階段也不用擔心被中斷。
故可以不用像 atomic operation 一樣每個指令都需花數個 cycles,在沒發生搶佔時,rseq 運行效率跟一般指令差不多快。